blog
Database Automation with Puppet: Deploying MySQL & MariaDB Galera Cluster

In the previous blog post, we showed you some basic steps to deploy and manage a standalone MySQL server as well as MySQL Replication setup using the MySQL Puppet module. In this second installation, we are going to cover similar steps, but now with a Galera Cluster setup.
Galera Cluster with Puppet
As you might know, Galera Cluster has three main providers:
- MySQL Galera Cluster (Codership)
- Percona XtraDB Cluster (Percona)
- MariaDB Cluster (embedded into MariaDB Server by MariaDB)
A common practice with Galera Cluster deployments is to have an additional layer sitting on top of the database cluster for load balancing purposes. However, that is a complex process which deserves its own post.
There are a number of Puppet modules available in the Puppet Forge that can be used to deploy a Galera Cluster. Here are some of them..
- puppetlabs/mysql – MariaDB Galera only
- fraenki/galera – Percona XtraDB Cluster and MySQL Galera from Codership
- edestecd/mariadb – MariaDB Cluster only
- filiadata/percona – Percona XtraDB Cluster
Since our objective is to provide a basic understanding of how to write manifest and automate the deployment for Galera Cluster, we will be covering the deployment of the MariaDB Galera Cluster using the puppetlabs/mysql module. For other modules, you can always take a look at their respective documentation for instructions or tips on how to install.
In Galera Cluster, the ordering when starting node is critical. To properly start a fresh new cluster one node has to be setup as the reference node. This node will be started with an empty-host connection string (gcomm://) to initialize the cluster. This process is called bootstrapping.
Once started, the node will become a primary component and the remaining nodes can be started using the standard mysql start command (systemctl start mysql or service mysql start) followed by a full-host connection string (gcomm://db1,db2,db3). Bootstrapping is only required if there is no primary component holds by any other node in the cluster (check with wsrep_cluster_status status).
The cluster startup process must be performed explicitly by the user. The manifest itself must NOT start the cluster (bootstrap any node) at the first run to avoid any risk of data loss. Remember, the Puppet manifest must be written to be as idempotent as possible. The manifest must be safe in order to be executed multiple times without affecting the already running MySQL instances. This means we have to focus primarily on repository configuration, package installation, pre-running configuration, and SST user configuration.
The following configuration options are mandatory for Galera:
- wsrep_on: A flag to turn on writeset replication API for Galera Cluster (MariaDB only).
- wsrep_cluster_name: The cluster name. Must be identical on all nodes that part of the same cluster.
- wsrep_cluster_address: The Galera communication connection string, prefix with gcomm:// and followed by node list, separated by comma. Empty node list means cluster initialization.
- wsrep_provider: The path where the Galera library resides. The path might be different depending on the operating system.
- bind_address: MySQL must be reachable externally so value ‘0.0.0.0’ is compulsory.
- wsrep_sst_method: For MariaDB, the preferred SST method is mariabackup.
- wsrep_sst_auth: MySQL user and password (separated by colon) to perform snapshot transfer. Commonly, we specify a user that has the ability to create a full backup.
- wsrep_node_address: IP address for Galera communication and replication. Use Puppet facter to pick the correct IP address.
- wsrep_node_name: hostname of FQDN. Use Puppet facter to pick the correct hostname.
For Debian-based deployments, the post-installation script will attempt to start the MariaDB server automatically. If we configured wsrep_on=ON (flag to enable Galera) with the full address in wsrep_cluster_address variable, the server would fail during installation. This is because it has no primary component to connect to.
To properly start a cluster in Galera the first node (called bootstrap node) has to be configured with an empty connection string (wsrep_cluster_address = gcomm://) to initiate the node as the primary component. You can also run the provided bootstrap script, called galera_new_cluster, which basically does a similar thing in but the background.
Deployment of Galera Cluster (MariaDB)
Deployment of Galera Cluster requires additional configuration on the APT source to install the preferred MariaDB version repository.
Note that Galera replication is embedded inside MariaDB Server and requires no additional packages to be installed. That being said, an extra flag is required to enable Galera by using wsrep_on=ON. Without this flag, MariaDB will act as a standalone server.
In our Debian-based environment, the wsrep_on option can only present in the manifest after the first deployment completes (as shown further down in the deployment steps). This is to ensure the first, initial start acts as a standalone server for Puppet to provision the node before it’s completely ready to be a Galera node.
Let’s start by preparing the manifest content as below (modify the global variables section if necessary):
# Puppet manifest for Galera Cluster MariaDB 10.3 on Ubuntu 18.04 (Puppet v6.4.2)
# /etc/puppetlabs/code/environments/production/manifests/galera.pp

# global vars
$sst_user         = 'sstuser'
$sst_password     = 'S3cr333t$'
$backup_dir       = '/home/backup/mysql'
$mysql_cluster_address = 'gcomm://192.168.0.161,192.168.0.162,192.168.0.163'


# node definition
node "db1.local", "db2.local", "db3.local" {
  Apt::Source['mariadb'] ~>
  Class['apt::update'] ->
  Class['mysql::server'] ->
  Class['mysql::backup::xtrabackup']
}

# apt module must be installed first: 'puppet module install puppetlabs-apt'
include apt

# custom repository definition
apt::source { 'mariadb':
  location => 'http://sfo1.mirrors.digitalocean.com/mariadb/repo/10.3/ubuntu',
  release  => $::lsbdistcodename,
  repos    => 'main',
  key      => {
    id     => 'A6E773A1812E4B8FD94024AAC0F47944DE8F6914',
    server => 'hkp://keyserver.ubuntu.com:80',
  },
  include  => {
    src    => false,
    deb    => true,
  },
}

# Galera configuration
class {'mysql::server':
  package_name            => 'mariadb-server',
  root_password           => 'q1w2e3!@#',
  service_name            => 'mysql',
  create_root_my_cnf      => true,
  remove_default_accounts => true,
  manage_config_file      => true,
  override_options        => {
    'mysqld' => {
      'datadir'                 => '/var/lib/mysql',
      'bind_address'            => '0.0.0.0',
      'binlog-format'           => 'ROW',
      'default-storage-engine'  => 'InnoDB',
      'wsrep_provider'          => '/usr/lib/galera/libgalera_smm.so',
      'wsrep_provider_options'  => 'gcache.size=1G',
      'wsrep_cluster_name'      => 'galera_cluster',
      'wsrep_cluster_address'   => $mysql_cluster_address,
      'log-error'               => '/var/log/mysql/error.log',
      'wsrep_node_address'      => $facts['networking']['interfaces']['enp0s8']['ip'],
      'wsrep_node_name'         => $hostname,
      'innodb_buffer_pool_size' => '512M',
      'wsrep_sst_method'        => 'mariabackup',
      'wsrep_sst_auth'          => "${sst_user}:${sst_password}"
    },
    'mysqld_safe' => {
      'log-error'               => '/var/log/mysql/error.log'
    }
  }
}

# force creation of backup dir if not exist
exec { "mkdir -p ${backup_dir}" :
  path   => ['/bin','/usr/bin'],
  unless => "test -d ${backup_dir}"
}

# create SST and backup user
class { 'mysql::backup::xtrabackup' :
  xtrabackup_package_name => 'mariadb-backup',
  backupuser              => "${sst_user}",
  backuppassword          => "${sst_password}",
  backupmethod            => 'mariabackup',
  backupdir               => "${backup_dir}"
}

# /etc/hosts definition
host {
  'db1.local': ip => '192.168.0.161';
  'db2.local': ip => '192.169.0.162';
  'db3.local': ip => '192.168.0.163';
}
A bit of explanation is needed at this point. ‘wsrep_node_address’ must be pointed to the same IP address as what was declared in the wsrep_cluster_address. In this environment our hosts have two network interfaces and we want to use the second interface (called enp0s8) for Galera communication (where 192.168.0.0/24 network is connected to). That’s why we use Puppet facter to get the information from the node and apply it to the configuration option. The rest is pretty self-explanatory.
On every MariaDB node, run the following command to apply the catalogue as root user:
$ puppet agent -tThe catalogue will be applied to each node for installation and preparation. Once done, we have to add the following line into our manifest under “override_options => mysqld” section:
'wsrep_on' => 'ON',The above will satisfy the Galera requirement for MariaDB. Then, apply the catalogue on every MariaDB node once more:
$ puppet agent -tOnce done, we are ready to bootstrap our cluster. Since this is a new cluster, we can pick any of the node to be the reference node a.k.a bootstrap node. Let’s pick db1.local (192.168.0.161) and run the following command:
$ galera_new_cluster #db1Once the first node is started, we can start the remaining node with the standard start command (one node at a time):
$ systemctl restart mariadb #db2 and db3Once started, take a peek at the MySQL error log at /var/log/mysql/error.log and make sure the log ends up with the following line:
2019-06-10 4:11:10 2 [Note] WSREP: Synchronized with group, ready for connectionsThe above tells us that the nodes are synchronized with the group. We can then verify the status by using the following command:
$ mysql -uroot -e 'show status like "wsrep%"'Make sure on all nodes, the wsrep_cluster_size, wsrep_cluster_status and wsrep_local_state_comment are 3, “Primary” and “Synced” respectively.
MySQL Management
This module can be used to perform a number of MySQL management tasks…
- configuration options (modify, apply, custom configuration)
- database resources (database, user, grants)
- backup (create, schedule, backup user, storage)
- simple restore (mysqldump only)
- plugins installation/activation
Service Control
The safest way when provisioning Galera Cluster with Puppet is to handle all service control operations manually (don’t let Puppet handle it). For a simple cluster rolling restart, the standard service command would do. Run the following command one node at a time.
$ systemctl restart mariadb # Systemd
$ service mariadb restart # SysVinit
However, in the case of a network partition happening and no primary component is available (check with wsrep_cluster_status), the most up-to-date node has to be bootstrapped to bring the cluster back operational without data loss. You can follow the steps as shown in the above deployment section. To learn more about bootstrapping process with examples scenario, we have covered this in detail in this blog post, How to Bootstrap MySQL or MariaDB Galera Cluster.
Database Resource
Use the mysql::db class to ensure a database with associated user and privileges are present, for example:
  # make sure the database and user exist with proper grant
  mysql::db { 'mynewdb':
    user          => 'mynewuser',
    password      => 'passw0rd',
    host          => '192.168.0.%',
    grant         => ['SELECT', 'UPDATE']
  }
The above definition can be assigned to any node since every node in a Galera Cluster is a master.
Backup and Restore
Since we created an SST user using the xtrabackup class, Puppet will configure all the prerequisites for the backup job – creating the backup user, preparing the destination path, assigning ownership and permission, setting the cron job and setting up the backup command options to use in the provided backup script. Every node will be configured with two backup jobs (one for weekly full and another for daily incremental) default to 11:05 PM as you can tell from the crontab output:
$ crontab -l
# Puppet Name: xtrabackup-weekly
5 23 * * 0 /usr/local/sbin/xtrabackup.sh --target-dir=/home/backup/mysql --backup
# Puppet Name: xtrabackup-daily
5 23 * * 1-6 /usr/local/sbin/xtrabackup.sh --incremental-basedir=/home/backup/mysql --target-dir=/home/backup/mysql/`date +%F_%H-%M-%S` --backup
If you would like to schedule mysqldump instead, use the mysql::server::backup class to prepare the backup resources. Suppose we have the following declaration in our manifest:
  # Prepare the backup script, /usr/local/sbin/mysqlbackup.sh
  class { 'mysql::server::backup':
    backupuser     => 'backup',
    backuppassword => 'passw0rd',
    backupdir      => '/home/backup',
    backupdirowner => 'mysql',
    backupdirgroup => 'mysql',
    backupdirmode  => '755',
    backuprotate   => 15,
    time           => ['23','30'],   #backup starts at 11:30PM everyday
    include_routines  => true,
    include_triggers  => true,
    ignore_events     => false,
    maxallowedpacket  => '64M'
  }
The above tells Puppet to configure the backup script at /usr/local/sbin/mysqlbackup.sh and schedule it up at 11:30PM everyday. If you want to make an immediate backup, simply invoke:
$ mysqlbackup.shFor the restoration, the module only supports restoration with mysqldump backup method, by importing the SQL file directly to the database using the mysql::db class, for example:
mysql::db { 'mydb':
  user     => 'myuser',
  password => 'mypass',
  host     => 'localhost',
  grant    => ['ALL PRIVILEGES'],
  sql      => '/home/backup/mysql/mydb/backup.gz',
  import_cat_cmd => 'zcat',
  import_timeout => 900
}
The SQL file will be loaded only once and not on every run, unless enforce_sql => true is used.
Configuration Management
In this example, we used manage_config_file => true with override_options to structure our configuration lines which later will be pushed out by Puppet. Any modification to the manifest file will only reflect the content of the target MySQL configuration file. This module will neither load the configuration into runtime nor restart the MySQL service after pushing the changes into the configuration file. It’s the sysadmin responsibility to restart the service in order to activate the changes.
To add custom MySQL configuration, we can place additional files into “includedir”, default to /etc/mysql/conf.d. This allows us to override settings or add additional ones, which is helpful if you don’t use override_options in mysql::server class. Making use of Puppet template is highly recommended here. Place the custom configuration file under the module template directory (default to , /etc/puppetlabs/code/environments/production/modules/mysql/templates) and then add the following lines in the manifest:
# Loads /etc/puppetlabs/code/environments/production/modules/mysql/templates/my-custom-config.cnf.erb into /etc/mysql/conf.d/my-custom-config.cnf

file { '/etc/mysql/conf.d/my-custom-config.cnf':
  ensure  => file,
  content => template('mysql/my-custom-config.cnf.erb')
}Puppet vs ClusterControl
Did you know that you can also automate the MySQL or MariaDB Galera deployment by using ClusterControl? You can use ClusterControl Puppet module to install it, or simply by downloading it from our website.
When compared to ClusterControl, you can expect the following differences:
- A bit of a learning curve to understand Puppet syntaxes, formatting, structures before you can write manifests.
- Manifest must be tested regularly. It’s very common you will get a compilation error on the code especially if the catalog is applied for the first time.
- Puppet presumes the codes to be idempotent. The test/check/verify condition falls under the author’s responsibility to avoid messing up with a running system.
- Puppet requires an agent on the managed node.
- Backward incompatibility. Some old modules would not run correctly on the new version.
- Database/host monitoring has to be set up separately.
ClusterControl’s deployment wizard guides the deployment process:
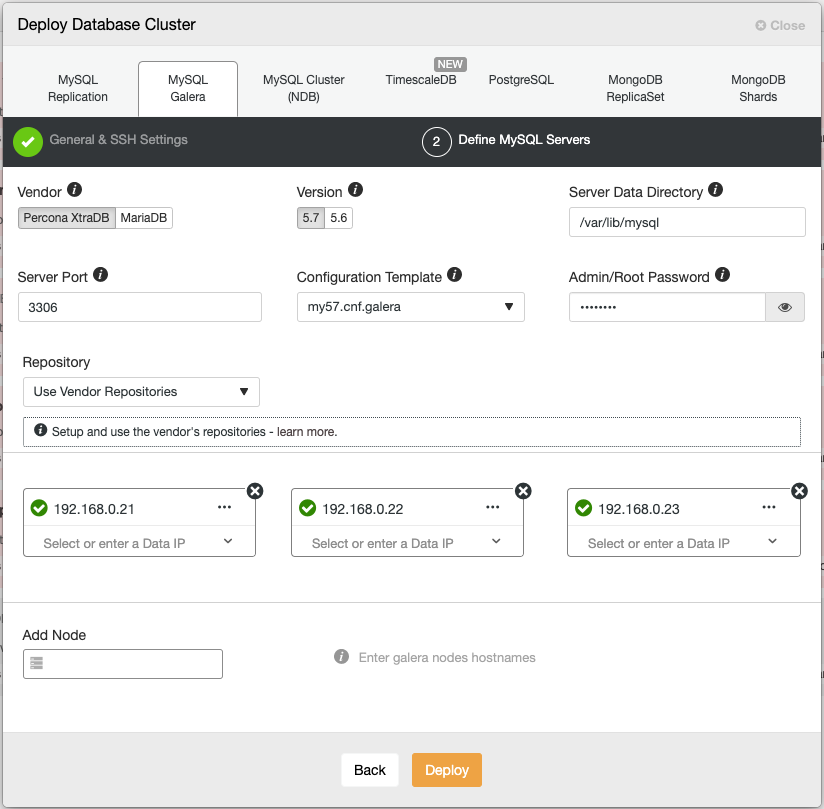
Alternatively, you may use the ClusterControl command line interface called “s9s” to achieve similar results. The following command creates a three-node Percona XtraDB Cluster (provided passwordless to all nodes has been configured beforehand):
$ s9s cluster --create
  --cluster-type=galera
  --nodes='192.168.0.21;192.168.0.22;192.168.0.23'
  --vendor=percona
  --cluster-name='Percona XtraDB Cluster 5.7'
  --provider-version=5.7
  --db-admin='root'
  --db-admin-passwd='$ecR3t^word'
--logAdditionally, ClusterControl supports deployment of load balancers for Galera Cluster – HAproxy, ProxySQL and MariaDB MaxScale – together with a virtual IP address (provided by Keepalived) to eliminate any single point of failure for your database service.
Post deployment, nodes/clusters can be monitored and fully managed by ClusterControl, including automatic failure detection, automatic recovery, backup management, load balancer management, attaching asynchronous slave, configuration management and so on. All of these are bundled together in one product. On average, your database cluster will be up and running within 30 minutes. What it needs is only passwordless SSH to the target nodes.
You can also import an already running Galera Cluster, deployed by Puppet (or any other means) into ClusterControl to supercharge your cluster with all the cool features that comes with it. The community edition (free forever!) offers deployment and monitoring.
In the next episode, we are going to walk you through MySQL load balancer deployment using Puppet. Stay tuned!