blog
Database Automation with Puppet: Deploying MySQL & MariaDB Replication

Puppet is an open source systems management tool for centralizing and automating configuration management. Automation tools help to minimize manual and repetitive tasks, and can save a great deal of time.

Puppet works by default in a server/agent model. Agents fetch their “catalog” (final desired state) from the master and apply it locally. Then they report back to the server. The catalog is computed depending on “facts” the machine sends to the server, user input (parameters) and modules (source code).
In this blog, we’ll show you how to deploy and manage MySQL/MariaDB instances via Puppet. There are a number of technologies around MySQL/MariaDB such as replication (master-slave, Galera or group replication for MySQL), SQL-aware load balancers like ProxySQL and MariaDB MaxScale, backup and recovery tools and many more which we will cover in this blog series. There are also many modules available in the Puppet Forge built and maintained by the community which can help us simplify the code and avoid reinventing the wheel. In this blog, we are going to focus on MySQL Replication.
puppetlabs/mysql
This is the most popular Puppet module for MySQL and MariaDB (and probably the best in the market) right now. This module manages both the installation and configuration of MySQL, as well as extending Puppet to allow management of MySQL resources, such as databases, users, and grants.
The module is officially maintained by the Puppet team (via puppetlabs Github repository) and supports all major versions of Puppet Enterprise 2019.1.x, 2019.0.x, 2018.1.x, Puppet >= 5.5.10 < 7.0.0 on RedHat, Ubuntu, Debian, SLES, Scientific, CentOS, OracleLinux platforms. User has options to install MySQL, MariaDB and Percona Server by customizing the package repository
The following example shows how to deploy a MySQL server. On the puppet master install the MySQL module and create the manifest file:
(puppet-master)$ puppet module install puppetlabs/mysql
(puppet-master)$ vim /etc/puppetlabs/code/environments/production/manifests/mysql.pp
Add the following lines:
node "db1.local" {
  class { '::mysql::server':
    root_password => 't5[sb^D[+rt8bBYu',
    remove_default_accounts => true,
    override_options => {
      'mysqld' => {
        'log_error' => '/var/log/mysql.log',
        'innodb_buffer_pool_size' => '512M'
      }
      'mysqld_safe' => {
        'log_error' => '/var/log/mysql.log'
      }
    }
  }
}
Then on the puppet agent node, run the following command to apply the configuration catalog:
(db1.local)$ puppet agent -tOn the first run, you might get the following error:
Info: Certificate for db1.local has not been signed yetJust run the following command on the Puppet master to sign the certificate:
(puppet-master)$ puppetserver ca sign --certname=db1.local
Successfully signed certificate request for db1.local
Retry again with “puppet agent -t” command to re-initiate the connection with the signed certificate.
The above definition will install the standard MySQL-related packages available in the OS distribution repository. For example, on Ubuntu 18.04 (Bionic), you would get MySQL 5.7.26 packages installed:
(db1.local) $ dpkg --list | grep -i mysql
ii  mysql-client-5.7                5.7.26-0ubuntu0.18.04.1           amd64        MySQL database client binaries
ii  mysql-client-core-5.7           5.7.26-0ubuntu0.18.04.1           amd64        MySQL database core client binaries
ii  mysql-common                    5.8+1.0.4                         all          MySQL database common files, e.g. /etc/mysql/my.cnf
ii  mysql-server                    5.7.26-0ubuntu0.18.04.1           all          MySQL database server (metapackage depending on the latest version)
ii  mysql-server-5.7                5.7.26-0ubuntu0.18.04.1           amd64        MySQL database server binaries and system database setup
ii  mysql-server-core-5.7           5.7.26-0ubuntu0.18.04.1           amd64        MySQL database server binaries
You may opt for other vendors like Oracle, Percona or MariaDB with extra configuration on the repository (refer to the README section for details). The following definition will install the MariaDB packages from MariaDB apt repository (requires apt Puppet module):
$ puppet module install puppetlabs/apt
$ vim /etc/puppetlabs/code/environments/production/manifests/mariadb.pp
# include puppetlabs/apt module
include apt

# apt definition for MariaDB 10.3
apt::source { 'mariadb':
  location => 'http://sgp1.mirrors.digitalocean.com/mariadb/repo/10.3/ubuntu/',
  release  => $::lsbdistcodename,
  repos    => 'main',
  key      => {
    id     => 'A6E773A1812E4B8FD94024AAC0F47944DE8F6914',
    server => 'hkp://keyserver.ubuntu.com:80',
  },
  include => {
    src   => false,
    deb   => true,
  },
}

# MariaDB configuration
class {'::mysql::server':
  package_name     => 'mariadb-server',
  service_name     => 'mysql',
  root_password    => 't5[sb^D[+rt8bBYu',
  override_options => {
    mysqld => {
      'log-error' => '/var/log/mysql/mariadb.log',
      'pid-file'  => '/var/run/mysqld/mysqld.pid',
    },
    mysqld_safe => {
      'log-error' => '/var/log/mysql/mariadb.log',
    },
  }
}

# Deploy on db2.local
node "db2.local" {
Apt::Source['mariadb'] ->
Class['apt::update'] ->
Class['::mysql::server']
}
Take note on the key->id value, where there is a special way to retrieve the 40-character id as shown in this article:
$ sudo apt-key adv --recv-keys --keyserver hkp://keyserver.ubuntu.com:80 0xF1656F24C74CD1D8
$ apt-key adv --list-public-keys --with-fingerprint --with-colons
uid:-::::1459359915::6DC53DD92B7A8C298D5E54F950371E2B8950D2F2::MariaDB Signing Key ::::::::::0:
sub:-:4096:1:C0F47944DE8F6914:1459359915::::::e::::::23:
fpr:::::::::A6E773A1812E4B8FD94024AAC0F47944DE8F6914:
Where the id value is in the line started with “fpr”, which is ‘A6E773A1812E4B8FD94024AAC0F47944DE8F6914’.
After the Puppet catalog is applied, you may directly access MySQL console as root without explicit password since the module configures and manages ~/.my.cnf automatically. If we would want to reset the root password to something else, simply change the root_password value in the Puppet definition and apply the catalog on the agent node.
MySQL Replication Deployment
To deploy a MySQL Replication setup, one has to create at least two types of configuration to separate master and slave configuration. The master will have read-only disabled to allow read/write while slaves will be configured with read-only enabled. In this example, we are going to use GTID-based replication to simplify the configuration (since all nodes’ configuration would be very similar). We will want to initiate replication link to the master right after the slave is up.
Supposed we are having 3 nodes MySQL master-slave replication:
- db1.local – master
- db2.local – slave #1
- db3.local – slave #2
To meet the above requirements, we can write down our manifest to something like this:
# Puppet manifest for MySQL GTID-based replication MySQL 5.7 on Ubuntu 18.04 (Puppet v6.4.2)
# /etc/puppetlabs/code/environments/production/manifests/replication.pp

# node's configuration
class mysql {
  class {'::mysql::server':
    root_password           => 'q1w2e3!@#',
    create_root_my_cnf      => true,
    remove_default_accounts => true,
    manage_config_file      => true,
    override_options        => {
      'mysqld' => {
        'datadir'                 => '/var/lib/mysql',
        'bind_address'            => '0.0.0.0',
        'server-id'               => $mysql_server_id,
        'read_only'               => $mysql_read_only,
        'gtid-mode'               => 'ON',
        'enforce_gtid_consistency'=> 'ON',
        'log-slave-updates'       => 'ON',
        'sync_binlog'             => 1,
        'log-bin'                 => '/var/log/mysql-bin',
        'read_only'               => 'OFF',
        'binlog-format'           => 'ROW',
        'log-error'               => '/var/log/mysql/error.log',
        'report_host'             => ${fqdn},
        'innodb_buffer_pool_size' => '512M'
      },
      'mysqld_safe' => {
        'log-error'               => '/var/log/mysql/error.log'
      }
    }
  }

  # create slave user
  mysql_user { "${slave_user}@192.168.0.%":
      ensure        => 'present',
      password_hash => mysql_password("${slave_password}")
  }

  # grant privileges for slave user
  mysql_grant { "${slave_user}@192.168.0.%/*.*":
      ensure        => 'present',
      privileges    => ['REPLICATION SLAVE'],
      table         => '*.*',
      user          => "${slave_user}@192.168.0.%"
  }

  # /etc/hosts definition
  host {
    'db1.local': ip => '192.168.0.161';
    'db2.local': ip => '192.169.0.162';
    'db3.local': ip => '192.168.0.163';
  }

  # executes change master only if $master_host is defined
  if $master_host {
    exec { 'change master':
      path    => '/usr/bin:/usr/sbin:/bin',
      command => "mysql --defaults-extra-file=/root/.my.cnf -e "CHANGE MASTER TO MASTER_HOST = '$master_host', MASTER_USER = '$slave_user', MASTER_PASSWORD = '$slave_password', MASTER_AUTO_POSITION = 1; START SLAVE;"",
      unless  => "mysql --defaults-extra-file=/root/.my.cnf -e 'SHOW SLAVE STATUSG' | grep 'Slave_SQL_Running: Yes'"
    }
  }
}

## node assignment

# global vars
$master_host = undef
$slave_user = 'slave'
$slave_password = 'Replicas123'

# master
node "db1.local" {
  $mysql_server_id = '1'
  $mysql_read_only = 'OFF'
  include mysql
}

# slave1
node "db2.local" {
  $mysql_server_id = '2'
  $mysql_read_only = 'ON'
  $master_host = 'db1.local'
  include mysql
}

# slave2
node "db3.local" {
  $mysql_server_id = '3'
  $mysql_read_only = 'ON'
  $master_host = 'db1.local'
  include mysql
}
Force the agent to apply the catalog:
(all-mysql-nodes)$ puppet agent -tOn the master (db1.local), we can verify all the connected slaves:
mysql> SHOW SLAVE HOSTS;
+-----------+-----------+------+-----------+--------------------------------------+
| Server_id | Host      | Port | Master_id | Slave_UUID                           |
+-----------+-----------+------+-----------+--------------------------------------+
|         3 | db3.local | 3306 |         1 | 2d0b14b6-8174-11e9-8bac-0273c38be33b |
|         2 | db2.local | 3306 |         1 | a9dfa4c7-8172-11e9-8000-0273c38be33b |
+-----------+-----------+------+-----------+--------------------------------------+
Pay extra attention to the “exec { ‘change master’ :” section, where it means a MySQL command will be executed to initiate the replication link if the condition is met. All “exec” resources executed by Puppet must be idempotent, meaning the operation that will have the same effect whether you run it once or 10,001 times. There are a number of condition attributes you may use like “unless”, “onlyif” and “create” to safeguard the correct state and prevent Puppet to be messing up with your setup. You may delete/comment that section if you want to initiate the replication link manually.
MySQL Management
This module can be used to perform a number of MySQL management tasks:
- configuration options (modify, apply, custom configuration)
- database resources (database, user, grants)
- backup (create, schedule, backup user, storage)
- simple restore (mysqldump only)
- plugins installation/activation
Database Resource
As you can see in the example manifest above, we have defined two MySQL resources – mysql_user and mysql_grant – to create user and grant privileges for the user respectively. We can also use the mysql::db class to ensure a database with associated user and privileges are present, for example:
  # make sure the database and user exist with proper grant
  mysql::db { 'mynewdb':
    user          => 'mynewuser',
    password      => 'passw0rd',
    host          => '192.168.0.%',
    grant         => ['SELECT', 'UPDATE']
  }
Take note that in MySQL replication, all writes must be performed on the master only. So, make sure that the above resource is assigned to the master. Otherwise, errant transaction could occur.
Backup and Restore
Commonly, only one backup host is required for the entire cluster (unless you replicate a subset of data). We can use the mysql::server::backup class to prepare the backup resources. Suppose we have the following declaration in our manifest:
  # Prepare the backup script, /usr/local/sbin/mysqlbackup.sh
  class { 'mysql::server::backup':
    backupuser     => 'backup',
    backuppassword => 'passw0rd',
    backupdir      => '/home/backup',
    backupdirowner => 'mysql',
    backupdirgroup => 'mysql',
    backupdirmode  => '755',
    backuprotate   => 15,
    time           => ['23','30'],   #backup starts at 11:30PM everyday
    include_routines  => true,
    include_triggers  => true,
    ignore_events     => false,
    maxallowedpacket  => '64M',
    optional_args     => ['--set-gtid-purged=OFF'] #extra argument if GTID is enabled
  }
Puppet will configure all the prerequisites before running a backup – creating the backup user, preparing the destination path, assigning ownership and permission, setting the cron job and setting up the backup command options to use in the provided backup script located at /usr/local/sbin/mysqlbackup.sh. It’s then up to the user to run or schedule the script. To make an immediate backup, simply invoke:
$ mysqlbackup.shIf we extract the actual mysqldump command based on the above, here is what it looks like:
$ mysqldump --defaults-extra-file=/tmp/backup.NYg0TR --opt --flush-logs --single-transaction --events --set-gtid-purged=OFF --all-databasesFor those who want to use other backup tools like Percona Xtrabackup, MariaDB Backup (MariaDB only) or MySQL Enterprise Backup, the module provides the following private classes:
- mysql::backup::xtrabackup (Percona Xtrabackup and MariaDB Backup)
- mysql::backup::mysqlbackup (MySQL Enterprise Backup)
Example declaration with Percona Xtrabackup:
  class { 'mysql::backup::xtrabackup':
    xtrabackup_package_name => 'percona-xtrabackup',
    backupuser     => 'xtrabackup',
    backuppassword => 'passw0rd',
    backupdir      => '/home/xtrabackup',
    backupdirowner => 'mysql',
    backupdirgroup => 'mysql',
    backupdirmode  => '755',
    backupcompress => true,
    backuprotate   => 15,
    include_routines  => true,
    time              => ['23','30'], #backup starts at 11:30PM
    include_triggers  => true,
    maxallowedpacket  => '64M',
    incremental_backups => true
  }
The above will schedule two backups, one full backup every Sunday at 11:30 PM and one incremental backup every day except Sunday at the same time, as shown by the cron job output after the above manifest is applied:
(db1.local)$ crontab -l
# Puppet Name: xtrabackup-weekly
30 23 * * 0 /usr/local/sbin/xtrabackup.sh --target-dir=/home/backup/mysql/xtrabackup --backup
# Puppet Name: xtrabackup-daily
30 23 * * 1-6 /usr/local/sbin/xtrabackup.sh --incremental-basedir=/home/backup/mysql/xtrabackup --target-dir=/home/backup/mysql/xtrabackup/`date +%F_%H-%M-%S` --backup
For more details and options available for this class (and other classes), check out the option reference here.
For the restoration aspect, the module only support restoration with mysqldump backup method, by importing the SQL file directly to the database using the mysql::db class, for example:
mysql::db { 'mydb':
  user     => 'myuser',
  password => 'mypass',
  host     => 'localhost',
  grant    => ['ALL PRIVILEGES'],
  sql      => '/home/backup/mysql/mydb/backup.gz',
  import_cat_cmd => 'zcat',
  import_timeout => 900
}
The SQL file will be loaded only once and not on every run, unless enforce_sql => true is used.
Configuration Options
In this example, we used manage_config_file => true with override_options to structure our configuration lines which later will be pushed out by Puppet. Any modification to the manifest file will only reflect the content of the target MySQL configuration file. This module will neither load the configuration into runtime nor restart the MySQL service after pushing the changes into the configuration file. It’s the sysadmin responsibility to restart the service in order to activate the changes.
To add custom MySQL configuration, we can place additional files into “includedir”, default to /etc/mysql/conf.d. This allows us to override settings or add additional ones, which is helpful if you don’t use override_options in mysql::server class. Making use of Puppet template is highly recommended here. Place the custom configuration file under the module template directory (default to , /etc/puppetlabs/code/environments/production/modules/mysql/templates) and then add the following lines in the manifest:
# Loads /etc/puppetlabs/code/environments/production/modules/mysql/templates/my-custom-config.cnf.erb into /etc/mysql/conf.d/my-custom-config.cnf

file { '/etc/mysql/conf.d/my-custom-config.cnf':
  ensure  => file,
  content => template('mysql/my-custom-config.cnf.erb')
}
To implement version specific parameters, use the version directive, for example [mysqld-5.5]. This allows one config for different versions of MySQL.
Puppet vs ClusterControl
Did you know that you can also automate the MySQL or MariaDB replication deployment by using ClusterControl? You can use ClusterControl Puppet module to install it, or simply by downloading it from our website.
When compared to ClusterControl, you can expect the following differences:
- A bit of a learning curve to understand Puppet syntaxes, formatting, structures before you can write manifests.
- Manifest must be tested regularly. It’s very common you will get a compilation error on the code especially if the catalog is applied for the first time.
- Puppet presumes the codes to be idempotent. The test/check/verify condition falls under the author’s responsibility to avoid messing up with a running system.
- Puppet requires an agent on the managed node.
- Backward incompatibility. Some old modules would not run correctly on the new version.
- Database/host monitoring has to be set up separately.
ClusterControl’s deployment wizard guides the deployment process:
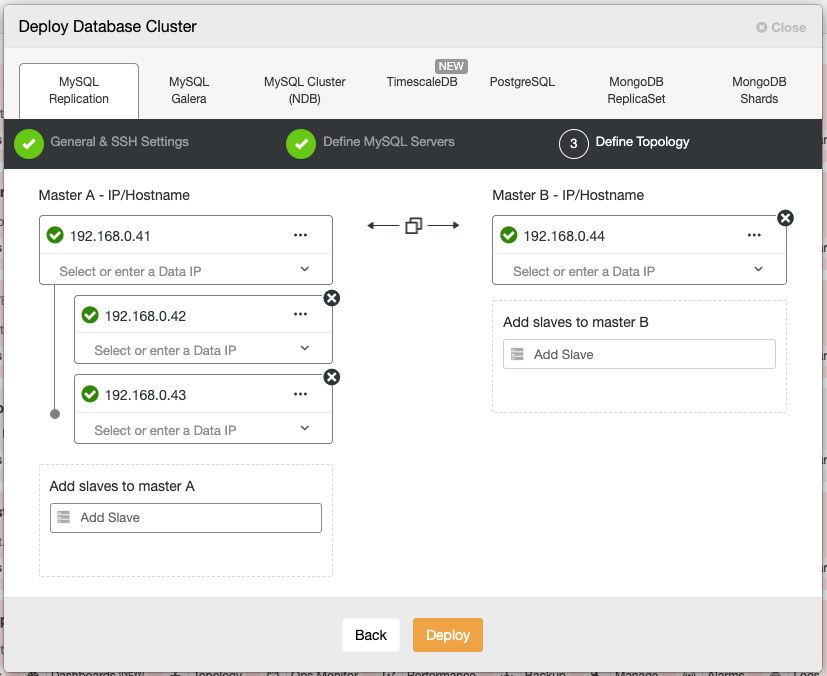
Alternatively, you may use ClusterControl command line interface called “s9s” to achieve similar results. The following command creates a three-node MySQL replication cluster (provided passwordless to all nodes has been configured beforehand):
$ s9s cluster --create
  --cluster-type=mysqlreplication
      --nodes=192.168.0.41?master;192.168.0.42?slave;192.168.0.43?slave;192.168.0.44?master;
  --vendor=oracle
  --cluster-name='MySQL Replication 8.0'
  --provider-version=8.0
  --db-admin='root'
  --db-admin-passwd='$ecR3t^word'
--logThe following MySQL/MariaDB replication setups are supported:
- Master-slave replication (file/position-based)
- Master-slave replication with GTID (MySQL/Percona)
- Master-slave replication with MariaDB GTID
- Master-master replication (semi-sync/async)
- Master-slave chain replication (semi-sync/async)
Post deployment, nodes/clusters can be monitored and fully managed by ClusterControl, including automatic failure detection, master failover, slave promotion, automatic recovery, backup management, configuration management and so on. All of these are bundled together in one product. The community edition (free forever!) offers deployment and monitoring. On average, your database cluster will be up and running within 30 minutes. What it needs is only passwordless SSH to the target nodes.
In the next part, we are going to walk you through Galera Cluster deployment using the same Puppet module. Stay tuned!