blog
How to Automate Deployment of MySQL Galera Cluster using s9s CLI and Chef

In our previous blog, we showed how devops can automate your daily database tasks with Chef. Now, let’s see how we can quickly deploy a MySQL Galera Cluster with Chef using s9s CLI.
Setting up a Galera Cluster manually can be fast for an experienced DBA. Automating it with something like Ansible may take a hell of a lot longer, as our colleague Krzysztof found out in this blog. While automating deployment of a database cluster with Chef is certainly doable, it is not an easy task as you can end up with hundreds of lines of code which can be hard to maintain when there are updates to the software. We will demonstrate here how you can integrate the s9s CLI in your deployment cookbook and speed up the process.
About the s9s CLI
s9s is the CLI tool for ClusterControl, you can use it to integrate with your runbooks for automation like Ansible, Puppet, Chef or Salt. This allows you to easily integrate database management functionality into your orchestration scripts. The command line tool allows you to interact, control and manage your database infrastructure using ClusterControl. For instance, we used it here to automate deployment when running ClusterControl and Galera Cluster on Docker Swarm. It is noteworthy that this tool is open source so you can freely use or contribute to it.
How to get the s9s CLI
The CLI can be installed by adding the s9s tools repository and using a package manager, or compiled from source. The current installation script to install ClusterControl, install-cc, will automatically install the command line client. The command line client can also be installed on another computer or workstation for remote management. More information in our documentation.
Some of the things you can do from the CLI:
- Deploy and manage database clusters
- MySQL and MariaDB
- PostgreSQL
- MongoDB to be added soon
- TimescaleDB
- Monitor your databases
- Status of nodes and clusters
- Cluster properties can be extracted
- Gives detailed enough information about your clusters
- Manage your systems and integrate with DevOps tools
- Create, stop or start clusters
- Add, remove, or restart nodes in the cluster
- Create database users (CREATE USER, GRANT privileges to user)
- Users created in the CLI are traceable through the system
- Create load balancers (HAProxy, ProxySQL)
- Create and Restore backups
- Use maintenance mode
- Conduct configuration changes of db nodes
- Integrate with existing deployment automation
- Ansible, Puppet, Chef or Salt, …
- Integrate with chatbots like Slack, FlowDock and Hipchat
Automating your Galera Cluster Setup
In our previous blog, we have discussed about the flow of Chef in which you have to setup your workstation, Chef server, and the nodes/clients. Now, let’s look at first the diagram for this setup on automating our Galera Cluster setup. Check out below:
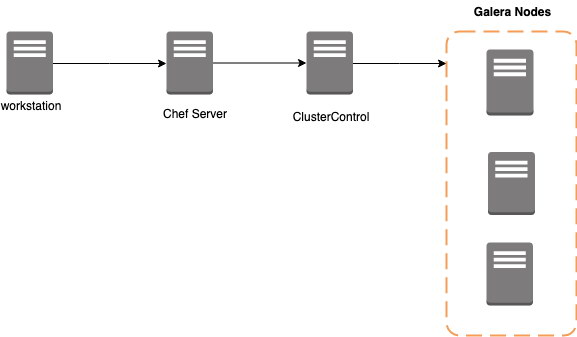
The workstation serves here as your development machine, where you write your code. Then push the cookbooks/recipes to the Chef Server, which runs them in the target node which is the ClusterControl in this setup. This target ClusterControl must be a clean/dedicated host. As mentioned earlier, we’ll be using s9s-tools to leverage the installation and setup of Galera nodes without writing lots of lines of code. Instead, code it like a boss.
Here are the prerequisites:
- Workstation/Node
- Chef Server
- ClusterControl controller/server – The controller here is a requirement for our s9s CLI to operate. Our community version lets you deploy your database clusters.
- 3-galera nodes. For this setup, I have the following IP’s used: 192.168.70.70,192.168.70.80,192.168.70.100
- Setup your ClusterControl OS user public keys to all of the targeted Galera nodes to avoid further SSH errors.
Integrating ClusterControl into your automation tools
Installing ClusterControl can be done in several ways. You can use the package manager such as your favorite yum or apt and use our repository, you can use install-cc, or you can use our automation scripts for Puppet, Ansible, or Chef.
For the purpose of this blog, we will use the S9s_cookbook and integrate the automation process for our Galera Cluster setup. There are two ways to utilize the S9s_cookbook. You can use the github https://github.com/severalnines/S9s_cookbooks or through the marketplace using knife. We’ll use the marketplace.
-
In your workstation, download the cookbook using Chef’s knife tool, and uncompress the tar ball.
$ cd ~/dba-tasks-repo/cookbooks $ knife cookbook site download clustercontrol $ tar -xzvf clustercontrol-* $ unlink clusercontrol-*.tar.gz -
Then run the s9s_helper.sh located in app the clustercontrol cookbook.
$ cd ~/dba-tasks-repo/cookbooks/clustercontrol/files/default
$ ./s9s_helper.sh
For example, you’ll see the following as you run the script:
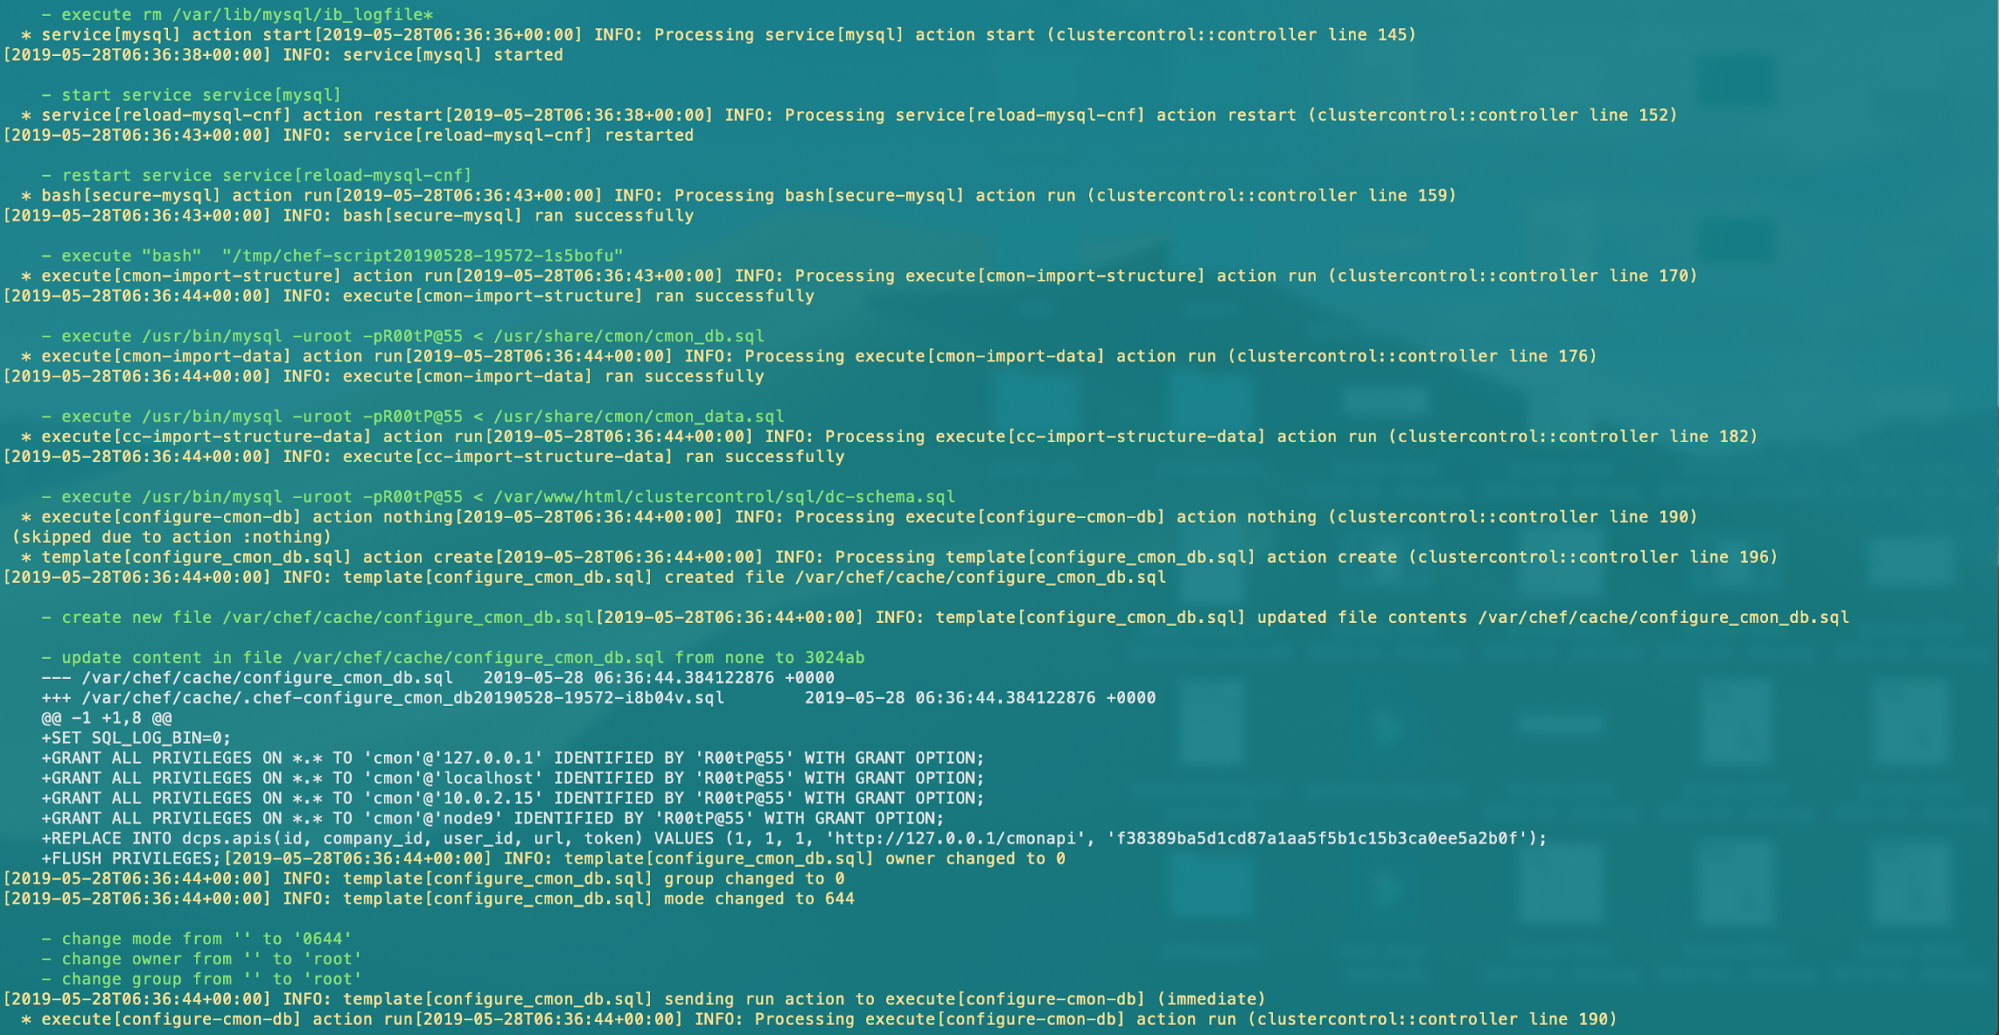
[vagrant@node2 default]$ ./s9s_helper.sh ============================================== Helper script for ClusterControl Chef cookbook ============================================== ClusterControl will install a MySQL server and setup the MySQL root user. Enter the password for MySQL root user [password] : R00tP@55 ClusterControl will create a MySQL user called 'cmon' for automation tasks. Enter the password for user cmon [cmon] : cm0nP@55 Generating config.json.. { "id" : "config", "mysql_root_password" : "R00tP@55", "cmon_password" : "cm0nP@55", "clustercontrol_api_token" : "f38389ba5d1cd87a1aa5f5b1c15b3ca0ee5a2b0f" } Data bag file generated at /home/vagrant/dba-tasks-repo/cookbooks/clustercontrol/files/default/config.json To upload the data bag, you can use following command: $ knife data bag create clustercontrol $ knife data bag from file clustercontrol /home/vagrant/dba-tasks-repo/cookbooks/clustercontrol/files/default/config.json ** We highly recommend you to use encrypted data bag since it contains confidential information ** -
Then create a data bag as per instruction in the last output of the s9s_helper.sh script,
[vagrant@node2 clustercontrol]$ knife data bag create clustercontrol Created data_bag[clustercontrol] [vagrant@node2 clustercontrol]$ knife data bag from file clustercontrol ~/dba-tasks-repo/cookbooks/clustercontrol/files/default/config.json Updated data_bag_item[clustercontrol::config] -
Before you upload to the Chef Server, ensure that you have the similar contents in your templates/default/configure_cmon_db.sql.erb as follows:
SET SQL_LOG_BIN=0; GRANT ALL PRIVILEGES ON *.* TO 'cmon'@'127.0.0.1' IDENTIFIED BY '<%= node['cmon']['mysql_password'] %>' WITH GRANT OPTION; GRANT ALL PRIVILEGES ON *.* TO 'cmon'@'localhost' IDENTIFIED BY '<%= node['cmon']['mysql_password'] %>' WITH GRANT OPTION; GRANT ALL PRIVILEGES ON *.* TO 'cmon'@'<%= node['ipaddress'] %>' IDENTIFIED BY '<%= node['cmon']['mysql_password'] %>' WITH GRANT OPTION; GRANT ALL PRIVILEGES ON *.* TO 'cmon'@'<%= node['fqdn'] %>' IDENTIFIED BY '<%= node['cmon']['mysql_password'] %>' WITH GRANT OPTION; REPLACE INTO dcps.apis(id, company_id, user_id, url, token) VALUES (1, 1, 1, 'http://127.0.0.1/cmonapi', '<%= node['api_token'] %>'); FLUSH PRIVILEGES; -
Ensure in file recipes/controller.erb also that the cmon service will be restarted. See below:
service "cmon" do supports :restart => true, :start => true, :stop => true, :reload => true action [ :enable, :restart ] end -
Upload the cookbook to the Chef Server
$ ~/dba-tasks-repo/cookbooks/ $ knife cookbook upload clustercontrol -
Alternatively, you can create roles to attach the role to the node. We'll use roles again just like in our previous blog. You can do the following for example:
-
Create a file called cc_controller.rb in path ~/dba-tasks-repo/cookbooks/clustercontrol with the following contents:
name "cc_controller" description "ClusterControl Controller" run_list ["recipe[clustercontrol]"] -
Create a role from the file we created as follows:
[vagrant@node2 clustercontrol]$ knife role from file cc_controller.rb Updated Role cc_controller -
Assign the roles to the target nodes/client as follows:
$ knife node run_list add"role[cc_controller]" Where
is your ClusterControl controller's hostname. -
Verify what nodes the role is attached to and its run list. For example, I have the following:
[vagrant@node2 clustercontrol]$ knife role show cc_controller
chef_type:           role
default_attributes:
description:         ClusterControl Controller
env_run_lists:
json_class:          Chef::Role
name:                cc_controller
override_attributes:
run_list:
  recipe[clustercontrol]
  recipe[db_galera_install]
-
Now, we're not yet finished. We'll proceed on integrating our Galera Cluster automation Chef cookbook.
Writing our Chef Cookbook for MySQL Galera Cluster
As mentioned earlier, we will be integrating s9s CLI into our automation code. Let's proceed with the steps.
-
Let's generate a cookbook. Let's name it as db_galera_install,
$ cd ~/dba-tasks-repo/cookbooks/ $ chef generate cookbook db_galera_install -
Let's also generate the attribute file,
$ chef generate attribute default -
Go to attributes/default.rb and add the following contents in the file
default['cmon']['s9s_bin'] = '/bin/s9s' default['cmon']['galera_cluster_name'] = 'PS-galera_cluster' default['cmon']['db_pass'] = 'R00tP@55' -
Go to recipes/default.rb and add the following contents in the file
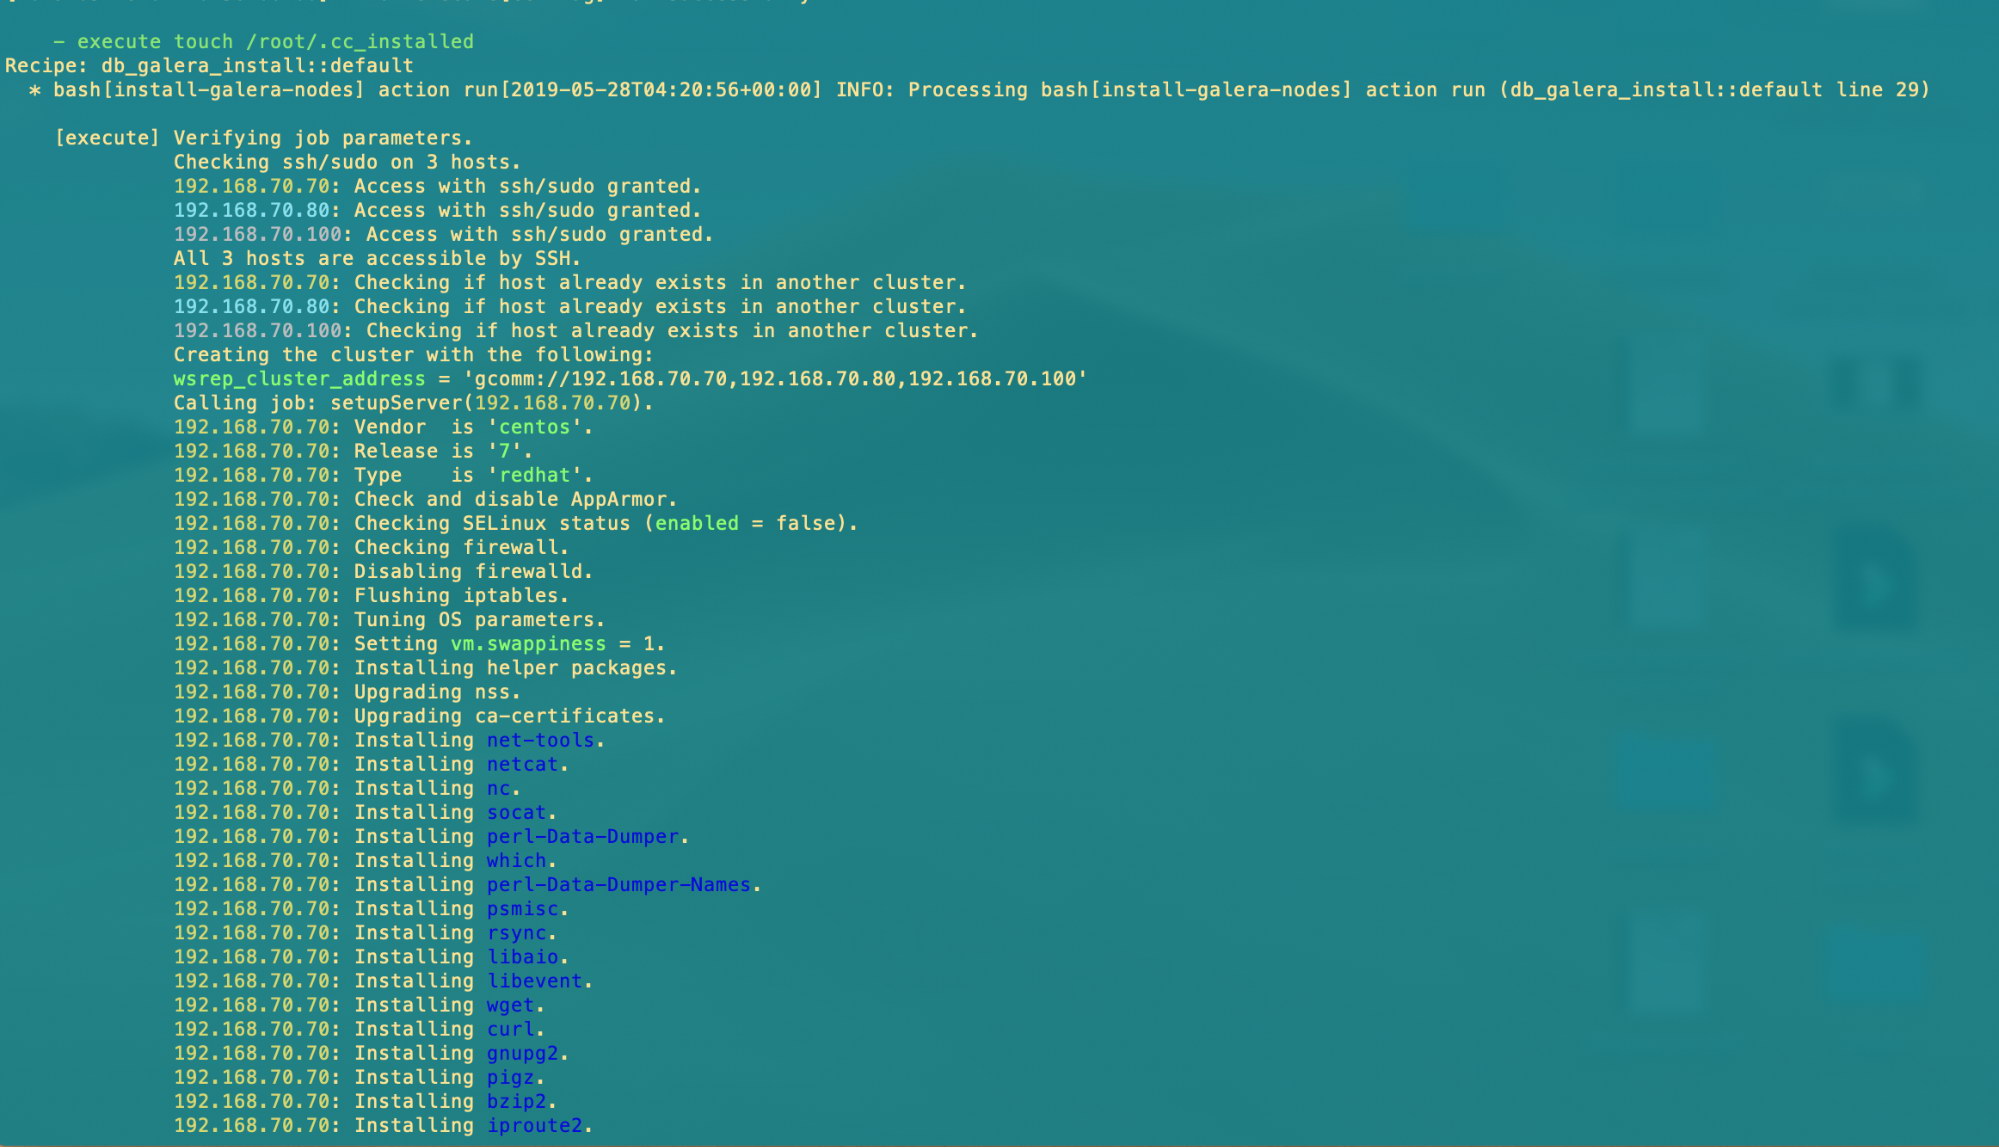
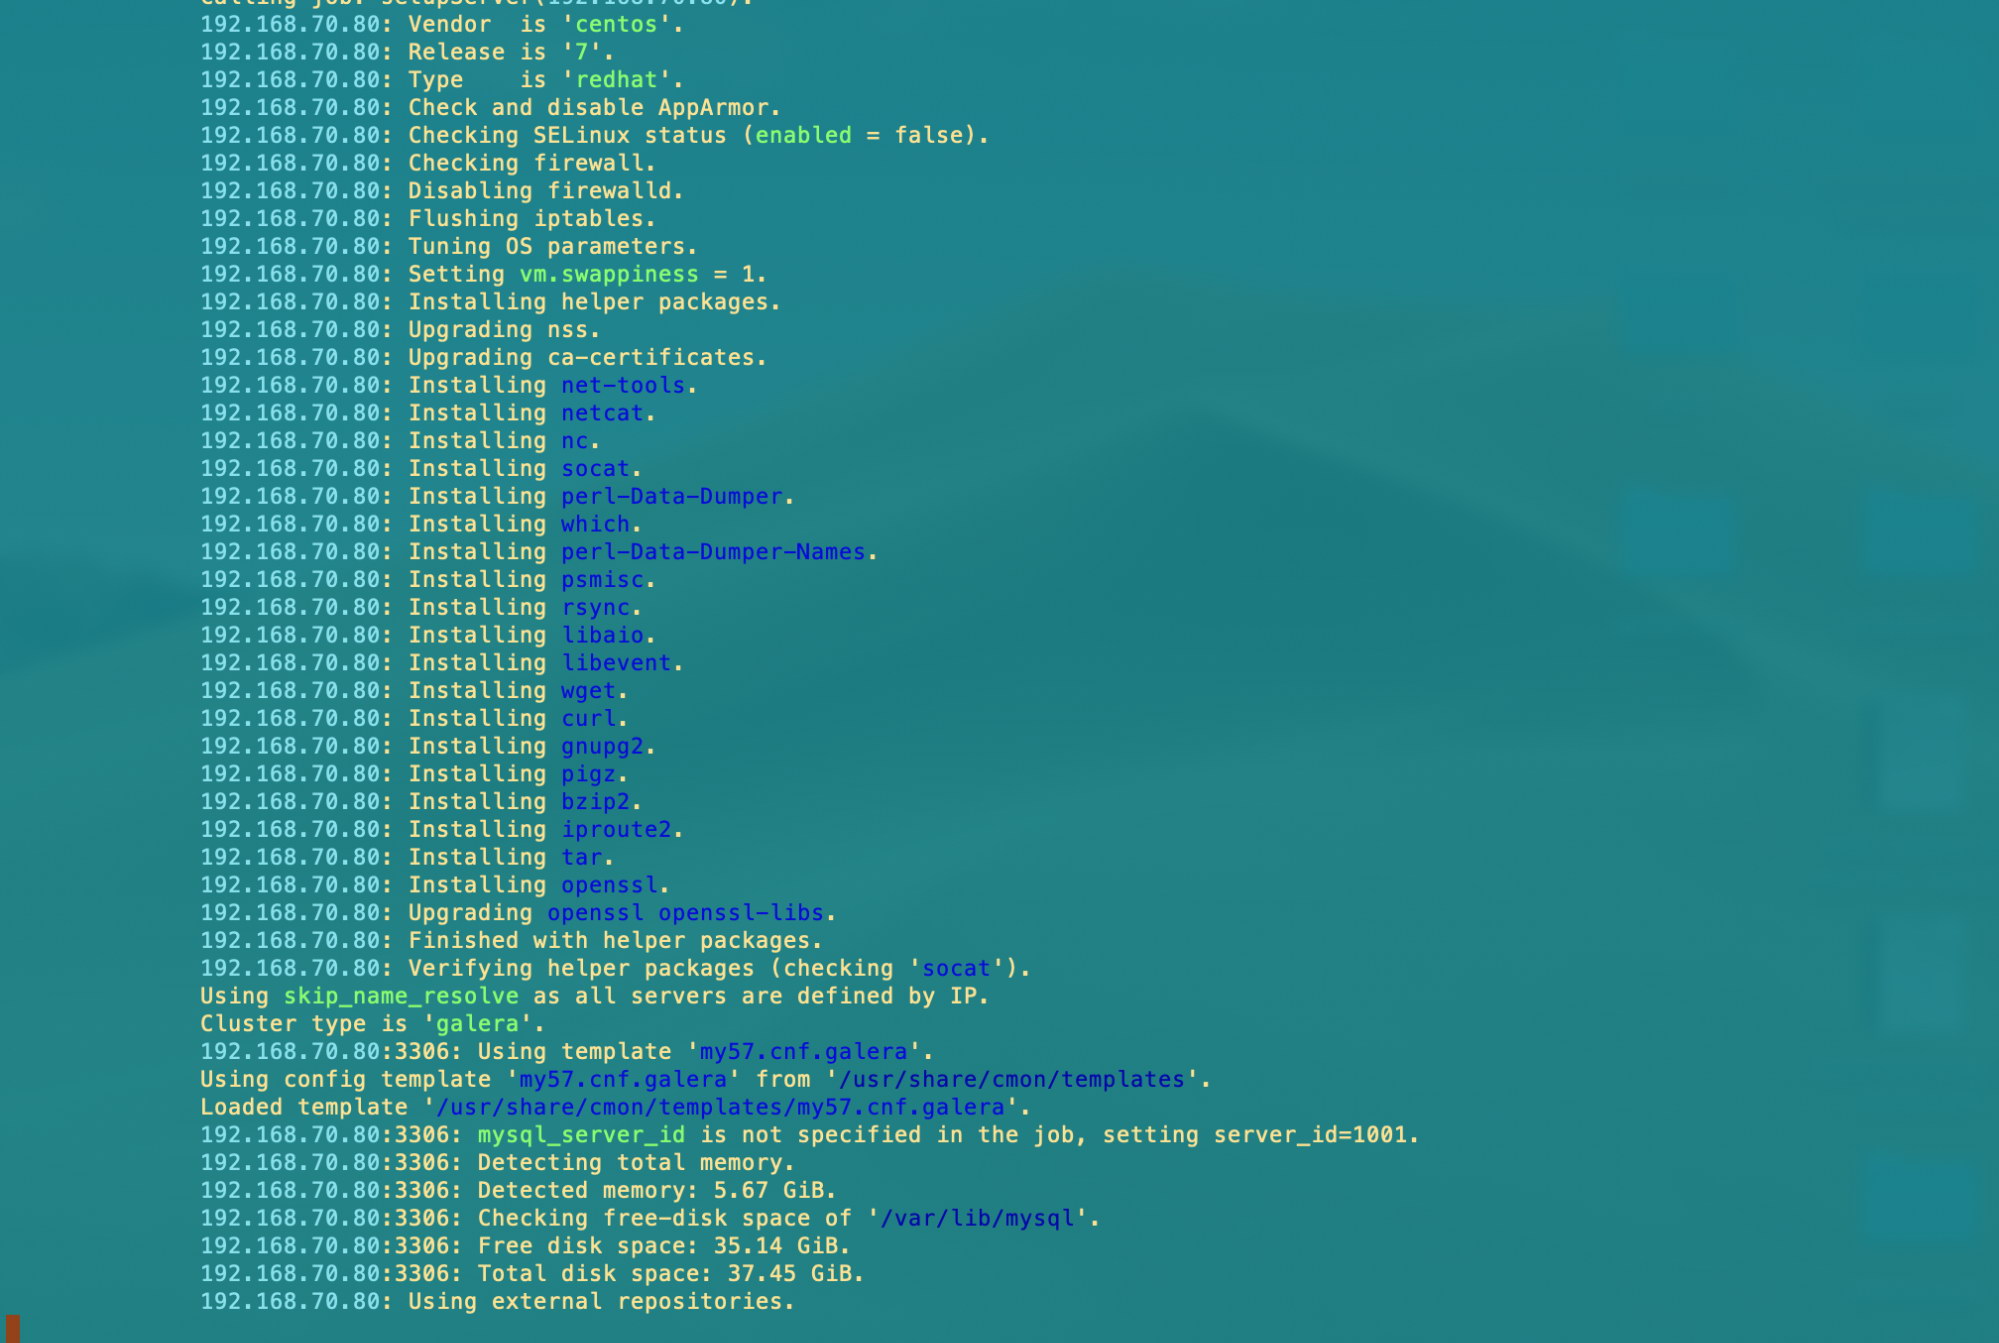
galera_cluster_name = "#{node['cmon']['galera_cluster_name']}"
s9s_bin = "#{node['cmon']['s9s_bin']}"

cc_config = data_bag_item('clustercontrol','config')
db_pass = cc_config['mysql_root_password']


bash "install-galera-nodes" do
  user "root"
  code <<-EOH
  #{s9s_bin} cluster --create --cluster-type=galera --nodes="192.168.70.70,192.168.70.80,192.168.70.100"
    --vendor=percona
    --provider-version=5.7
    --db-admin-passwd='#{db_pass}'
    --os-user=vagrant
    --cluster-name='#{galera_cluster_name}'
    --wait
    --log
  EOH

  not_if "[[ ! -z $(#{s9s_bin} cluster --list --cluster-format='%I' --cluster-name '#{galera_cluster_name}') ]]"
end
A little bit of explanation about the code. It uses the s9s cluster --create command to create a Galera type of cluster. The nodes are specified using its IP addresses within the --nodes argument. We also use the same password setup from the ClusterControl database using the current data bag named clustercontrol. Hence, you can initiate another data bag as preferred. The rest are self-explainable but you can check here in our documentation.
Lastly, the conditional statement not_if part is very important. It determines that the bash resource, which handles the setup for the Galera cluster, will not be invoked once the Galera Cluster named PS-galera_cluster has been provisioned. -
Since we have it setup, we'll then upload it to the Chef server as follows:
$ ~/dba-tasks-repo/cookbooks/ $ knife cookbook upload db_galera_install -
Let's verify the list of roles and then add it to the role we have setup earlier namely cc_controller
[vagrant@node2 cookbooks]$ knife role list
cc_controller
pg_nodes
Then edit the role by running the command below:
$ export EDITOR=vi;
$ knife role edit cc_controller
You might have something look like as follows,
{
  "name": "cc_controller",
  "description": "ClusterControl Controller",
  "json_class": "Chef::Role",
  "default_attributes": {

  },
  "override_attributes": {

  },
  "chef_type": "role",
  "run_list": [
    "recipe[clustercontrol]",
    "recipe[db_galera_install]"
  ],
  "env_run_lists": {

  }
}
You must ensure that the run_list must have the following,
"recipe[clustercontrol]",
"recipe[db_galera_install]"
That's all and we are ready to roll!
Executing the Runbooks
We're done preparing both ClusterControl and our Galera Cluster cookbooks ready to be tested. We'll proceed on running it and show the results of our Chef automation.
Go to the target node/client. In my end, I use node9 with IP 192.168.70.90. Then run the command below,
$ sudo chef-client -l infoIn my client node, this shows as follows:
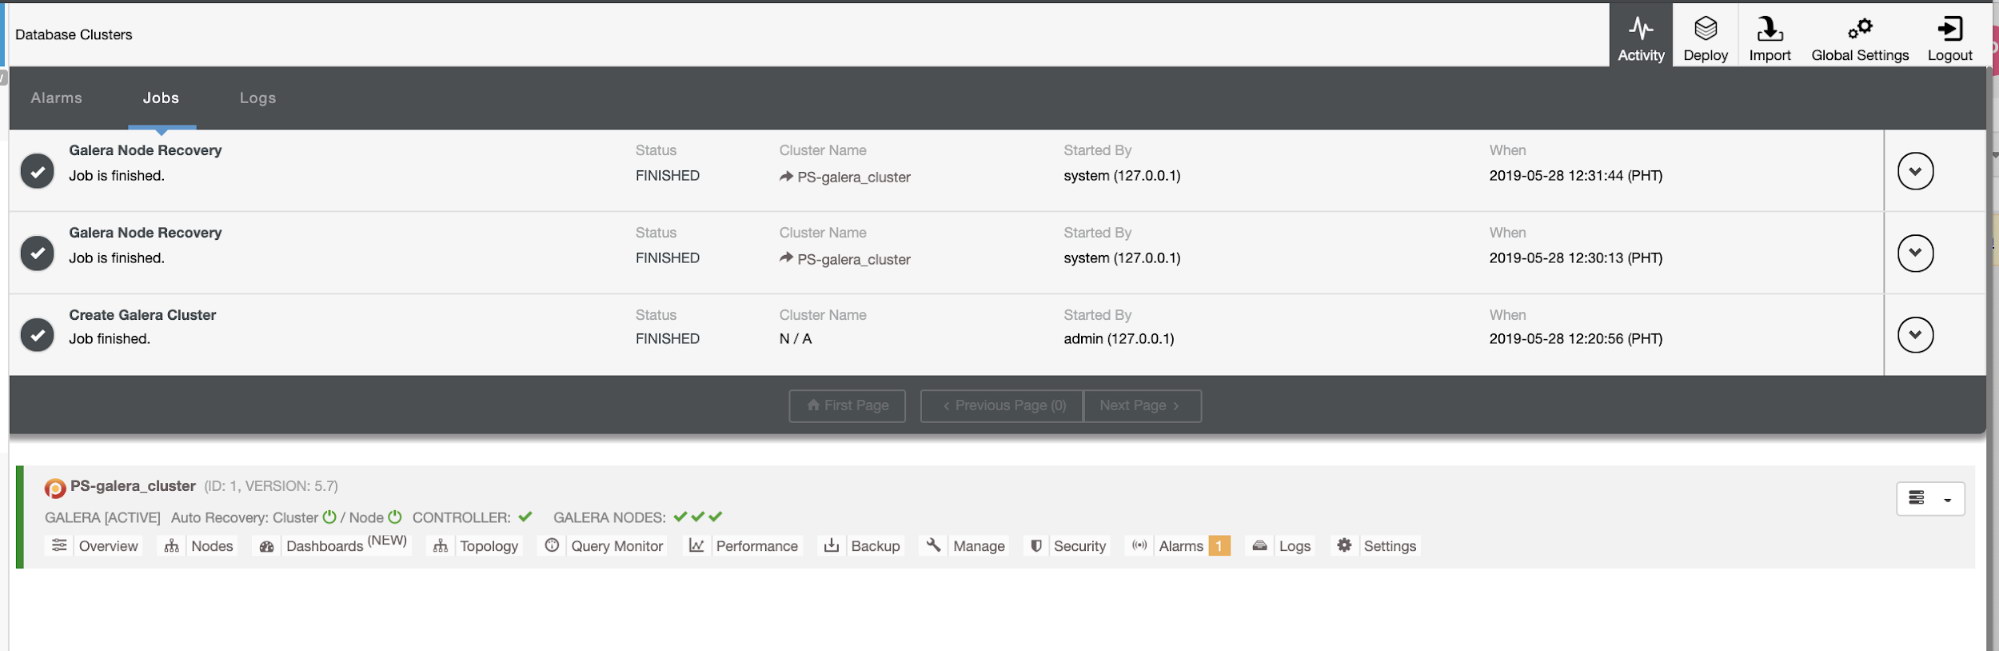
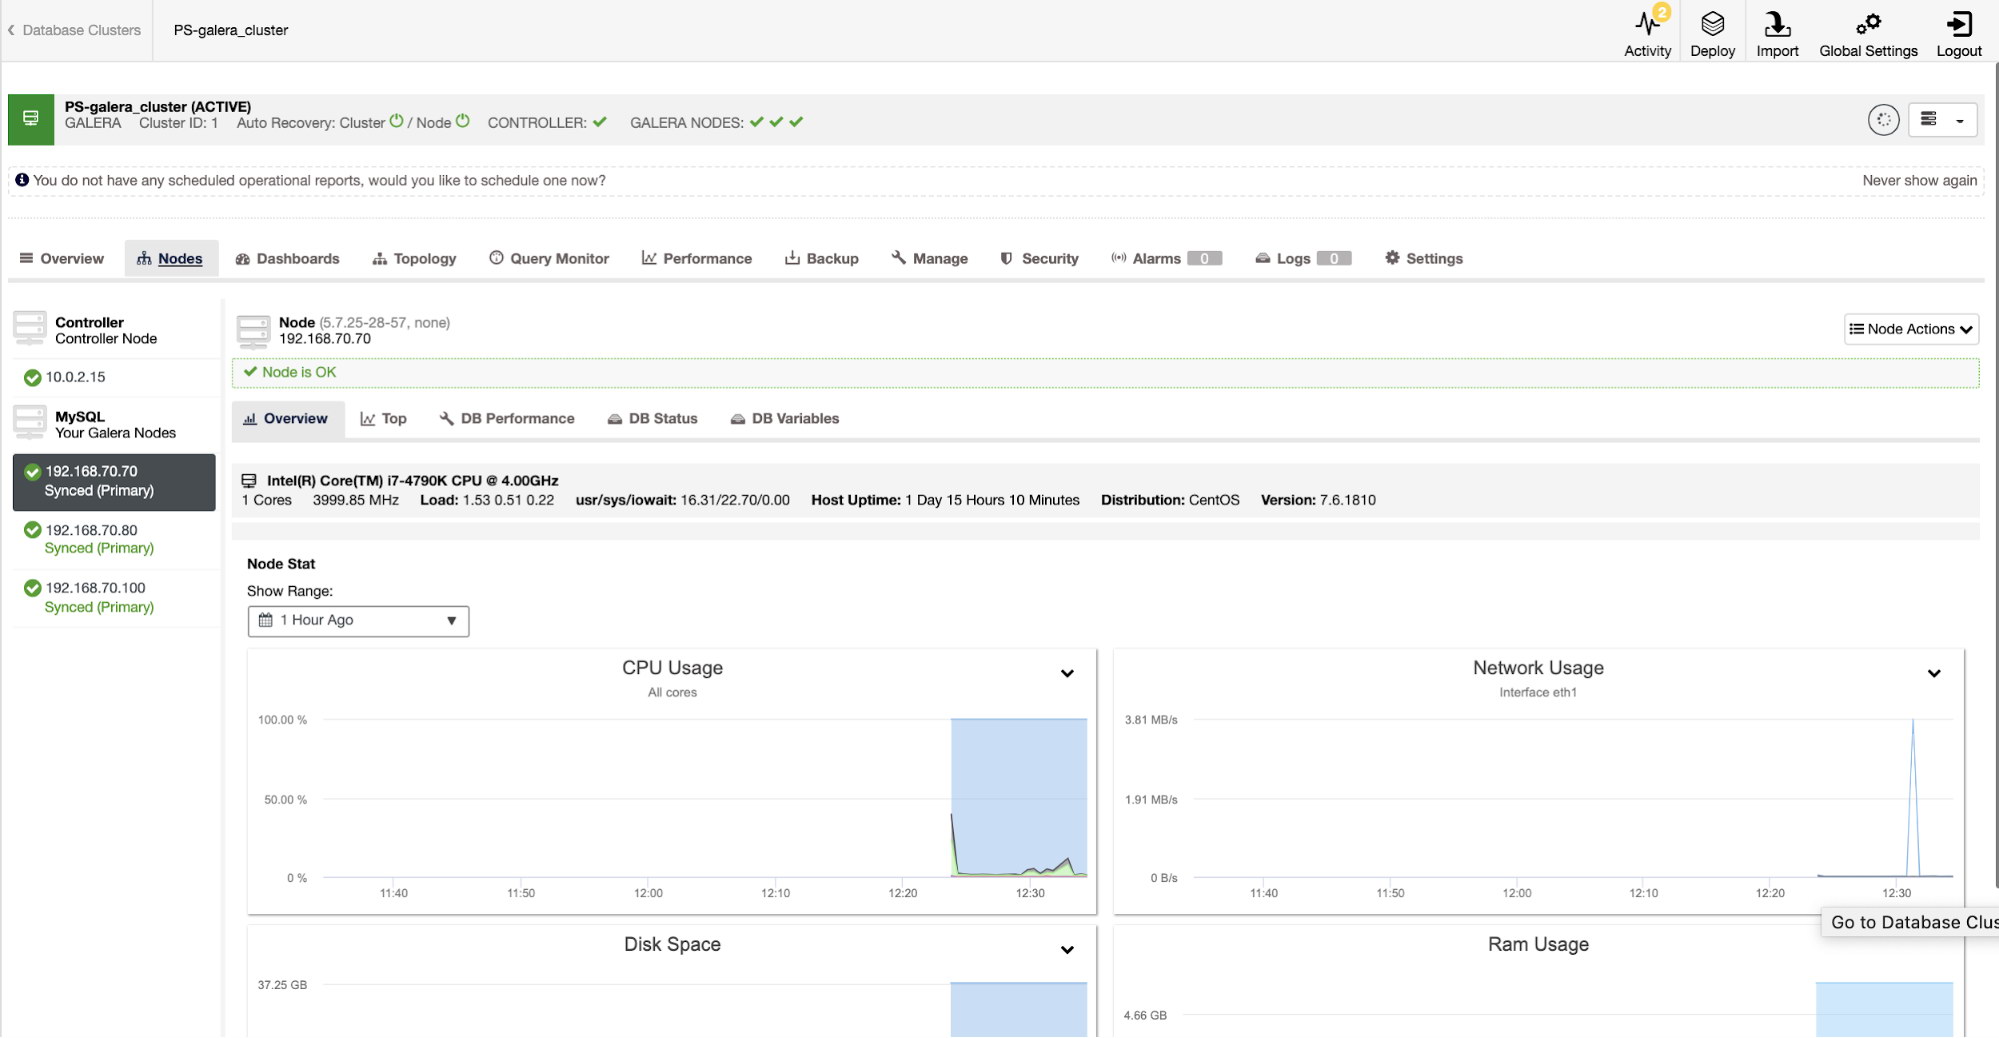
Once it's all done, you'll have all your ClusterControl setup and the Galera Cluster nodes with ease!
Lastly, here's a screenshot of our Galera Cluster within ClusterControl:
Conclusion
We have showed you how easy it is to integrate our s9s CLI tool for your common database activities. This is very helpful in an organization where Chef is used as the de-facto automation tool. s9s can make you more productive by automating your daily database administrative work.


