blog
How to Deploy the Chamilo MariaDB Database for High Availability

Learning Management System (LMS) platforms allow you to learn/teach remotely, something that is really important due to the current situation around the world.
That being said, we can also say High Availability is a must in this kind of platform, otherwise, it could not be accessible when it is needed.
In this blog, we will see how to deploy a MariaDB database for High Availability to be used for one of the most popular LMS platform options, Chamilo LMS.
What is Chamilo?
Chamilo LMS is a free Learning Management System (LMS) designed for online education and developed through the collaboration of many companies and individuals developers.
As a teacher, using Chamilo you can access a series of useful tools to create an effective learning environment. Some of these tools are:
- Import or create documents (audio, video, images) and publish them
- Build tests and exams with automated scores and feedback as required
- Set and receive virtual assignments
- Describe the components of the course through description sections
- Communicate through forums or chat
- Publish announcements
- Add links
- Create work groups or laboratory groups
- Set up a virtual classroom
- Create surveys
- Add a wiki to create documents collaboratively
- Use a glossary and an agenda
- Enable tracking of learners in your courses
- Register attendances
- Elaborate a class diary, and more
The Chamilo platform is extremely flexible. All its tools can be customized according to the needs of each course. It provides a friendly and intuitive user interface that requires no special prior technical knowledge or skills.
So, the question is, how can you deploy a MariaDB database for High Availability to be used for this system?
MariaDB Database for High Availability
There are different approaches to deploy a MariaDB Database for High Availability. Let’s see the two main options.
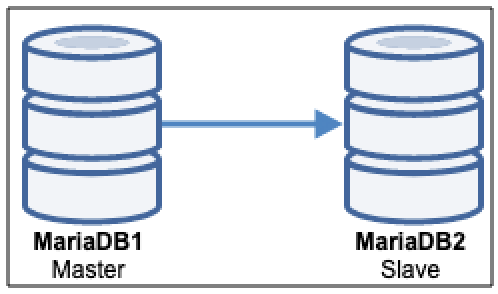
MariaDB Master-Slave Replication
You can run a master-slave setup using asynchronous or semi-synchronous replication. The advantage of this simple option is that, when the master is unavailable, you can promote one of the slaves and continue working as usual. The main issue with this setup is that the failover has to be performed manually, or even using an external tool like ClusterControl. It means you will have a (short) downtime, which could be acceptable or not for your business.
MariaDB Cluster
Another approach would be to use a Galera Cluster to store the data from Chamilo LMS. You can start using it with three nodes, and it can automatically handle the failure of one of these nodes. The remaining two nodes will continue working receiving connections from the Chamilo application. It means you won’t have downtime in this case, but as it is a more complex topology, you will require more knowledge about this technology, and depending on the workload, it could not be the best option.

Load Balancers
To improve High Availability, both options will require a Load Balancer in front of them, which would handle the traffic and redirect it to an available/healthy node.
ProxySQL is a dedicated load balancer for MySQL which comes with a variety of features including query redirecting, query caching, and traffic shaping. It can be used to easily set up a read-write split and redirect queries to separate backend nodes.
HAProxy is a load balancer that distributes traffic from one origin to one or more destinations and can define specific rules and/or protocols for this task. If any of the destinations stops responding, it is marked as offline, and the traffic is sent to the rest of the available destinations.
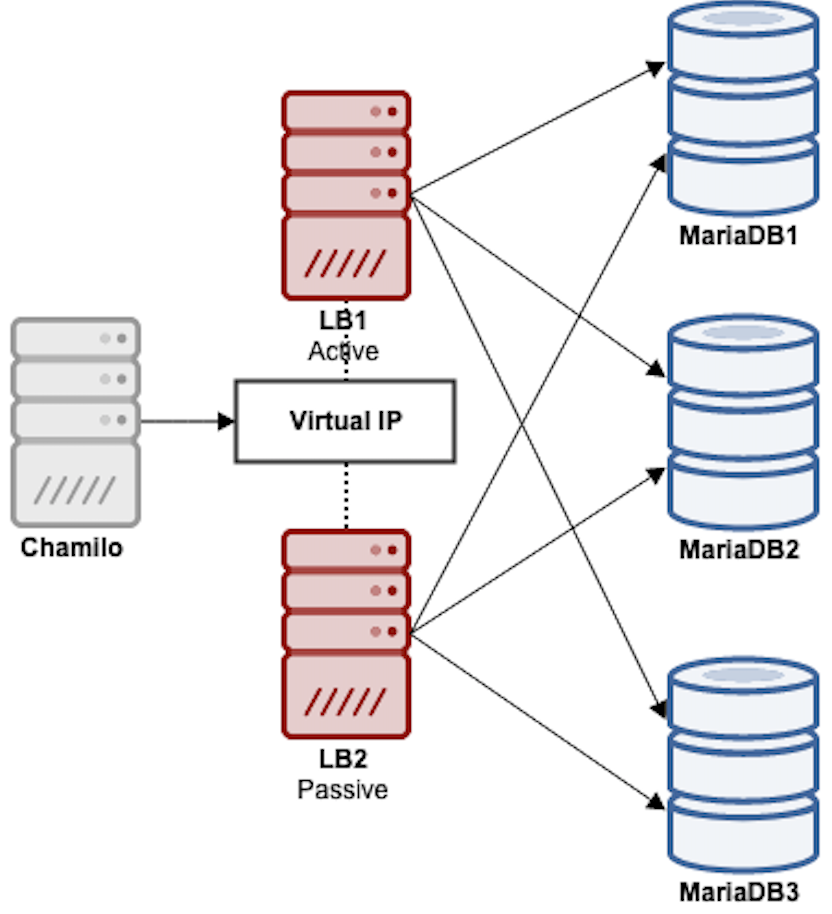
Keepalived is a service that allows you to configure a Virtual IP Address within an active/passive group of servers. This Virtual IP Address is assigned to an active server. If this server fails, the IP Address is automatically migrated to the “Secondary” passive server, allowing it to continue working with the same IP Address in a transparent way for the systems.
Using only one Load Balancer node will add a single point of failure in your topology, so, you can use the combination of ProxySQL+Keepalived or HAProxy+Keepalived using two Load Balancer nodes (at least) and Keepalived between them.
Now, let’s see how ClusterControl can help you to deploy a MariaDB Database adding Load Balancers and a Virtual IP Address to be used in your Chamilo application.
Chamilo MariaDB Database Deployment
As an example, we will deploy a MariaDB Master-Slave Replication, which will be used by the Chamilo application. For this, we will use ClusterControl to deploy 2 MariaDB Database nodes (master-slave), and 2 HAProxy Load Balancers with Keepalived configured between them.
MariaDB Database Deployment
To perform a deployment from ClusterControl, simply select the option “Deploy” and follow the instructions that appear.
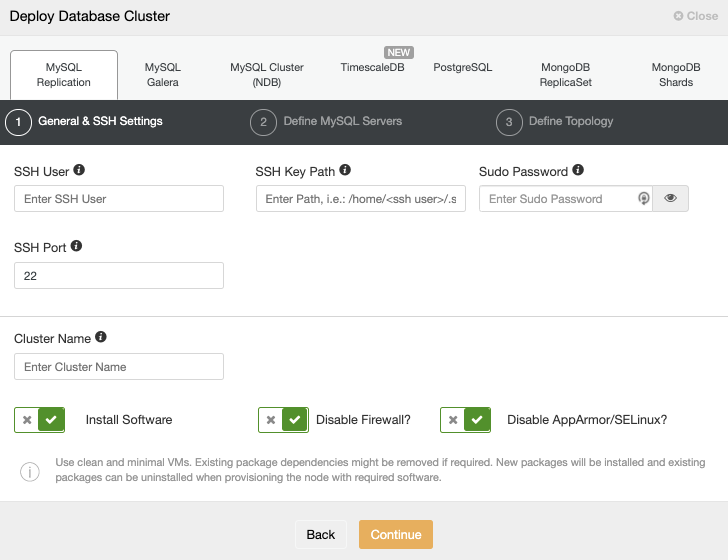
When selecting MySQL Replication, you must specify User, Key or Password, and Port to connect by SSH to your servers. You can also add a name for your new cluster and if you want ClusterControl to install the corresponding software and configurations for you.
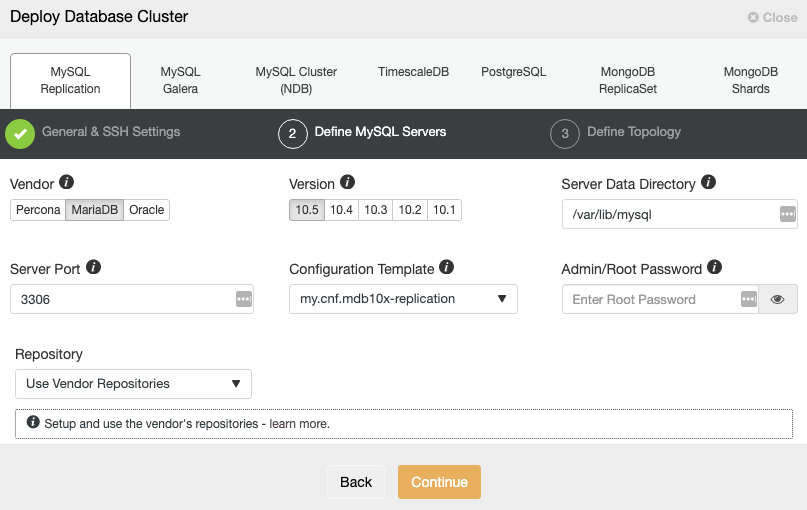
After setting up the SSH access information, you need to select the database vendor/version, and define the database credentials, port, and data directory. You can also specify which repository to use.
In the next step, you need to add your servers to the cluster that you are going to create using the IP Address or Hostname.
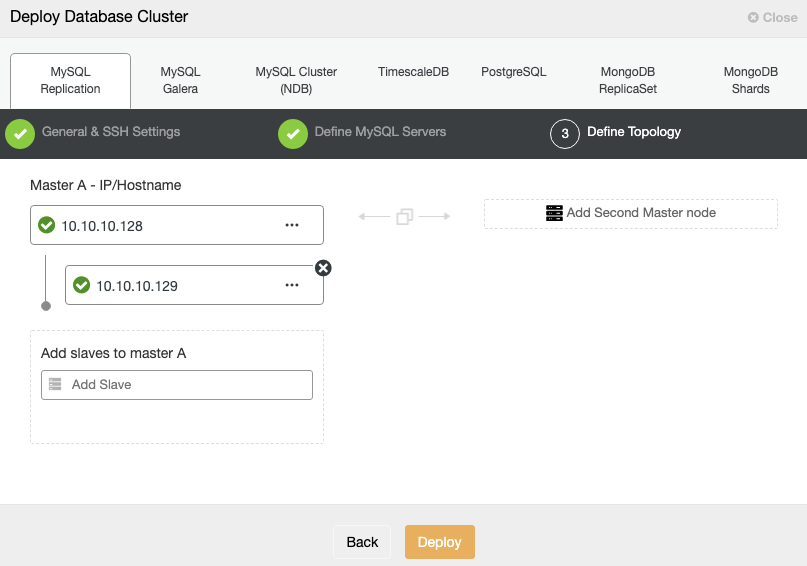
Once the task is finished, you can see your new MariaDB cluster in the main ClusterControl screen.

Now you have your cluster created, you can perform several tasks on it, like adding a Load Balancer or a new replica.
Load Balancer Deployment
To perform a Load Balancer deployment, select the option “Add Load Balancer” in the cluster actions, and complete the asked information.
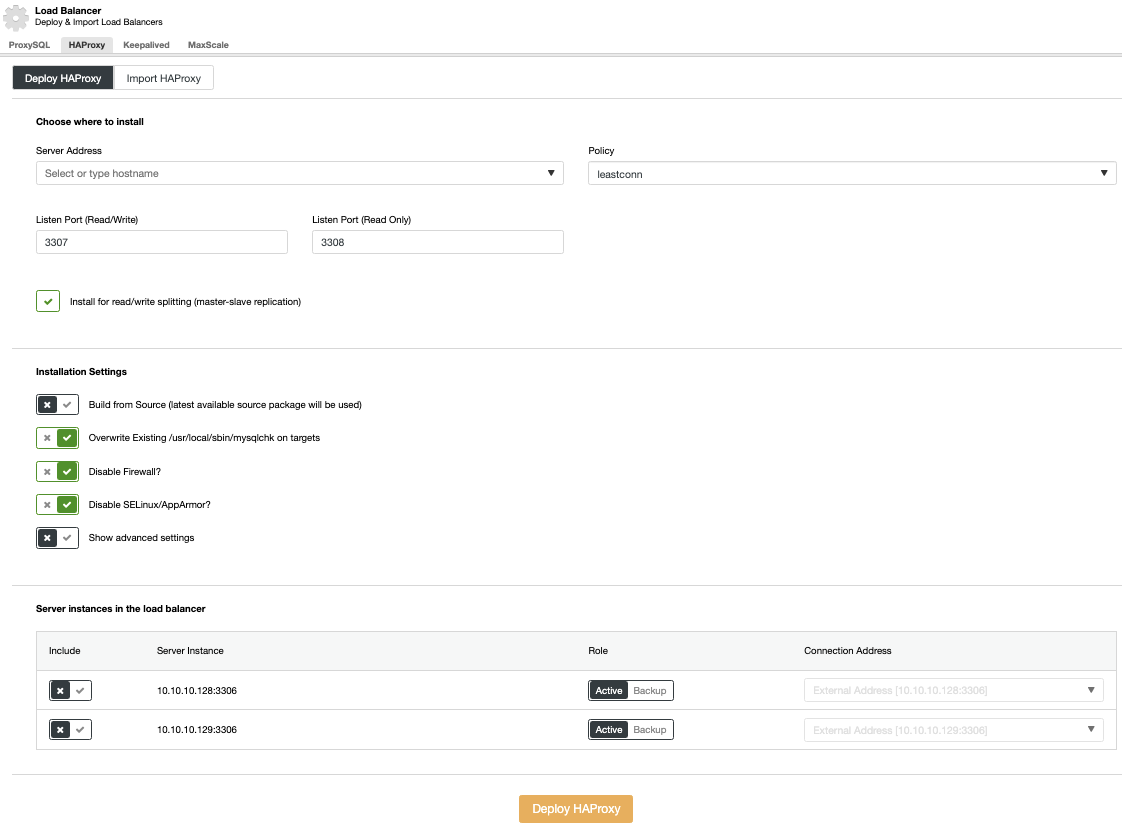
You only need to add IP or Hostname, Port, Policy, and the nodes you are going to use for load balancing. You can deploy it using two different ports (read/write and read-only), or you can use just one read/write port to send all the traffic there.
Keepalived Deployment
To perform a Keepalived deployment, select the option “Add Load Balancer” in the cluster actions and then, go to the Keepalived Tab.

Here, select the HAProxy nodes, and specify the Virtual IP Address that will be used to access the database.
Now, let’s connect this environment to the Chamilo application.
Chamilo Database Configuration
During the Chamilo deployment, in the step 4, you will need to add the database configuration.
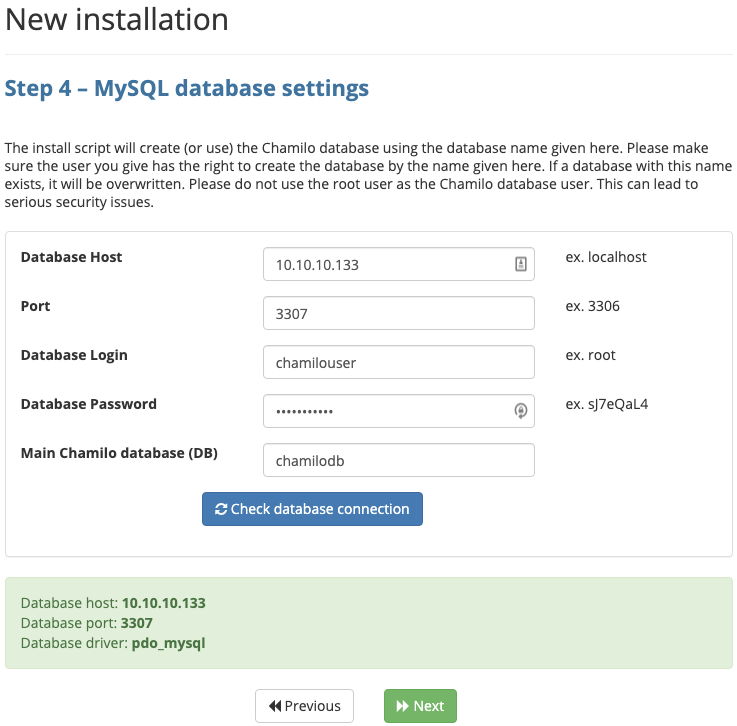
Here you should use the Virtual IP address to access your MariaDB Database, and the database credentials.
For more details about the Chamilo configuration your can refer to the Official Documentation.
That’s it! You have your Chamilo Application using a MariaDB Database with High Availability.
ClusterControl Autorecovery Feature
In case of failure, ClusterControl will promote the most advanced slave node to master as well as notify you of the problem. It also fails over the rest of the slave nodes to replicate from the new master server.
By default, HAProxy is configured with two different ports: read-write and read-only. In the read-write port, you have your master node as online and the rest of the nodes as offline, and in the read-only port, you have both the master and the slave nodes online.
When HAProxy detects that one of your nodes is not accessible, it automatically marks it as offline and does not take it into account for sending traffic to it. Detection is done by health check scripts that are configured by ClusterControl at the time of deployment. These check whether the instances are up, whether they are undergoing recovery, or are read-only.
When ClusterControl promotes a slave node, HAProxy marks the old master as offline for both ports and puts the promoted node online in the read-write port.
If your active HAProxy, which is assigned a Virtual IP Address to which your systems connect, fails, Keepalived migrates this IP Address to your passive HAProxy automatically. This means that your systems are then able to continue to function normally.
MariaDB Database Deployment using the ClusterControl CLI
If you prefer to deploy the MariaDB Cluster using command-line, you can use the ClusterControl command-line client tool called “s9s”. This tool will send a deployment job to the ClusterControl server and it will perform all the necessary steps to deploy the cluster.
For example, you can run the following command on the ClusterControl server to create a MariaDB master-slave replication:
$ s9s cluster --create

--cluster-type=mysqlreplication

--nodes='10.10.10.136;10.10.10.137'

--vendor=mariadb

--provider-version='10.5'

--db-admin-passwd='root123'

--os-user=root

--os-key-file=/root/.ssh/id_rsa

--cluster-name='MariaDB1'

--log
You will see the job log in the console so you can monitor the deployment progress there, or you can also monitor the job progress from ClusterControl UI -> Activity -> Jobs. When it is finished you can see it listed in the ClusterControl UI.
Conclusion
In this blog, we mentioned some options to deploy a MariaDB Database for High Availability using ClusterControl and how to use it on a Chamilo LMS application.
We used a simple master-slave deployment adding load balancers to improve High Availability on this topology, but you can improve this environment even more by using a different approche like Galera+ProxySQL or a different combination of them.


