blog
The Easy Way to Deploy a MySQL Galera Cluster on AWS

ClusterControl 1.7.3 comes with a notable improvement in cloud integration. It is possible to deploy a MySQL and PostgreSQL replication cluster to the cloud, as well as automatically launch a cloud instance and scale out your database cluster by adding a new database node.
This blog post showcases how to easily deploy a Galera Cluster using ClusterControl on AWS. This new feature is part of the ClusterControl Community Edition, which comes with free deployment and monitoring features. This means that you can take advantage of this feature for no cost!
ClusterControl Database Cluster Architecture
The following diagram summarizes our overall database clusters architecture.
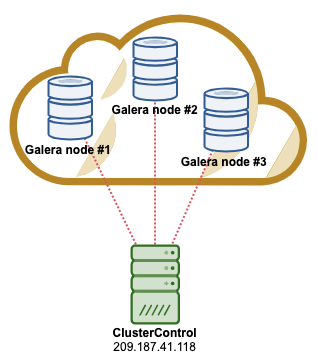
The ClusterControl server is located outside of the AWS infrastructure, allowing for fair visibility to our database cluster (located in Frankfurt: eu-central-1). The ClusterControl server MUST have a dedicated public IP address. This is because the IP address will be granted by ClusterControl on the database server and AWS security group. The Galera database version that we are going to deploy is MariaDB Cluster 10.3, using ClusterControl 1.7.3.
Preparing the AWS Environment
ClusterControl is able to deploy a database cluster on supported cloud platforms, namely AWS, Google Cloud Platform (GCP), and Microsoft Azure. The first thing we have to configure is to get the AWS access keys to allow ClusterControl to perform programmatic requests to AWS services. You could use the root account access key, but this is not the recommended way. It’s better to create a dedicated Identity and Access Management (IAM) user solely for this purpose.
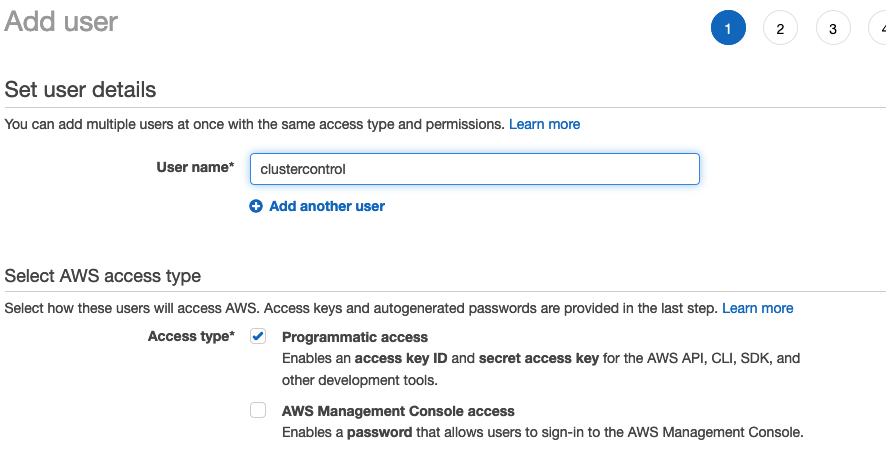
Login to your AWS Console -> My Security Credentials -> Users -> Add User. Specify the user and pick “Programmatic Access” as the Access Type:
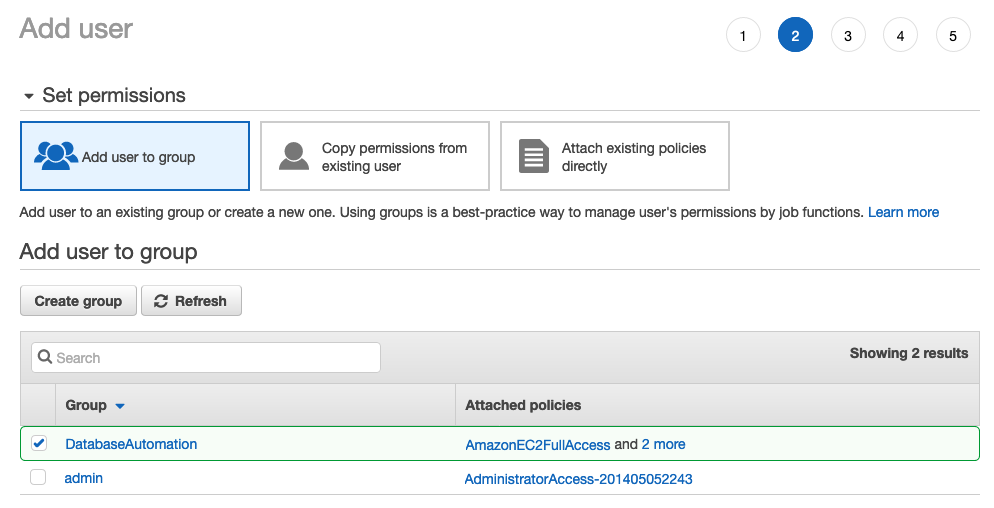
In the next page, create a new user group by clicking the “Create group” button and give the group name “DatabaseAutomation”. Assign the following access type:
- AmazonEC2FullAccess
- AmazonVPCFullAccess
- AmazonS3FullAccess (only if you plan to store the database backup on AWS S3)
Tick the DatabaseAutomation checkbox and click “Add user to group”:
Optionally, you can assign tags on the next page. Otherwise, just proceed to create the user. You should get the two most important things, Access key ID and Secret access key.
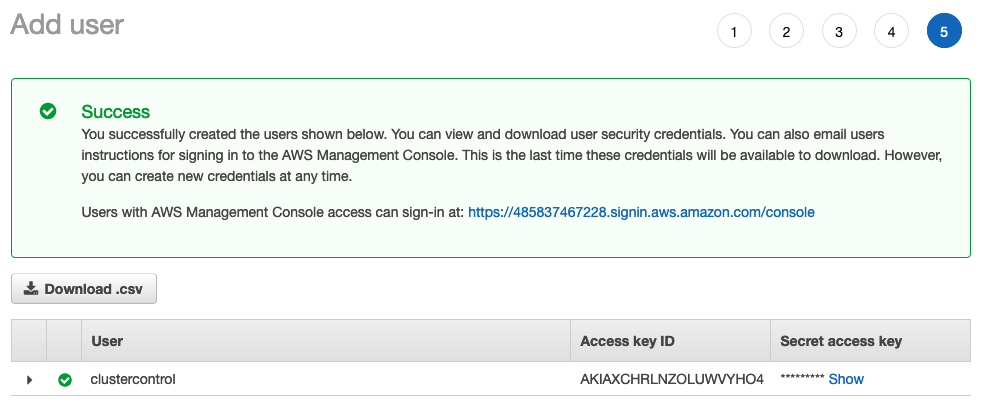
Download the CSV file and store it somewhere safe. We are now good to automate the deployment on cloud.
Install ClusterControl on the respective server:
$ whoami

root

$ wget https://severalnines.com/downloads/cmon/install-cc

$ chmod 755 install-cc

$ ./install-cc
Follow the installation instructions and go to http://192.168.0.11/clustercontrol and create the super admin user and password.
To allow ClusterControl to perform automatic deployment on cloud, one has to create cloud credentials for the selected region with a valid AWS key ID and secret. Go to Sidebar -> Integrations -> Cloud Providers -> Add your first Cloud Credential -> Amazon Web Services and enter the required details and choose Frankfurt as the default region:
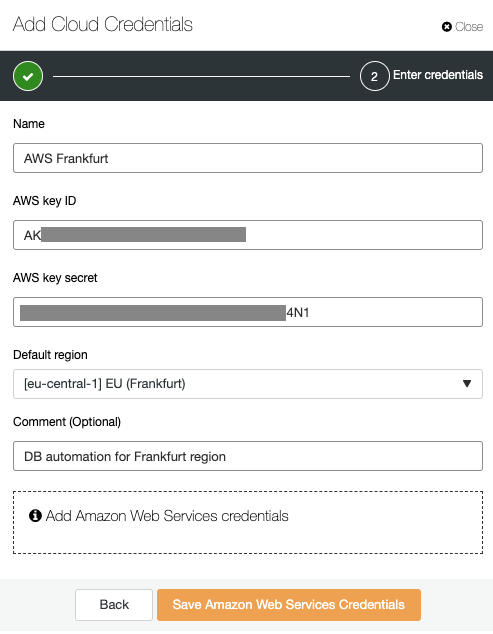
This credential will be used by ClusterControl to automate the cluster deployment and management. At this point, we are ready to deploy our first cluster.
Database Cluster Deployment
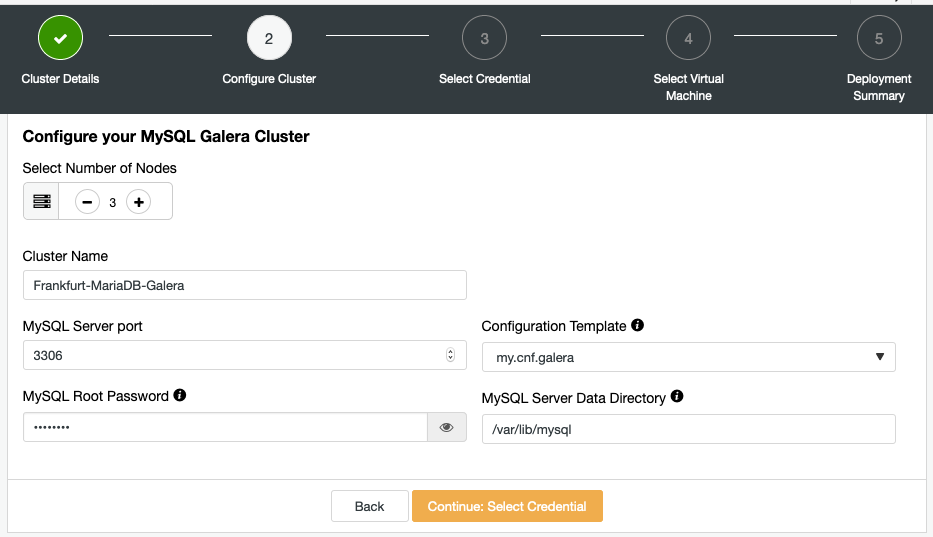
Go to Deploy -> Deploy in the Cloud -> MySQL Galera -> MariaDB 10.3 -> Configure Cluster to proceed to the next page.
Under Configure Cluster section, ensure the number of nodes is 3 and give a cluster name and MySQL root password:
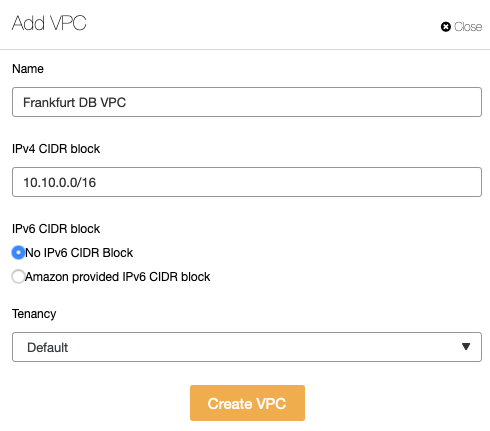
Under Select Credential, choose a credential called “AWS Frankfurt” and proceed to the next page by clicking “Select Virtual Machine”. Choose the preferred operating system and instance size. It’s recommended to run our infrastructure inside a private cloud so we could get a dedicated internal IP address for our cloud instances and the hosts are not directly exposed to the public network. Click “Add New” button next to Virtual Private Cloud (VPC) field and give a subnet of 10.10.0.0/16 to this network:
The VPC that we have created is a private cloud and does not have internet connectivity. In order for ClusterControl to be able to deploy and manage the hosts from outside AWS network, we have to allow internet connectivity to this VPC. To do this, we have to do the following:
- Create an internet gateway
- Add external routing to the route table
- Associate the subnet to the route table
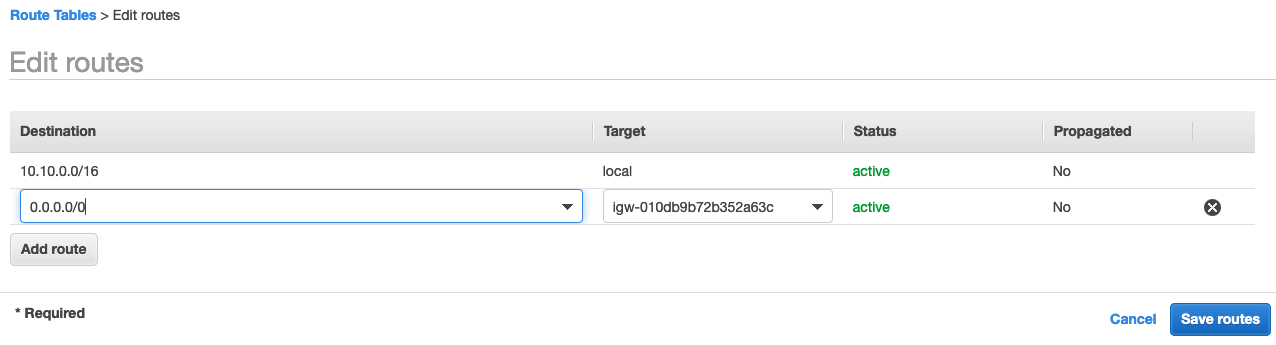
To create an internet gateway, login to AWS Management Console -> VPC -> Internet Gateways -> Create internet gateway -> assign a name for this gateway. Then select the created gateway from the list and go to Actions -> Attach to VPC -> select the VPC for the dropdown list -> Attach. We have now attach an internet gateway to the private cloud. However, we need to configure the network to forward all external requests via this internet gateway. Hence, we have to add a default route to the route table. Go to VPC -> Route Tables -> select the route table -> Edit Routes and specify the destination network, 0.0.0.0/0 and target (the created internet gateway ID) as below:
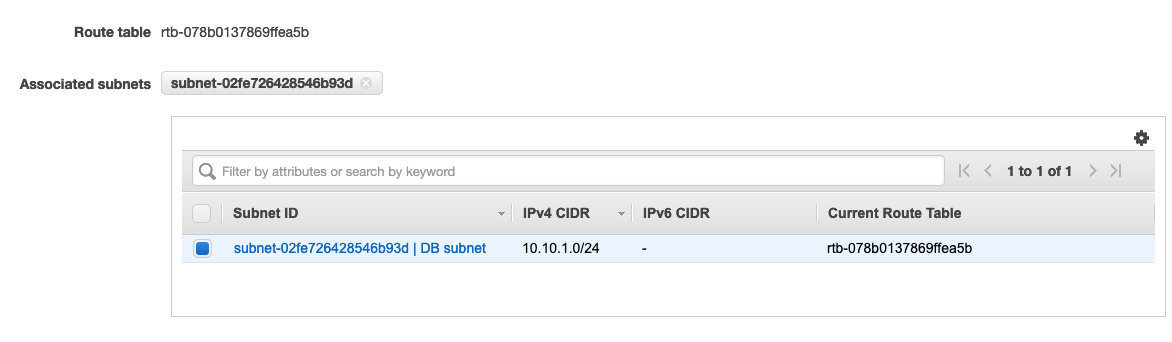
Then, we have to associate the DB subnet to this network so it assigns all instances created inside this network to the default route that we have created earlier, select the route table -> Edit Subnet Association -> assign the the DB subnet, as shown below:
The VPC is now ready to be used by ClusterControl for the deployment.
Once created, select the created VPC from the dropdown. For SSH Key, we will ask ClusterControl to auto generate it:
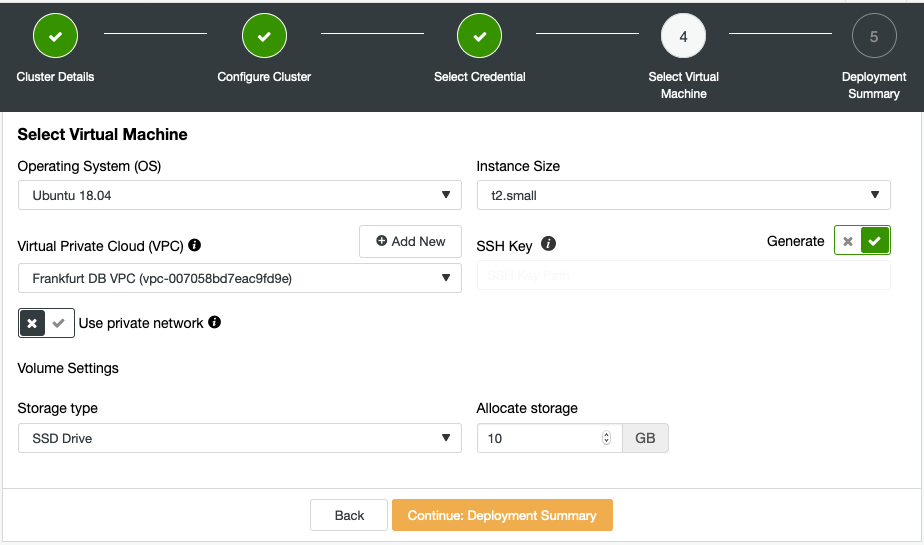
The generated SSH key will be located inside ClusterControl server under /var/lib/cmon/autogenerated_ssh_keys/s9s/ directory.
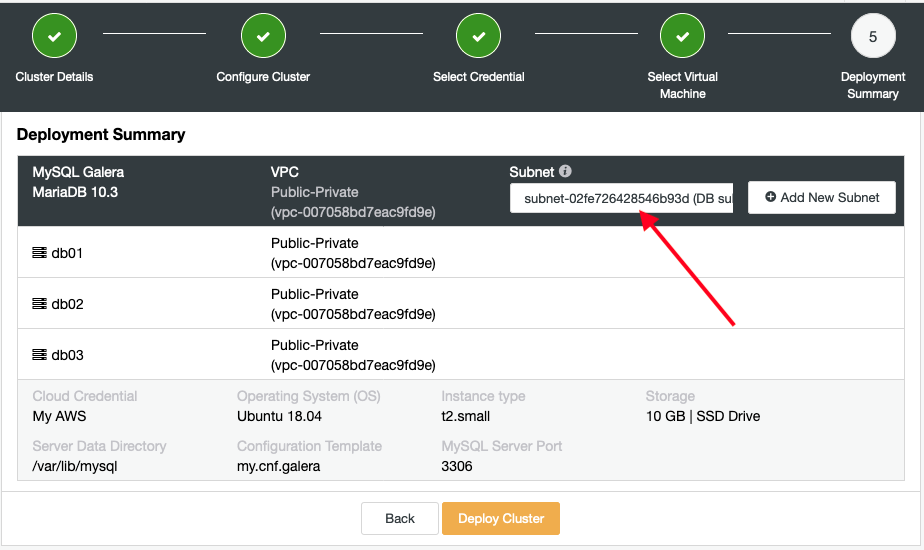
Click on “Deployment Summary”. In this page, we have to assign a subnet from the VPC to the database cluster. Since this is a new VPC, it has no subnet and we have to create a new one. Click on “Add New Subnet” button and assign 10.10.1.0/24 as the network for our database cluster:

Finally, select the create subnet in the textbox and click on “Deploy Cluster”:
You can monitor the job progress under Activity -> Jobs -> Create Cluster. ClusterControl will perform the necessary pre-installation steps like creating the cloud instances, security group, generating SSH key and so on, before the actual installation steps begin.
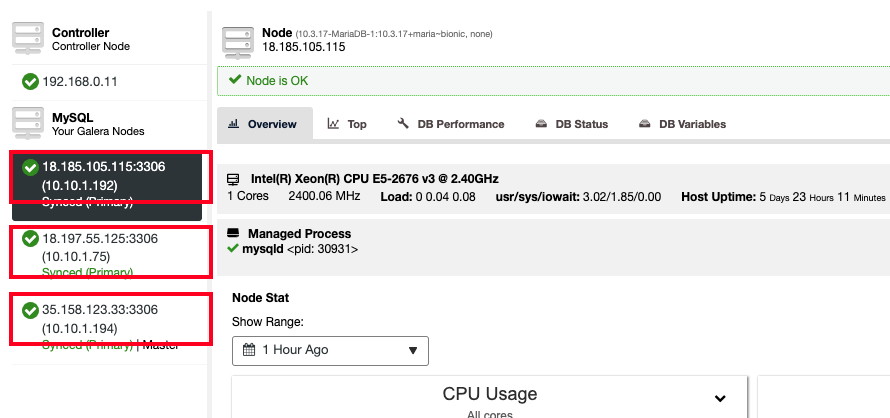
Once cluster is ready, you should see the following cluster in ClusterControl dashboard:

Our cluster deployment is now complete.
Post AWS Database Deployment
We can start loading our data into the cluster or create a new database for your application usage. To connect, simply instruct your applications or clients to connect to the private or public IP address of one of the database servers. You can get this information by going to Nodes page, as shown in the following screenshot:
If you like to access the database nodes directly, you can use ClusterControl web-SSH module at Node Actions -> SSH Console, which gives you a similar experience like connecting via SSH client.
To scale the cluster up by adding a database node, you can just go Cluster Actions (server stack icon) -> Add Node -> Add a DB node on a new cloud instance and you will be presented with the following dialog:
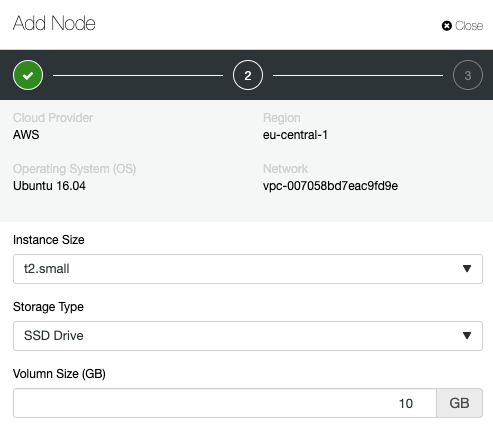
Just simply follow the deployment wizard and configure your new instance accordingly. Once the instance is created, ClusterControl will install, configure and join the node into the cluster automatically.
That’s it for now, folks. Happy clustering in the cloud!


