Whitepapers
MySQL replication for high availability

This white paper covers information about MySQL Replication, with information about the latest features introduced in 5.6, 5.7 and 8.0. There is also a more hands-on, practical section on how to quickly deploy and manage a replication setup using ClusterControl.
Content of the whitepaper
- Introduction
- What is MySQL replication
- Topology for MySQL replication
- Deploying a MySQL replication setup
- Connecting applications to the replication setup
- Failover with ClusterControl
- Managing your Mysql replication setup
- Issues and troubleshooting
1. Introduction
MySQL Replication is probably the most popular high availability solution for MySQL, and widely used by top web properties like Twitter and Facebook. Although easy to set up, ongoing maintenance like software upgrades, schema changes, topology changes, failover and recovery have always been tricky. At least until MySQL 5.6.
Fortunately, MySQL 5.6 brought a number of significant enhancements to Replication, including Global Transaction IDs, event checksums, multi-threaded slaves and crash-safe slaves/masters. Replication got even better with MySQL 5.7 and MySQL 8.0.
This tutorial covers basic information about MySQL Replication, with information about the features introduced in 5.6, 5.7 and 8.0. At the end, you should be able to answer questions like:
- How do I use GTID with replication?
- How do I recover my setup if my master fails?
- How do I upgrade the master and slave servers without downtime?
- How do I change my database schema across all servers?
- How do I handle slave lag?
- etc.
There is also a more hands-on, practical section on how to quickly deploy and manage a replication setup using ClusterControl. You would need 4 hosts/VMs if you plan on doing this.
2. What is MySQL Replication?
Replication enables data from one MySQL server (the master) to be replicated to one or more MySQL servers (the slaves). MySQL Replication is very easy to setup, and is used to scale out read workloads, provide high availability and geographic redundancy, and offload backups and analytic jobs.
2.1. Replication Scheme
There are currently two replication schemes supported by MySQL Replication:
- Asynchronous replication
- Semi-synchronous replication
There is no restriction in mixing replication schemes in the same topology. Both have their pros and cons. At the time of writing, there is no fully-synchronous solution for MySQL replication.
2.1.1. Asynchronous Replication
MySQL Replication by default is asynchronous. This is the oldest, most popular and widely deployed replication scheme. With asynchronous replication, the master writes events to its binary log and slaves request them when they are ready. There is no guarantee that any event will ever reach any slave. It’s a loosely coupled master-slave relationship, where:
- Master does not wait for Slave.
- Slave determines how much to read and from which point in the binary log.
- Slave can be arbitrarily behind master in reading or applying changes.
If the master crashes, transactions that it has committed might not have been transmitted to any slave. Consequently, failover from master to slave in this case may result in failover to a server that is missing transactions relative to the master.
Asynchronous replication provides lower write latency, since a write is acknowledged locally by a master before being written to slaves. It is great for read scaling as adding more replicas does not impact replication latency. Good use cases for asynchronous replication include deployment of read replicas for read scaling, live backup copy for disaster recovery and analytics/reporting.
2.1.2. Semi-Synchronous Replication
MySQL also supports semi-synchronous replication, where the master does not confirm transactions to the client until at least one slave has copied the change to its relay log, and flushed it to disk. To enable semi-synchronous replication, extra steps for plugin installation are required, and must be enabled on the designated MySQL master and slave.
Semi-synchronous seems to be good and practical solution for many cases where high availability and no data-loss is important. But you should consider that semi-synchronous has a performance impact due to the additional round trip and does not provide strong guarantees against data loss. When a commit returns successfully, it is known that the data exists in at least two places (on the master and at least one slave). If the master commits but a crash occurs while the master is waiting for acknowledgment from a slave, it is possible that the transaction may not have reached any slave. This is not that big of an issue as the commit will not be returned to the application in this case. It is the application’s task to retry the transaction in the future. What is important to keep in mind is that, when the master failed and a slave has been promoted, the old master cannot join the replication chain. Under some circumstances this may lead to conflicts with data on the slaves (when master crashed after the slave received the binary log event but before master got the acknowledgement from the slave). Thus the only safe way is to discard the data on the old master and provision it from scratch using the data from the newly promoted master.
A good use case for semi-synchronous replication is a backup master to reduce the impact of a master failure by minimizing the risk of data loss. We’ll explain this in detail under ‘Chapter 3 – Topology for MySQL Replication’.
2.2. Global Transaction Identifier (GTID)
Global Transaction Identifiers (GTID) was introduced in MySQL 5.6. GTID is a unique identifier created and associated with each transaction committed on the server of origin (master). This identifier is unique not only to the server on which it originated, but is unique across all servers in a given replication setup. There is a one-to-one mapping between all transactions and all GTIDs. Note that MySQL and MariaDB have different GTID implementation, as we’ll explain further down.
2.2.1. Replication in MySQL 5.5 and Earlier
In MySQL 5.5, resuming a broken replication setup required you to determine the last binary log file and position, which are distinct on nodes if binary logging is enabled. If the MySQL master fails, replication breaks and the slave will need to switch to another master. You will need to promote the most updated slave node to be a master, and manually determine a new binary log file and position of the last transaction executed by the slave. Another option is to dump the data from the new master node, restore it on slave and start replication with the new master node. These options are of course doable, but not very practical in production.
2.2.2. How GTID Solves the Problem
GTID (Global Transaction Identifier) provides a better transactions mapping across nodes. In MySQL 5.5. or before, Replication works in such a way that all nodes will generate different binlog files. Binlog events are the same and in the same order, but binlog file offsets may vary. With GTID, slaves can see a unique transaction coming in from several masters and this can easily be mapped into the slave execution list if it needs to restart or resume replication.
Every transaction has a unique identifier which identifies it in the same way on every server. It’s not important anymore in which binary log position a transaction was recorded, all you need to know is the GTID: ‘966073f3-b6a4-11e4-af2c-080027880ca6:4’. GTID is built from two parts – the unique identifier of a server where a transaction was first executed, and a sequence number. In the above example, we can see that the transaction was executed by the server with server_uuid of ‘966073f3-b6a4-11e4-af2c-080027880ca6’ and it’s 4th transaction executed there. This information is enough to perform complex topology changes – MySQL knows which transactions have been executed and therefore it knows which transactions need to be executed next. Forget about binary logs, it’s now all in the GTID.
All necessary information for synchronizing with the master can be obtained directly from the replication stream. When you are using GTIDs for replication, you do not need to include MASTER_LOG_FILE or MASTER_LOG_POS options in the CHANGE MASTER TO statement; instead, it is necessary only to enable the MASTER_AUTO_POSITION option.
2.2.3. MariaDB GTID vs MySQL GTID
MariaDB has a different implementation of Global Transaction ID (GTID), and is enabled by default starting from MariaDB 10.0.2. A MariaDB GTID consists of three separated values:
- Domain ID – Replication domain. A replication domain is a server or group of servers that generate a single, strictly ordered replication stream.
- Server ID – Server identifier number to enable master and slave servers to identify themselves uniquely.
- Event Group ID – A sequence number for a collection of events that are always applied as a unit. Every binlog event group (eg. transaction, DDL, non-transactional statement) is annotated with its GTID.
The figure below illustrates the differences between the two GTIDs:

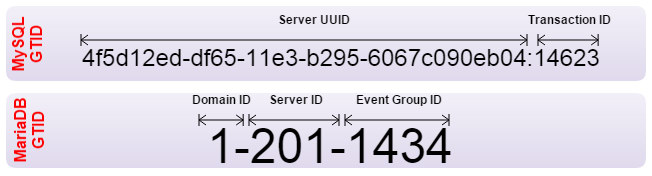
In MariaDB, there is no special configuration needed on the server to start using GTID. Some of MariaDB GTID advantages:
- It is easy to identify which server or domain the event group is originating from.
- You do not necessarily need to turn on binary logging on slaves.
- It allows multi-source replication with distinct domain ID.
- Enabling GTID features is dynamic, you don’t have to restart the MariaDB server.
- The state of the slave is recorded in a crash-safe way.
Despite the differences between these two, it is still possible to replicate from MySQL 5.6 to MariaDB 10.0 or vice versa. However, you will not be able to use the GTID features to automatically pick the correct binlog position when switching to a new master. Old-style MySQL replication will work.
Further reading can be found at MariaDB GTID and MySQL GTID documentation page.
2.3. Multi-Threaded Slave
MySQL 5.6 allows you to execute replicated events in parallel as long as data is split across several databases. This feature is named “Multi-Threaded Slave” (MTS) and it is easy to enable by setting slave_parallel_workers to a > 1 value. In MySQL 5.7, it can now be used for any workload, including intra-schema, unlike 5.6 where it could only be applied with one thread per schema. MySQL 8.0 introduced write-sets, which allows for even better parallelization of applying binary log events.
2.4. Crash-Safe Slave
Crash safe means even if a slave mysqld/OS crash, you can recover the slave and continue replication without restoring MySQL databases onto the slave. To make crash safe slave work, you have to use InnoDB storage engine only, and in 5.6 you need to set relay_log_info_repository=TABLE and relay_log_recovery=1.
Durability (sync_binlog = 1 and innodb_flush_log_at_trx_commit = 1) is NOT required.
2.5. Group Commit
InnoDB, like any other ACID-compliant database engine, flushes the redo log of a transaction before it is committed. InnoDB uses group commit functionality to group multiple such flush requests together to avoid one flush for each commit. With group commit, InnoDB issues a single write to the log file to perform the commit action for multiple user transactions that commit at about the same time, significantly improving throughput.
3. Topology for MySQL Replication
3.1. Master with Slaves (Single Replication)
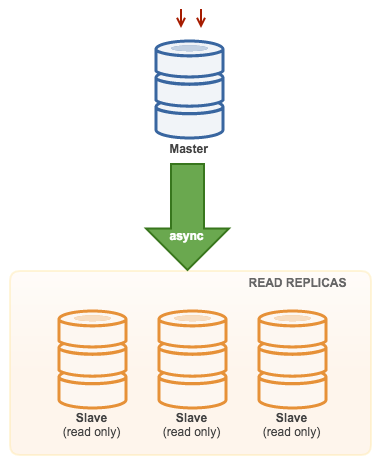
This the most straightforward MySQL replication topology. One master receives writes, one or more slaves replicate from the same master via asynchronous or semi-synchronous replication. If the designated master goes down, the most up-to-date slave must be promoted as new master. The remaining slaves resume the replication from the new master.
3.2. Master with Relay Slaves (Chain Replication)
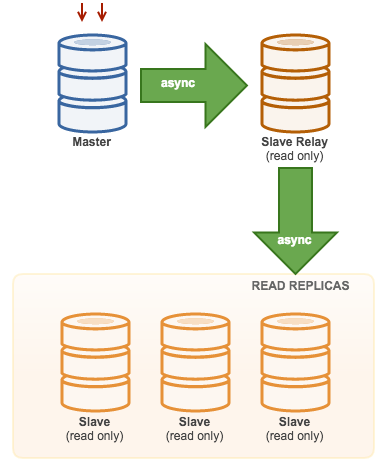
This setup use an intermediate master to act as a relay to the other slaves in the replication chain. When there are many slaves connected to a master, the network interface of the master can get overloaded. This topology allows the read replicas to pull the replication stream from the relay server to offload the master server. On the slave relay server, binary logging and log_slave_updates must be enabled, whereby updates received by the slave server from the master server are logged to the slave’s own binary log.
Using slave relay has its problems:
- log_slave_updates has some performance penalty.
- Replication lag on the slave relay server will generate delay on all of its slaves.
- Rogue transactions on the slave relay server will infect of all its slaves.
- If a slave relay server fails and you are not using GTID, all of its slaves stop replicating and they need to be reinitialized.
3.3. Master with Active Master (Circular Replication)
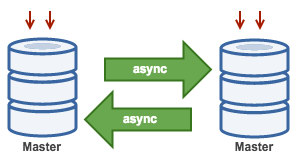
Also known as ring topology, this setup requires two or more MySQL servers which act as master. All masters receive writes and generate binlogs with a few caveats:
- You need to set auto-increment offset on each server to avoid primary key collisions.
- There is no conflict resolution.
- MySQL Replication currently does not support any locking protocol between master and slave to guarantee the atomicity of a distributed update across two different servers.
- Common practice is to only write to one master and the other master acts as a hot-standby node. Still, if you have slaves below that tier, you have to switch to the new master manually if the designated master fails.
You can deploy this topology with ClusterControl 1.4 and later. Previously, ClusterControl would raise an alarm because two or more masters were currently running. One master will be configured as read-only while the other is writable. However, locking and conflict resolution need to be handled by the application itself. ClusterControl does not support two writable masters in a replication setup, one of those two masters has to be in read_only mode.
3.4. Master with Backup Master (Multiple Replication)
The master pushes changes to a backup master and to one or more slaves. Semi-synchronous replication is used between master and backup master. Master sends update to backup master and waits with transaction commit. Backup master gets update, writes to its relay log and flushes to disk. Backup master then acknowledges receipt of the transaction to the master, and proceeds with transaction commit. Semi-sync replication has a performance impact, but the risk for data loss is minimized.
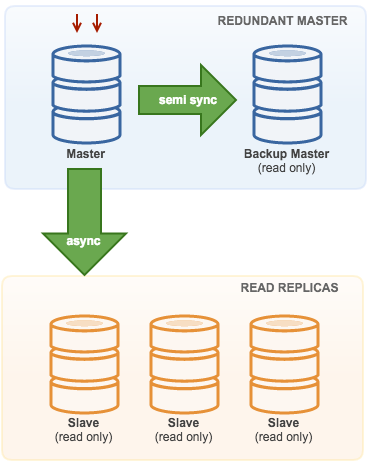
This topology works well when performing master failover in case the master goes down. The backup master acts as a warm-standby server as it has the highest probability of having up-to-date data when compared to other slaves.
3.5. Multiple Masters to Single Slave (Multi-Source Replication)
Multi-Source Replication enables a replication slave to receive transactions from multiple sources simultaneously. Multi-source replication can be used to backup multiple servers to a single server, to merge table shards, and consolidate data from multiple servers to a single server.
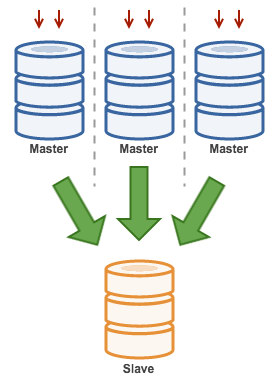
MySQL and MariaDB have different implementations of multi-source replication, where MariaDB must have GTID with gtid-domain-id configured to distinguish the originating transactions while MySQL uses a separate replication channel for each master the slave replicates from. In MySQL, masters in a multi-source replication topology can be configured to use either global transaction identifier (GTID) based replication, or binary log position-based replication.
More on MariaDB multi source replication can be found in this blog post. For MySQL, please refer to the MySQL documentation.
3.6. Galera with Replication Slave (Hybrid Replication)
Hybrid replication is a combination of MySQL asynchronous replication and virtually synchronous replication provided by Galera. The deployment is now simplified with the implementation of GTID in MySQL replication, where setting up and performing master failover has become a straightforward process on the slave side.

Galera cluster performance is as fast as the slowest node. Having an asynchronous replication slave can minimize the impact on the cluster if you send long-running reporting/OLAP type queries to the slave, or if you perform heavy jobs that require locks like mysqldump. The slave can also serve as a live backup for onsite and offsite disaster recovery.
Hybrid replication is supported by ClusterControl and you can deploy it directly from the ClusterControl UI. For more information on how to do this, please read the blog posts – Hybrid replication with MySQL 5.6 and Hybrid replication with MariaDB 10.x.
4. Deploying a MySQL Replication Setup
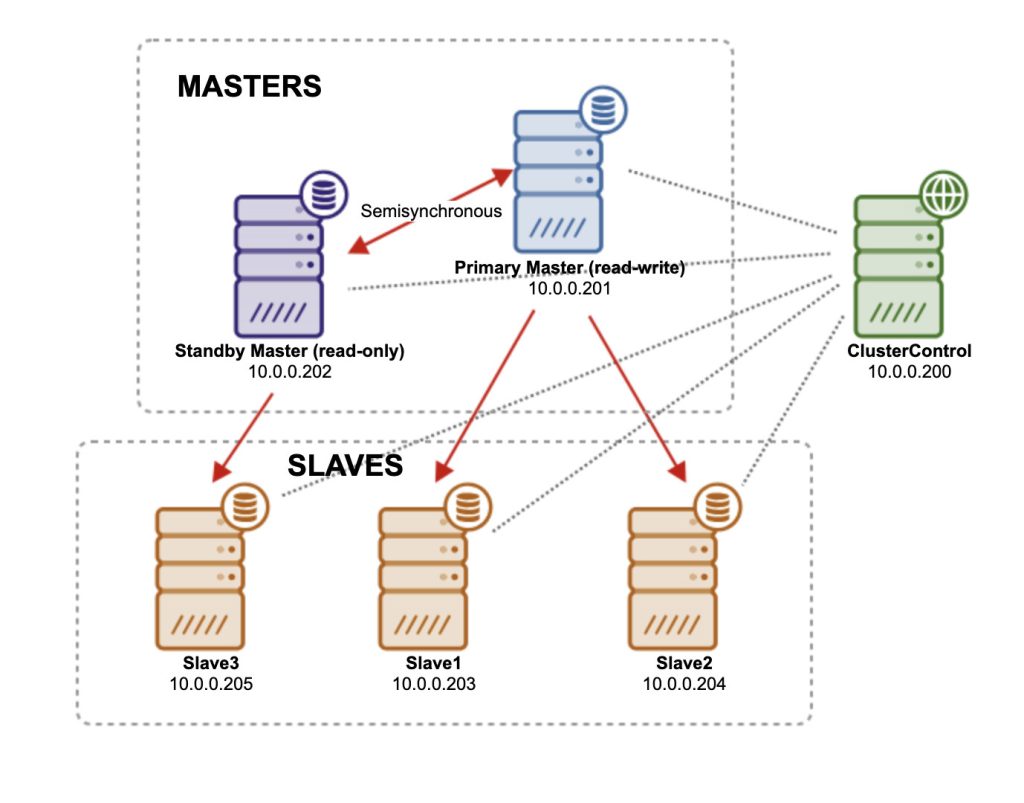
We’ll now deploy a MySQL replication topology consisting of one master, one backup master (read-only) and two slaves, using ClusterControl. Our architecture is illustrated below:
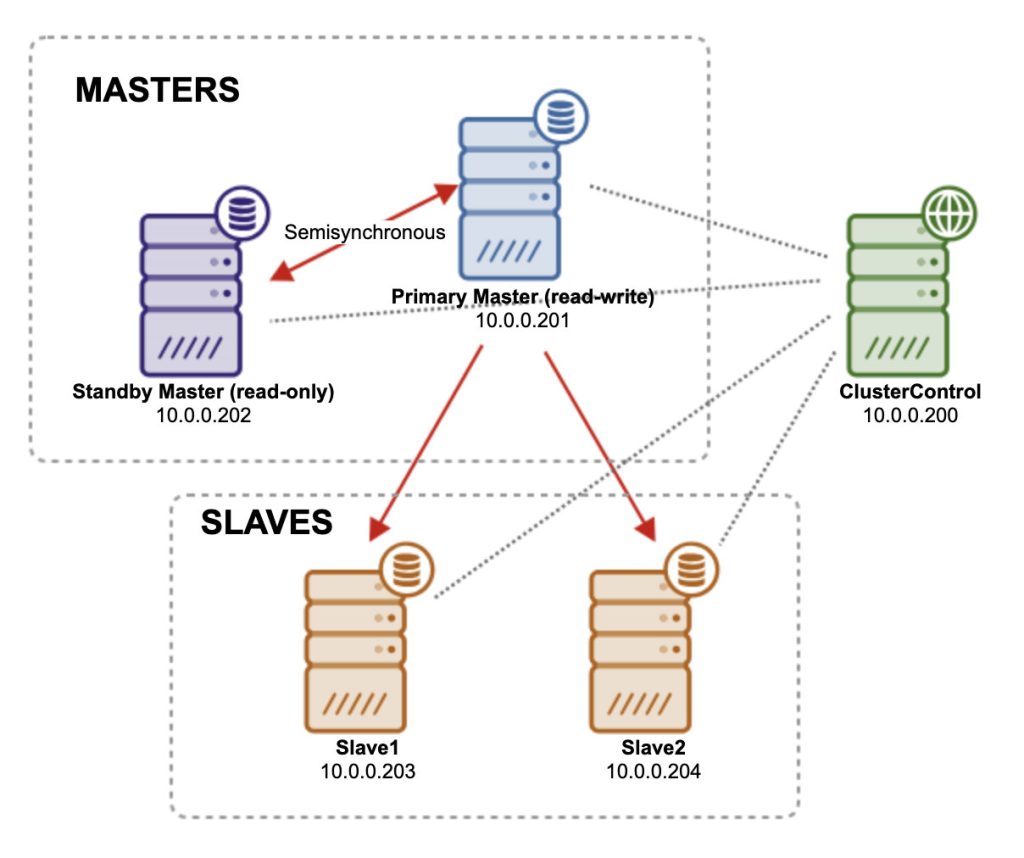
Install ClusterControl by following the instructions laid out in the ClusterControl installation instructions documentation page. Do not forget to setup passwordless SSH from ClusterControl to all nodes (including the ClusterControl node itself). We are going to use root user for deployment. On ClusterControl node, run:
$ ssh-keygen -t rsa
$ ssh-copy-id 10.0.0.200 # clustercontrol
$ ssh-copy-id 10.0.0.201 # master
$ ssh-copy-id 10.0.0.202 # backup-master
$ ssh-copy-id 10.0.0.203 # slave1
$ ssh-copy-id 10.0.0.204 # slave2
Open the ClusterControl UI, go to the ‘Create Database Node’ and open the ‘MySQL Replication’ tab. In the dialog, there are 3 tabs to be filled up, as shown in the following screenshots.
4.1. General and SSH Settings
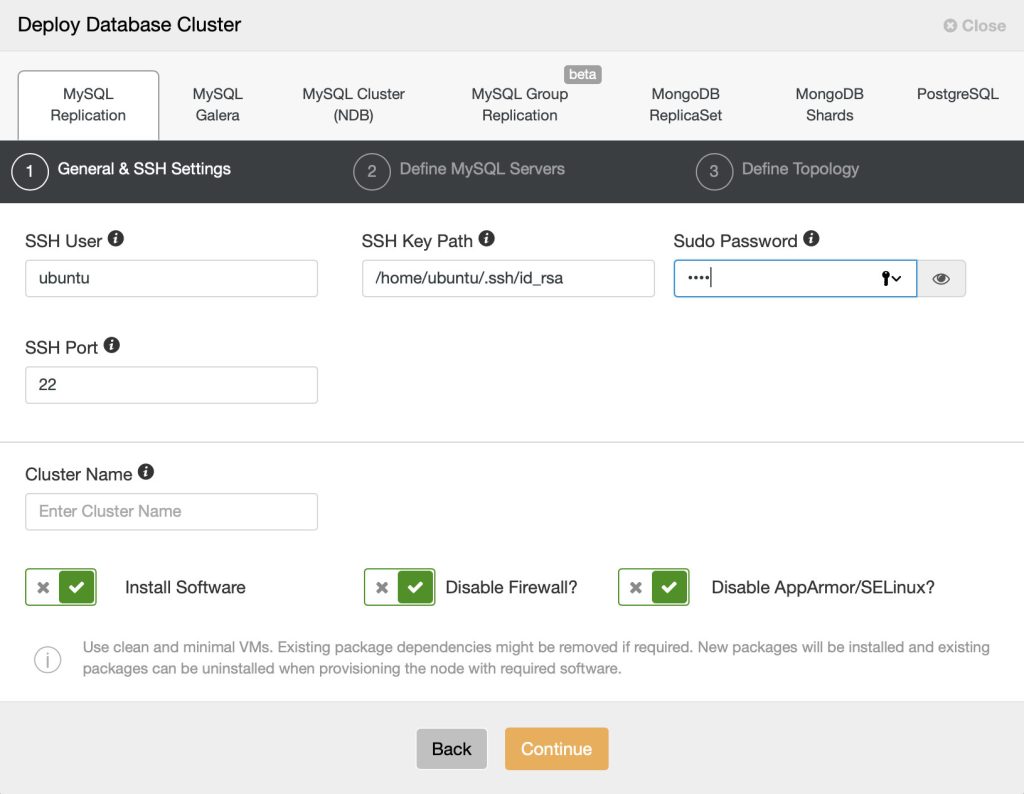
Under “General & SSH Settings”, specify the required information:
- SSH User – Specify the SSH user the ClusterControl will use to connect to the target host.
- SSH Key Path – Passwordless SSH requires an SSH key. Specify the physical path to the key file here.
- Sudo Password – Sudo password if the sudo user use password to escalate privileges. Otherwise, leave it blank.
- SSH Port Number – Self-explanatory. Default is 22.
- Cluster Name – Cluster name after deployed by ClusterControl.
Keep the checkboxes as default so ClusterControl installs the software and configures the security options accordingly. If you would like to keep the firewall settings, uncheck the “Disable Firewall” however make sure MySQL related ports are opened before the deployment begins, as shown in this documentation page.
4.2. Define the MySQL Servers
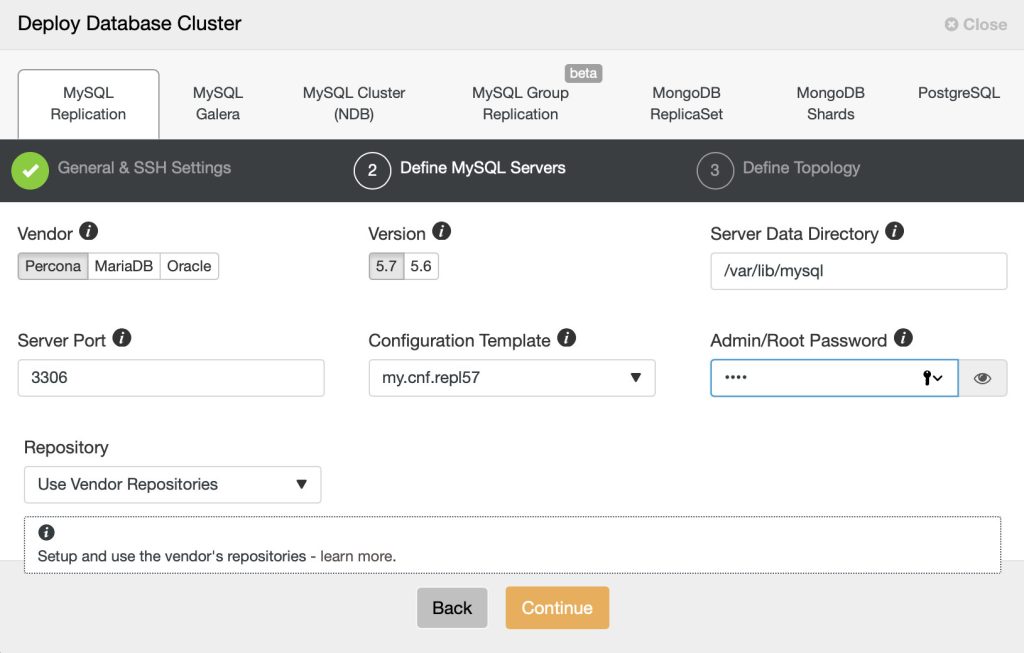
Move on the next tab, defined the MySQL Servers installation and configuration options:
- Vendor – Currently supported vendor is Percona Server, MariaDB and Oracle.
- Version – MySQL major version. Version 5.7 (Oracle/Percona) or 10.3 (MariaDB) is recommended.
- Server Data Directory – The physical location of MySQL data directory. Default is /var/lib/mysql.
- Server Port – MySQL server port. Default is 3306.
- My.cnf Template – MySQL configuration template. Leave it empty to use the default template located under /usr/share/cmon/templates. For MySQL 5.7, ClusterControl will use my.cnf.repl57 for MySQL 5.7, my.cnf.gtid_replication for MySQL 5.6 and my.cnf.replication for MySQL 5.5.
- Root Password – MySQL root password. ClusterControl will set this up for you.
- Repository – Choose the default value is recommended, unless if you want to use existing repositories on the database nodes. You can also choose “Create New Repository” to create and mirror the current database vendor’s repository and then deploy using the local mirrored repository.
Replication user and password will be generated automatically by ClusterControl. You can retrieve them later inside the generated CMON configuration file for the corresponding cluster.
4.3. Define Topology
Here you can define what kind of MySQL Replication topology you want. The interface allows a number of replication topologies to be deployed like multi master, backup master and chain replication. Please refer to the Topology for MySQL Replication features for more details.

- IP/Hostname – Specify the IP address or hostname of the target hosts. In this dialog, you can define the topology of the standard master-slave or multi-master replication. For multi-master replication, Master A will be the writer while Master B will be started as read-only. ClusterControl must able to reach the specified server through passwordless SSH. If ClusterControl won’t be able to connect to the host, an error will be shown here pointing towards the root cause.
After we have filled in the required information, click on ‘Deploy’ to start the deployment. ClusterControl will deploy the replication cluster according to the topology. Starting from ClusterControl v1.4, new MySQL Replication deployment will be configured with semi-synchronous replication scheme to reduce the chance of data loss. Details on this scheme is explained in this chapter, What is MySQL Replication.
You can monitor the deployment progress from the Activity (top menu) under Jobs tab. Pick the “Create Cluster” and click “Full Job Details” dialog when you click on the spinning arrow icon on the top menu:
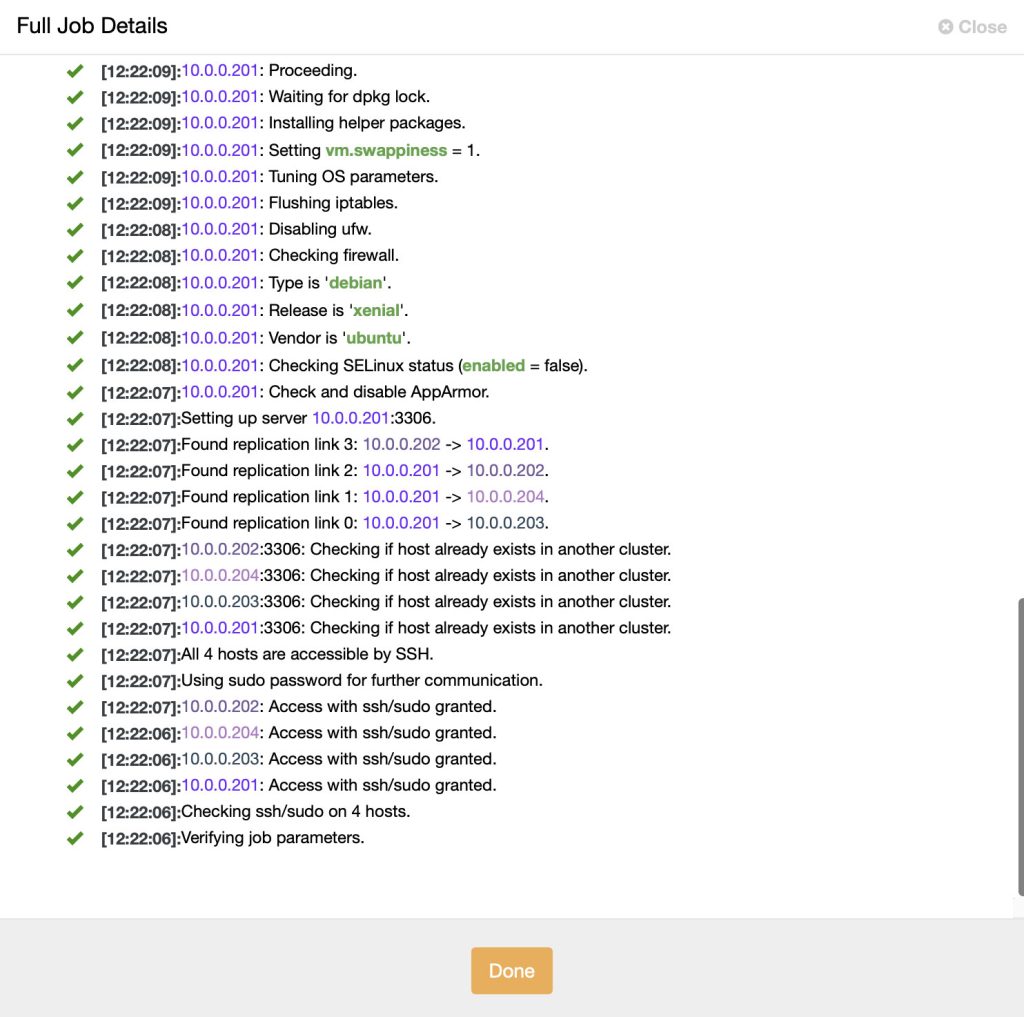
ClusterControl performs the following tasks:
- Verifies SSH connectivity.
- Installs the specified MySQL Server.
- Creates datadir and installs system tables.
- Creates/grants the mysql user for MySQL Server.
- Grants CMON user from the ClusterControl server.
- Configures replication role for MySQL (master/slave).
- Verifies the deployment.
- Registers the node with the ClusterControl server.
The MySQL Replication cluster is now deployed.
4.4. Scaling Out
Using replication for scale-out works best in an environment where you have a high number of reads and low number of writes/updates. Web applications tend to be more read-intensive than write-intensive. Read requests can be load-balanced across more slaves.
To scale out by adding more read copies, go to ClusterControl > select the database cluster > Actions > Add Node > Create and add a new DB Node and enter the relevant information for the slave:
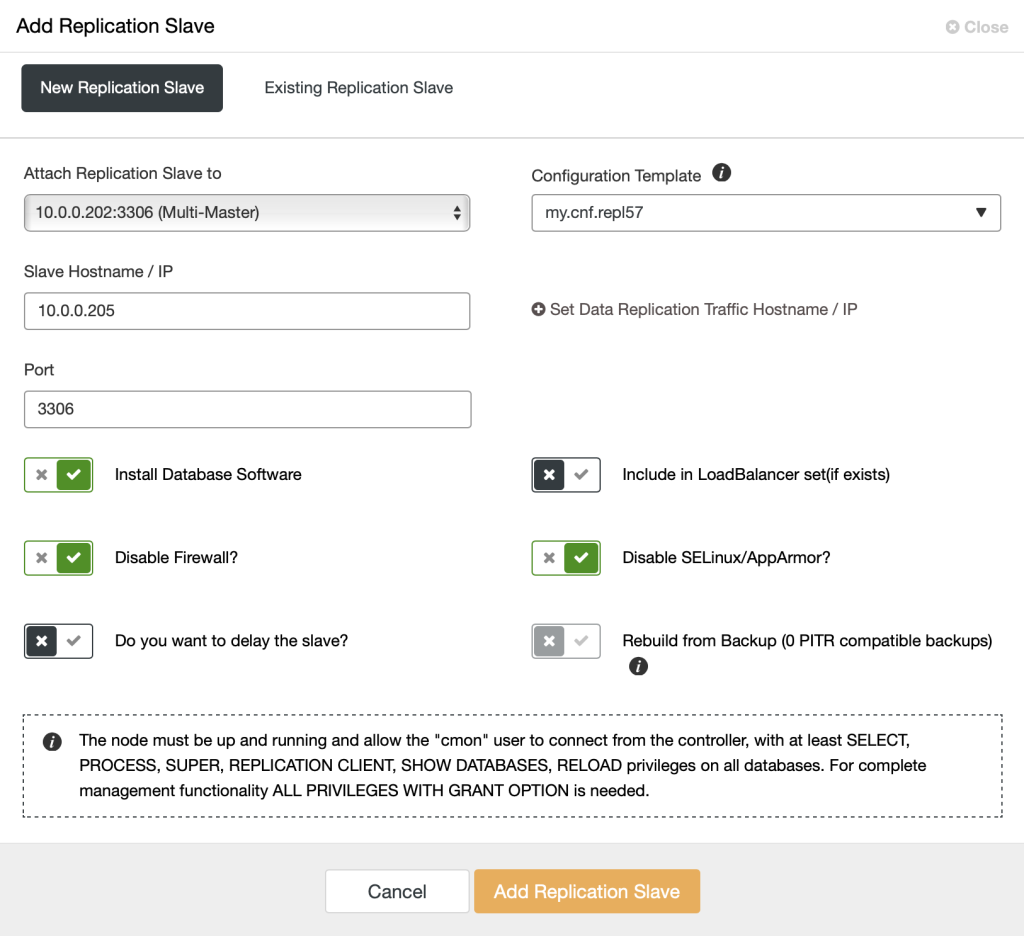
ClusterControl supports adding a replication chain under any of the running slaves thanks to the GTID implementation. A big advantage of chaining replication is that it will not add overhead to the master server. You can decide whether the slave has lower priority so it can be under a specific slave. In this example, we are going to add a new server as slave (10.0.0.205) replicating from one of the available slaves (10.0.0.202). There are also options to include the node as part of the load balancing set or you can configure it as a delayed slave. You can also use one of the backups to provision this new slave instead of copying the data directly from its master.
Click ‘Add Node’. Monitor the progress at ClusterControl > Activity > Jobs > choose the ‘Adding a Replication Slave’ job > Full Job Details and you should see something like below:
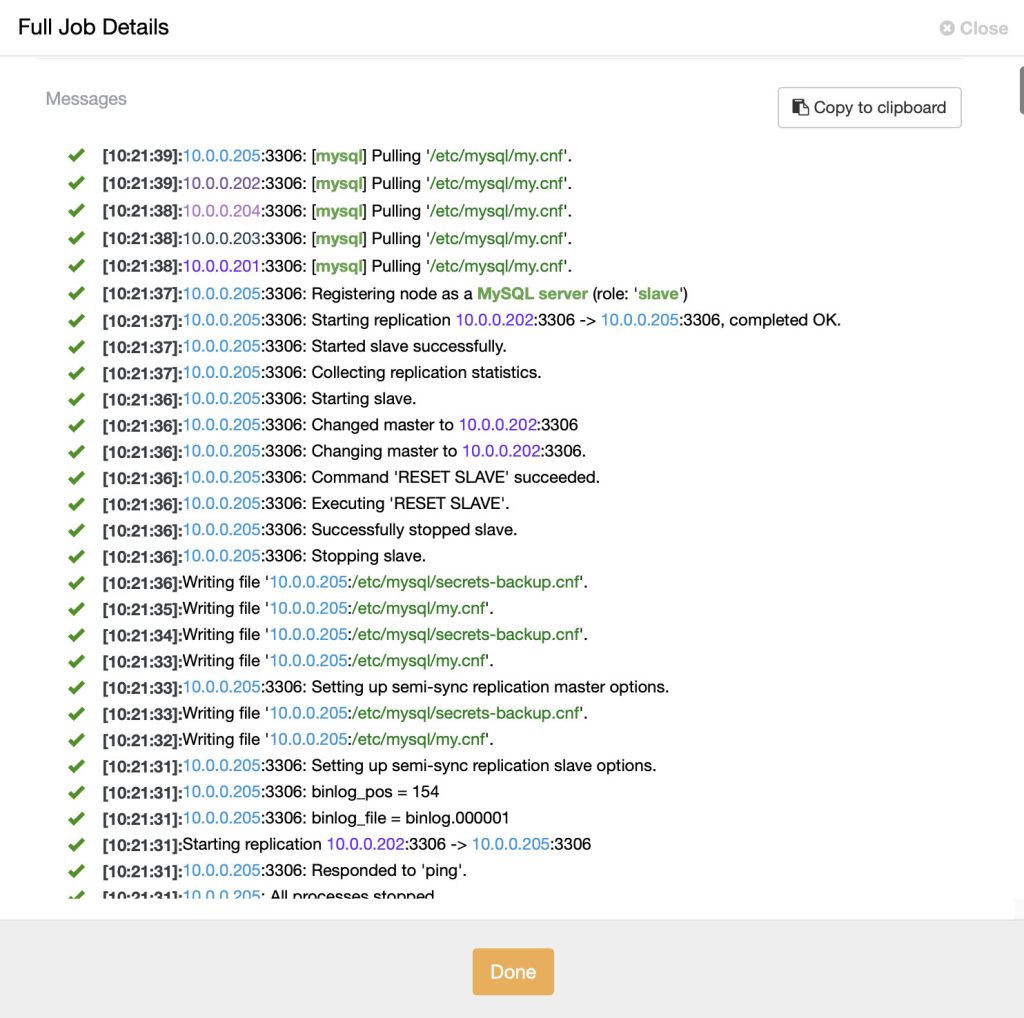
ClusterControl performs the following tasks when creating a new slave:
- Verifies SSH connectivity.
- Installs the same MySQL Server major version as the master from repository.
- Creates datadir and installs system tables.
- Creates/grants the mysql user for MySQL Server.
- Grants CMON user from the ClusterControl server.
- Stages the data on slave from the selected master.
- Configures replication role for MySQL slave with GTID.
- Starts the replication.
- Verifies the deployment.
- Registers the node under the corresponding “cluster ID” in the ClusterControl server.
- Updating the balancing set on load balancer.
We can see from the status that the replication between 10.0.0.202 and slave2 is started and the deployment status returned “completed OK”. At this point, slave3 is replicating from slave2 and our architecture is now looking like this:
At the end of it, you will see the summary of the replication from the Overview page.

You can also confirm the topology in the Topology View:
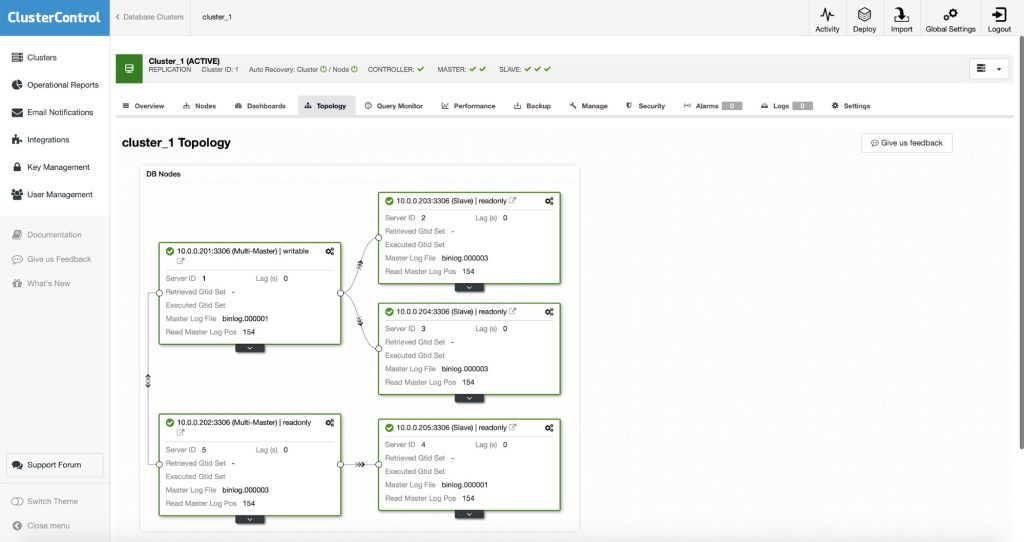
We have now scaled out our MySQL Replication setup.
5. Connecting Application to the Replication Setup
By now, we should have a MySQL replication setup ready. The next thing is to import an existing database or to create a brand new database for a new application. When designing or deploying your application, just bear in mind that all write operations (statement/query that change the state of a database) must be executed ONLY on the master server. Example of write operations are statements that contain the following:
- DDL – CREATE, ALTER, DROP, TRUNCATE, RENAME
- DML – INSERT, DELETE, UPDATE, REPLACE
- DCL – GRANT, REVOKE
Read operations can be executed on any of the servers in the replication setup. Slaves should therefore be started in read-only mode. Applications will not be able to modify data directly on the slaves, but the replication stream will still be able to update data on the read-only server.
In simple words, your application must be able to send writes to the master server and reads to the slave servers. If your application is not able to do this, you can use other options like application connectors or load balancers that support query routing with read-write split to minimize the changes on the application side.
5.1. Application Connector
If your application runs on PHP, you can use MySQL native driver (mysqlnd) to perform read/write splitting without big changes on the application side. Java users can use ConnectorJ to do read/write splitting with some minor changes on the coding side. Since the connector itself performs the routing, the extra network latency involved in proxy-based solutions is avoided.
One of the major drawbacks with the application connector is you have to maintain it on each of the application servers. For example, if a slave has been promoted as a new master, a new configuration must be updated on every application server. Having another tier that manages database availability is recommended. This is where a reverse proxy aka load balancer comes in handy.
We have covered some examples on read-write splitting in the following blog posts:
- Read-Write Splitting with PHP mysqlnd, MySQL Replication and HAProxy
- Read-Write Splitting with ConnectorJ, MySQL Replication and HAproxy
5.2. Fabric-Aware Connector
Oracle released MySQL Fabric, an extensible framework for managing farms of MySQL Servers. At the time of writing, it supports two main category of features – High Availability and scaling out using data sharding. For High Availability, MySQL Fabric manages the replication relationships, detects the failure of the master and automatically promotes one of the slaves to be the new master. As for sharding, the admin can define how data is partitioned between shards – e.g., which table columns are to be used as shard keys, and how to map the keys to the correct shard (HASH or RANGE). This is all transparent to the application.
MySQL Connectors are used by the application code to access the database(s), converting instructions from a specific programming language to the MySQL wire protocol, which is used to communicate with the MySQL Server processes. A ‘Fabric-aware’ connector stores a cache of the routing information that it has received from the mysqlfabric process and then uses that information to send transactions or queries to the correct MySQL Server. Currently the three supported Fabric-aware MySQL connectors are for PHP, Python and Java.
5.3. Reverse Proxy/Load Balancer
It is possible to deploy load balancers in multiple ways. You can deploy them on the application hosts, you can deploy them on separate hosts, you can deploy them on the database servers. The latter is not recommended because of the additional CPU utilization that load balancers require – it is not a good idea to collocate any CPU-intensive services on database servers.
Whether to collocate load balancers with the application or to use separate hosts depends on how you would like to use the load balancer. Some of them, like ProxySQL or MaxScale, do support query caching. In case you would like to benefit from this feature, it might be better to collocate them with application hosts. Please keep in mind that the local connection over the Unix socket will always have lower latency that the connection to the proxy over TCP. You will benefit more from caching if the latency will be lower. On the other hand, utilizing separated hosts removes potential resource contention on the application hosts when both web servers and proxies would compete for CPU. It is also easier to manage a limited number of performant proxy nodes rather than tens of them, collocated with application servers.
By having a reverse proxy as the middle-man, the application side does not need to perform health checks for slave consistency, replication lag or master/slave availability as these tasks have been taken care of by reverse proxy. Applications just have to send queries to the load balancer servers, and the queries are then re-routed to the correct backends.
By adding a reverse-proxy into the picture, our architecture should look like this:
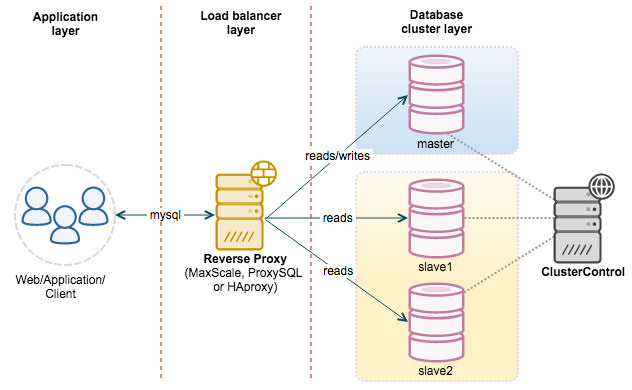
At the time of writing, there are several reverse proxies that support read-write splitting e.g MaxScale, ProxySQL and MySQL Router. ClusterControl v1.7.1 supports MaxScale deployment, ProxySQL and HAproxy for master-slave replication right from the UI.
5.3.1. MariaDB MaxScale
MariaDB MaxScale is a database proxy that allows the forwarding of database statements to one or more MySQL/MariaDB database servers. The recent MaxScale 2.3 is licensed under MariaDB BSL which is free to use on up to two database servers.
MaxScale supports a modular architecture. The underlying concept of modules allows to extend the MaxScale proxy services. The current version implements Read Write splitting and Load Balancing. MaxAdmin is a command line interface available with MaxScale that allows extensive health checks, user management, status and control of MaxScale operations. ClusterControl gives you direct access to the MaxAdmin commands. You can reach it by going to ‘Nodes’ tab and then clicking on your MaxScale node:

To deploy a MaxScale instance, simply go to Manage > Load Balancer > Install MaxScale and specify the necessary information. Choose the server instance to be included into the load balancing set and you are good to go. Once deployed, you can simply send the MySQL connection to the load balancer host on port 4008 for read/write splitting listener or port 4006 for round-robin listener.
We have covered this in detail in this blog post. For example deployment and more details, please refer to our blog post, How to Deploy and Manage MaxScale using ClusterControl.
5.3.2. ProxySQL
ProxySQL is a new high-performance MySQL proxy with an open-source GPL license. It was released as generally available (GA) for production usage towards the end of 2015. It accepts incoming traffic from MySQL clients and forwards it to backend MySQL servers. It supports various MySQL topologies, with capabilities like query routing (e.g, read/write split), sharding, queries rewrite, query mirroring, connection pooling and lots more.
ProxySQL for MySQL Replication is designed around the concept of hostgroups – different set of nodes which are somehow related. The idea behind it is that, under some conditions (two hostgroups only, one for a master and one for all slaves, read_only is used to differentiate between master and slaves) it is possible for ProxySQL to start monitoring the read_only flag on those hosts. Through this, it can follow the topology changes and automatically introduce changes in the server definitions to mirror the topology. ClusterControl uses the ‘read_only’ flag to mark master (read_only=0) and slaves (read_only=1). If you promote a slave as a new master manually, and change read_only flags accordingly, ProxySQL can detect such change and move old ‘master’ host to the ‘reader’ hostgroup while new master will be moved to the ‘writer’ hostgroup.
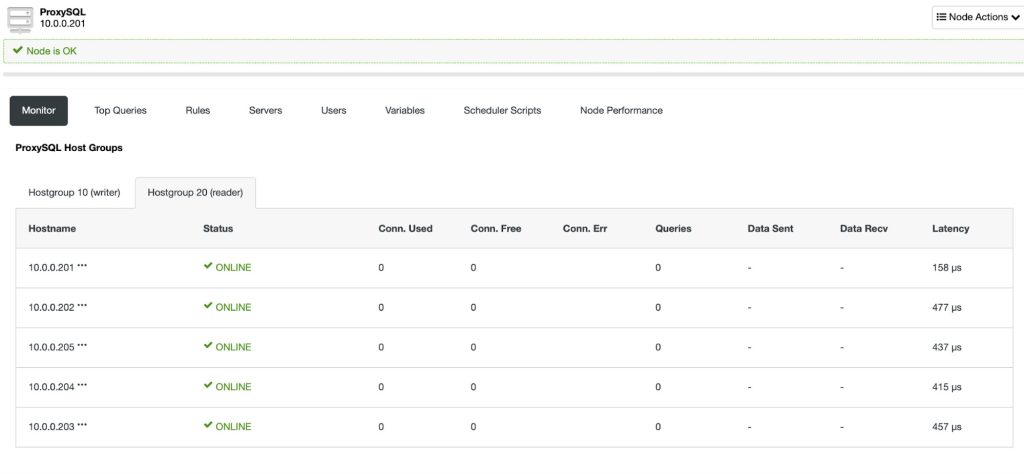
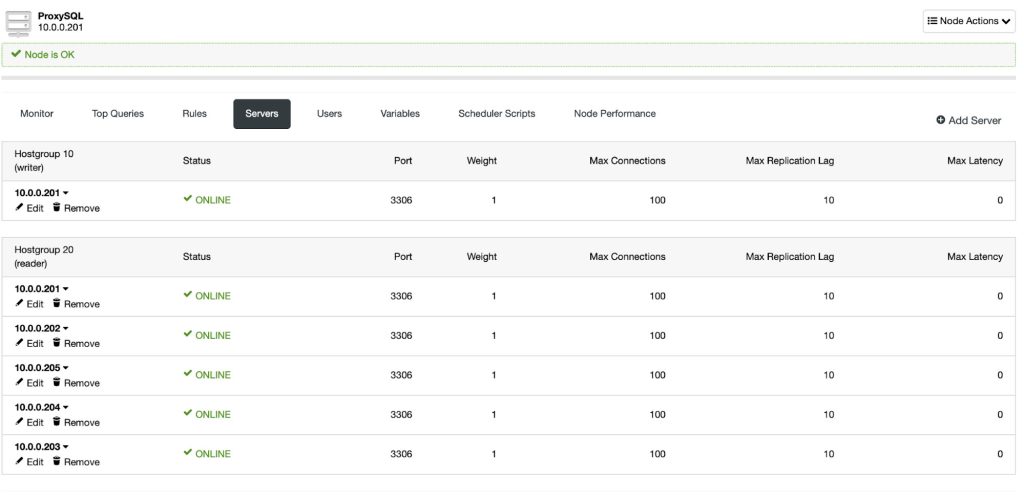
To deploy a ProxySQL instance, simply go to Manage > Load Balancer > Install ProxySQL and specify the necessary information. Choose the server instance to be included into the load balancing set and specify the max replication lag for each of them. By default, ClusterControl will configure a default read/write splitter for the MySQL Replication cluster. Any basic select query will be routed to hostgroup 20 (read pool) while all other queries will be routed to hostgroup 10 (master).
Once deployed, you can simply send the MySQL connection to the load balancer host on port 6033. The following screenshot shows the reader hostgroup (Hostgroup 20) with some stats captured by ProxySQL:
We encourage you to read further on the following resources to get better understanding on ProxySQL:
- MySQL Load Balancing with ProxySQL – an Overview
- Using ClusterControl to Deploy and Configure ProxySQL on top of MySQL Replication
- Tips and Tricks – How to Shard MySQL with ProxySQL in ClusterControl
5.3.3. HAProxy (Master-Slave Replication)
HAProxy as MySQL load balancer works similarly to a TCP forwarder, which operates in the transport layer of TCP/IP model. It does not understand the MySQL queries (which operates in the higher layer) that it distributes to the backend MySQL servers. Setting up HAProxy for MySQL Replication requires two different HAProxy listeners e.g, port 3307 for writes to the master and port 3308 for reads to all available slaves (including the master).
The application then have to be instructed to send reads/writes to the respective listener, by either:
- Build/Modify your application to have ability to send reads and writes to the respective listeners.
- Use application connector which supports built-in read/write splitting. If you are using Java, you can use Connecter/J. For PHP, you can use php-mysqlnd for master-slave. This will minimize the changes on the application side.
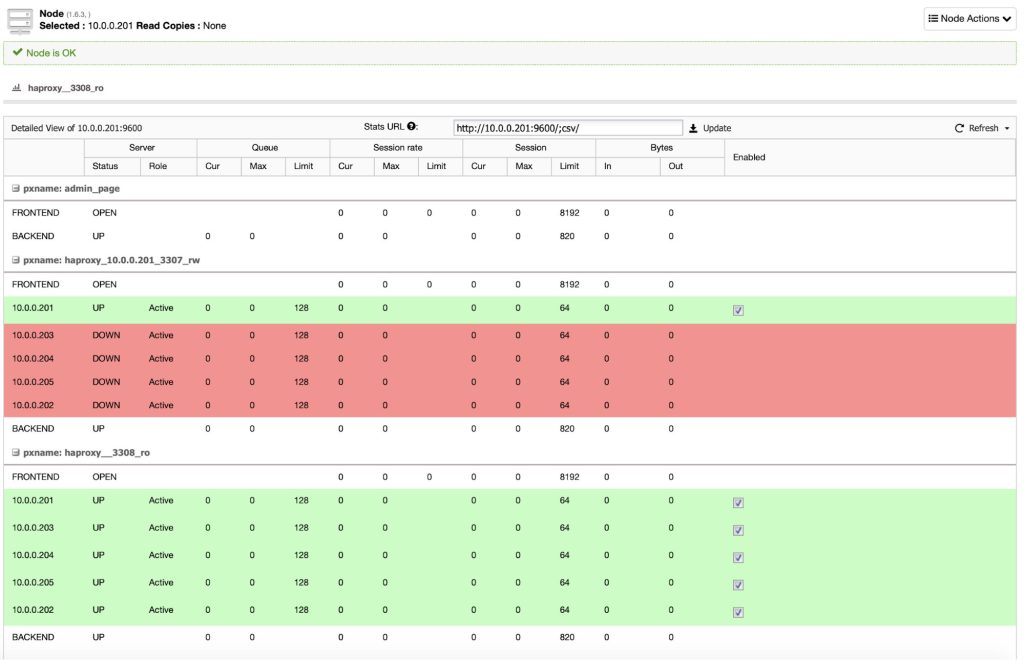
To create a HAProxy instance for master-slave replication, go to Manage > Load Balancer > Install HAproxy and make sure that the check “Install for read/write splitting” is enabled – this should happen by default for replication setups. The following screenshot shows HAproxy instance stats deployed by ClusterControl for MySQL Replication:
We have covered HAproxy in extensive details in our tutorial page, MySQL Load Balancing with HAproxy.
6. Failover with ClusterControl
In order to keep your replication setup stable and running, it is important for the system to be resilient to failures. Failures are caused by either software bugs, configuration problems or hardware issues, and can happen at any time. In case a server goes down, ClusterControl will raise an alarm about the degraded setup and you will be notified via email or pager. Failover (promotion of a slave to master) can be performed via ClusterControl automatically or manually. Usually it will be the slave that has the most up-to-date data. For automatic failover, it is possible for the admin to blacklist servers that should not be promoted as masters, or have a whitelist of servers that can be promoted.
How do you decide which slave is most up-to-date? The process is different depending on whether you are using GTID or not. GTID makes it easier, although you could run into issues like errant transactions. Failover of replication is covered in detail in “Become a MySQL DBA” – Common Operations – Replication Topology Changes.
6.1. Automatic Failover of Master
To have a fully resilient MySQL Replication setup with automatic master failover, you are advised to deploy a reverse proxy in front of the database instances. This will simplify routing of queries from applications to the correct master after topology changes, thus reducing the risks of errant transactions and minimizing database downtime. Please refer to Reverse proxy/Load balancer section for details.
By default, ClusterControl’s automatic recovery is turned on. Failover will be performed by ClusterControl when a failure on master happens. It is done in a matter of seconds based on the following flow:
- If ClusterControl is not able to connect to the master server, ClusterControl will mark the failure master as offline.
- An alarm will be raised to indicate replication failure and all available nodes are on read-only.
- ClusterControl will pick a master candidate based on replication_failover_whitelist, replication_failover_blacklist or the most up-to-date slave.
- ClusterControl will check for errant transactions on the master candidate. If there are errant transactions, failover process will be stopped and an alarm will be raised to indicate failure in failover procedures.
- ClusterControl will then perform the master failover by stopping all slaves and performing the CHANGE MASTER statement to the new master.
- If failover succeeds (all slaves are started), ClusterControl marks the new master as writeable (set read_only = 0) and alarm is cleared.
- Reverse proxy shall then update the load balancing set accordingly.
Unless explicitly disabled (replication_check_external_bf_failover=0) ClusterControl will attempt to connect to the slaves and ProxySQL instances (if available in the setup) to verify if those nodes can access the failed master. If some of the nodes can do that, the failover will not happen. Most probably, there is a network partition and ClusterControl somehow cannot directly connect to the master. But since the master can be seen by the slaves and/or the load balancer, then the master is still running.
6.1.1. Whitelists and Blacklists
To anticipate the next slave to be promoted as a new master during failover, there are two variables you can set in the CMON configuration file for this cluster:
- replication_failover_whitelist – A list of IP’s or hostnames of slaves (comma separated) which should be used as potential master candidates. If this variable is set, only those hosts will be considered.
- replication_failover_blacklist – A list of hosts (comma separated) which will never be considered a master candidate. You can use it to list slaves that are used for backups or analytical queries. If the hardware varies between slaves, you may want to put here the slaves which use slower hardware.
In our case, we would like to have the backup-master (10.0.0.202) as the next master whenever failover occurs. Thus, inside CMON configuration file (assuming the cluster_id = 1), /etc/cmon.d/cmon_1.cnf, we appended the following line:
replication_failover_whitelist=10.0.0.201,10.0.0.202Take note that failover is attempted ONLY once. Should a failover attempt fail, then no more attempts will be made until the controller is restarted. You can force ClusterControl to retry with a more aggressive approach by specifying replication_stop_on_error=0 inside CMON configuration file (however, there is a chance the slaves may have broken replication). Or perform a manual master failover as described in the next section.
6.2. Manual Failover of Master
Writes are done on the master server only. If the master fails, replication will stop. Failover must be done by promoting one of the most updated slaves to master to restore our replication setup. Applications doing updates must then reconnect to the newly promoted master and then continue to operate.
If the master is down, we need to promote one of the slaves (backup-master) to become a master. To achieve this, go to ClusterControl > Nodes > choose backup-master node > Promote Slave:

You will be prompted with the following:

Effectively, the selected slave has become the new master and will process updates while the old master is down:

When the old master comes up again, it will be started as read-only and then re-synchronize with the new master (backup-master) as a slave. This action is automatically orchestrated by ClusterControl. The following screenshot shows the old master (10.0.0.201) has became a slave for the backup-master (10.0.0.202) in the replication:
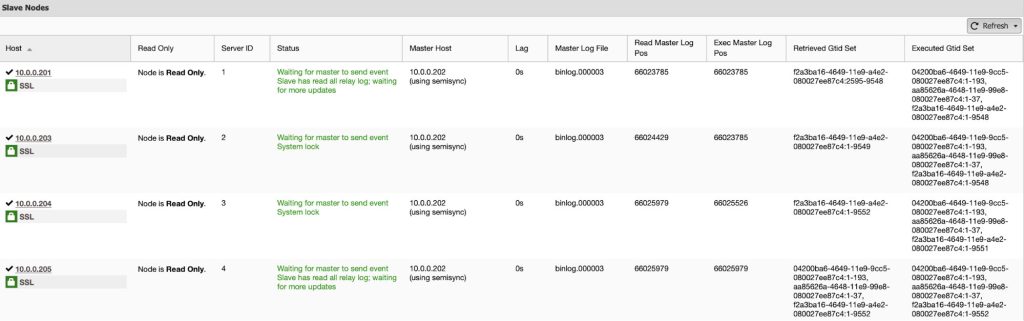
The old master (10.0.0.201) may need to do some catching up after the slave service is started and once it is up-to-date with the new master (10.0.0.202), it will remain as slave.
6.3. Failure of a Slave
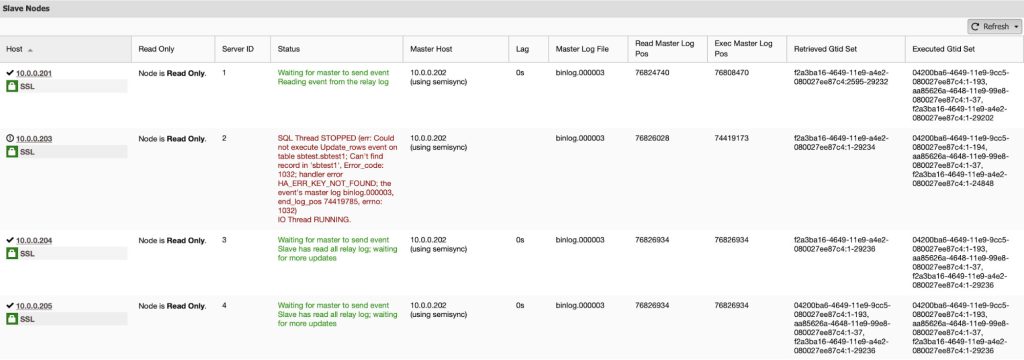
If a slave fails, applications connected to the slave can connect to another slave and continue to operate. ClusterControl will show the current status of failed slave in the Overview page:
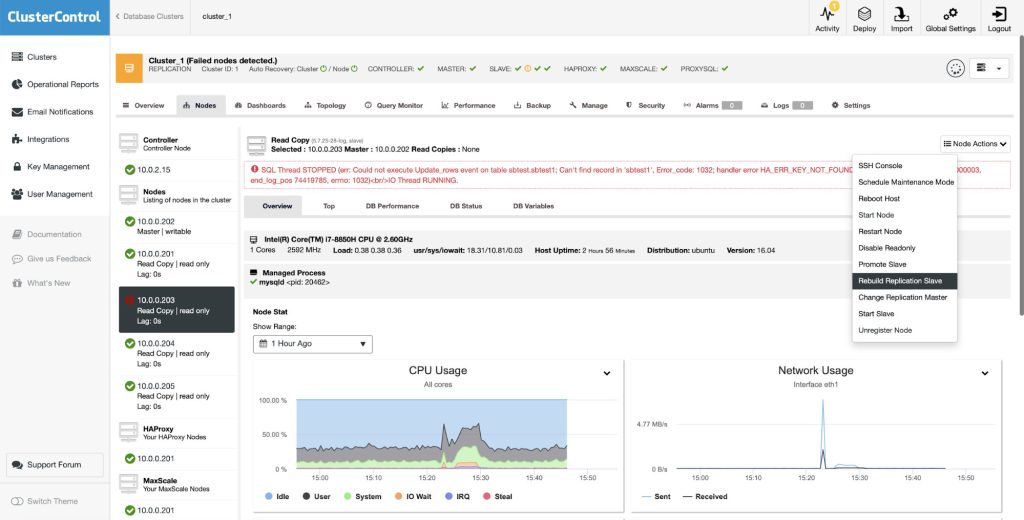
When the slave comes up again, ClusterControl will automatically resume the replication with the master and make the slave available to the applications. Depending on how long the slave is lagging behind, or whether ClusterControl was unable to resume the replication due to replication errors, you can resynchronize the missing transactions manually. Or you can use the ‘Rebuild Replication Slave’ feature to rebuild the slave. In this case, ClusterControl will delete the old data on the slave, take a dump of the master data from the selected master and provision the slave with it, before finally reconnecting it with the master.
At this point, the replication setup has been restored to its original topology.
6.4. Pre and Post-Failover Scripts
ClusterControl provides several hooks that can be used to plug in external scripts. Below you will find a list of those with some explanation.
- Replication_onfail_failover_script – this script executes as soon as it has been discovered that a failover is needed. If the script returns non-zero, it will force the failover to abort. If the script is defined but not found, the failover will be aborted. Four arguments are supplied to the script: arg1=’all servers’ arg2=’oldmaster’ arg3=’candidate’, arg4=’slaves of oldmaster’ and passed like this: ‘scripname arg1 arg2 arg3 arg4’. The script must be accessible on the controller and be executable.
- Replication_pre_failover_script – this script executes before the failover happens, but after a candidate has been elected and it is possible to continue the failover process. If the script returns non-zero it will force the failover to abort. If the script is defined but not found, the failover will be aborted. The script must be accessible on the controller and be executable.
- Replication_post_failover_script – this script executes after the failover happened. If the script returns non-zero, a Warning will be written in the job log. The script must be accessible on the controller and be executable.
- Replication_post_unsuccessful_failover_script – This script is executed after the failover attempt failed. If the script returns non-zero, a Warning will be written in the job log. The script must be accessible on the controller and be executable.
- Replication_failed_reslave_failover_script – this script is executed after that a new master has been promoted and if the reslaving of the slaves to the new master fails. If the script returns non-zero, a Warning will be written in the job log. The script must be accessible on the controller and be executable.
- Replication_pre_switchover_script – this script executes before the switchover happens. If the script returns non-zero, it will force the switchover to fail. If the script is defined but not found, the switchover will be aborted. The script must be accessible on the controller and be executable.
- Replication_post_switchover_script – this script executes after the switchover happened. If the script returns non-zero, a Warning will be written in the job log. The script must be accessible on the controller and be executable.
As you can see, the hooks cover most of the cases where you may want to take some actions – before and after a switchover, before and after a failover, when the reslave has failed or when the failover has failed. All of the scripts are invoked with four arguments (which may or may not be handled in the script, it is not required for the script to utilize all of them): all servers, hostname (or IP – as it is defined in ClusterControl) of the old master, hostname (or IP – as it is defined in ClusterControl) of the master candidate and the fourth one, all replicas of the old master. Those options should make it possible to handle the majority of the cases.
All of those hooks should be defined in a configuration file for a given cluster (/etc/cmon.d/cmon_X.cnf where X is the id of the cluster). An example may look like this:
replication_pre_failover_script=/usr/bin/stonith.py
replication_post_failover_script=/usr/bin/vipmove.sh
Of course, invoked scripts have to be executable, otherwise cmon won’t be able to execute them.
6.4.1. When Hooks Can Be Useful?
Let’s see a couple of example cases where it might be a good idea to implement external scripts. We will not get into any details as those are too closely related to a particular environment. It will be more of a list of suggestions that might be useful to implement.STONITH script
Shoot The Other Node In The Head (STONITH) is a process of making sure that the old master, which is dead, will stay dead (and yes.. we don’t like zombies roaming about in our infrastructure). The last thing you probably want is to have an unresponsive old master which then gets back online and, as a result, you end up with two writable masters. There are precautions you can take to make sure the old master will not be used even if shows up again, and it is safer for it to stay offline. Ways on how to ensure it will differ from environment to environment. Therefore, most likely, there will be no built-in support for STONITH in the failover tool. Depending on the environment, you may want to execute CLI command which will stop (and even remove) a VM on which the old master is running. If you have an on-prem setup, you may have more control over the hardware. It might be possible to utilize some sort of remote management (integrated Lights-out or some other remote access to the server). You may have also access to manageable power sockets and turn off the power in one of them to make sure server will never start again without human intervention.
6.4.1.1. Service Discovery
We already mentioned a bit about service discovery. There are numerous ways one can store information about a replication topology and detect which host is a master. Definitely, one of the more popular options is to use etc.d or Consul to store data about current topology. With it, an application or proxy can rely in this data to send the traffic to the correct node. ClusterControl (just like most of the tools which do support failover handling) does not have a direct integration with either etc.d or Consul. The task to update the topology data is on the user. She can use hooks like replication_post_failover_script or replication_post_switchover_script to invoke some of the scripts and do the required changes. Another pretty common solution is to use DNS to direct traffic to correct instances. If you will keep the Time-To-Live of a DNS record low, you should be able to define a domain, which will point to your master (i.e. writes.cluster1.example.com). This requires a change to the DNS records and, again, hooks like replication_post_failover_script or replication_post_switchover_script can be really helpful to make required modifications after a failover happened.
6.4.1.2. Proxy Reconfiguration
Each proxy server that is used has to send traffic to correct instances. Depending on the proxy itself, how a master detection is performed can be either (partially) hardcoded or can be up to the user to define whatever she likes. ClusterControl failover mechanism is designed in a way it integrates well with proxies that it deployed and configured. It still may happen that there are proxies in place, which were not installed by ClusterControl and they require some manual actions to take place while failover is being executed. Such proxies can also be integrated with the ClusterControl failover process through external scripts and hooks like replication_post_failover_script or replication_post_switchover_script.
6.4.1.3. Additional Logging
It may happen that you’d like to collect data of the failover process for debugging purposes. ClusterControl has extensive printouts to make sure it is possible to follow the process and figure out what happened and why. It still may happen that you would like to collect some additional, custom information. Basically all of the hooks can be utilized here – you can collect the initial state, before the failover, you can track the state of the environment at all stages of the failover.
7. Operations – Managing Your MySQL Replication Setup
How you choose to deploy a replication setup also affects how you should manage it. In this section, we will assume a single master with multiple slaves, as deployed in section 4 of this tutorial. We’ll see how we can manage different operational tasks using ClusterControl.
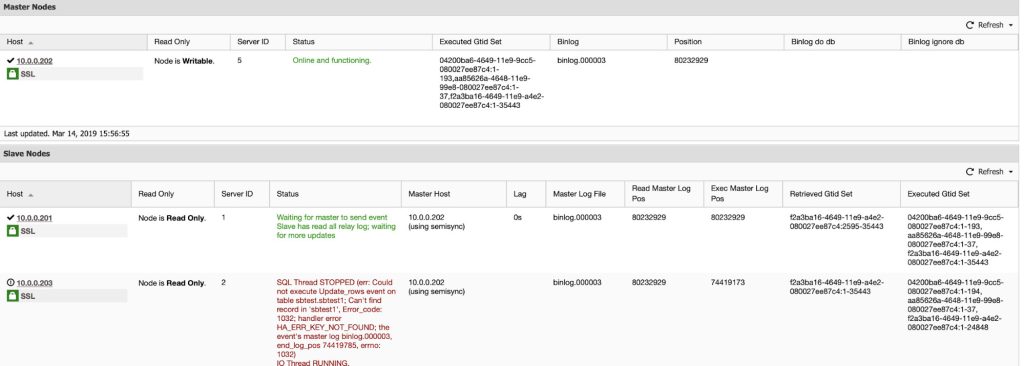
7.1. Show Replication Status
You can find a summary of MySQL Replication status directly from the summary bar in the database cluster list. The Replication cluster status can be ACTIVE, FAILED or DEGRADED.

You can find further details on the master status, slave status and host statistics directly from the Cluster Overview page:
7.2. Start/Stop Replication
ClusterControl supports starting or stopping a slave from its UI. It’s similar to performing ‘STOP SLAVE’ and ‘START SLAVE’ via command line.

If either SQL or IO threads are stopped, ClusterControl will list out an extra option to start/stop the thread.
7.3. Promote Slave
Promoting a slave to master might be required if e.g. the master server goes down, or in case you would like to perform maintenance on the master host. Assuming you have GTID-based replication configured, you are able to promote a slave to master easily using ClusterControl. If the master is currently functioning correctly, then make sure you stop application queries before promoting another slave. This is to avoid the data loss. Connections on the current running master will be killed by ClusterControl after a 10 second grace period.

7.4. Rebuild Replication Slave
In case a slave gets corrupted, or it does not sync with the master for some reason, you might want to rebuild it. With ClusterControl, you would be able to rebuild a replication slave using the data from the master. It uses Percona Xtrabackup to stage the replication data on the slave. Note that this feature will wipe out the MySQL datadir of the slave.

Before proceeding with the rebuilding process from ClusterControl, you have to choose the available master. The slave process will be started automatically once the rebuilding completes.
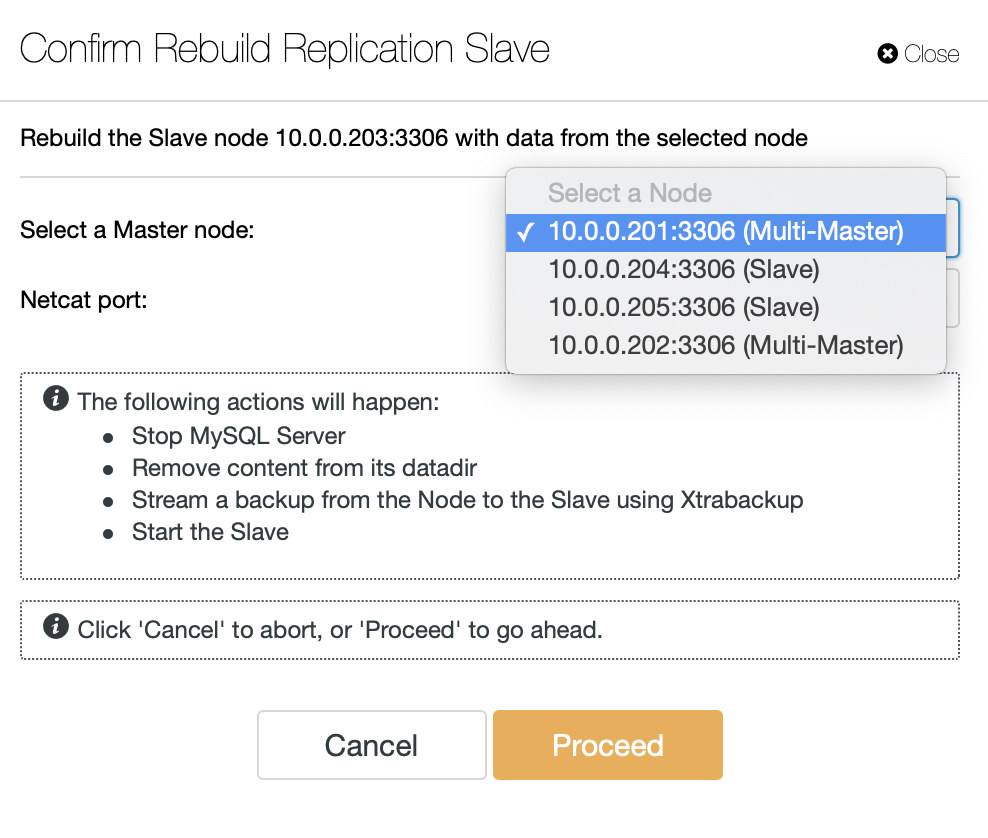
The staging process will be performed by Percona Xtrabackup due to its hot-backup capability on InnoDB storage engine. If you have MyISAM tables, FLUSH TABLES will happen at the end of the backup process and during this time, the chosen master will be read-only momentarily.
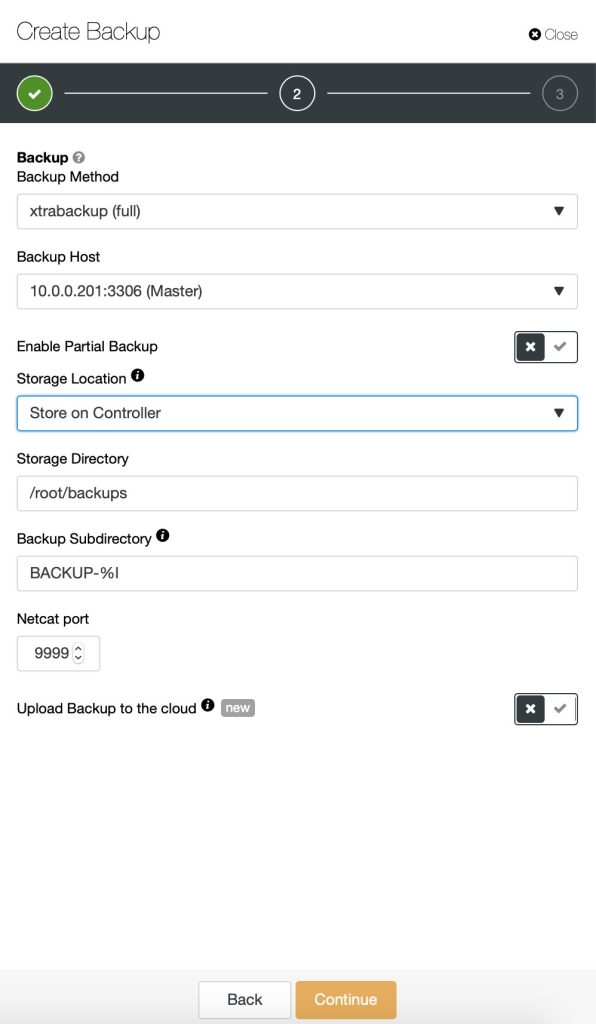
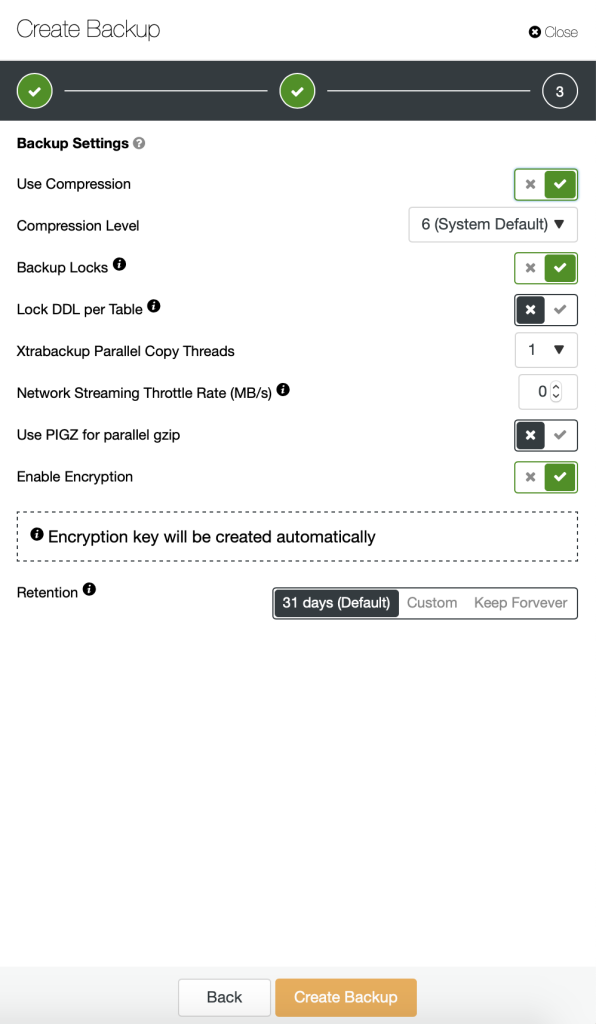
7.5. Backup
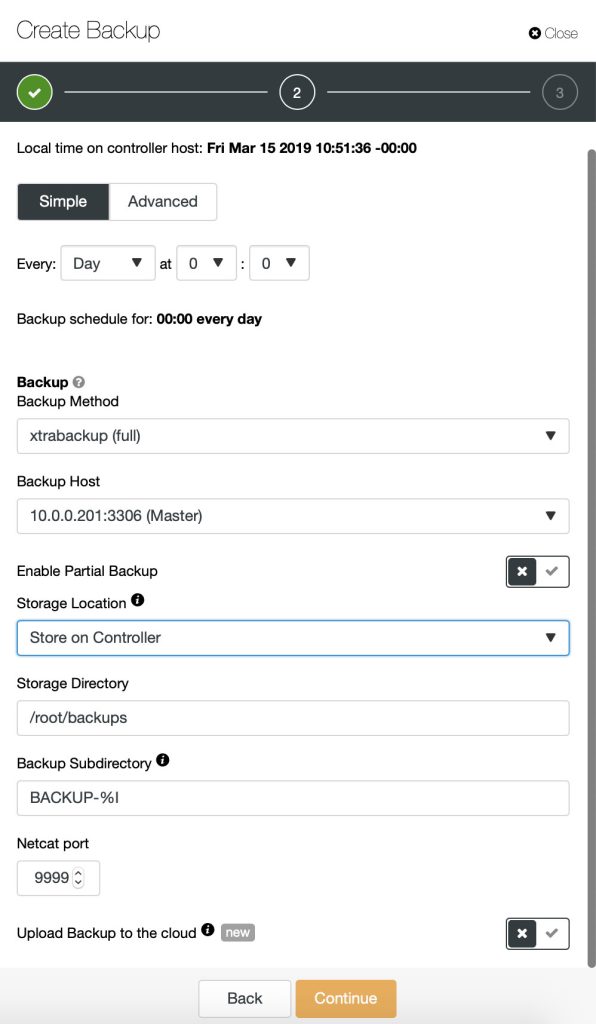
We have blogged previously about backup strategies for MySQL. ClusterControl supports mysqldump and xtrabackup (full and incremental) to perform backups. Backups can be performed or scheduled on any database node (master or slaves) and stored locally or stored centrally on the ClusterControl node. When storing backups on the ClusterControl node, the backup is first created on the target database node and then streamed over using netcat to the controller node. You can also choose to backup individual databases or all databases. Backup progress is available underneath it and you will get a notification on the backup status each time it is created.
To create a backup, simply go to Backup > Create Backup and specify the necessary details:
To schedule backups, click on “Schedule Backup” and configure the scheduling accordingly:
Backups created by ClusterControl can be restored on one of the database nodes.
7.6. Restore
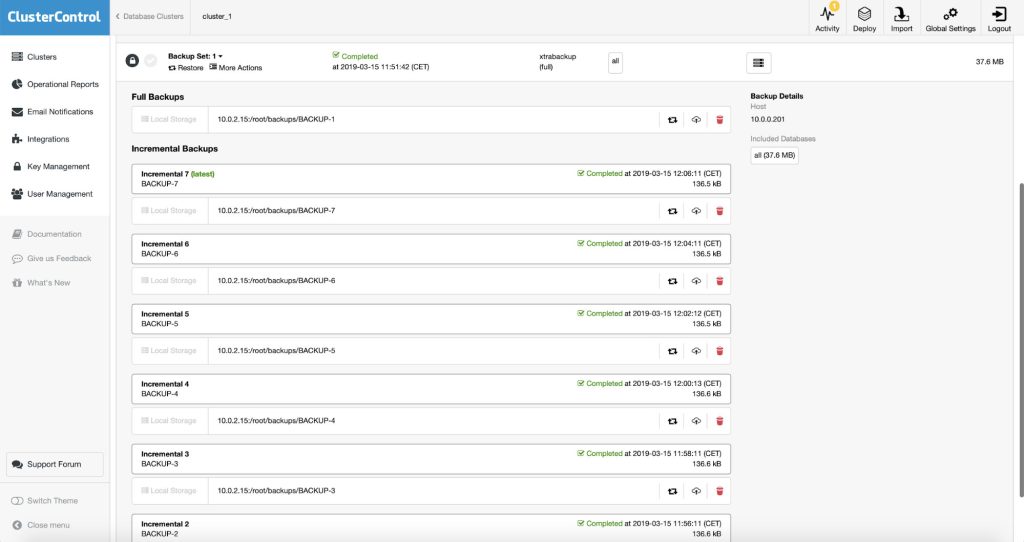
ClusterControl has ability to restore backups (mysqldump and xtrabackup) created by ClusterControl or externally via some other tool. For external backup, the backup files must exist on the ClusterControl node and only xbstream, xbstream.gz and tar.gz extensions are supported.
All incremental backups are automatically grouped together under the last full backup and expandable with a drop down. Each created backup will have “Restore” and “Log” buttons:
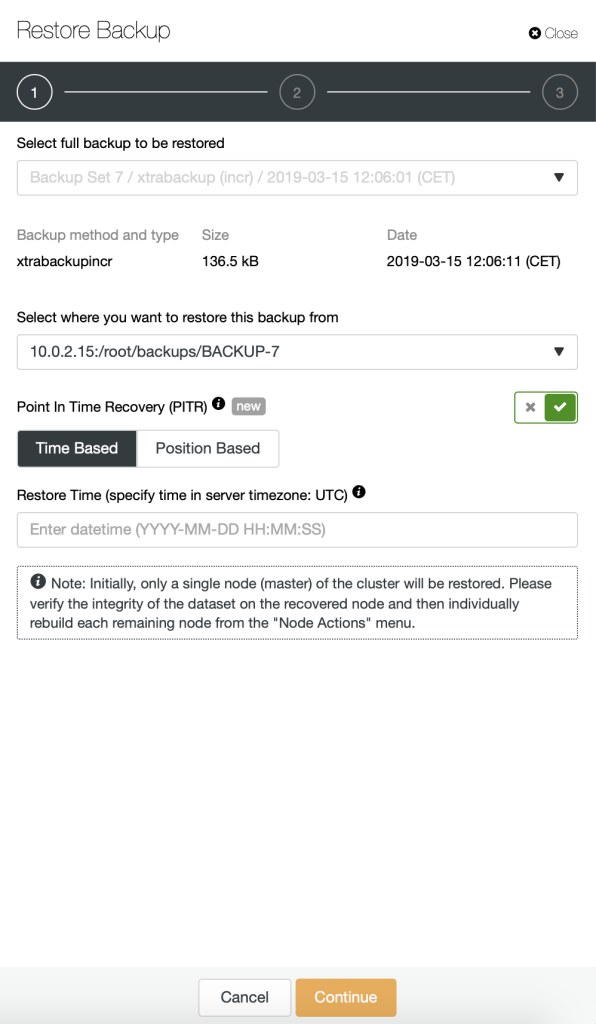
To restore a backup, simply click on the “Restore” button for the respective backup. You should then see the following Restore wizard and a couple of post-restoration options:
If the backup was taken using Percona Xtrabackup, the replication has to be stopped. The following steps will be performed:
- Stop all nodes in the replication setup.
- Copy the backup files to the selected server.
- Restore the backup.
- Once the restore job is completed, start the restored node under ClusterControl > Nodes > select the restored node > Start Node.
- Once started, promote the node as a new master (if it wasn’t a master) at ClusterControl > Nodes > select the restored node > Promote Slave.
- On each slave, rebuild the replication slave by go to ClusterControl > Nodes > slave node > Stage Replication Slave.
ClusterControl can also be used to perform a Point in Time Recovery – you can either decide about a point in time (with a granularity of one second) or you can specify exact binary log file and position up to which backup should be restored.
A critical part of the backup is the restore. The main issue is that you cannot tell if the backup will work unless you actually attempt to restore it. Every backup is Schrödinger’s backup – it may work or not and you can’t tell its state unless the restore is attempted. That’s why testing of the backups is a must-have. ClusterControl provides you with an easy way of doing that. When scheduling a backup you can decide whether to run the restore test or not.
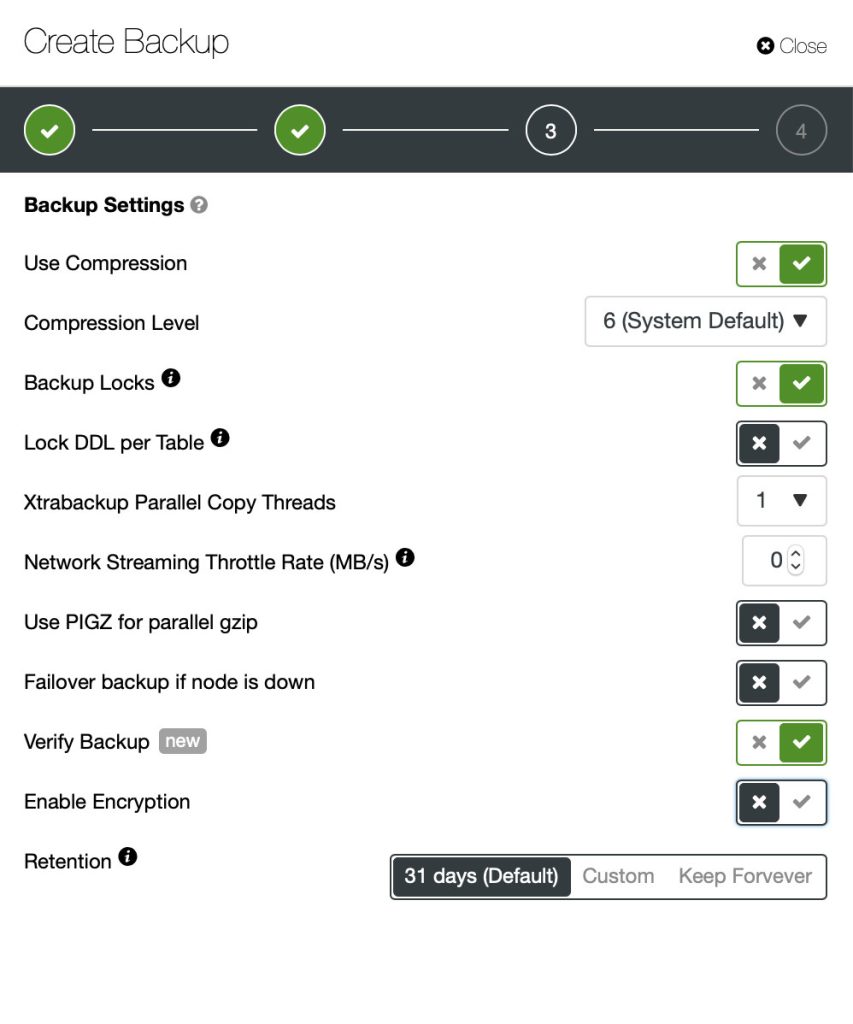
When you decide to do so, you will be presented with another set of options.
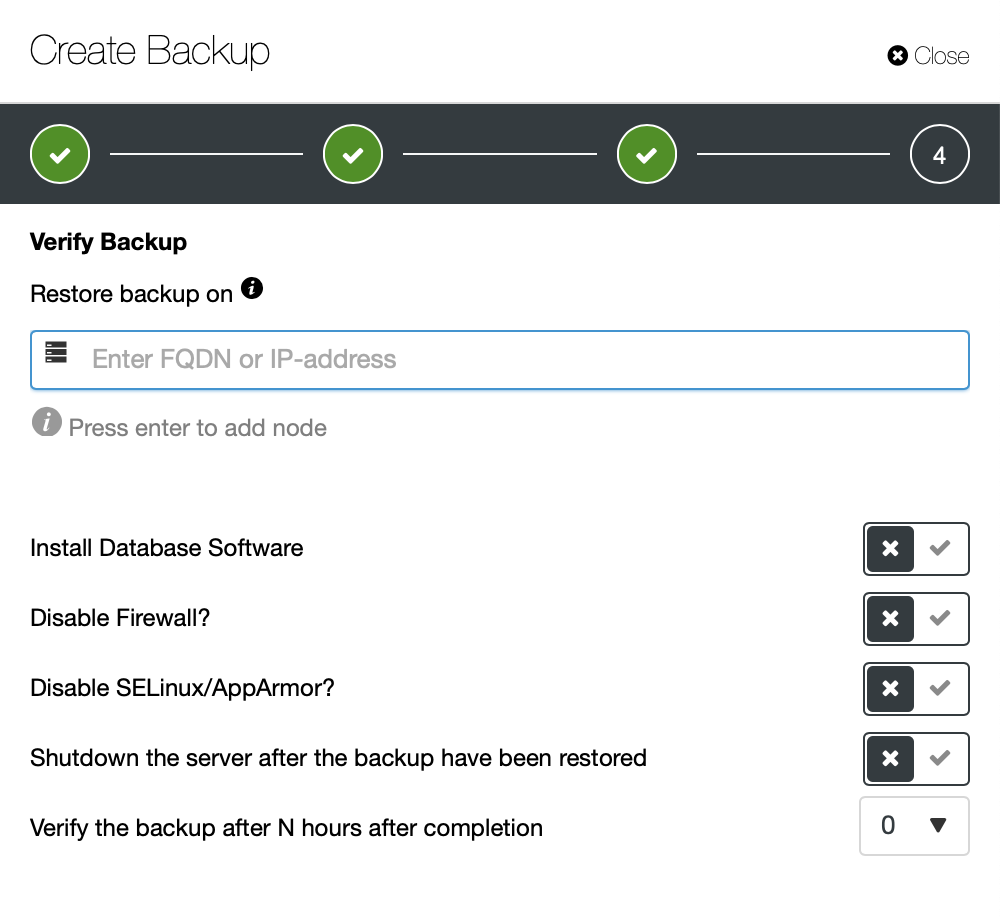
What you have to define is the hostname or IP of the host on which you want ClusterControl to attempt the recovery. You can ask ClusterControl to set the node up and install MySQL. You can also either shutdown the server after every restore test or just keep it up and reuse it in the future. Backup can be restored either immediately after the backup completed or scheduled to start after a certain delay.
Similar case is when you attempt to restore one of the backups:
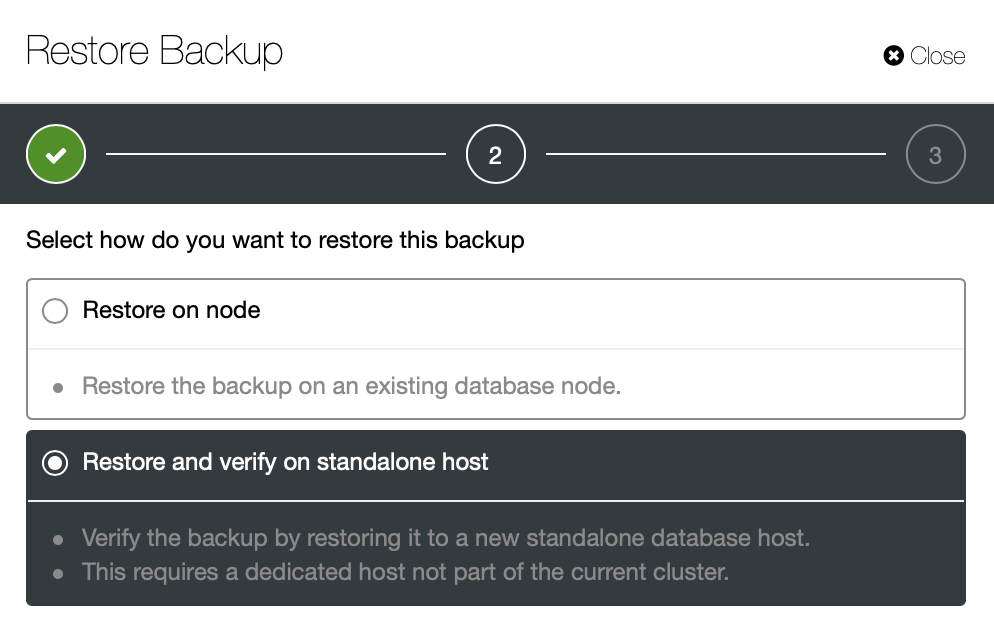
You can either restore it on the cluster or you can run the backup restore on a standalone host. Here, in addition to the backup testing and verification, one of use cases is to reduce data loss when restoring partially deleted data. Let’s assume you have a large data set and you do not take a logical backups with mysqldump due to the time required to create such backup. Let’s assume that a small table or a subset of rows have been deleted or mistakenly updated. If you will restore the whole dataset, you will lose all modifications that happened afterwards. What you can do instead is to use this option to restore a backup set on a separate node, keep it up and running and then extract (using SELECT INTO OUTFILE or by any other means) only the data you want and then load it on the master server.
7.7. Software Upgrade
You can perform a database software upgrade via ClusterControl > Manage > Upgrades > Upgrade. Upgrades are online and are performed on one node at a time. One node will be stopped, then the software is updated through package manager and finally the node is started again. If a node fails to upgrade, the upgrade process is aborted. Upgrades should only be performed when there is as little traffic as possible on the database hosts.
You can monitor the MySQL upgrade progress from ClusterControl > Activity > Jobs, as shown in the following screenshot:
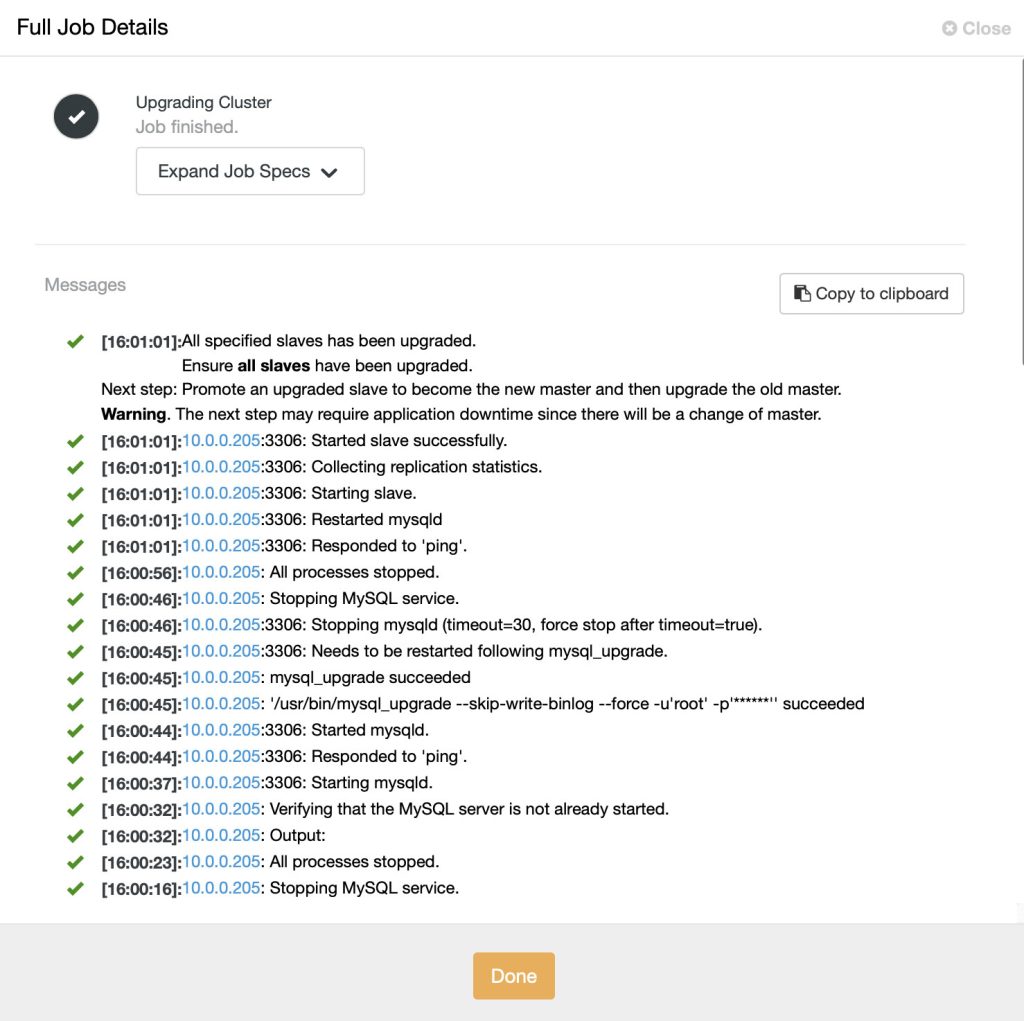
ClusterControl performs upgrade of MySQL Replication setup by upgrading all slaves, one at a time. Once all slaves have been upgraded, verify the new version is correct from the Cluster Overview page. Then, promote an upgraded slave (using ‘Promote Slave’) to become the new master. Finally, upgrade the old master by repeating the same upgrade step.
7.8. Configuration Changes
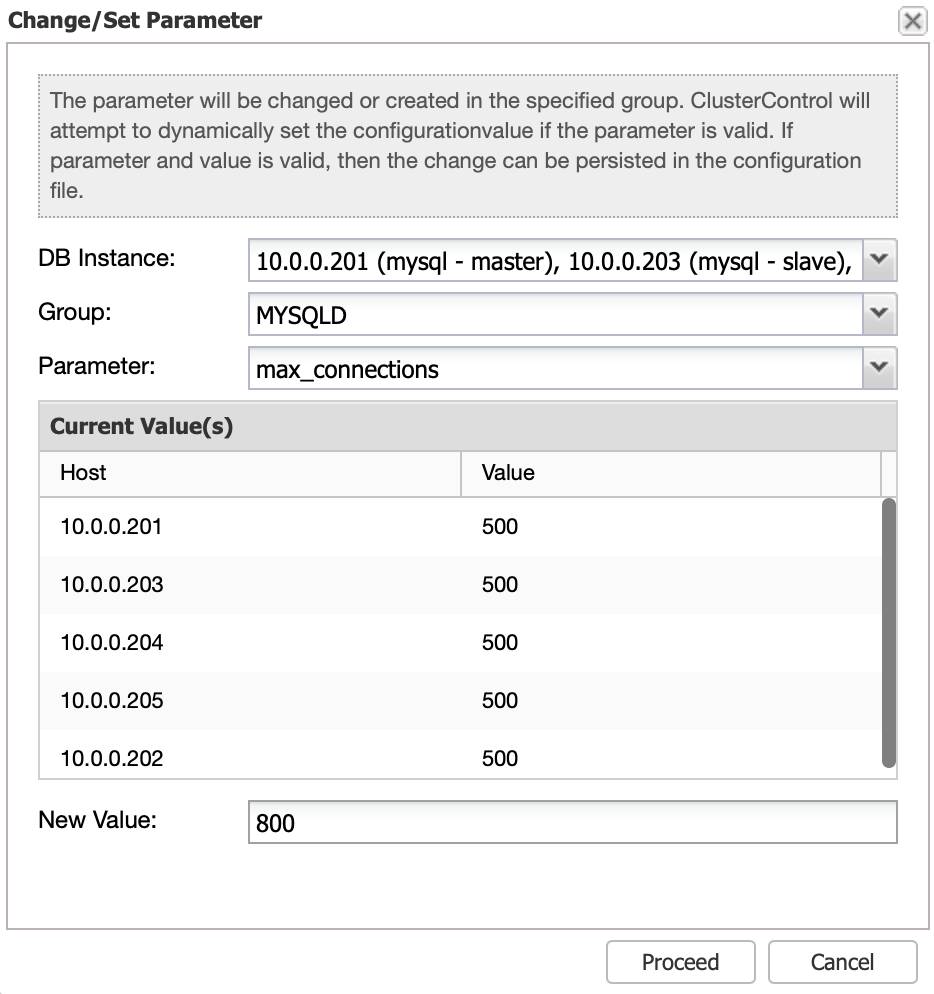
System variables are found in my.cnf. Some of the variables are dynamic and can be set at runtime, others not. ClusterControl provides an interface to update MySQL configuration parameters on all DB instances at once. Select DB instance(s), configuration group and parameter and ClusterControl will perform the necessary changes via SET GLOBAL (if possible) and also make it persistent in my.cnf.
If a restart is required, ClusterControl will acknowledge that in the Config Change Log dialog:
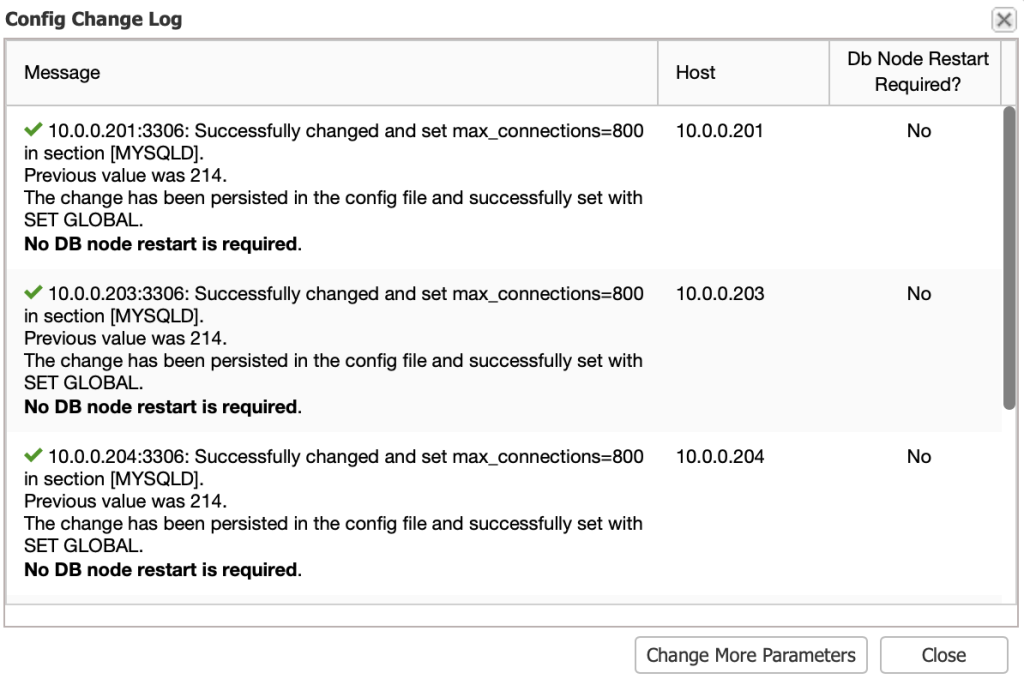
More information in this blog post, Updating your MySQL Configuration.
7.9. Schema Changes
Traditionally, a schema change in MySQL was a blocking operation – a table had to be locked for the duration of the ALTER. In MySQL replication, some ALTERs may lock writes on the master and create replication lag. The reason is MySQL replication is single-threaded and if the SQL thread is executing an ALTER statement, it won’t execute anything else. It is also important to understand that the slave is able to start replicating the schema change only after it has completed on the master. This results in a significant amount of time needed to complete changes on the slave: time needed for a change on the master plus time needed for a change on the slave.
Luckily, there are ways to perform this operation online:
- Rolling schema update – take one of the slaves out of rotation, execute ALTERs, bring it back, rinse and repeat until all slaves have been updated. Once that’s done, promote one of the slaves to master, run ALTER on the old master, bring it back as a slave.
- Online schema changes tools:
- pt-online-schema-change by Percona
- Online Schema Change by Facebook
- gh-ost by GitHub
Each method has its own pros and cons. More details in this blog post, Become a MySQL DBA blog series – Common operations – Schema Changes.
7.10. Topology Changes
Replication topology changes and failover processes are common operations, albeit complex. Changes are usually needed to help scale out, to distribute your database across multiple regions or data centers, or to perform software/hardware maintenance operations. The initial setup of a replication topology is simple, but as soon as you start changing it, things can quickly get complex.
Depending on whether you are running on GTID-based or standard replication with binlog, the failover steps are different and require close attention. We have discussed this in detail in this webinar on Replication Topology Changes for MySQL and MariaDB as well as this blog post – DBA Operations – Replication Topology Changes.
8. Issues and Troubleshooting
Because it is simple to setup, MySQL Replication is probably the most widely used mechanism to provide high availability. Unfortunately, it is also somewhat fragile:
- Failover is not automatic and has to be performed by somebody who is skilled.
- Slaves can easily end up with different data to the master, due to hardware problems, software bugs or the use of non-deterministic functions. Diverging datasets on master and slave servers causes replication to stop.
- A crashing master can cause corruption of the binary log. When it is restarted, the slave servers would not be able to continue from the last binary log position.
- GTID-based failover is exposed to errant transaction. We describe this further down in this tutorial, as well as in this blog.
- Slave lag can be a nightmare when your application reads out-of-date data from a slave.
- It is possible to set up two-way replication between two mysql servers. However, ring topologies are not recommended. MySQL Replication currently does not support any locking protocol between master and slave to guarantee the atomicity of a distributed updated across two different servers.
8.1. Replication Status
The replication status can only be checked from a replicating slave by using the following statement:
mysql> SHOW SLAVE STATUS\G
*************************** 1. row ***************************
               Slave_IO_State: Waiting for master to send event
                  Master_Host: 192.168.55.111
                  Master_User: slave
                  Master_Port: 3306
                Connect_Retry: 60
              Master_Log_File: binlog.000005
          Read_Master_Log_Pos: 911532980
               Relay_Log_File: relay-bin.000004
                Relay_Log_Pos: 911533144
        Relay_Master_Log_File: binlog.000005
             Slave_IO_Running: Yes
            Slave_SQL_Running: Yes
              Replicate_Do_DB:
          Replicate_Ignore_DB:
           Replicate_Do_Table:
       Replicate_Ignore_Table:
      Replicate_Wild_Do_Table:
  Replicate_Wild_Ignore_Table:
                   Last_Errno: 0
                   Last_Error:
                 Skip_Counter: 0
          Exec_Master_Log_Pos: 911532980
              Relay_Log_Space: 911533311
              Until_Condition: None
               Until_Log_File:
                Until_Log_Pos: 0
           Master_SSL_Allowed: No
           Master_SSL_CA_File:
           Master_SSL_CA_Path:
              Master_SSL_Cert:
            Master_SSL_Cipher:
               Master_SSL_Key:
        Seconds_Behind_Master: 0
Master_SSL_Verify_Server_Cert: No
                Last_IO_Errno: 0
                Last_IO_Error:
               Last_SQL_Errno: 0
               Last_SQL_Error:
  Replicate_Ignore_Server_Ids:
             Master_Server_Id: 1
                  Master_UUID: a2bac331-a899-11e5-98f0-000c29901dfb
             Master_Info_File: /var/lib/mysql/master.info
                    SQL_Delay: 0
          SQL_Remaining_Delay: NULL
      Slave_SQL_Running_State: Slave has read all relay log; waiting for the slave I/O thread to update it
           Master_Retry_Count: 86400
                  Master_Bind:
      Last_IO_Error_Timestamp:
     Last_SQL_Error_Timestamp:
               Master_SSL_Crl:
           Master_SSL_Crlpath:
           Retrieved_Gtid_Set: a2bac331-a899-11e5-98f0-000c29901dfb:10-1937
            Executed_Gtid_Set: a2bac331-a899-11e5-98f0-000c29901dfb:1-1937
The following status variables are the main indicator that replication works as expected:
Slave_IO_Running: Yes
    Slave_SQL_Running: Yes
Seconds_Behind_Master: 0
     Master_Server_Id: 1
The above indicates the slave’s IO and SQL threads are running, replicating from the Master server (server-id=1) with no replication lag (where Seconds_Behind_Master is 0). Other than the abovementioned slave status, you can also use the following statements:
- SELECT @@global.gtid_executed – Shows applied transactions.
- SELECT @@gtid_purged – Shows applied but purged from binary logs already.
8.2. Replication Lag
Replication lag is the number of seconds that the slave is behind the master. If it happens, your application might read old data from the slave. This somewhat introduces a deficiency on the application side when retrieving data from a lagging slave. For example, you might configure the application to retrieve data when Seconds_Behing_Master is only equal to 0 on that slave. Else, the application falls back on the master to retrieve the data. ProxySQL can also be configured to keep track of the slave lag.
You can decide that given server will not be getting traffic when the replication lag exceeds “Max Replication Lag” defined for it. Once the lag gets back below the threshold, ProxySQL will start sending the traffic to that backend again.
MySQL replication works with two threads, IO_THREAD & SQL_THREAD. For IO_THREAD, the slave:
- connects to a master,
- reads binary log events from the master as they come in,
- copies them over to a local log file called relay log.
While SQL_THREAD, the slave:
- reads events from a relay log, stored locally on the replication slave (the file that was written by IO thread).
- applies them as fast as possible.
Whenever replication lag happens, it’s important to determine whether it’s delaying on slave IO_THREAD or slave SQL_THREAD. Normally, I/O thread would not cause a big replication delay as it is just reading the binary logs from the master. However, It depends on the network connectivity and latency between the servers. The slave I/O thread could be slow because of high bandwidth usage. Usually, when the slave IO_THREAD is able to read binary logs quickly enough, it copies and piles up the relay logs on the slave – which is one indication that the slave IO_THREAD is not the culprit of slave lag.
When the slave SQL_THREAD is the source of replication delays, it is probably because the queries coming from the replication stream are taking too long to execute on the slave. This is sometimes due to different hardware between master/slave, different schema indexes or workload. Moreover, the slave OLTP workload sometimes causes replication delays because of locking. Take note that replication is single threaded prior to MySQL 5.6, which would be another reason for delays on the slave’s SQL_THREAD.
8.3. Data Drifting
Though the main purpose of replication is to have exact copies of data across the replication setup, data drifting can still happen between a MySQL master and its replicas. This can happen if there is transaction rollback on a non-transactional storage engine, a non-deterministic statement with statement-based replication, software bugs or human/application mistakes. It is also necessary to check slave consistency after a master failover event, as data drifting might happen after a new master is promoted.
You can use Percona Toolkit’s pt-table-checksum to perform an online replication consistency check by executing checksum queries on the master, which produces different results on replicas that are inconsistent with the master. Then, you can apply the missing transactions manually or use pt-table-sync to resynchronize the slave.
Using row-based replication (by setting binlog_format=ROW) is also a safe bet to reduce the risk of data drifting. With row-based replication, the master writes events to the binary log that indicate how individual table rows are changed. Replication of the master to the slave works by copying the events representing the row changes to the slave.
8.4. Errant Transaction
Errant transactions are transactions that are executed directly on a slave in GTID-based replication. Thus, they only exist on a specific slave. This could be the result of a mistake e.g, the application wrote to a slave instead of writing to the master or this could be by design e.g, you need additional tables for reports. It can cause data corruption or replication error if a slave with an errant transaction is promoted to the new master. The main issue with errant transactions is that when failing over, the slave may execute transactions ‘coming from nowhere’ that can silently corrupt your data or break replication.
If you find an errant transaction on one server, there are two ways to overcome errant transaction:
- Either commit an empty transaction with the GTID of the errant one on all other servers;
- Or, remove the corresponding GTID on the offending slave.
The bottomline is, before a new slave is promoted to be a master, it is necessary to check for errant transactions. We have covered this topic in detail in this blog post, MySQL Replication and GTID-based failover – A Deep Dive into Errant Transactions.
8.5. Corrupted Slave
Corrupted slave happens when the relay logs are corrupted. A relay log is a log file of the binary log events coming from the master via replication IO thread. In case of corruption, replication would stop on the slave. There are multiple reasons that could lead to this problem, it could be network (especially if replicating over unreliable long distance networks), MySQL bugs on master or slave, hardware problems and few others.
Firstly, verify if the corruption happens on master or slave. A good indicator is if the other slaves are replicating without error, it’s most likely that only the relay log on that particular slave is corrupted. To fix it, simply re-point the replication on the slave to Relay_Master_Log_FIle:Exec_Master_Log_Pos:
(corrupted slave)> SLAVE STOP;
(corrupted slave)> CHANGE MASTER TO master_log_file=Relay_Master_Log_File,master_log_pos=Exec_Master_Log_Pos;
(corrupted slave)> SLAVE START;
8.6. Recommendations
- Use Global Transaction Identifier (GTID) based replication for simpler deployment and failover.
- Use InnoDB storage engine since it provides full transaction capability with ACID compliance and better crash recovery.
- Replication only flows in one direction, applications only write on the master.
- Deploy a backup master, the master pushes changes to a backup master and to one or more slaves.
- Use semi-synchronous replication between master and backup master.
- Master sends update to backup master and waits with transaction commit.
- Backup master gets update, writes to its relay log and flushes to disk. Backup master then acknowledges receipt of the transaction to the master.
- Master proceeds with transaction commit.
- Semi-sync replication has a performance impact, but the risk for data loss is minimized.
- Have only the replication process to make changes on the slaves, so as to minimize the risk of data conflicts on the slaves. Slaves should therefore be started in read-only mode. Applications will not be able to modify data directly on the slaves, but the Replication process will still function on a read-only server.
- Replication sends larger packets between the servers, the max_allowed_packet set to a high value so as to avoid replication errors.
- Binary logs need to be available to bring a new slave up to date. Provisioning of a new slave requires a combination of the last backup, and all transactions that happened after the backup.
- Replication connection parameters should not be placed in the my.cnf file. For instance, a slave may have its configuration file overwritten, and not know from what point to continue the replication.