blog
Read-Write Splitting for Java Apps Using Connector/J, MySQL Replication and HAProxy

In a previous post, we looked into load balancing for PHP apps and how to configure read-write splitting on MySQL Replication setups. The native PHP MySQL driver (php-mysqlnd_ms) would perform read/write splits, and the MySQL connections would be made on one of the two listeners of HAProxy.
Today, we’ll play around with Java, Connector/J, MySQL Replication and HAProxy. One important thing to note is that, unlike php-mysqlnd_ms, Connector/J is aware of MySQL Replication but it does not automatically perform read-write splitting. We have to instruct the query statement in the code of our Java application to establish a so-called read operation, using a JDBC connection object as read-only. Then, the driver will redirect the query to one of the healthy slaves as defined in the JDBC connection string.
Why add HAProxy between Connector/J and MariaDB?
We are going to manually deploy a MariaDB Replication setup and add it into ClusterControl using “Add Existing Server/Cluster”. Then, we will deploy HAProxy with Keepalived, and create a simple Java application to connect to our Replication setup.
Since we are using MariaDB Server, we are going to use MariaDB Connector/J. Similar to MySQL Connector/J (MariaDB’s Connector/J also supports MySQL and vice versa), it supports various features like read/write master, failover or round-robin load balanced set of slaves. These features are configurable from the application via coding, and we want to eliminate that so the load balancer tier (HAProxy and Keepalived) is totally independent.
The load balancer tier will take care of failover, load balancing, connection throttling, Virtual IP address and backend health checks. By doing this, we can minimize the hard-coded changes on the application side and reduce dependency between the layers. If you have multiple application/web servers that connect to a single replication setup, or the database servers are hosted in a dynamic environment that is constantly changing (e.g Docker, cloud instances), then this setup might be what you are looking for.
Our architecture looks like this:
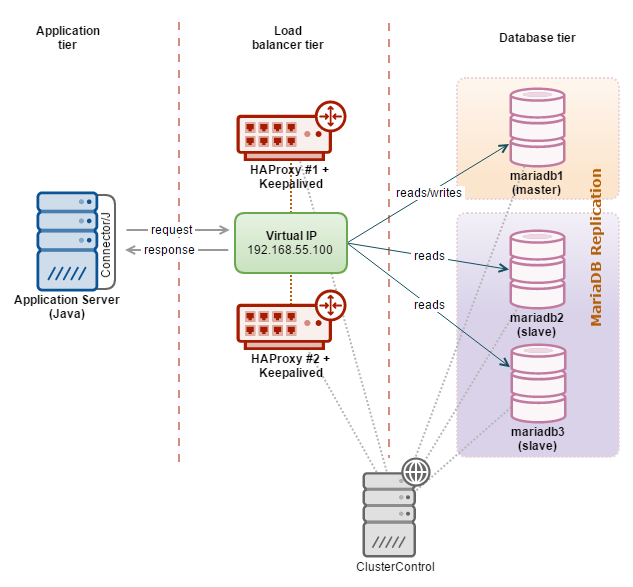
Our simple Java application is hosted on the web server, and the JDBC driver will redirect writes to the HAProxy node on port 3307 while reads are redirected to port 3308. A hot-standby HAProxy instance is coupled with Keepalived to provide a virtual IP address. The web server connects to the virtual IP address on the respective port as a single access point to our MariaDB Replication setup. All database nodes in this setup are running on Debian 8 (Jessie).
Deploying a replicated master-slave MariaDB setup
- Let’s deploy our MariaDB setup. We used three hosts for this purpose, one master and two slaves. Install MariaDB server on each of the server:
$ apt-get install software-properties-common
$ apt-key adv --recv-keys --keyserver keyserver.ubuntu.com 0xcbcb082a1bb943db
$ add-apt-repository 'deb [arch=amd64,i386] http://ossm.utm.my/mariadb/repo/10.1/debian jessie main'
$ apt-get update
$ apt-get install -y mariadb-server
** Enter the MySQL root password in the password dialog.
- Configure each MariaDB server with minimal recommended replication configuration. Firstly, create a new MariaDB configuration file at /etc/mysql/my.cnf:
$ vi /etc/my.cnfAnd add following lines:
mariadb1:
[mysqld]
bind-address=0.0.0.0
gtid_domain_id=1
log_bin=binlog
log_slave_updates=1
expire_logs_days=7
server_id=1001
binlog_format=ROW
basedir=/usr
datadir=/var/lib/mysql
pid_file=mysql.pid
socket=/var/run/mysqld/mysqld.sock
mariadb2:
[mysqld]
bind-address=0.0.0.0
gtid_domain_id=1
log_bin=binlog
log_slave_updates=1
expire_logs_days=7
server_id=1002
binlog_format=ROW
basedir=/usr
datadir=/var/lib/mysql
pid_file=mysql.pid
socket=/var/run/mysqld/mysqld.sock
mariadb3:
[mysqld] bind-address=0.0.0.0 gtid_domain_id=1 log_bin=binlog log_slave_updates=1 expire_logs_days=7 server_id=1003 binlog_format=ROW basedir=/usr datadir=/var/lib/mysql pid_file=mysql.pid socket=/var/run/mysqld/mysqld.sock - Restart MariaDB to load the changes:
$ systemctl restart mysql - On mariadb1, create the replication slave user. Use mysql client to access the server:
$ mysql -uroot -pAnd run the following statements:
MariaDB [(none)]> GRANT REPLICATION SLAVE ON *.* TO ‘slave’@’%’ IDENTIFIED BY ‘slavepassword’; MariaDB [(none)]> FLUSH PRIVILEGES; - Identify the MariaDB GTID value on mariadb1 by using the binlog_gtid_pos function:
MariaDB [(none)]> show master status;
+---------------+----------+--------------+------------------+
| File          | Position | Binlog_Do_DB | Binlog_Ignore_DB |
+---------------+----------+--------------+------------------+
| binlog.000003 |      609 |              |                  |
+---------------+----------+--------------+------------------+
1 row in set (0.00 sec)

MariaDB [(none)]>  SELECT binlog_gtid_pos('binlog.000003',609);
+--------------------------------------+
| binlog_gtid_pos('binlog.000003',609) |
+--------------------------------------+
| 1-1001-2                             |
+--------------------------------------+
The GTID position is 1-1001-2. We will use this value when setting up the slaves.
- On slaves (mariadb2 and mariadb3), run the following statements to start the slaves:
MariaDB [(none)]> SET GLOBAL gtid_slave_pos = '1-1001-2'; MariaDB [(none)]> CHANGE MASTER TO master_host='192.168.55.111', master_user='slave', master_password='slavepassword', master_use_gtid=slave_pos; MariaDB [(none)]> START SLAVE; - Verify the slave status and ensure the value of Slave_IO_Running and Slave_SQL_Running is ‘Yes’:
MariaDB [(none)]> SHOW SLAVE STATUSG
Our Replication setup is now deployed.
Adding the Replication Setup into ClusterControl
- Install ClusterControl on ClusterControl server.
- Once installed, generate SSH keys and copy it to all nodes (including the ClusterControl server itself):
$ ssh-keygen -t rsa $ ssh-copy-id 192.168.55.110 # ClusterControl + Haproxy #1 $ ssh-copy-id 192.168.55.111 # mariadb1 $ ssh-copy-id 192.168.55.112 # mariadb2 $ ssh-copy-id 192.168.55.113 # mariadb3 $ ssh-copy-id 192.168.55.101 # Haproxy #2 - Login to ClusterControl and go to “Add Existing Server/Cluster”. Specify the required details in the dialog:

Click on ‘Add Cluster’ and wait for the job to complete.
Once completed, you should see something like the below in the ClusterControl summary bar. You should see one master node and two slaves:

Since our database is MariaDB, we are going to change some parameters so ClusterControl can handle Replication for MariaDB. Find the following lines inside /etc/cmon.d/cmon_1.cnf and change the value accordingly:
type=replication
vendor=mariadb
Save the file and restart CMON service so it loads up the new configuration options:
$ service cmon restartGo to ClusterControl > Settings > Cluster Registrations > Synchronize Cluster to load up the interface for Replication. You should now notice the changes, similar to the screenshot below:

Deploying HAProxy and Configuring Health Checks
Similar to the previous blog post, we are going to use the same custom health check script for MariaDB. This health check script produces a more accurate health check on the master and slave servers. The script detects the MySQL replication role on the database node as per below:
- if master (SHOW SLAVE HOSTS > 1 AND read_only = OFF)
- return ‘MySQL master is running.’
- if slave (Slave_IO_Running = Yes AND Slave_SQL_Running = Yes AND (Seconds_Behind_Master = 0 OR Seconds_Behind_Master < SLAVE_LAG_LIMIT))
- return ‘MySQL slave is running. (slave lag: 0)’
- else
- return ‘MySQL is *down*’
Note that the assigned mysql user must have at least PROCESS, REPLICATION CLIENT and REPLICATION SLAVE privileges in order for the script to report correctly.
- Before the deployment begins, run the following command on the ClusterControl node to replace the health check template for MySQL Replication:
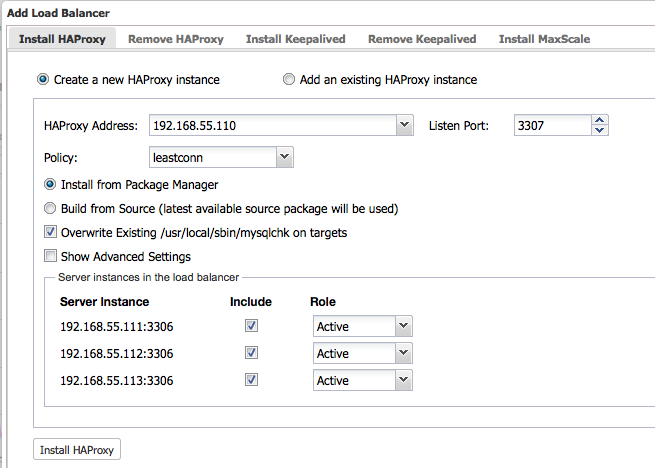
$ wget https://raw.githubusercontent.com/ashraf-s9s/mysqlchk/master/mysqlchk.mysql -O /usr/share/cmon/templates/mysqlchk.mysql - Now we are good to deploy the two HAProxy instances. Ensure the role for all nodes are set to Active and click on ‘Install HAProxy’ to start the installation:
Repeat the above step for the second HAproxy node.
- To make HAProxy work with MySQL Replication, two HAProxy listeners (3307 for writes, 3308 for reads) are required. We also have to use tcp-check to distinguish whether the backend node is a healthy master or slave. To achieve this, we need to perform some modification to the installed HAProxy configuration file located at /etc/haproxy/haproxy.cfg of the load balancer nodes.Ensure you have the following configuration lines in haproxy.cfg on both load balancer nodes (don’t forget to replace the existing listener directive created by ClusterControl):
listen  haproxy_192.168.55.110_3307
        bind *:3307
        mode tcp
        timeout client  10800s
        timeout server  10800s
        balance leastconn
        option tcp-check
        tcp-check expect string MySQL master
        option allbackups
        default-server port 9200 inter 2s downinter 5s rise 3 fall 2 slowstart 60s maxconn 64 maxqueue 128 weight 100
        server mariadb1 192.168.55.111:3306 check
        server mariadb2 192.168.55.112:3306 check
        server mariadb3 192.168.55.113:3306 check

listen  haproxy_192.168.55.110_3308
        bind *:3308
        mode tcp
        timeout client  10800s
        timeout server  10800s
        balance leastconn
        option tcp-check
        tcp-check expect string is running.
        option allbackups
        default-server port 9200 inter 2s downinter 5s rise 3 fall 2 slowstart 60s maxconn 64 maxqueue 128 weight 100
        server mariadb1 192.168.55.111:3306 check
        server mariadb2 192.168.55.112:3306 check
        server mariadb3 192.168.55.113:3306 check
** The use of ‘option tcp-check’ and ‘tcp-check expect’ is vital here. This is how HAProxy is capable of routing the incoming query to the correct backend server. Writes are redirected to the node which report ‘MySQL master is running’ (therefore the expected string is “MySQL master”). Reads are redirected to the nodes which contain “is running” in the return string, to include master (‘MySQL master is running’) and all slaves (‘MySQL slave is running’) in the read-only load balancing set.
Restart HAProxy service to load it up:
$ systemctl restart haproxyTo verify, go to ClusterControl > Nodes > choose one of the load balancer node, and you should see something like below:

- Then, deploy Keepalived with virtual IP address 192.168.55.100 via ClusterControl > Actions > Add Load Balancer > Install Keepalived:

At this point, all nodes have been deployed correctly – as indicated by the green ticks in the summary bar:

Database and load balancer tiers are now deployed. Let’s move to the application tier.
Deploying Application and MariaDB Connector/J
In this example, we wrote a simple Java application that can read/write to our MariaDB setup. The connection string for replication format is “jdbc:mysql:replication://master,slave1,slave2,slave3/database”, assumes that the first (and only the first) host is the master and the rest are slaves. We also need to install MariaDB Connector/J before the application can connect to the database.
To perform read-write splitting, we have to use the setReadOnly method. If the connection object with Connection.setReadOnly(false) is called, connection will be established on the available master, while Connection.setReadOnly(true) will be established to the available slave(s), throwing an SQLException if it cannot establish a connection to a slave, unless the property readFromMasterWhenNoSlaves is set to be “true”.
- Install Java and required packages:
$ yum install -y java-1.8.0-openjdk java-1.8.0-openjdk-devel - On the master node (mariadb1), create a database, a database user and a table, java.tbl_test:
$ mysql -uroot -p -h192.168.55.111 -P3306And run the following statements:
MariaDB> CREATE SCHEMA java; MariaDB> GRANT ALL PRIVILEGES ON java.* to java@’%’ IDENTIFIED BY ‘password’; MariaDB> CREATE TABLE tbl_test (id INT PRIMARY KEY AUTO_INCREMENT, data INT); - Create an application directory and a file called ExampleReadWrite.java:
$ mkdir -p /root/java-apps
$ vi /root/java-apps/ExampleReadWrite.java
And paste the following lines into it:
import java.sql.*; public class ExampleReadWrite { // JDBC driver name and database URL static final String JDBC_DRIVER = "org.mariadb.jdbc.Driver"; static final String DB_URL = "jdbc:mysql:replication://192.168.55.100:3307,192.168.55.100:3308/java"; // Database credentials static final String USER = "java"; static final String PASS = "password"; public static void main(String[] args) { Connection conn = null; Statement stmt = null; try { // Register JDBC driver Class.forName("org.mariadb.jdbc.Driver"); // Open a connection while (true) { conn = DriverManager.getConnection(DB_URL, USER, PASS); stmt = conn.createStatement(); String insert_sql = "INSERT INTO tbl_test (data) VALUES (1)"; String get_hostname = "SELECT @@hostname"; String read_sql = "SELECT @@hostname AS hostname, count(id) AS count FROM tbl_test"; // Turn off readonly so write is forwarded to master - HAProxy port 3307 conn.setReadOnly(false); conn.setAutoCommit(false); ResultSet hrs = stmt.executeQuery(get_hostname); stmt.executeUpdate(insert_sql); conn.commit(); if (hrs.next()) { String write_hostname = hrs.getString(1); System.out.println("[WRITE] Hostname: " + write_hostname); } // Turn on readonly so read is forwarded to master/slave(s) - HAProxy port 3308 conn.setReadOnly(true); ResultSet rs = stmt.executeQuery(read_sql); while (rs.next()) { String hostname = rs.getString("hostname"); int row_count = rs.getInt("count"); System.out.println("[READ ] Hostname: " + hostname + " | Row counts: " + row_count); System.out.println(""); } rs.close(); stmt.close(); conn.close(); // Pause for 2 seconds before loop Thread.sleep(2000); } } catch (SQLException se) { se.printStackTrace(); } catch (Exception e) { e.printStackTrace(); } finally { try { if (stmt != null) stmt.close(); } catch (SQLException se2) {} try { if (conn != null) conn.close(); } catch (SQLException se) { se.printStackTrace(); } } System.out.println("Goodbye!"); } } - Download and install MariaDB Connector/J JAR file from this page (registration required) inside the application directory. Then, set the location of the JAR file into CLASSPATH environment so Java can load it:
$ cd /root/java-apps $ wget https://downloads.mariadb.com/enterprise/zdkv-r01a/connectors/java/connector-java-1.3.6/mariadb-java-client-1.3.6.jar $ export CLASSPATH=/root/java-apps/mariadb-java-client-1.3.6.jar:$CLASSPATH - Compile the source:
$ javac ExampleReadWrite.java - Let’s run the application:
$ java ExampleReadWrite
[WRITE] Hostname: mariadb1.local
[READ ] Hostname: mariadb1.local | Row counts: 124

[WRITE] Hostname: mariadb1.local
[READ ] Hostname: mariadb2.local | Row counts: 125

[WRITE] Hostname: mariadb1.local
[READ ] Hostname: mariadb3.local | Row counts: 126

[WRITE] Hostname: mariadb1.local
[READ ] Hostname: mariadb1.local | Row counts: 127

[WRITE] Hostname: mariadb1.local
[READ ] Hostname: mariadb2.local | Row counts: 128

[WRITE] Hostname: mariadb1.local
[READ ] Hostname: mariadb3.local | Row counts: 129

[WRITE] Hostname: mariadb1.local
[READ ] Hostname: mariadb1.local | Row counts: 130
From the application’s output, we can see that writes will always go to master (mariadb1.local) while reads are distributed evenly to all nodes (slaves + master), based on the leastconn algorithm specified in the HAProxy configuration.
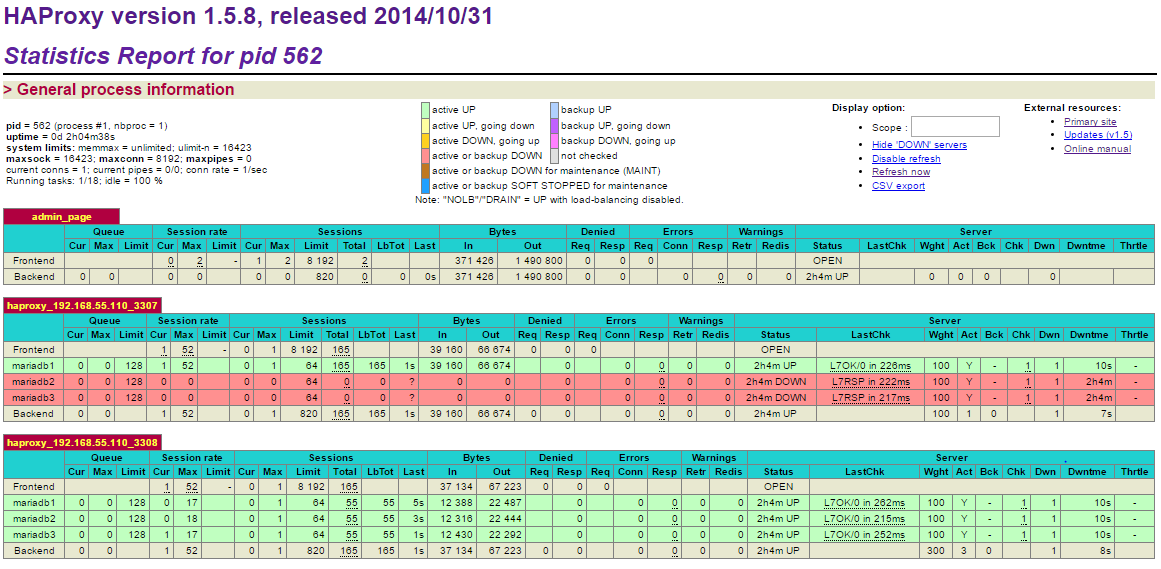
You can also access the HAProxy admin page available at http://[clustercontrol_server]:9600/ with default username/password is “admin”:
Note that in this example, no connection pooling is configured for our Java apps.
Connection Pooling + HAProxy
Connection pooling is popular in Java since it can significantly increase the performance of your Java application, while reducing overall resource usage. After a connection is created, it is placed in the pool and it is used again so that a new connection does not have to be established. If all the connections are being used, a new connection is made and is added to the pool. Connection pooling also cuts down on the amount of time a user must wait to establish a connection to the database.
On the other hand, HAProxy is pretty good in forwarding raw TCP packets where connections are created and then closed. Due to this, HAProxy is usually configured with low timeout values. Common practice if using connection pooling with HAProxy is to configure the timeout client, timeout connect and timeout server variables to be the same value as the timeout value configured in the connection pool. Also, the value of HAProxy’s maxconn must be equal to or greater than the maximum number of database connections in the pool.
Wrapping up
In this blog post, we demonstrated how to create a more resilient architecture for your Java apps on top of replication setups with the help of ClusterControl. For more in-depth information on read-write splitting and other replication considerations for highly available MySQL clusters, read this white paper on MySQL replication for High Availability.
And don’t forget to follow us on Twitter or LinkedIn and sign-up to our newsletter below!


