blog
High Availability Read-Write Splitting with php-mysqlnd, MySQL Replication and HAProxy

MySQL Replication is used in a variety of use cases – scale out read workloads, provide high availability and geographic redundancy, offload backups and reporting/analytic jobs. However it has a big drawback – the application needs to be able to send writes to the master only. Updating more than one master in a replication setup can result in data inconsistency and cause replication to break.
An SQL-aware load balancer like MaxScale could help here, as it could redirect SQL to the appropriate node. If you are using HAProxy and the application is written in PHP, read-write splitting is still achievable with the PHP MySQL native driver with master slave plugin (aka php-mysqlnd_ms). The driver can perform the read-write splitting, as well as load balancing and failover. There are advantages for having a load balancer as well though. php-mysqlnd_ms also has experimental support for multi-master replication setups like Galera or MMM.
In this blog post, we explore the use of php-mysqlnd_ms with a PHP application (WordPress) on a standard MySQL Replication backend.
Why add HAProxy between php-mysqlnd and MySQL?
The suggestion here is to use HAProxy between the PHP driver and MySQL, as it provides a single point access to the application, routes queries to the backend MySQL servers and also takes care of the master slave health checks. The reason behind this is to minimize the changes that need to be done on the php-mysqlnd configuration file residing on each application server. Especially important during dynamic replication topology changes, e.g., when a new slave is added or removed from the setup. If you have many application/web servers that connects to a single replication setup or the database servers are hosted in a dynamic environment that is constantly changing (e.g Docker, cloud instances), then this setup might be what you are looking for.
Our architecture looks like this:
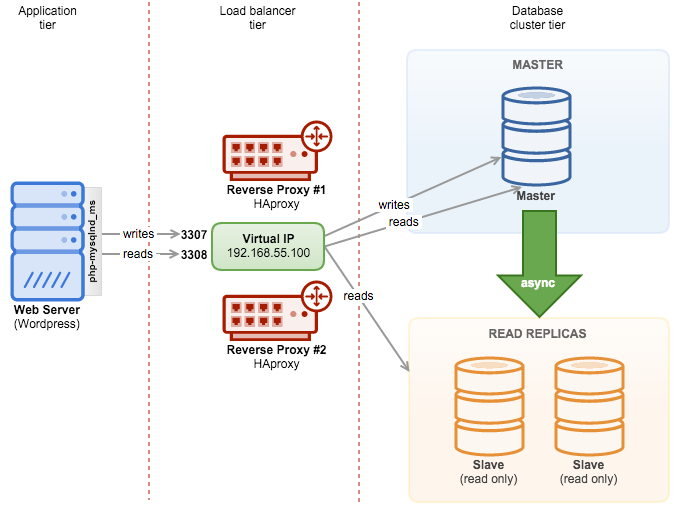
The PHP application (WordPress) is hosted on the web server, and php-mysqlnd_ms will redirect writes to the HAProxy node on port 3307 while reads are redirected to port 3308. A hot-standby HAProxy instance is coupled with Keepalived to provide a virtual IP address. The web server connects to the virtual IP address on the respective port as a single access point to our MySQL Replication setup. All nodes in this setup are running on Debian 8 (Jessie).
Deploying MySQL Replication
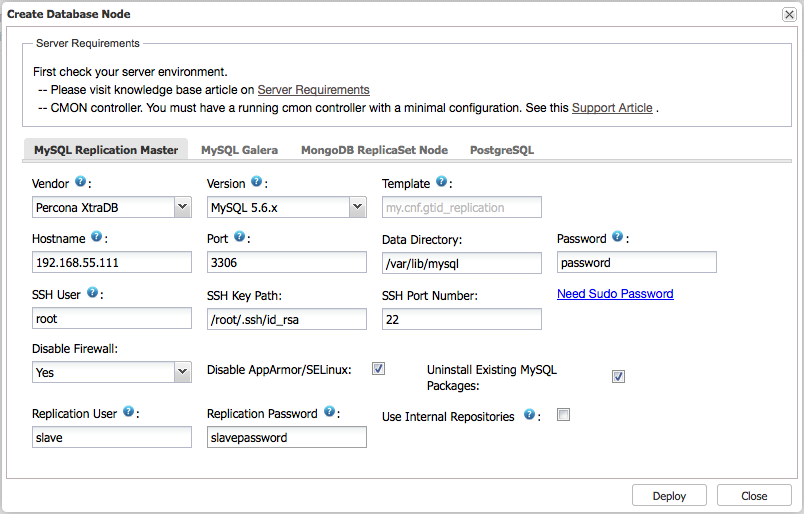
We use ClusterControl to deploy a three node MySQL Replication with two slaves. Install ClusterControl and go to “Create Database Node”. In this dialog, we are going to create a MySQL Replication master node. Specify the required information and click “Deploy”:
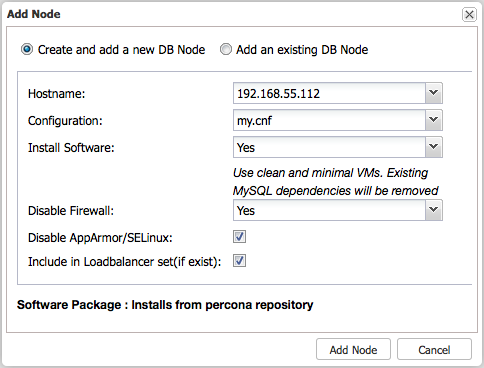
Once added, we will use “Add Node” function to add one slave at a time:
Repeat the above step for the second slave. At the end of the deployment, you should see something like the below in ClusterControl’s summary bar. You should see one master node and two slaves:

Deploying HAProxy and Configuring Health Checks
ClusterControl supports deployment of HAProxy and Keepalived. For MySQL Replication, ClusterControl by default uses a script called mysqlchk located at /usr/local/sbin/mysqlchk on the every database node to run a simple ‘select 1’ health check. The script doesn’t produce an accurate health check result and can’t distinguish whether the database node is a healthy master or slave.
We have to come out with a better health check that suits HAProxy. For the purpose of this blog post, we have built a custom health check script. The script detects the MySQL replication role on the database node as per below:
- if master (SHOW SLAVE HOSTS > 1 AND read_only = OFF)
- return ‘MySQL master is running.’
- if slave (Slave_IO_Running = Yes AND Slave_SQL_Running = Yes AND (Seconds_Behind_Master = 0 OR Seconds_Behind_Master < SLAVE_LAG_LIMIT))
- return ‘MySQL slave is running. (slave lag: 0)’
- else
- return ‘MySQL is *down*’
Note that the assigned mysql user must have at least REPLICATION CLIENT and REPLICATION SLAVE in order for the script to report correctly.
1.
Before the deployment begins, run the following command on the ClusterControl node to replace the health check template for MySQL Replication:
$ wget https://raw.githubusercontent.com/ashraf-s9s/mysqlchk/master/mysqlchk.mysql -O /usr/share/cmon/templates/mysqlchk.mysql2.
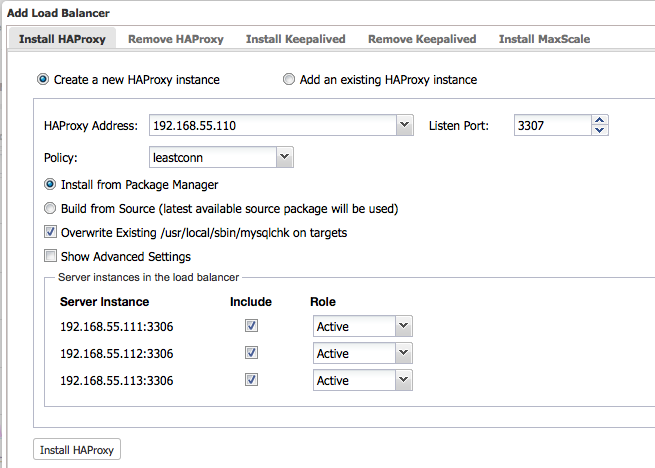
Now we are good to deploy the two HAProxy instances. Ensure the role for all nodes are set to Active and click on ‘Install HAProxy’ to start the installation:
**Repeat the above step for the second HAproxy node.
3.
To make HAProxy work with MySQL Replication, two HAProxy listeners (3307 for writes, 3308 for reads) are required. We also have to use tcp-check to distinguish whether the backend node is a healthy master or slave. To achieve this, we need to perform some modification to the installed HAProxy configuration file located at /etc/haproxy/haproxy.cfg of the load balancer nodes.
Ensure you have the following configuration lines in haproxy.cfg on both load balancer nodes:
listen  haproxy_192.168.55.110_3307
        bind *:3307
        mode tcp
        timeout client  10800s
        timeout server  10800s
        balance leastconn
        option tcp-check
        tcp-check expect string MySQL master
        option allbackups
        default-server port 9200 inter 2s downinter 5s rise 3 fall 2 slowstart 60s maxconn 64 maxqueue 128 weight 100
        server 192.168.55.111 192.168.55.111:3306 check
        server 192.168.55.112 192.168.55.112:3306 check
        server 192.168.55.113 192.168.55.113:3306 check

listen  haproxy_192.168.55.110_3308
        bind *:3308
        mode tcp
        timeout client  10800s
        timeout server  10800s
        balance leastconn
        option tcp-check
        tcp-check expect string is running.
        option allbackups
        default-server port 9200 inter 2s downinter 5s rise 3 fall 2 slowstart 60s maxconn 64 maxqueue 128 weight 100
        server 192.168.55.111 192.168.55.111:3306 check
        server 192.168.55.112 192.168.55.112:3306 check
        server 192.168.55.113 192.168.55.113:3306 check
** The use of ‘option tcp-check’ and ‘tcp-check expect’ is vital here. This is how HAProxy is capable to route the incoming query to the correct backend server. Writes are redirected to the node which report ‘MySQL master is running’ (therefore the expected string is “MySQL master”). Reads are redirected to the nodes which contain “is running” in the return string, to include master (‘MySQL master is running’) and all slaves (‘MySQL slave is running’) in the read-only load balancing set.
4.
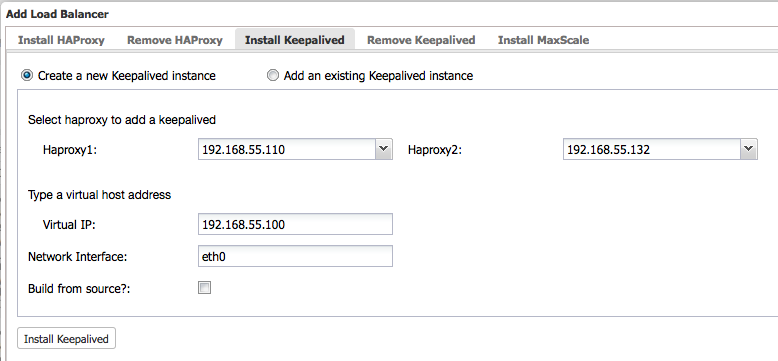
Then, deploy Keepalived with virtual IP address 192.168.55.100 via ClusterControl > Actions > Add Load Balancer > Install Keepalived:
At this point, all nodes have been deployed correctly – as indicated by the green ticks in the summary bar:

Database and load balancer tiers are now deployed. Let’s move to the application tier.
Deploying Web Server and Configuring php-mysqlnd for Master Slave
The following steps should be performed on the web/application server:
1.
Install Apache web server and PHP 5 packages:
$ apt-get install apache2 libapache2-mod-php5 php5-common php5-gd php5-json php5-curl php5-mysqlnd php-pear php5-dev2.
Install mysqlnd_ms module through PECL:
$ pecl install mysqlnd_ms3.
Create a configuration file for mysqlnd_ms:
$ vi /etc/php5/mods-available/mysqlnd_ms.ini4.
Add the following line:
**We are using priority=40 since it requires php-mysqlnd module to be loaded first.
5.
Enable the module:
$ php5enmod mysqlnd_ms6.
Create the mysqlnd_ms.json configuration file
$ vi /etc/php5/mods-available/mysqlnd_ms.json7.
Add the following lines:
{
       "wordpress_ms": {
               "master": {
                       "master_0": {
                               "host": "192.168.55.100",
                               "port": "3307",
                               "user": "wpress",
                               "password": "password",
                               "db": "wpress"
                       }
               },
               "slave": {
                       "slave_0": {
                               "host": "192.168.55.100",
                               "port": "3308",
                               "user": "wpress",
                               "password": "password",
                               "db": "wpress"
                       }
               }
       }
}
We defined the application name as “wordpress_ms”, this value will be used to replace the ‘host’ value in MySQL function call. The master section provides information about the MySQL master – we forward writes to the virtual IP address on the HAProxy node, on port 3307. HAProxy will automatically discover the correct master to send the writes to. The slave section provides information for MySQL slaves – we forward reads to the virtual IP address on the HAProxy node, on port 3308. HAProxy will then automatically discover which nodes available to send the reads to.
8. The JSON configuration file must be accessible by the Apache user, in this case we are using the default www-data. Apply correct ownership on the config file:
$ chown www-data.www-data /etc/php5/mods-available/mysqlnd_ms.jsonNow we are ready to deploy Wordpess with MySQL Replication as the database backend.
Installing WordPress
When installing WordPress, specify the mysqlnd_ms application name (wordpess_ms) as the Database Host value:

That’s it! You are now running WordPress with read-write splitting on top of MySQL Replication.
Testing
Writes are done on the master server only. If the master fails, replication will stop. Failover must be done by promoting the most updated slave, before replication can resume. Applications doing updates must then reconnect to the newly promoted master and then continue to operate.
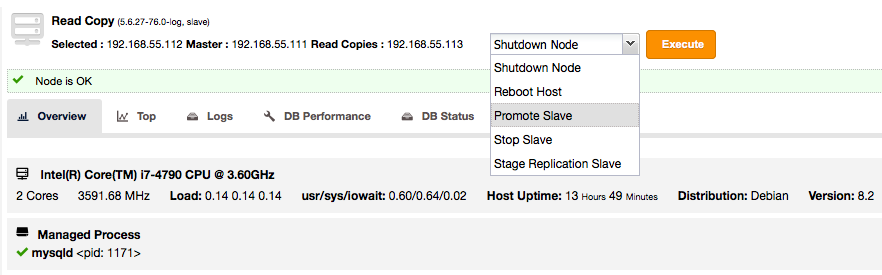
If the master (192.168.55.111) is down, we need to promote one of the slaves (192.168.55.112) to new master. To achieve this, go to ClusterControl > Nodes > choose 192.168.55.112 > Promote Slave:
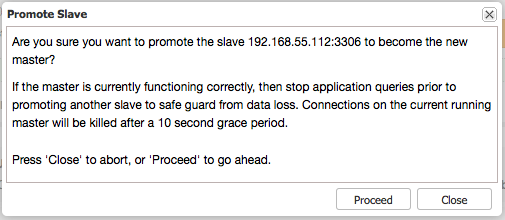
Once selected, click ‘Execute’. You will be prompted with the following:
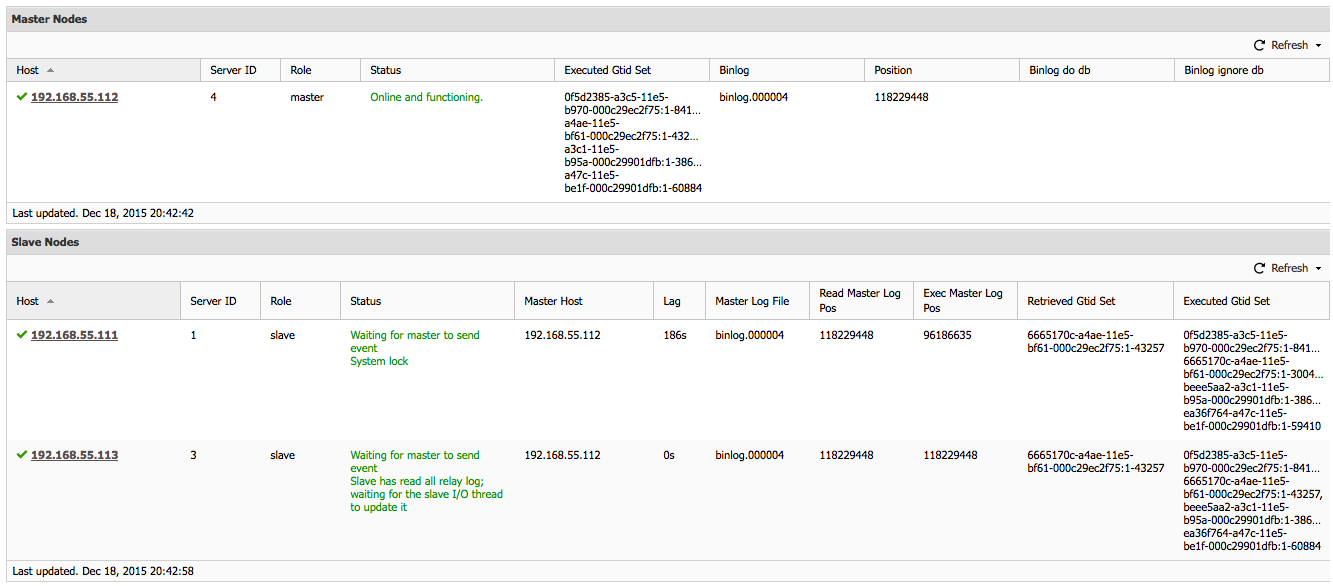
Once the selected slave has become the new master, the other slaves will automatically failover to the new master and continue to get updates while the old master is down. When the old master comes up again, it will take the role of a slave and synchronize with the new master (which is handling application updates). This is orchestrated by ClusterControl. The following screenshot shows the old master (192.168.55.111) has became a slave in the replication chain:
Once the old master is up-to-date with the new master, the old master will remain as slave.
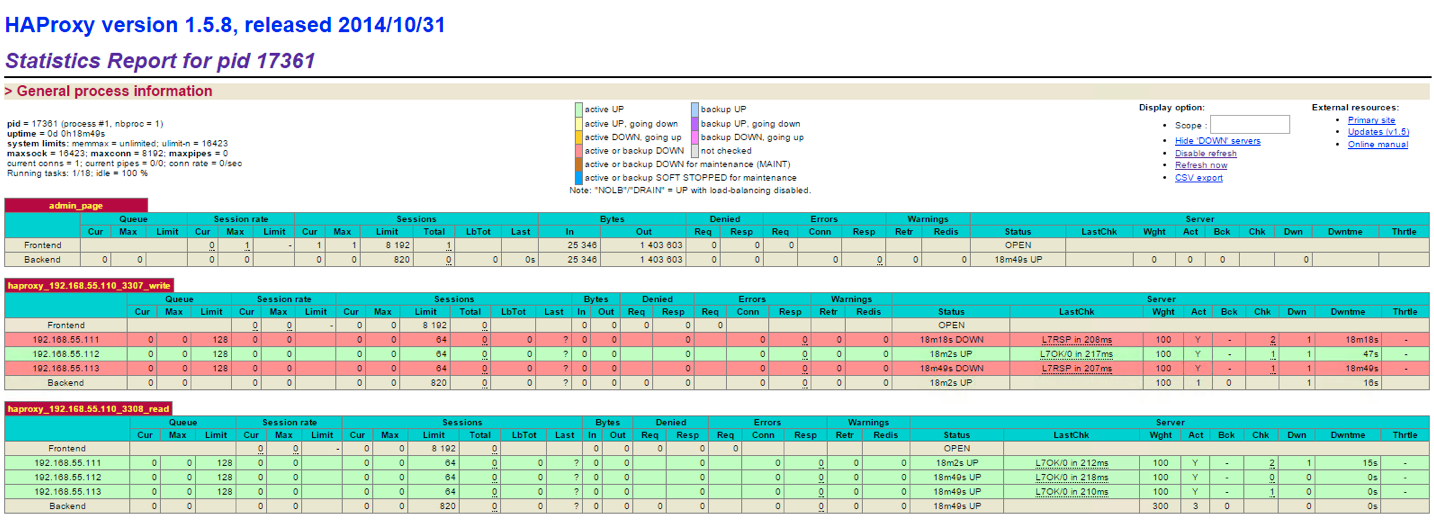
When a new master is promoted, HAProxy will automatically send the writes to the newly promoted node, as shown in the HAProxy stats page below:
This setup will require no changes on the application and load balancer tier if the replication topology changes. Easier to manage and less error prone.
Wrapping up
In this blog post, we demonstrated how to set up php-mysqlnd_ms for read-write splitting, with a PHP application (WordPress) on a standard MySQL Replication backend with the help of ClusterControl.
For more in-depth information on read-write splitting and other replication considerations for highly available MySQL clusters, read this white paper on MySQL replication for High Availability.
And don’t forget to follow us on Twitter or LinkedIn and sign-up to our newsletter below!


