blog
Multi-Cloud Galera Cluster on AWS and Azure via Asynchronous Replication

In this blog post, we are going to set up two Galera-based Clusters running on Percona XtraDB Cluster 5.7, one for the production and one for the disaster recovery (DR). We will use ClusterControl to deploy both clusters in AWS and Azure, where the latter will become the disaster recovery site.
ClusterControl is located in our local data center and it is going to communicate with all the database nodes using direct connectivity via public IP addresses. Both production and disaster recovery sites will be replicating through an encrypted asynchronous replication where database nodes in AWS are the master cluster while database nodes on Azure are the slave cluster.
The following diagram illustrates our final architecture that we are trying to achieve:
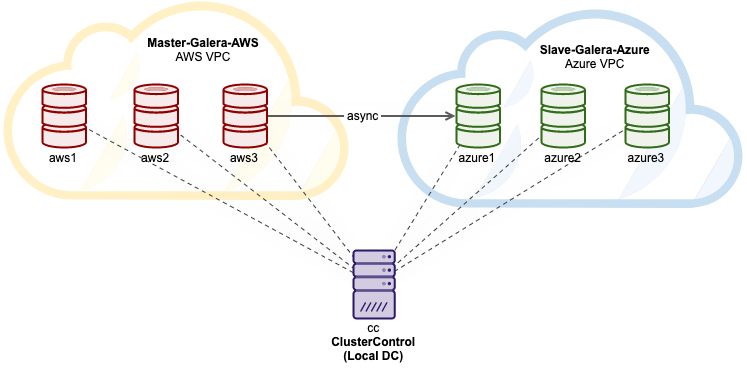
All instances are running on Ubuntu 18.04. Note that both clusters are inside their own virtual private network, thus intra-cluster communication will always happen via the internal network.
ClusterControl Installation
First of all, install ClusterControl on the local DC server. Simply run the following command on the ClusterControl server:
$ wget https://severalnines.com/downloads/cmon/install-cc
$ chmod 755 install-cc
$ ./install-cc
Follow the instructions until the installation completes. Then, open a web browser and go to http://{ClusterControl_IP}/clustercontrol and create an admin user account.
Configuring Cloud Credentials
Once the ClusterControl is running, we will need to configure the cloud credentials for both AWS and Microsoft Azure. Go to Integrations -> Cloud Providers -> Add Cloud Credentials and add both credentials. For AWS, follow the steps as described in the documentation page to obtain the AWS key ID, AWS key secret and also specify the default AWS region. ClusterControl will always deploy a database cluster in this defined region.
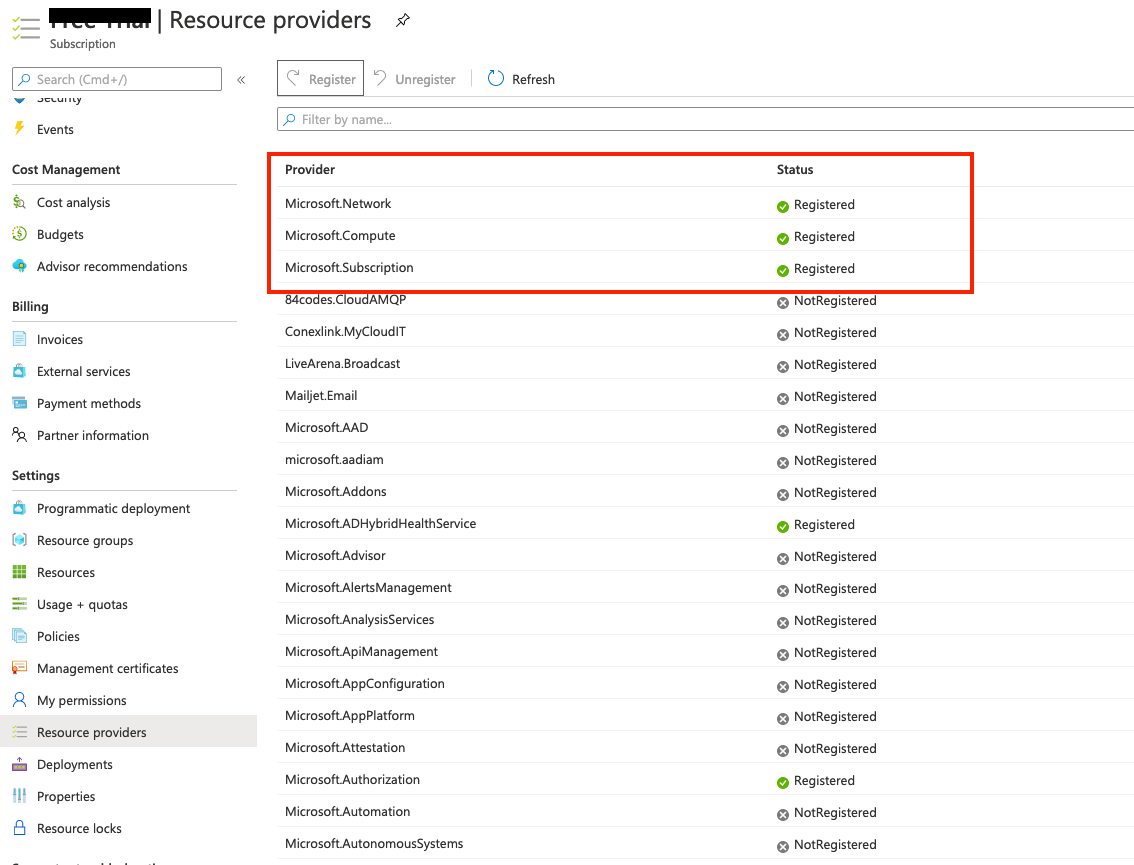
For Microsoft Azure, one has to register an application and grant access to the Azure resources. The steps are described here in this documentation page. Make sure the Resource Groups’ providers for “Microsoft.Network”, “Microsoft.Compute” and “Microsoft.Subscription” are registered:
Once both keys are added, the end result would look like this:

We have configured two cloud credentials, one for AWS and another for Microsoft Azure. These credentials will be used by ClusterControl for database cluster deployment and management later on.
Running a Master Galera Cluster on AWS
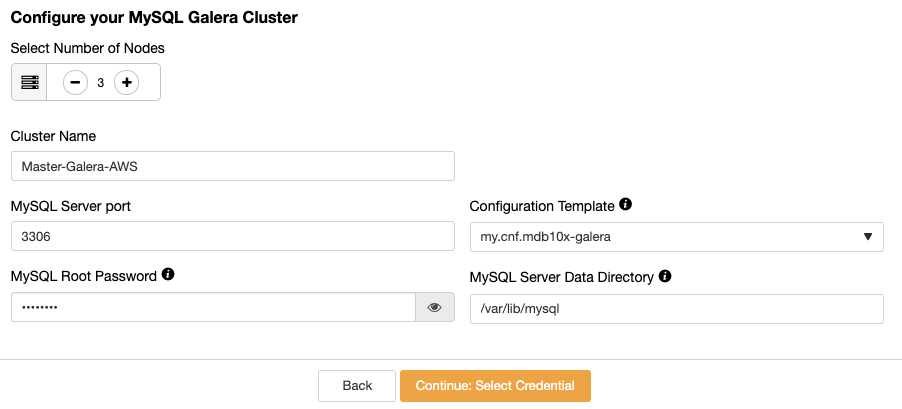
We are now ready to deploy our master cluster on AWS. Click on Deploy -> Deploy in the Cloud -> MySQL Galera and choose Percona XtraDB Cluster 5.7 as the vendor and version, and click Continue. Then under “Configure Cluster” page, specify the number of nodes to 3, with its cluster name “Master-Galera-AWS” as well as the MySQL root password, as shown in the following screenshot:
Click Continue, and choose the AWS credentials under Select Credentials:

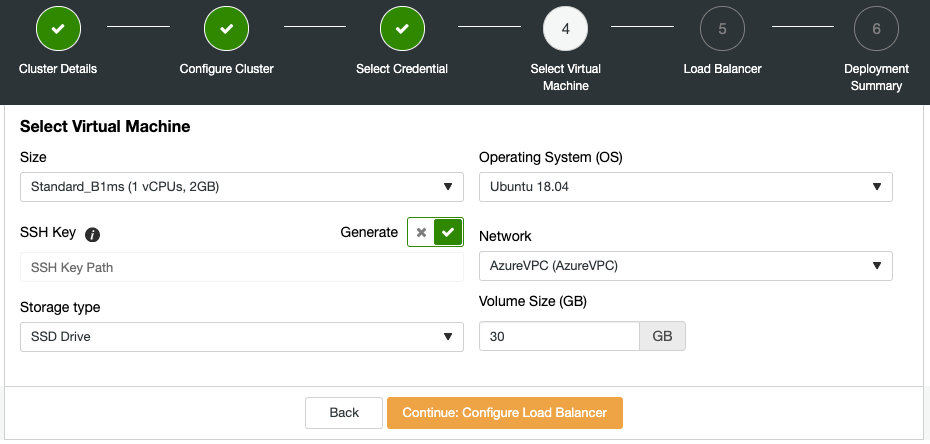
Continue to the next section to select the cloud instances:
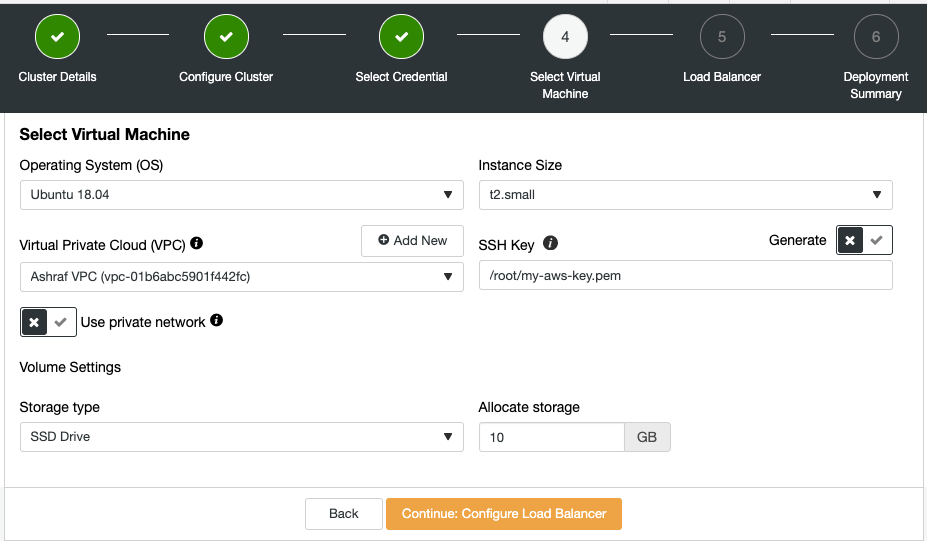
In this dialog, choose the operating system, instance size and the VPC that we want ClusterControl to deploy the database cluster onto. We already have a VPC configured so we are going to use the existing one. Since the ClusterControl server is located outside of AWS, we are going to skip “Use private network”. If you want to use an existing keypair, make sure the key exists on the ClusterControl node with the path that we specified here, /root/my-aws-key.pem. Otherwise, toggle the Generate button to ON and ClusterControl will generate a new keypair and use it specifically for this deployment. The rest is pretty self-explanatory. Click Continue and skip the next step for HAProxy load balancer configuration.
Finally, under the Deployment Summary dialog, we need to choose any existing subnet of the chosen VPC or create a new one. In this example, we are going to create a new subnet specifically for this purpose, as below:

Looks good. We can now start the deployment process. ClusterControl will use the provided cloud credentials to create cloud instances, configure networking and SSH key, and also deploy the Galera Cluster on AWS. Grab a cup of coffee while waiting for this deployment to complete.
Once done, you should see this database cluster appear in the cluster list and when clicking on the Nodes page, we should be able to see that ClusterControl has deployed the cluster with two IP addresses, one for the public interface and another for the private interface in the VPC:

Galera communication happens through the private IP interface, 10.15.10.0/24 based on the subnet defined in the deployment wizard. The next step is to enable binary logging on all nodes in the master cluster, so the slave cluster can replicate from any of the nodes. Click on Node Actions -> Enable Binary Logging and specify the following details:
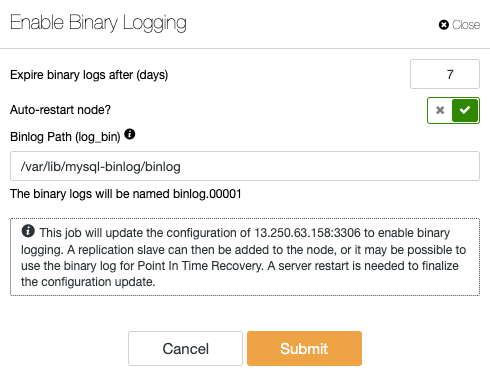
Repeat the same step for the remaining nodes. Once done, we can see there are 3 new ticks for “MASTER”, indicating that there are 3 nodes that can potentially become a master (because they produce binary logs) on the cluster’s summary bar similar to the screenshot below:

Our master cluster deployment is now complete.
Running a Slave Galera Cluster on Azure
Similarly for Azure, we are going to deploy the exact same Galera Cluster version. Click on Deploy -> Deploy in the Cloud -> MySQL Galera and choose Percona XtraDB Cluster 5.7 as the vendor and version, and click Continue. Then under Configure Cluster page, specify the number of nodes to 3, with its cluster name “Slave-Cluster-Azure” as well as the MySQL root password.
Click Continue, and choose the corresponding Azure credentials under Select Credentials:

Then, choose the Azure region, instance size and network. In this deployment, we are going to ask ClusterControl to generate a new SSH key for this deployment:
Click Continue and skip the next step for HAProxy load balancer configuration. Click Continue to the Deployment Summary, where you need to pick an existing subnet of the chosen VPC or create a new one. In this example, we are going to create a new subnet specifically for this purpose, as below:
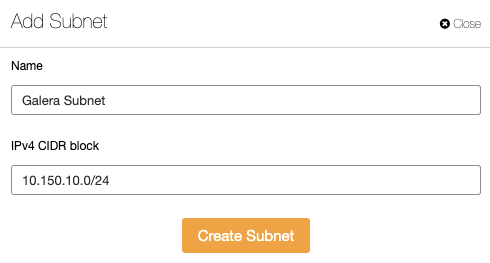
In this setup, our AWS CIDR block is 10.15.10.0/24 while the Azure CIDR block is 10.150.10.0/24. Proceed for the cluster deployment and wait until it finishes.
Once done, you should see this database cluster appear in the cluster list and when clicking on the Nodes page, we should be able to see that ClusterControl has deployed the cluster with two IP addresses, one for the public interface and another for the private interface in the VPC:
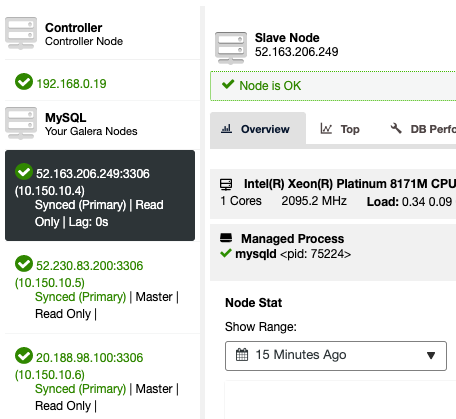
Galera communication happens through the private IP interface, 10.150.10.0/24 based on the subnet defined in the deployment wizard. The next step is to enable binary logging on all nodes in the slave cluster, which is useful when we want to fall back to the production cluster after a failover to the DR. Click on Node Actions -> Enable Binary Logging and specify the following details:
Repeat the same step for the remaining nodes. Once done, we can see there are 3 new ticks for “MASTER”, indicating that there are 3 nodes that potentially become a master, on the cluster’s summary bar. Our slave cluster deployment is now complete.
Setting Up the Asynchronous Replication Link
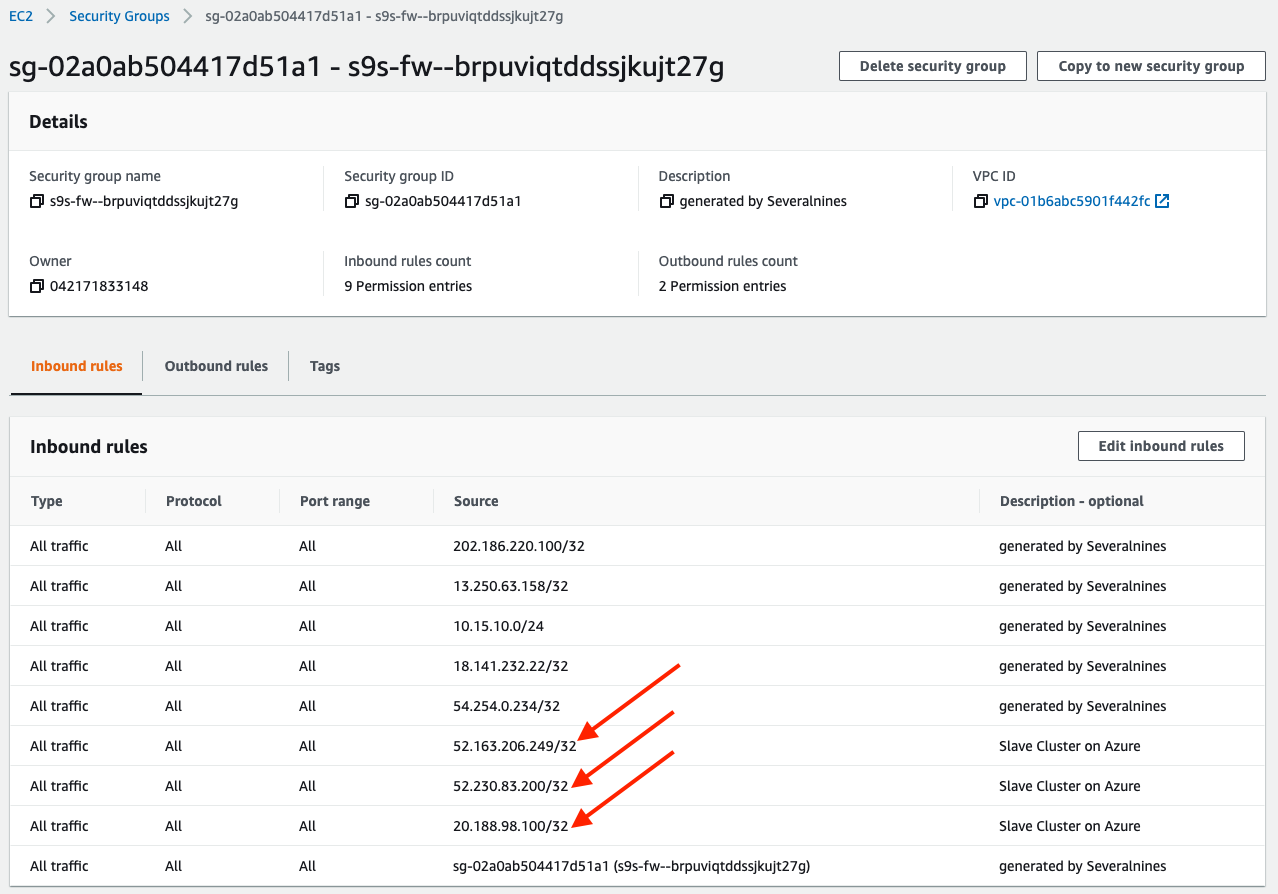
Before we can start to establish the replication link, we have to allow the slave cluster to communicate with the master cluster. By default, ClusterControl will create a specific security group and allow all IP addresses or networks that matter for that particular cluster connectivity. Therefore, we need to add a couple more rules to allow the Azure nodes to communicate with the AWS nodes.
Inside AWS Management Console, navigate to the respective Security Groups and edit the inbound rules to allow IP address from Azure, as highlighted in the following screenshot:
Create a replication slave user on the master cluster to be used by the slave cluster. Go to Manage -> Schemas and Users -> Create New User and specify the following:
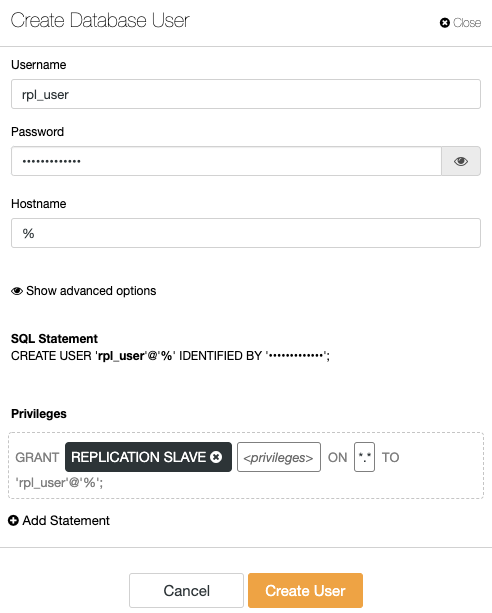
Alternatively, you can use the following statements on any node of the master cluster:
mysql> CREATE USER 'rpl_user'@'%' IDENTIFIED BY 'SlavePassw0rd';
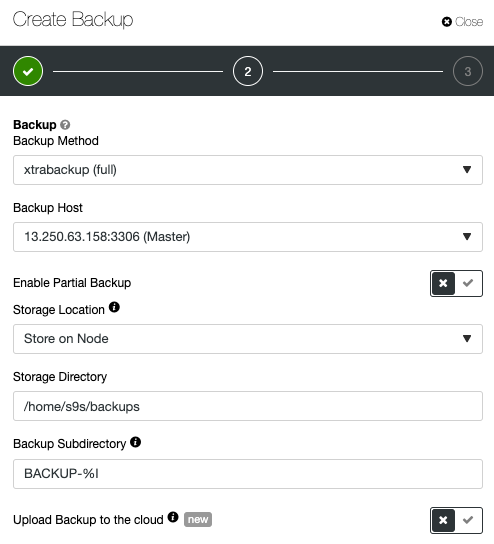
mysql> GRANT REPLICATION SLAVE ON *.* TO 'rpl_user'@'%';Next, take a full backup of one of the nodes in the master cluster. In this example, we are going to choose 13.250.63.158 as the master node. Go to ClusterControl -> pick the master cluster -> Backup -> Create Backup, and specify the following:
The backup will be created and stored inside the database node, 13.250.63.158. Login to the server and copy the created backup to one of the nodes in the slave cluster. In this example, we are going to choose 52.163.206.249 as the slave node:
$ scp /root/backups/BACKUP-8/backup-full-2020-06-26_062022.xbstream.gz [email protected]:~Before we perform any maintenance, it’s recommended to turn off ClusterControl auto-recovery on the slave cluster. Click on the Auto Recovery Cluster and Node icons and make sure they turn red.
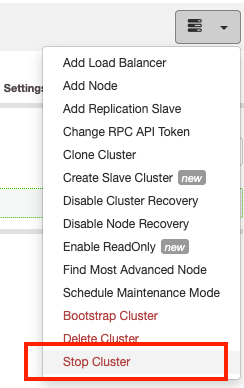
In order to restore a Percona Xtrabackup backup, we need to first stop the slave Galera cluster (because the MySQL datadir would need to be replaced). Click on the “Cluster Actions” dropdown menu of the slave cluster and click on “Stop Cluster”:
Then, we can perform the restoration of the chosen slave node of the slave cluster. On 52.163.206.249, run:
$ mv /var/lib/mysql /var/lib/mysql_old
$ mkdir -p /var/lib/mysql
$ gunzip backup-full-2020-06-26_062022.xbstream.gz
$ xbstream -x -C /var/lib/mysql < backup-full-2020-06-26_062022.xbstream
$ innobackupex --apply-log /var/lib/mysql/
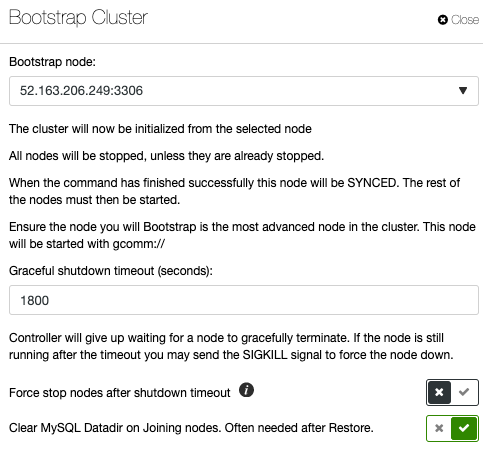
$ chown -Rf mysql:mysql /var/lib/mysqlWe can then bootstrap the slave cluster by going to the “Cluster Actions” dropdown menu, and choose “Bootstrap Cluster”. Pick the restored node, 52.163.206.249 as the bootstrap node and toggle on the “Clear MySQL Datadir on Joining nodes” button, similar to the screenshot below:
After the cluster started, our slave cluster is now staged with the same data as the master cluster. We can then set up the replication link to the master cluster. Remember that the MySQL root password has changed to the same root password as the master cluster. To retrieve the root password of the master cluster, go to the ClusterControl server and look into the respective cluster CMON configuration file. In this example, the master cluster ID is 56, so the CMON configuration file is located at /etc/cmon.d/cmon_56.cnf, and look for “monitored_mysql_root_password” parameter:
$ grep monitored_mysql_root_password /etc/cmon.d/cmon_56.cnf
monitored_mysql_root_password='3ieYDAj1!N4N3{iHV1tUeb67qkr2{EQ@'
By using the above root password we can then configure the replication slave on the chosen slave node of the slave cluster (52.163.206.249):
$ mysql -uroot -p
mysql> CHANGE MASTER TO MASTER_HOST = '13.250.63.158', MASTER_USER = 'rpl_user', MASTER_PASSWORD = 'SlavePassw0rd', MASTER_AUTO_POSITION = 1;
mysql> START SLAVE;
mysql> SHOW SLAVE STATUSG
At this point, the slave cluster will catch up with the master cluster via asynchronous replication. In the database cluster list inside ClusterControl, you will notice that the Slave-Galera-Azure has been indented a bit, with an arrow pointing to the cluster from the master cluster:

ClusterControl has detected that both Galera Clusters are interconnected via an asynchronous replication slave. You can also verify this by looking at the Topology view for the respective cluster:
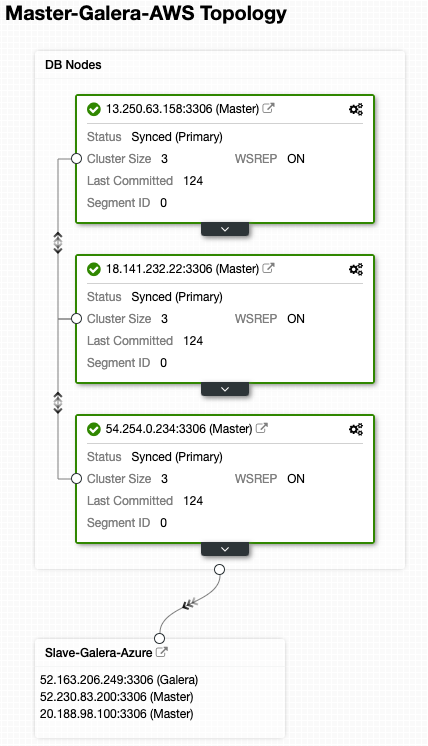

The above screenshots compare both clusters’ topology from their point-of-view. The replication setup for both clusters is now complete.
To make sure all the modification that we have made persist and remembered by ClusterControl, update the CMON configuration for the slave cluster as below (slave’s cluster ID is 57, thus the cmon configuration file is /etc/cmon.d/cmon_57.cnf):
$ vi /etc/cmon.d/cmon_57.cnf
backup_user_password='{same as the master cluster, ID 56}'
monitored_mysql_root_password='{same as the master cluster, ID 56}'
repl_user=rpl_user # add this line
repl_password='SlavePassw0rd' # add this line
Replace the required information as shown above. Restarting CMON is not necessary.
Turning on Encryption for Asynchronous Replication
Since the Cluster-to-Cluster Replication happens via a public network, it is recommended to secure the replication channel with encryption. By default, ClusterControl configures every MySQL cluster with client-server SSL encryption during the deployment. We can use the very same key and certificates generated for the database nodes to for our replication encryption setup.
To locate the ssl_cert, ssl_key and ssl_ca path on the master server of the master cluster, examine the MySQL configuration file and look for the following lines:
[mysqld]
...
ssl_cert=/etc/ssl/galera/cluster_56/server-cert.crt
ssl_key=/etc/ssl/galera/cluster_56/server-cert.key
ssl_ca=/etc/ssl/galera/cluster_56/ca.crt
Copy all those files into the slave’s node and put them under a directory that is owned by mysql user:
(master)$ scp /etc/ssl/galera/cluster_56/server-cert.crt /etc/ssl/galera/cluster_56/server-cert.key /etc/ssl/galera/cluster_56/ca.crt [email protected]
(slave)$ mkdir /var/lib/mysql-ssl
(slave)$ cp -pRf server-cert.crt server-cert.key ca.crt /var/lib/mysql-ssl/
(slave)$ chown -Rf mysql:mysql /var/lib/mysql-ssl
On the master, we can enforce the rpl_user to use SSL by running the following ALTER statement:
mysql> ALTER USER 'rpl_user'@'%' REQUIRE SSL;
Now login to the slave node, 52.163.206.249 and activate the SSL configuration for the replication channel:
mysql> STOP SLAVE;
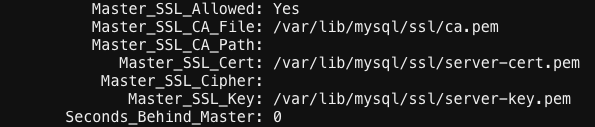
mysql> CHANGE MASTER TO MASTER_SSL = 1, MASTER_SSL_CA = '/var/lib/mysql-ssl/ca.pem', MASTER_SSL_CERT = '/var/lib/mysql-ssl/server-cert.pem', MASTER_SSL_KEY = '/var/lib/mysql-ssl/server-key.pem';
mysql> START SLAVE;Double-check by running the SHOW SLAVE STATUSG statement. You should see the following lines:
For the slave cluster, it’s recommended to set the cluster as read-only under the Cluster Actions dropdown menu to protect against accidental writes since the replication is now one-way from the master cluster to the slave cluster. If the cluster-wide read-only is enabled, you should see an indicator as highlighted by the red arrow in the following screenshot:

Our database cluster deployment is now securely running in the cloud (AWS and Microsoft Azure), ready to serve the production database with redundancy on the disaster recovery site.