blog
Building a Hot Standby on Amazon AWS Using MariaDB Cluster

Galera Cluster 4.0 was first released as part of the MariaDB 10.4 and there are a lot of significant improvements in this version release. The most impressive feature in this release is the Streaming Replication which is designed to handle the following problems.
- Problems with long transactions
- Problems with large transactions
- Problems with hot-spots in tables
In a previous blog, we deep-dove into the new Streaming Replication feature in a two-part series blog (Part 1 and Part 2). Part of this new feature in Galera 4.0 are new system tables which are very useful for querying and checking the Galera Cluster nodes and also the logs that have been processed in Streaming Replication.
Also in previous blogs, we also showed you the Easy Way to Deploy a MySQL Galera Cluster on AWS and also how to Deploy a MySQL Galera Cluster 4.0 onto Amazon AWS EC2.
Percona hasn’t released a GA for their Percona XtraDB Cluster (PXC) 8.0 yet as some features are still under development, such as the MySQL wsrep function WSREP_SYNC_WAIT_UPTO_GTID which looks to be not present yet (at least on PXC 8.0.15-5-27dev.4.2 version). Yet, when PXC 8.0 will be released, it will be packed with great features such as…
- Improved resilient cluster
- Cloud friendly cluster
- improved packaging
- Encryption support
- Atomic DDL
While we’re waiting for the release of PXC 8.0 GA, we’ll cover in this blog how you can create a Hot Standby Node on Amazon AWS for Galera Cluster 4.0 using MariaDB.
What is a Hot Standby?
A hot standby is a common term in computing, especially on highly distributed systems. It’s a method for redundancy in which one system runs simultaneously with an identical primary system. When failure happens on the primary node, the hot standby immediately takes over replacing the primary system. Data is mirrored to both systems in real time.
For database systems, a hot standby server is usually the second node after the primary master that is running on powerful resources (same as the master). This secondary node has to be as stable as the primary master to function correctly.
It also serves as a data recovery node if the master node or the entire cluster goes down. The hot standby node will replace the failing node or cluster while continuously serving the demand from the clients.
In Galera Cluster, all servers part of the cluster can serve as a standby node. However, if the region or entire cluster goes down, how will you be able to cope up with this? Creating a standby node outside the specific region or network of your cluster is one option here.
In the following section, we’ll show you how to create a standby node on AWS EC2 using MariaDB.
Deploying a Hot Standby On Amazon AWS
Previously, we have showed you how you can create a Galera Cluster on AWS. You might want to read Deploying MySQL Galera Cluster 4.0 onto Amazon AWS EC2 in the case that you are new to Galera 4.0.
Deploying your hot standby node can be on another set of Galera Cluster which uses synchronous replication (check this blog Zero Downtime Network Migration With MySQL Galera Cluster Using Relay Node) or by deploying an asynchronous MySQL/MariaDB node. In this blog, we’ll setup and deploy the hot standby node replicating asynchronously from one of the Galera nodes.
The Galera Cluster Setup
In this sample setup, we deployed 3-node cluster using MariaDB 10.4.8 version. This cluster is being deployed under US East (Ohio) region and the topology is shown below:
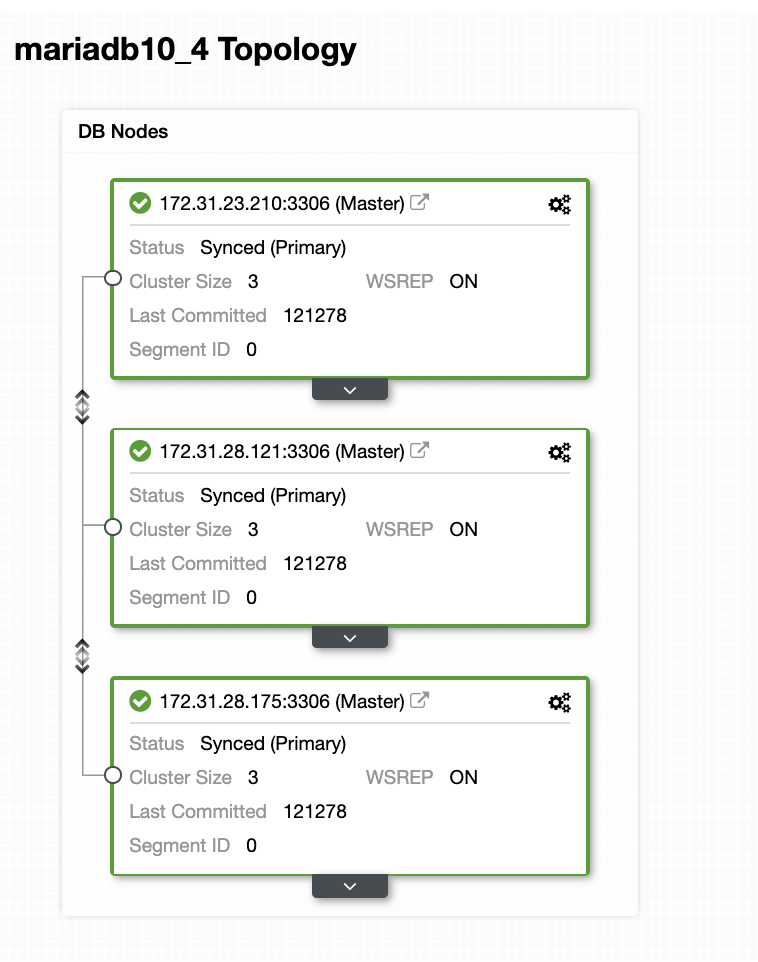
We’ll use 172.31.26.175 server as the master for our asynchronous slave which will serve as the standby node.
Setting up your EC2 Instance for Hot Standby Node
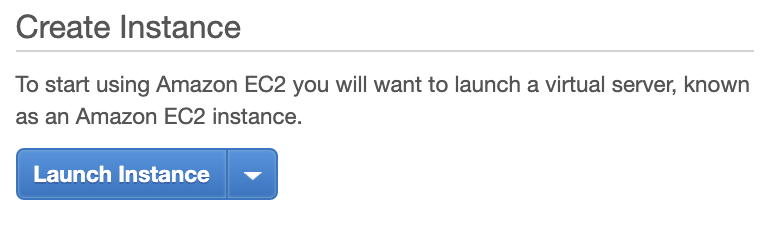
In the AWS console, go to EC2 found under the Compute section and click Launch Instance to create an EC2 instance just like below.
We’ll create this instance under the US West (Oregon) region. For your OS type, you can choose what server you like (I prefer Ubuntu 18.04) and choose the type of instance based on your preferred target type. For this example I will use t2.micro since it doesn’t require any sophisticated setup and it’s only for this sample deployment.
As we’ve mentioned earlier that its best that your hot standby node be located on a different region and not collocated or within the same region. So in case the regional data center goes down or suffers a network outage, your hot standby can be your failover target when things gone bad.
Before we continue, in AWS, different regions will have its own Virtual Private Cloud (VPC) and its own network. In order to communicate with the Galera cluster nodes, we must first define a VPC Peering so the nodes can communicate within the Amazon infrastructure and do not need to go outside the network which just adds overhead and security concerns.
First, go to your VPC from where your hot standby node shall reside, then go to Peering Connections. Then you need to specify the VPC of your standby node and the Galera cluster VPC. In the example below, I have us-west-2 interconnecting to us-east-2.

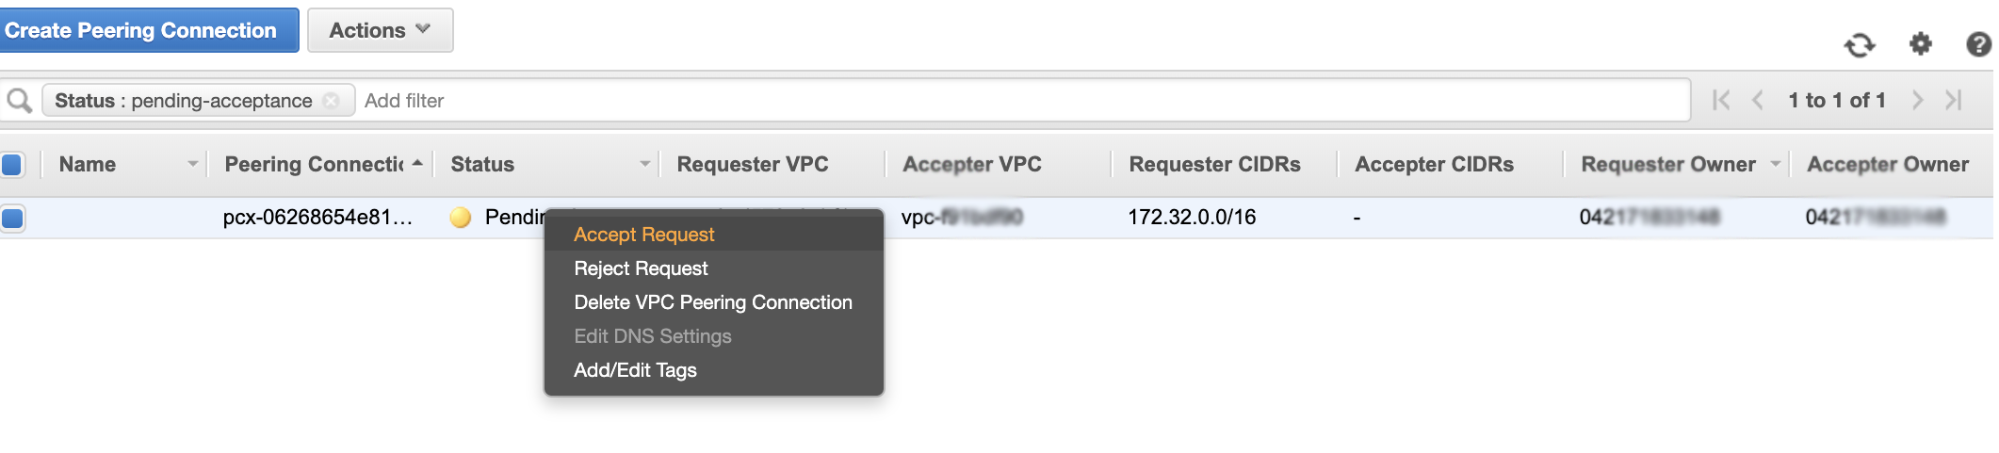
Once created, you’ll see an entry under your Peering Connections. However, you need to accept the request from the Galera cluster VPC, which is on us-east-2 in this example. See below,
Once accepted, do not forget to add the CIDR to the routing table. See this external blog VPC Peering about how to do it after VPC Peering.
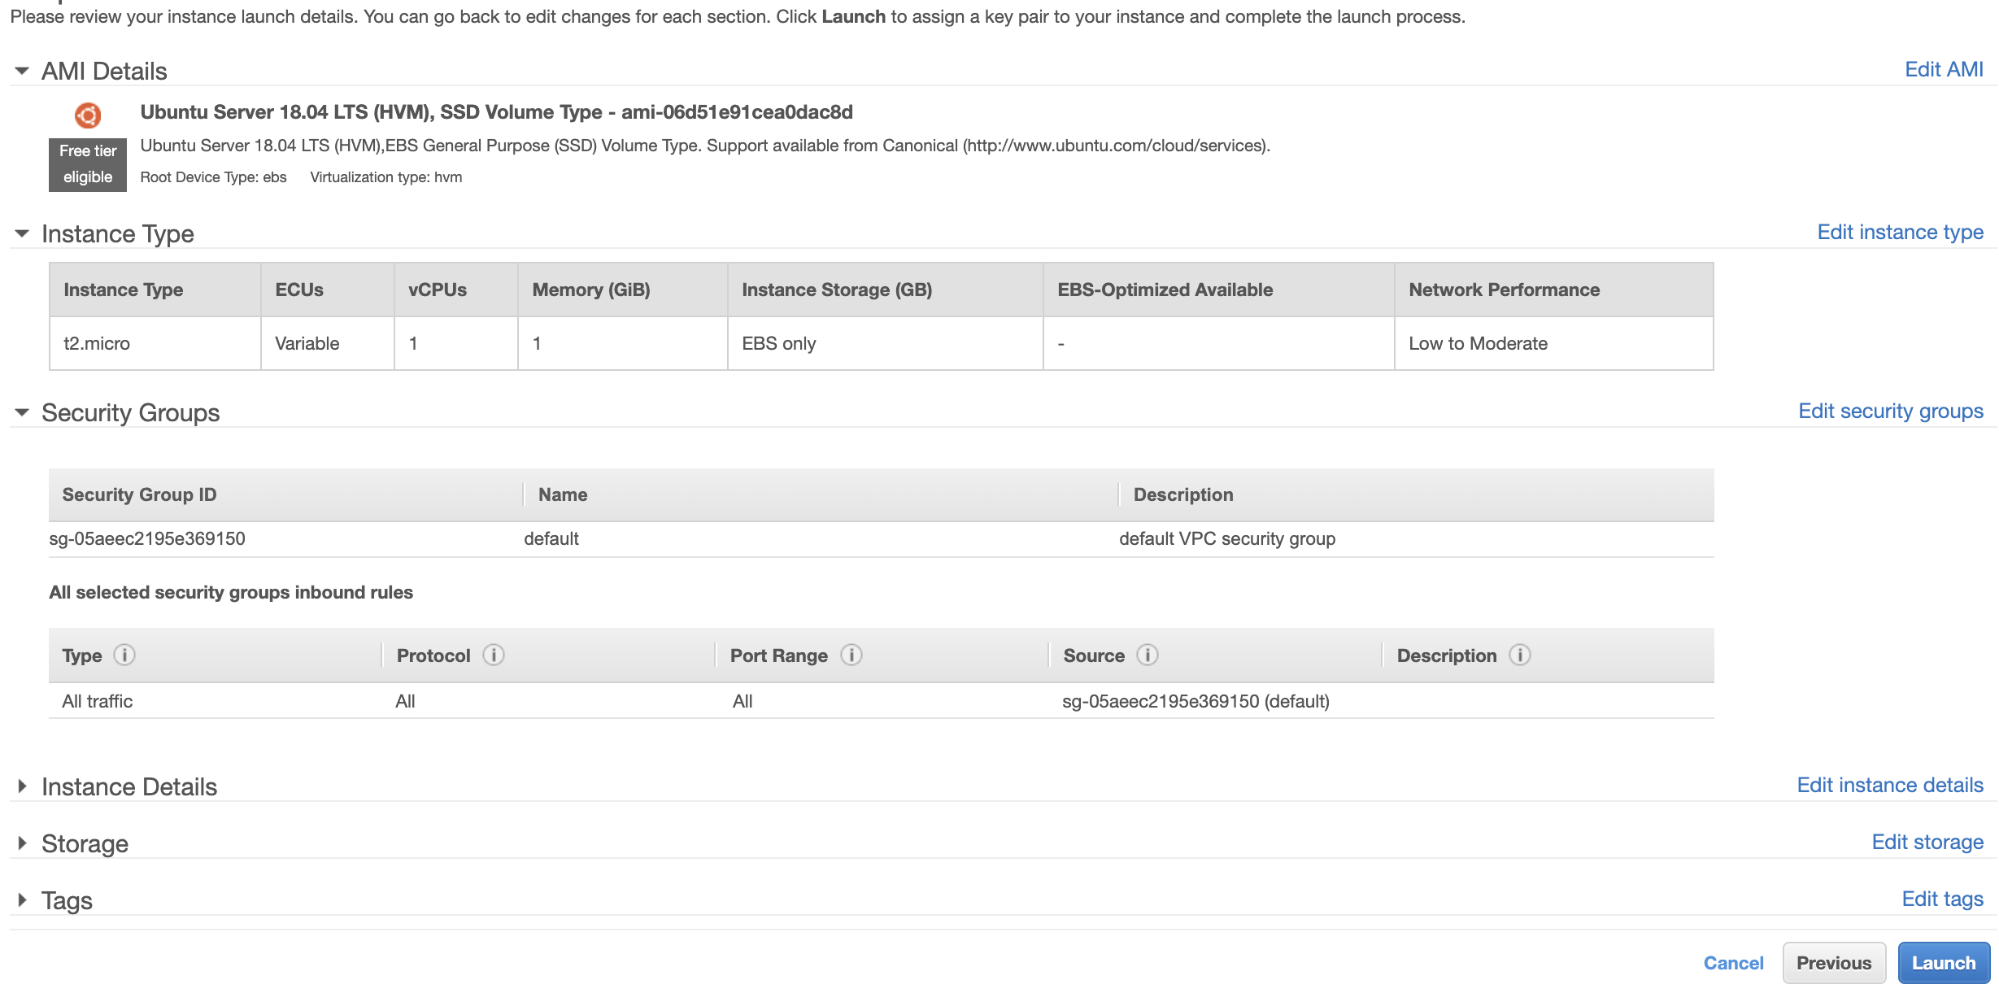
Now, let’s go back and continue creating the EC2 node. Make sure your Security Group has the correct rules or required ports that needs to be opened. Check the firewall settings manual for more information about this. For this setup, I just set All Traffic to be accepted since this is just a test. See below,
Make sure when creating your instance, you have set the correct VPC and you have defined your proper subnet. You can check this blog in case you need some help about that.
Setting up the MariaDB Async Slave
Step One
First we need to setup the repository, add the repo keys and update the package list in the repository cache,
$ vi /etc/apt/sources.list.d/mariadb.list

$ apt-key adv --recv-keys --keyserver hkp://keyserver.ubuntu.com:80 0xF1656F24C74CD1D8

$ apt update
Step Two
Install the MariaDB packages and its required binaries
$ apt-get install mariadb-backup mariadb-client mariadb-client-10.4 libmariadb3 libdbd-mysql-perl mariadb-client-core-10.4 mariadb-common mariadb-server-10.4 mariadb-server-core-10.4 mysql-commonStep Three
Now, let’s take a backup using xbstream to transfer the files to the network from one of the nodes in our Galera Cluster.
## Wipe out the datadir of the newly fresh installed MySQL in your hot standby node.
$ systemctl stop mariadb

$ rm -rf /var/lib/mysql/*
## Then on the hot standby node, run this on the terminal,
$ socat -u tcp-listen:9999,reuseaddr stdout 2>/tmp/netcat.log | mbstream -x -C /var/lib/mysql## Then on the target master, i.e. one of the nodes in your Galera Cluster (which is the node 172.31.28.175 in this example), run this on the terminal,
$ mariabackup --backup --target-dir=/tmp --stream=xbstream | socat - TCP4:172.32.31.2:9999where 172.32.31.2 is the IP of the host standby node.
Step Four
Prepare your MySQL configuration file. Since this is in Ubuntu, I am editing the file in /etc/mysql/my.cnf and with the following sample my.cnf taken from our ClusterControl template,
[MYSQLD]

user=mysql

basedir=/usr/

datadir=/var/lib/mysql

socket=/var/lib/mysql/mysql.sock

pid_file=/var/lib/mysql/mysql.pid

port=3306

log_error=/var/log/mysql/mysqld.log

log_warnings=2

# log_output = FILE


#Slow logging

slow_query_log_file=/var/log/mysql/mysql-slow.log

long_query_time=2

slow_query_log=OFF

log_queries_not_using_indexes=OFF


### INNODB OPTIONS

innodb_buffer_pool_size=245M

innodb_flush_log_at_trx_commit=2

innodb_file_per_table=1

innodb_data_file_path = ibdata1:100M:autoextend

## You may want to tune the below depending on number of cores and disk sub

innodb_read_io_threads=4

innodb_write_io_threads=4

innodb_doublewrite=1

innodb_log_file_size=64M

innodb_log_buffer_size=16M

innodb_buffer_pool_instances=1

innodb_log_files_in_group=2

innodb_thread_concurrency=0

# innodb_file_format = barracuda

innodb_flush_method = O_DIRECT

innodb_rollback_on_timeout=ON

# innodb_locks_unsafe_for_binlog = 1

innodb_autoinc_lock_mode=2

## avoid statistics update when doing e.g show tables

innodb_stats_on_metadata=0

default_storage_engine=innodb


# CHARACTER SET

# collation_server = utf8_unicode_ci

# init_connect = 'SET NAMES utf8'

# character_set_server = utf8


# REPLICATION SPECIFIC

server_id=1002

binlog_format=ROW

log_bin=binlog

log_slave_updates=1

relay_log=relay-bin

expire_logs_days=7

read_only=ON

report_host=172.31.29.72

gtid_ignore_duplicates=ON

gtid_strict_mode=ON


# OTHER THINGS, BUFFERS ETC

key_buffer_size = 24M

tmp_table_size = 64M

max_heap_table_size = 64M

max_allowed_packet = 512M

# sort_buffer_size = 256K

# read_buffer_size = 256K

# read_rnd_buffer_size = 512K

# myisam_sort_buffer_size = 8M

skip_name_resolve

memlock=0

sysdate_is_now=1

max_connections=500

thread_cache_size=512

query_cache_type = 0

query_cache_size = 0

table_open_cache=1024

lower_case_table_names=0

# 5.6 backwards compatibility (FIXME)

# explicit_defaults_for_timestamp = 1


performance_schema = OFF

performance-schema-max-mutex-classes = 0

performance-schema-max-mutex-instances = 0


[MYSQL]

socket=/var/lib/mysql/mysql.sock

# default_character_set = utf8

[client]

socket=/var/lib/mysql/mysql.sock

# default_character_set = utf8

[mysqldump]

socket=/var/lib/mysql/mysql.sock

max_allowed_packet = 512M

# default_character_set = utf8


[xtrabackup]


[MYSQLD_SAFE]

# log_error = /var/log/mysqld.log

basedir=/usr/

# datadir = /var/lib/mysql
Of course, you can change this according to your setup and requirements.
Step Five
Prepare the backup from step #3 i.e. the finish backup that is now in the hot standby node by running the command below,
$ mariabackup --prepare --target-dir=/var/lib/mysqlStep Six
Set the ownership of the datadir in the hot standby node,
$ chown -R mysql.mysql /var/lib/mysqlStep Seven
Now, start the MariaDB instance
$ systemctl start mariadbStep Eight
Lastly, we need to setup the asynchronous replication,
## Create the replication user on the master node, i.e. the node in the Galera cluster
MariaDB [(none)]> CREATE USER 'cmon_replication'@'172.32.31.2' IDENTIFIED BY 'PahqTuS1uRIWYKIN';

Query OK, 0 rows affected (0.866 sec)

MariaDB [(none)]> GRANT REPLICATION SLAVE, REPLICATION CLIENT ON *.* TO 'cmon_replication'@'172.32.31.2';

Query OK, 0 rows affected (0.127 sec)
## Get the GTID slave position from xtrabackup_binlog_info as follows,
$  cat /var/lib/mysql/xtrabackup_binlog_info

binlog.000002   71131632 1000-1000-120454
## Then setup the slave replication as follows,
MariaDB [(none)]> SET GLOBAL gtid_slave_pos='1000-1000-120454';

Query OK, 0 rows affected (0.053 sec)

MariaDB [(none)]> CHANGE MASTER TO MASTER_HOST='172.31.28.175', MASTER_USER='cmon_replication', master_password='PahqTuS1uRIWYKIN', MASTER_USE_GTID = slave_pos;
## Now, check the slave status,
MariaDB [(none)]> show slave status G

*************************** 1. row ***************************

                Slave_IO_State: Waiting for master to send event

                   Master_Host: 172.31.28.175

                   Master_User: cmon_replication

                   Master_Port: 3306

                 Connect_Retry: 60

               Master_Log_File:

           Read_Master_Log_Pos: 4

                Relay_Log_File: relay-bin.000001

                 Relay_Log_Pos: 4

         Relay_Master_Log_File:

              Slave_IO_Running: Yes

             Slave_SQL_Running: Yes

               Replicate_Do_DB:

           Replicate_Ignore_DB:

            Replicate_Do_Table:

        Replicate_Ignore_Table:

       Replicate_Wild_Do_Table:

   Replicate_Wild_Ignore_Table:

                    Last_Errno: 0

                    Last_Error:

                  Skip_Counter: 0

           Exec_Master_Log_Pos: 4

               Relay_Log_Space: 256

               Until_Condition: None

                Until_Log_File:

                 Until_Log_Pos: 0

            Master_SSL_Allowed: No

            Master_SSL_CA_File:

            Master_SSL_CA_Path:

               Master_SSL_Cert:

             Master_SSL_Cipher:

                Master_SSL_Key:

         Seconds_Behind_Master: 0

 Master_SSL_Verify_Server_Cert: No

                 Last_IO_Errno: 0

                 Last_IO_Error:

                Last_SQL_Errno: 0

                Last_SQL_Error:

   Replicate_Ignore_Server_Ids:

              Master_Server_Id: 1000

                Master_SSL_Crl:

            Master_SSL_Crlpath:

                    Using_Gtid: Slave_Pos

                   Gtid_IO_Pos: 1000-1000-120454

       Replicate_Do_Domain_Ids:

   Replicate_Ignore_Domain_Ids:

                 Parallel_Mode: conservative

                     SQL_Delay: 0

           SQL_Remaining_Delay: NULL

       Slave_SQL_Running_State: Slave has read all relay log; waiting for the slave I/O thread to update it

              Slave_DDL_Groups: 0

Slave_Non_Transactional_Groups: 0

    Slave_Transactional_Groups: 0

1 row in set (0.000 sec)
Adding Your Hot Standby Node To ClusterControl
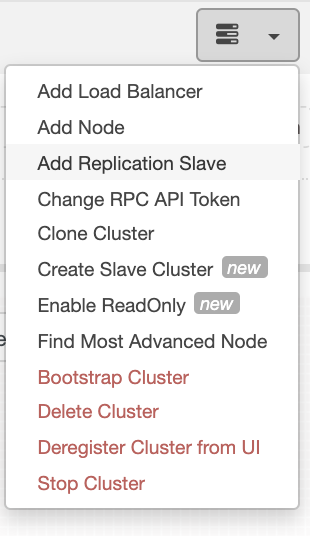
If you are using ClusterControl, it’s easy to monitor your database server’s health. To add this as a slave, select the Galera node cluster you have then go to the selection button as shown below to Add Replication Slave:
Click Add Replication Slave and choose adding an existing slave just like below,

Our topology looks promising.
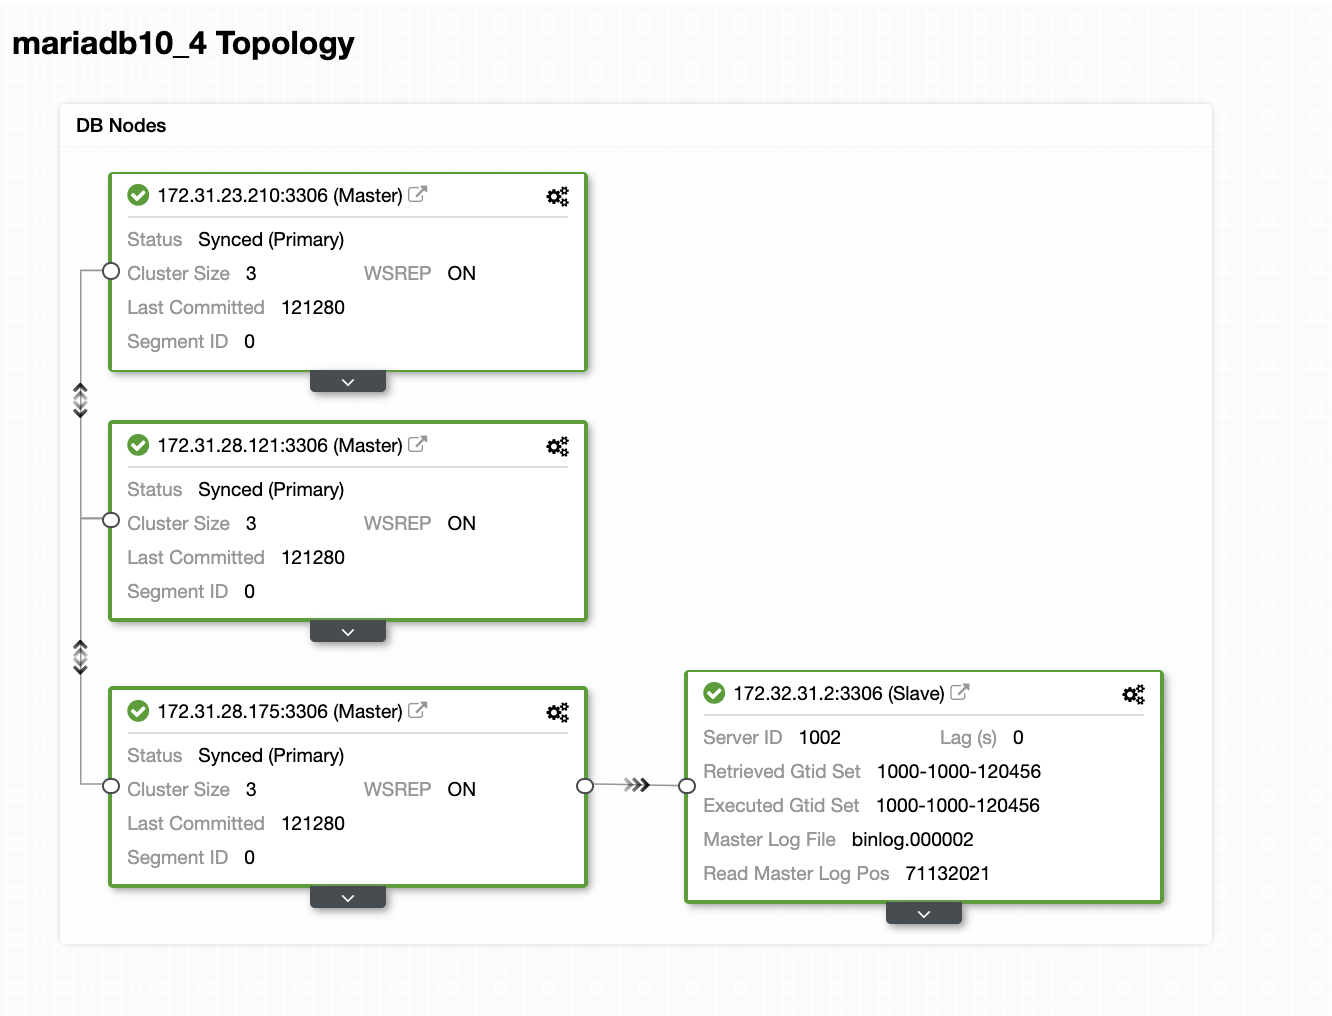
As you might notice, our node 172.32.31.2 serving as our hot standby node has a different CIDR which prefixes as 172.32.% us-west-2 (Oregon) while the other nodes are of 172.31.% located on us-east-2 (Ohio). They’re totally on different region, so in case network failure occurs on your Galera nodes, you can failover to your hot standby node.
Conclusion
Building a Hot Standby on Amazon AWS is easy and straightforward. All you need is to determine your capacity requirements and your networking topology, security, and protocols that need to be setup.
Using VPC Peering helps speed up inter-communication between different region without going to the public internet, so the connection stays within the Amazon network infrastructure.
Using asynchronous replication with one slave is, of course, not enough, but this blog serves as the foundation on how you can initiate this. You can now easily create another cluster where the asynchronous slave is replicating and create another series of Galera Clusters serving as your Disaster Recovery nodes, or you can also use gmcast.segment variable in Galera to replicate synchronously just like what we have on this blog.


