blog
How to Automatically Manage Failover of the MySQL Database for Moodle

In our previous blogs, we made justification for why you need a database failover and have explained how a failover mechanism works. I’m sharing this in case you have questions on why you should set up a failover mechanism for your MySQL database. If you do, please read our previous blog posts.
How To Setup Automatic Failover
The advantage with using MySQL or MariaDB for automatically managing your failover is that there are available tools you can use and implement in your environment. From open source ones to enterprise grade solutions. Most tools are not only failover capable, there are other features such as switchover, monitoring and advanced features that can offer more management capabilities for your MySQL database cluster. Below, we’ll go over the most common ones that you can use.
Using MHA (Master High Availability)
We have taken this topic with MHA with its most common issues and how to fix them. We have also compared MHA with MRM or with MaxScale.
Setting up with MHA for high availability might not be easy but it’s efficient to use and flexible as there are tunable parameters you can define to customize your failover. MHA has been tested and used. But as technology advances, MHA has been lagging behind as it does not support GTID for MariaDB and it has not been pushing any updates for the last 2 or 3 years.
By running the masterha_manager script,
masterha_manager --conf=/etc/app1.cnfWhere a sample /etc/app1.cnf shall look like as follows,
[server default]

user=cmon

password=pass

ssh_user=root

# working directory on the manager

manager_workdir=/var/log/masterha/app1

# working directory on MySQL servers

remote_workdir=/var/log/masterha/app1

[server1]

hostname=node1

candidate_master=1

[server2]

hostname=node2

candidate_master=1

[server3]

hostname=node3

no_master=1
Parameters such as no_master and candidate_master shall be crucial as you set whitelisting desired nodes to be your target master and nodes that you do not want to be a master.
Once set, you are ready to have failover for your MySQL database in case failure on the primary or master occurs. The script masterha_manager manages the failover (automatic or manual), takes decisions on when and where to failover, and manages slave recovery during promotion of the candidate master for applying differential relay logs. If the master database dies, MHA Manager will coordinate with MHA Node agent as it applies differential relay logs to the slaves that do not have the latest binlog events from the master.
Checkout what MHA Node agent does and its scripts involved. Basically, it’s the script that the MHA Manager will invoke when failover occurs. It will wait for its mandate from MHA Manager as it searches for the latest slave that contains the binlog events and copies missing events from the slave using scp and applies them to itself. As mentioned, it applies relay logs, purge relay logs, or save binary logs.
If you want to know more about tunable parameters and how to customize your failover management, checkout the Parameters wiki page for MHA.
Using Orchestrator
Orchestrator is a MySQL and MariaDB high availability and replication management tool. It is released by Shlomi Noach under the terms of the Apache License, version 2.0. This is an open source software and handles automatic failover but there’s tons of things you can customize or do to manage your MySQL/MariaDB database aside from recovery or automatic failover.
Installing Orchestrator can be easy or straightforward. Once you have downloaded the specific packages required for your target environment, you are then ready to register your cluster and nodes to be monitored by Orchestrator. It provides a UI for which this is very easy to manage but has lots of tunable parameters or set of commands that you can use to attain your failover management.
Let’s consider that you have finally setup and Registering the cluster by adding our primary or master node can be done by the command below,
$ orchestrator -c discover -i pupnode21:3306

2021-01-07 12:32:31 DEBUG Hostname unresolved yet: pupnode21

2021-01-07 12:32:31 DEBUG Cache hostname resolve pupnode21 as pupnode21

2021-01-07 12:32:31 DEBUG Connected to orchestrator backend: orchestrator:?@tcp(127.0.0.1:3306)/orchestrator?timeout=1s

2021-01-07 12:32:31 DEBUG Orchestrator pool SetMaxOpenConns: 128

2021-01-07 12:32:31 DEBUG Initializing orchestrator

2021-01-07 12:32:31 INFO Connecting to backend 127.0.0.1:3306: maxConnections: 128, maxIdleConns: 32

2021-01-07 12:32:31 DEBUG Hostname unresolved yet: 192.168.40.222

2021-01-07 12:32:31 DEBUG Cache hostname resolve 192.168.40.222 as 192.168.40.222

2021-01-07 12:32:31 DEBUG Hostname unresolved yet: 192.168.40.223

2021-01-07 12:32:31 DEBUG Cache hostname resolve 192.168.40.223 as 192.168.40.223

pupnode21:3306
Now, we have our cluster added.

If a primary node fails (hardware failure or encountered crashed), Orchestrator will detect and find the most advanced node to be promoted as the primary or master node.
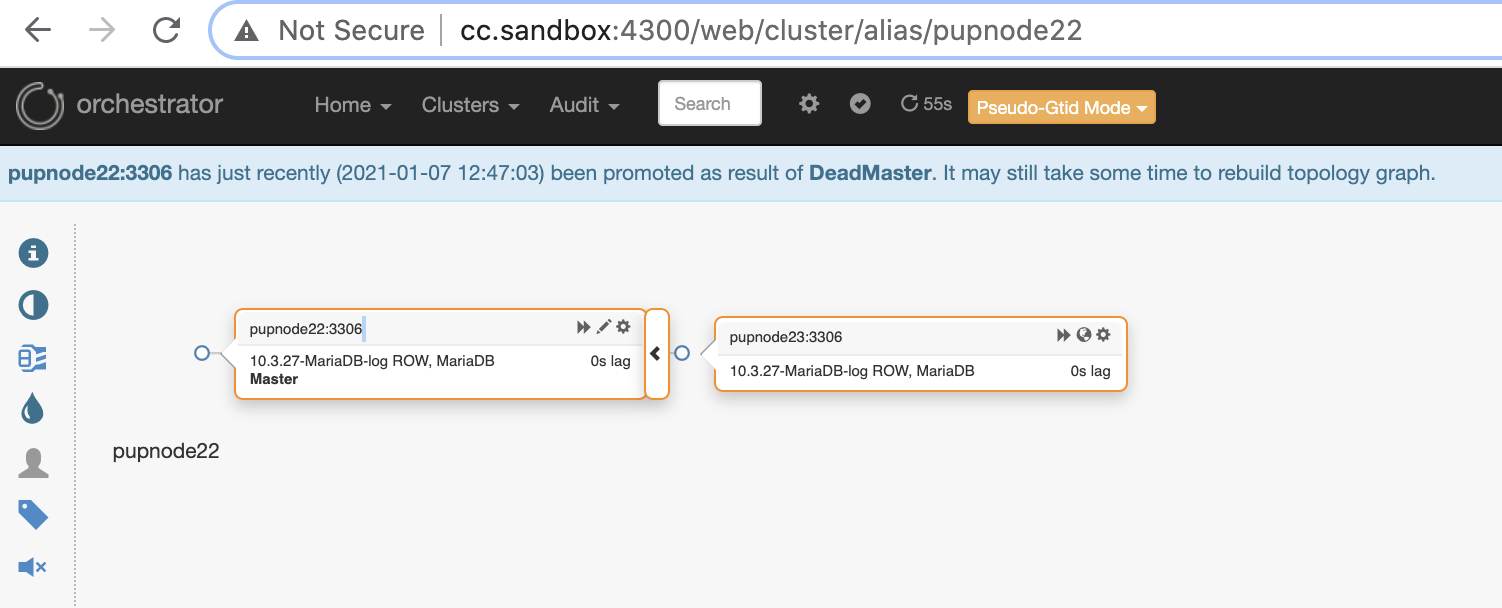
Now, we have two nodes remaining in the cluster while the primary is down.
$ orchestrator-client -c topology -i pupnode21:3306

pupnode21:3306 [unknown,invalid,10.3.27-MariaDB-log,rw,ROW,>>,downtimed]

$ orchestrator-client -c topology -i pupnode22:3306

pupnode22:3306   [0s,ok,10.3.27-MariaDB-log,rw,ROW,>>]

+ pupnode23:3306 [0s,ok,10.3.27-MariaDB-log,ro,ROW,>>,GTID]
Using MaxScale
MariaDB MaxScale has been supported as a database load balancer. Over the years MaxScale has grown and matured, extended with several rich features and that includes automatic failover. Since MariaDB MaxScale 2.2 was released, it introduces several new features including replication cluster failover management. You can read our previous blog regarding MaxScale failover mechanism.
Using MaxScale is under BSL although the software is freely available but requires you to at least buy service with MariaDB. It might not be suitable but in case you have acquired MariaDB enterprise services, then this can be a great advantage if you require failover management and its other features.
Installation of MaxScale is easy but setting up the required configuration and defining its parameters is not, and that it requires that you have to understand the software. You can refer to their configuration guide.
For quick and fast deployment, you can use ClusterControl to install MaxScale for you in your existing MySQL/MariaDB environment.
Once installed, setting up your Moodle database can be done by pointing your host to the MaxScale IP or hostname and the read-write port. For example,
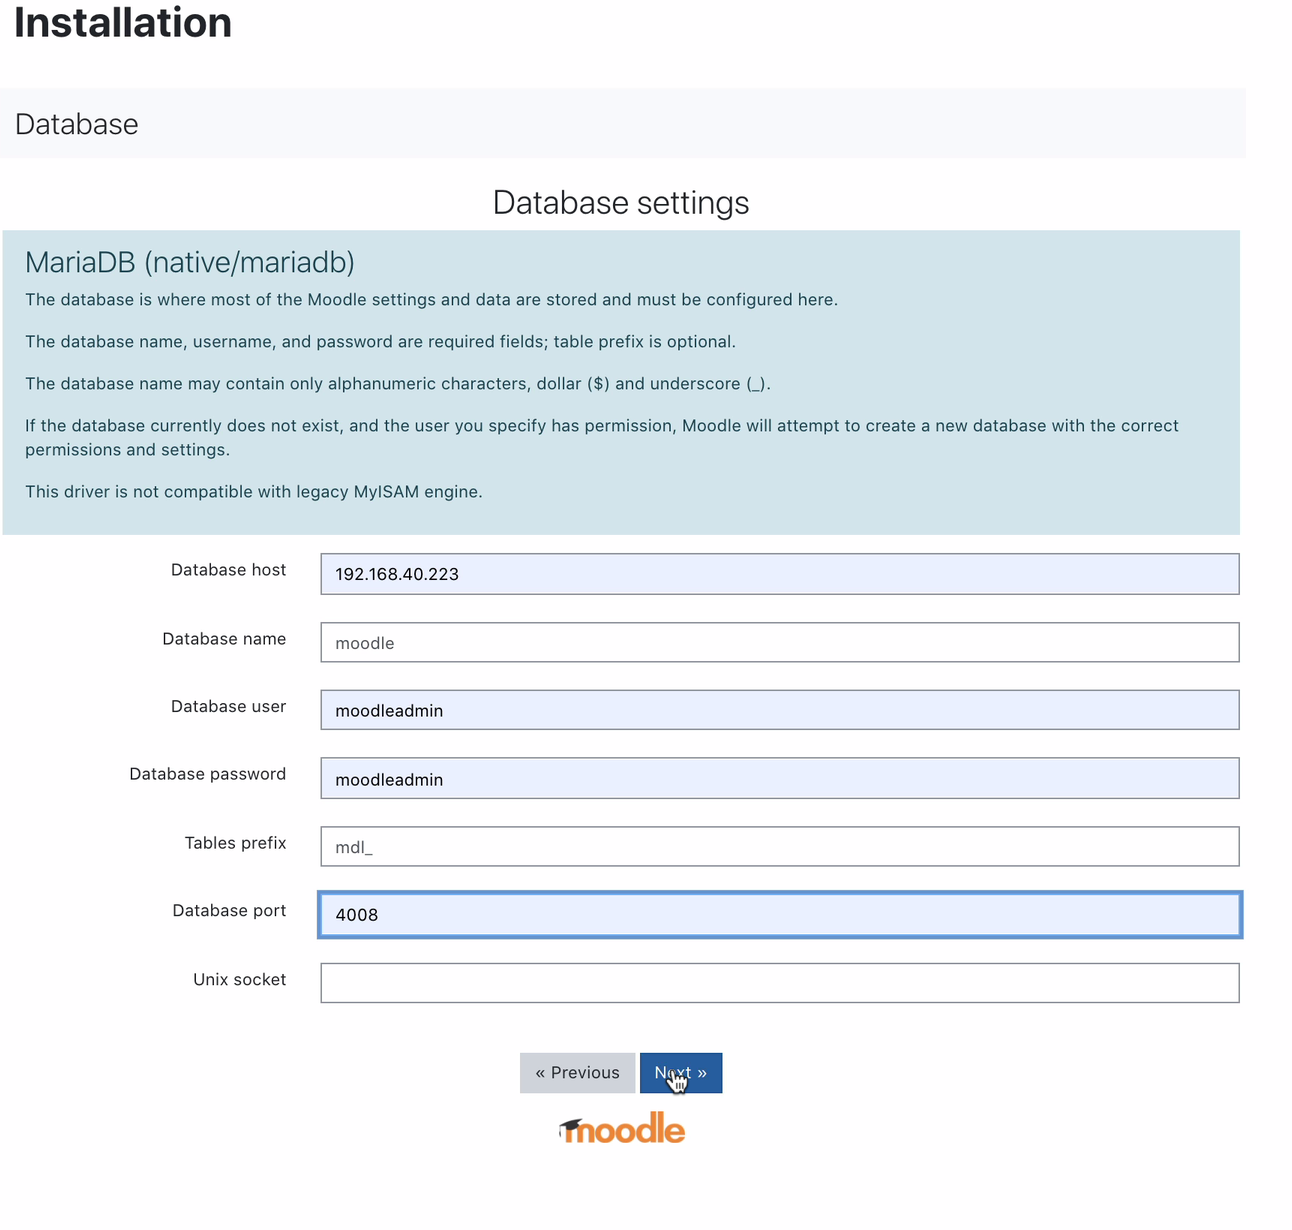
For which port 4008 is your read-write for your service listener. For example, here’s the following service and listener configuration for my MaxScale.
$ cat maxscale.cnf.d/rw-listener.cnf

[rw-listener]

type=listener

protocol=mariadbclient

service=rw-service

address=0.0.0.0

port=4008

authenticator=MySQLAuth


$ cat maxscale.cnf.d/rw-service.cnf

[rw-service]

type=service

servers=DB_123,DB_122,DB_124

router=readwritesplit

user=maxscale_adm

password=42BBD2A4DC1BF9BE05C41A71DEEBDB70

max_slave_connections=100%

max_sescmd_history=15000000

causal_reads=true

causal_reads_timeout=10

transaction_replay=true

transaction_replay_max_size=32Mi

delayed_retry=true

master_reconnection=true

max_connections=0

connection_timeout=0

use_sql_variables_in=master

master_accept_reads=true

disable_sescmd_history=false
While in your monitor configuration, you must not forget to enable the automatic failover or also enable auto rejoin if you want the previous master to fail to auto rejoin when going back online. It goes like this,
$ egrep -r 'auto|^['  maxscale.cnf.d/replication_monitor.cnf

[replication_monitor]

auto_failover=true

auto_rejoin=1
Take note that the variables I have stated are not meant for production use but only for this blog post and test purposes. The good thing with MaxScale, once the primary or master goes down, MaxScale is smart enough to promote the ideal or best candidate to take the role of the master. Hence, no need to change your IP and port as we have used the host/IP of our MaxScale node and its port as our endpoint once master goes down. For example,
[192.168.40.223:6603] MaxScale> list servers


┌────────┬────────────────┬──────┬─────────────┬─────────────────┬──────────────────────────┐

│ Server │ Address        │ Port │ Connections │ State           │ GTID                     │

├────────┼────────────────┼──────┼─────────────┼─────────────────┼──────────────────────────┤

│ DB_124 │ 192.168.40.223 │ 3306 │ 0           │ Slave, Running  │ 3-2003-876,5-2001-219541 │

├────────┼────────────────┼──────┼─────────────┼─────────────────┼──────────────────────────┤

│ DB_123 │ 192.168.40.221 │ 3306 │ 0           │ Master, Running │ 3-2003-876,5-2001-219541 │

├────────┼────────────────┼──────┼─────────────┼─────────────────┼──────────────────────────┤

│ DB_122 │ 192.168.40.222 │ 3306 │ 0           │ Slave, Running  │ 3-2003-876,5-2001-219541 │

└────────┴────────────────┴──────┴─────────────┴─────────────────┴──────────────────────────┘
Node DB_123 which points to 192.168.40.221 is the current master. Terminating the node DB_123 shall trigger MaxScale to perform a failover and it shall look like this,
[192.168.40.223:6603] MaxScale> list servers


┌────────┬────────────────┬──────┬─────────────┬─────────────────┬──────────────────────────┐

│ Server │ Address        │ Port │ Connections │ State           │ GTID                     │

├────────┼────────────────┼──────┼─────────────┼─────────────────┼──────────────────────────┤

│ DB_124 │ 192.168.40.223 │ 3306 │ 0           │ Slave, Running  │ 3-2003-876,5-2001-219541 │

├────────┼────────────────┼──────┼─────────────┼─────────────────┼──────────────────────────┤

│ DB_123 │ 192.168.40.221 │ 3306 │ 0           │ Down            │ 3-2003-876,5-2001-219541 │

├────────┼────────────────┼──────┼─────────────┼─────────────────┼──────────────────────────┤

│ DB_122 │ 192.168.40.222 │ 3306 │ 0           │ Master, Running │ 3-2003-876,5-2001-219541 │

└────────┴────────────────┴──────┴─────────────┴─────────────────┴──────────────────────────┘
Whilst, our Moodle database is still up and running as our MaxScale points to the latest master that was promoted.
$ mysql -hmaxscale.local.domain -umoodleuser -pmoodlepassword -P4008

Welcome to the MariaDB monitor.  Commands end with ; or g.

Your MariaDB connection id is 9

Server version: 10.3.27-MariaDB-log MariaDB Server


Copyright (c) 2000, 2018, Oracle, MariaDB Corporation Ab and others.


Type 'help;' or 'h' for help. Type 'c' to clear the current input statement.


MariaDB [(none)]> select @@hostname;

+------------+

| @@hostname |

+------------+

| 192.168.40.222  |

+------------+

1 row in set (0.001 sec)
Using ClusterControl
ClusterControl can be downloaded freely and offers licenses for Community, Advance, and Enterprise. The automatic failover is only available on Advance and Enterprise. Automatic failover is covered under our Auto-Recovery feature which tries to recover a failed cluster or a failed node. If you want more details on how to perform this, check out our previous post How ClusterControl Performs Automatic Database Recovery and Failover. It offers tunable parameters which are very convenient and easy to use. Please read our previous post also on How to Automate Database Failover with ClusterControl.
Managing your automatic failover for your Moodle database must at least require a virtual IP (VIP) as your endpoint for your Moodle application client interfacing your database backend. To do this, you can deploy Keepalived with HAProxy (or ProxySQL–depends on your load balancer choice) on top of it. In this case, your Moodle database endpoint shall point to the virtual IP, which is basically assigned by Keepalived once you have deployed it, same as how we showed you earlier when setting up MaxScale. You can also check this blog on how to do it.
As mentioned above, tunable parameters are available which you can just set via your /etc/cmon.d/cmon_.cnf located in your ClusterControl host wherein CLUSTER_ID is the id of your cluster. These are the parameters which would help you manage your autofailover more efficiently,
- replication_check_binlog_filtration_bf_failover
- replication_check_external_bf_failover
- replication_failed_reslave_failover_script
- replication_failover_blacklist
- replication_failover_events
- replication_failover_wait_to_apply_timeout
- replication_failover_whitelist
- replication_onfail_failover_script
- Replication_post_failover_script
- replication_post_unsuccessful_failover_script
- replication_pre_failover_script
- replication_skip_apply_missing_txs
- replication_stop_on_error
ClusterControl is very flexible when managing the failover so you can do some pre-failover or post-failover tasks.
Conclusion
There are other great choices when setting up and automatically managing your failover for your MySQL database for Moodle. It depends on your budget and what you likely have to spend money for. Using open source ones requires expertise and requires multiple testing to get familiarized as there’s no support you can run when you need help other than the community. With enterprise solutions, it comes with a price but offers you support and ease as the time consuming work can be diminished. Take note that if failover is used mistakenly, it can cost damage to your database if not properly handled and managed. Focus on what is more important and how you are capable of the solutions you are utilizing for managing your Moodle database failover.


