blog
How to Setup MariaDB 10.3 Replication Using Ansible and Vagrant


Manual deployments are common, but they can be slow and monotonous, if you ever tried Oracle RAC installation with Data Guard setup on more than three nodes, you know what I mean. Depending on the number of nodes, the deployment steps may be time draining and error likely. Of course, there are many good “how-to’s” on how to do a manual database cluster setup, however, with the manual approach on a scale there are many additional questions to address.
Are the other instances in my environment setup in the same way? Was that QA system set up in the same way as production? Whether what we just deployed is production-ready? To address all that questions deployments are increasingly being automated via configuration management tools.
Popular configuration management tools like Puppet, Chef, and Ansible are proven technologies in deploying various IT services. They help eliminate manual work, minimize the risk of human error, and make it possible to deploy rapidly. In today’s blog, we will take a look at one of them.
Ansible is an open source system management tool for centralizing and automating configuration management. With Ansible you can easily automate various database deployments and perform simple administration tasks. We will showcase how to automatically install and configure software such as MySQL server in reproducible environments. In this blog, we are going to focus on MariaDB replication but if you are interested in other tasks please check our other blogs where we write more about Ansible.
Vagrant, Virtualbox, and Ansible
Ansible can help to deploy MySQL Cluster in the cloud or on-prem. For the purpose of this blog, we are going to use the popular setup for running various tests on desktop machines with Vagrant and Virtualbox.
Vagrant is a system that allows you to easily create and move development environments from one machine to another. Simply define what type of VM you want in a file called Vagrantfile and then fire them up with a single command. It integrates well with virtual machine providers like VirtualBox, VMware and AWS and what is important for our task it has a great support of Ansible.
Our Vagrantfile deploys 2 instances on the VirtualBox platform, one for master node and second slave node. Then we will use the Ansible to run the necessary packages installation and execute configuration of a master/slave. Below is the list of tasks that we are going to perform.
- Install Vagrant and Virtualbox
- Configure vagrant file and ansible playbook
- Launch the instances
- Download the related Vagrant boxes and Vagrantfile (this is done automatically)
- Run Ansible playbook (this will be done automatically)
- Add the cluster to ClusterControl for the monitoring and management task (like backups, security, user management, performance management and many other).
Vagrant, Virtualbox and Ansible Installation on Ubuntu
Install packages
sudo apt-get install ansible vagrant virtualboxCreate configuration files for Vagrant and Ansible
$ mkdir mariadbtest
$ vi Vagrantfile
VAGRANTFILE_API_VERSION = "2"
 Vagrant.configure(VAGRANTFILE_API_VERSION) do |config|
  config.vm.box = "ubuntu/trusty64"
  config.vm.provision "ansible" do |ansible|
    ansible.playbook = "maria.yml"
    ansible.sudo = true
  end
  config.vm.define "master" do |master|
    master.vm.hostname = "master"
    master.vm.network "forwarded_port", guest: 3306, host: 3336
    master.vm.network "private_network", ip: "192.168.10.2"
  end
  config.vm.define "slave" do |slave|
    slave.vm.hostname = "slave"
    slave.vm.network "forwarded_port", guest: 3306, host: 3337
    slave.vm.network "private_network", ip: "192.168.10.3"
  end
  config.vm.provider "virtualbox" do |v|
    v.memory = 1024
    v.cpus = 2
  end
end
Above vagrant file will create two machines with the following configuration:
- Master: 2 CPU, 1GB RAM, Private IP: 192.168.10.2 Port forward: 3336
- Slave: 2CPU, 1GB RAM, Private IP: 192.168.10.3, Port forward: 3337
Playbook Structure
In this step, we will define Ansible playbook. Ansible uses YAML as an easy markup language to define instructions. We create the following “maria.yml” based on the Ansible file delivered by Mariadb.
$vi maria.yml
- hosts: master:slave
  user: vagrant
  tasks:
  - name: Install MariaDB repository
    apt_repository: repo='deb http://ftp.igh.cnrs.fr/pub/mariadb/repo/10.3/ubuntu trusty main' state=present
  - name: Add repository key to the system
    apt_key: keyserver=keyserver.ubuntu.com id=0xcbcb082a1bb943db
  - name: Install MariaDB Server
    apt: name=mariadb-server state=latest update_cache=yes
  - name: Install python module
    apt: name=python-mysqldb state=installed
  - name: Create replication account
    mysql_user: name=repl host="%" password=s3cr3tPaSSwordR priv=*.*:"REPLICATION SLAVE" state=present
  - name: Create readwrite user
    mysql_user: name=rwuser host="%" password=s3cr3tPaSSwordR priv=*.*:SELECT,INSERT,UPDATE,DELETE,CREATE,DROP state=present
  - name: Modify configuration file to listen on all interfaces
    lineinfile: dest=/etc/mysql/my.cnf regexp="^bind-address" line="bind-address=0.0.0.0"
- hosts: master
  user: vagrant
  tasks:
  - name: Modify configuration file to setup server ID
    lineinfile: dest=/etc/mysql/my.cnf regexp="^#server-id" line="server-id=1"
  - name: Restart mysql service
    service: name=mysql state=restarted
  - name: Reset master binlog
    command: /usr/bin/mysql -u root -e "RESET MASTER"
- hosts: slave
  user: vagrant
  tasks:
  - name: Modify configuration file to setup server ID
    lineinfile: dest=/etc/mysql/my.cnf regexp="^#server-id" line="server-id=2"
  - name: Setup replication
    command: /usr/bin/mysql -uroot -e "CHANGE MASTER TO master_host='192.168.10.2', master_user='repl', master_password='s3cr3tPaSSwordR', master_use_gtid=current_pos"
  - name: Restart mysql service
service: name=mysql state=restartedNow it’s time for the instances. Vagrant up will trigger playbook installation.
$ vagrant up
DEPRECATION: The 'sudo' option for the Ansible provisioner is deprecated.
Please use the 'become' option instead.
The 'sudo' option will be removed in a future release of Vagrant.

==> vagrant: A new version of Vagrant is available: 2.2.4 (installed version: 2.2.3)!
==> vagrant: To upgrade visit: https://www.vagrantup.com/downloads.html

Bringing machine 'master' up with 'virtualbox' provider...
Bringing machine 'slave' up with 'virtualbox' provider...
==> master: Box 'ubuntu/trusty64' could not be found. Attempting to find and install...
    master: Box Provider: virtualbox
    master: Box Version: >= 0
==> master: Loading metadata for box 'ubuntu/trusty64'
    master: URL: https://vagrantcloud.com/ubuntu/trusty64
==> master: Adding box 'ubuntu/trusty64' (v20190429.0.1) for provider: virtualbox
    master: Downloading: https://vagrantcloud.com/ubuntu/boxes/trusty64/versions/20190429.0.1/providers/virtualbox.box
    master: Download redirected to host: cloud-images.ubuntu.com
    master: Progress: 7% (Rate: 551k/s, Estimated time remaining: 0:14:31)

Bringing machine 'master' up with 'virtualbox' provider...
Bringing machine 'slave' up with 'virtualbox' provider...
If you don’t have ubuntu image from Virtualbox already downloaded, vagrant will download it automatically like with the above example.
PLAY [master:slave] ************************************************************

TASK [Gathering Facts] *********************************************************
ok: [slave]

TASK [Install MariaDB repository] **********************************************
changed: [slave]

TASK [Add repository key to the system] ****************************************
changed: [slave]

TASK [Install MariaDB Server] **************************************************
After successful playbook installation you will see following output and you should be able to login to the database with predefined credentials (see playbook).
PLAY RECAP ********************************************************************
master                     : ok=12   changed=10   unreachable=0    failed=0
The next step is to import your master/slave configuration to ClusterControl. The easiest and most convenient way to install ClusterControl is to use the installation script provided by Severalnines. Simply download the script and execute as the root user or user with sudo root permission.
$ wget https://severalnines.com/downloads/cmon/install-cc
$ chmod +x install-cc
$ ./install-cc # as root or sudo user
If you wish to add a ClusterControl installation to your playbook you can use the following instructions.
Next step is to generate an SSH key which we will use to set up the passwordless SSH later on. If you have a key pair which you would like to use, you can skip the creation of a new one.
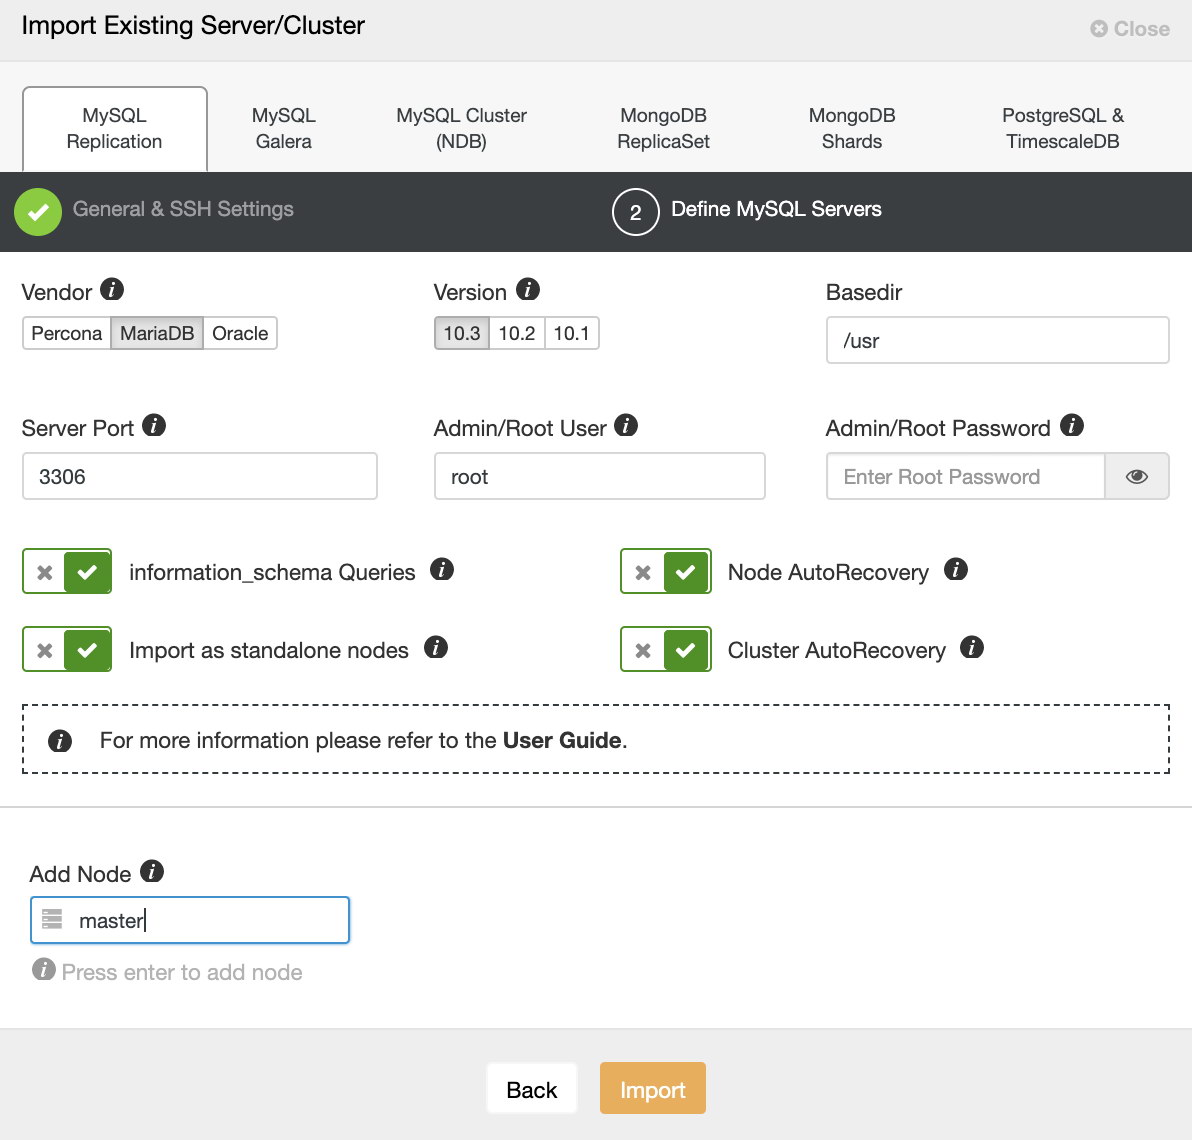
After successful installation, you can finally import your newly created test cluster into ClusterControl.
We hope this blog post gave you insight into basic of Ansible MariaDB master/slave replication installation and setup. Please check our other blogs where we present Chef, Puppet, Docker for MariaDB database and other database cluster deployments.