blog
How to Deploy Percona XtraDB Cluster 8 for High Availability

Percona XtraDB Cluster 8.0 is based on Percona Server for MySQL 8.0 embedded with Galera writeset replication API and Galera replication library, to form a highly available multi-master replication for MySQL-based database server. Percona XtraDB Cluster comes with XtraDB storage engine (a drop-in replacement of InnoDB) and follows the upstream Oracle MySQL releases very closely (including all the bug fixes in it), with some additional variables and status specific for this build.
In this blog post, we are going to look into how to deploy a Percona XtraDB Cluster 8.0 for high availability using the manual and automated way.
Notable Features
Before we move further with the deployment steps, it’s worth mentioning notable features and significant improvements in this major version which is based on Percona Server for MySQL 8.0 (without Group Replication plugin) and Galera 4:
- Streaming replication – This allows writeset replication to process large data transactions in smaller, more manageable fragments, minimizing data conflicts.
- The synchronization MySQL functions for action coordination (wsrep_last_seen_gtid, wsrep_last_written_gtid, wsrep_sync_wait_upto_gtid).
- New Galera system tables, which will help to monitor the state of the cluster under the “mysql” schema – wsrep_cluster, wsrep_cluster_members and wsrep_streaming_log.
- Gcache encryption.
- The wsrep infrastructure of Galera 4 is more robust than that of Galera 3. It features a faster execution of code with better state handling, improved predictability, and error handling.
For a complete list of changes, check out the release notes.
Manual Deployment of Percona XtraDB Cluster 8.0
Installation Steps
For the Percona XtraDB Cluster, we need at least three nodes:
- db1 (192.168.20.61)
- db2 (192.168.20.62)
- db3 (192.168.20.63)
The steps described in this section should be performed on all database nodes (db1, db2 and db3) running on CentOS 8. First, disable SELinux (otherwise IST process would fail):
$ setenforce 0
$ sed -i 's/^SELINUX=.*/SELINUX=disabled/g' /etc/sysconfig/selinux
Install the Percona repository package:
$ yum -y install https://repo.percona.com/yum/percona-release-latest.noarch.rpmThe latest stable version at this point is Percona XtraDB Cluster 8.0, but by default, the repository package is configured up until version 5.7. The percona-release package contains a script that can enable additional repositories for the newer products. Let’s run that script and enable the pxc80 specific repository:
$ percona-release setup pxc80
* Disabling all Percona Repositories

On RedHat 8 systems it is needed to disable dnf mysql module to install Percona-Server
Do you want to disable it? [y/N]
Choose “y” to disable the mysql DNF module. This is necessary to prioritize the Percona repository for MySQL-related packages.
Then, install the latest Percona XtraDB Cluster and Percona Xtrabackup:
$ dnf -y install percona-xtradb-cluster percona-xtrabackup-80At this moment in time, you should get a Percona XtraDB Cluster 8.0.0-11.3 installed. All dependency packages will be installed like shared-compat, shared and client packages. We can then start the MySQL service for initial configuration:
$ systemctl start mysqlA new root password will be generated during the first startup. We need to retrieve the root password information first from the MySQL error log (default is /var/log/mysqld.log in RHEL-based systems):
$ cat /var/log/mysqld.log | grep 'temporary password'
2020-11-27T06:53:05.929661Z 6 [Note] [MY-010454] [Server] A temporary password is generated for root@localhost: <eqo+jxnw2lk< code=""></eqo+jxnw2lk<>
As you can see the generated password is “<eqo+jxnw2lk”. next,=”” we=”” need=”” to=”” perform=”” a=”” post-installation=”” task=”” secure=”” the=”” mysql=”” deployment.=”” run=”” following=”” command=”” and=”” answer=”” questions=”” accordingly:<=”” span=””></eqo+jxnw2lk”.>
$ mysql_secure_installation

Securing the MySQL server deployment.

Enter password for user root:

The existing password for the user account root has expired. Please set a new password.

New password:

Re-enter new password:

VALIDATE PASSWORD COMPONENT can be used to test passwords
and improve security. It checks the strength of password
and allows the users to set only those passwords which are
secure enough. Would you like to setup VALIDATE PASSWORD component?

Press y|Y for Yes, any other key for No: y

There are three levels of password validation policy:
LOW    Length >= 8
MEDIUM Length >= 8, numeric, mixed case, and special characters
STRONG Length >= 8, numeric, mixed case, special characters and dictionary file

Please enter 0 = LOW, 1 = MEDIUM and 2 = STRONG: 2

Using existing password for root.
Estimated strength of the password: 100

Change the password for root ? ((Press y|Y for Yes, any other key for No) : y

New password:

Re-enter new password:

Estimated strength of the password: 100

Do you wish to continue with the password provided?(Press y|Y for Yes, any other key for No) : y

By default, a MySQL installation has an anonymous user,
allowing anyone to log into MySQL without having to have
a user account created for them. This is intended only for
testing, and to make the installation go a bit smoother.
You should remove them before moving into a production
environment.

Remove anonymous users? (Press y|Y for Yes, any other key for No) : y
Success.

Normally, root should only be allowed to connect from
'localhost'. This ensures that someone cannot guess at
the root password from the network.

Disallow root login remotely? (Press y|Y for Yes, any other key for No) : y
Success.

By default, MySQL comes with a database named 'test' that
anyone can access. This is also intended only for testing,
and should be removed before moving into a production
environment.

Remove test database and access to it? (Press y|Y for Yes, any other key for No) : y
 - Dropping test database...
Success.

 - Removing privileges on test database...
Success.

Reloading the privilege tables will ensure that all changes
made so far will take effect immediately.

Reload privilege tables now? (Press y|Y for Yes, any other key for No) : y

Success.

All done!
The generated root password will be expired immediately upon the first root login. The above helper script helps us to configure a new MySQL root password, setting password validation policy, disabling remote login for root, remove test database and anonymous users and also reload the privilege tables.
The default configuration file (/etc/my.cnf) is configured with an empty gcomm:// connection string under wsrep_cluster_address variable, as shown below:
wsrep_cluster_address=gcomm://The above line must be set with a list of IP addresses of all participating nodes in the cluster. If you missed this step, a new Galera cluster would be created on every node (3 separate 1-node cluster) after the service on every nodes was started. Therefore, the following lines should be modified accordingly under [mysqld] section:
wsrep_cluster_address=gcomm://192.168.20.51,192.168.20.52,192.168.20.53
wsrep_node_address=192.168.20.51 # IP address of this DB host
wsrep_node_name=db1 # any name to identify this DB host
pxc-encrypt-cluster-traffic=OFF
Do expect for the wsrep_cluster_address to be identical in all database hosts, while wsrep_node_address and wsrep_node_name must be distinct on every database host. The last line pxc-encrypt-cluster-traffic=OFF means we would like to disable encryption for the cluster traffic. Note that this is intentional to simplify our deployment steps, or otherwise we would have to perform key/cert management steps. If you would like to enable encryption, see this article.
Repeat the above steps for the remaining database nodes before proceeding to bootstrap the cluster.
Cluster Bootstrapping
Galera requires you to start a node in a cluster as a reference point before the remaining nodes are able to join and form the cluster. This process is known as cluster bootstrap. Bootstrapping is an initial step to introduce a database node as the primary component before others see it as a reference point to sync up data.
In this example, we are going to use db1 as the reference node and start it with the bootstrap command (you could choose other nodes as well since this is a new cluster with no data):
$ systemctl stop mysql
$ systemctl start mysql@bootstrap
$ systemctl status mysql@bootstrap
Once started, we can start the other nodes (db2 and db3) with the standard start command (one node at a time):
$ systemctl stop mysql
$ systemctl start mysql
You can verify with the following line inside /var/log/mysqld.log:
2020-11-27T08:09:01.964152Z 2 [Note] [MY-000000] [WSREP] Synchronized with group, ready for connectionsAt this point, our Percona XtraDB Cluster service has started and the manual deployment is now complete. For more information regarding Percona XtraDB Cluster bootstrapping process, check out this blog post How to Bootstrap MySQL or MariaDB Galera Cluster.
Automatic Deployment with ClusterControl
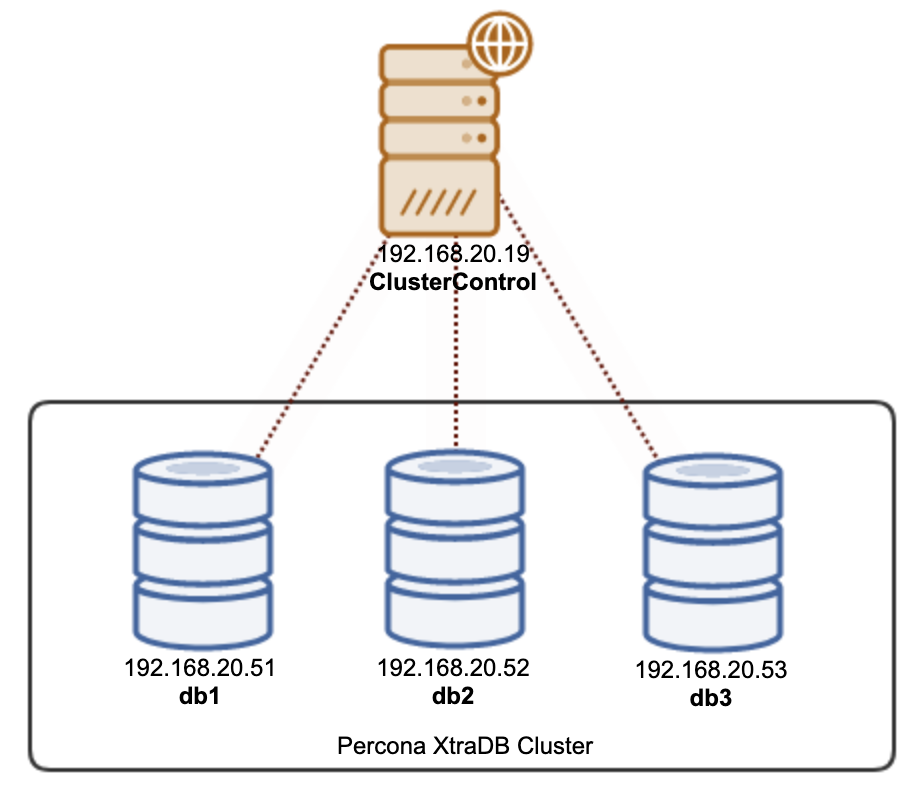
There are two ways you can deploy a Percona XtraDB Cluster 8.0 using ClusterControl. You may use the ClusterControl UI (web-based GUI) or ClusterControl CLI called s9s. We will show you both ways in this section. ClusterControl must reside on a separate host, away from your database cluster. Therefore, our architecture can be illustrated like this:
Installing ClusterControl
SSH into the ClusterControl server and install ClusterControl with the following commands:
$ wget https://severalnines.com/downloads/cmon/install-cc
$ chmod 744 install-cc
$ ./install-cc
Follow the installation wizard until the installation finishes. After installation is complete, open the web browser and go to http://192.168.20.19/clustercontrol . Create an admin user and the license will be installed automatically. All new installations come with a trial license for enterprise edition for 30 days. Once this trial license expires, it will default back to the community edition which is free forever.
Passwordless SSH
ClusterControl requires passwordless SSH to be set up from the ClusterControl server to all the managed nodes. To achieve this, we need to generate an SSH key on the ClusterControl server first. The SSH user must have a super-user privilege (sudo or root). In this case, we are going to use the root user:
$ whoami
root
Now generate an SSH key for user root:
$ ssh-keygen -t rsa # press Enter on all promptsNext, copy the public key to all the database nodes that we are going to deploy and manage. In this case, all 3 Galera nodes:
$ ssh-copy-id [email protected]
$ ssh-copy-id [email protected]
$ ssh-copy-id [email protected]
Enter the root password of the respective hosts when prompted.
Test it out with the following command and make sure you get a correct response:
$ ssh [email protected] "ls /root"Now we are ready to deploy our cluster using ClusterControl UI or CLI, as shown in the next sections.
PXC Deployment using ClusterControl UI
It’s practically easy to deploy a Percona XtraDB Cluster with ClusterControl, and by default, ClusterControl will configure the cluster with Galera encryption enabled. After the passwordless SSH has been configured, go to ClusterControl -> Deploy -> MySQL Galera and specify the required details as below:
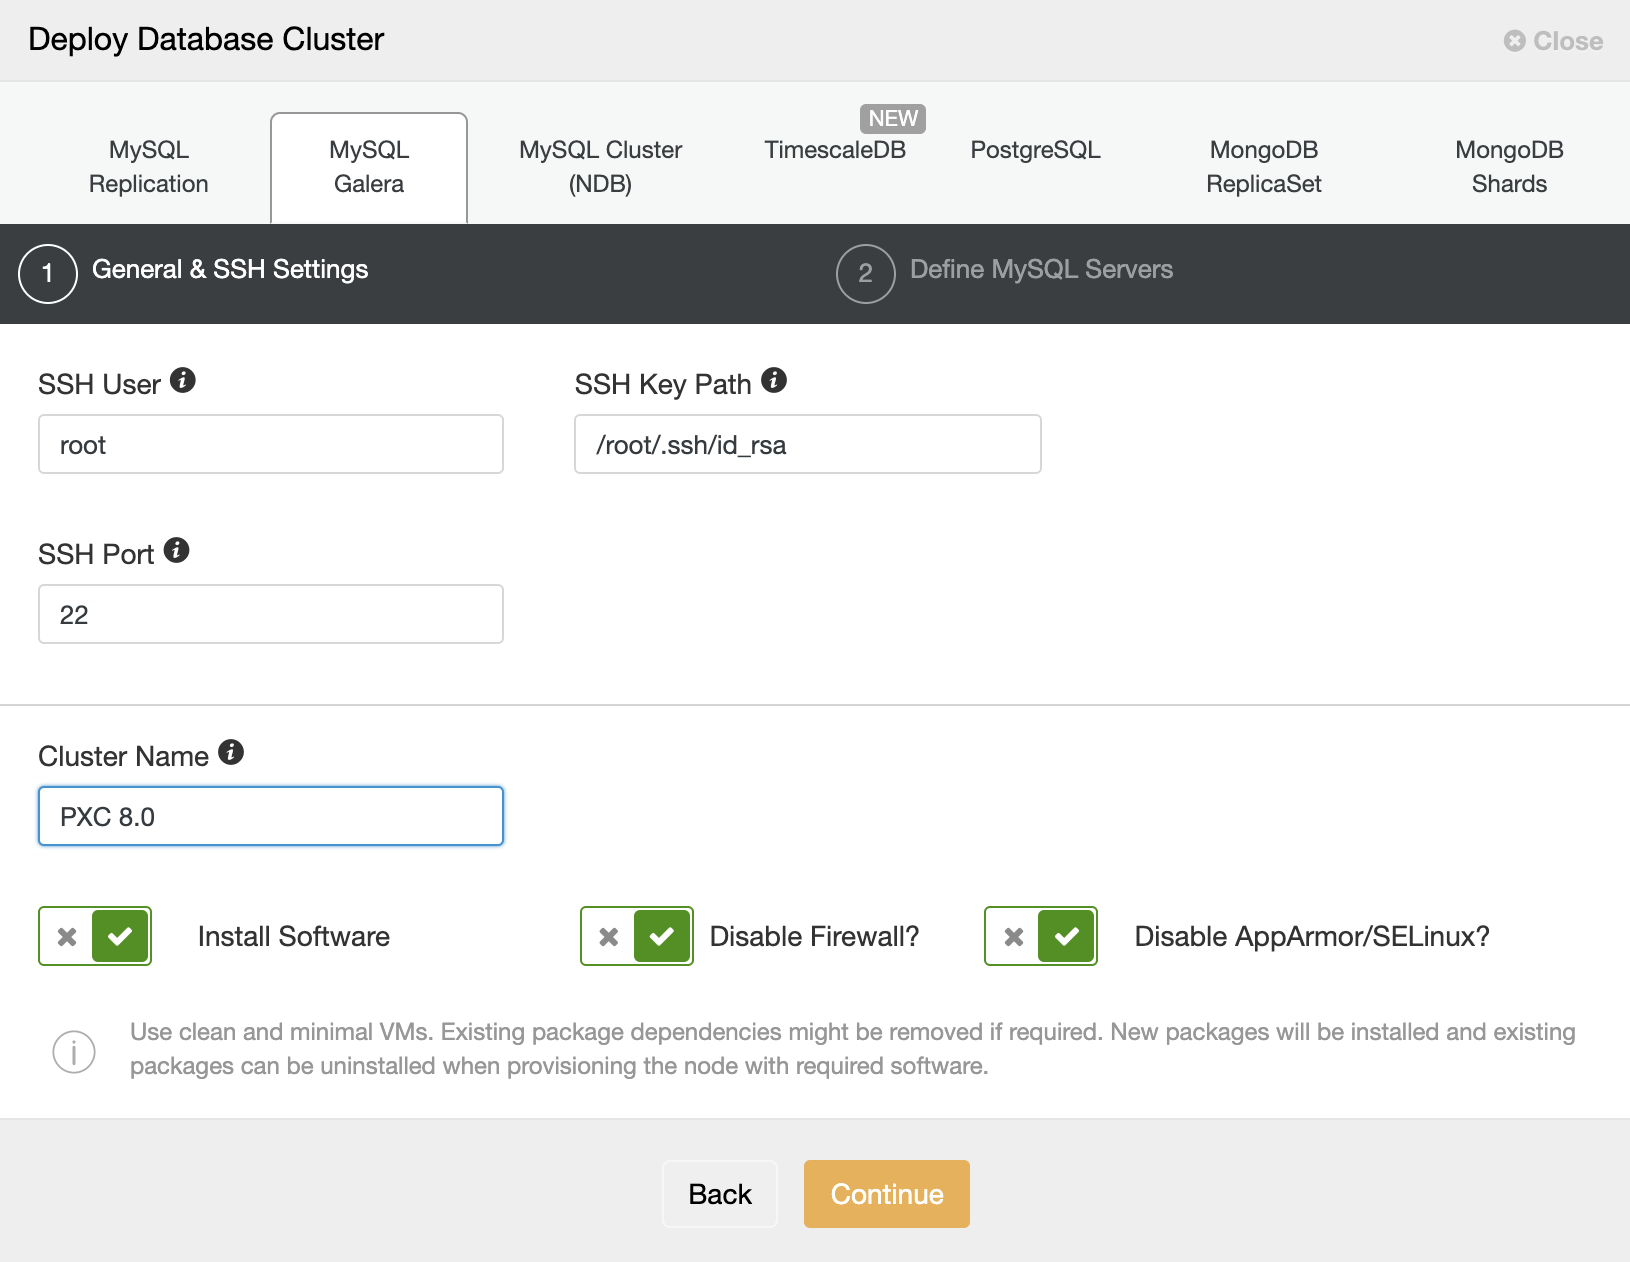
Then, click “Continue” to proceed to the next step where we configure the MySQL specification:

Choose “Percona” for the Vendor and 8.0 as the Version. Keep the rest as default and enter the MySQL root password. Specify the IP address or hostname of the database hosts one by one and make sure you get the green tick icons after each insertion. This indicates that ClusterControl is able to reach the corresponding hosts via passwordless SSH with the provided SSH user and key as defined in step 1. Click on the “Deploy” button to start the deployment.
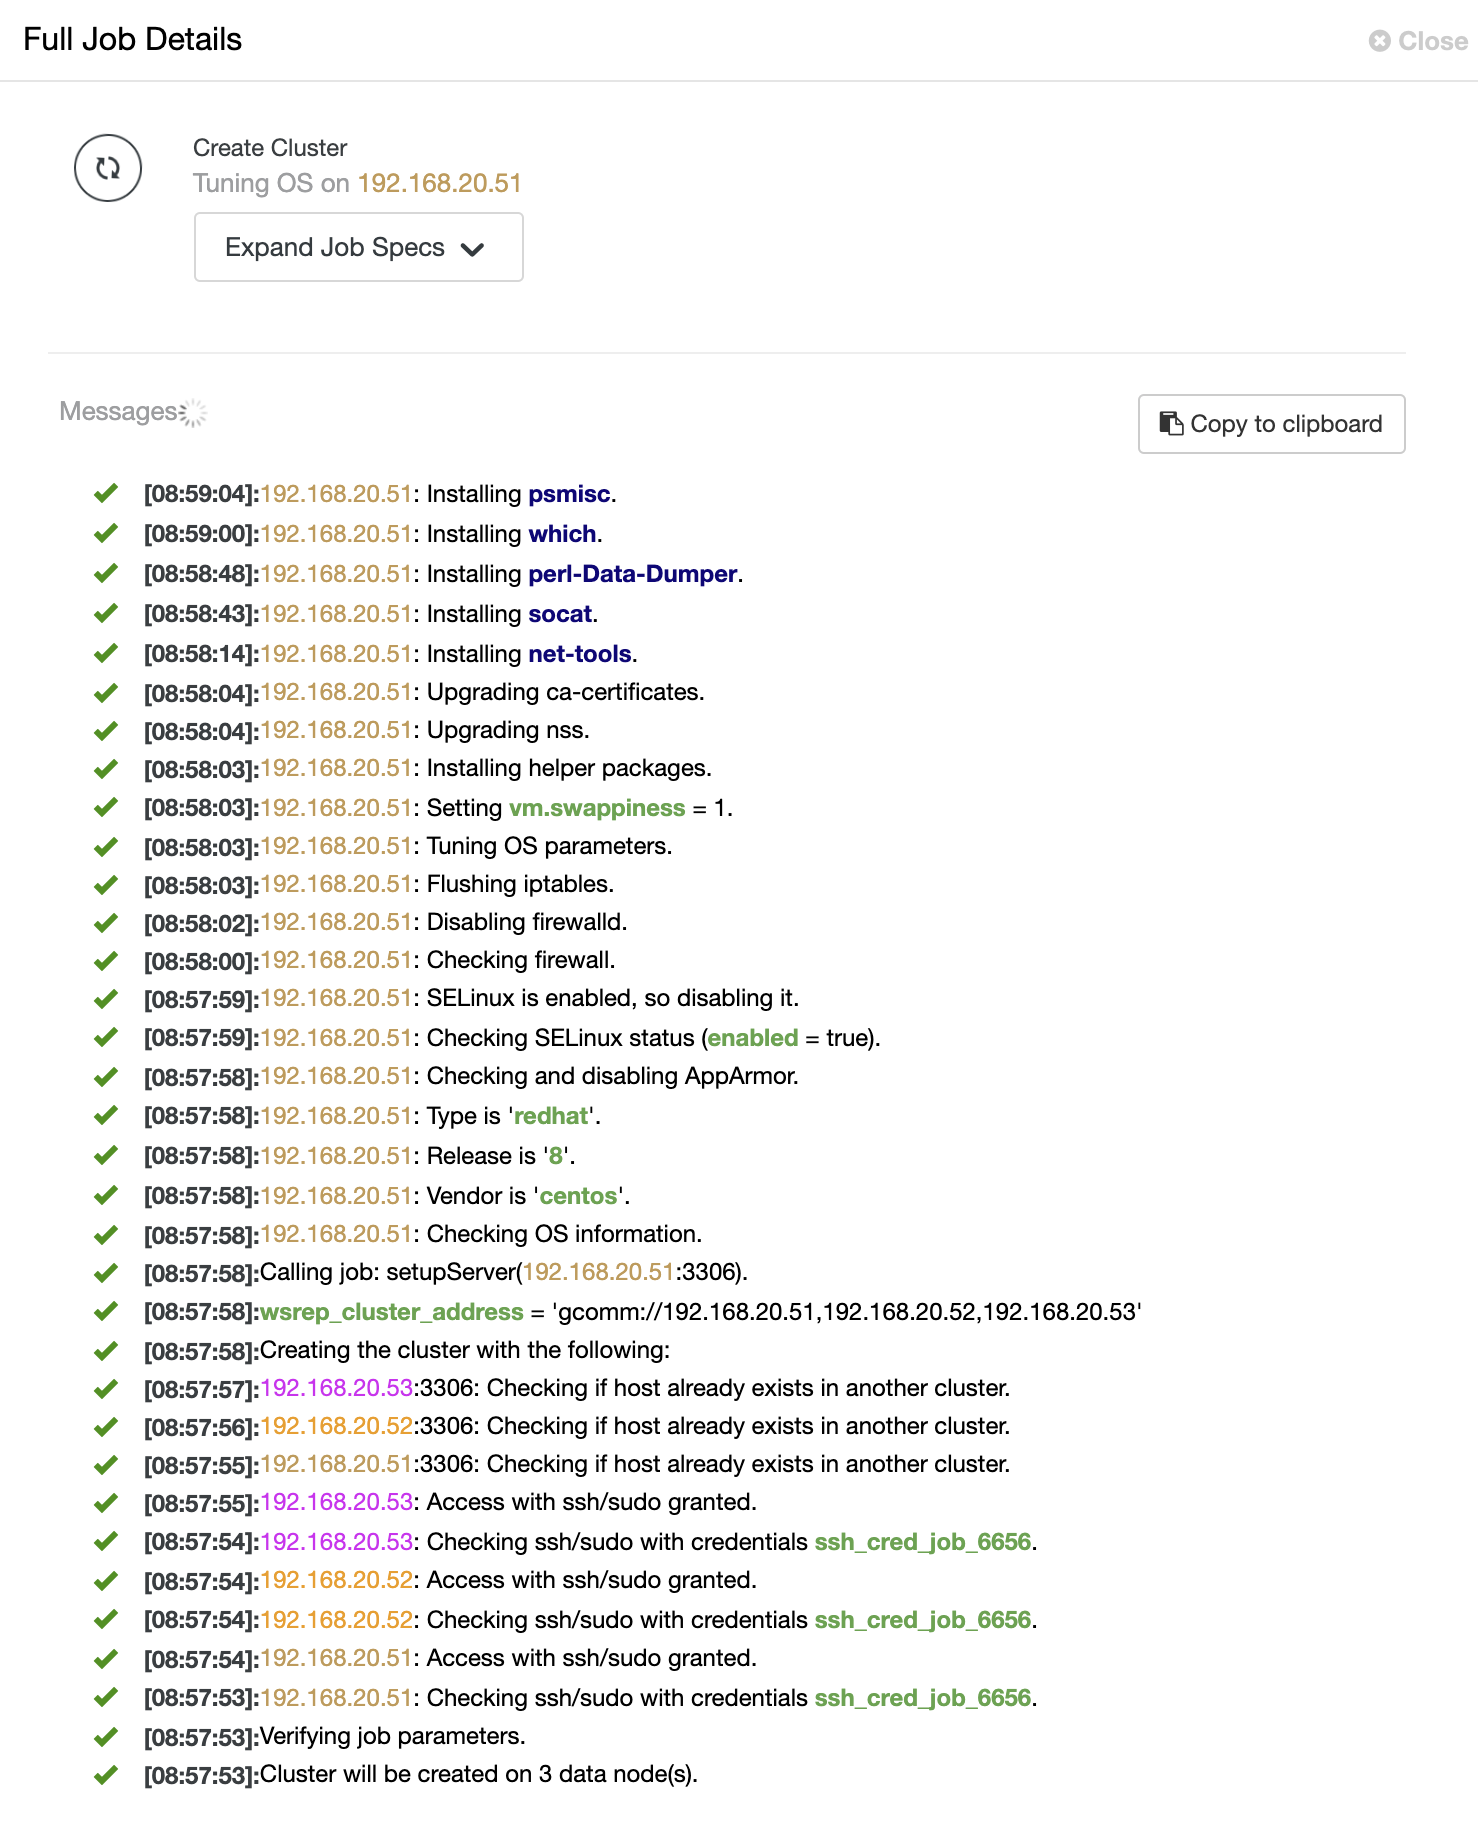
ClusterControl then triggers a deployment job where you can monitor the deployment progress by going to ClusterControl -> Activity -> Jobs -> Create Cluster -> Full Job Details, as shown in the following screenshot:
Once the process completes, you should see the cluster is listed in the Dashboard:
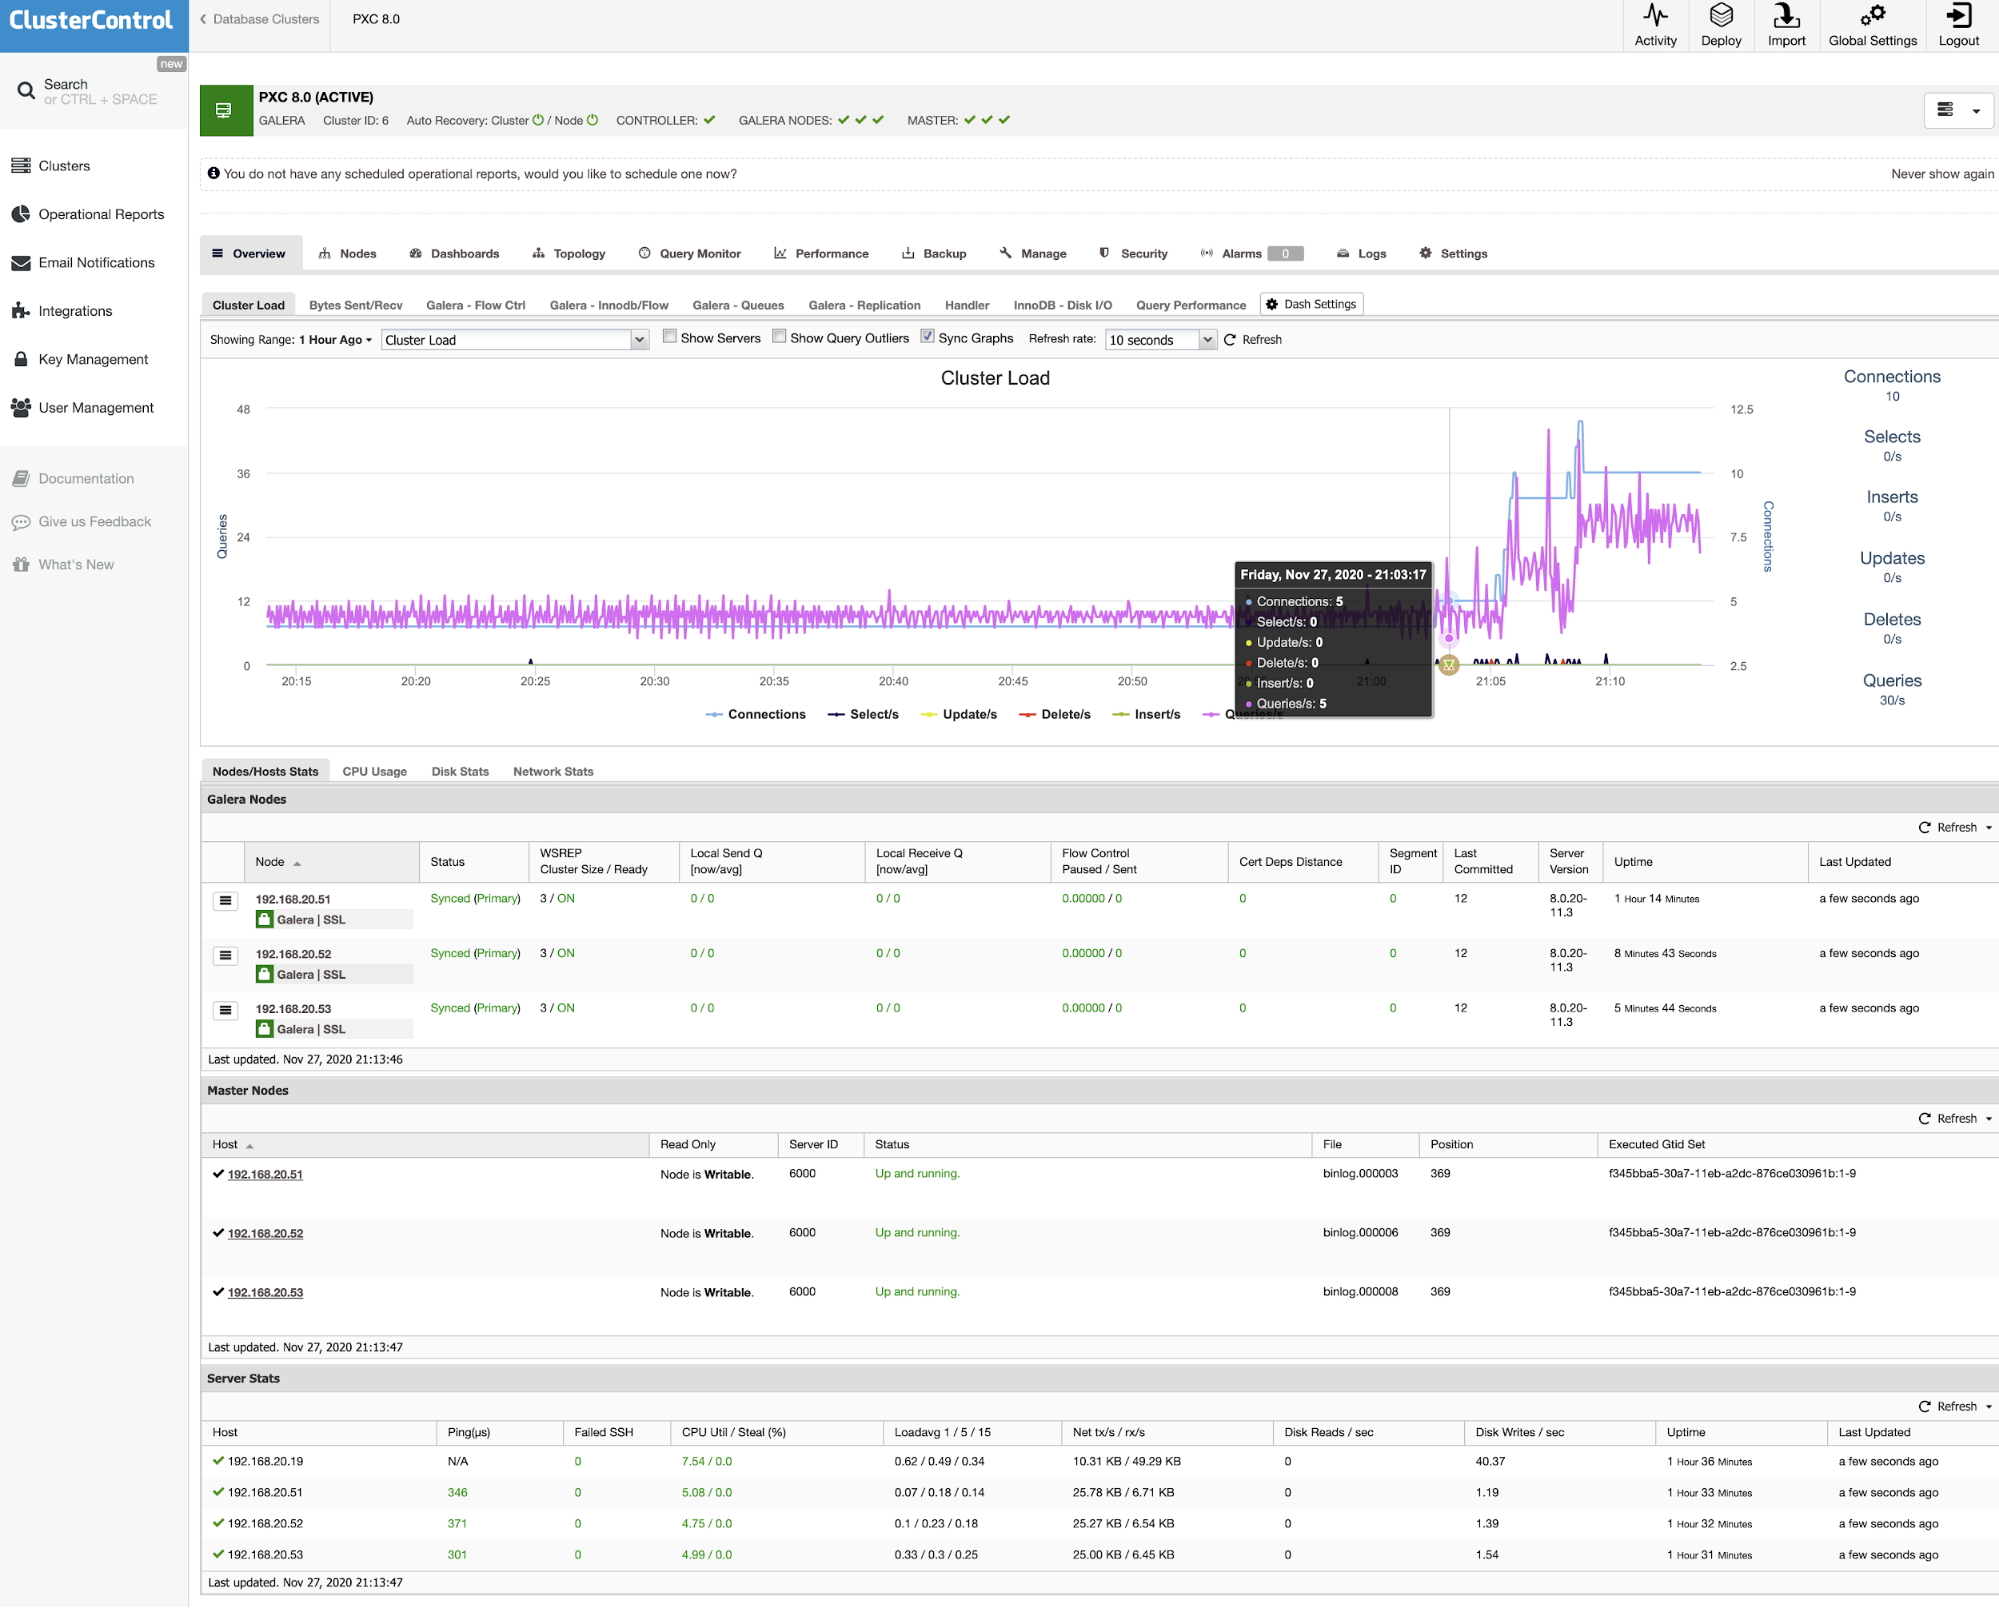
That’s it. The deployment is now complete.
PXC Deployment using ClusterControl CLI
If you prefer to deploy the cluster using command-line, we can simply use the ClusterControl command-line client tool called “s9s”. This tool will send a deployment job to the ClusterControl controller and it will perform all the necessary steps to deploy the cluster.
Run the following command on the ClusterControl server:
$ s9s cluster --create
--cluster-type=galera
--nodes="192.168.20.51;192.168.20.52;192.168.20.53"
--vendor=percona
--provider-version=8.0
--db-admin-passwd='P4ssw0rdSecr3t'
--os-user=root
--os-key-file=/root/.ssh/id_rsa
--cluster-name='My Percona XtraDB Cluster 8.0'
--log
You will see the job messages shall appear and you can monitor the deployment progress there and you can also monitor the job progress from ClusterControl UI -> Activity -> Jobs. Wait for 15-20 minutes (depending on the Internet connection) until you see the job completion notification. Our Percona XtraDB Cluster 8.0 is now deployed and you can see it listed in the ClusterControl UI.


