blog
Comparing Amazon RDS Point-in-Time Recovery to ClusterControl

The Amazon RDS is a fully-managed database service which can support multiple database engines. Among those supported are PostgreSQL, MySQL, and MariaDB. ClusterControl, on the other hand, is a database management and automation software which also supports backup handling for PostgreSQL, MySQL, and MariaDB open source databases.
While RDS has been widely embraced by many companies, some might not be familiar with how their Point-in-time Recovery (PITR) works and how it can be used.
Several of the database engines used by Amazon RDS have special considerations when restoring from a specific point in time, and in this blog we’ll cover how it works for PostgreSQL, MySQL, and MariaDB. We’ll also compare how it differs with the PITR function in ClusterControl.
What is Point-in-Time Recovery (PITR)
If you are not yet familiar with Disaster Recovery Planning (DRP) or Business Continuity Planning (BCP), you should know that PITR is one of the important standard practices for database management. As mentioned in our previous blog, Point In Time Recovery (PITR) involves restoring the database at any given moment in the past. To be able to do this, we will need to restore a full backup and then PITR takes place by applying all the changes that happened at a specific point in time you want to recover.
Point-in-time Recovery (PITR) with AWS RDS
AWS RDS handles PITR differently than the traditional way common to an on-prem database. The end result shares the same concept, but with AWS RDS the full backup is a snapshot, it then applies the PITR (which is stored in S3), and then launches a new (different) database instance.
The common way requires you to either use a logical (using pg_dump, mysqldump, mydumper) or a physical (Percona Xtrabackup, Mariabackup, pg_basebackup, pg_backrest) for your full backup before you apply the PITR.
AWS RDS will require you to launch a new DB instance, whereas the traditional approach allows you to flexibly store the PITR on the same database node where backup was taken or target a different (existing) DB instance that needs recovery or to a fresh DB instance.
Upon creation of your AWS RDS instance automated backups will be turned on. Amazon RDS automatically performs a full daily snapshot of your data. Snapshot schedules can be set during creation at your preferred backup window. While automated backups are turned on, AWS also captures transaction logs to Amazon S3 every 5 minutes recording all your DB updates. Once you initiate a point-in-time recovery, transaction logs are applied to the most appropriate daily backup in order to restore your DB instance to the specific requested time.
How To Apply a PITR with AWS RDS
Applying PITR can be done in three different ways. You can use AWS Management Console, the AWS CLI, or the Amazon RDS API once the DB instance is available. You must also take into consideration that the transaction logs are captured every five minutes which is then stored in AWS S3.
Once you restore a DB instance, the default DB security group (SG) is applied to the new DB instance. If you need the custom db SG, you can explicitly define this using the AWS Management Console, the AWS CLI modify-db-instance command, or the Amazon RDS API ModifyDBInstance operation after the DB instance is available.
PITR requires that you need to identify the most latest restorable time for a DB instance. To do this, you can use the AWS CLI describe-db-instances command and look at the value returned in the LatestRestorableTime field for the DB instance. For example,
[root@ccnode ~]# aws rds describe-db-instances --db-instance-identifier database-s9s-mysql|grep LatestRestorableTime

            "LatestRestorableTime": "2020-05-08T07:25:00+00:00",
Applying PITR with AWS Console
To apply PITR in AWS Console, login to AWS Console → go to Amazon RDS → Databases → Select (or click) your desired DB instance, then click Actions. See below,
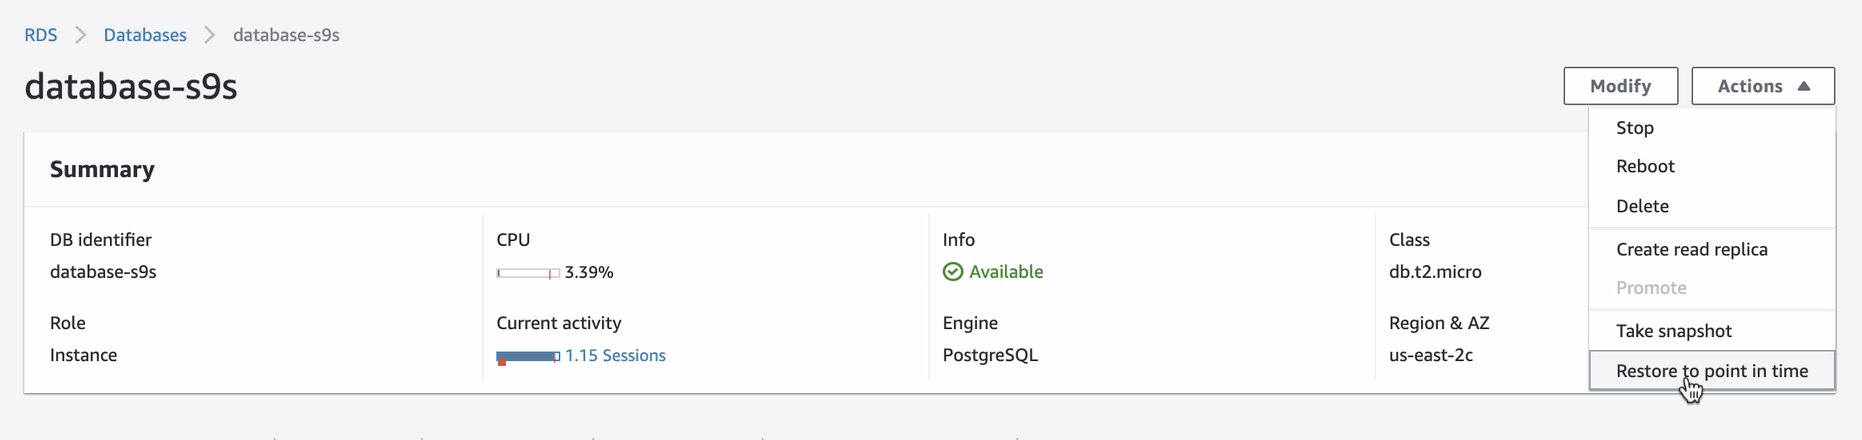
Once you attempt to restore via PITR, the console UI will notify you what’s the most latest restorable time you can set. You can use the latest restorable time or specify your desired target date and time. See below:

It’s quite easy to follow but it requires you to pay attention and fill in the desired specifications you need for the new instance to be launched.
Applying PITR with AWS CLI
Using the AWS CLI can be quite handy especially if you need to incorporate this with your automation tools for your CI/CD pipeline. To do this, you can start simply with,
[root@ccnode ~]# aws rds restore-db-instance-to-point-in-time

>     --source-db-instance-identifier  database-s9s-mysql

>     --target-db-instance-identifier  database-s9s-mysql-pitr

>     --restore-time 2020-05-08T07:30:00+00:00

{

    "DBInstance": {

        "DBInstanceIdentifier": "database-s9s-mysql-pitr",

        "DBInstanceClass": "db.t2.micro",

        "Engine": "mysql",

        "DBInstanceStatus": "creating",

        "MasterUsername": "admin",

        "DBName": "s9s",

        "AllocatedStorage": 18,

        "PreferredBackupWindow": "00:00-00:30",

        "BackupRetentionPeriod": 7,

        "DBSecurityGroups": [],

        "VpcSecurityGroups": [

            {

                "VpcSecurityGroupId": "sg-xxxxx",

                "Status": "active"

            }

        ],

        "DBParameterGroups": [

            {

                "DBParameterGroupName": "default.mysql5.7",

                "ParameterApplyStatus": "in-sync"

            }

        ],

        "DBSubnetGroup": {

            "DBSubnetGroupName": "default",

            "DBSubnetGroupDescription": "default",

            "VpcId": "vpc-f91bdf90",

            "SubnetGroupStatus": "Complete",

            "Subnets": [

                {

                    "SubnetIdentifier": "subnet-exxxxx",

                    "SubnetAvailabilityZone": {

                        "Name": "us-east-2a"

                    },

                    "SubnetStatus": "Active"

                },

                {

                    "SubnetIdentifier": "subnet-xxxxx",

                    "SubnetAvailabilityZone": {

                        "Name": "us-east-2c"

                    },

                    "SubnetStatus": "Active"

                },

                {

                    "SubnetIdentifier": "subnet-xxxxxx",

                    "SubnetAvailabilityZone": {

                        "Name": "us-east-2b"

                    },

                    "SubnetStatus": "Active"

                }

            ]

        },

        "PreferredMaintenanceWindow": "fri:06:01-fri:06:31",

        "PendingModifiedValues": {},

        "MultiAZ": false,

        "EngineVersion": "5.7.22",

        "AutoMinorVersionUpgrade": true,

        "ReadReplicaDBInstanceIdentifiers": [],

        "LicenseModel": "general-public-license",

        "OptionGroupMemberships": [

            {

                "OptionGroupName": "default:mysql-5-7",

                "Status": "pending-apply"

            }

        ],

        "PubliclyAccessible": true,

        "StorageType": "gp2",

        "DbInstancePort": 0,

        "StorageEncrypted": false,

        "DbiResourceId": "db-XXXXXXXXXXXXXXXXX",

        "CACertificateIdentifier": "rds-ca-2019",

        "DomainMemberships": [],

        "CopyTagsToSnapshot": false,

        "MonitoringInterval": 0,

        "DBInstanceArn": "arn:aws:rds:us-east-2:042171833148:db:database-s9s-mysql-pitr",

        "IAMDatabaseAuthenticationEnabled": false,

        "PerformanceInsightsEnabled": false,

        "DeletionProtection": false,

        "AssociatedRoles": []

    }

}
Both of these approaches take time to create or prepare the database instance until it will be available and viewable in the list of database instances in your AWS RDS console.
AWS RDS PITR Limitations
When using AWS RDS you are tied to them as a vendor. Moving your operations out their system can be troublesome. Here’s are some things you have to consider:
- The level of vendor-lock in when using AWS RDS
- Your only option to recover via PITR requires you to launch a new instance running on RDS
- No way you can recover using PITR process to an external node not in RDS
- Requires you to learn and be familiar with their tools and security framework.
How To Apply A PITR with ClusterControl
ClusterControl performs PITR in a simple, yet straightforward, fashion (but requires you have to enable or set the prerequisites so PITR can be used). As discussed earlier, PITR for ClusterControl works differently than AWS RDS. Here a list of where PITR can be applied using ClusterControl (as of version 2.4.0):
- Applies after the full backup based on the available backup method solutions we support for PostgreSQL, MySQL, and MariaDB databases.
- For PostgreSQL, only pg_basebackup and pgBackRest methods are supported and compatible to work with PITR
- For MySQL or MariaDB, only xtrabackup/mariabackup backup method is supported and compatible to work with PITR, or mysqldump with dump type “Complete PITR-compatible”
- Applicable for MySQL or MariaDB databases, PITR applies only if the source node of the full backup is the target node to be recovered.
- MySQL or MariaDB databases requires that you have binary logging enabled
- For PostgreSQL, PITR is restricted to the primary node and requires enabling WAL archiving for pg_basebackup; or, is automatically set up for pgBackRest when configured
Backup Management for ClusterControl is applicable for environments where databases are not fully managed and requires SSH access which is totally different from AWS RDS. Although they share the same result which is to recover data, the backup solutions that are present in ClusterControl cannot be applicable in AWS RDS. ClusterControl also does not support RDS as well for management and monitoring.
Using ClusterControl for PITR in PostgreSQL
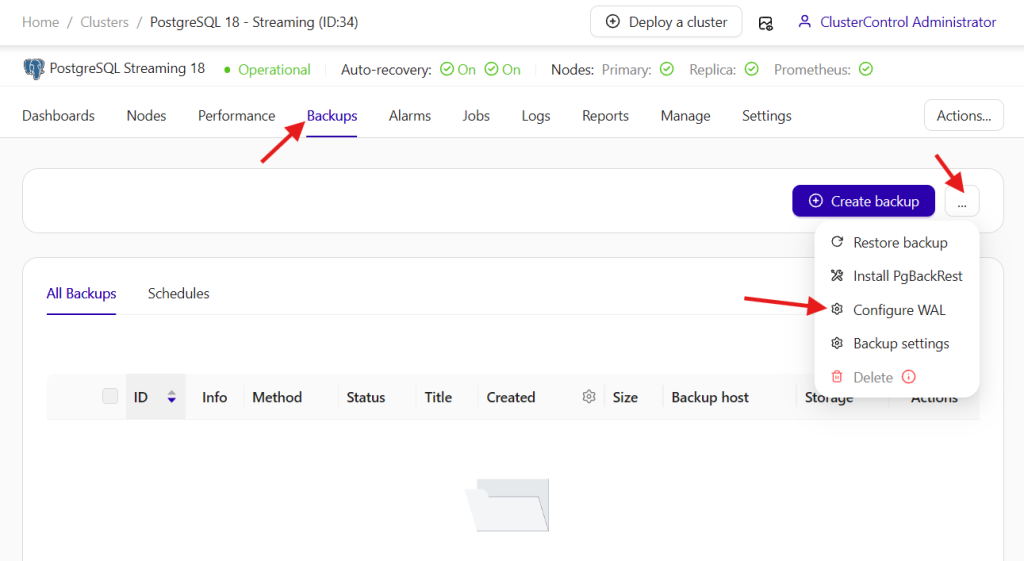
As mentioned earlier of the prerequisites to leverage the PITR, you must have to enable WAL archiving for pg_basebackup, before you take the first full backup. This can be achieved by going to Backups -> “…” -> Configure WAL, as shown below:
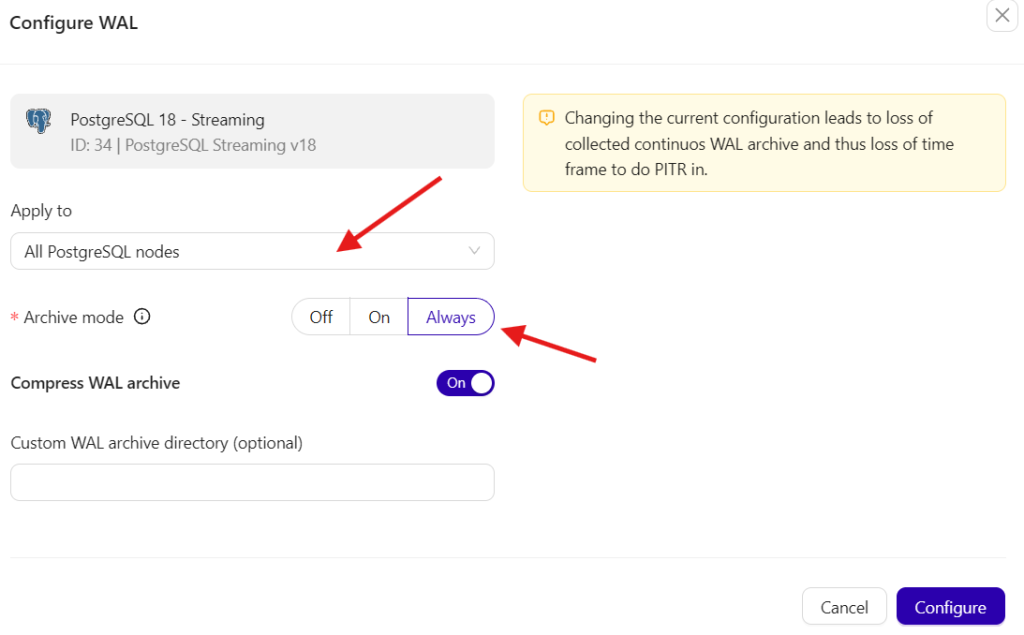
Then, set the “Archive mode” to On (primary only) or Always (all nodes, regardless the role):
When using pgBackRest, WAL archiving is set up automatically upon the initial configuration of the backup method. These WAL archives are kept on the pgBackRest repository server, where pgBackRest retrieves them during the restoration process.
For pg_basebackup, PITR can be applied right after a full backup while for pgBackRest, any types of existing backups (full, differential or incremental) can be used for PITR. First, find an existing backup to restore from under the Backup list:
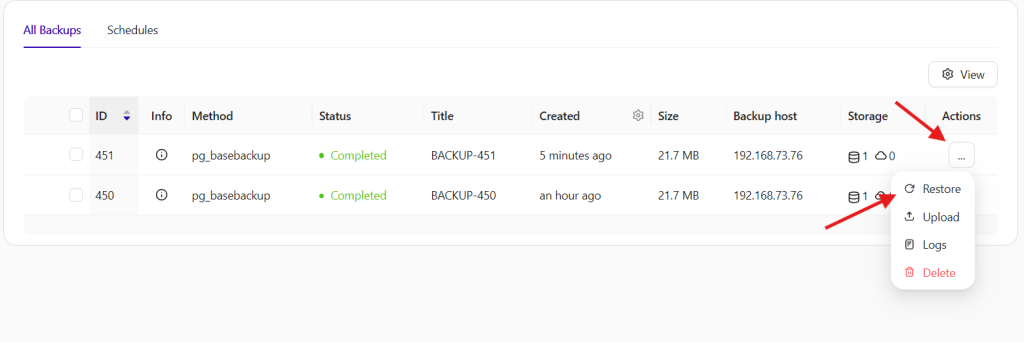
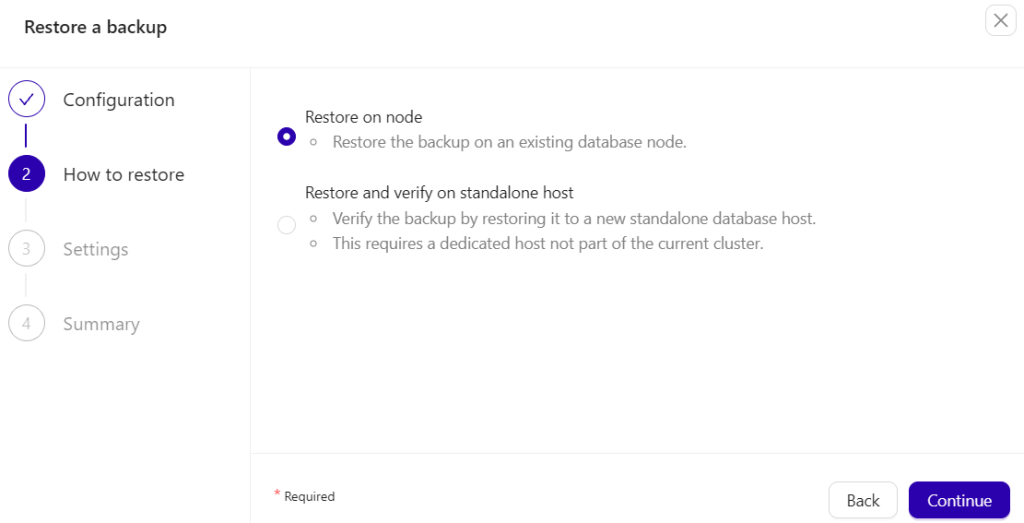
Then restore it on the same host as the source of the backup as taken,
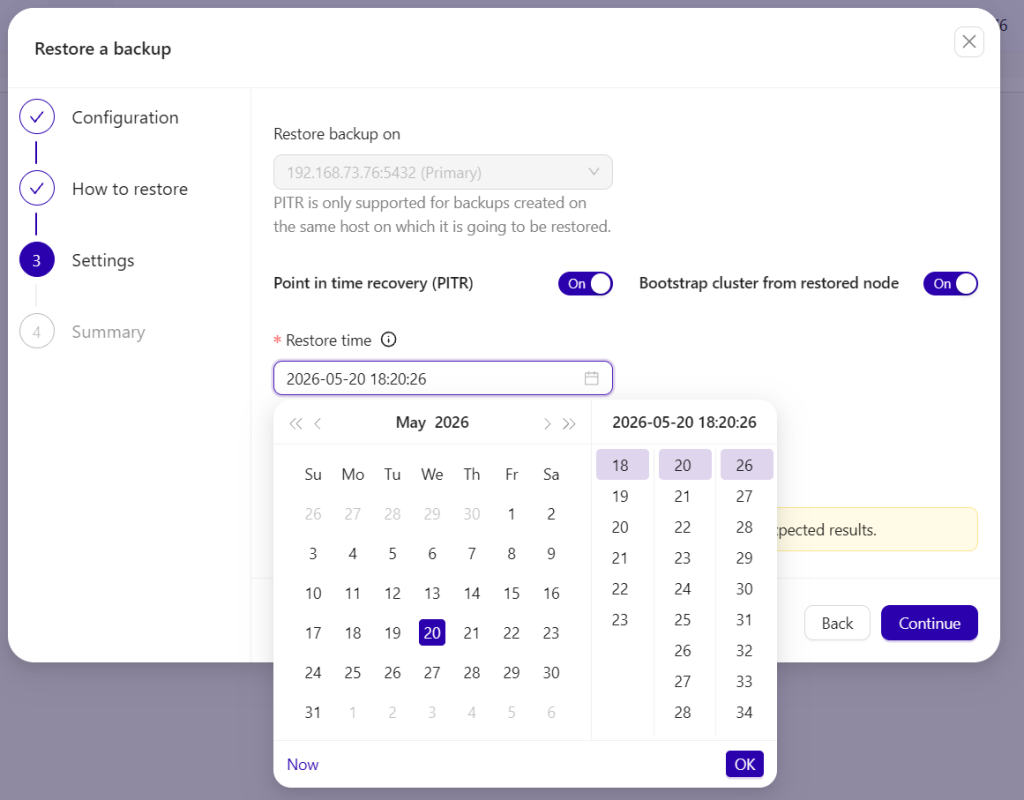
Then just specify the date and time,
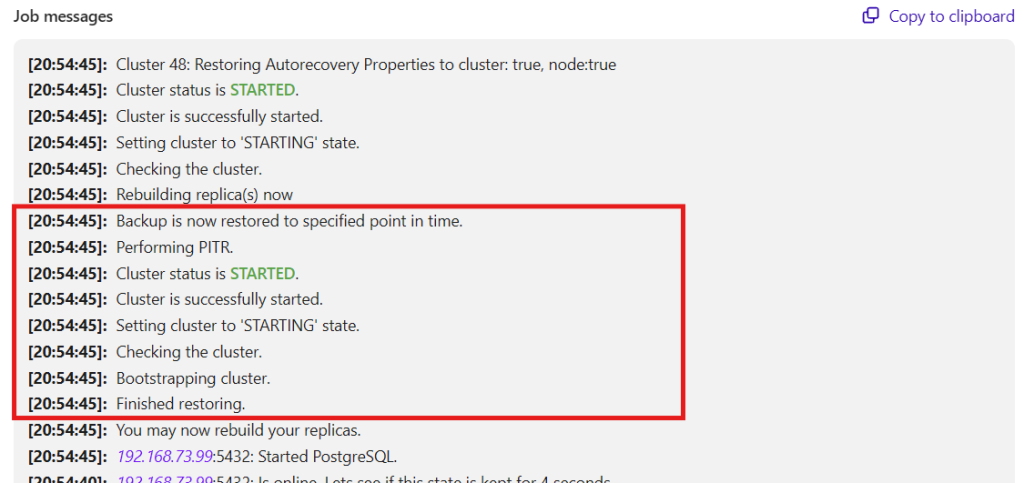
Once you are set and specify the date and time, ClusterControl will then restore the backup then apply the PITR once the backup is done. You can also verify this by inspecting the job activity logs just like below,
Using ClusterControl for PITR in MySQL/MariaDB
For MySQL or MariaDB, binary logging must be enabled which you can check under the Performance -> DB Variables section:
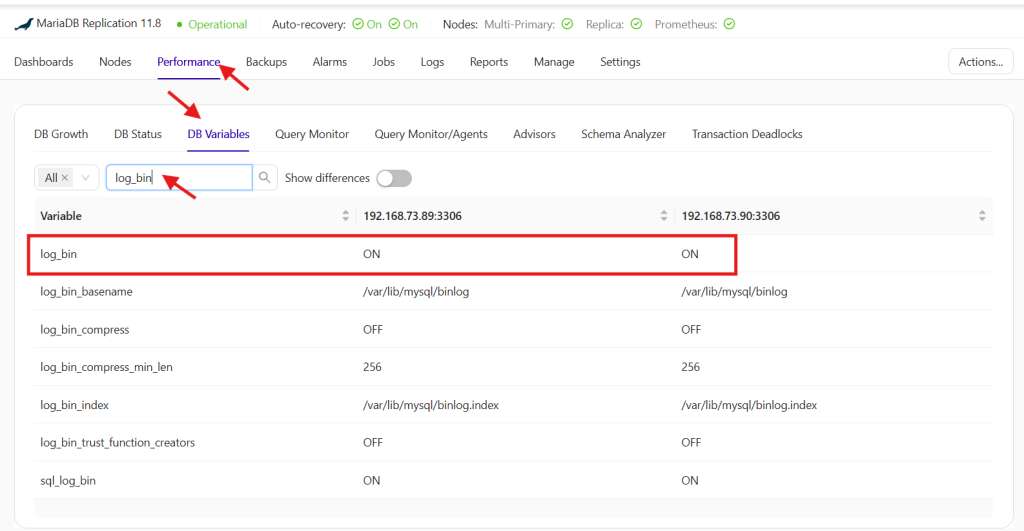
After confirming that log_bin is active on your node, you must have a full backup created on that same node to proceed with Point-in-Time Recovery (PITR), as noted in the prerequisites. If binary logging is not yet active, you can enable it by adding log_bin=ON to the [mysqld] section of your configuration files, such as /etc/my.cnf or /etc/mysql/my.cnf.
With binary logs active and a valid full backup ready, the PITR process can be initiated. While the workflow is similar to the PostgreSQL interface, the MySQL/MariaDB UI provides unique fields for recovery. Users have the flexibility to define the recovery target by either selecting a specific date and time or by designating a particular binary log file and position.

ClusterControl PITR Limitations
In case you’re wondering what you can and cannot do for PITR in ClusterControl, here’s the list below:
- No PITR support for external nodes
- No PITR support when the source of the backup is different from the target node
- There’s no such periodic notification of what’s the most latest period of time you can apply for PITR
Conclusion
Both tools have different approaches and different solutions for the target environment. The key takeaways is that AWS RDS has its own PITR which is faster, but is applicable only if your database is hosted under RDS and you are tied to a vendor lock in.
ClusterControl allows you to freely apply the PITR process in any environment so long as the prerequisites are met — try its MySQL, MariaDB, and PG workflows free for 30-days.
Install ClusterControl in 10-minutes. Free 30-day Enterprise trial included!
Script Installation Instructions
The installer script is the simplest way to get ClusterControl up and running. Run it on your chosen host, and it will take care of installing all required packages and dependencies.
Offline environments are supported as well. See the Offline Installation guide for more details.
On the ClusterControl server, run the following commands:
wget https://severalnines.com/downloads/cmon/install-cc
chmod +x install-cc
With your install script ready, run the command below. Replace S9S_CMON_PASSWORD and S9S_ROOT_PASSWORD placeholders with your choice password, or remove the environment variables from the command to interactively set the passwords. If you have multiple network interface cards, assign one IP address for the HOST variable in the command using HOST=<ip_address>.
S9S_CMON_PASSWORD=<your_password> S9S_ROOT_PASSWORD=<your_password> HOST=<ip_address> ./install-cc # as root or sudo userAfter the installation is complete, open a web browser, navigate to https://<ClusterControl_host>/, and create the first admin user by entering a username (note that “admin” is reserved) and a password on the welcome page. Once you’re in, you can deploy a new database cluster or import an existing one.
The installer script supports a range of environment variables for advanced setup. You can define them using export or by prefixing the install command.
See the list of supported variables and example use cases to tailor your installation.
Other Installation Options
Helm Chart
Deploy ClusterControl on Kubernetes using our official Helm chart.
Ansible Role
Automate installation and configuration using our Ansible playbooks.
Puppet Module
Manage your ClusterControl deployment with the Puppet module.
ClusterControl on Marketplaces
Prefer to launch ClusterControl directly from the cloud? It’s available on these platforms: