blog
Tips for Storing PostgreSQL Backups on Amazon AWS

Data is probably one of the most valuable assets in a company. Because of this we should always have a Disaster Recovery Plan (DRP) to prevent data loss in the event of an accident or hardware failure.
A backup is the simplest form of DR, however it might not always be enough to guarantee an acceptable Recovery Point Objective (RPO). It is recommended that you have at least three backups stored in different physical places.
Best practice dictates backup files should have one stored locally on the database server (for a faster recovery), another one in a centralized backup server, and the last one the cloud.
For this blog, we’ll take a look at which options Amazon AWS provides for the storage of PostgreSQL backups in the cloud and we’ll show some examples on how to do it.
About Amazon AWS
Amazon AWS is one of the world’s most advanced cloud providers in terms of features and services, with millions of customers. If we want to run our PostgreSQL databases on Amazon AWS we have some options…
-
Amazon RDS: It allows us to create, manage and scale a PostgreSQL database (or different database technologies) in the cloud in an easy and fast way.
-
Amazon Aurora: It’s a PostgreSQL compatible database built for the cloud. According to the AWS web site, it’s three times faster than standard PostgreSQL databases.
-
Amazon EC2: It’s a web service that provides resizable compute capacity in the cloud. It provides you with complete control of your computing resources and allows you to set up and configure everything about your instances from your operating system up to your applications.
But, in fact, we don’t need to have our databases running on Amazon to store our backups here.
Storing Backups on Amazon AWS
There are different options to store our PostgreSQL backup on AWS. If we’re running our PostgreSQL database on AWS we have more options and (as we’re in the same network) it could also be faster. Let’s see how AWS can help us store our backups.
AWS CLI
First, let’s prepare our environment to test the different AWS options. For our examples, we’ll use an On-prem PostgreSQL 11 server, running on CentOS 7. Here, we need to install the AWS CLI following the instructions from this site.
When we have our AWS CLI installed, we can test it from the command line:
[root@PG1bkp ~]# aws --version

aws-cli/1.16.225 Python/2.7.5 Linux/4.15.18-14-pve botocore/1.12.215
Now, the next step is to configure our new client running the aws command with the configure option.
[root@PG1bkp ~]# aws configure

AWS Access Key ID [None]: AKIA7TMEO21BEBR1A7HR

AWS Secret Access Key [None]: SxrCECrW/RGaKh2FTYTyca7SsQGNUW4uQ1JB8hRp

Default region name [None]: us-east-1

Default output format [None]:
To get this information, you can go to the IAM AWS Section and check the current user, or if you prefer, you can create a new one for this task.
After this, we’re ready to use the AWS CLI to access our Amazon AWS services.
Amazon S3
This is probably the most commonly used option to store backups in the cloud. Amazon S3 can store and retrieve any amount of data from anywhere on the Internet. It’s a simple storage service that offers an extremely durable, highly available, and infinitely scalable data storage infrastructure at low costs.
Amazon S3 provides a simple web service interface which you can use to store and retrieve any amount of data, at any time, from anywhere on the web, and (with the AWS CLI or AWS SDK) you can integrate it with different systems and programming languages.
How to use it
Amazon S3 uses Buckets. They are unique containers for everything that you store in Amazon S3. So, the first step is to access the Amazon S3 Management Console and create a new Bucket.
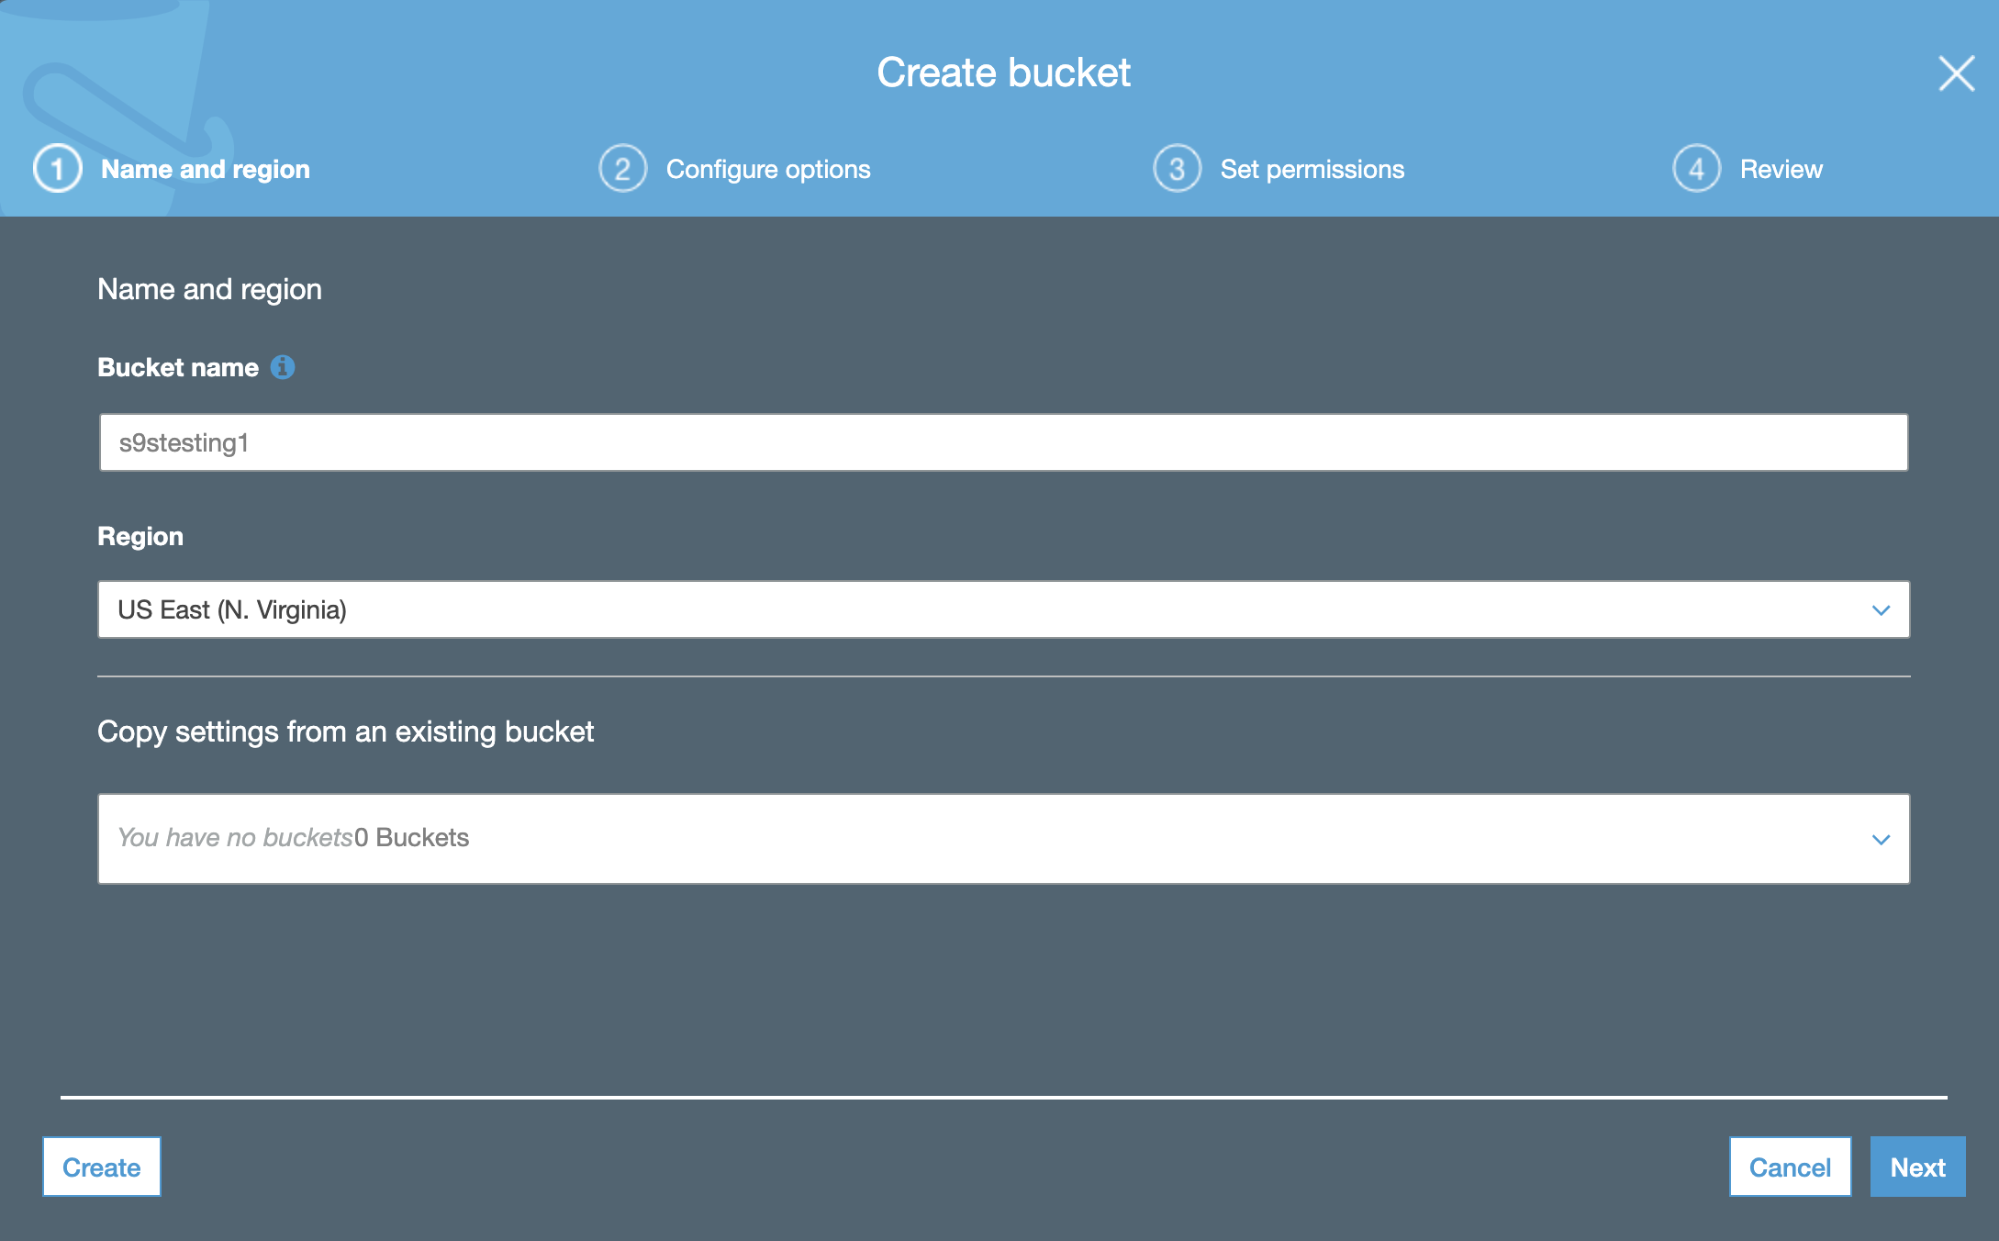
In the first step, we just need to add the Bucket name and the AWS Region.
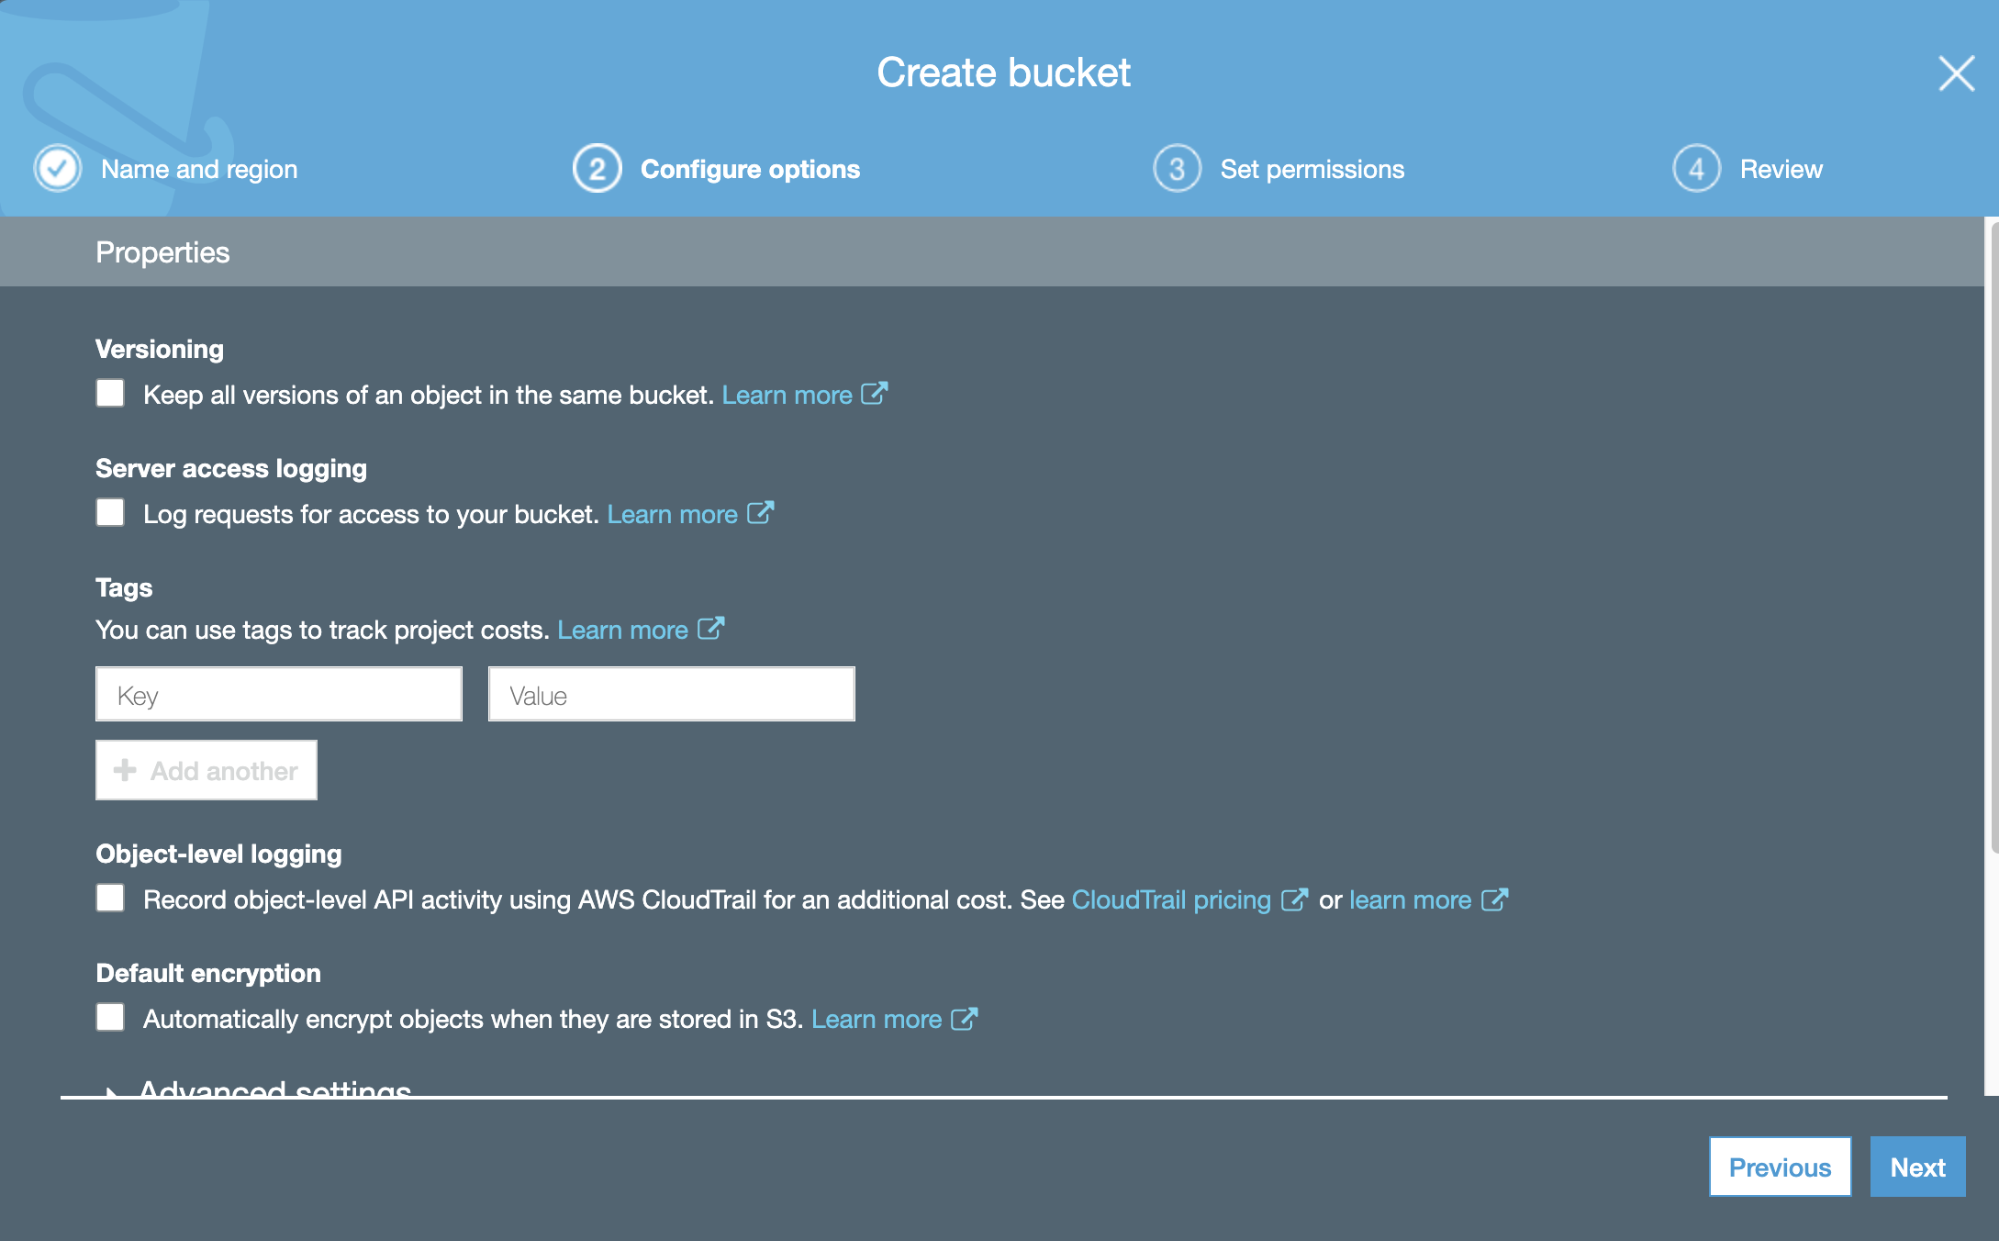
Now, we can configure some details about our new Bucket, like versioning and logging.
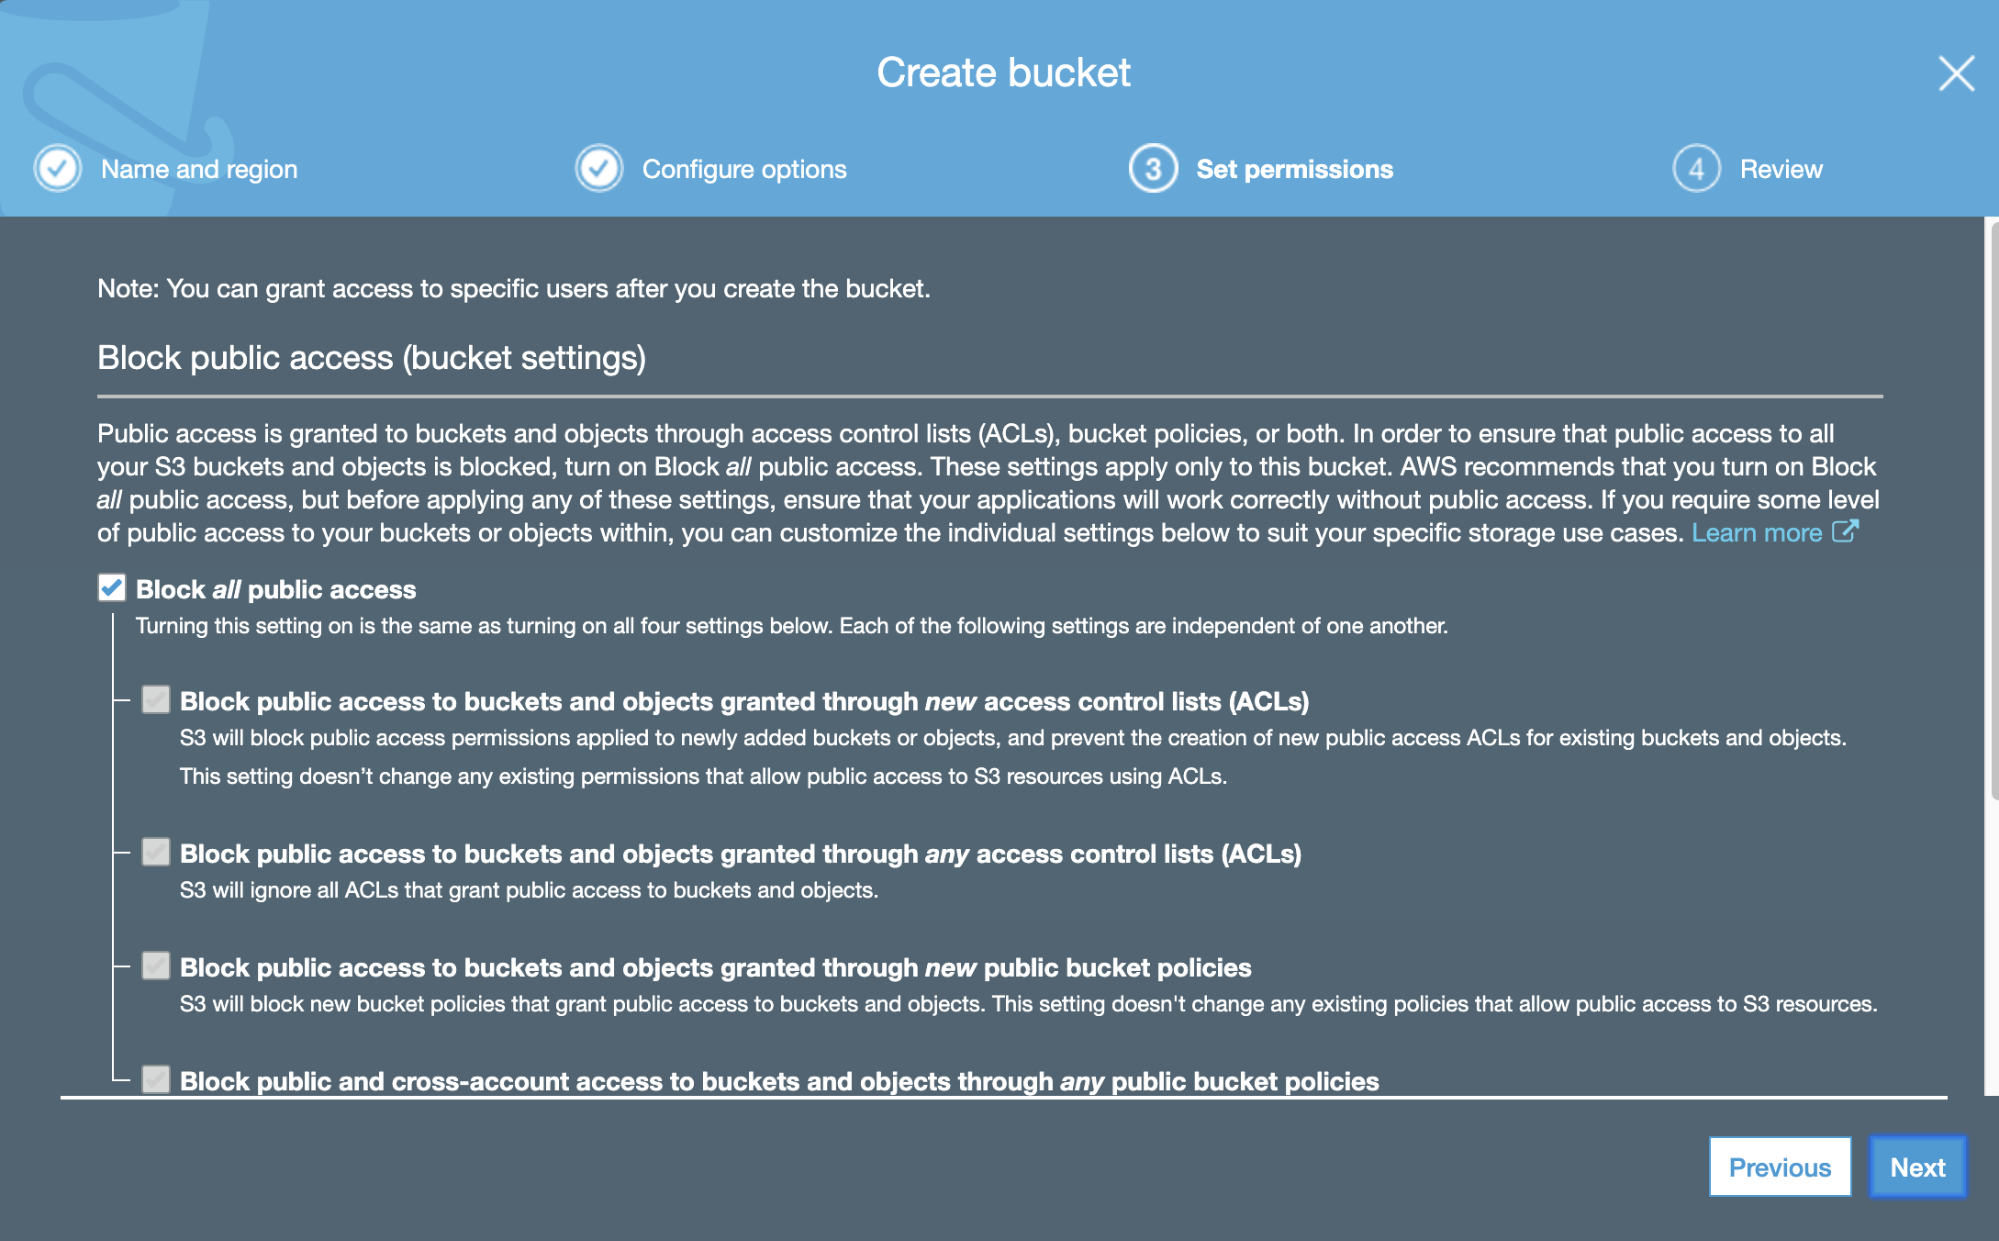
And then, we can specify the permissions for this new Bucket.
Now we have our Bucket created, let’s see how we can use it to store our PostgreSQL backups.
First, let’s test our client connecting it to S3.
[root@PG1bkp ~]# aws s3 ls
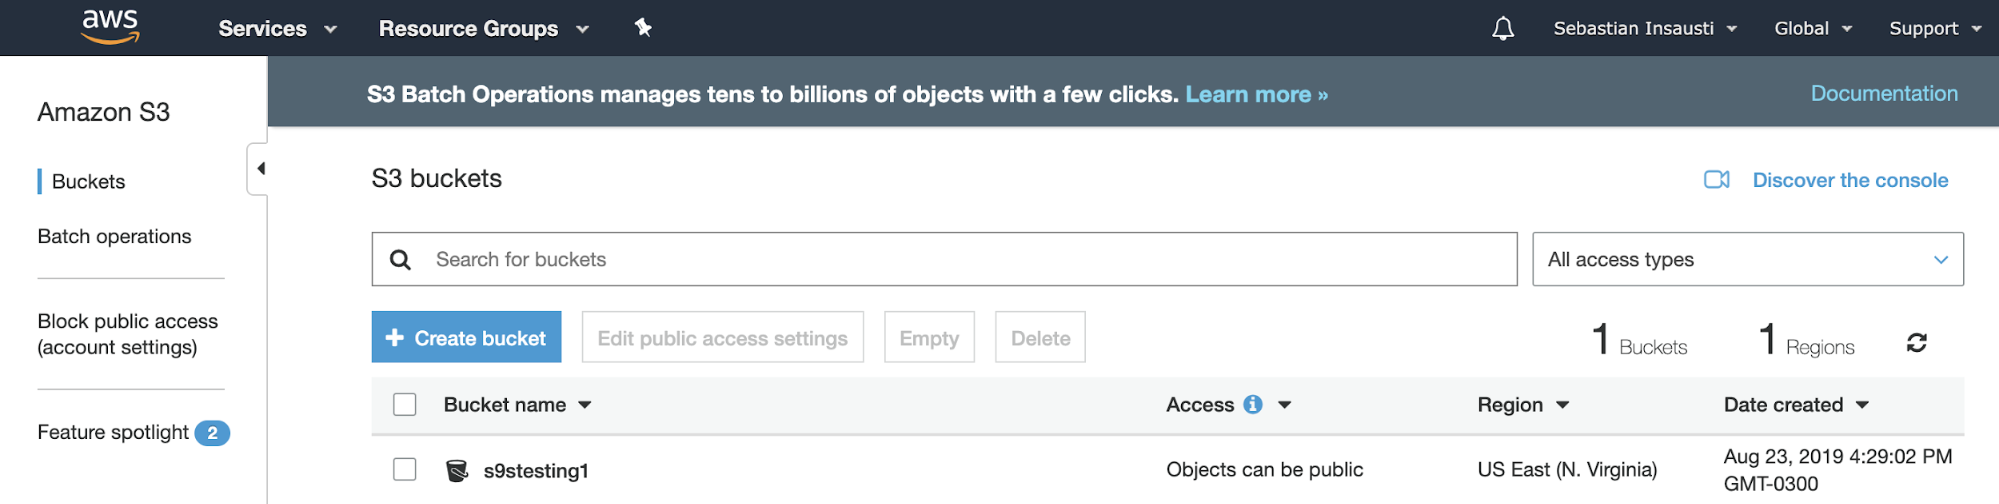
2019-08-23 19:29:02 s9stesting1It works! With the previous command, we list the current Buckets created.
So, now, we can just upload the backup to the S3 service. For this, we can use aws sync or aws cp command.
[root@PG1bkp ~]# aws s3 sync /root/backups/BACKUP-5/ s3://s9stesting1/backups/

upload: backups/BACKUP-5/cmon_backup.metadata to s3://s9stesting1/backups/cmon_backup.metadata

upload: backups/BACKUP-5/cmon_backup.log to s3://s9stesting1/backups/cmon_backup.log

upload: backups/BACKUP-5/base.tar.gz to s3://s9stesting1/backups/base.tar.gz

[root@PG1bkp ~]#

[root@PG1bkp ~]# aws s3 cp /root/backups/BACKUP-6/pg_dump_2019-08-23_205919.sql.gz s3://s9stesting1/backups/

upload: backups/BACKUP-6/pg_dump_2019-08-23_205919.sql.gz to s3://s9stesting1/backups/pg_dump_2019-08-23_205919.sql.gz

[root@PG1bkp ~]#
We can check the Bucket content from the AWS web site.
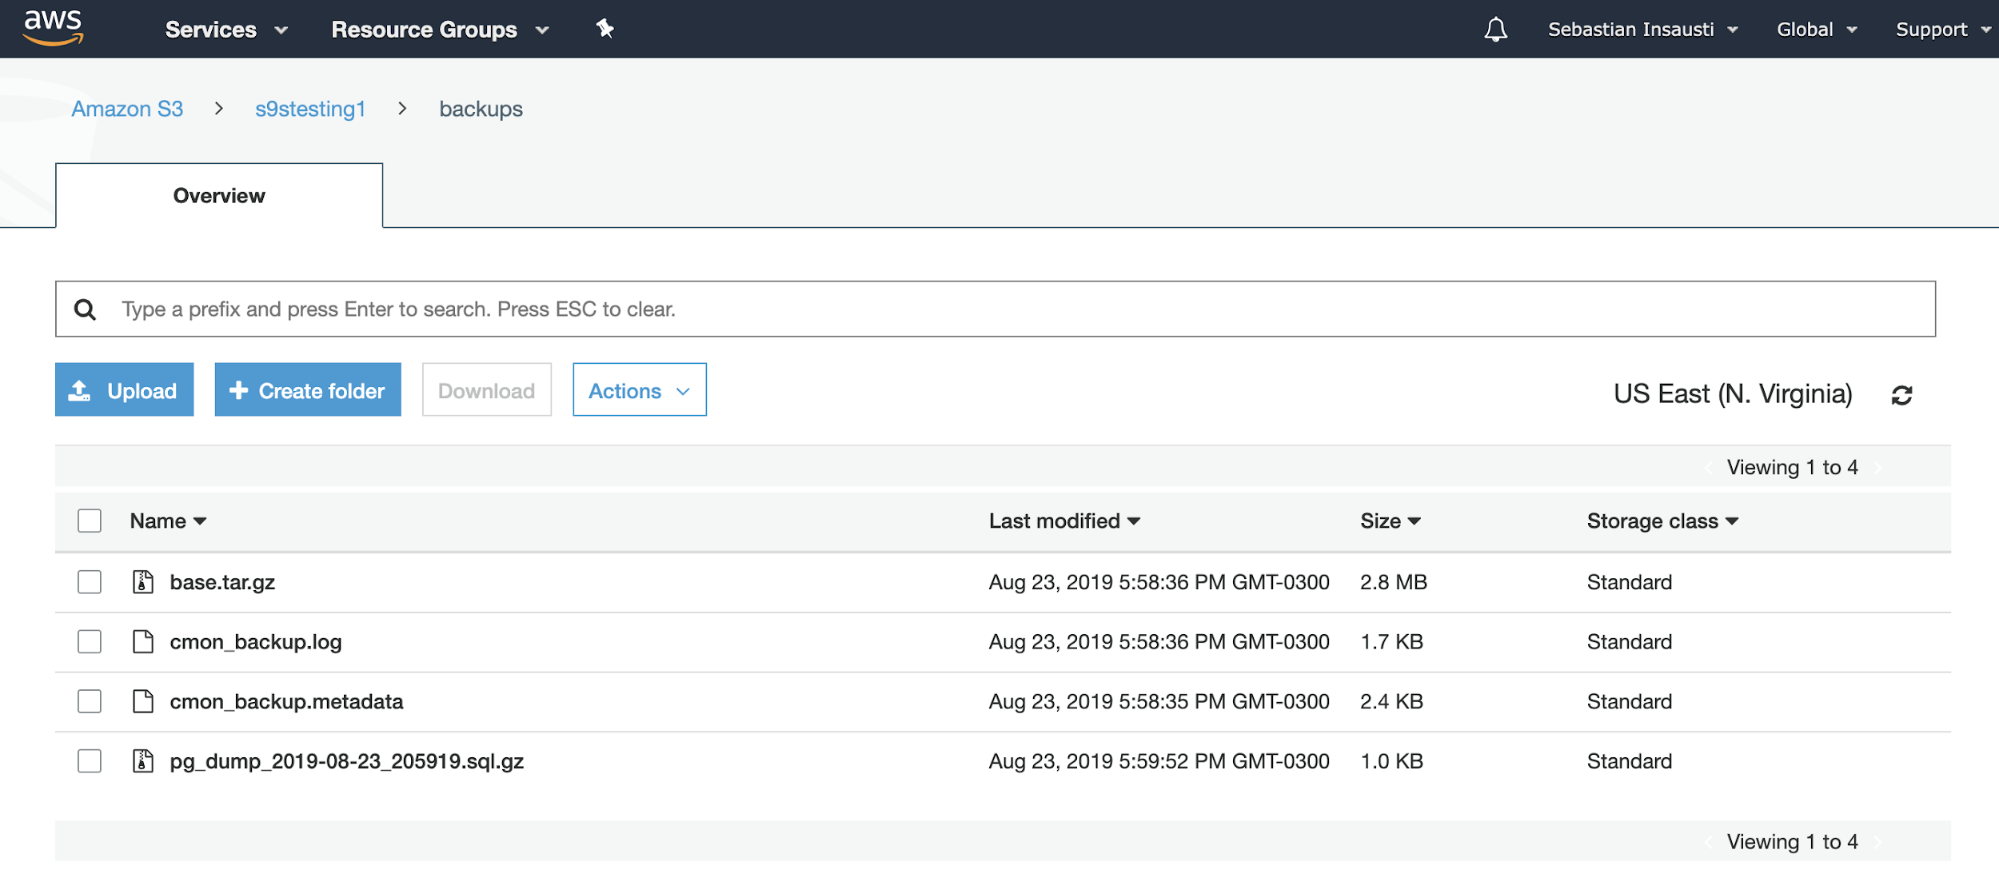
Or even by using the AWS CLI.
[root@PG1bkp ~]# aws s3 ls s3://s9stesting1/backups/

2019-08-23 19:29:31          0

2019-08-23 20:58:36    2974633 base.tar.gz

2019-08-23 20:58:36       1742 cmon_backup.log

2019-08-23 20:58:35       2419 cmon_backup.metadata

2019-08-23 20:59:52       1028 pg_dump_2019-08-23_205919.sql.gz
For more information about AWS S3 CLI, you can check the official AWS documentation.
Amazon S3 Glacier
This is the lower-cost version of Amazon S3. The main difference between them is velocity and accessibility. You can use Amazon S3 Glacier if the cost of storage needs to stay low and you don’t require millisecond access to your data. Usage is another important difference between them.
How to use it
Instead Buckets, Amazon S3 Glacier uses Vaults. It’s a container for storing any object. So, the first step is to access the Amazon S3 Glacier Management Console and create a new Vault.
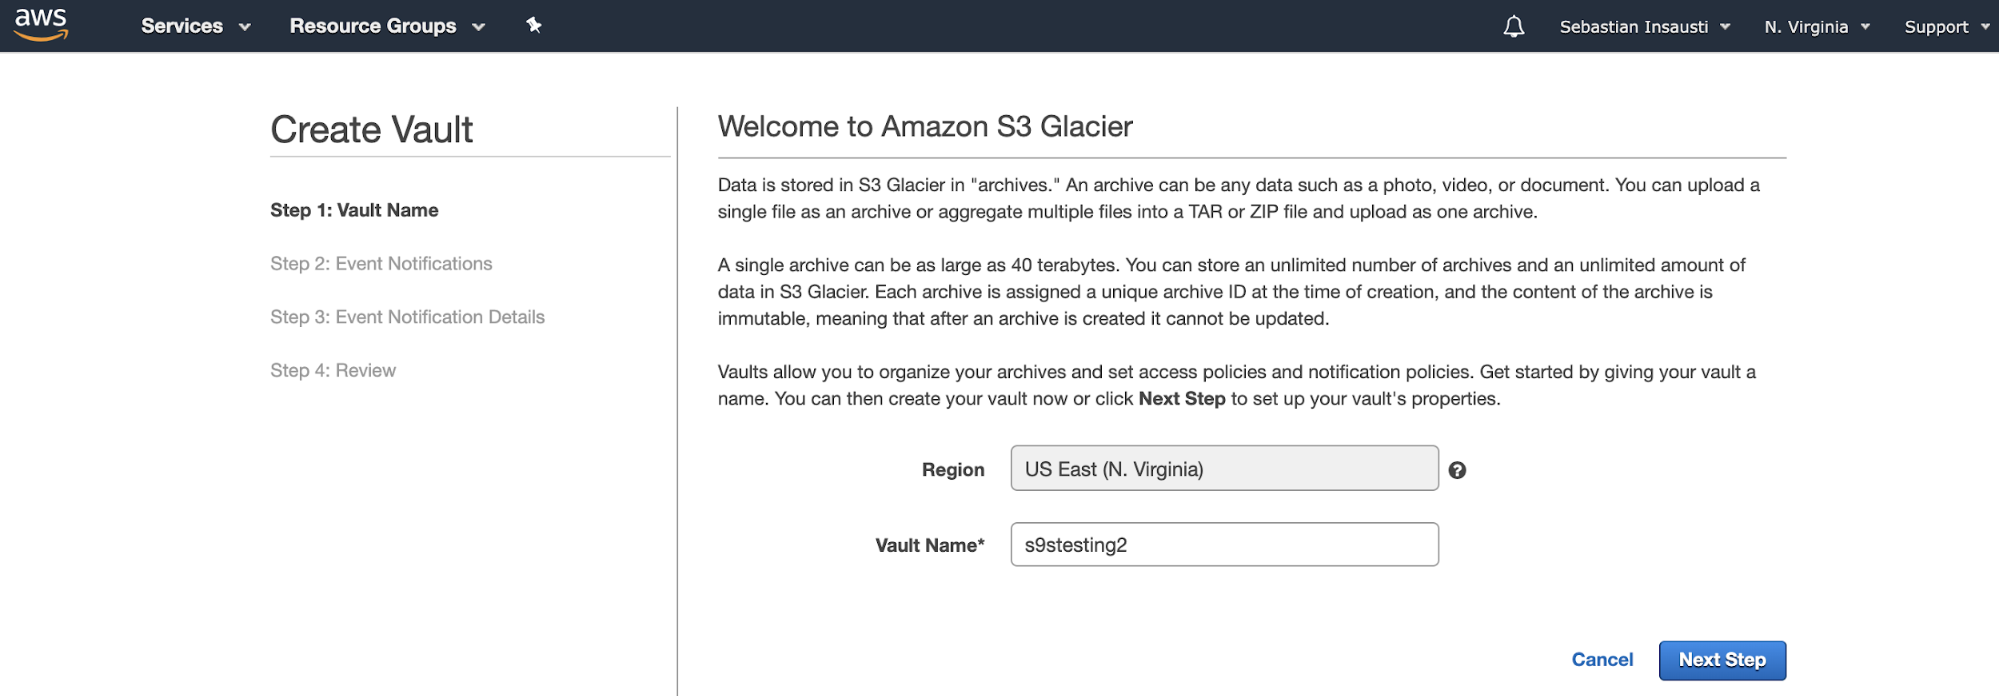
Here, we need to add the Vault Name and the Region and, in the next step, we can enable the event notifications that uses the Amazon Simple Notification Service (Amazon SNS).
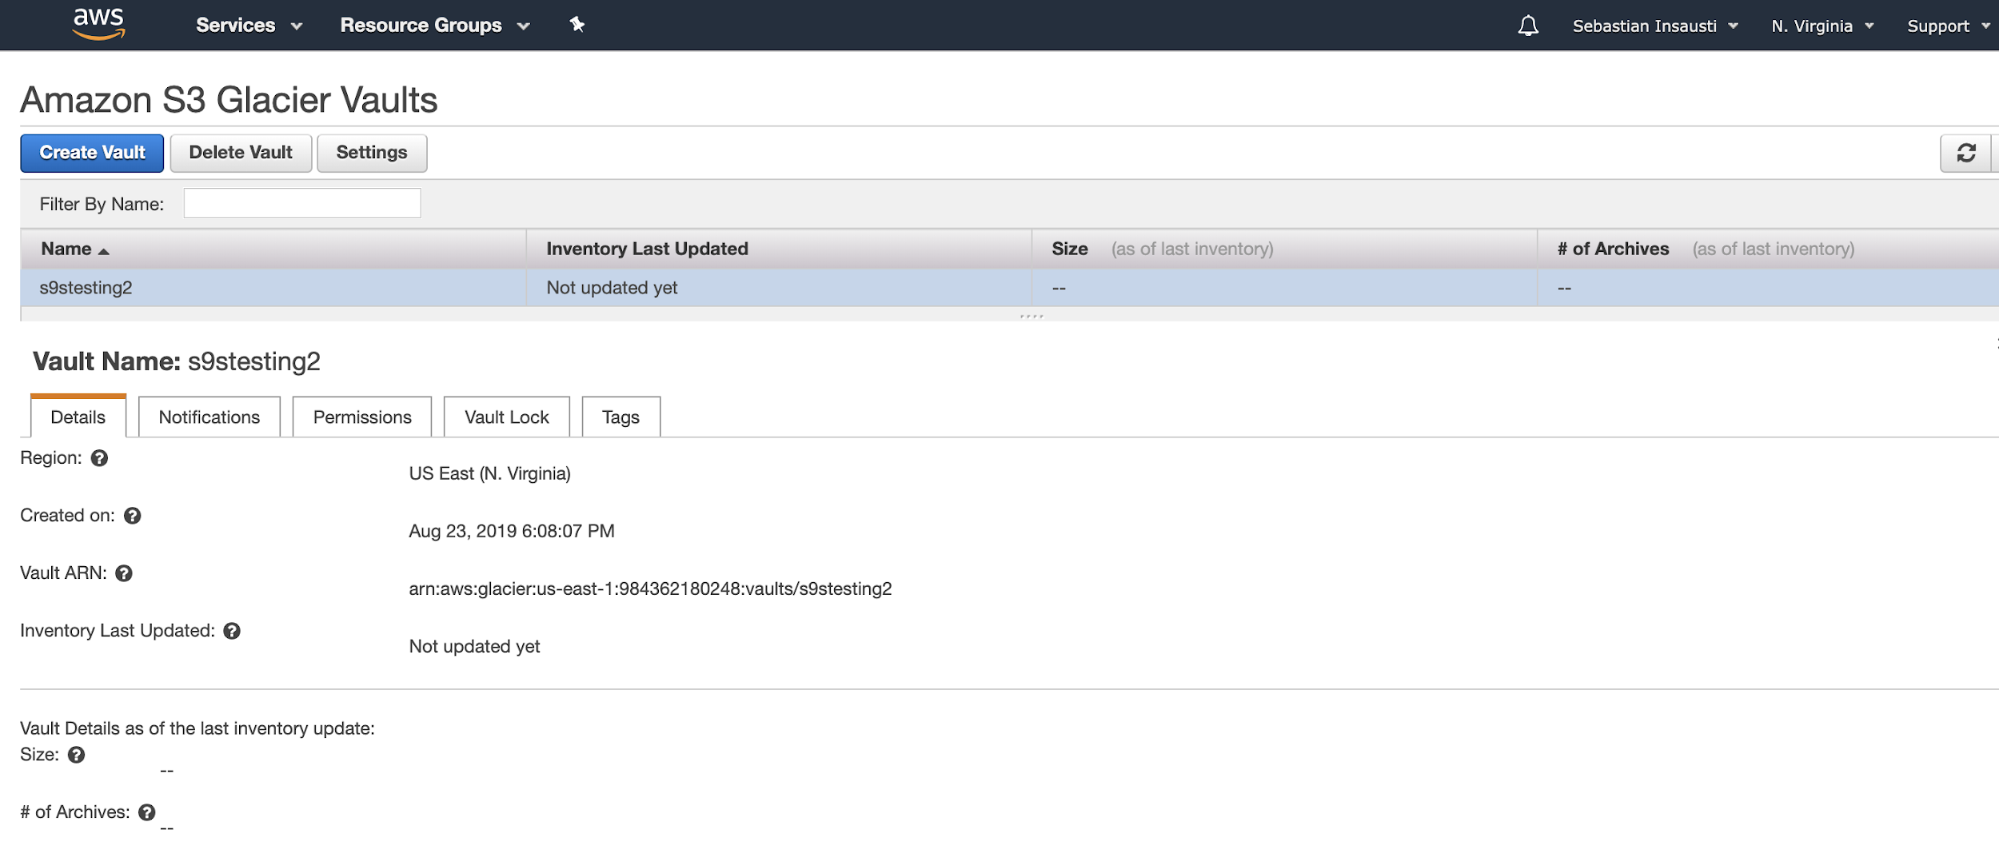
Now we have our Vault created, we can access it from the AWS CLI.
[root@PG1bkp ~]# aws glacier describe-vault --account-id - --vault-name s9stesting2

{

    "SizeInBytes": 0,

    "VaultARN": "arn:aws:glacier:us-east-1:984227183428:vaults/s9stesting2",

    "NumberOfArchives": 0,

    "CreationDate": "2019-08-23T21:08:07.943Z",

    "VaultName": "s9stesting2"

}
It’s working. So now, we can upload our backup here.
[root@PG1bkp ~]# aws glacier upload-archive --body /root/backups/BACKUP-6/pg_dump_2019-08-23_205919.sql.gz --account-id - --archive-description "Backup upload test" --vault-name s9stesting2

{

    "archiveId": "ddgCJi_qCJaIVinEW-xRl4I_0u2a8Ge5d2LHfoFBlO6SLMzG_0Cw6fm-OLJy4ZH_vkSh4NzFG1hRRZYDA-QBCEU4d8UleZNqsspF6MI1XtZFOo_bVcvIorLrXHgd3pQQmPbxI8okyg",

    "checksum": "258faaa90b5139cfdd2fb06cb904fe8b0c0f0f80cba9bb6f39f0d7dd2566a9aa",

    "location": "/984227183428/vaults/s9stesting2/archives/ddgCJi_qCJaIVinEW-xRl4I_0u2a8Ge5d2LHfoFBlO6SLMzG_0Cw6fm-OLJy4ZH_vkSh4NzFG1hRRZYDA-QBCEU4d8UleZNqsspF6MI1XtZFOo_bVcvIorLrXHgd3pQQmPbxI8okyg"

}
One important thing is the Vault status is updated about once per day, so we should wait to see the file uploaded.
[root@PG1bkp ~]# aws glacier describe-vault --account-id - --vault-name s9stesting2

{

    "SizeInBytes": 33796,

    "VaultARN": "arn:aws:glacier:us-east-1:984227183428:vaults/s9stesting2",

    "LastInventoryDate": "2019-08-24T06:37:02.598Z",

    "NumberOfArchives": 1,

    "CreationDate": "2019-08-23T21:08:07.943Z",

    "VaultName": "s9stesting2"

}
Here we have our file uploaded on our S3 Glacier Vault.
For more information about AWS Glacier CLI, you can check the official AWS documentation.
EC2
This backup store option is the more expensive and time consuming one, but it’s useful if you want to have full-control over the backup storage environment and wish to perform custom tasks on the backups (e.g. Backup Verification.)
Amazon EC2 (Elastic Compute Cloud) is a web service that provides resizable compute capacity in the cloud. It provides you with complete control of your computing resources and allows you to set up and configure everything about your instances from your operating system up to your applications. It also allows you to quickly scale capacity, both up and down, as your computing requirements change.
Amazon EC2 supports different operating systems like Amazon Linux, Ubuntu, Windows Server, Red Hat Enterprise Linux, SUSE Linux Enterprise Server, Fedora, Debian, CentOS, Gentoo Linux, Oracle Linux, and FreeBSD.
How to use it
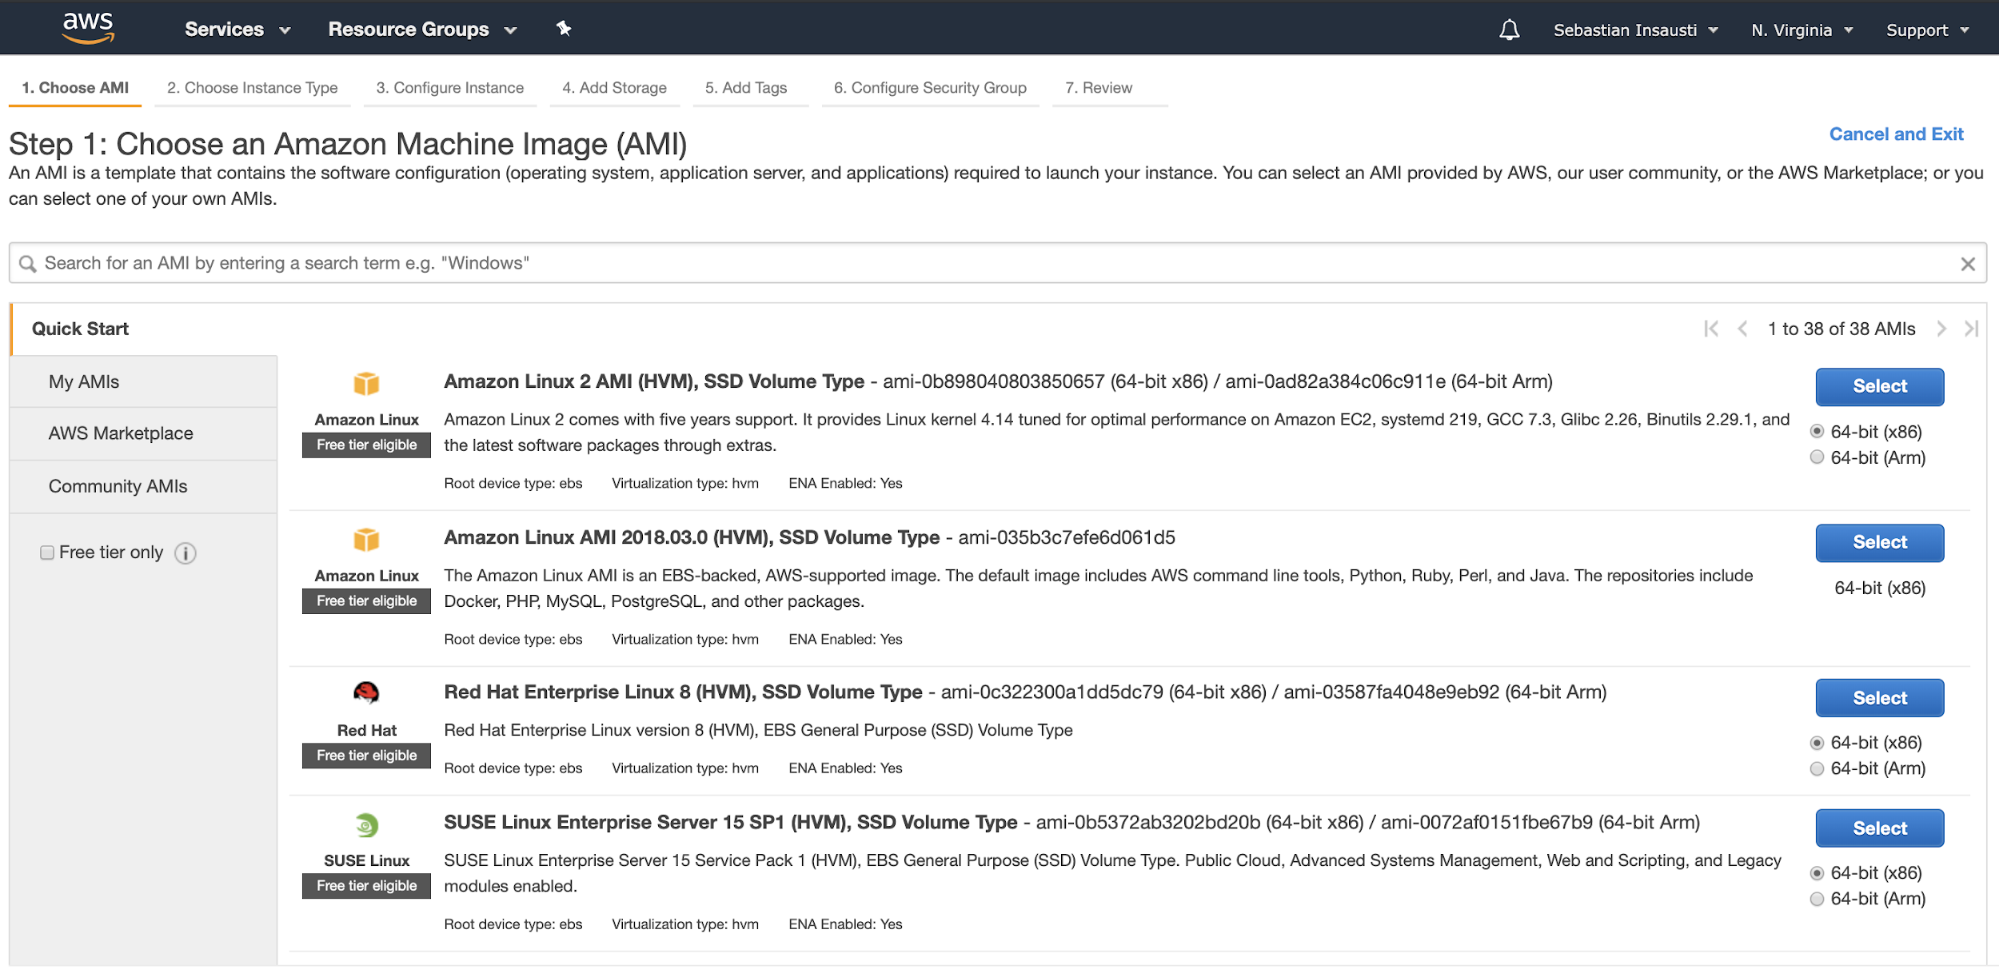
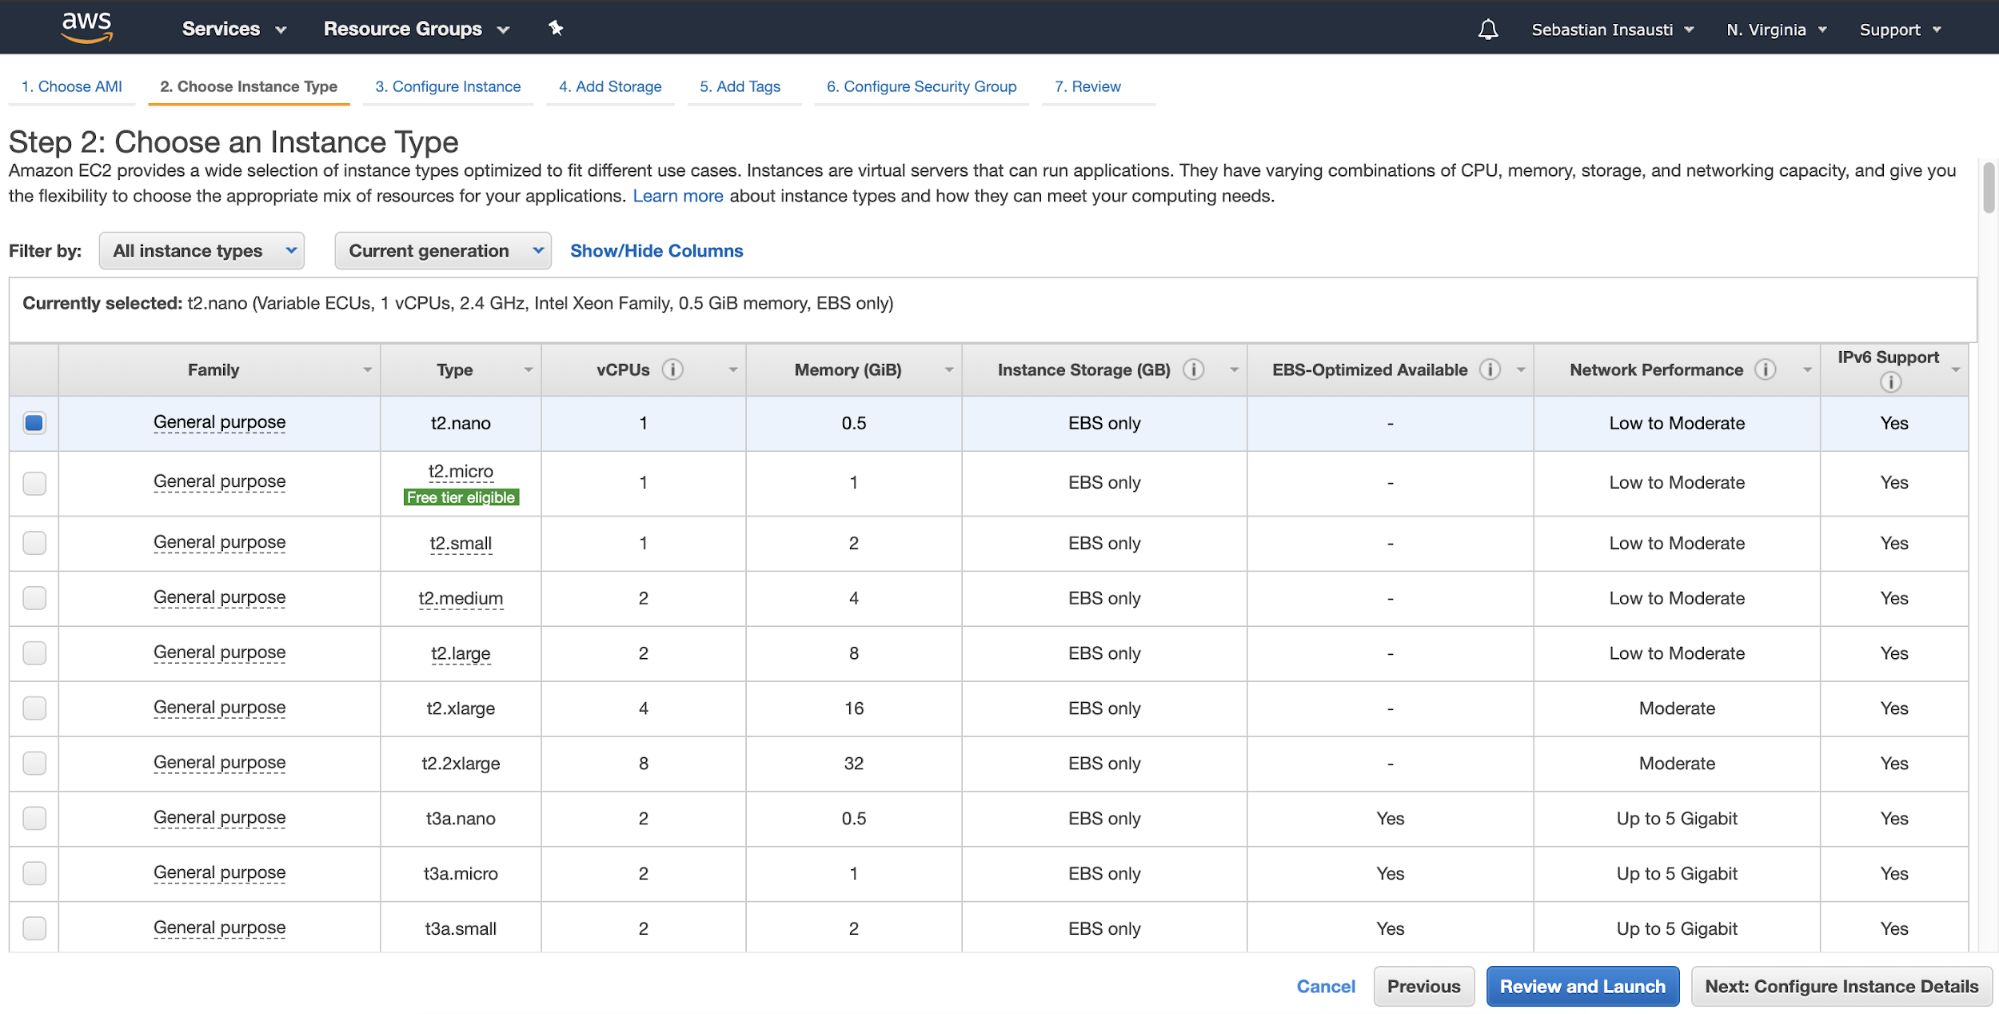
Go to the Amazon EC2 section, and press on Launch Instance. In the first step, you must choose the EC2 instance operating system.
In the next step, you must choose the resources for the new instance.
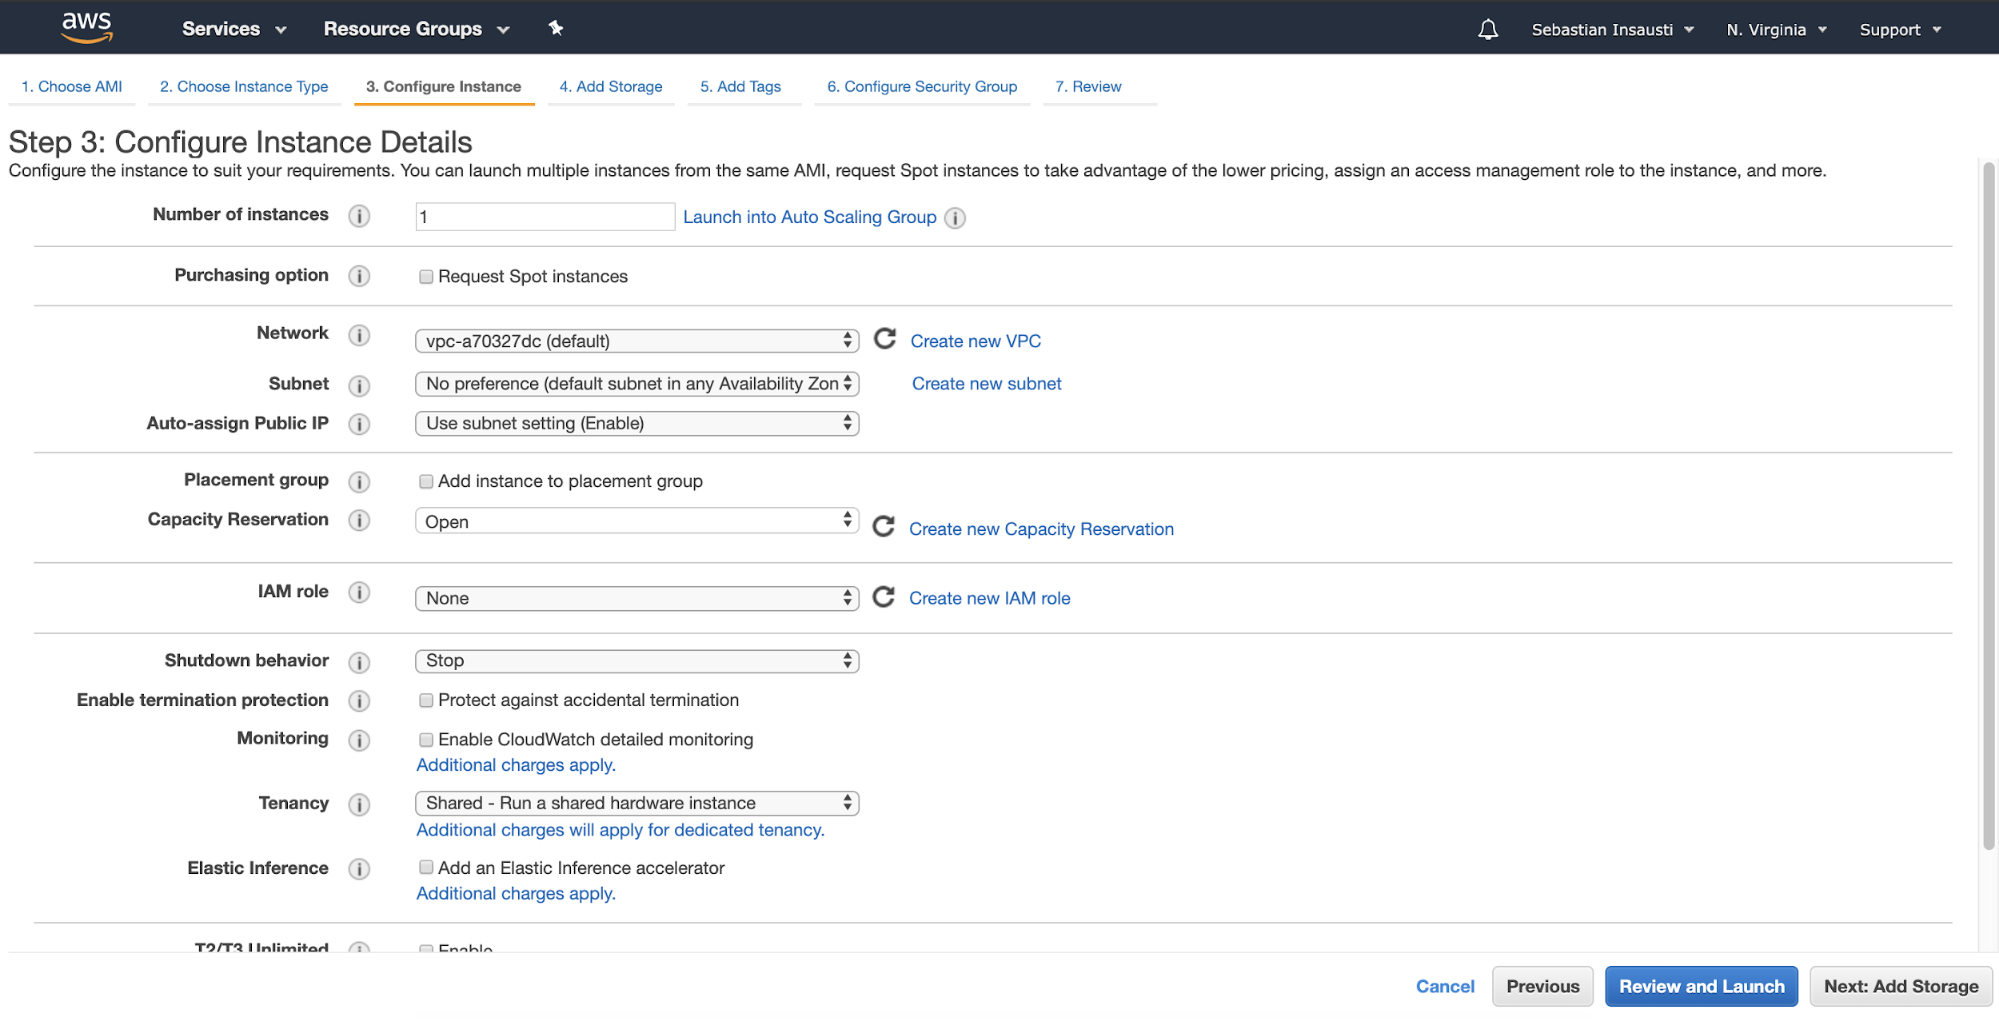
Then, you can specify more detailed configuration like network, subnet, and more.
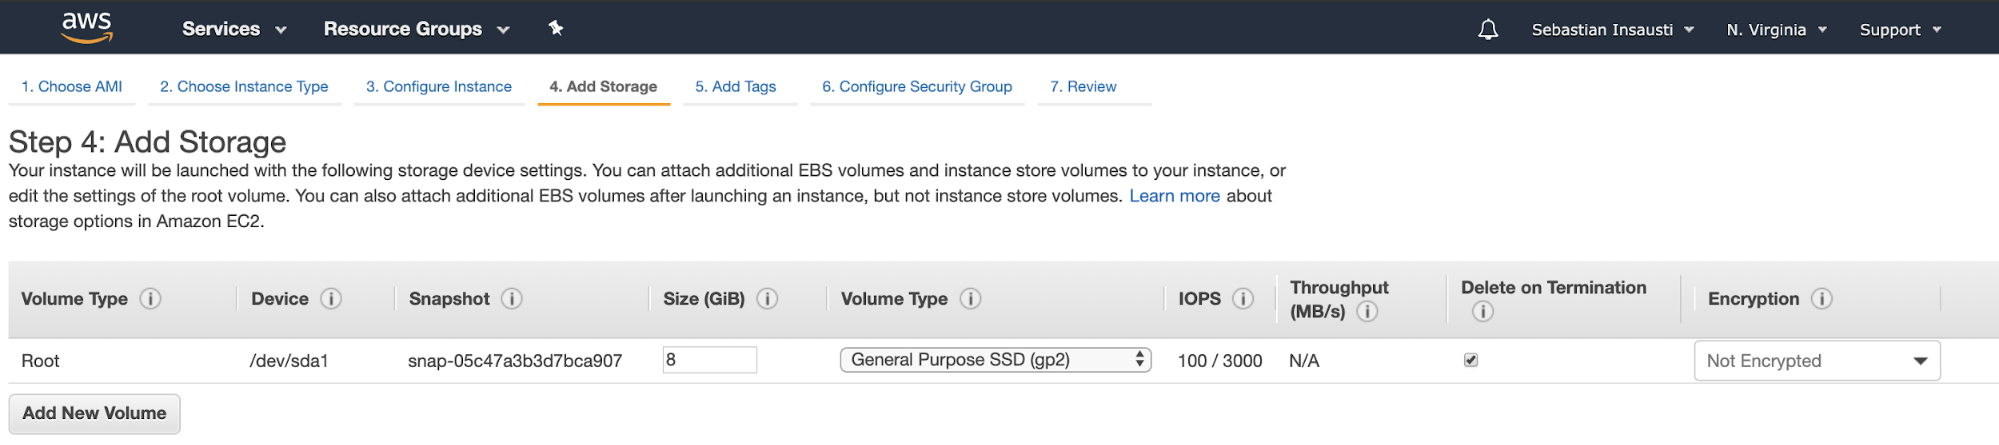
Now, we can add more storage capacity on this new instance, and as a backup server, we should do it.
When we finish the creation task, we can go to the Instances section to see our new EC2 instance.
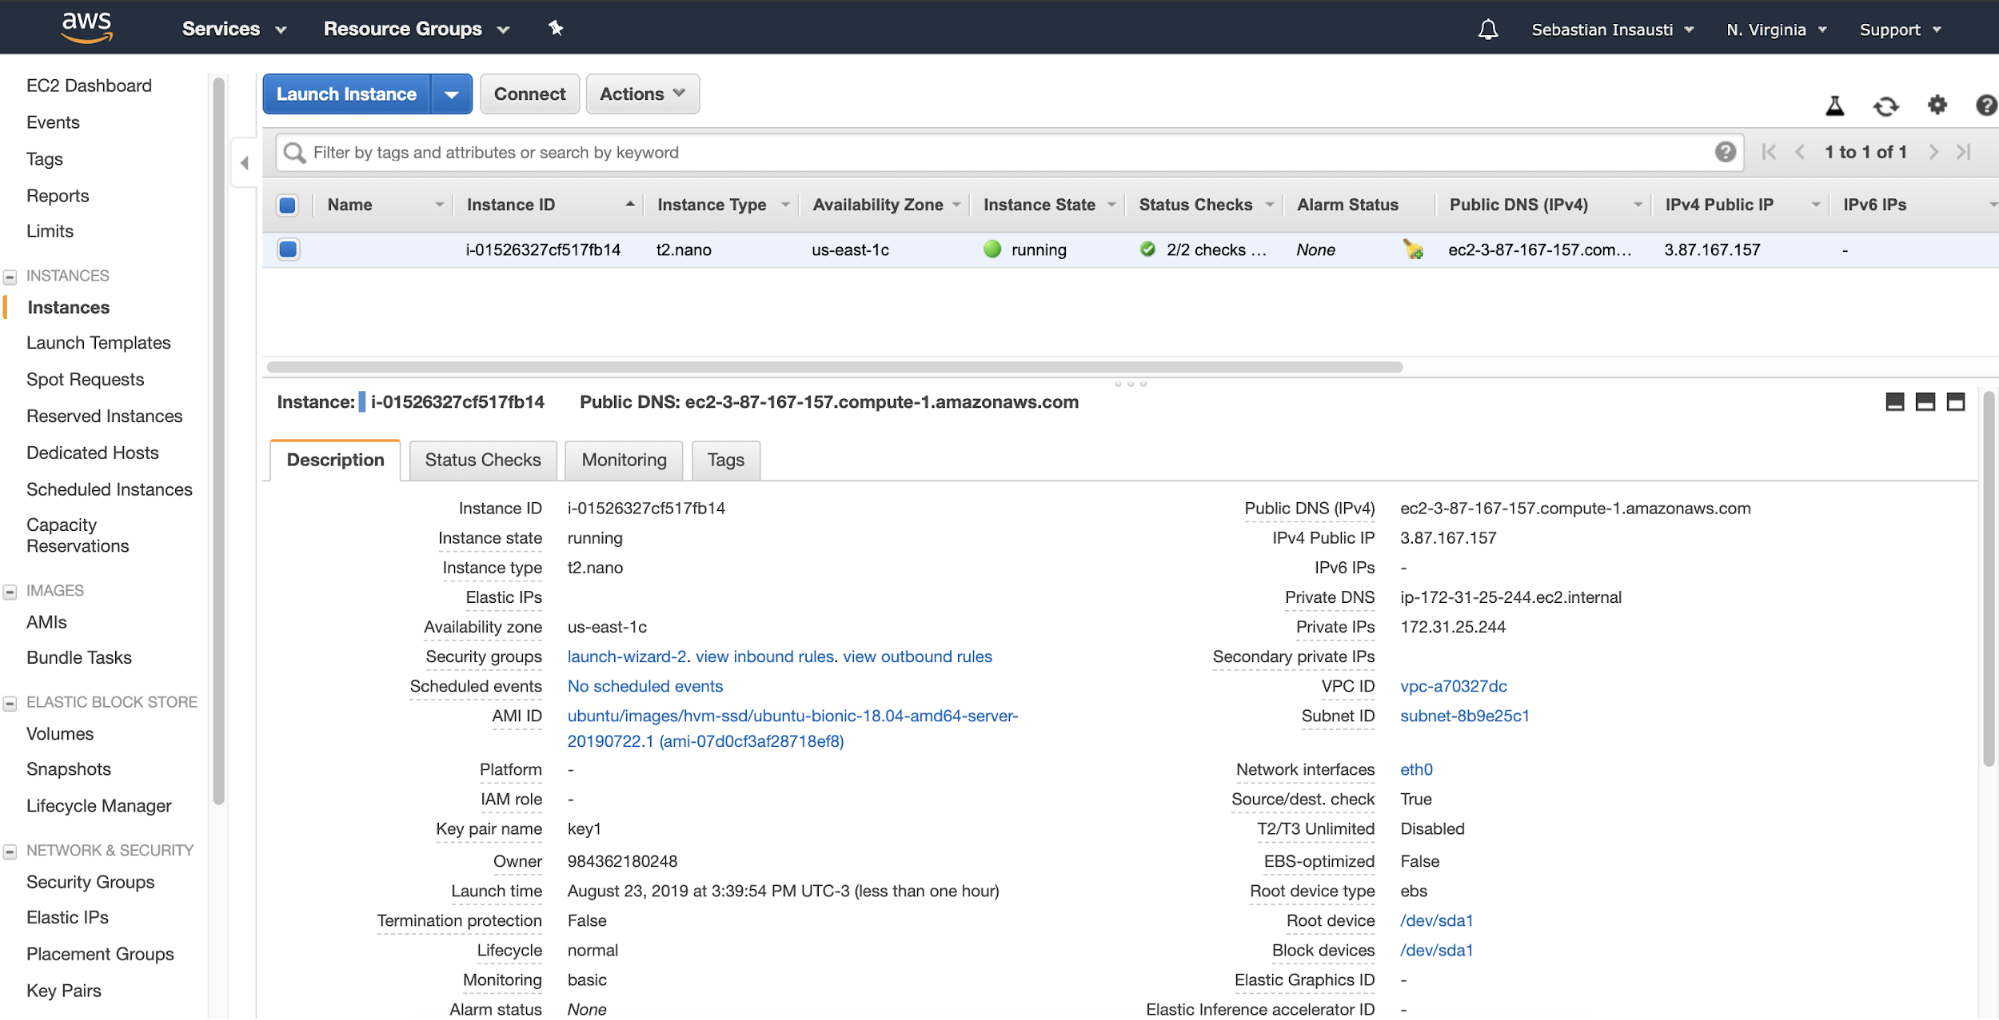
When the instance is ready (Instance State running), you can store the backups here, for example, sending it via SSH or FTP using the Public DNS created by AWS. Let’s see an example with Rsync and another one with SCP Linux command.
[root@PostgreSQL1 ~]# rsync -avzP -e "ssh -i /home/user/key1.pem" /root/backups/BACKUP-11/base.tar.gz [email protected]:/backups/20190823/

sending incremental file list

base.tar.gz

      4,091,563 100%    2.18MB/s 0:00:01 (xfr#1, to-chk=0/1)


sent 3,735,675 bytes  received 35 bytes 574,724.62 bytes/sec

total size is 4,091,563  speedup is 1.10

[root@PostgreSQL1 ~]#

[root@PostgreSQL1 ~]# scp -i /tmp/key1.pem /root/backups/BACKUP-12/pg_dump_2019-08-25_211903.sql.gz [email protected]:/backups/20190823/

pg_dump_2019-08-25_211903.sql.gz                                                                                                                                        100% 24KB 76.4KB/s 00:00
AWS Backup
AWS Backup is a centralized backup service that provides you with backup management capabilities, such as backup scheduling, retention management, and backup monitoring, as well as additional features, such as lifecycling backups to a low-cost storage tier, backup storage, and encryption that is independent of its source data, and backup access policies.
You can use AWS Backup to manage backups of EBS volumes, RDS databases, DynamoDB tables, EFS file systems, and Storage Gateway volumes.
How to use it
Go to the AWS Backup section on the AWS Management Console.
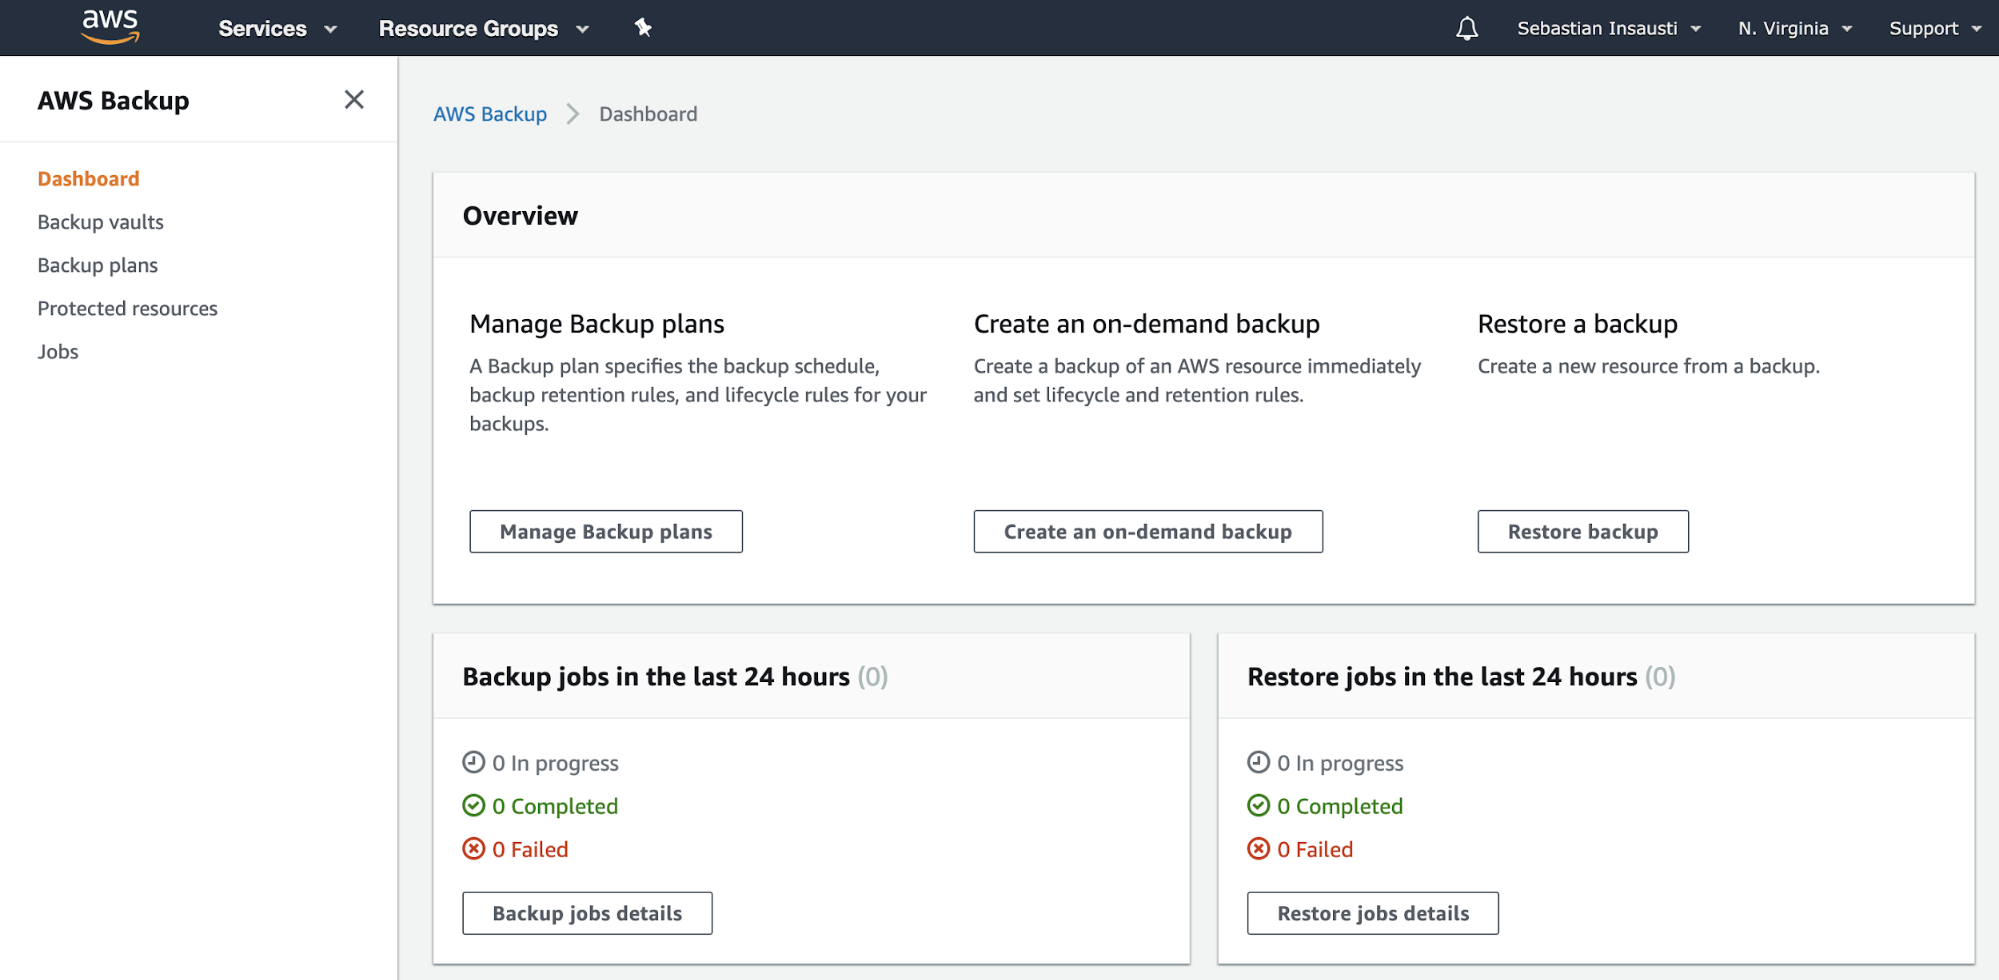
Here you have different options, such as Schedule, Create or Restore a backup. Let’s see how to create a new backup.
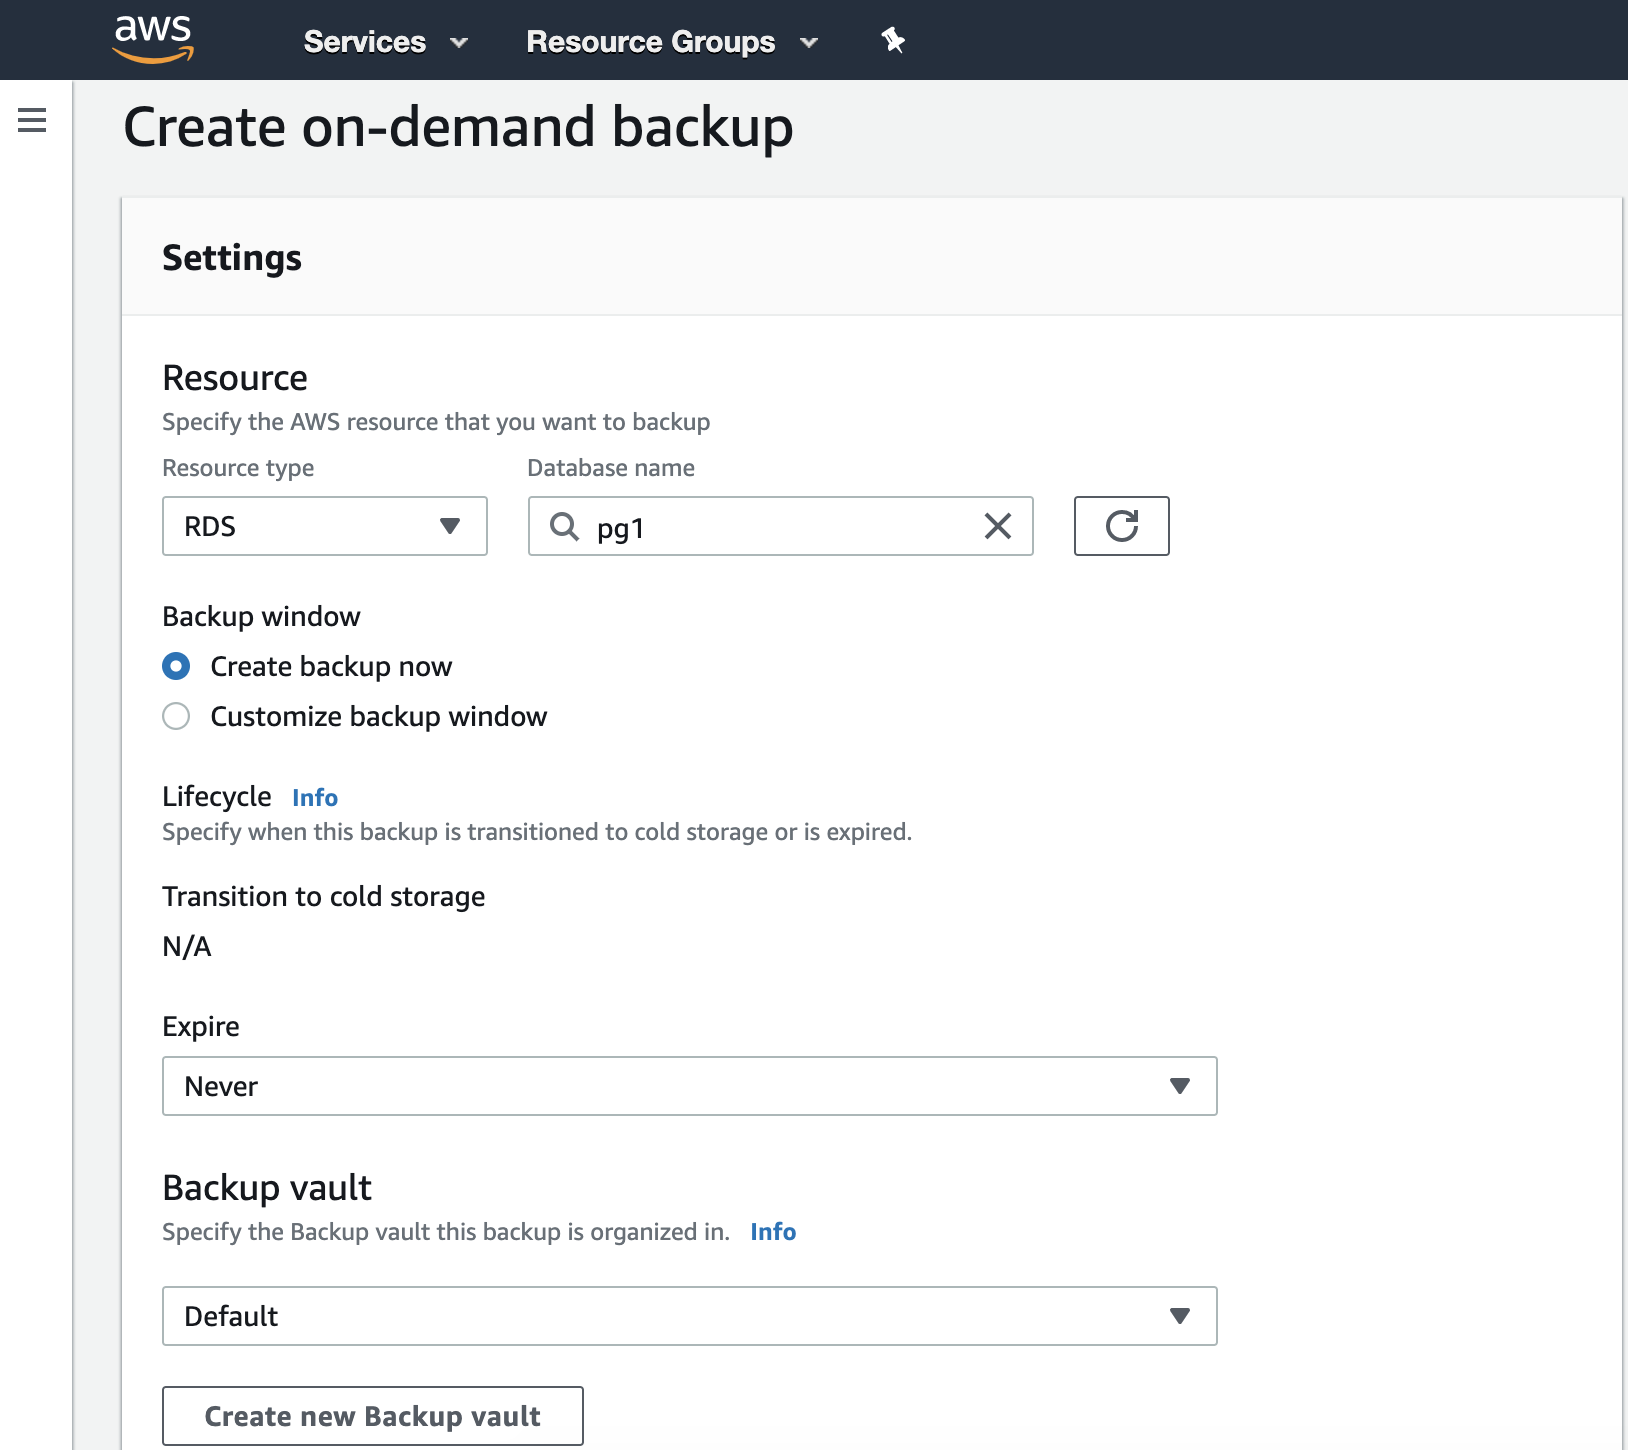
In this step, we must choose the Resource Type that can be DynamoDB, RDS, EBS, EFS or Storage Gateway, and more details like expiration date, backup vault, and the IAM Role.
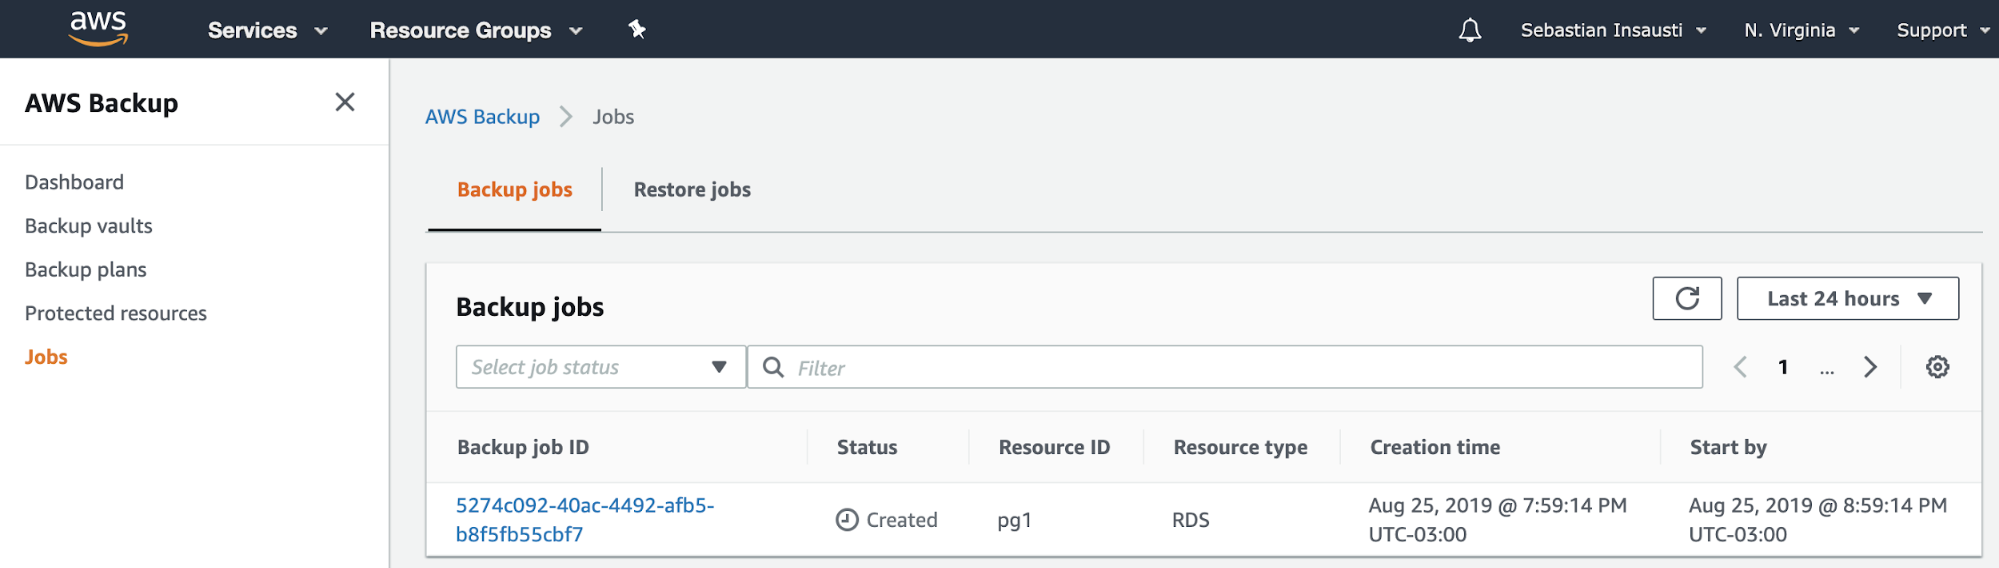
Then, we can see the new job created in the AWS Backup Jobs section.
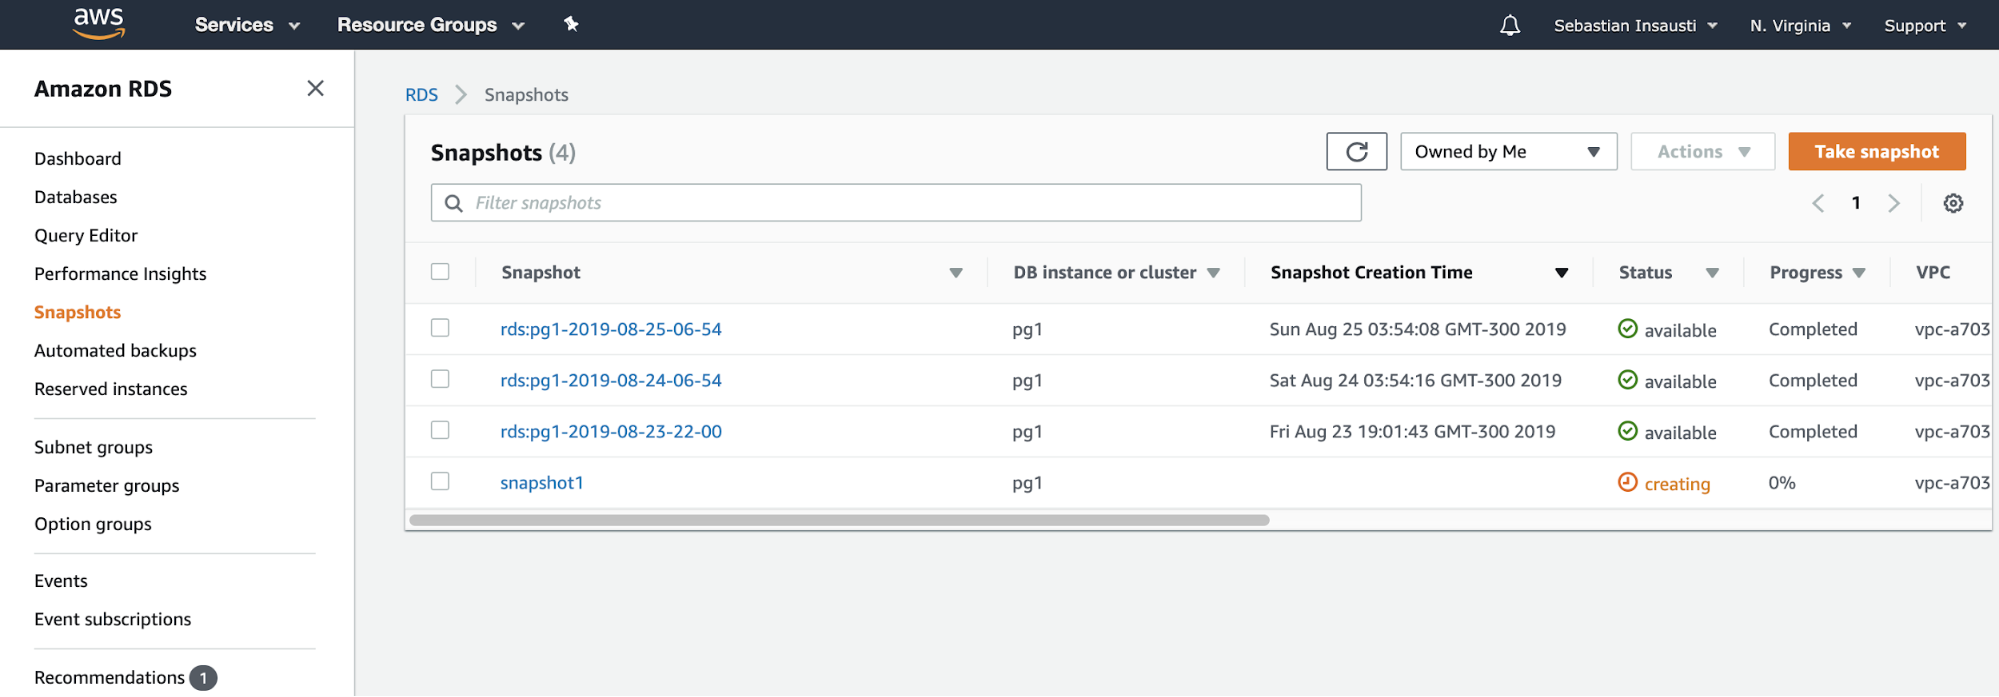
Snapshot
Now, we can mention this known option in all virtualization environments. The snapshot is a backup taken at a specific point in time, and AWS allows us to use it for the AWS products. Let’s an example of an RDS snapshot.
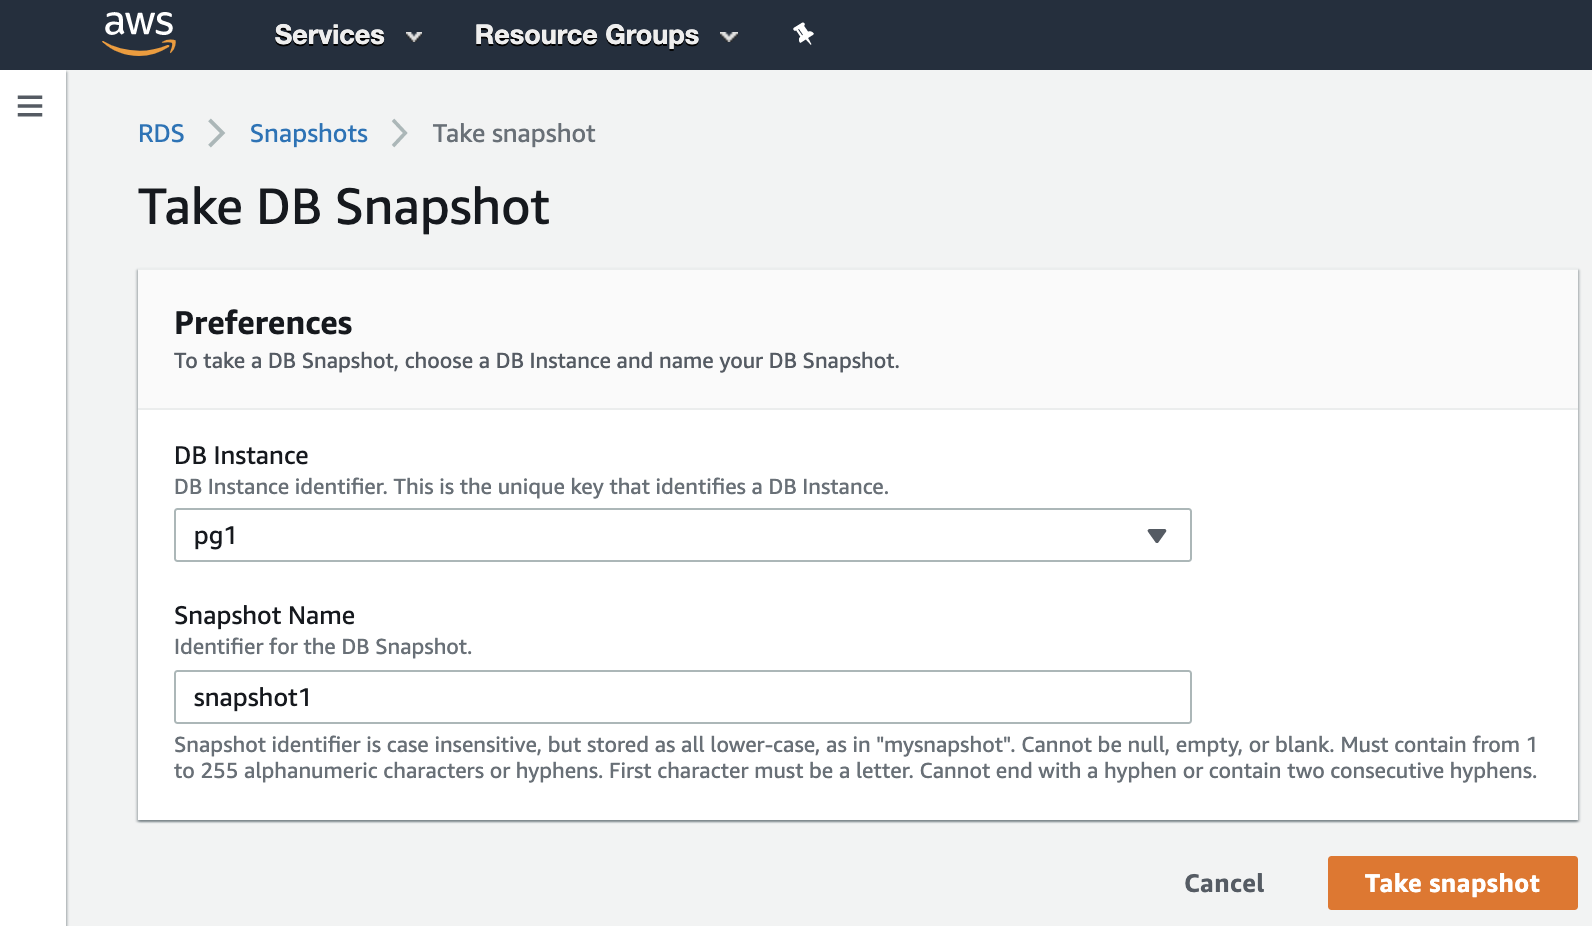
We only need to choose the instance and add the snapshot name, and that’s it. We can see this and the previous snapshot in the RDS Snapshot section.
Managing Your Backups with ClusterControl
ClusterControl is a comprehensive management system for open source databases that automates deployment and management functions, as well as health and performance monitoring. ClusterControl supports deployment, management, monitoring and scaling for different database technologies and environments, EC2 included. So, we can, for example, create our EC2 instance on AWS, and deploy/import our database service with ClusterControl.

Creating a Backup
For this task, go to ClusterControl -> Select Cluster -> Backup -> Create Backup.
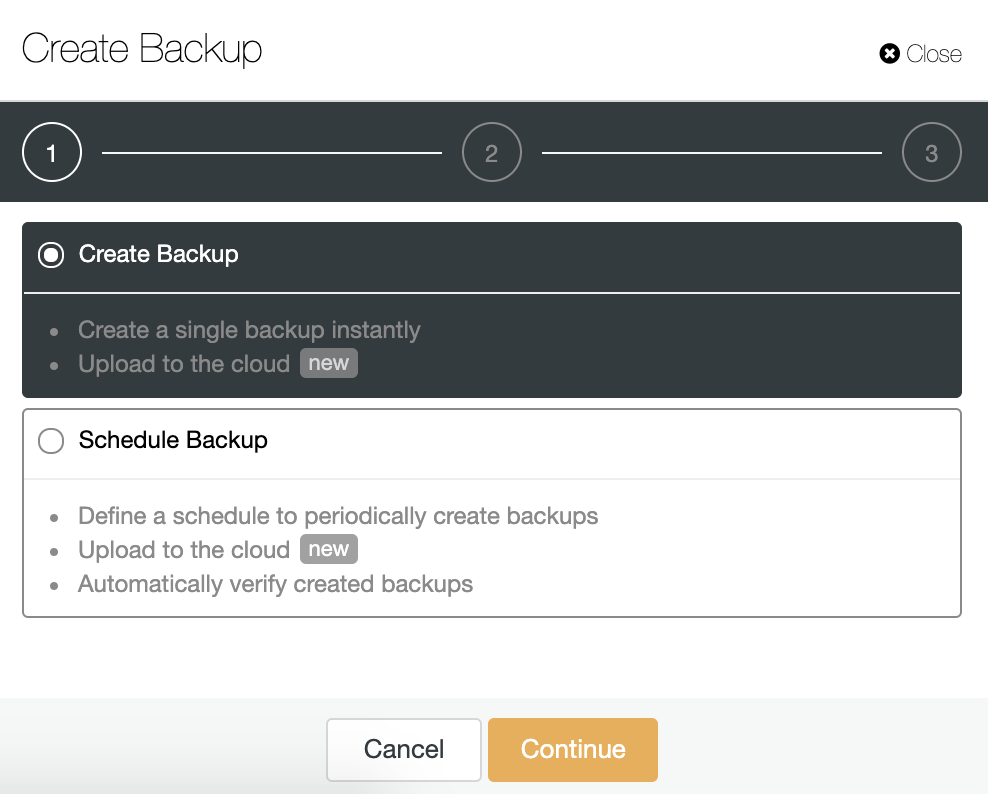
We can create a new backup or configure a scheduled one. For our example, we’ll create a single backup instantly.
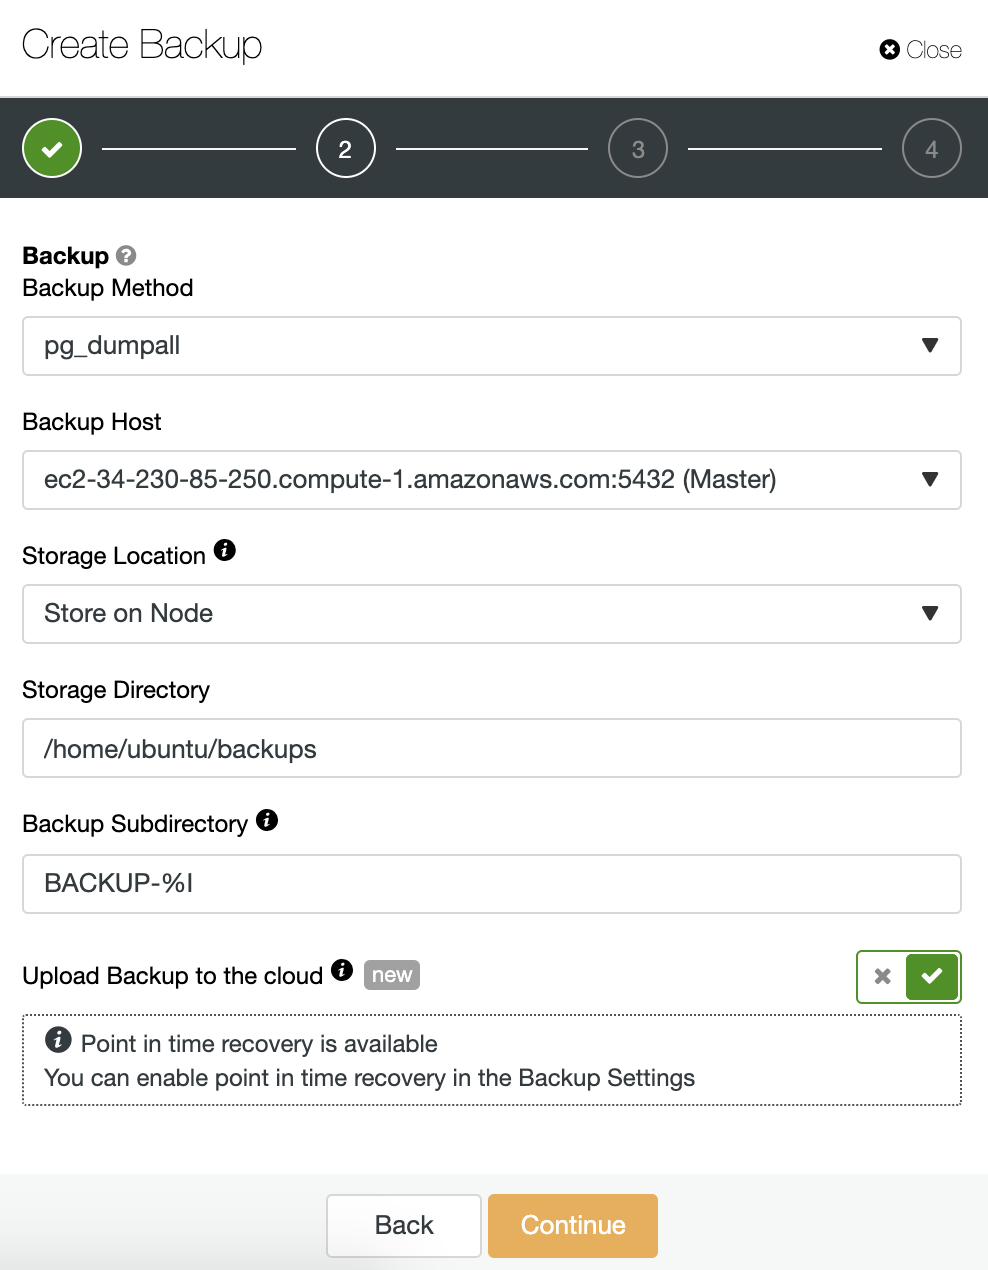
We must choose one method, the server from which the backup will be taken, and where we want to store the backup. We can also upload our backup to the cloud (AWS, Google or Azure) by enabling the corresponding button.
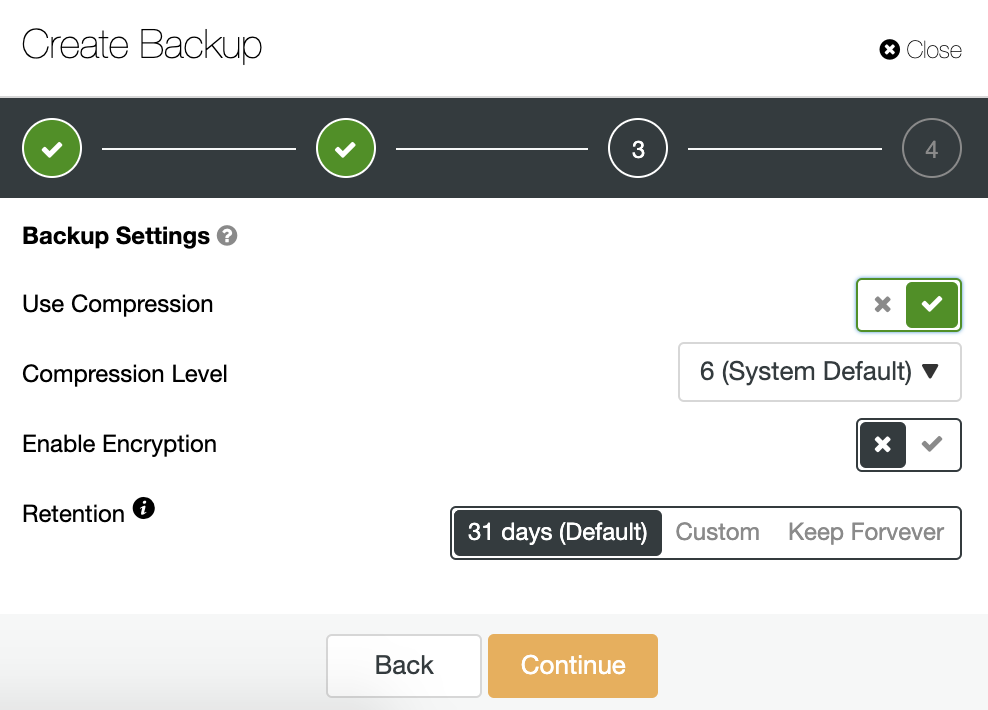
Then we specify the use of compression, the compression level, encryption and retention period for our backup.
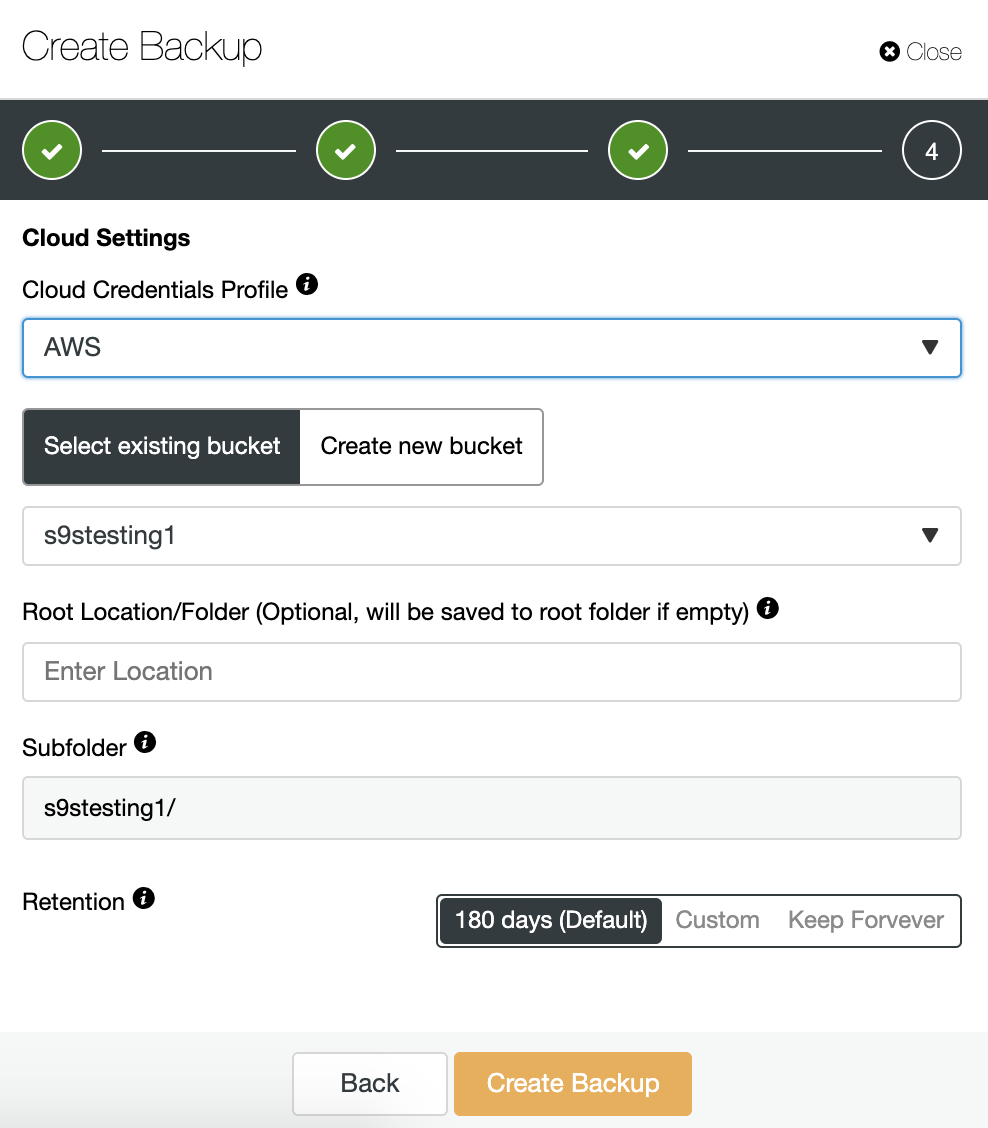
If we enabled the upload backup to the cloud option, we’ll see a section to specify the cloud provider (in this case AWS) and the credentials (ClusterControl -> Integrations -> Cloud Providers). For AWS, it uses the S3 service, so we must select a Bucket or even create a new one to store our backups.
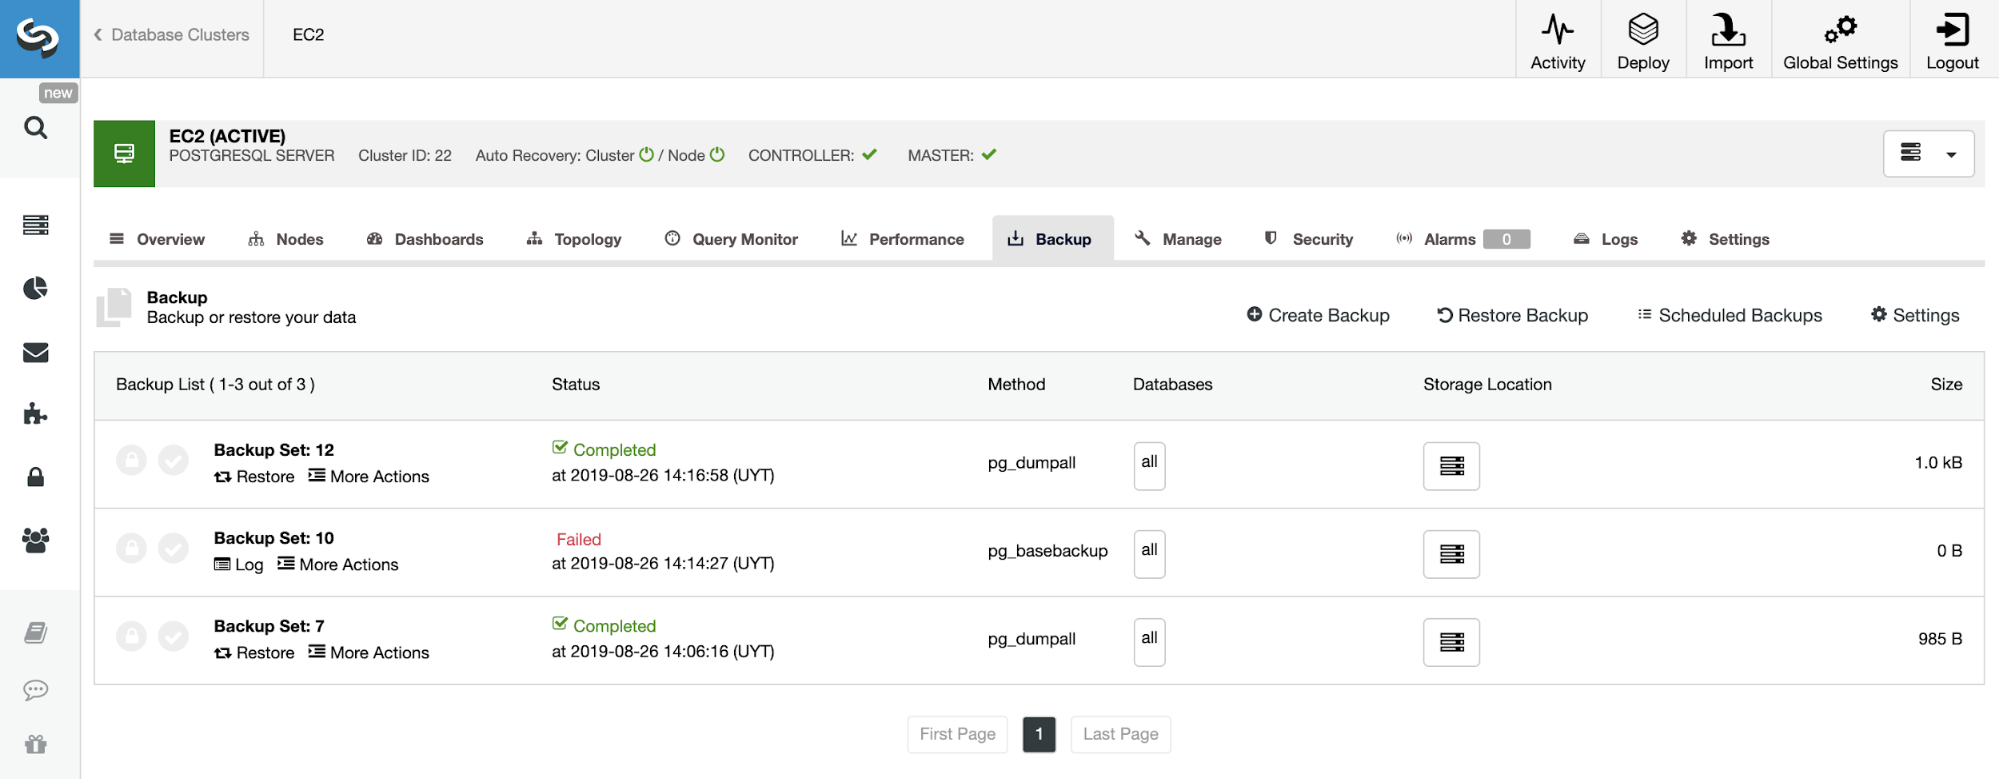
On the backup section, we can see the progress of the backup, and information like method, size, location, and more.
Conclusion
Amazon AWS allows us to store our PostgreSQL backups, whether we’re using it as a database cloud provider or not. To have an effective backup plan you should consider storing at least one database backup copy in the cloud to avoid data loss in the event of hardware failure in another backup store. The cloud lets you store as many backups as you want to store or pay for.