blog
Simple Scheduling of Maintenance Windows Across Your Database Clusters

Maintenance is something that an operation team can not avoid. Servers have to keep up with the latest software, hardware and technology to ensure systems are stable and running with the lowest risk possible, while making use of newer features to improve the overall performance.
Undoubtedly, there is a long list of maintenance tasks that have to be performed by system administrators, especially when it comes to critical systems. Some of the tasks have to be performed at regular intervals, like daily, weekly, monthly and yearly. Some have to be done right away, urgently. Nevertheless, any maintenance operation should not lead to another bigger problem, and any maintenance has to be handled with extra care to avoid any interruption to the business.
Getting questionable state and false alarms is common while maintenance is ongoing. This is expected because during the maintenance period, the server will not be operating as it should be until the maintenance task is completed. ClusterControl, the all-inclusive management and monitoring platform for your open-source databases, can be configured to understand these circumstances to simplify your maintenance routines, without sacrificing the monitoring and automation features it offers.
Maintenance Mode
ClusterControl introduced maintenance mode in version 1.4.0, where you can put an individual node into maintenance which prevents ClusterControl to raise alarms and send notifications for the specified duration. Maintenance mode can be configured from ClusterControl UI and also using ClusterControl CLI tool called “s9s”. From the UI, just go to Nodes -> pick a node -> Node Actions -> Schedule Maintenance Mode:

Here, one can set the maintenance period for a pre-defined time or schedule it accordingly. You can also write down the reason for scheduling the upgrade, useful for auditing purposes. You should see the following notification when the maintenance mode is active:
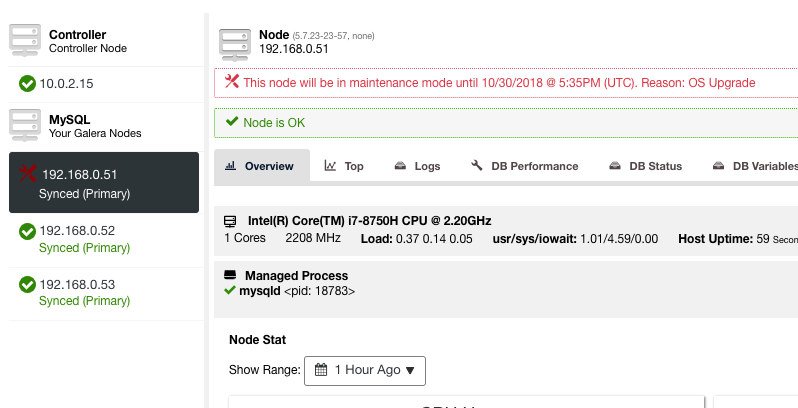
ClusterControl will not degrade the node, hence the node’s state remains as is unless you perform any action that changes the state. Alarms and notifications for this node will be reactivated once the maintenance period is over, or the operator explicitly disabling it by going to Node Actions -> Disable Maintenance Mode.
Take note that if automatic node recovery is enabled, ClusterControl will always recover a node regardless of the maintenance mode status. Don’t forget to disable node recovery to avoid ClusterControl interfering your maintenance tasks, this can be done from the top summary bar.
The maintenance mode can also be configured via ClusterControl CLI or “s9s”. You can use the “s9s maintenance” command to list out and manipulate the maintenance periods. The following command line schedules a one-hour maintenance window for node 192.168.1.121 tomorrow:
$ s9s maintenance --create
--nodes=192.168.1.121
--start="$(date -d 'now + 1 day' '+%Y-%m-%d %H:%M:%S')"
--end="$(date -d 'now + 1 day + 1 hour' '+%Y-%m-%d %H:%M:%S')"
--reason="Upgrading software."
For more details and examples, see s9s maintenance documentation.
Cluster-Wide Maintenance Mode
At the time of this writing, the maintenance mode configuration must be configured per managed node. For cluster-wide maintenance, one has to repeat the scheduling process for every managed node of the cluster. This can be impractical if you have a high number of nodes in your cluster, or if the maintenance interval is very short between two tasks.
Fortunately, ClusterControl CLI (a.k.a s9s) can be used as a workaround to overcome this limitation. You can use “s9s nodes” to list out and manipulate the managed nodes in a cluster. This list can be iterated over to schedule a cluster-wide maintenance mode at one given time using “s9s maintenance” command.
Let’s look at an example to understand this better. Consider the following three-node Percona XtraDB Cluster that we have:
$ s9s nodes --list --cluster-name='PXC57' --long
STAT VERSION    CID CLUSTER HOST         PORT COMMENT
coC- 1.7.0.2832   1 PXC57   10.0.2.15    9500 Up and running.
go-M 5.7.23       1 PXC57   192.168.0.51 3306 Up and running.
go-- 5.7.23       1 PXC57   192.168.0.52 3306 Up and running.
go-- 5.7.23       1 PXC57   192.168.0.53 3306 Up and running.
Total: 4
The cluster has a total of 4 nodes – 3 database nodes with one ClusterControl node. The first column, STAT shows the role and status of the node. The first character is the node’s role – “c” means controller and “g” means Galera database node. Suppose we want to schedule only the database nodes for maintenance, we can filter out the output to get the hostname or IP address where the reported STAT has “g” at the beginning:
$ s9s nodes --list --cluster-name='PXC57' --long --batch | grep ^g | awk {'print $5'}
192.168.0.51
192.168.0.52
192.168.0.53
With a simple iteration, we can then schedule a cluster-wide maintenance window for every node in the cluster. The following command iterates the maintenance creation based on all the IP addresses found in the cluster using a for loop, where we plan to start the maintenance operation same time tomorrow and finish an hour later:
$ for host in $(s9s nodes --list --cluster-id='PXC57' --long --batch | grep ^g | awk {'print $5'}); do
s9s maintenance
--create
--nodes=$host
--start="$(date -d 'now + 1 day' '+%Y-%m-%d %H:%M:%S')"
--end="$(date -d 'now + 1 day + 1 hour' '+%Y-%m-%d %H:%M:%S')"
--reason="OS upgrade"; done
f92c5370-004d-4735-bba0-8c1bd26b9b98
9ff7dd8c-f2cb-4446-b14b-a5c2b915b853
103d715d-d0bc-4402-9326-1a053bc5d36b
You should see a printout of 3 UUIDs, the unique string that identifies every maintenance period. We can then verify with the following command:
$ s9s maintenance --list --long
ST UUID    OWNER GROUP  START               END                 HOST/CLUSTER REASON
-h f92c537 admin admins 2018-10-31 16:02:00 2018-10-31 17:02:00 192.168.0.51 OS upgrade
-h 9ff7dd8 admin admins 2018-10-31 16:02:00 2018-10-31 17:02:00 192.168.0.52 OS upgrade
-h 103d715 admin admins 2018-10-31 16:02:00 2018-10-31 17:02:00 192.168.0.53 OS upgrade
Total: 3
From the above output, we got a list of scheduled maintenance times for every database node. During the scheduled time, ClusterControl will neither raise alarms nor send out notification if it finds irregularities to the cluster.
Maintenance Mode Iteration
Some maintenance routines have to be done at a regular interval, e.g., backups, housekeeping and clean-up tasks. During the maintenance time, we would expect the server to behave differently. However, any service failure, temporary inaccessibility or high load would surely cause havoc to our monitoring system. For frequent and short interval maintenance slots, this could turn out to be very annoying and skipping the raised false alarms might give you a better sleep during the night.
However, enabling maintenance mode can also expose the server to a bigger risk since strict monitoring is ignored for the period of time. Therefore, it’s probably a good idea to understand the nature of the maintenance operation that we would like to perform before enabling the maintenance mode. The following checklist should help us determine our maintenance mode policy:
- Affected nodes – Which nodes are involved in the maintenance?
- Consequences – What happens to the node when the maintenance operation is ongoing? Will it be inaccessible, high loaded or restarted?
- Duration – How much time does the maintenance operation take to complete?
- Frequency – How frequent the maintenance operation should be running?
Let’s put it into a use case. Consider we have a three-node Percona XtraDB Cluster with a ClusterControl node. Supposed our servers are all running on virtual machines and the VM backup policy requires all VMs to be backed up every day starting from 1:00 AM, one node at a time. During this backup operation, the node will be freezed up for about 10 minutes max and the node which is being managed and monitored by ClusterControl will be inaccessible until the backup finishes. From a Galera Cluster perspective, this operation does not bring the whole cluster down since the cluster remains in quorum and the primary component is not affected.
Based on the nature of the maintenance task, we can summarize it as the following:
- Affected nodes – All nodes for cluster ID 1 (3 database nodes and 1 ClusterControl node).
- Consequence – The VM that being backed up will be inaccessible until completion.
- Duration – Each VM backup operation takes about 5 to 10 minutes to complete.
- Frequency – The VM backup is scheduled to run daily, starting from 1:00 AM on the first node.
We can then come out with an execution plan to schedule our maintenance mode:
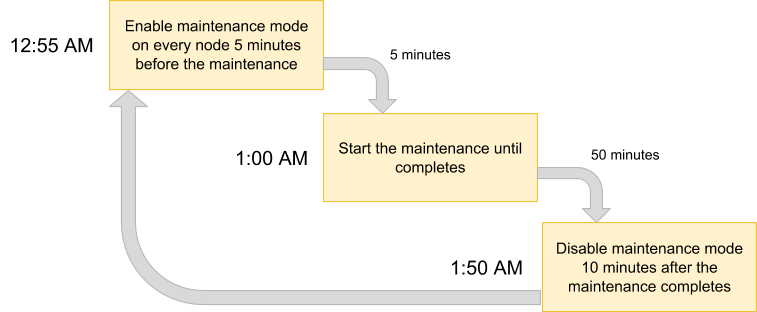
Since we want all nodes in the cluster to be backed up by the VM manager, simply list out the nodes for the corresponding cluster ID:
$ s9s nodes --list --cluster-id=1
192.168.0.51  10.0.2.15     192.168.0.52  192.168.0.53
The above output can be used to schedule maintenance across the whole cluster. For example, if you run the following command, ClusterControl will activate maintenance mode for all nodes under cluster ID 1 from now until the next 50 minutes:
$ for host in $(s9s nodes --list --cluster-id=1); do
s9s maintenance --create
--nodes=$host
--start="$(date -d 'now' '+%Y-%m-%d %H:%M:%S')"
--end="$(date -d 'now + 50 minutes' '+%Y-%m-%d %H:%M:%S')"
--reason="Backup VM"; done
Using the above command, we can convert it into an execution file by putting it into a script. Create a file:
$ vim /usr/local/bin/enable_maintenance_modeAnd add the following lines:
for host in $(s9s nodes --list --cluster-id=1)
do
s9s maintenance
--create
--nodes=$host
--start="$(date -d 'now' '+%Y-%m-%d %H:%M:%S')"
--end="$(date -d 'now + 50 minutes' '+%Y-%m-%d %H:%M:%S')"
--reason="VM Backup"
done
Save it and make sure the file permission is executable:
$ chmod 755 /usr/local/bin/enable_maintenance_modeThen use cron to schedule the script to be running at 5 minutes to 1:00 AM daily, right before the VM backup operation starts at 1:00 AM:
$ crontab -e
55 0 * * * /usr/local/bin/enable_maintenance_mode
Reload the cron daemon to ensure our script is being queued up:
$ systemctl reload crond # or service crond reloadThat’s it. We can now perform our daily maintenance operation without being bugged by false alarms and mail notification until the maintenance completes.
Bonus Maintenance Feature – Skipping Node Recovery
With automatic recovery enabled, ClusterControl is smart enough to detect a node failure and will try to recover a failed node after a 30-second grace period, regardless of the maintenance mode status. Did you know that ClusterControl can be configured to deliberately skip node recovery for a particular node? This could be very helpful when you have to perform an urgent maintenance without knowing the timespan and the outcome of the maintenance.
For example, imagine a file-system corruption happened and filesystem check and repair is required after a hard reboot. It’s hard to determine in advance how much time it would need to complete this operation. Thus, we can simply use a flag file to signal ClusterControl to skip recovery for the node.
Firstly, add the following line inside the /etc/cmon.d/cmon_X.cnf (where X is the cluster ID) on ClusterControl node:
node_recovery_lock_file=/root/do_not_recoverThen, restart cmon service to load the change:
$ systemctl restart cmon # service cmon restartFinally, ensure the specified file is present on the node that we want to skip for ClusterControl recovery:
$ touch /root/do_not_recoverRegardless of automatic recovery and maintenance mode status, ClusterControl will only recover the node when this flag file does not exist. The administrator is then responsible to create and remove the file on the database node.
That’s it, folks. Happy maintenancing!