blog
ProxySQL Native Clustering with Kubernetes

ProxySQL has supported native clustering since v1.4.2. This means multiple ProxySQL instances are cluster-aware; they are aware of each others’ state and able to handle the configuration changes automatically by syncing up to the most up-to-date configuration based on configuration version, timestamp and checksum value. Check out this blog post which demonstrates how to configure clustering support for ProxySQL and how you could expect it to behave.
ProxySQL is a decentralized proxy, recommended to be deployed closer to the application. This approach scales pretty well even up to hundreds of nodes, as it was designed to be easily reconfigurable at runtime. To efficiently manage multiple ProxySQL nodes, one has to make sure whatever changes performed on one of the nodes should be applied across all nodes in the farm. Without native clustering, one has to manually export the configurations and import them to the other nodes (albeit, you could automate this by yourself).
In the previous blog post, we have covered ProxySQL clustering via Kubernetes ConfigMap. This approach is more or less pretty efficient with the centralized configuration approach in ConfigMap. Whatever loaded into ConfigMap will be mounted into pods. Updating the configuration can be done via versioning (modify the proxysql.cnf content and load it into ConfigMap with another name) and then push to the pods depending on the Deployment method scheduling and update strategy.
However, in a rapidly changing environment, this ConfigMap approach is probably not the best method because in order to load the new configuration, pod rescheduling is required to remount the ConfigMap volume and this might jeopardize the ProxySQL service as a whole. For example, let’s say in our environment, our strict password policy requires to force MySQL user password expiration for every 7 days, which we would have to keep updating the ProxySQL ConfigMap for the new password on a weekly basis. As a side note, MySQL user inside ProxySQL requires user and password to match the one on the backend MySQL servers. That’s where we should start making use of ProxySQL native clustering support in Kubernetes, to automatically apply the configuration changes without the hassle of ConfigMap versioning and pod rescheduling.
In this blog post, we’ll show you how to run ProxySQL native clustering with headless service on Kubernetes. Our high-level architecture can be illustrated as below:
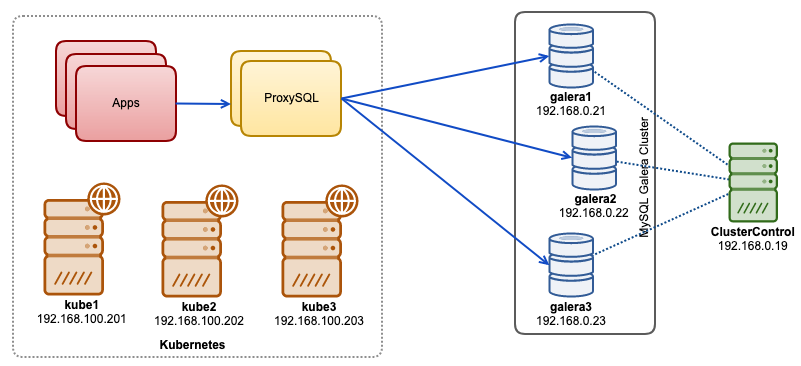
We have 3 Galera nodes running on bare-metal infrastructure deployed and managed by ClusterControl:
- 192.168.0.21
- 192.168.0.22
- 192.168.0.23
Our applications are all running as pods within Kubernetes. The idea is to introduce two ProxySQL instances in between the application and our database cluster to serve as a reverse proxy. Applications will then connect to ProxySQL pods via Kubernetes service which will be load balanced and failover across a number of ProxySQL replicas.
The following is a summary of our Kubernetes setup:
root@kube1:~# kubectl get nodes -o wide
NAME    STATUS   ROLES    AGE     VERSION   INTERNAL-IP       EXTERNAL-IP   OS-IMAGE             KERNEL-VERSION      CONTAINER-RUNTIME
kube1   Ready    master   5m      v1.15.1   192.168.100.201           Ubuntu 18.04.1 LTS   4.15.0-39-generic   docker://18.9.7
kube2   Ready       4m1s    v1.15.1   192.168.100.202           Ubuntu 18.04.1 LTS   4.15.0-39-generic   docker://18.9.7
kube3   Ready       3m42s   v1.15.1   192.168.100.203           Ubuntu 18.04.1 LTS   4.15.0-39-generic   docker://18.9.7
ProxySQL Configuration via ConfigMap
Let’s first prepare our base configuration which will be loaded into ConfigMap. Create a file called proxysql.cnf and add the following lines:
datadir="/var/lib/proxysql"

admin_variables=
{
    admin_credentials="proxysql-admin:adminpassw0rd;cluster1:secret1pass"
    mysql_ifaces="0.0.0.0:6032"
    refresh_interval=2000
    cluster_username="cluster1"
    cluster_password="secret1pass"
    cluster_check_interval_ms=200
    cluster_check_status_frequency=100
    cluster_mysql_query_rules_save_to_disk=true
    cluster_mysql_servers_save_to_disk=true
    cluster_mysql_users_save_to_disk=true
    cluster_proxysql_servers_save_to_disk=true
    cluster_mysql_query_rules_diffs_before_sync=3
    cluster_mysql_servers_diffs_before_sync=3
    cluster_mysql_users_diffs_before_sync=3
    cluster_proxysql_servers_diffs_before_sync=3
}

mysql_variables=
{
    threads=4
    max_connections=2048
    default_query_delay=0
    default_query_timeout=36000000
    have_compress=true
    poll_timeout=2000
    interfaces="0.0.0.0:6033;/tmp/proxysql.sock"
    default_schema="information_schema"
    stacksize=1048576
    server_version="5.1.30"
    connect_timeout_server=10000
    monitor_history=60000
    monitor_connect_interval=200000
    monitor_ping_interval=200000
    ping_interval_server_msec=10000
    ping_timeout_server=200
    commands_stats=true
    sessions_sort=true
    monitor_username="proxysql"
    monitor_password="proxysqlpassw0rd"
    monitor_galera_healthcheck_interval=2000
    monitor_galera_healthcheck_timeout=800
}

mysql_galera_hostgroups =
(
    {
        writer_hostgroup=10
        backup_writer_hostgroup=20
        reader_hostgroup=30
        offline_hostgroup=9999
        max_writers=1
        writer_is_also_reader=1
        max_transactions_behind=30
        active=1
    }
)

mysql_servers =
(
    { address="192.168.0.21" , port=3306 , hostgroup=10, max_connections=100 },
    { address="192.168.0.22" , port=3306 , hostgroup=10, max_connections=100 },
    { address="192.168.0.23" , port=3306 , hostgroup=10, max_connections=100 }
)

mysql_query_rules =
(
    {
        rule_id=100
        active=1
        match_pattern="^SELECT .* FOR UPDATE"
        destination_hostgroup=10
        apply=1
    },
    {
        rule_id=200
        active=1
        match_pattern="^SELECT .*"
        destination_hostgroup=20
        apply=1
    },
    {
        rule_id=300
        active=1
        match_pattern=".*"
        destination_hostgroup=10
        apply=1
    }
)

mysql_users =
(
    { username = "wordpress", password = "passw0rd", default_hostgroup = 10, transaction_persistent = 0, active = 1 },
    { username = "sbtest", password = "passw0rd", default_hostgroup = 10, transaction_persistent = 0, active = 1 }
)

proxysql_servers =
(
    { hostname = "proxysql-0.proxysqlcluster", port = 6032, weight = 1 },
    { hostname = "proxysql-1.proxysqlcluster", port = 6032, weight = 1 }
)
Some of the above configuration lines are explained per section below:
admin_variables
Pay attention to the admin_credentials variable where we used non-default user which is “proxysql-admin”. ProxySQL reserves the default “admin” user for local connection via localhost only. Therefore, we have to use other users to access the ProxySQL instance remotely. Otherwise, you would get the following error:
ERROR 1040 (42000): User 'admin' can only connect locallyWe also appended the cluster_username and cluster_password value in the admin_credentials line, separated by a semicolon to allow automatic syncing to happen. All variables prefixed with cluster_* are related to ProxySQL native clustering and are self-explanatory.
mysql_galera_hostgroups
This is a new directive introduced for ProxySQL 2.x (our ProxySQL image is running on 2.0.5). If you would like to run on ProxySQL 1.x, do remove this part and use the scheduler table instead. We already explained the configuration details in this blog post, How to Run and Configure ProxySQL 2.0 for MySQL Galera Cluster on Docker under “ProxySQL 2.x Support for Galera Cluster”.
mysql_servers
All lines are self-explanatory, which is based on three database servers running in MySQL Galera Cluster as summarized in the following Topology screenshot taken from ClusterControl:

proxysql_servers
Here we define a list of ProxySQL peers:
- hostname – Peer’s hostname/IP address
- port – Peer’s admin port
- weight – Currently unused, but in the roadmap for future enhancements
- comment – Free form comment field
In Docker/Kubernetes environment, there are multiple ways to discover and link up container hostnames or IP addresses and insert them into this table, either by using ConfigMap, manual insert, via entrypoint.sh scripting, environment variables or some other means. In Kubernetes, depending on the ReplicationController or Deployment method used, guessing the pod’s resolvable hostname in advance is somewhat tricky unless if you are running on StatefulSet.
Check out this tutorial on StatefulState pod ordinal index which provides a stable resolvable hostname for the created pods. Combine this with headless service (explained further down), the resolvable hostname format would be:
{app_name}-{index_number}.{service}
Where {service} is a headless service, which explains where “proxysql-0.proxysqlcluster” and “proxysql-1.proxysqlcluster” come from. If you want to have more than 2 replicas, add more entries accordingly by appending an ascending index number relative to the StatefulSet application name.
Now we are ready to push the configuration file into ConfigMap, which will be mounted into every ProxySQL pod during deployment:
$ kubectl create configmap proxysql-configmap --from-file=proxysql.cnfVerify if our ConfigMap is loaded correctly:
$ kubectl get configmap
NAME                 DATA   AGE
proxysql-configmap   1      7h57m
Creating ProxySQL Monitoring User
The next step before we start the deployment is to create a ProxySQL monitoring user in our database cluster. Since we are running on the Galera cluster, run the following statements on one of the Galera nodes:
mysql> CREATE USER 'proxysql'@'%' IDENTIFIED BY 'proxysqlpassw0rd';
mysql> GRANT USAGE ON *.* TO 'proxysql'@'%';
If you haven’t created the MySQL users (as specified under mysql_users section above), we have to create them as well:
mysql> CREATE USER 'wordpress'@'%' IDENTIFIED BY 'passw0rd';
mysql> GRANT ALL PRIVILEGES ON wordpress.* TO 'wordpress'@'%';
mysql> CREATE USER 'sbtest'@'%' IDENTIFIED BY 'passw0rd';
mysql> GRANT ALL PRIVILEGES ON sbtest.* TO 'proxysql'@'%';
That’s it. We are now ready to start the deployment.
Deploying a StatefulSet
We will start by creating two ProxySQL instances, or replicas for redundancy purposes using StatefulSet.
Let’s start by creating a text file called proxysql-ss-svc.yml and add the following lines:
apiVersion: apps/v1
kind: StatefulSet
metadata:
  name: proxysql
  labels:
    app: proxysql
spec:
  replicas: 2
  serviceName: proxysqlcluster
  selector:
    matchLabels:
      app: proxysql
      tier: frontend
  updateStrategy:
    type: RollingUpdate
  template:
    metadata:
      labels:
        app: proxysql
        tier: frontend
    spec:
      restartPolicy: Always
      containers:
      - image: severalnines/proxysql:2.0.4
        name: proxysql
        volumeMounts:
        - name: proxysql-config
          mountPath: /etc/proxysql.cnf
          subPath: proxysql.cnf
        ports:
        - containerPort: 6033
          name: proxysql-mysql
        - containerPort: 6032
          name: proxysql-admin
      volumes:
      - name: proxysql-config
        configMap:
          name: proxysql-configmap
---
apiVersion: v1
kind: Service
metadata:
  annotations:
  labels:
    app: proxysql
    tier: frontend
  name: proxysql
spec:
  ports:
  - name: proxysql-mysql
    nodePort: 30033
    port: 6033
    protocol: TCP
    targetPort: 6033
  - name: proxysql-admin
    nodePort: 30032
    port: 6032
    protocol: TCP
    targetPort: 6032
  selector:
    app: proxysql
    tier: frontend
  type: NodePort
There are two sections of the above definition – StatefulSet and Service. The StatefulSet is the definition of our pods or replicas and the mount point for our ConfigMap volume, loaded from proxysql-configmap. The next section is the service definition, where we define how the pods should be exposed and routed for the internal or external network.
Create the ProxySQL stateful set and service:
$ kubectl create -f proxysql-ss-svc.ymlVerify the pod and service states:
$ kubectl get pods,svc
NAME             READY   STATUS    RESTARTS   AGE
pod/proxysql-0   1/1     Running   0          4m46s
pod/proxysql-1   1/1     Running   0          2m59s

NAME                      TYPE        CLUSTER-IP       EXTERNAL-IP   PORT(S)                         AGE
service/kubernetes        ClusterIP   10.96.0.1                443/TCP                         10h
service/proxysql          NodePort    10.111.240.193           6033:30033/TCP,6032:30032/TCP   5m28s
If you look at the pod’s log, you would notice we got flooded with this warning:
$ kubectl logs -f proxysql-0
...
2019-08-01 19:06:18 ProxySQL_Cluster.cpp:215:ProxySQL_Cluster_Monitor_thread(): [WARNING] Cluster: unable to connect to peer proxysql-1.proxysqlcluster:6032 . Error: Unknown MySQL server host 'proxysql-1.proxysqlcluster' (0)
The above simply means proxysql-0 was unable to resolve “proxysql-1.proxysqlcluster” and connect to it, which is expected since we haven’t created our headless service for DNS records that are going to be needed for inter-ProxySQL communication.
Kubernetes Headless Service
In order for ProxySQL pods to be able to resolve the anticipated FQDN and connect to it directly, the resolving process must be able to look up the assigned target pod IP address and not the virtual IP address. This is where headless service comes into the picture. When creating a headless service by setting “clusterIP=None“, no load-balancing is configured and no cluster IP (virtual IP) is allocated for this service. Only DNS is automatically configured. When you run a DNS query for headless service, you will get the list of the pods IP addresses.
Here is what it looks like if we look up the headless service DNS records for “proxysqlcluster” (in this example we had 3 ProxySQL instances):
$ host proxysqlcluster
proxysqlcluster.default.svc.cluster.local has address 10.40.0.2
proxysqlcluster.default.svc.cluster.local has address 10.40.0.3
proxysqlcluster.default.svc.cluster.local has address 10.32.0.2
While the following output shows the DNS record for the standard service called “proxysql” which resolves to the clusterIP:
$ host proxysql
proxysql.default.svc.cluster.local has address 10.110.38.154
To create a headless service and attach it to the pods, one has to define the ServiceName inside the StatefulSet declaration, and the Service definition must have “clusterIP=None” as shown below. Create a text file called proxysql-headless-svc.yml and add the following lines:
apiVersion: v1
kind: Service
metadata:
  name: proxysqlcluster
  labels:
    app: proxysql
spec:
  clusterIP: None
  ports:
  - port: 6032
    name: proxysql-admin
  selector:
    app: proxysql
Create the headless service:
$ kubectl create -f proxysql-headless-svc.ymlJust for verification, at this point, we have the following services running:
$ kubectl get svc
NAME              TYPE        CLUSTER-IP      EXTERNAL-IP   PORT(S)                         AGE
kubernetes        ClusterIP   10.96.0.1               443/TCP                         8h
proxysql          NodePort    10.110.38.154           6033:30033/TCP,6032:30032/TCP   23m
proxysqlcluster   ClusterIP   None                    6032/TCP                        4s
Now, check out one of our pod’s log:
$ kubectl logs -f proxysql-0
...
2019-08-01 19:06:19 ProxySQL_Cluster.cpp:215:ProxySQL_Cluster_Monitor_thread(): [WARNING] Cluster: unable to connect to peer proxysql-1.proxysqlcluster:6032 . Error: Unknown MySQL server host 'proxysql-1.proxysqlcluster' (0)
2019-08-01 19:06:19 [INFO] Cluster: detected a new checksum for mysql_query_rules from peer proxysql-1.proxysqlcluster:6032, version 1, epoch 1564686376, checksum 0x3FEC69A5C9D96848 . Not syncing yet ...
2019-08-01 19:06:19 [INFO] Cluster: checksum for mysql_query_rules from peer proxysql-1.proxysqlcluster:6032 matches with local checksum 0x3FEC69A5C9D96848 , we won't sync.
You would notice the Cluster component is able to resolve, connect and detect a new checksum from the other peer, proxysql-1.proxysqlcluster on port 6032 via the headless service called “proxysqlcluster”. Note that this service exposes port 6032 within the Kubernetes network only, hence it is unreachable externally.
At this point, our deployment is now complete.
Connecting to ProxySQL
There are several ways to connect to ProxySQL services. The load-balanced MySQL connections should be sent to port 6033 from within the Kubernetes network and use port 30033 if the client is connecting from an external network.
To connect to the ProxySQL admin interface from an external network, we can connect to the port defined under NodePort section, 30032 (192.168.100.203 is the primary IP address of host kube3.local):
$ mysql -uproxysql-admin -padminpassw0rd -h192.168.100.203 -P30032Use the clusterIP 10.110.38.154 (defined under “proxysql” service) on port 6032 if you want to access it from other pods in the Kubernetes network.
Then perform the ProxySQL configuration changes as you wish and load them to runtime:
mysql> INSERT INTO mysql_users (username,password,default_hostgroup) VALUES ('newuser','passw0rd',10);
mysql> LOAD MYSQL USERS TO RUNTIME;
You will notice the following lines in one of the pods indicating the configuration syncing completes:
$ kubectl logs -f proxysql-0
...
2019-08-02 03:53:48 [INFO] Cluster: detected a peer proxysql-1.proxysqlcluster:6032 with mysql_users version 2, epoch 1564718027, diff_check 4. Own version: 1, epoch: 1564714803. Proceeding with remote sync
2019-08-02 03:53:48 [INFO] Cluster: detected peer proxysql-1.proxysqlcluster:6032 with mysql_users version 2, epoch 1564718027
2019-08-02 03:53:48 [INFO] Cluster: Fetching MySQL Users from peer proxysql-1.proxysqlcluster:6032 started
2019-08-02 03:53:48 [INFO] Cluster: Fetching MySQL Users from peer proxysql-1.proxysqlcluster:6032 completed
Keep in mind that the automatic syncing only happens if there is a configuration change in ProxySQL runtime. Therefore, it’s vital to run “LOAD … TO RUNTIME” statement before you can see the action. Don’t forget to save the ProxySQL changes into the disk for persistency:
mysql> SAVE MYSQL USERS TO DISK;Limitation
Note that there is a limitation to this setup due to ProxySQL does not support saving/exporting the active configuration into a text configuration file that we could use later on to load into ConfigMap for persistency. There is a feature request for this. Meanwhile, you could push the modifications to ConfigMap manually. Otherwise, if the pods were accidentally deleted, you would lose your current configuration because the new pods would be bootstrapped by whatever defined in the ConfigMap.
Special thanks to Sampath Kamineni, who sparked the idea of this blog post and provide insights about the use cases and implementation.


