blog
Running ProxySQL as Kubernetes Service

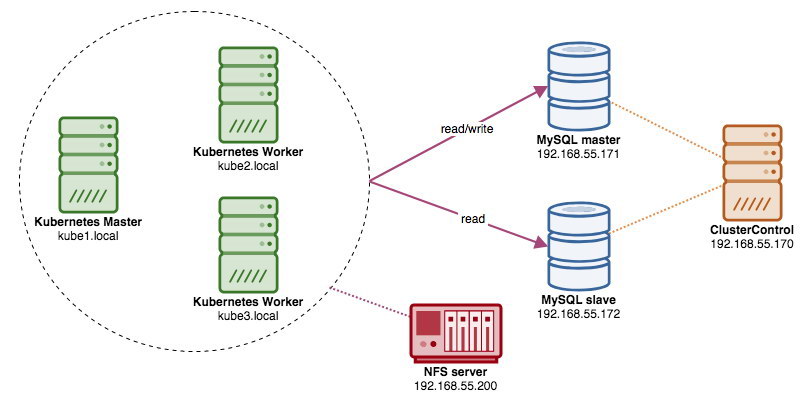
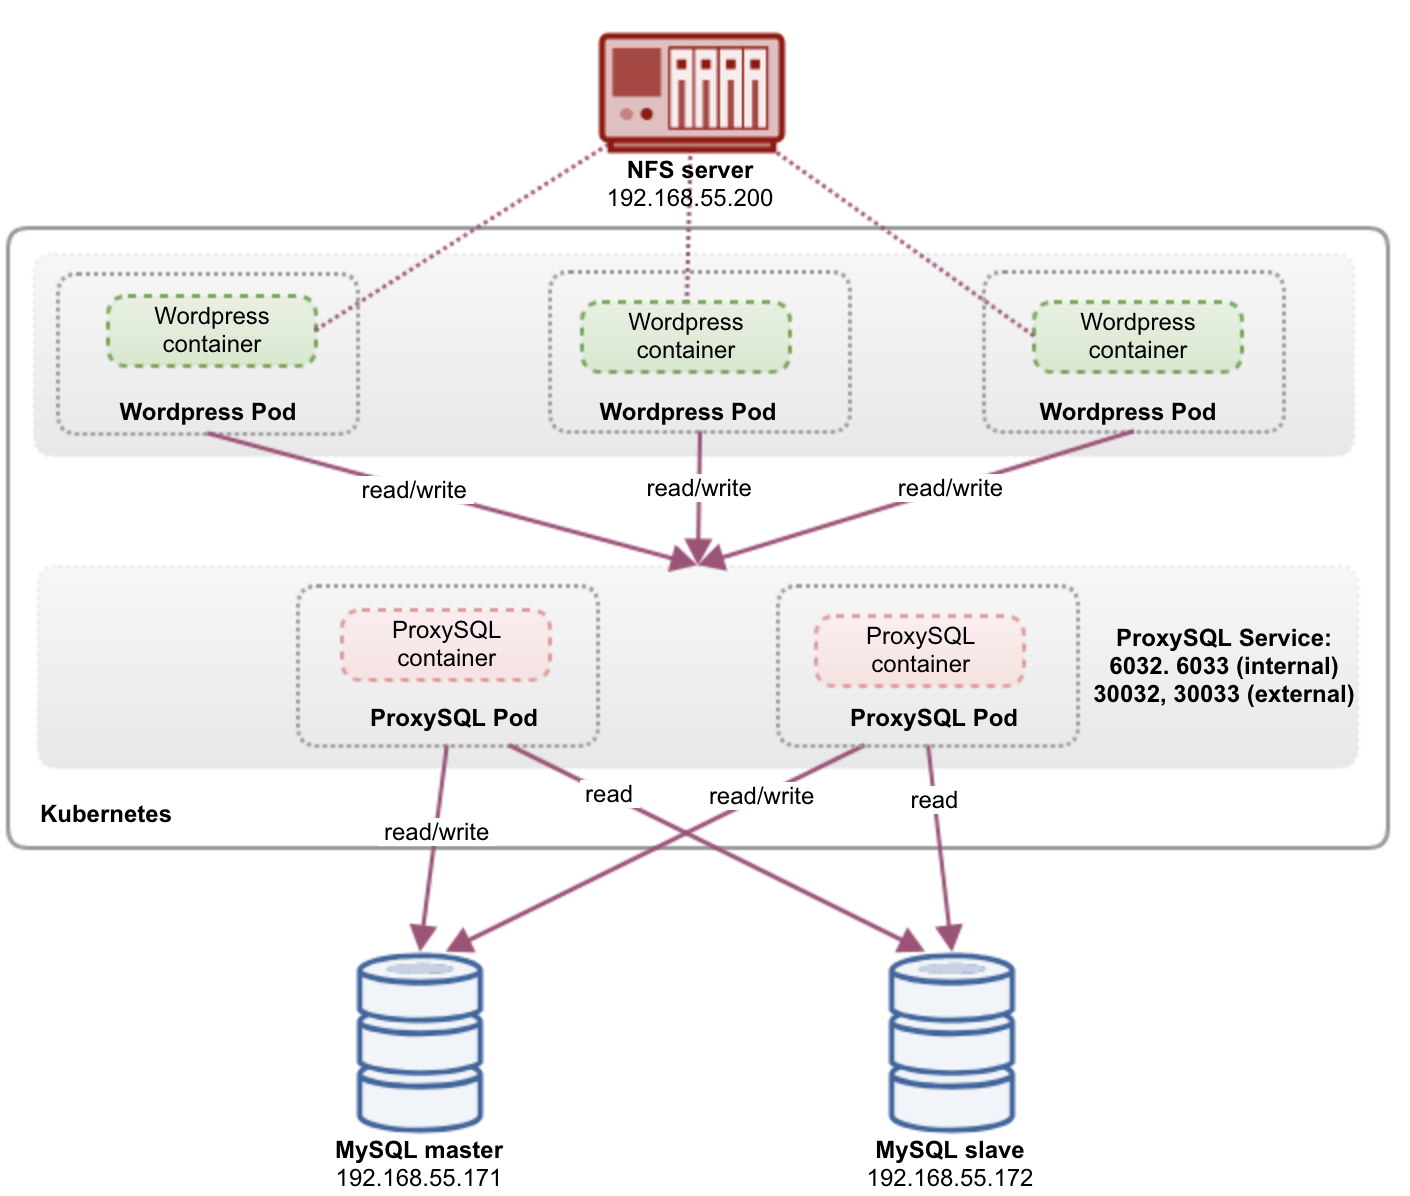
When running distributed database clusters, it is quite common to front them with load balancers. The advantages are clear – load balancing, connection failover and decoupling of the application tier from the underlying database topologies. For more intelligent load balancing, a database-aware proxy like ProxySQL or MaxScale would be the way to go. In our previous blog, we showed you how to run ProxySQL as a helper container in Kubernetes. In this blog post, we’ll show you how to deploy ProxySQL as a Kubernetes service. We’ll use WordPress as an example application and the database backend is running on a two-node MySQL Replication deployed using ClusterControl. The following diagram illustrates our infrastructure:
Since we are going to deploy a similar setup as in this previous blog post, do expect duplication in some parts of the blog post to keep the post more readable.
ProxySQL on Kubernetes
Let’s start with a bit of recap. Designing a ProxySQL architecture is a subjective topic and highly dependent on the placement of the application, database containers as well as the role of ProxySQL itself. Ideally, we can configure ProxySQL to be managed by Kubernetes with two configurations:
- ProxySQL as a Kubernetes service (centralized deployment)
- ProxySQL as a helper container in a pod (distributed deployment)
Both deployments can be distinguished easily by looking at the following diagram:
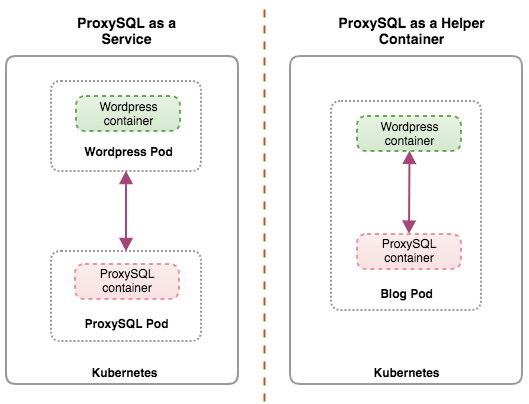
This blog post will cover the first configuration – running ProxySQL as a Kubernetes service. The second configuration is already covered here. In contrast to the helper container approach, running as a service makes ProxySQL pods live independently from the applications and can be easily scaled and clustered together with the help of Kubernetes ConfigMap. This is definitely a different clustering approach than ProxySQL native clustering support which relies on configuration checksum across ProxySQL instances (a.k.a proxysql_servers). Check out this blog post if you want to learn about ProxySQL clustering made easy with ClusterControl.
In Kubernetes, ProxySQL’s multi-layer configuration system makes pod clustering possible with ConfigMap. However, there are a number of shortcomings and workarounds to make it work smoothly as what ProxySQL’s native clustering feature does. At the moment, signalling a pod upon ConfigMap update is a feature in the works. We will cover this topic in much greater detail in an upcoming blog post.
Basically, we need to create ProxySQL pods and attach a Kubernetes service to be accessed by the other pods within the Kubernetes network or externally. Applications will then connect to the ProxySQL service via TCP/IP networking on the configured ports. Default to 6033 for MySQL load-balanced connections and 6032 for ProxySQL administration console. With more than one replica, the connections to the pod will be load balanced automatically by Kubernetes kube-proxy component running on every Kubernetes node.
ProxySQL as Kubernetes Service
In this setup, we run both ProxySQL and WordPress as pods and services. The following diagram illustrates our high-level architecture:
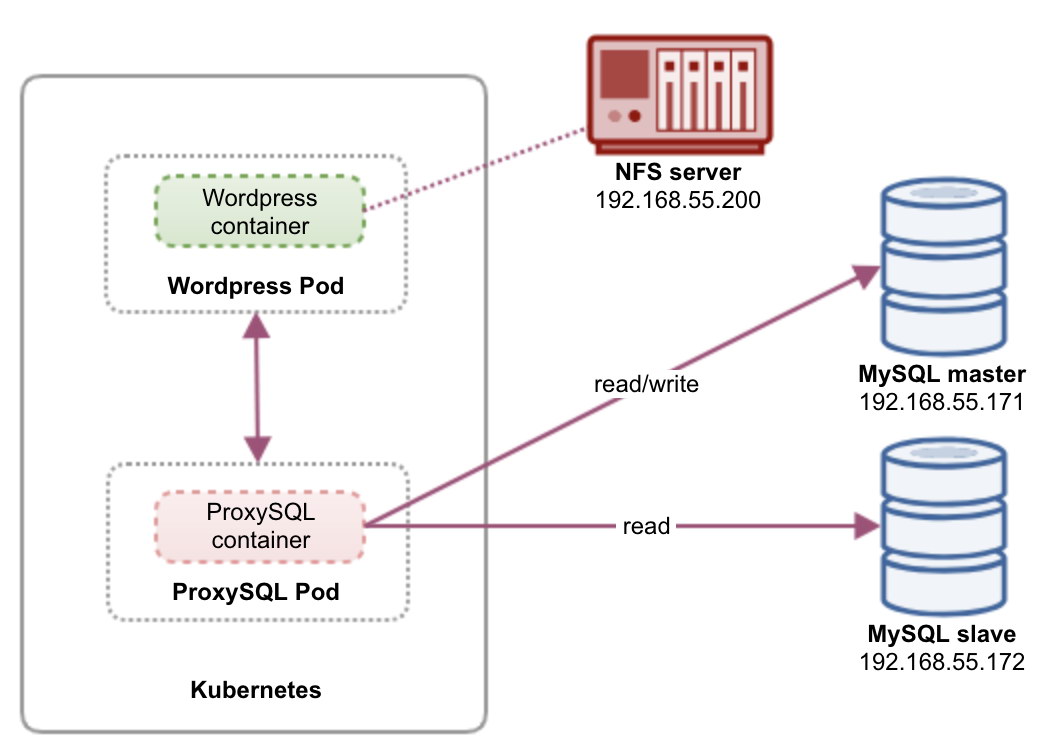
In this setup, we will deploy two pods and services – “wordpress” and “proxysql”. We will merge Deployment and Service declaration in one YAML file per application and manage them as one unit. To keep the application containers’ content persistent across multiple nodes, we have to use a clustered or remote file system, which in this case is NFS.
Deploying ProxySQL as a service brings a couple of good things over the helper container approach:
- Using Kubernetes ConfigMap approach, ProxySQL can be clustered with immutable configuration.
- Kubernetes handles ProxySQL recovery and balance the connections to the instances automatically.
- Single endpoint with Kubernetes Virtual IP address implementation called ClusterIP.
- Centralized reverse proxy tier with shared nothing architecture.
- Can be used with external applications outside Kubernetes.
We will start the deployment as two replicas for ProxySQL and three for WordPress to demonstrate running at scale and load-balancing capabilities that Kubernetes offers.
Preparing the Database
Create the wordpress database and user on the master and assign with correct privilege:
mysql-master> CREATE DATABASE wordpress;
mysql-master> CREATE USER wordpress@'%' IDENTIFIED BY 'passw0rd';
mysql-master> GRANT ALL PRIVILEGES ON wordpress.* TO wordpress@'%';
Also, create the ProxySQL monitoring user:
mysql-master> CREATE USER proxysql@'%' IDENTIFIED BY 'proxysqlpassw0rd';Then, reload the grant table:
mysql-master> FLUSH PRIVILEGES;ProxySQL Pod and Service Definition
The next one is to prepare our ProxySQL deployment. Create a file called proxysql-rs-svc.yml and add the following lines:
apiVersion: v1
kind: Deployment
metadata:
  name: proxysql
  labels:
    app: proxysql
spec:
  replicas: 2
  selector:
    matchLabels:
      app: proxysql
      tier: frontend
  strategy:
    type: RollingUpdate
  template:
    metadata:
      labels:
        app: proxysql
        tier: frontend
    spec:
      restartPolicy: Always
      containers:
      - image: severalnines/proxysql:1.4.12
        name: proxysql
        volumeMounts:
        - name: proxysql-config
          mountPath: /etc/proxysql.cnf
          subPath: proxysql.cnf
        ports:
        - containerPort: 6033
          name: proxysql-mysql
        - containerPort: 6032
          name: proxysql-admin
      volumes:
      - name: proxysql-config
        configMap:
          name: proxysql-configmap
---
apiVersion: v1
kind: Service
metadata:
  name: proxysql
  labels:
    app: proxysql
    tier: frontend
spec:
  type: NodePort
  ports:
  - nodePort: 30033
    port: 6033
    name: proxysql-mysql
  - nodePort: 30032
    port: 6032
    name: proxysql-admin
  selector:
    app: proxysql
    tier: frontend
Let’s see what those definitions are all about. The YAML consists of two resources combined in a file, separated by “—” delimiter. The first resource is the Deployment, which we define the following specification:
spec:
  replicas: 2
  selector:
    matchLabels:
      app: proxysql
      tier: frontend
  strategy:
    type: RollingUpdate
The above means we would like to deploy two ProxySQL pods as a ReplicaSet that matches containers labelled with “app=proxysql,tier=frontend”. The deployment strategy specifies the strategy used to replace old pods by new ones. In this deployment, we picked RollingUpdate which means the pods will be updated in a rolling update fashion, one pod at a time.
The next part is the container’s template:
      - image: severalnines/proxysql:1.4.12
        name: proxysql
        volumeMounts:
        - name: proxysql-config
          mountPath: /etc/proxysql.cnf
          subPath: proxysql.cnf
        ports:
        - containerPort: 6033
          name: proxysql-mysql
        - containerPort: 6032
          name: proxysql-admin
      volumes:
      - name: proxysql-config
        configMap:
          name: proxysql-configmap
In the spec.templates.spec.containers.* section, we are telling Kubernetes to deploy ProxySQL using severalnines/proxysql image version 1.4.12. We also want Kubernetes to mount our custom, pre-configured configuration file and map it to /etc/proxysql.cnf inside the container. The running pods will publish two ports – 6033 and 6032. We also define the “volumes” section, where we instruct Kubernetes to mount the ConfigMap as a volume inside the ProxySQL pods to be mounted by volumeMounts.
The second resource is the service. A Kubernetes service is an abstraction layer which defines the logical set of pods and a policy by which to access them. In this section, we define the following:
apiVersion: v1
kind: Service
metadata:
  name: proxysql
  labels:
    app: proxysql
    tier: frontend
spec:
  type: NodePort
  ports:
  - nodePort: 30033
    port: 6033
    name: proxysql-mysql
  - nodePort: 30032
    port: 6032
    name: proxysql-admin
  selector:
    app: proxysql
    tier: frontend
In this case, we want our ProxySQL to be accessed from the external network thus NodePort type is the chosen type. This will publish the nodePort on every Kubernetes nodes in the cluster. The range of valid ports for NodePort resource is 30000-32767. We chose port 30033 for MySQL-load balanced connections which is mapped to port 6033 of the ProxySQL pods and port 30032 for ProxySQL Administration port mapped to 6032.
Therefore, based on our YAML definition above, we have to prepare the following Kubernetes resource before we can begin to deploy the “proxysql” pod:
- ConfigMap – To store ProxySQL configuration file as a volume so it can be mounted to multiple pods and can be remounted again if the pod is being rescheduled to the other Kubernetes node.
Preparing ConfigMap for ProxySQL
Similar to the previous blog post, we are going to use ConfigMap approach to decouple the configuration file from the container and also for scalability purpose. Take note that in this setup, we consider our ProxySQL configuration is immutable.
Firstly, create the ProxySQL configuration file, proxysql.cnf and add the following lines:
datadir="/var/lib/proxysql"
admin_variables=
{
        admin_credentials="proxysql-admin:adminpassw0rd"
        mysql_ifaces="0.0.0.0:6032"
        refresh_interval=2000
}
mysql_variables=
{
        threads=4
        max_connections=2048
        default_query_delay=0
        default_query_timeout=36000000
        have_compress=true
        poll_timeout=2000
        interfaces="0.0.0.0:6033;/tmp/proxysql.sock"
        default_schema="information_schema"
        stacksize=1048576
        server_version="5.1.30"
        connect_timeout_server=10000
        monitor_history=60000
        monitor_connect_interval=200000
        monitor_ping_interval=200000
        ping_interval_server_msec=10000
        ping_timeout_server=200
        commands_stats=true
        sessions_sort=true
        monitor_username="proxysql"
        monitor_password="proxysqlpassw0rd"
}
mysql_replication_hostgroups =
(
        { writer_hostgroup=10, reader_hostgroup=20, comment="MySQL Replication 5.7" }
)
mysql_servers =
(
        { address="192.168.55.171" , port=3306 , hostgroup=10, max_connections=100 },
        { address="192.168.55.172" , port=3306 , hostgroup=10, max_connections=100 },
        { address="192.168.55.171" , port=3306 , hostgroup=20, max_connections=100 },
        { address="192.168.55.172" , port=3306 , hostgroup=20, max_connections=100 }
)
mysql_users =
(
        { username = "wordpress" , password = "passw0rd" , default_hostgroup = 10 , active = 1 }
)
mysql_query_rules =
(
        {
                rule_id=100
                active=1
                match_pattern="^SELECT .* FOR UPDATE"
                destination_hostgroup=10
                apply=1
        },
        {
                rule_id=200
                active=1
                match_pattern="^SELECT .*"
                destination_hostgroup=20
                apply=1
        },
        {
                rule_id=300
                active=1
                match_pattern=".*"
                destination_hostgroup=10
                apply=1
        }
)
Pay attention on the admin_variables.admin_credentials variable where we used non-default user which is “proxysql-admin”. ProxySQL reserves the default “admin” user for local connection via localhost only. Therefore, we have to use other users to access the ProxySQL instance remotely. Otherwise, you would get the following error:
ERROR 1040 (42000): User 'admin' can only connect locallyOur ProxySQL configuration is based on our two database servers running in MySQL Replication as summarized in the following Topology screenshot taken from ClusterControl:
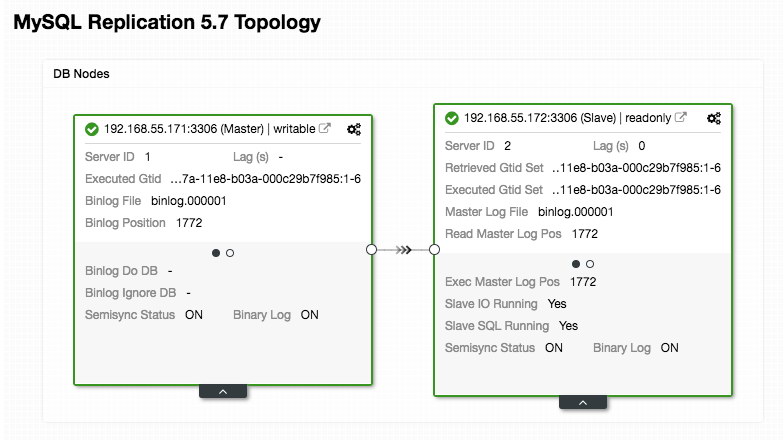
All writes should go to the master node while reads are forwarded to hostgroup 20, as defined under “mysql_query_rules” section. That’s the basic of read/write splitting and we want to utilize them altogether.
Then, import the configuration file into ConfigMap:
$ kubectl create configmap proxysql-configmap --from-file=proxysql.cnf
configmap/proxysql-configmap created
Verify if the ConfigMap is loaded into Kubernetes:
$ kubectl get configmap
NAME                 DATA   AGE
proxysql-configmap   1      45s
WordPress Pod and Service Definition
Now, paste the following lines into a file called wordpress-rs-svc.yml on the host where kubectl is configured:
apiVersion: apps/v1
kind: Deployment
metadata:
  name: wordpress
  labels:
    app: wordpress
spec:
  replicas: 3
  selector:
    matchLabels:
      app: wordpress
      tier: frontend
  strategy:
    type: RollingUpdate
  template:
    metadata:
      labels:
        app: wordpress
        tier: frontend
    spec:
      restartPolicy: Always
      containers:
      - image: wordpress:4.9-apache
        name: wordpress
        env:
        - name: WORDPRESS_DB_HOST
          value: proxysql:6033 # proxysql.default.svc.cluster.local:6033
        - name: WORDPRESS_DB_USER
          value: wordpress
        - name: WORDPRESS_DB_DATABASE
          value: wordpress
        - name: WORDPRESS_DB_PASSWORD
          valueFrom:
            secretKeyRef:
              name: mysql-pass
              key: password
        ports:
        - containerPort: 80
          name: wordpress
---
apiVersion: v1
kind: Service
metadata:
  name: wordpress
  labels:
    app: wordpress
    tier: frontend
spec:
  type: NodePort
  ports:
  - name: wordpress
    nodePort: 30088
    port: 80
  selector:
    app: wordpress
    tier: frontend
Similar to our ProxySQL definition, the YAML consists of two resources, separated by “—” delimiter combined in a file. The first one is the Deployment resource, which will be deployed as a ReplicaSet, as shown under the “spec.*” section:
spec:
  replicas: 3
  selector:
    matchLabels:
      app: wordpress
      tier: frontend
  strategy:
    type: RollingUpdate
This section provides the Deployment specification – 3 pods to start that matches label “app=wordpress,tier=backend”. The deployment strategy is RollingUpdate which means the way Kubernetes will replace the pod is by using rolling update fashion, same with our ProxySQL deployment.
The next part is the “spec.template.spec.*” section:
      restartPolicy: Always
      containers:
      - image: wordpress:4.9-apache
        name: wordpress
        env:
        - name: WORDPRESS_DB_HOST
          value: proxysql:6033
        - name: WORDPRESS_DB_USER
          value: wordpress
        - name: WORDPRESS_DB_PASSWORD
          valueFrom:
            secretKeyRef:
              name: mysql-pass
              key: password
        ports:
        - containerPort: 80
          name: wordpress
        volumeMounts:
        - name: wordpress-persistent-storage
          mountPath: /var/www/html
In this section, we are telling Kubernetes to deploy WordPress 4.9 using Apache web server and we gave the container the name “wordpress”. The container will be restarted every time it is down, regardless of the status. We also want Kubernetes to pass a number of environment variables:
- WORDPRESS_DB_HOST – The MySQL database host. Since we are using ProxySQL as a service, the service name will be the value of metadata.name which is “proxysql”. ProxySQL listens on port 6033 for MySQL load balanced connections while ProxySQL administration console is on 6032.
- WORDPRESS_DB_USER – Specify the wordpress database user that have been created under “Preparing the Database” section.
- WORDPRESS_DB_PASSWORD – The password for WORDPRESS_DB_USER. Since we do not want to expose the password in this file, we can hide it using Kubernetes Secrets. Here we instruct Kubernetes to read the “mysql-pass” Secret resource instead. Secrets has to be created in advanced before the pod deployment, as explained further down.
We also want to publish port 80 of the pod for the end user. The WordPress content stored inside /var/www/html in the container will be mounted into our persistent storage running on NFS. We will use the PersistentVolume and PersistentVolumeClaim resources for this purpose as shown under “Preparing Persistent Storage for WordPress” section.
After the “—” break line, we define another resource called Service:
apiVersion: v1
kind: Service
metadata:
  name: wordpress
  labels:
    app: wordpress
    tier: frontend
spec:
  type: NodePort
  ports:
  - name: wordpress
    nodePort: 30088
    port: 80
  selector:
    app: wordpress
    tier: frontend
In this configuration, we would like Kubernetes to create a service called “wordpress”, listen on port 30088 on all nodes (a.k.a. NodePort) to the external network and forward it to port 80 on all pods labelled with “app=wordpress,tier=frontend”.
Therefore, based on our YAML definition above, we have to prepare a number of Kubernetes resources before we can begin to deploy the “wordpress” pod and service:
- PersistentVolume and PersistentVolumeClaim – To store the web contents of our WordPress application, so when the pod is being rescheduled to other worker node, we won’t lose the last changes.
- Secrets – To hide the WordPress database user password inside the YAML file.
Preparing Persistent Storage for WordPress
A good persistent storage for Kubernetes should be accessible by all Kubernetes nodes in the cluster. For the sake of this blog post, we used NFS as the PersistentVolume (PV) provider because it’s easy and supported out-of-the-box. The NFS server is located somewhere outside of our Kubernetes network (as shown in the first architecture diagram) and we have configured it to allow all Kubernetes nodes with the following line inside /etc/exports:
/nfs 192.168.55.*(rw,sync,no_root_squash,no_all_squash)Take note that NFS client package must be installed on all Kubernetes nodes. Otherwise, Kubernetes wouldn’t be able to mount the NFS correctly. On all nodes:
$ sudo apt-install nfs-common #Ubuntu/Debian
$ yum install nfs-utils #RHEL/CentOS
Also, make sure on the NFS server, the target directory exists:
(nfs-server)$ mkdir /nfs/kubernetes/wordpressThen, create a file called wordpress-pv-pvc.yml and add the following lines:
apiVersion: v1
kind: PersistentVolume
metadata:
  name: wp-pv
  labels:
    app: wordpress
spec:
  accessModes:
    - ReadWriteOnce
  capacity:
    storage: 3Gi
  mountOptions:
    - hard
    - nfsvers=4.1
  nfs:
    path: /nfs/kubernetes/wordpress
    server: 192.168.55.200
---
kind: PersistentVolumeClaim
apiVersion: v1
metadata:
  name: wp-pvc
spec:
  accessModes:
    - ReadWriteOnce
  resources:
    requests:
      storage: 3Gi
  selector:
    matchLabels:
      app: wordpress
      tier: frontend
In the above definition, we are telling Kubernetes to allocate 3GB of volume space on the NFS server for our WordPress container. Take note for production usage, NFS should be configured with automatic provisioner and storage class.
Create the PV and PVC resources:
$ kubectl create -f wordpress-pv-pvc.ymlVerify if those resources are created and the status must be “Bound”:
$ kubectl get pv,pvc
NAME                     CAPACITY   ACCESS MODES   RECLAIM POLICY   STATUS   CLAIM            STORAGECLASS   REASON   AGE
persistentvolume/wp-pv   3Gi        RWO            Recycle          Bound    default/wp-pvc                           22h


NAME                           STATUS   VOLUME   CAPACITY   ACCESS MODES   STORAGECLASS   AGE
persistentvolumeclaim/wp-pvc   Bound    wp-pv    3Gi        RWO                           22h
Preparing Secrets for WordPress
Create a secret to be used by the WordPress container for WORDPRESS_DB_PASSWORD environment variable. The reason is simply because we don’t want to expose the password in clear text inside the YAML file.
Create a secret resource called mysql-pass and pass the password accordingly:
$ kubectl create secret generic mysql-pass --from-literal=password=passw0rdVerify that our secret is created:
$ kubectl get secrets mysql-pass
NAME         TYPE     DATA   AGE
mysql-pass   Opaque   1      7h12m
Deploying ProxySQL and WordPress
Finally, we can begin the deployment. Deploy ProxySQL first, followed by WordPress:
$ kubectl create -f proxysql-rs-svc.yml
$ kubectl create -f wordpress-rs-svc.yml
We can then list out all pods and services that have been created under “frontend” tier:
$ kubectl get pods,services -l tier=frontend -o wide
NAME                             READY   STATUS    RESTARTS   AGE   IP          NODE          NOMINATED NODE
pod/proxysql-95b8d8446-qfbf2     1/1     Running   0          12m   10.36.0.2   kube2.local
pod/proxysql-95b8d8446-vljlr     1/1     Running   0          12m   10.44.0.6   kube3.local
pod/wordpress-59489d57b9-4dzvk   1/1     Running   0          37m   10.36.0.1   kube2.local
pod/wordpress-59489d57b9-7d2jb   1/1     Running   0          30m   10.44.0.4   kube3.local
pod/wordpress-59489d57b9-gw4p9   1/1     Running   0          30m   10.36.0.3   kube2.local

NAME                TYPE       CLUSTER-IP       EXTERNAL-IP   PORT(S)                         AGE   SELECTOR
service/proxysql    NodePort   10.108.195.54            6033:30033/TCP,6032:30032/TCP   10m   app=proxysql,tier=frontend
service/wordpress   NodePort   10.109.144.234           80:30088/TCP                    37m   app=wordpress,tier=frontend
  kube2.local
The above output verifies our deployment architecture where we are currently having three WordPress pods, exposed on port 30088 publicly as well as our ProxySQL instance which is exposed on port 30033 and 30032 externally plus 6033 and 6032 internally.
At this point, our architecture is looking something like this:
Port 80 published by the WordPress pods is now mapped to the outside world via port 30088. We can access our blog post at http://{any_kubernetes_host}:30088/ and should be redirected to the WordPress installation page. If we proceed with the installation, it would skip the database connection part and directly show this page:
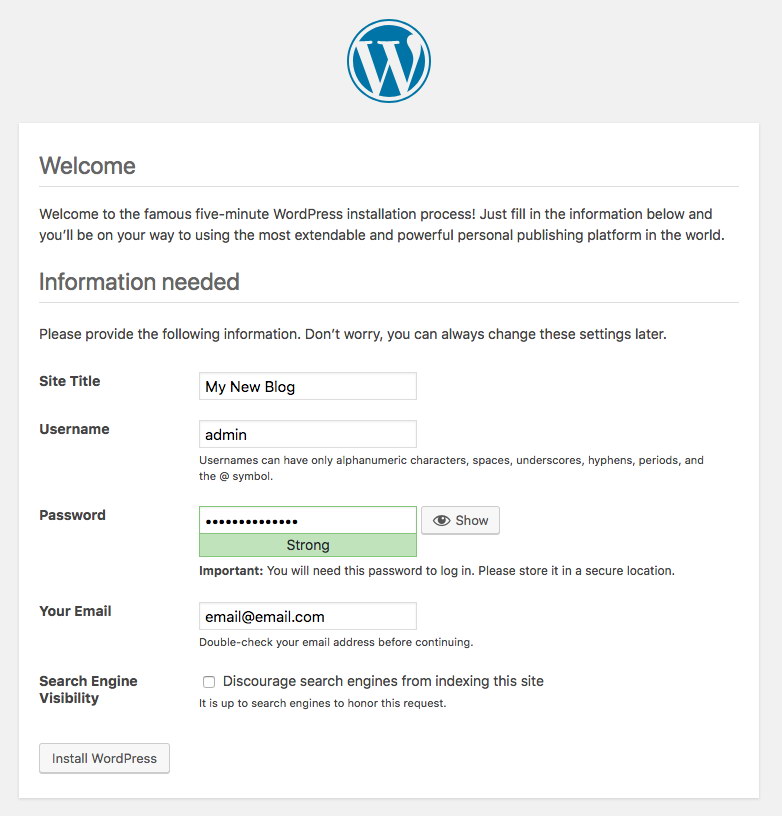
It indicates that our MySQL and ProxySQL configuration is correctly configured inside wp-config.php file. Otherwise, you would be redirected to the database configuration page.
Our deployment is now complete.
ProxySQL Pods and Service Management
Failover and recovery are expected to be handled automatically by Kubernetes. For example, if a Kubernetes worker goes down, the pod will be recreated in the next available node after –pod-eviction-timeout (default to 5 minutes). If the container crashes or is killed, Kubernetes will replace it almost instantly.
Some common management tasks are expected to be different when running within Kubernetes, as shown in the next sections.
Connecting to ProxySQL
While ProxySQL is exposed externally on port 30033 (MySQL) and 30032 (Admin), it is also accessible internally via the published ports, 6033 and 6032 respectively. Thus, to access the ProxySQL instances within the Kubernetes network, use the CLUSTER-IP, or the service name “proxysql” as the host value. For example, within WordPress pod, you may access the ProxySQL admin console by using the following command:
$ mysql -uproxysql-admin -p -hproxysql -P6032If you want to connect externally, use the port defined under nodePort value he service YAML and pick any of the Kubernetes node as the host value:
$ mysql -uproxysql-admin -p -hkube3.local -P30032The same applies to the MySQL load-balanced connection on port 30033 (external) and 6033 (internal).
Scaling Up and Down
Scaling up is easy with Kubernetes:
$ kubectl scale deployment proxysql --replicas=5
deployment.extensions/proxysql scaled
Verify the rollout status:
$ kubectl rollout status deployment proxysql
deployment "proxysql" successfully rolled out
Scaling down is also similar. Here we want to revert back from 5 to 2 replicas:
$ kubectl scale deployment proxysql --replicas=2
deployment.extensions/proxysql scaled
We can also look at the deployment events for ProxySQL to get a better picture of what has happened for this deployment by using the “describe” option:
$ kubectl describe deployment proxysql
...
Events:
  Type    Reason             Age    From                   Message
  ----    ------             ----   ----                   -------
  Normal  ScalingReplicaSet  20m    deployment-controller  Scaled up replica set proxysql-769895fbf7 to 1
  Normal  ScalingReplicaSet  20m    deployment-controller  Scaled down replica set proxysql-95b8d8446 to 1
  Normal  ScalingReplicaSet  20m    deployment-controller  Scaled up replica set proxysql-769895fbf7 to 2
  Normal  ScalingReplicaSet  20m    deployment-controller  Scaled down replica set proxysql-95b8d8446 to 0
  Normal  ScalingReplicaSet  7m10s  deployment-controller  Scaled up replica set proxysql-6c55f647cb to 1
  Normal  ScalingReplicaSet  7m     deployment-controller  Scaled down replica set proxysql-769895fbf7 to 1
  Normal  ScalingReplicaSet  7m     deployment-controller  Scaled up replica set proxysql-6c55f647cb to 2
  Normal  ScalingReplicaSet  6m53s  deployment-controller  Scaled down replica set proxysql-769895fbf7 to 0
  Normal  ScalingReplicaSet  54s    deployment-controller  Scaled up replica set proxysql-6c55f647cb to 5
  Normal  ScalingReplicaSet  21s    deployment-controller  Scaled down replica set proxysql-6c55f647cb to 2
The connections to the pods will be load balanced automatically by Kubernetes.
Configuration Changes
One way to make configuration changes on our ProxySQL pods is by versioning our configuration using another ConfigMap name. Firstly, modify our configuration file directly via your favourite text editor:
$ vim /root/proxysql.cnfThen, load it up into Kubernetes ConfigMap with a different name. In this example, we append “-v2” in the resource name:
$ kubectl create configmap proxysql-configmap-v2 --from-file=proxysql.cnfVerify if the ConfigMap is loaded correctly:
$ kubectl get configmap
NAME                    DATA   AGE
proxysql-configmap      1      3d15h
proxysql-configmap-v2   1      19m
Open the ProxySQL deployment file, proxysql-rs-svc.yml and change the following line under configMap section to the new version:
      volumes:
      - name: proxysql-config
        configMap:
          name: proxysql-configmap-v2 #change this line
Then, apply the changes to our ProxySQL deployment:
$ kubectl apply -f proxysql-rs-svc.yml
deployment.apps/proxysql configured
service/proxysql configured
Verify the rollout by using looking at the ReplicaSet event using the “describe” flag:
$ kubectl describe proxysql
...
Pod Template:
  Labels:  app=proxysql
           tier=frontend
  Containers:
   proxysql:
    Image:        severalnines/proxysql:1.4.12
    Ports:        6033/TCP, 6032/TCP
    Host Ports:   0/TCP, 0/TCP
    Environment:
    Mounts:
      /etc/proxysql.cnf from proxysql-config (rw)
  Volumes:
   proxysql-config:
    Type:      ConfigMap (a volume populated by a ConfigMap)
    Name:      proxysql-configmap-v2
    Optional:  false
Conditions:
  Type           Status  Reason
  ----           ------  ------
  Available      True    MinimumReplicasAvailable
  Progressing    True    NewReplicaSetAvailable
OldReplicaSets:
NewReplicaSet:   proxysql-769895fbf7 (2/2 replicas created)
Events:
  Type    Reason             Age   From                   Message
  ----    ------             ----  ----                   -------
  Normal  ScalingReplicaSet  53s   deployment-controller  Scaled up replica set proxysql-769895fbf7 to 1
  Normal  ScalingReplicaSet  46s   deployment-controller  Scaled down replica set proxysql-95b8d8446 to 1
  Normal  ScalingReplicaSet  46s   deployment-controller  Scaled up replica set proxysql-769895fbf7 to 2
  Normal  ScalingReplicaSet  41s   deployment-controller  Scaled down replica set proxysql-95b8d8446 to 0
Pay attention on the “Volumes” section with the new ConfigMap name. You can also see the deployment events at the bottom of the output. At this point, our new configuration has been loaded into all ProxySQL pods, where Kubernetes scaled down the ProxySQL ReplicaSet to 0 (obeying RollingUpdate strategy) and bring them back to the desired state of 2 replicas.
Final Thoughts
Up until this point, we have covered possible deployment approach for ProxySQL in Kubernetes. Running ProxySQL with the help of Kubernetes ConfigMap opens a new possibility of ProxySQL clustering, where it is somewhat different as compared to the native clustering support built-in inside ProxySQL.
In the upcoming blog post, we will explore ProxySQL Clustering using Kubernetes ConfigMap and how to do it the right way. Stay tuned!


