blog
Monitoring & Ops Management of MySQL 8.0 with ClusterControl

Users of open source databases often have to use a mixture of tools and homegrown scripts to manage their production database environments. However, even while having own homegrown scripts in the solution, it’s hard to maintain it and keep up with new database features, security requirements or upgrades. With new major versions of a database, including MySQL 8.0, this task can become even harder.
At the heart of ClusterControl is its automation functionality that lets you automate the database tasks you have to perform regularly, like deploying new databases, adding and scaling new nodes, managing backups, high availability and failover, topology changes, upgrades, and more. Automated procedures are accurate, consistent, and repeatable so you can minimize the risk of changes on the production environments.
Moreover, with ClusterControl, MySQL users are no longer subject to vendor lock-in; something that was questioned by many recently. You can deploy and import a variety of MySQL versions and vendors from a single console for free.
In this article, we will show you how to deploy MySQL 8.0 with a battle tested configuration and manage it in an automated way. You will find here how to do:
- ClusterControl installation
- MySQL deployment process
- Deploy a new cluster
- Import existing cluster
- Scaling MySQL
- Securing MySQL
- Monitoring and Trending
- Backup and Recovery
- Node and Cluster autorecovery (auto failover)
ClusterControl installation
To start with ClusterControl you need a dedicated virtual machine or host. The VM and supported systems requirements are described here. The base VM can start from 2 GB, 2 cores and Disk space 20 GB storage space, either on-prem or in the cloud.
The installation is well described in the documentation but basically, you download an installation script which walks you through the steps. The wizard script sets up the internal database, installs necessary packages, repositories, and other necessary tweaks. For environments without internet access, you can use the offline installation process.
ClusterControl requires SSH access to the database hosts, and monitoring can be agent-based or agentless. Management is agentless.
To setup passwordless SSH to all target nodes (ClusterControl and all database hosts), run the following commands on the ClusterControl server:
$ ssh-keygen -t rsa # press enter on all prompts
$ ssh-copy-id -i ~/.ssh/id_rsa [ClusterControl IP address]
$ ssh-copy-id -i ~/.ssh/id_rsa [Database nodes IP address] # repeat this to all target database nodes
One of the most convenient ways to try out cluster control maybe the option to run it in docker container.
docker run -d --name clustercontrol
--network db-cluster
--ip 192.168.10.10
-h clustercontrol
-p 5000:80
-p 5001:443
-v /storage/clustercontrol/cmon.d:/etc/cmon.d
-v /storage/clustercontrol/datadir:/var/lib/mysql
-v /storage/clustercontrol/sshkey:/root/.ssh
-v /storage/clustercontrol/cmonlib:/var/lib/cmon
-v /storage/clustercontrol/backups:/root/backups
severalnines/clustercontrol
After successful deployment, you should be able to access the ClusterControl Web UI at {host’s IP address}:{host’s port}, for example:
HTTP: http://192.168.10.100:5000/clustercontrol
HTTPS: https://192.168.10.100:5001/clustercontrol
Deployment and Scaling
Deploy MySQL 8.0
Once we enter the ClusterControl interface, the first thing to do is to deploy a new database or import an existing one. The new version 1.7.2 introduces support for version 8.0 of Oracle Community Edition and Percona Server. At the time of writing this blog, the current versions are Oracle MySQL Server 8.0.15 and Percona Server for MySQL 8.0-15. Select the option “Deploy Database Cluster” and follow the instructions that appear.
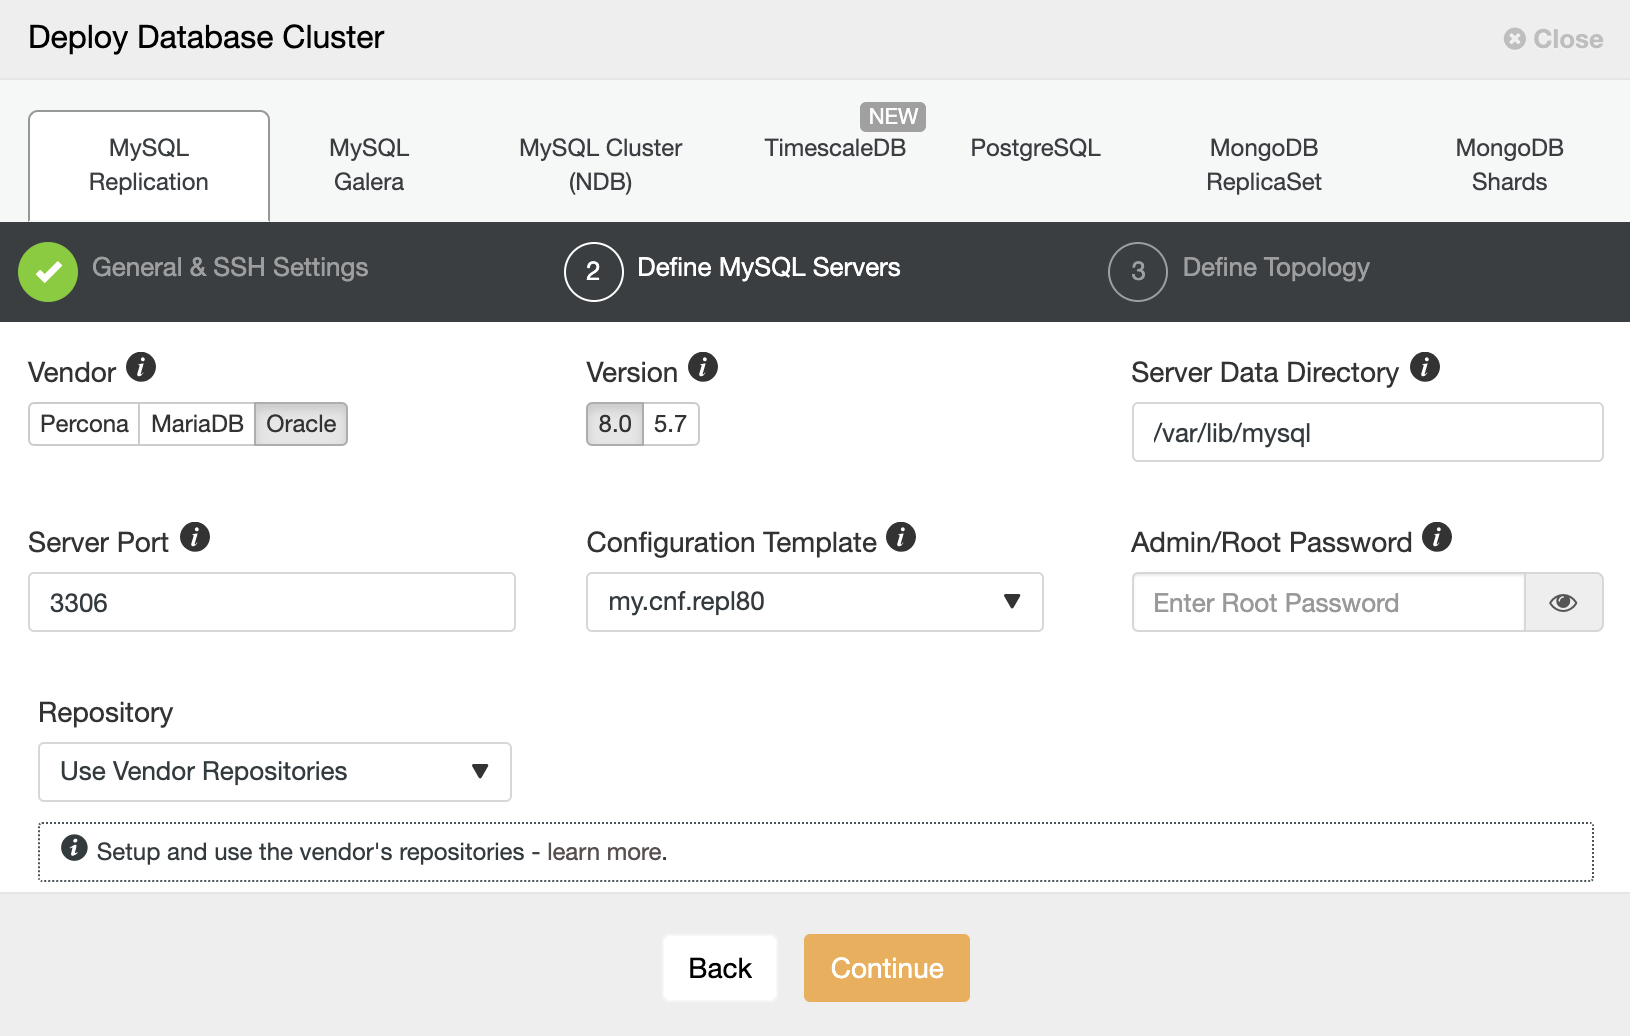
When choosing MySQL, we must specify User, Key or Password and port to connect by SSH to our servers. We also need a name for our new cluster and if we want ClusterControl to install the corresponding software and configurations for us.
After setting up the SSH access information, we must enter the data to access our database. We can also specify which repository to use. Repository configuration is an important aspect for database servers and clusters. You can have three types of repositories when deploying database server/cluster using ClusterControl:
- Use Vendor Repository
Provision software by setting up and using the database vendor’s preferred software repository. ClusterControl will install the latest version of what is provided by the database vendor repository. - Do Not Setup Vendor Repositories
Provision software by using the pre-existing software repository already set up on the nodes. The user has to set up the software repository manually on each database node and ClusterControl will use this repository for deployment. This is good if the database nodes are running without internet connection. - Use Mirrored Repositories (Create new repository)
Create and mirror the current database vendor’s repository and then deploy using the local mirrored repository. This allows you to “freeze” the current versions of the software packages.
In the next step, we need to add our servers to the cluster that we are going to create. When adding our servers, we can enter IP or hostname then choose network interface. For the latter, we must have a DNS server or have added our MySQL servers to the local resolution file (/etc/hosts) of our ClusterControl, so it can resolve the corresponding name that you want to add.
On the screen we can see an example deployment with one master and two slave servers. The server list is dynamic and allows you to create sophisticated topologies which can be extended after the initial installation.

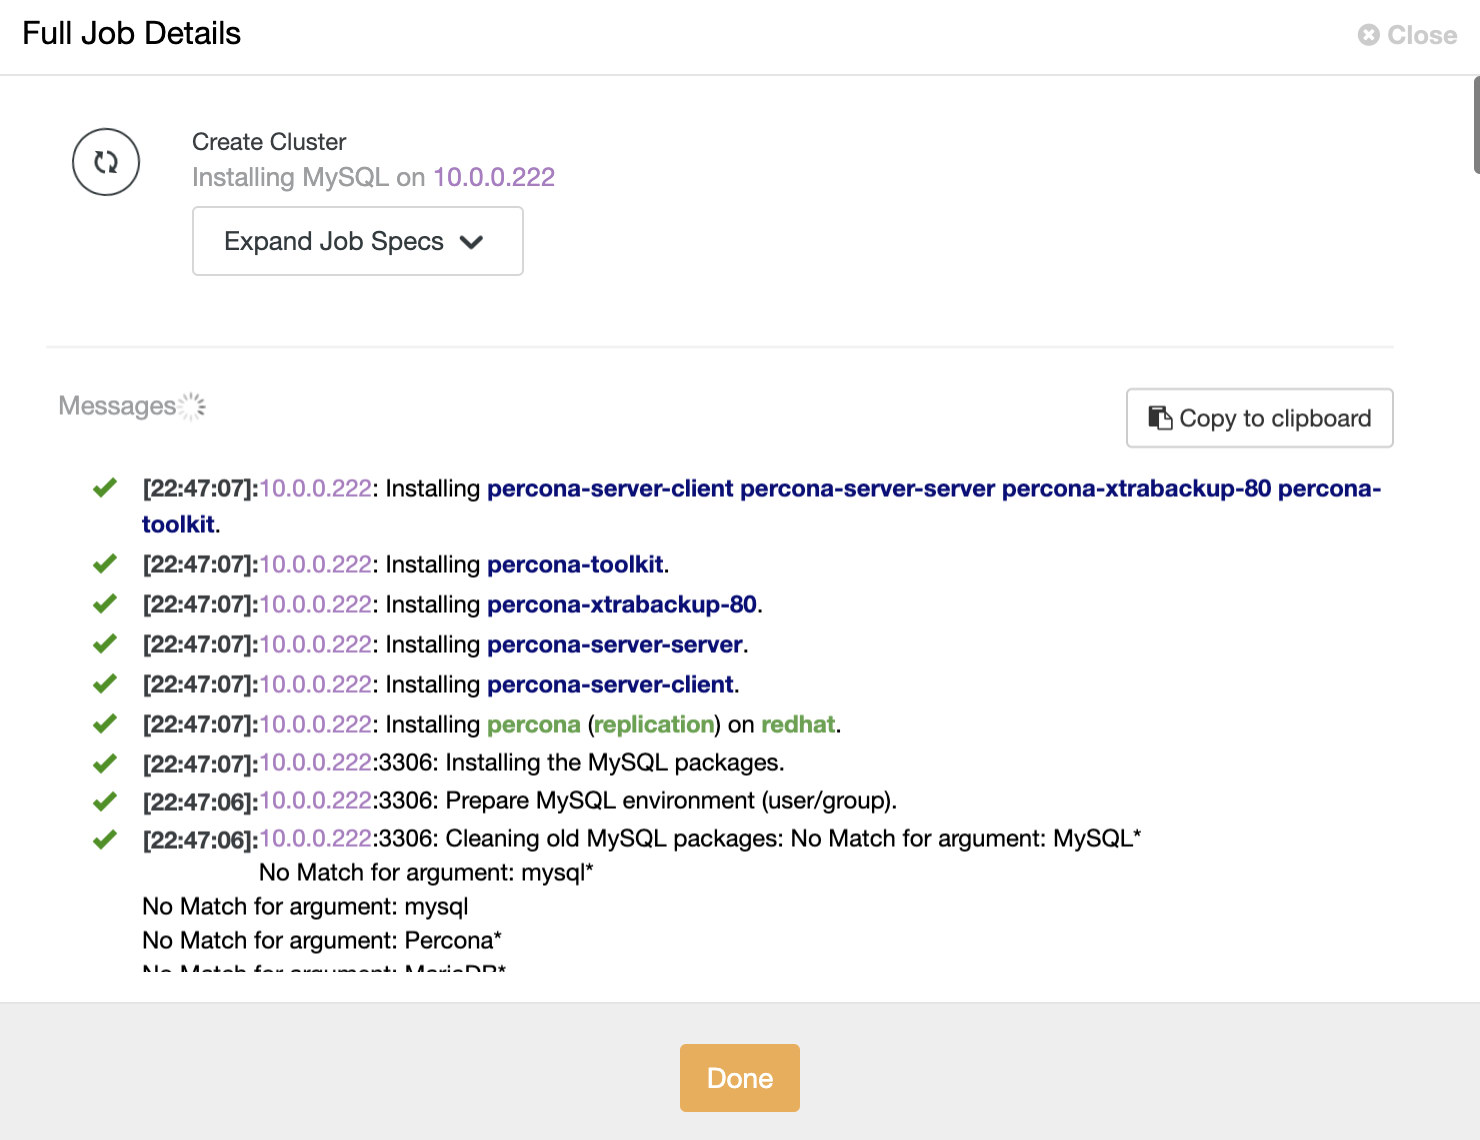
When all is set hit the deploy button. You can monitor the status of the creation of our new replication setup from the ClusterControl activity monitor. The deployment process will also take care of installation of popular mysql tools like percona toolkit and percona-xtradb-backup.
Once the task is finished, we can see our cluster in the main ClusterControl screen and on the topology view. Note that we also added a load balancer (ProxySQL) in front of the database instances.
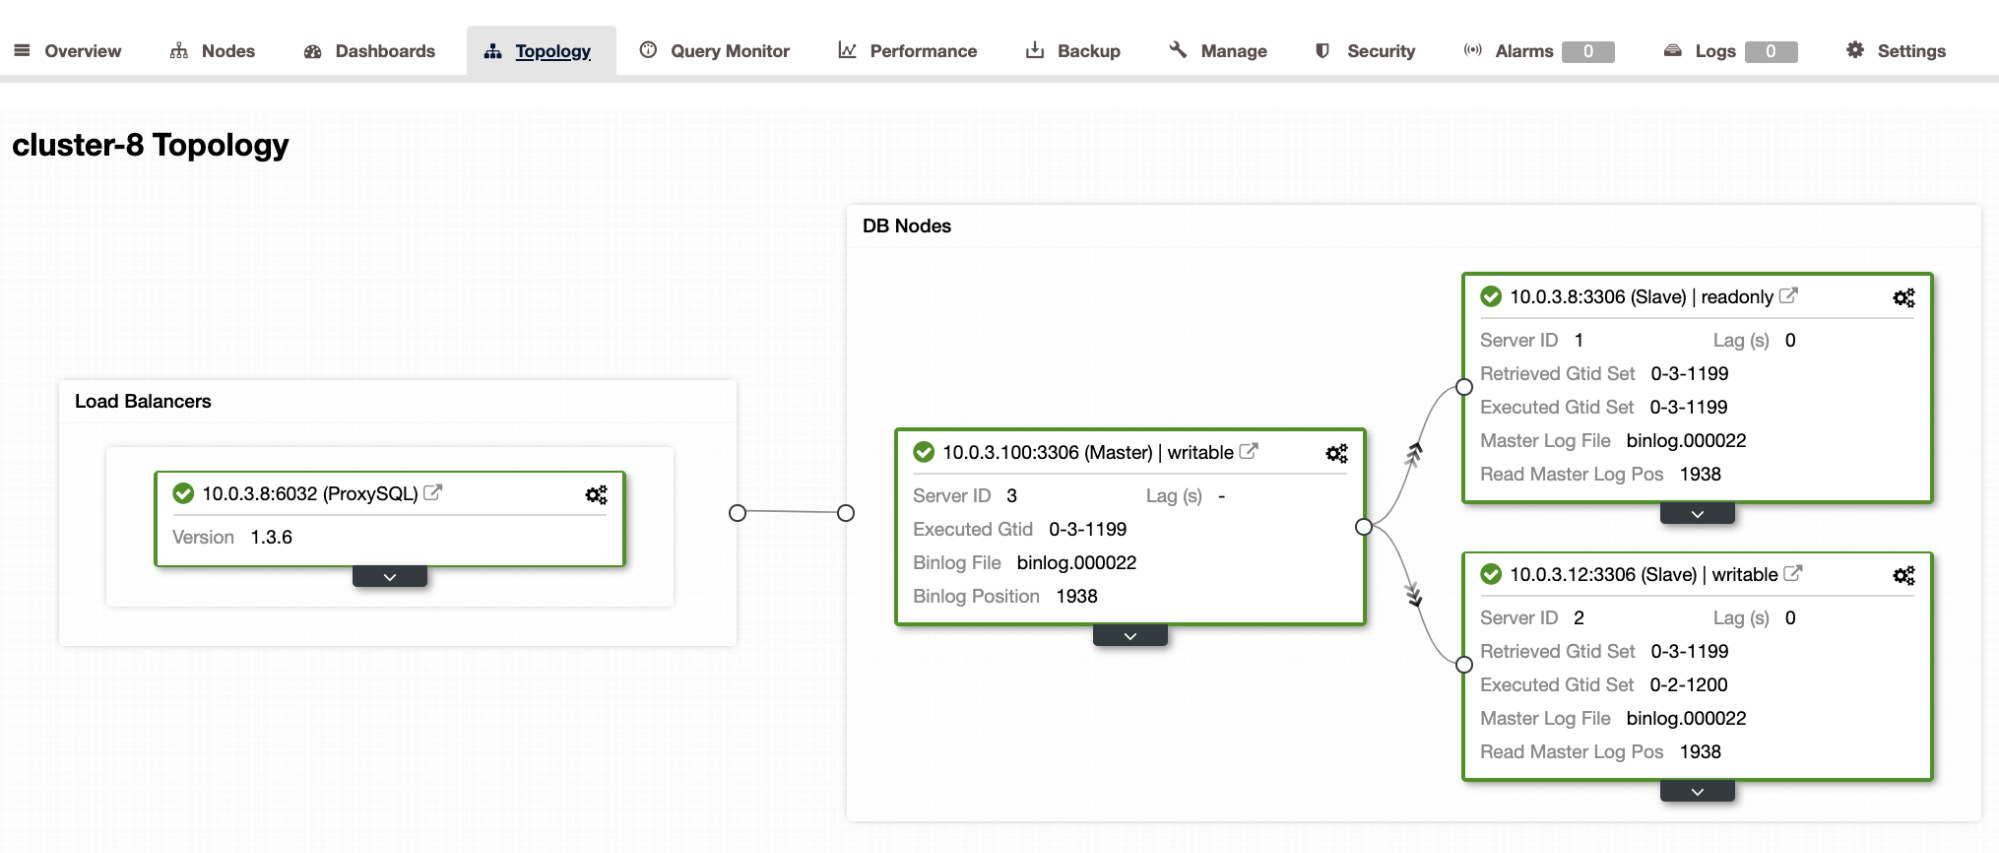
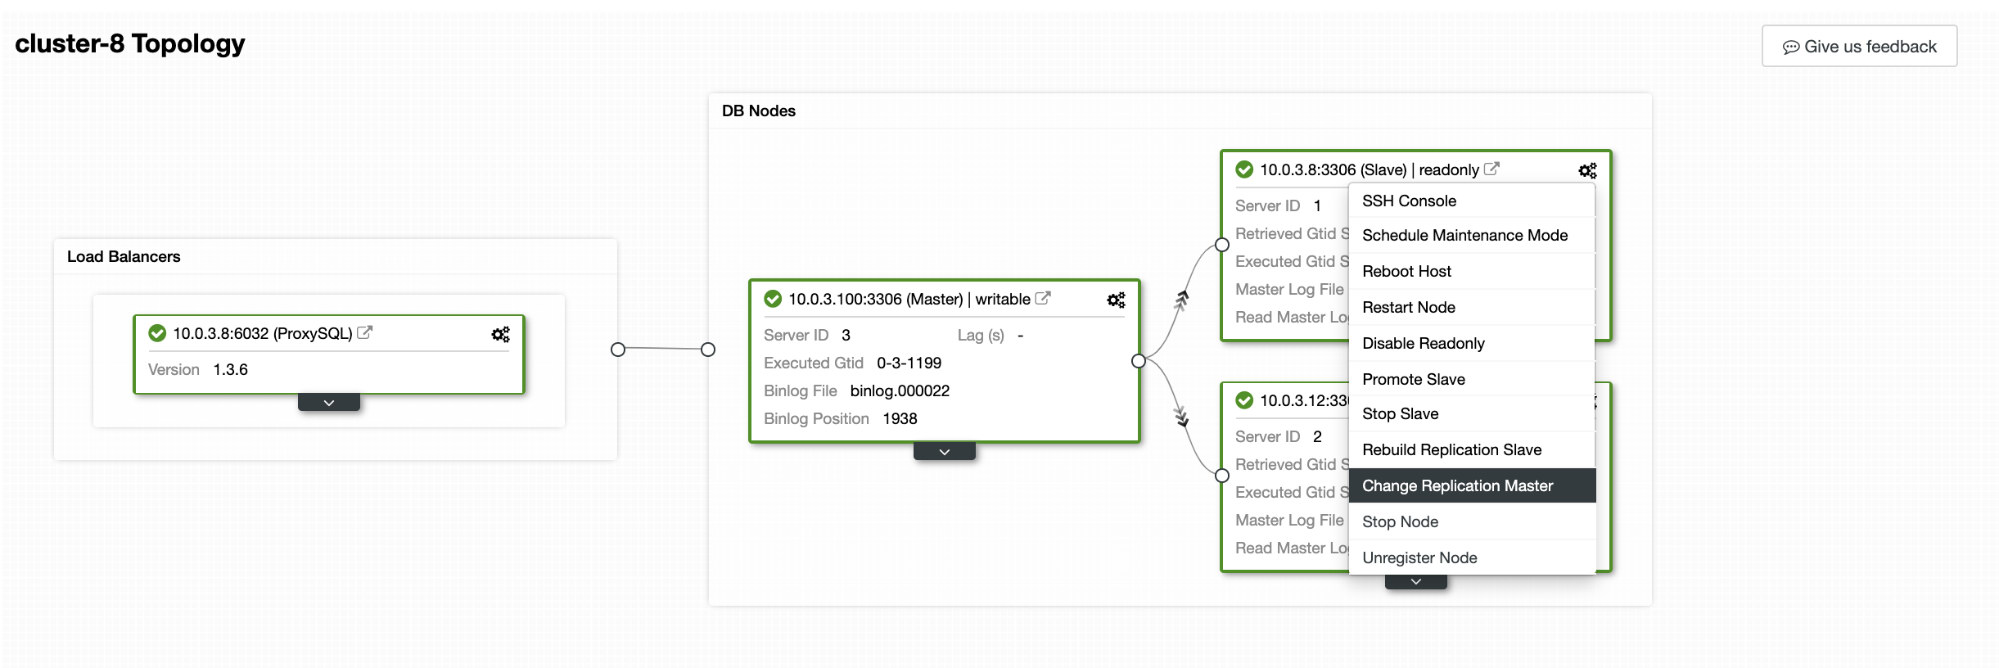
As we can see in the image, once we have our cluster created, we can perform several tasks on it, directly from the topology section.
Import a New Cluster
We also have the option to manage an existing setup by importing it into ClusterControl. Such an environment can be created by ClusterControl or other methods (puppet, chef, ansible, docker …). The process is simple and doesn’t require specialized knowledge.
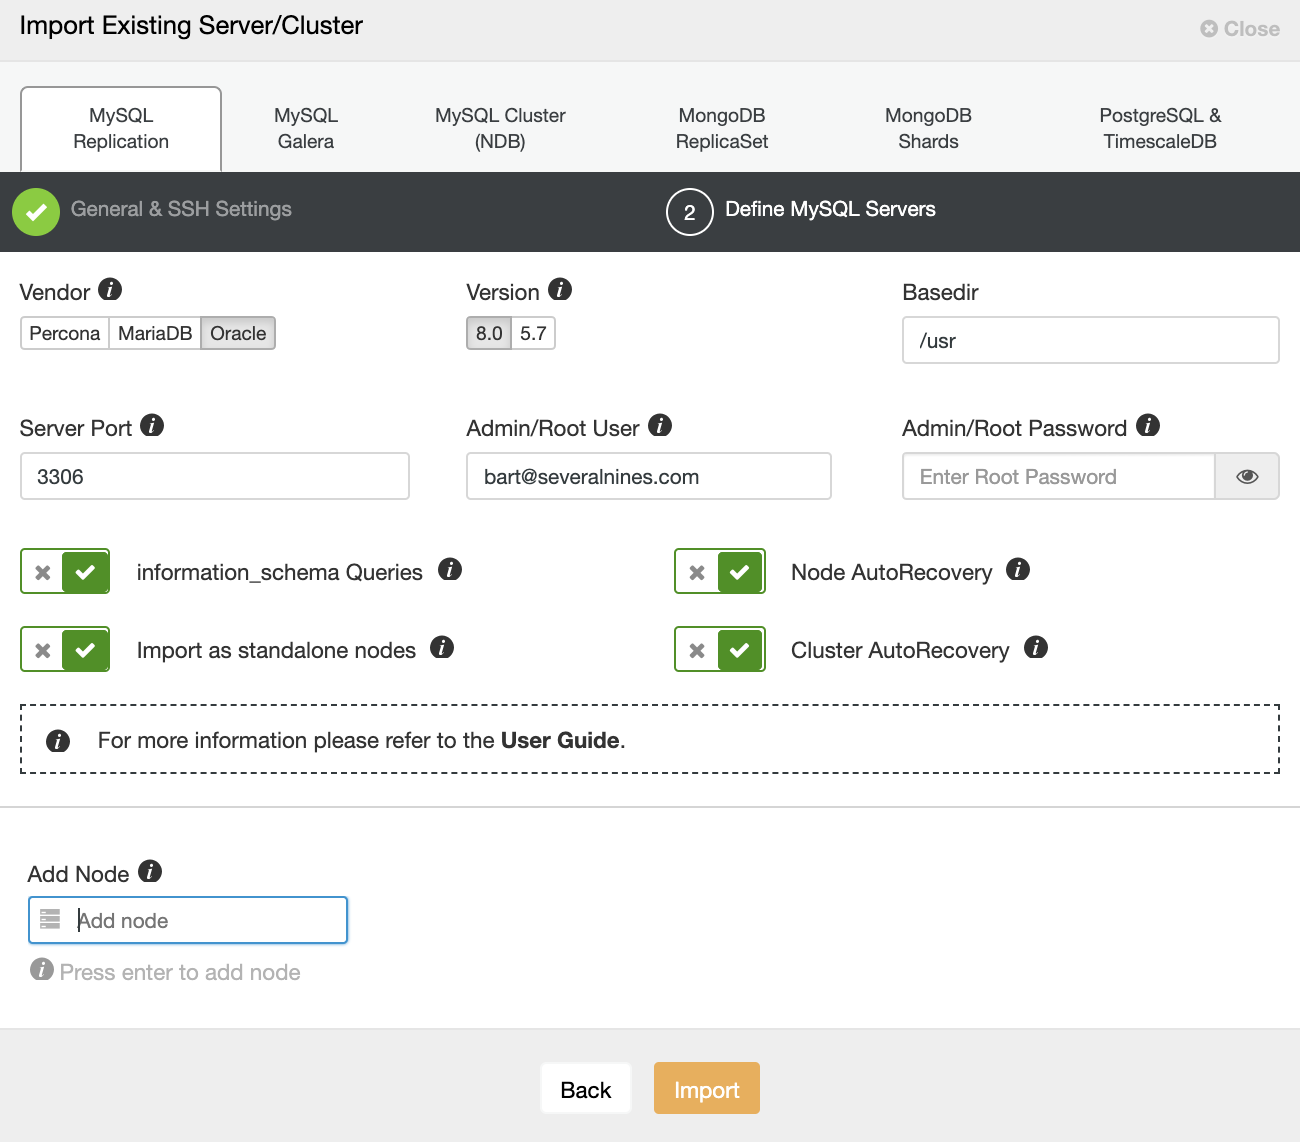
First, we must enter the SSH access credentials to our servers. Then we enter the access credentials to our database, the server data directory, and the version. We add the nodes by IP or hostname, in the same way as when we deploy, and press on Import. Once the task is finished, we are ready to manage our cluster from ClusterControl. At this point we can also define the options for node or cluster auto recovery.
Scaling MySQL
With ClusterControl, adding more servers to the server is an easy step. You can do that from the GUI or CLI. For more advanced users you can use ClusterControl Developer Studio and write a resource base condition to expand your cluster automatically.
When adding a new node to the setup, you have an option to use existing backup so there is no need to overwhelm the production master node with additional work.
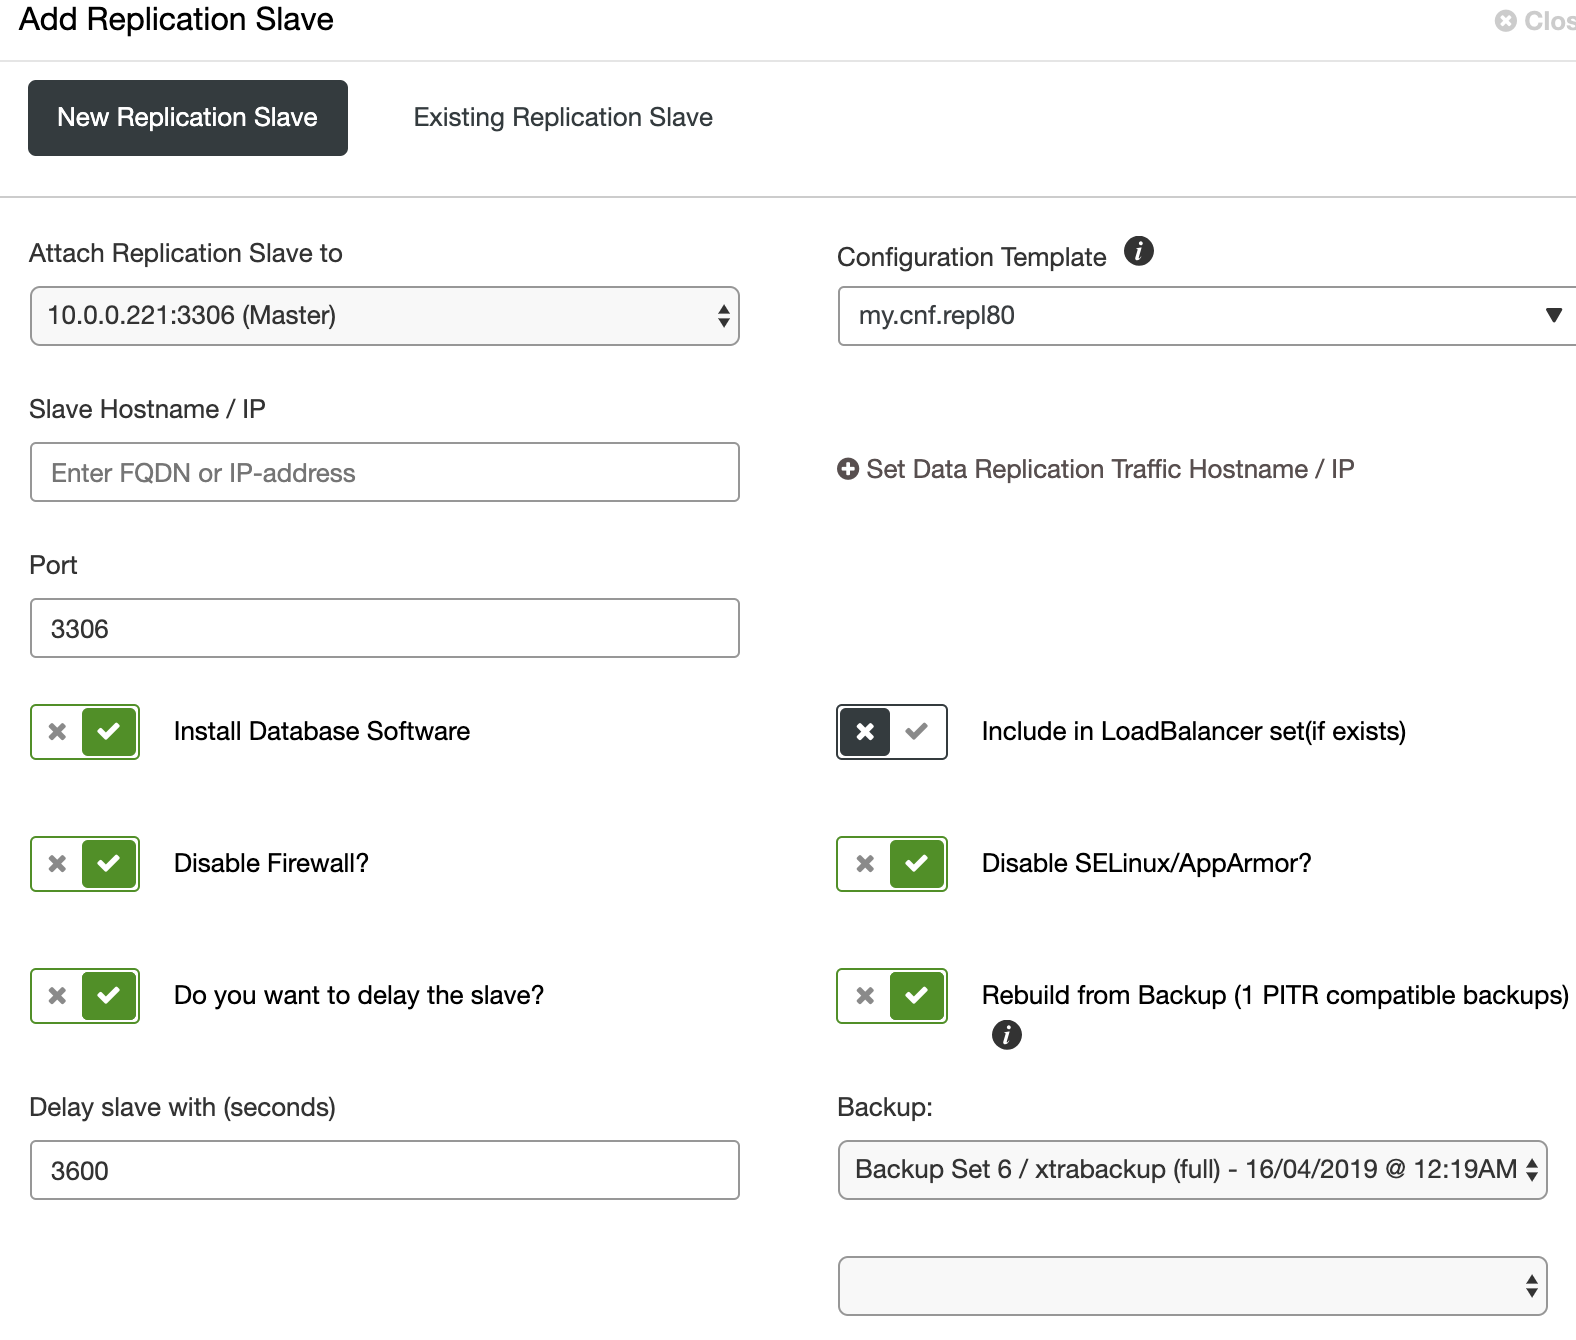
With the built-in support for load balancers (ProxySQL, Maxscale, HAProxy), you can add and remove MySQL nodes dynamically. If you wish to know more in-depth about how best to manage MySQL replication and clustering, please read the MySQL replication for HA replication whitepaper.
Securing MySQL
MySQL comes with very little security out of the box. This has been improved with the recent version however production grade systems still require tweeks in the default my.cnf configuration.
ClusterControl removes human error and provides access to a suite of security features, to automatically protect your databases from hacks and other threats.
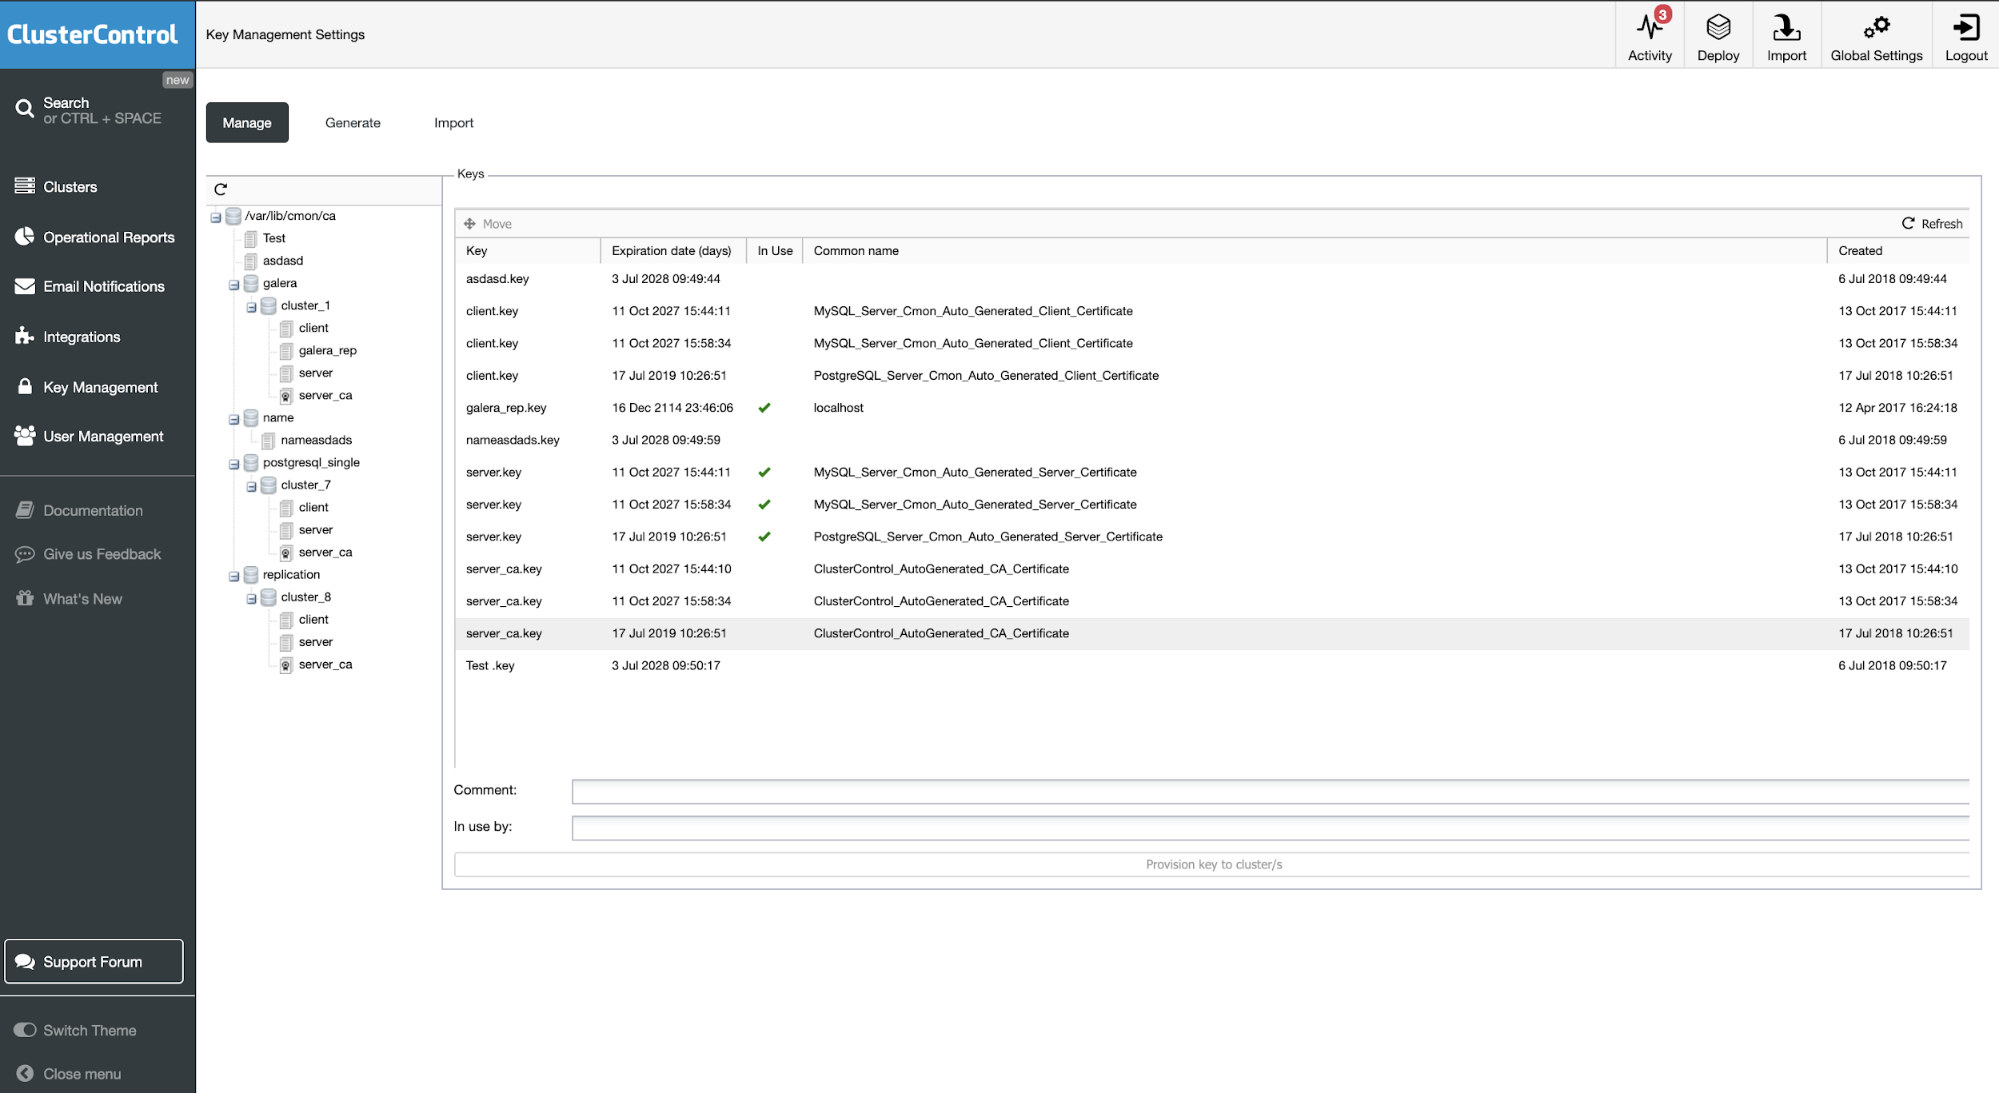
ClusterControl enables SSL support for MySQL connections. Enabling SSL adds another level of security for communication between the applications (including ClusterControl) and database. MySQL clients open encrypted connections to the database servers and verify the identity of those servers before transferring any sensitive information.
ClusterControl will execute all necessary steps, including creating certificates on all database nodes. Such certificates can be maintained later on in the Key Management tab.
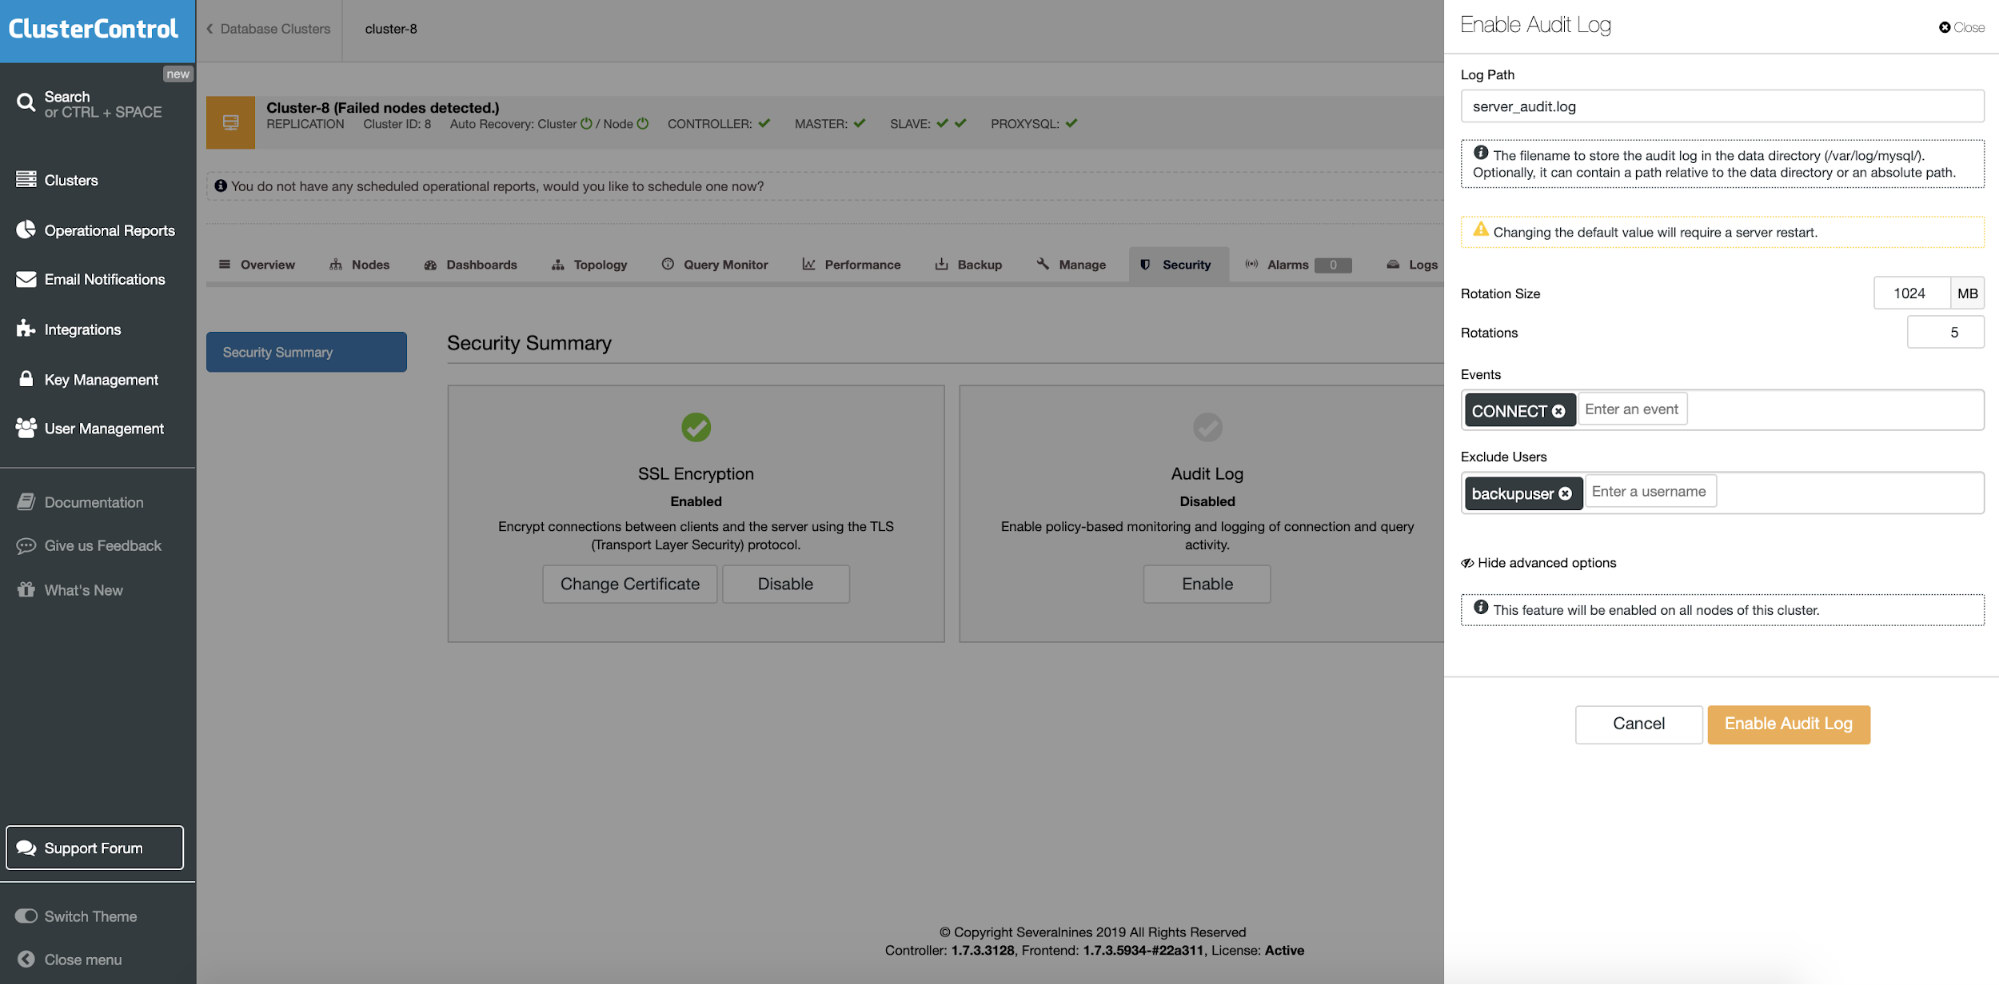
The Percona server installations comes with additional support for an audit plugin. Continuous auditing is an imperative task for monitoring your database environment. By auditing your database, you can achieve accountability for actions taken or content accessed. Moreover, the audit may include some critical system components, such as the ones associated with financial data to support a precise set of regulations like SOX, or the EU GDPR regulation. The guided process lets you choose what should be audited and how to maintain the audit log files.
Monitoring
When working with database systems, you should be able to monitor them. That will enable you to identify trends, plan for upgrades or improvements or react effectively to any problems or errors that may arise.
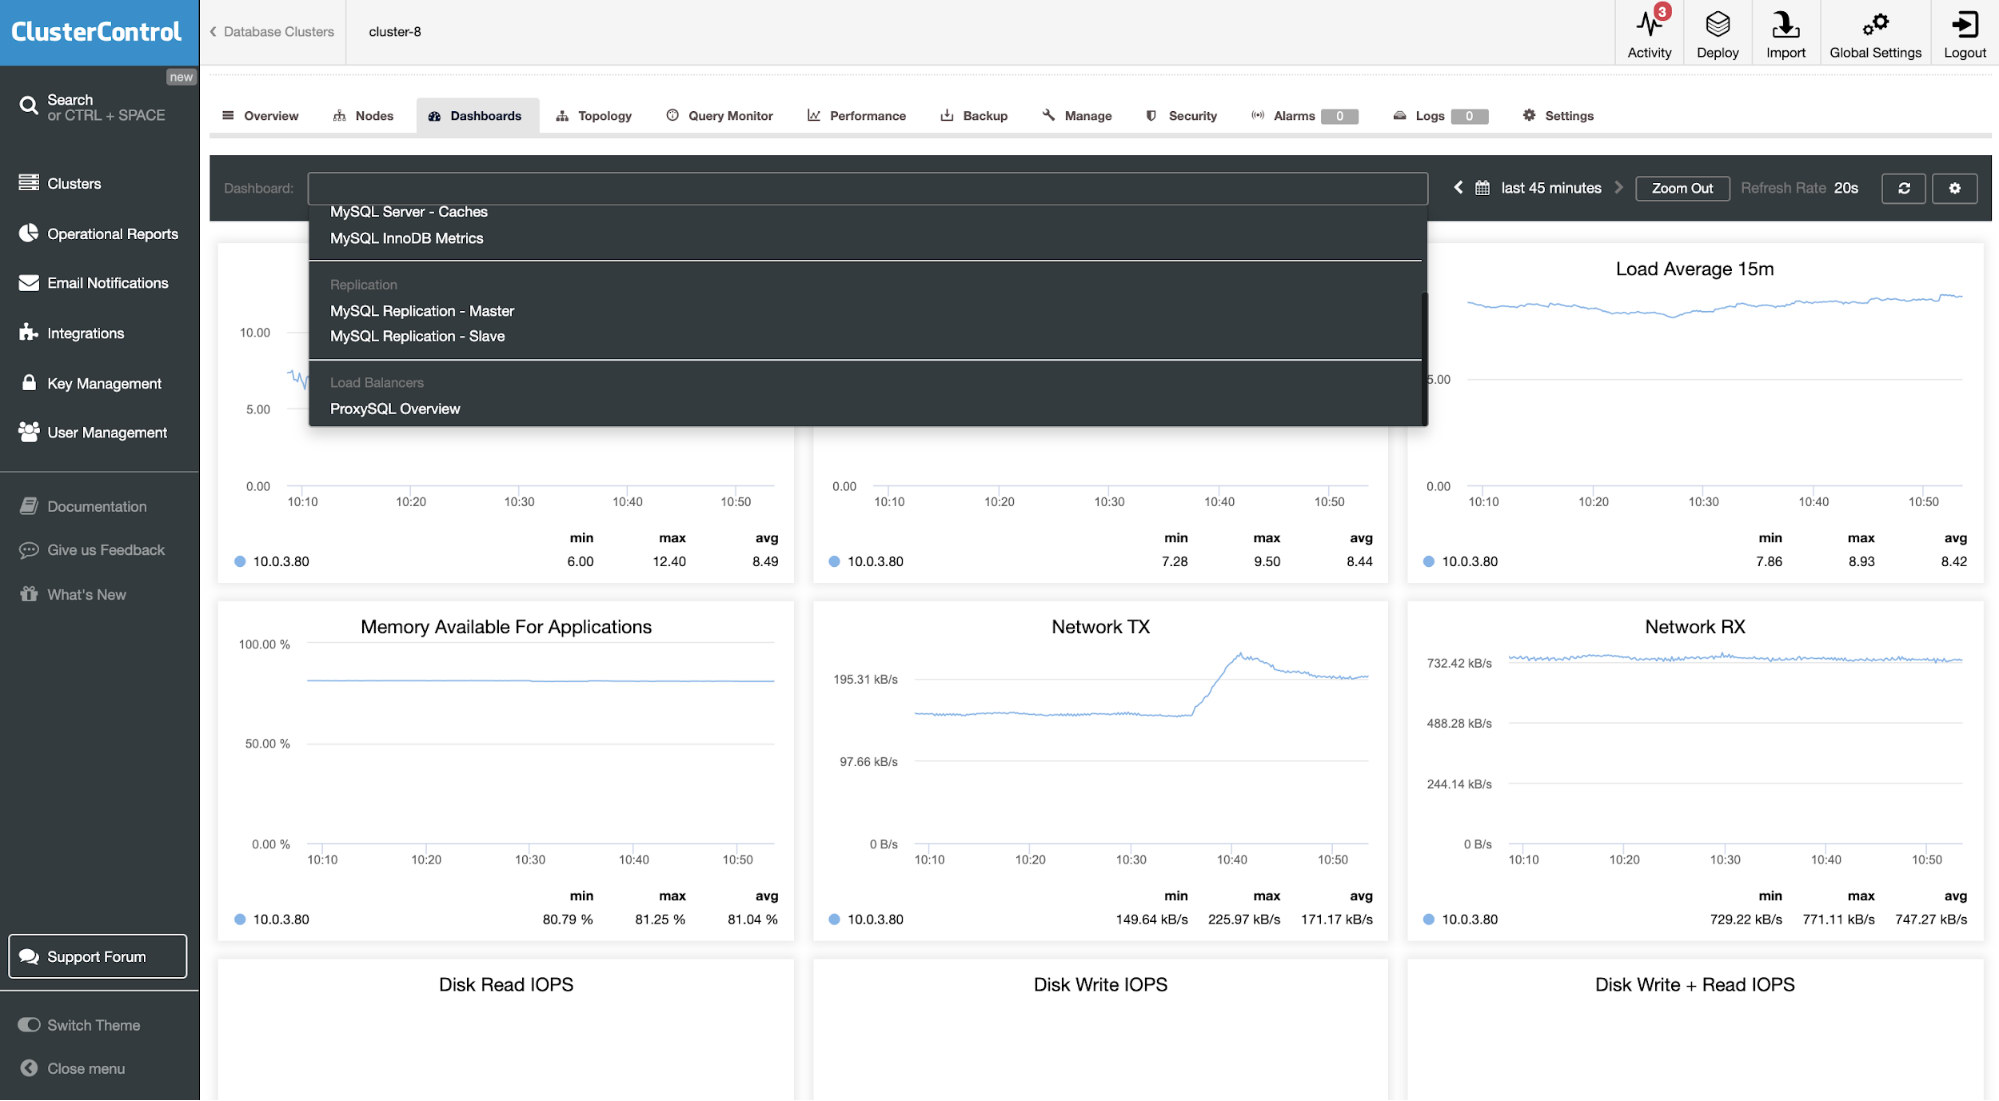
The new ClusterControl 1.7.2 comes with updated high-resolution monitoring for MySQL 8.0. It’s using Prometheus as the data store with PromQL query language. The list of dashboards includes MySQL Server General, MySQL Server Caches, MySQL InnoDB Metrics, MySQL Replication Master, MySQL Replication Slave, System Overview, and Cluster Overview Dashboards.
ClusterControl installs Prometheus agents, configures metrics and maintains access to Prometheus exporters configuration via its GUI, so you can better manage parameter configuration like collector flags for the exporters (Prometheus). We described in details what can be monitored recently in the article How to Monitor MySQL with Prometheus & ClusterControl.
Alerting
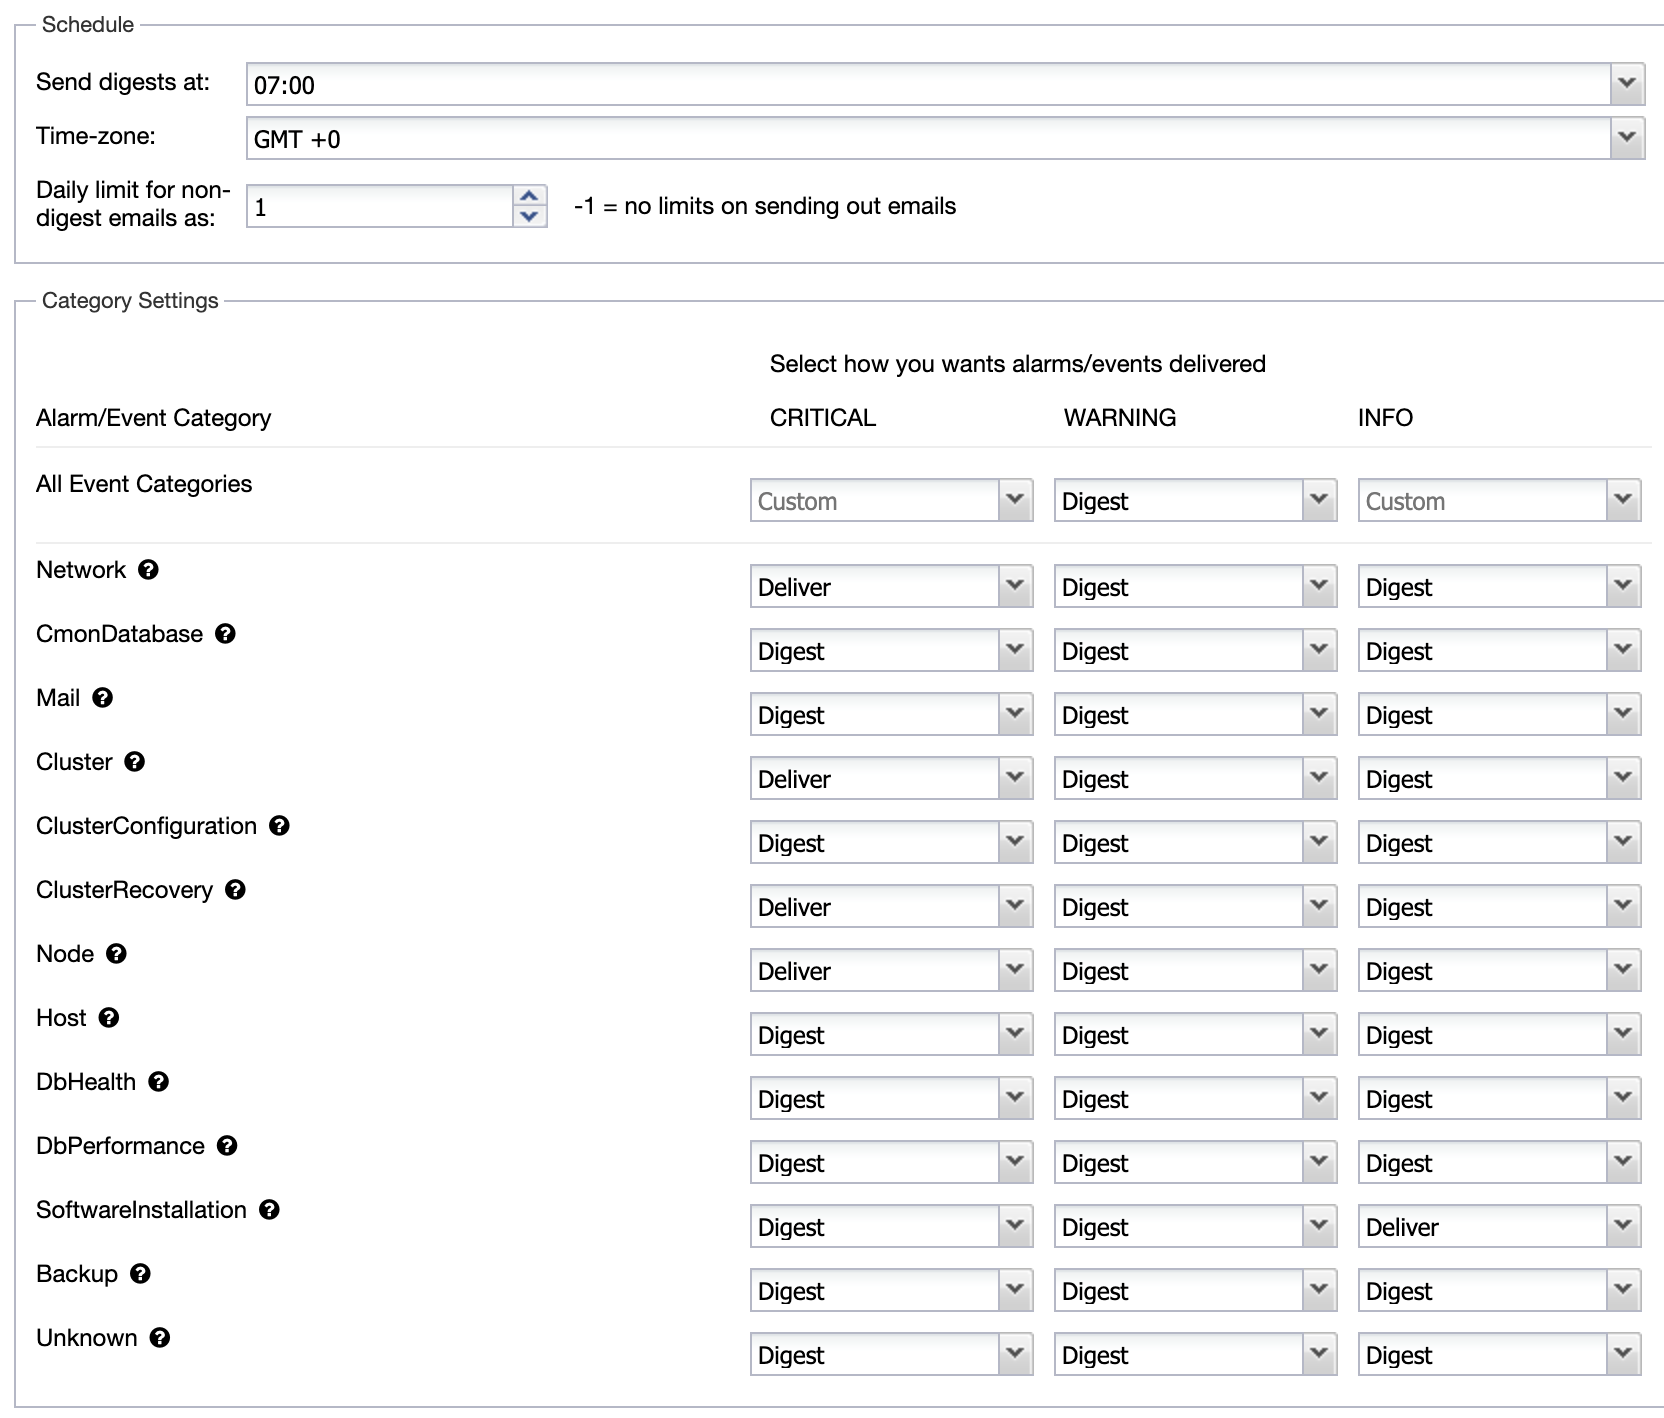
As a database operator, we need to be informed whenever something critical occurs on our database. The three main methods in ClusterControl to get an alert includes:
- email notifications
- integrations
- advisors
You can set the email notifications on a user level. Go to Settings > Email Notifications. Where you can choose between criticality and type of alert to be sent.
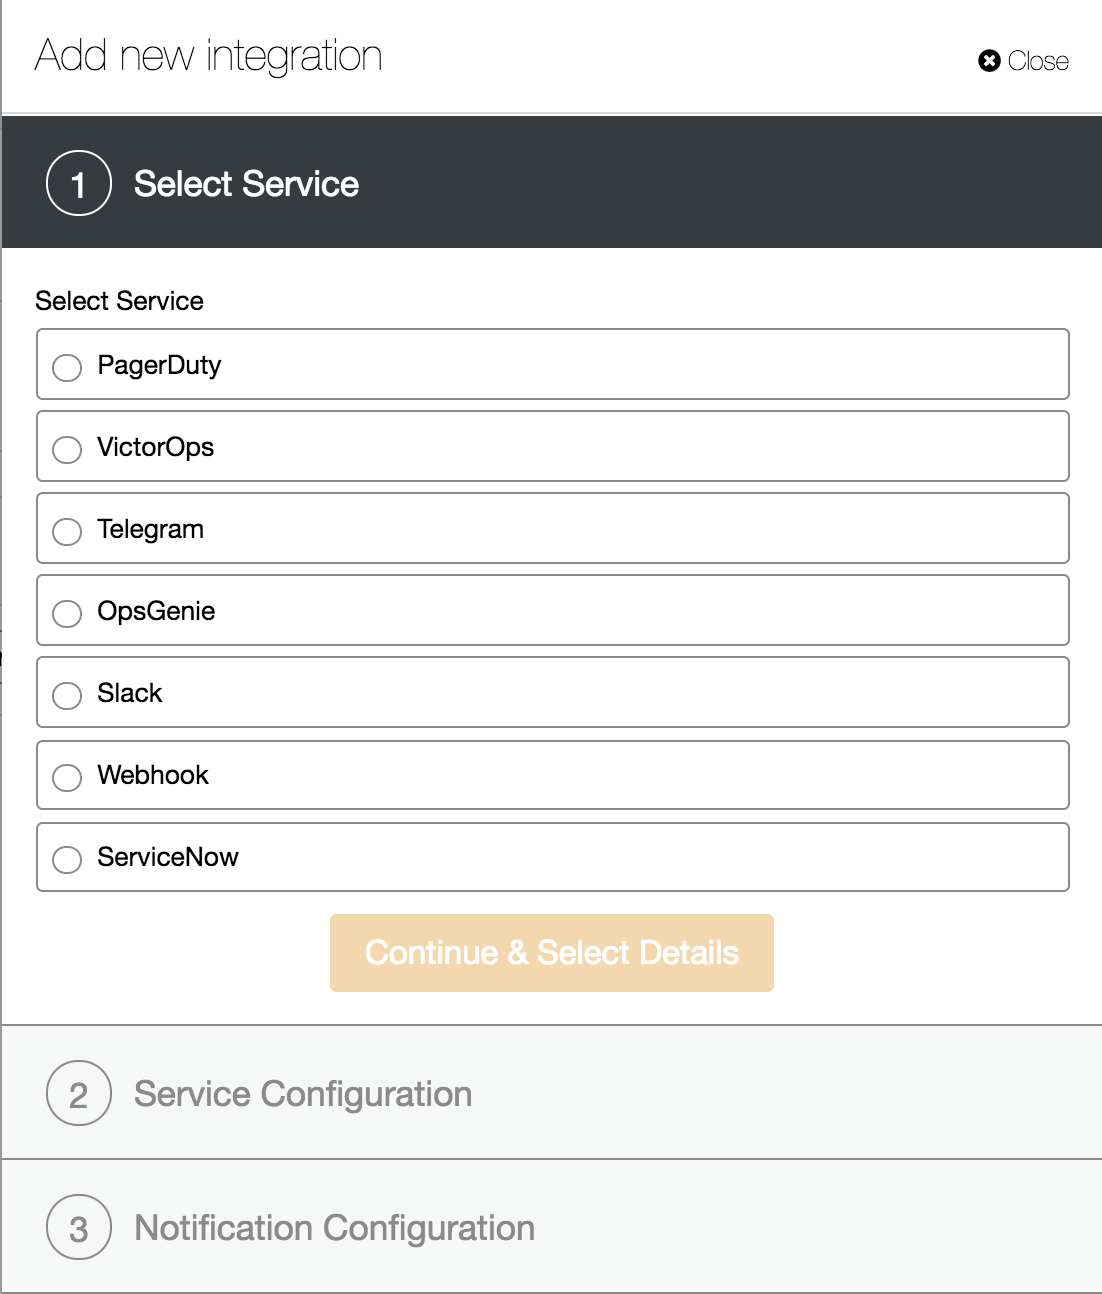
The next method is to use Integration services. This is to pass the specific category of events to the other service like ServiceNow tickets, Slack, PagerDuty etc. so you can create an advanced notification methods and integrations within your organization.
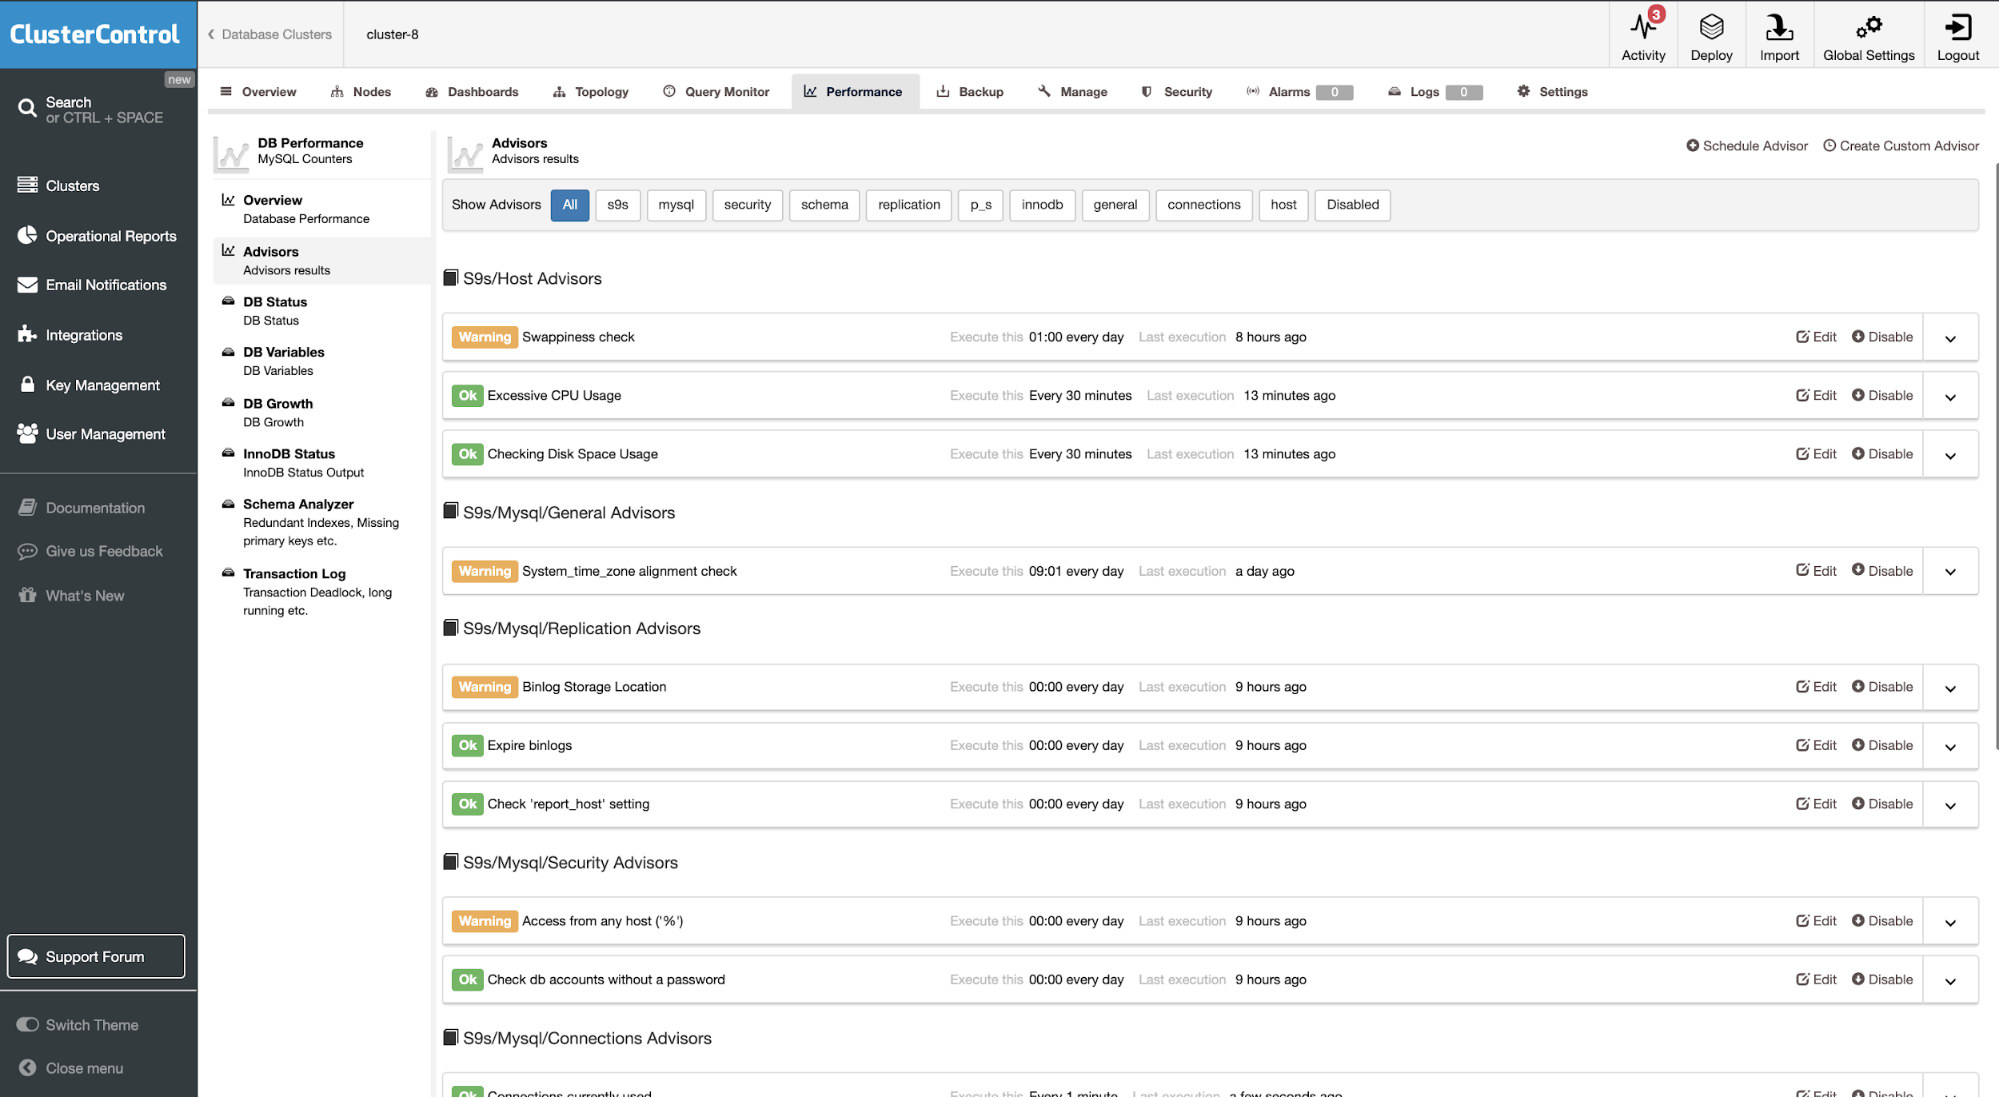
The last one is to involve sophisticated metrics analysis in Advisor section, where you can build intelligent checks and triggers.
Backup and Recovery
Now that you have your MySQL up and running, and have your monitoring in place, it is time for the next step: ensure you have a backup of your data.

ClusterControl provides an interface for MySQL backup management with support for scheduling and creative reports. It gives you two options for backup methods.
- Logical: mysqldump
- Binary: xtrabackup/mariabackup
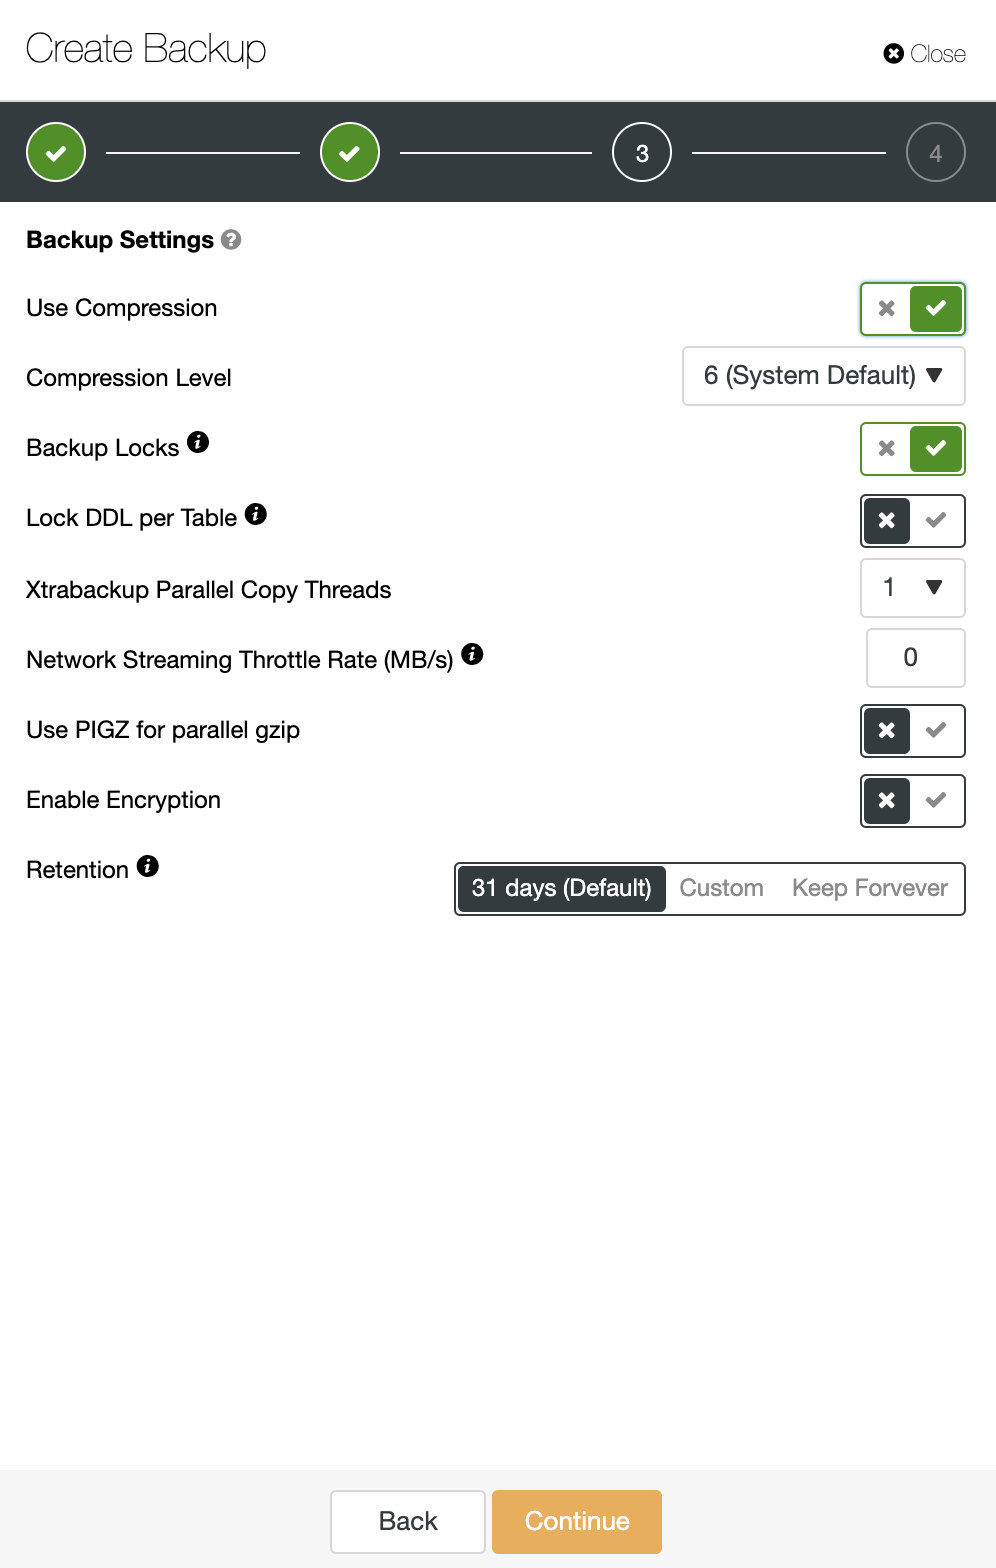
A good backup strategy is a critical part of any database management system. ClusterControl offers many options for backups and recovery/restore.
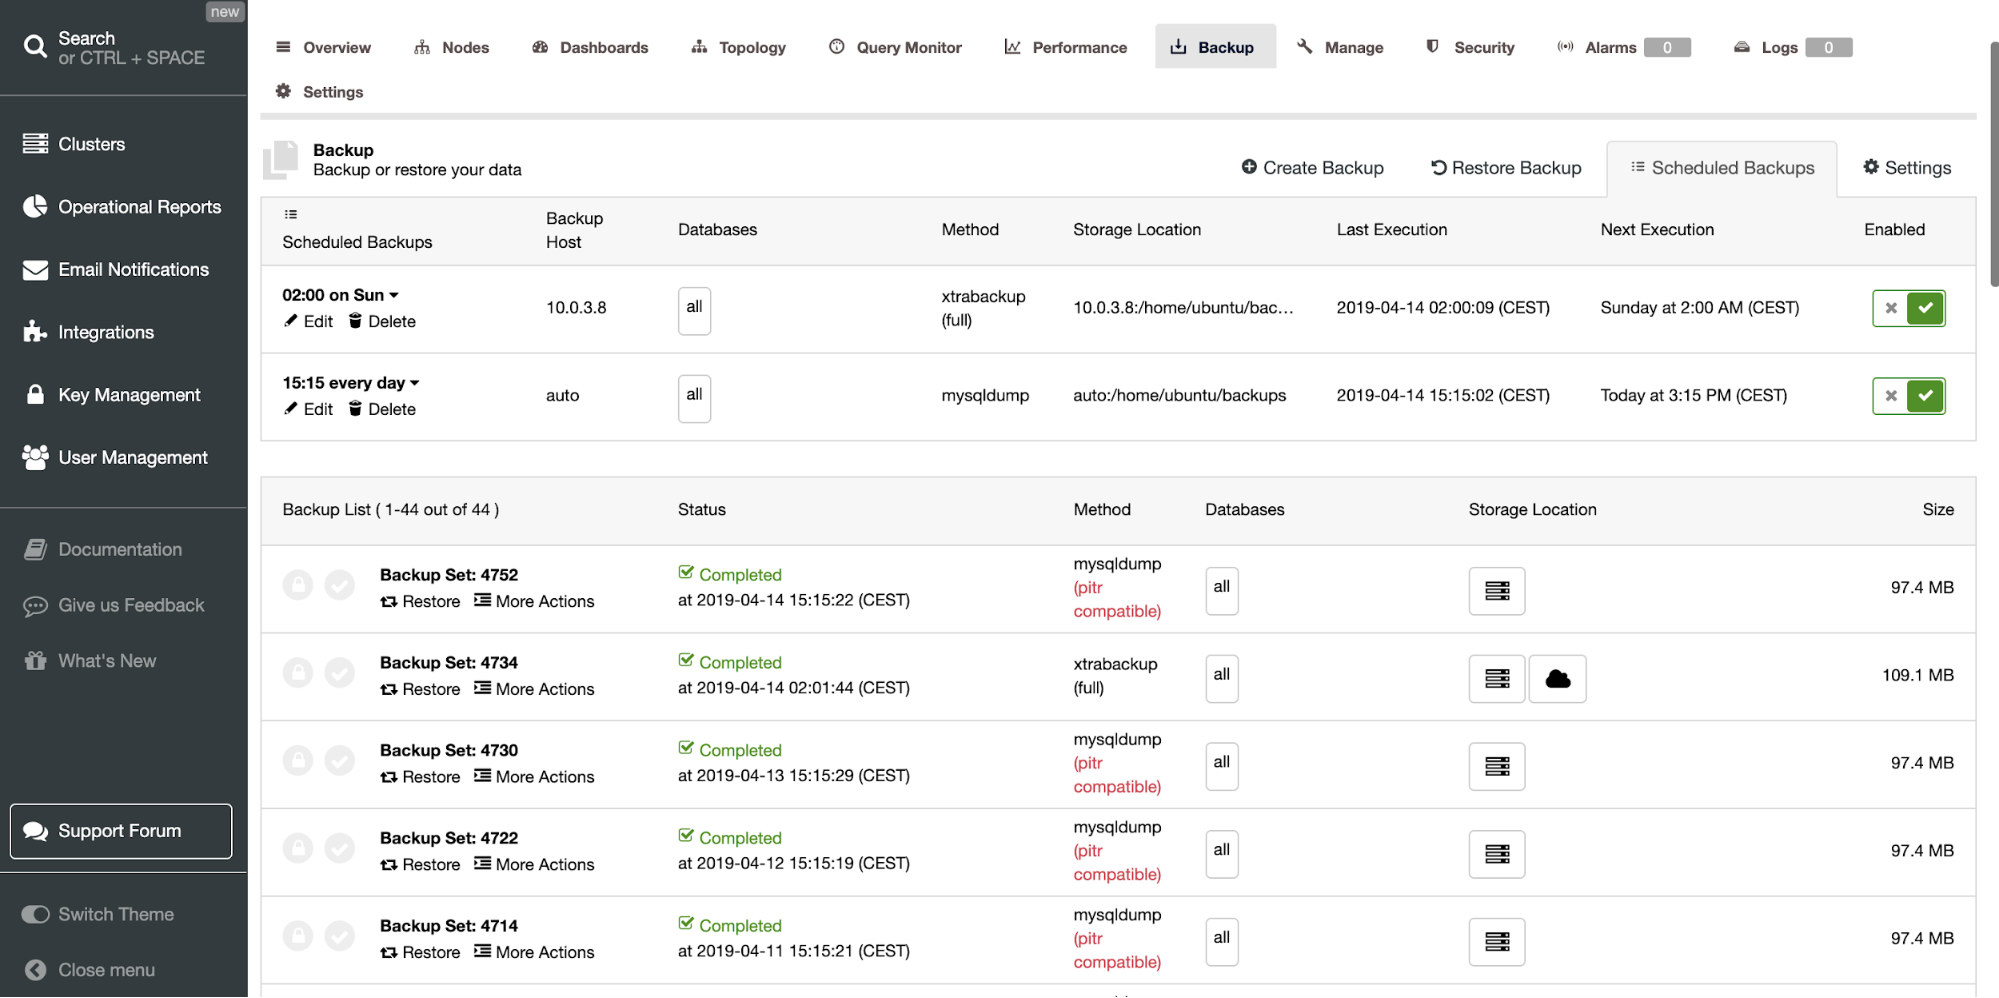
ClusterControl backup retention is configurable; you can choose to retain your backup for any time period or to never delete backups. AES256 encryption is employed to secure your backups against rogue elements. For rapid recovery, backups can be restored directly into a new cluster – ClusterControl handles the full restore process from launch of a new database setup to recovery of data, removing error-prone manual steps from the process.
Backups can be automatically verified upon completion, and then uploaded to cloud storage services (AWS, Azure and Google). Different retention policies can be defined for local backups in the datacenter as well as backups that are uploaded in the cloud.
Node and cluster autorecovery
ClusterControl provides advanced support for failure detection and handling. It also allows you to deploy different proxies to integrate them with your HA stack so there is no need to adjust application connection string or dns entry to redirect application to the new master node.
When master server is down, ClusterControl will create a job to perform automatic failover. ClusterControl does all the background work to elect a new master, deploy fail-over slave servers, and configure load balancers.
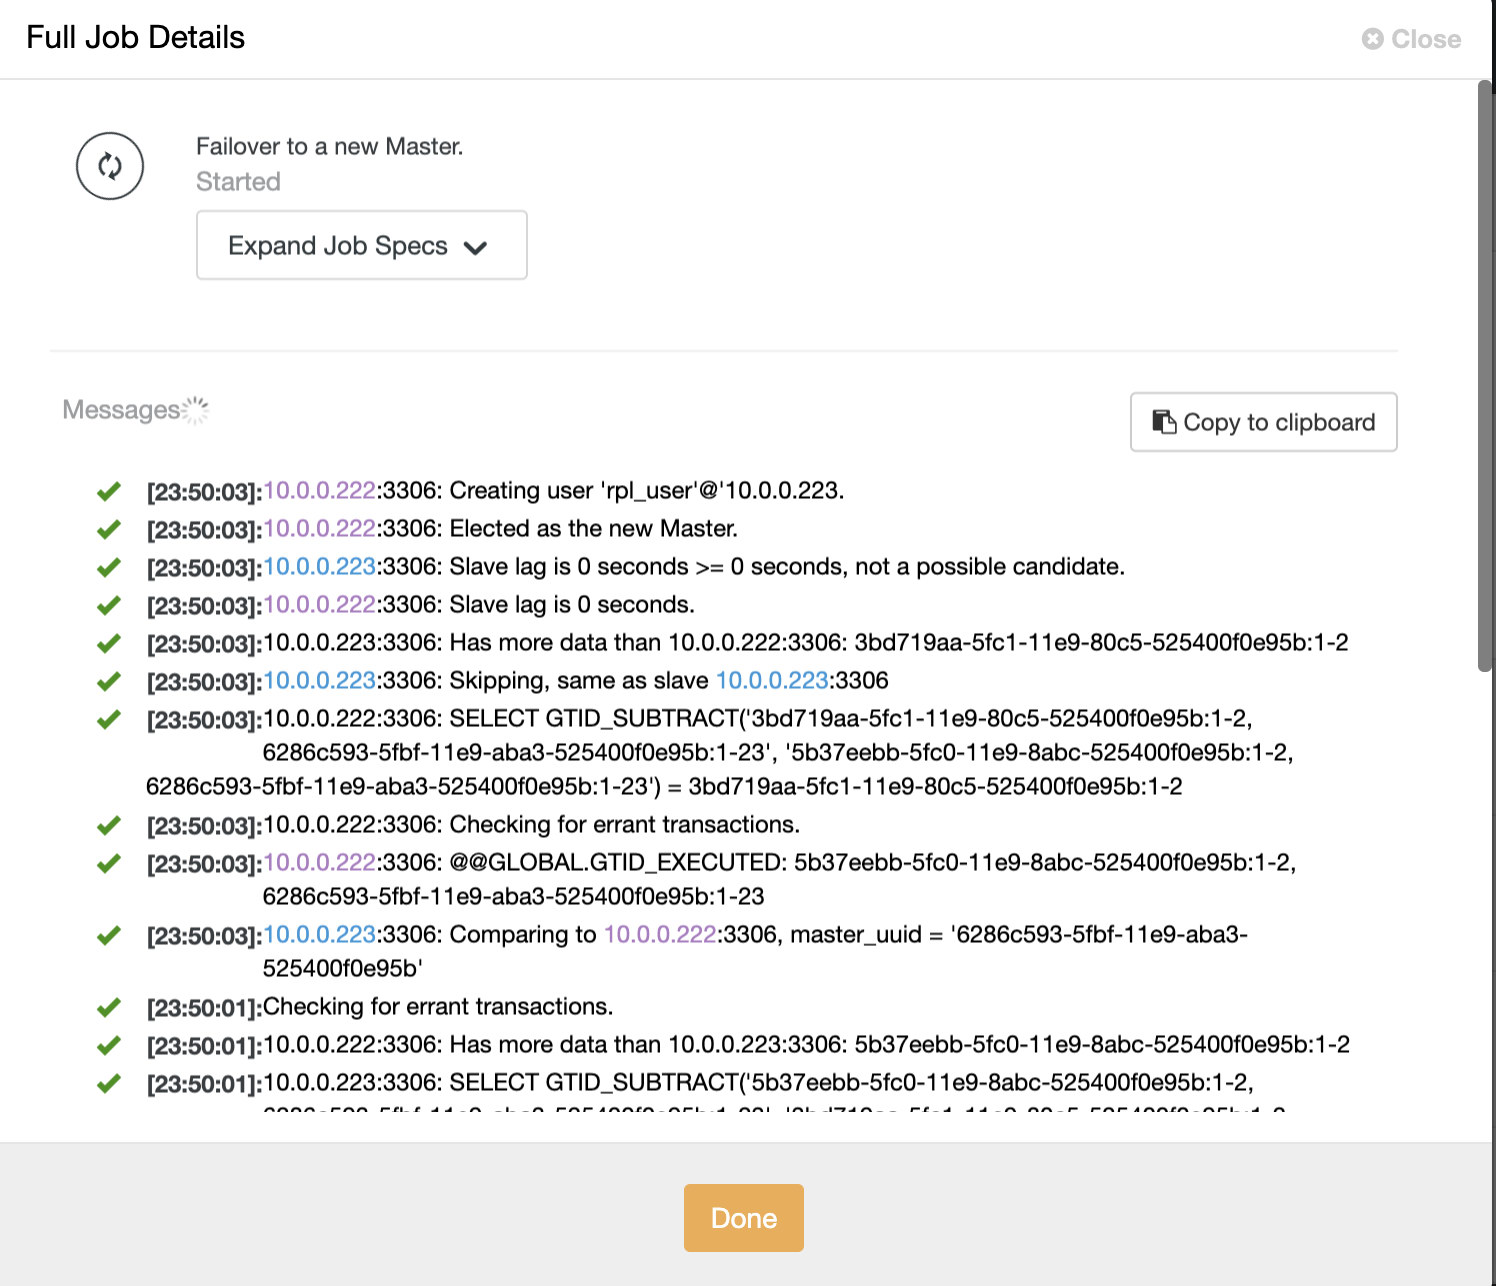
ClusterControl automatic failover was designed with the following principles:
- Make sure the master is really dead before you failover
- Failover only once
- Do not failover to an inconsistent slave
- Only write to the master
- Do not automatically recover the failed master
With the built-in algorithms, failover can often be performed pretty quickly so you can assure the highest SLA’s for your database environment.
The process is highly configurable. It comes with multiple parameters which you can use to adopt recovery to the specifics of your environment. Among the different options you can find replication_stop_on_error, replication_auto_rebuild_slave, replication_failover_blacklist, replication_failover_whitelist, replication_skip_apply_missing_txs, replication_onfail_failover_script and many others.