blog
Monitoring & Ops Management of MongoDB 4.0 With ClusterControl

While MongoDB has spent nearly a decade achieving maturity (initial release Feb 2009), the technology is a bit of a mystery to those experienced in conventional relational database (RDBMS) environments. Integrating NoSQL into an existing environment without in-depth knowledge can be challenging. It is not uncommon to see MongoDB running along MySQL or another RDBMS database.
The experience of RDBMS may help to understand some of the processes, but you need to know how to translate your expertise into the NoSQL world. Managing production environments involves steps like deployment, monitoring uptime and performance, maintaining system security, managing HA, backups and so on. Both RDBMS and NoSQL are viable options, but there are specific critical differences between the two that users must keep in mind while implementing or managing MongoDB. Technology changes rapidly and we need to adapt fast.
When MongoDB is suddenly your responsibility, management tools guarantees that the MongoDB databases you manage are stable and secure. Using predefined processes and automation can not only save you time but also protect from the common mistakes. A management platform that systematically addresses all the different aspects of the database lifecycle will be more robust than patching together a number of point solutions.
At the heart of ClusterControl is its automation functionality that lets you automate the database tasks you have to perform regularly, like deploying new databases, adding and scaling new nodes, managing backups, high availability and failover, topology changes, upgrades, and more. ClusterControl provides programmed security, keeping the integrity of your database infrastructure. Moreover, with ClusterControl, MongoDB users are no longer subject to vendor lock-in; something that was questioned by many recently. You can deploy and import a variety of MongoDB versions and vendors from a single console for free. Users of MongoDB often have to use a mixture of tools and homegrown scripts to achieve their requirements, and it’s good to know you can find them combined in the one product.
In this article, we will show you how to deploy and manage MongoDB 4.0 in an automated way. You will find here how to do:
- ClusterControl installation
- MongoDB deployment process
- Deploy a new cluster
- Import existing cluster
- Scaling MongoDB
- Read scaling (replicaSet)
- Write scaling (sharding)
- Securing MongoDB
- Monitoring and Trending
- Backup and Recovery
ClusterControl installation
To start with ClusterControl you need a dedicated virtual machine or host. The VM and supported systems requirements are described here. The base VM can start from 2 GB, 2 cores and Disk space 20 GB storage space, either on-prem or in the cloud.
The installation is well described in the documentation but basically, it comes to download of the installation script which will walk you through the wizard. The wizard script set up the internal database, installs necessary packages, repositories, and do other necessary tweaks. For the internet lock environments, you can use the offline installation process.
ClusterControl requires SSH access to the database hosts, and monitoring can be agent-based or agentless. Management is agentless.
Setup passwordless SSH to all target nodes (ClusterControl and all database hosts) involves running following commands on the ClusterControl server:
$ ssh-keygen -t rsa # press enter on all prompts
$ ssh-copy-id -i ~/.ssh/id_rsa [ClusterControl IP address]
$ ssh-copy-id -i ~/.ssh/id_rsa [Database nodes IP address] # repeat this to all target database nodes
MongoDB Deployment and Scaling
Deploy a New MongoDB 4.0 Cluster
Once we enter the ClusterControl interface, the first thing to do is deploy a new cluster or import an existing one. The new version 1.7.1 introduces support for version 4.0. You can now deploy/import and manage MongoDB v4.0 with support for SSL connections.
Select the option “Deploy Database Cluster” and follow the instructions that appear.
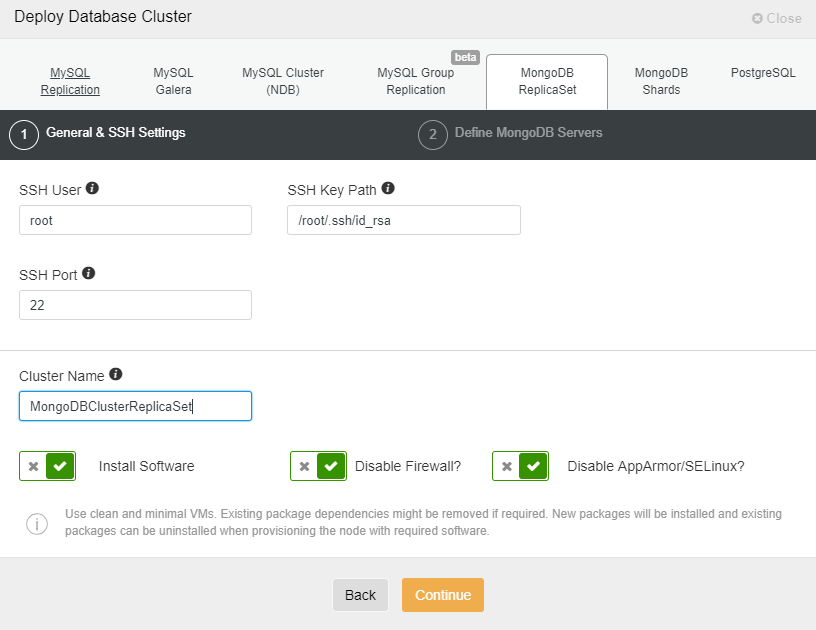
When choosing MongoDB, we must specify User, Key or Password and port to connect by SSH to our servers. We also need the name for our new cluster and if we want ClusterControl to install the corresponding software and configurations for us.
After setting up the SSH access information, we must enter the data to access our database. We can also specify which repository to use. Repository configuration is an important aspect for database servers and clusters. You can have three types of the repository when deploying database server/cluster using ClusterControl:
- Use Vendor Repository
Provision software by setting up and using the database vendor’s preferred software repository. ClusterControl will install the latest version of what is provided by the database vendor repository. - Do Not Setup Vendor Repositories
Provision software by using the pre-existing software repository already set up on the nodes. The user has to set up the software repository manually on each database node and ClusterControl will use this repository for deployment. This is good if the database nodes are running without internet connections. - Use Mirrored Repositories (Create new repository)
Create and mirror the current database vendor’s repository and then deploy using the local mirrored repository. This allows you to “freeze” the current versions of the software packages.
In the next step, we need to add our servers to the cluster that we are going to create. When adding our servers, we can enter IP or hostname. For the latter, we must have a DNS server or have added our MongoDB servers to the local resolution file (/etc/hosts) of our ClusterControl, so it can resolve the corresponding name that you want to add. For our example, we will deploy a ReplicaSet with three servers, one primary and two secondaries. It is possible to deploy only 2 MongoDB nodes (without arbiter). The caveat of this approach is no automatic failover, since a 2-node setup is vulnerable to split brain. If the primary node goes down then manual failover is required to make the other server as primary. Automatic failover works fine with 3 nodes and more. It is recommended that a replica set has an odd number of voting members. Fault tolerance for a replica set is the number of members that can become unavailable and still leave enough members in the set to elect a primary. The fault tolerance for three members is one, for five it is two etc.
On the same page you can choose from different MongoDB versions:
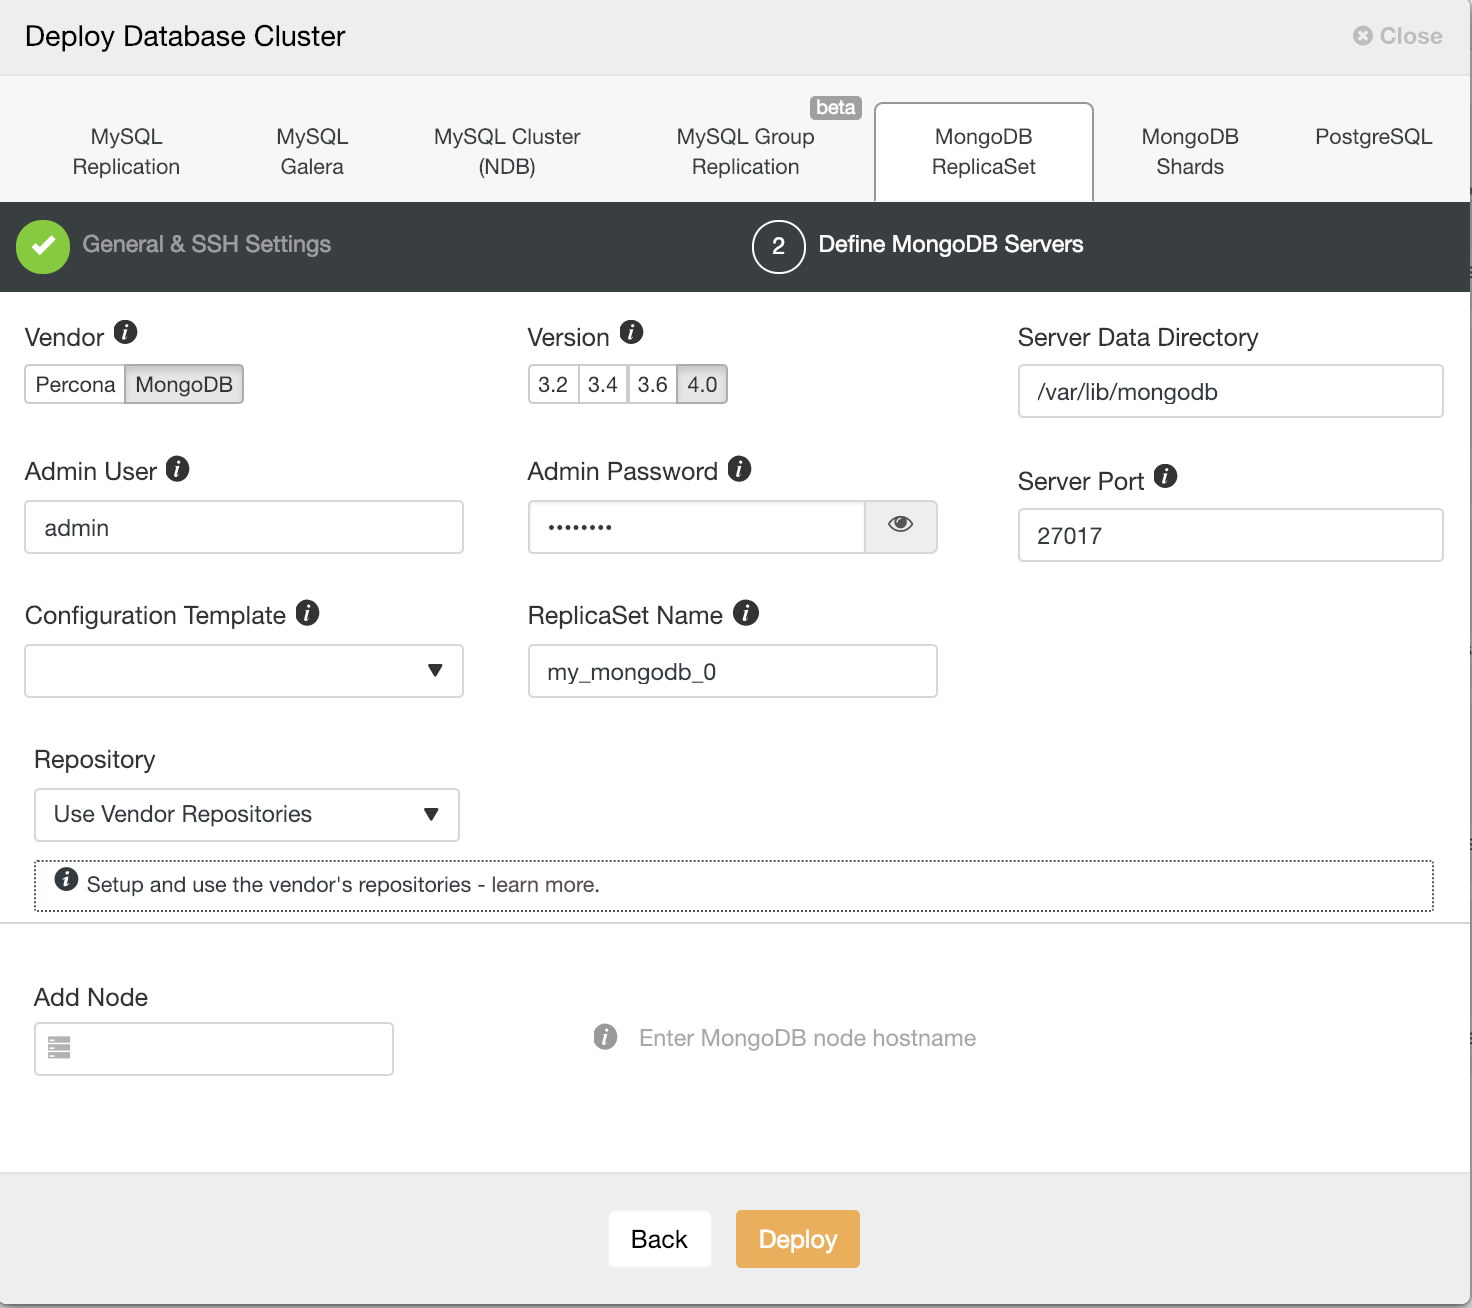
When all is set hit the deploy button. You can monitor the status of the creation of our new cluster from the ClusterControl activity monitor. Once the task is finished, we can see our cluster in the main ClusterControl screen and on the topology view.
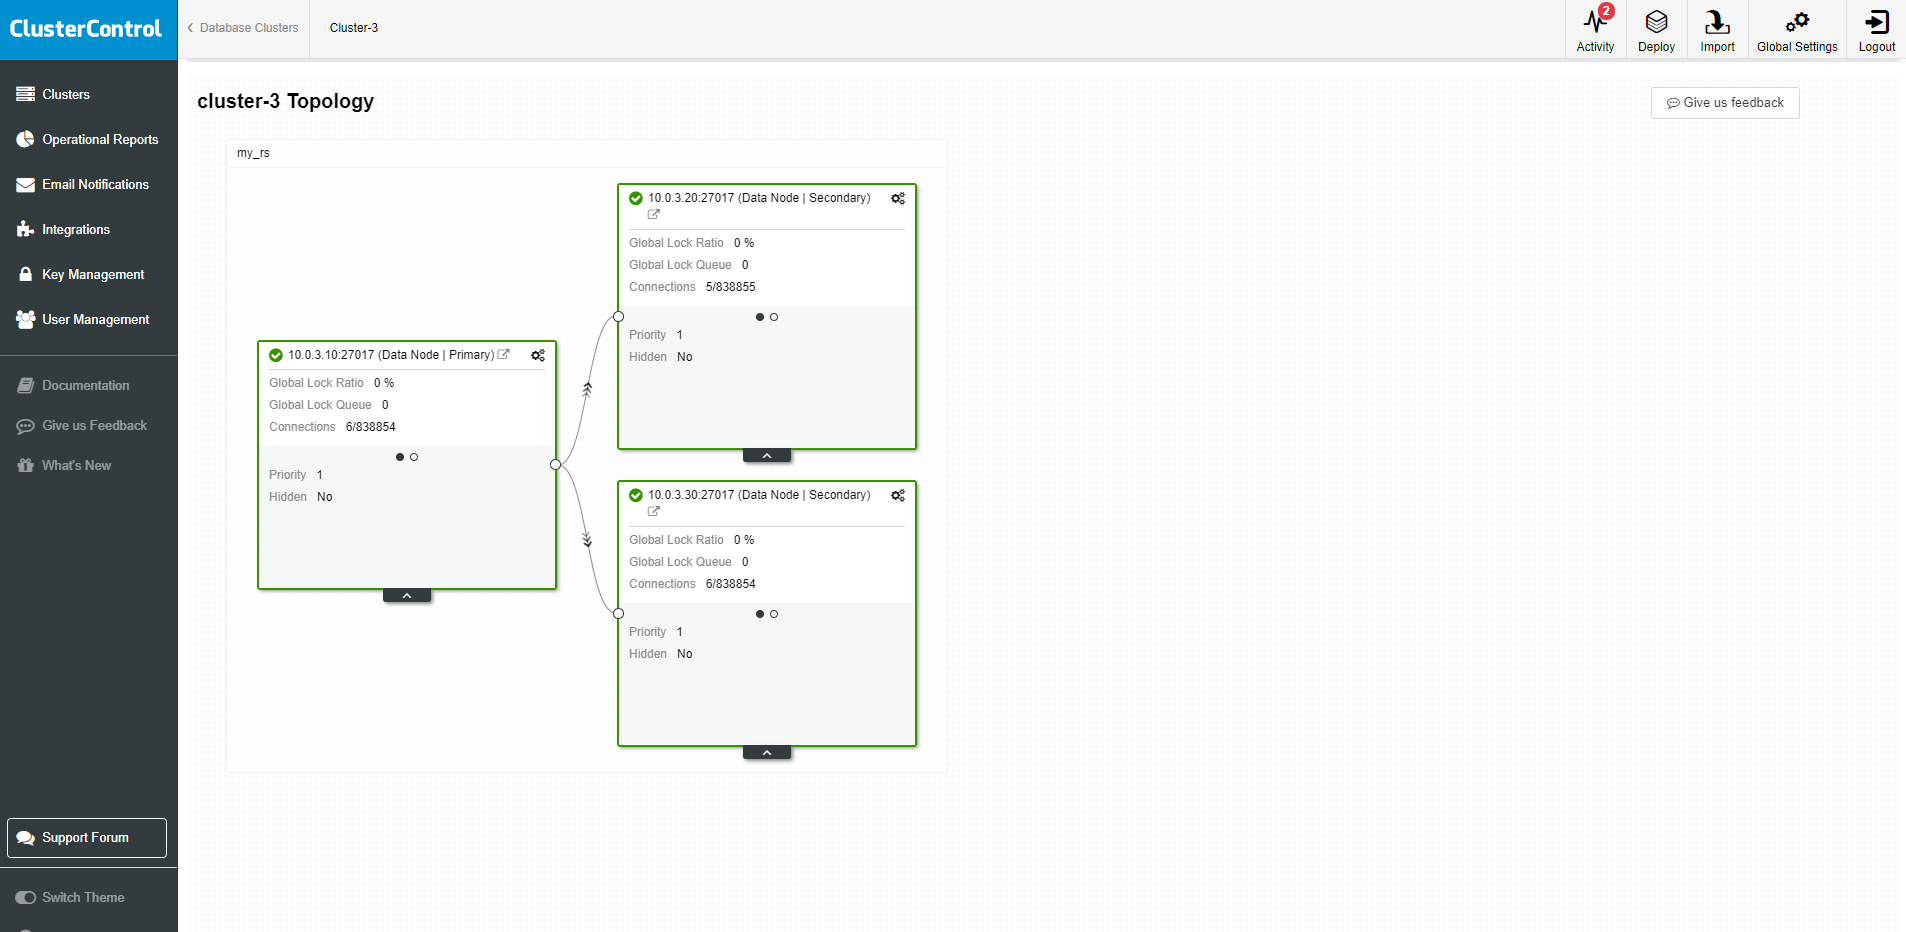
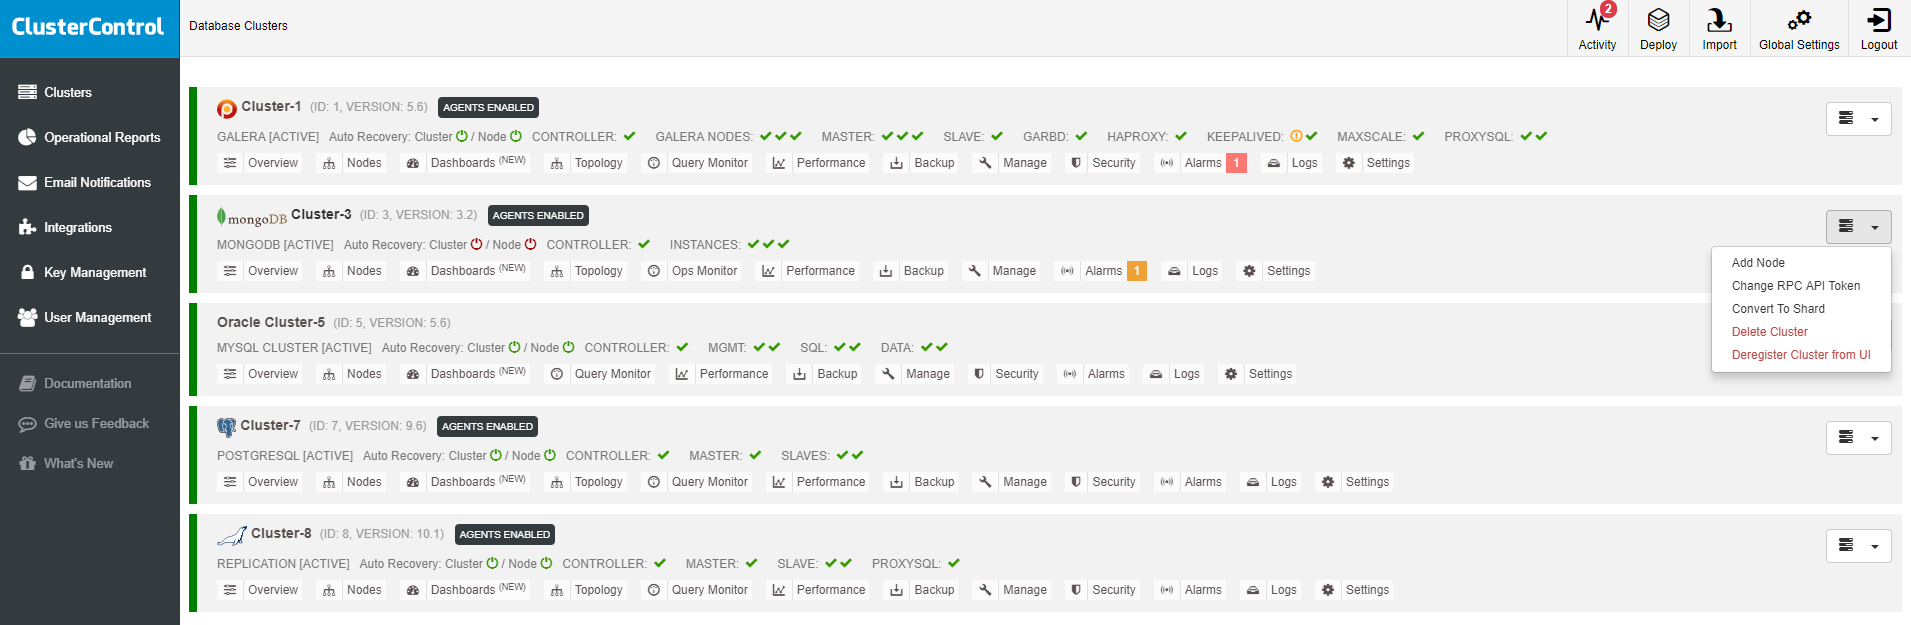
As we can see in the image, once we have our cluster created, we can perform several tasks on it, like converting replica set to shard or adding nodes to the cluster.
Import a New Cluster
We also have the option to manage an existing cluster by importing it into ClusterControl. Such environment can be created by ClusterControl or other methods like docker installation.
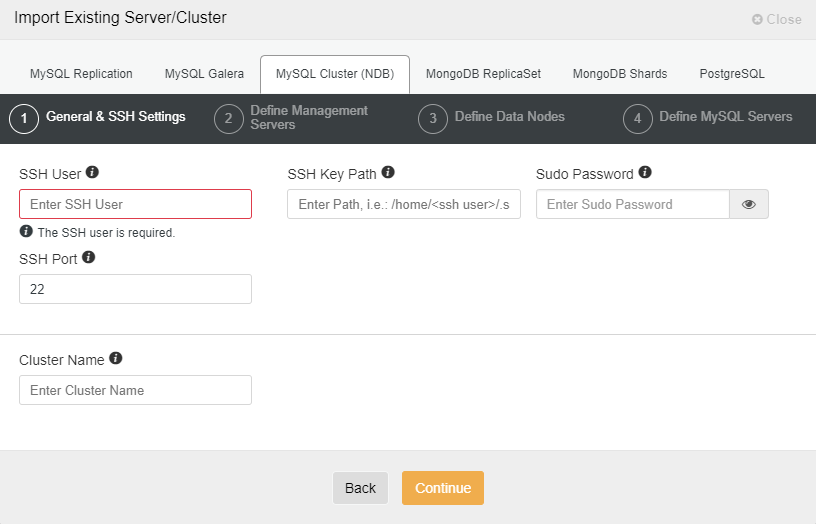
First, we must enter the SSH access credentials to our servers. Then we enter the access credentials to our database, the server data directory, and the version. We add the nodes by IP or hostname, in the same way as when we deploy, and press on Import. Once the task is finished, we are ready to manage our cluster from ClusterControl.
Scaling MongoDB
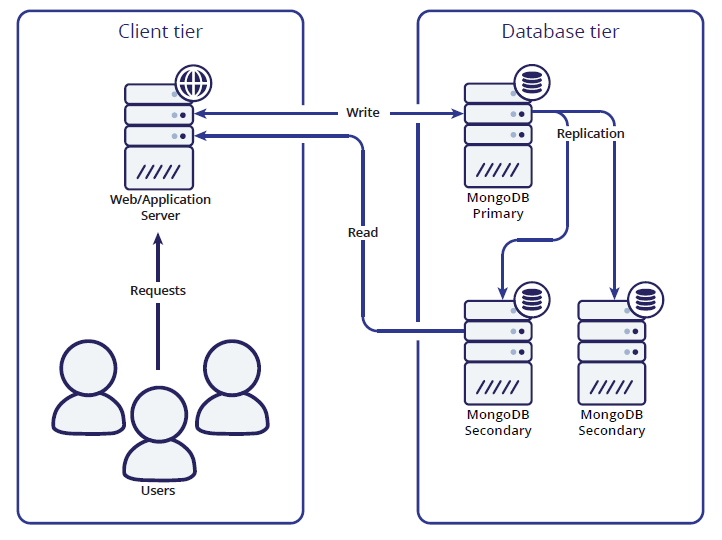
One of the cornerstones of MongoDB is that it is built with high availability and scaling in mind. Scaling can be done either vertically by adding more resources to the server or horizontally with more nodes. Horizontal scaling is what MongoDB is good at, and it is not much more than spreading the workload to multiple machines. In effect, we’re making use of multiple low-cost commodity hardware boxes, rather than upgrading to a more expensive high-performance server. MongoDB offers both read- and write scaling, and we will uncover the differences between these two strategies for you. Whether to choose read- or write scaling all depends on the workload of your application: if your application tends to read more often than it writes data you will probably want to make use of the read scaling capabilities of MongoDB.
With ClusterControl adding more servers to the cluster is an easy step. You can do that from the GUI or CLI. For more advanced users you can use ClusterControl Developer Studio and write an resource base condition to expand your cluster horizontally.
Sharding
The MongoDB sharding solution is similar to existing sharding frameworks for other major database solutions. It makes use of a typical lookup solution, where the sharding is defined in a shard-key and the ranges are stored inside a configuration database. MongoDB works with three components to find the correct shard for your data. A typical sharded MongoDB environment looks like this:
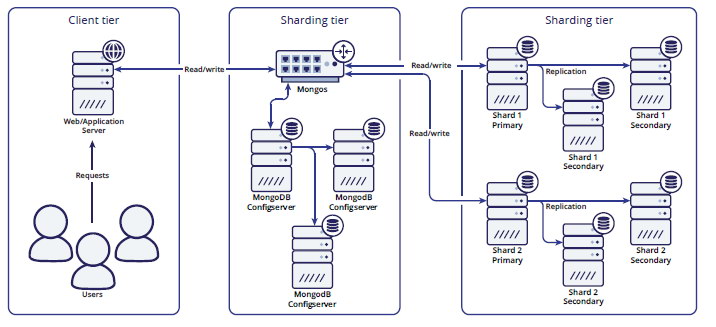
The first component used is the shard router called mongos. All read and write operations must be sent to the shard router, making all shards act as a single database for the client application. The shard router will route the queries to the appropriate shards by consulting the Configserver.
Shard management is really easy in MongoDB. You can add and remove shards online and the MongoDB shard router will automatically adjust to what you tell it to. If you wish to know more in-depth about how best to manage shards, please read our blog post about managing MongoDB shards.
Securing MongoDB
MongoDB comes with very little security out of the box: for instance, authentication is disabled by default. In other words: by default, anyone has root rights over any database. One of the changes MongoDB applied to mitigate risks was to change its default binding to 127.0.0.1. This prevents it from being bound to the external IP address, but naturally, this will be reverted by most people who install it. ClusterControl removes human error and provides access to a suite of security features, to automatically protect your databases from hacks and other threats. We previously published a short video with security tips.
The new version of ClusterControl offers SSL support for MongoDB connections. Enabling SSL adds another level of security for communication between the applications (including ClusterControl) and database. MongoDB clients open encrypted connections to the database servers and verify the identity of those servers before transferring any sensitive information.
To enable SSL connection you need to use the latest s9s client. You can install it with
wget http://repo.severalnines.com/s9s-tools/install-s9s-tools.sh
chmod 755 install-s9s-tools.sh
./install-s9s-tools.sh
Or follow other possible installation methods described here.
Once you have s9s tools installed (min version 1.7-93.1) you can use –enable-ssl flag to enable SSL connection.
Example below:
[root@cmon ~]# s9s cluster --cluster-id=3 --enable-ssl --log
This is an RPC V2 job (a job created through RPC V2).
The job owner is 'admin'.
Accessing '/.runtime/jobs/jobExecutor' to execute...
Access ok.
Stopping the cluster
node1:27017: Node is already stopped by the user.
node2:27017: Node is already stopped by the user.
node3:27017: Node is already stopped by the user.
Checking/generating (expire 1000 days) server and CA certificate.
node1:27017: setting up SSL as required way of connection.
Using certificate 'mongodb/cluster_3/server'
node1:27017: installed /etc/ssl/mongodb/cluster_3/server.crt, /etc/ssl/mongodb/cluster_3/server.key and /etc/ssl/mongodb/cluster_3/server_ca.crt
node1:27017: Deploying client certificate 'mongodb/cluster_3/client'
Writing file 'node1:/etc/mongod.conf'.
node1:27017: /etc/mongod.conf [mongod] set: ssl_cert, ssl_key and ssl_ca values.
node2:27017: setting up SSL as required way of connection.
Using certificate 'mongodb/cluster_3/server'
node2:27017: installed /etc/ssl/mongodb/cluster_3/server.crt, /etc/ssl/mongodb/cluster_3/server.key and /etc/ssl/mongodb/cluster_3/server_ca.crt
node2:27017: Deploying client certificate 'mongodb/cluster_3/client'
Writing file 'node2:/etc/mongod.conf'.
node2:27017: /etc/mongod.conf [mongod] set: ssl_cert, ssl_key and ssl_ca values.
node3:27017: setting up SSL as required way of connection.
Using certificate 'mongodb/cluster_3/server'
node3:27017: installed /etc/ssl/mongodb/cluster_3/server.crt, /etc/ssl/mongodb/cluster_3/server.key and /etc/ssl/mongodb/cluster_3/server_ca.crt
node3:27017: Deploying client certificate 'mongodb/cluster_3/client'
Writing file 'node3:/etc/mongod.conf'.
node3:27017: /etc/mongod.conf [mongod] set: ssl_cert, ssl_key and ssl_ca values.
Starting the cluster
node3:27017: Doing some preparation for starting the node.
node3:27017: Disable transparent huge page and its defrag according to mongo suggestions.
node3:27017: Checking file permissions and ownership.
node3:27017: Starting mongod MongoDb server with command:
ulimit -u 32000 -n 32000 && runuser -s /bin/bash mongod '-c mongod -f /etc/mongod.conf'
node3:27017: Verifing that 'mongod' process is started.
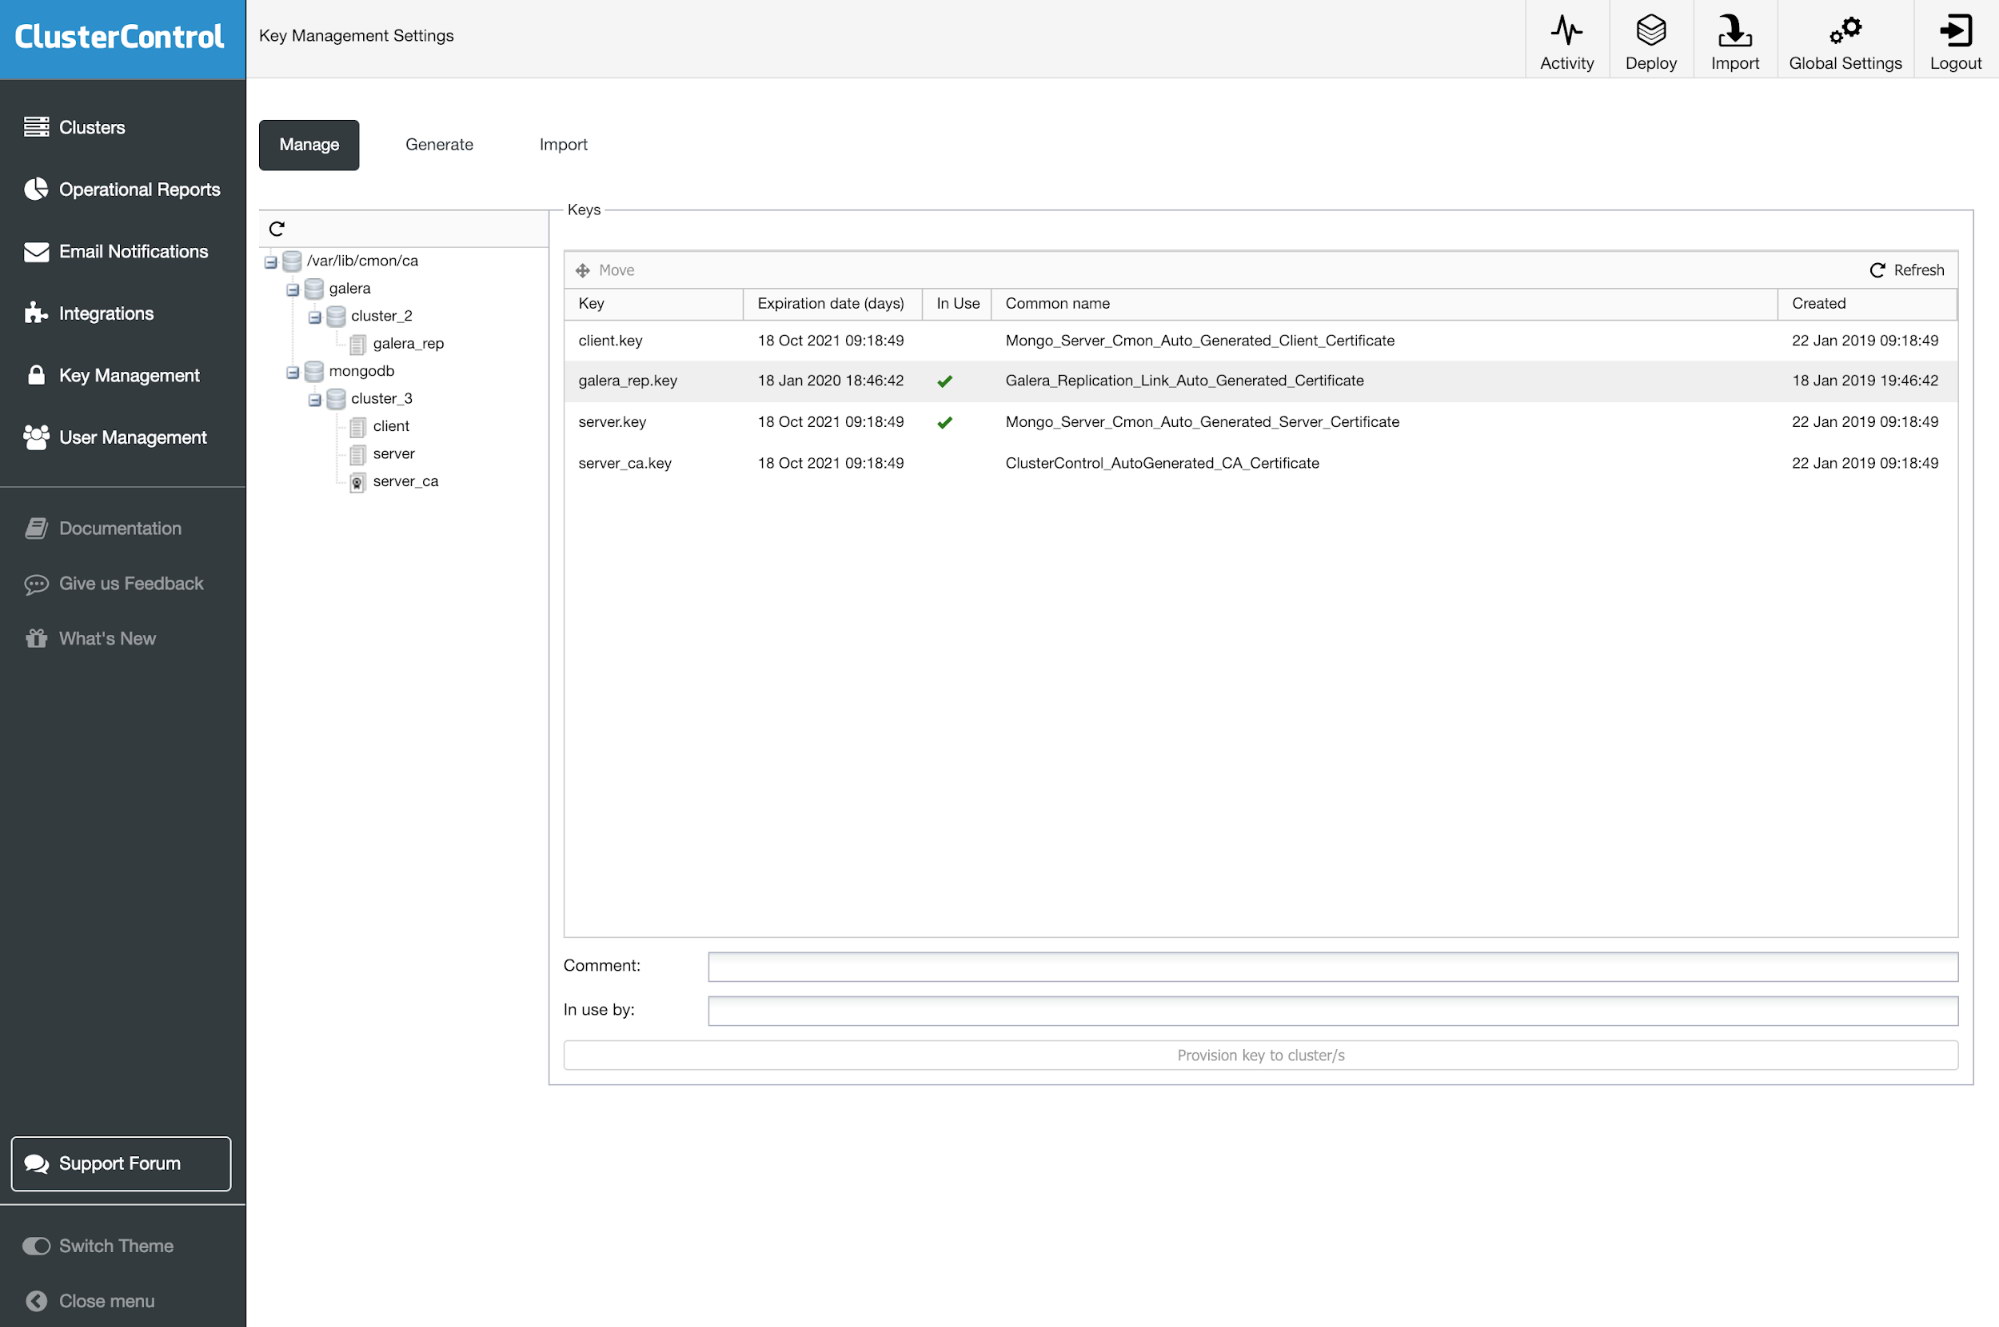
SSL setup done.ClusterControl will execute all necessary steps including certification creation on all cluster nodes. Such certificates can be maintained later on in the Key Management tab.
Monitoring
When working with database systems, you should be able to monitor them. That will enable you to identify trends, plan for upgrades or improvements or react effectively to any problems or errors that may arise.
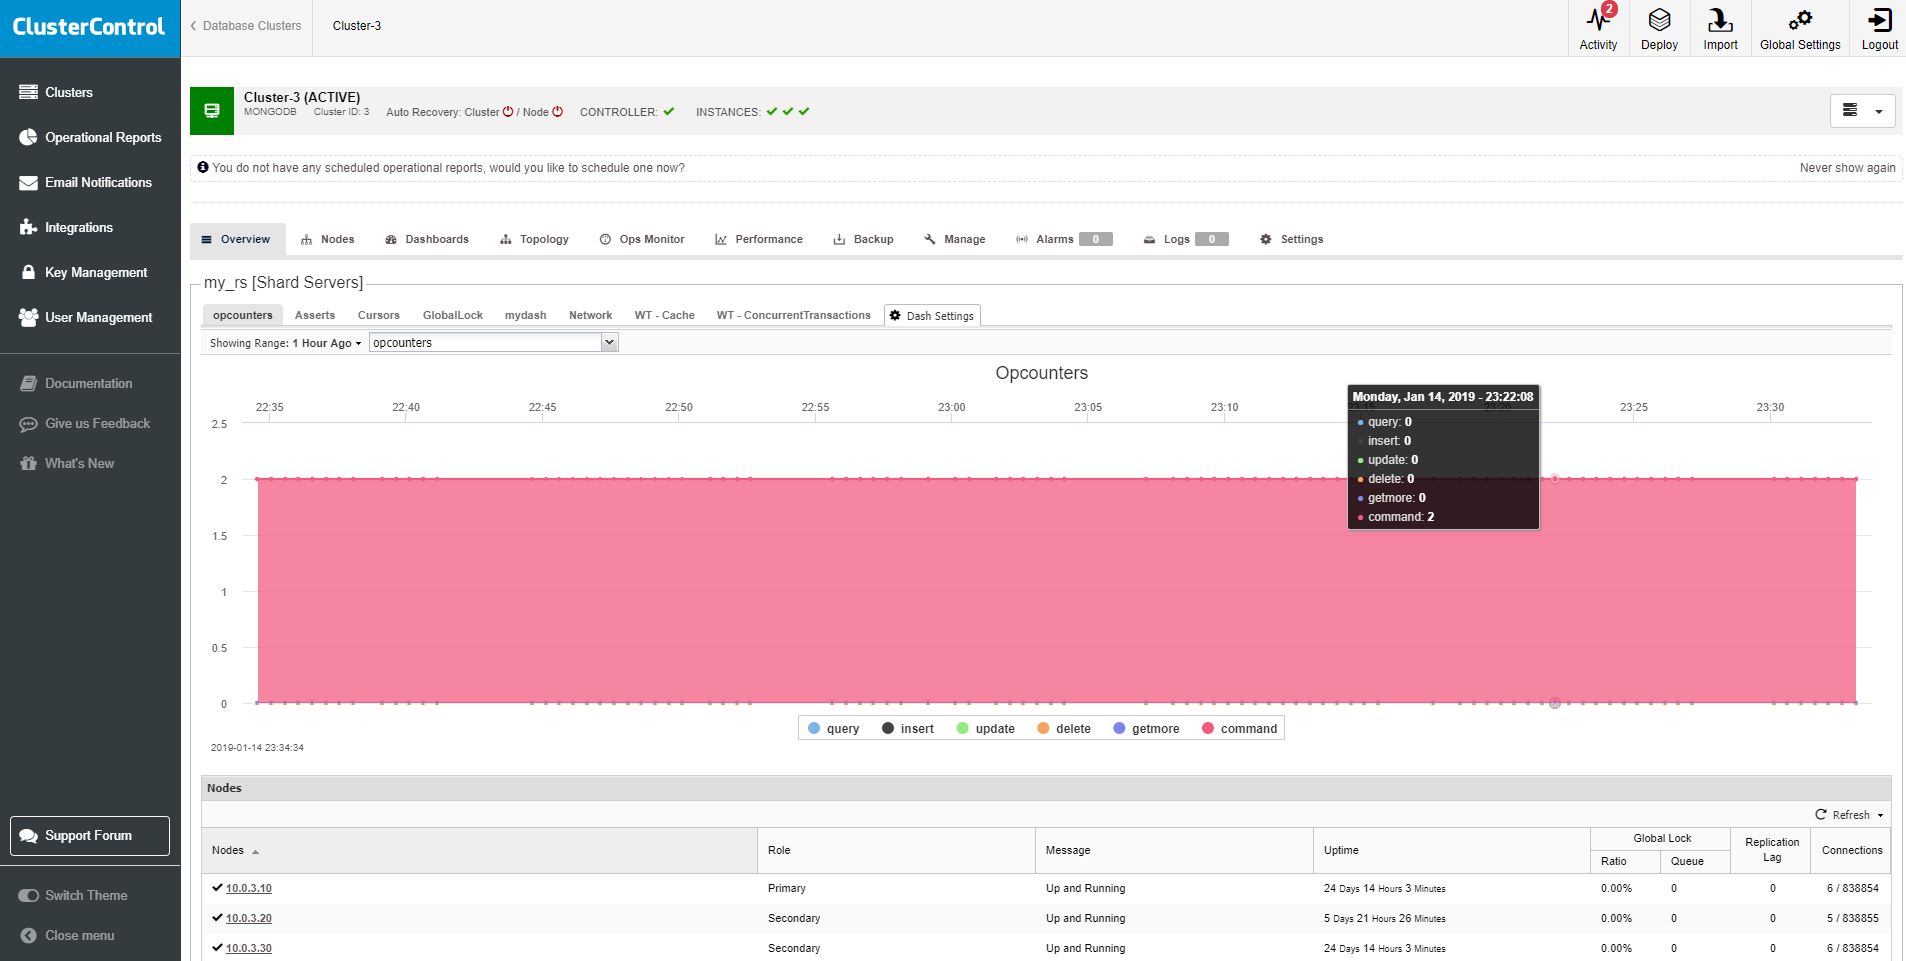
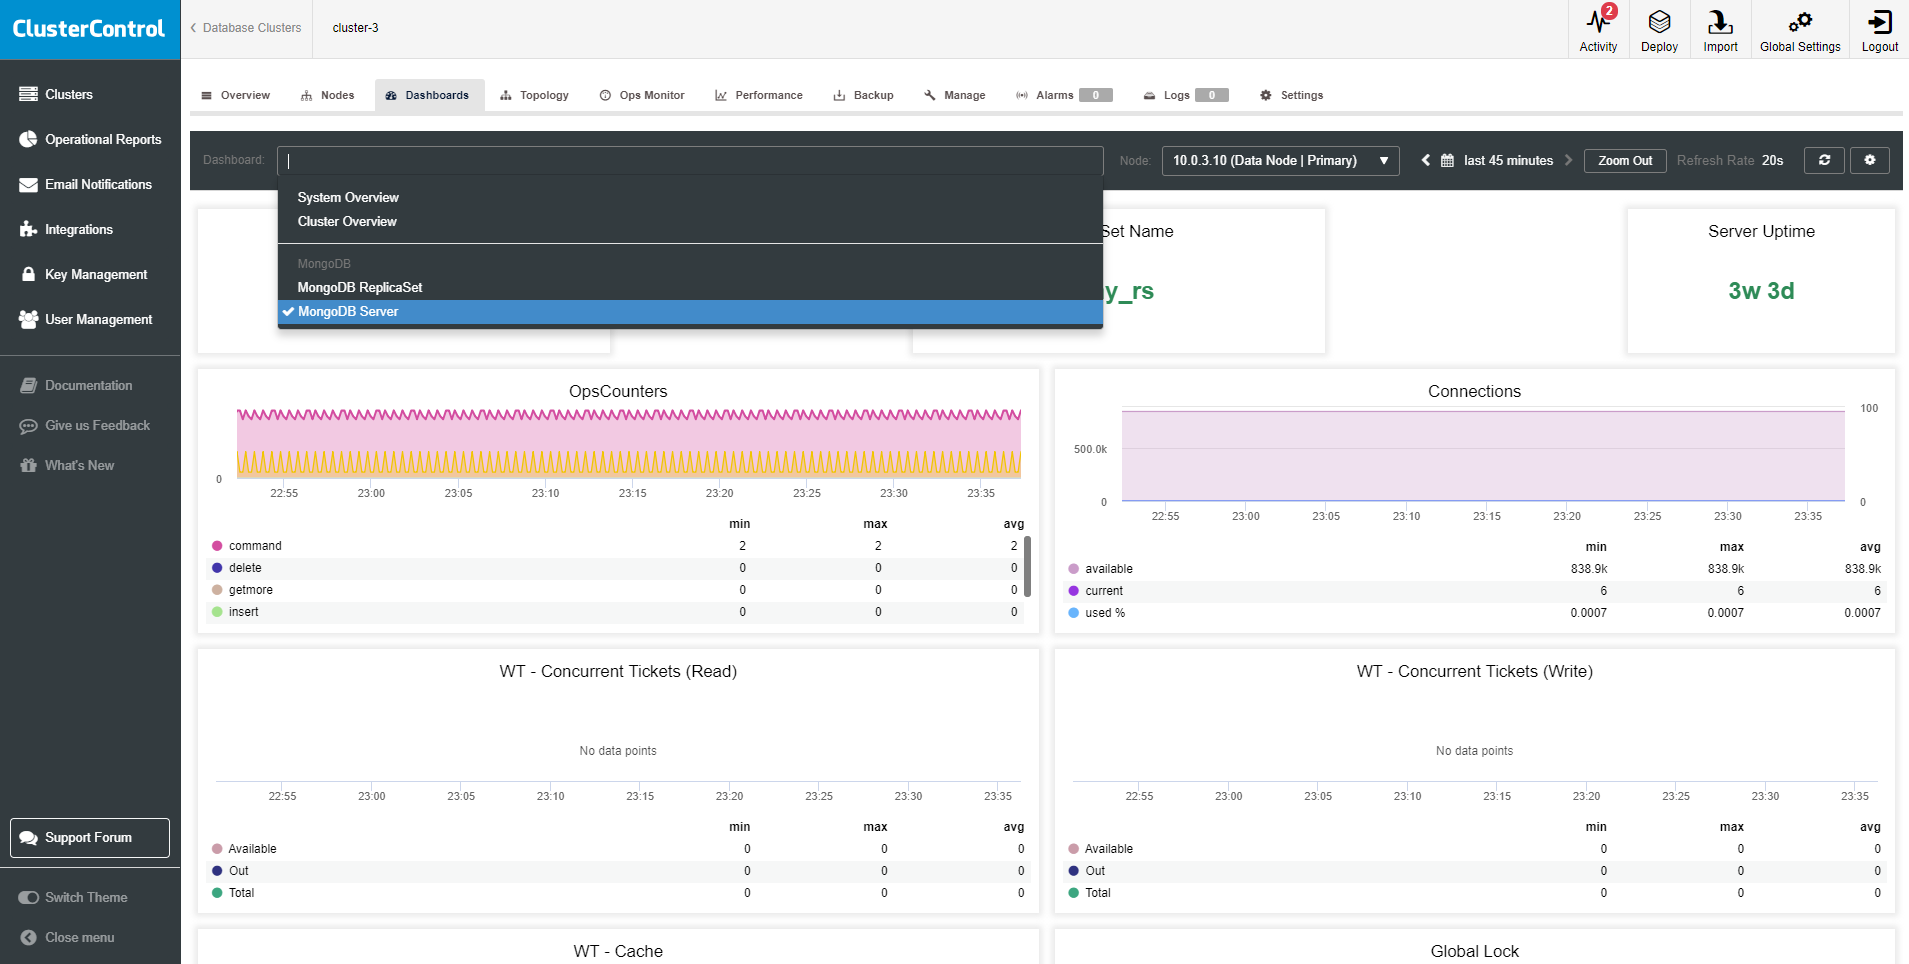
The new ClusterControl 1.7.1 adds high-resolution monitoring for MongoDB based. It’s using Prometheus as the data store with PromQL query language. The list of dashboards includes MongoDB Server, MongoDB ReplicaSet, System Overview, and Cluster Overview Dashboards. ClusterControl installs Prometheus agents, configures metrics and maintains access to Prometheus exporters configuration via its GUI, so you can better manage parameter configuration like collector flags for the exporters (Prometheus). We described in details what can be monitored recently in the article How to Monitor MongoDB with Prometheus & ClusterControl.
Alerting
As a database operator, we need to be informed whenever something critical occurs on our database. The three main methods in ClusterControl to get an alert includes:
- email notifications
- integrations
- advisors
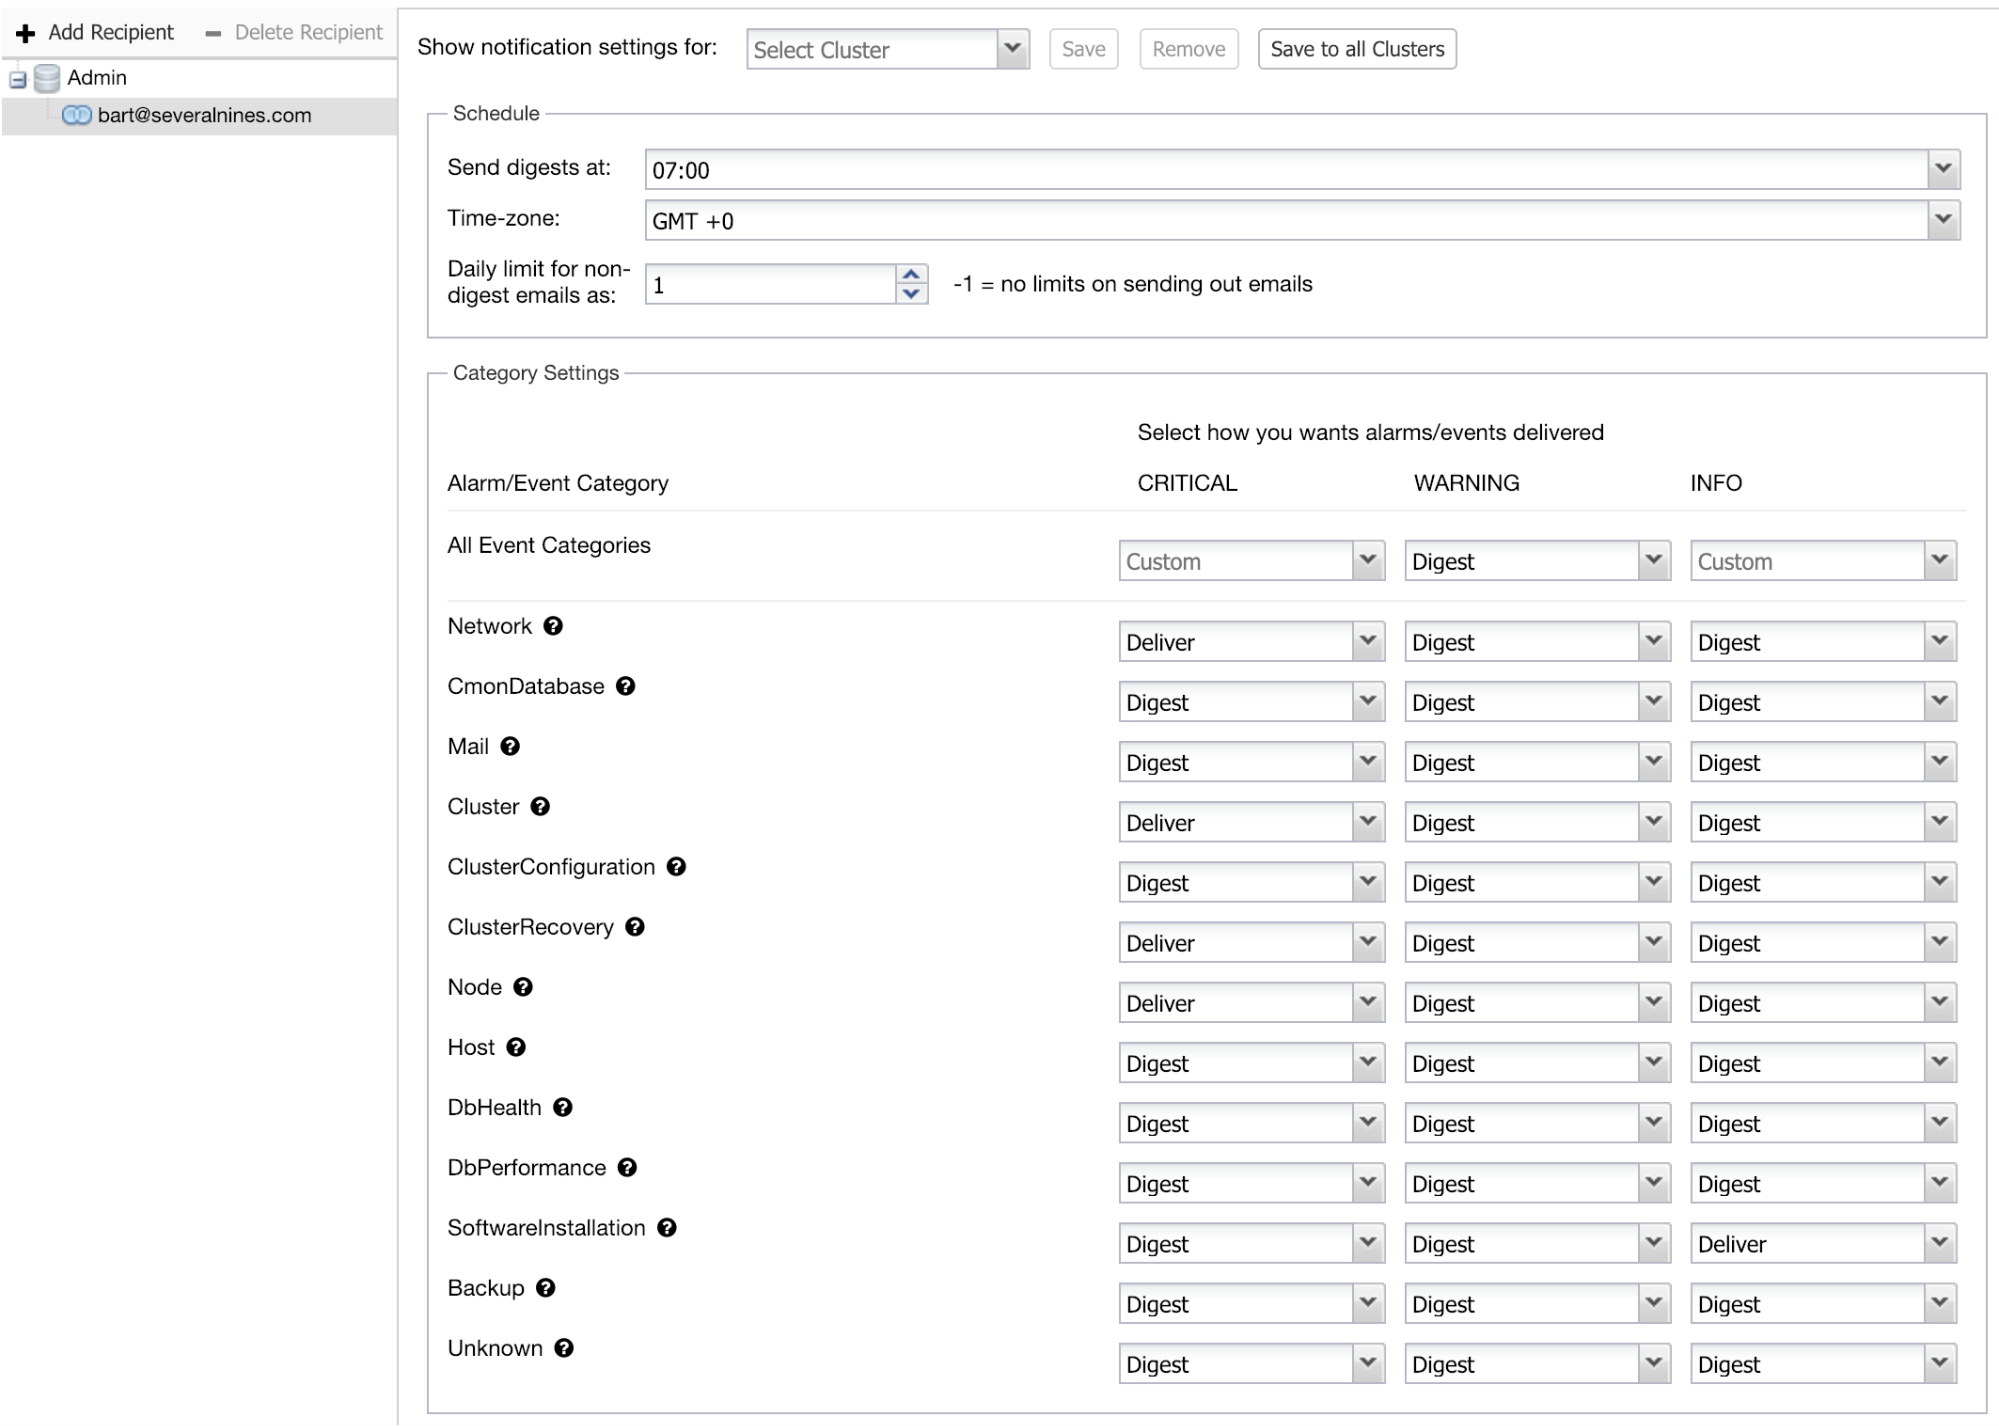
You can set the email notifications on a user level. Go to Settings > Email Notifications. Where you can choose between criticality and type of alert to be sent.
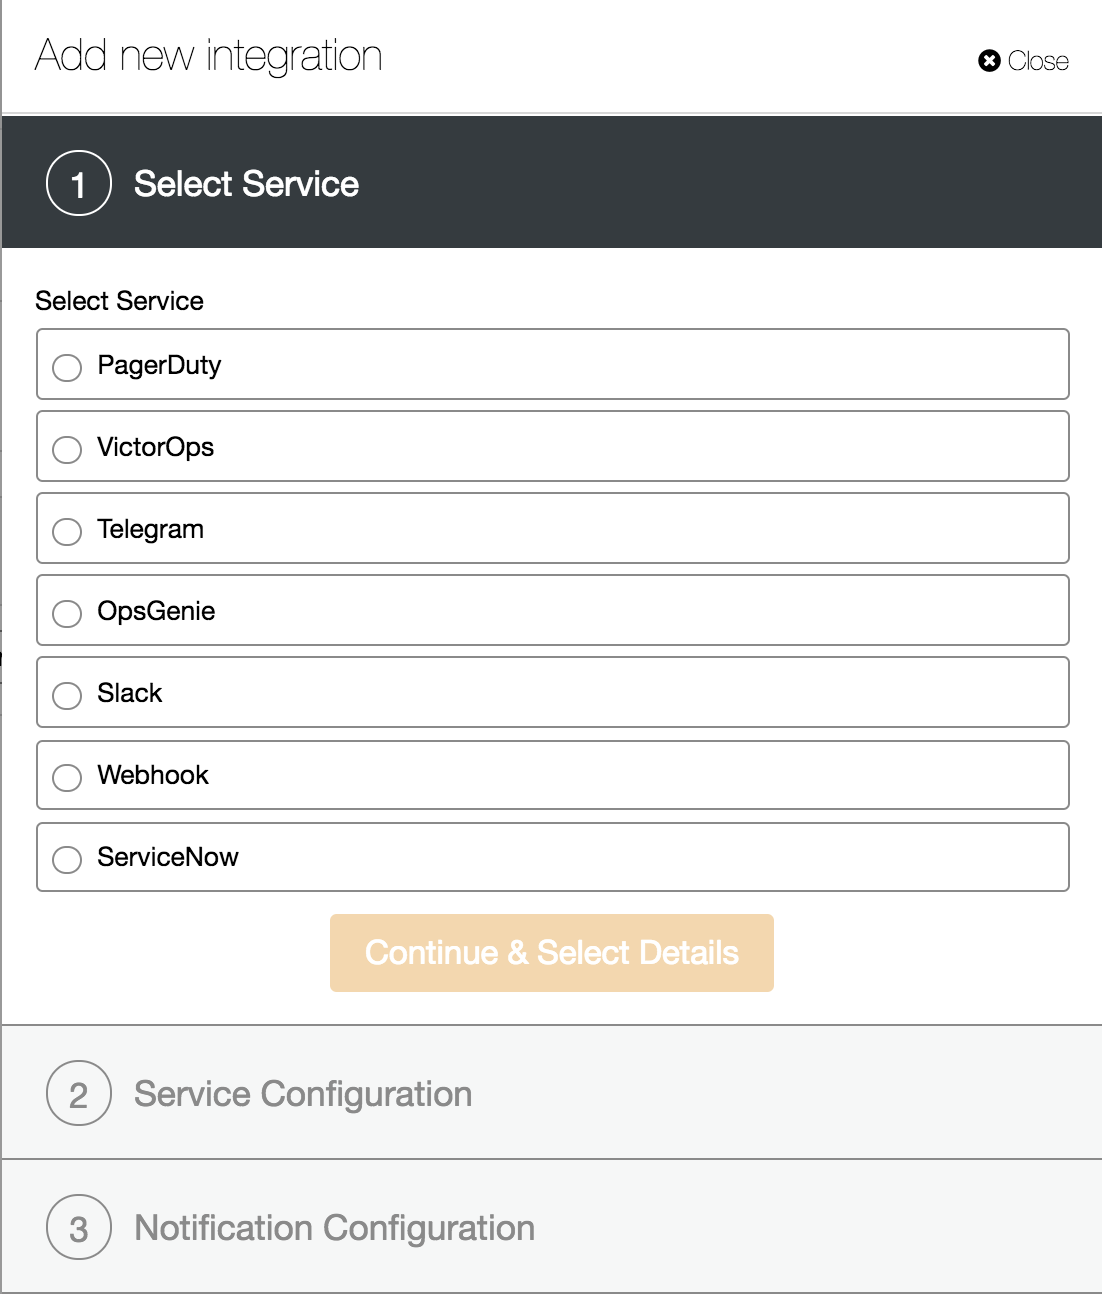
The next method is to use Integration services. This is to pass the specific category of events to the other service like ServiceNow tickets, Slack, PagerDuty etc. so you can create an advanced notification methods and integrations within your organization.
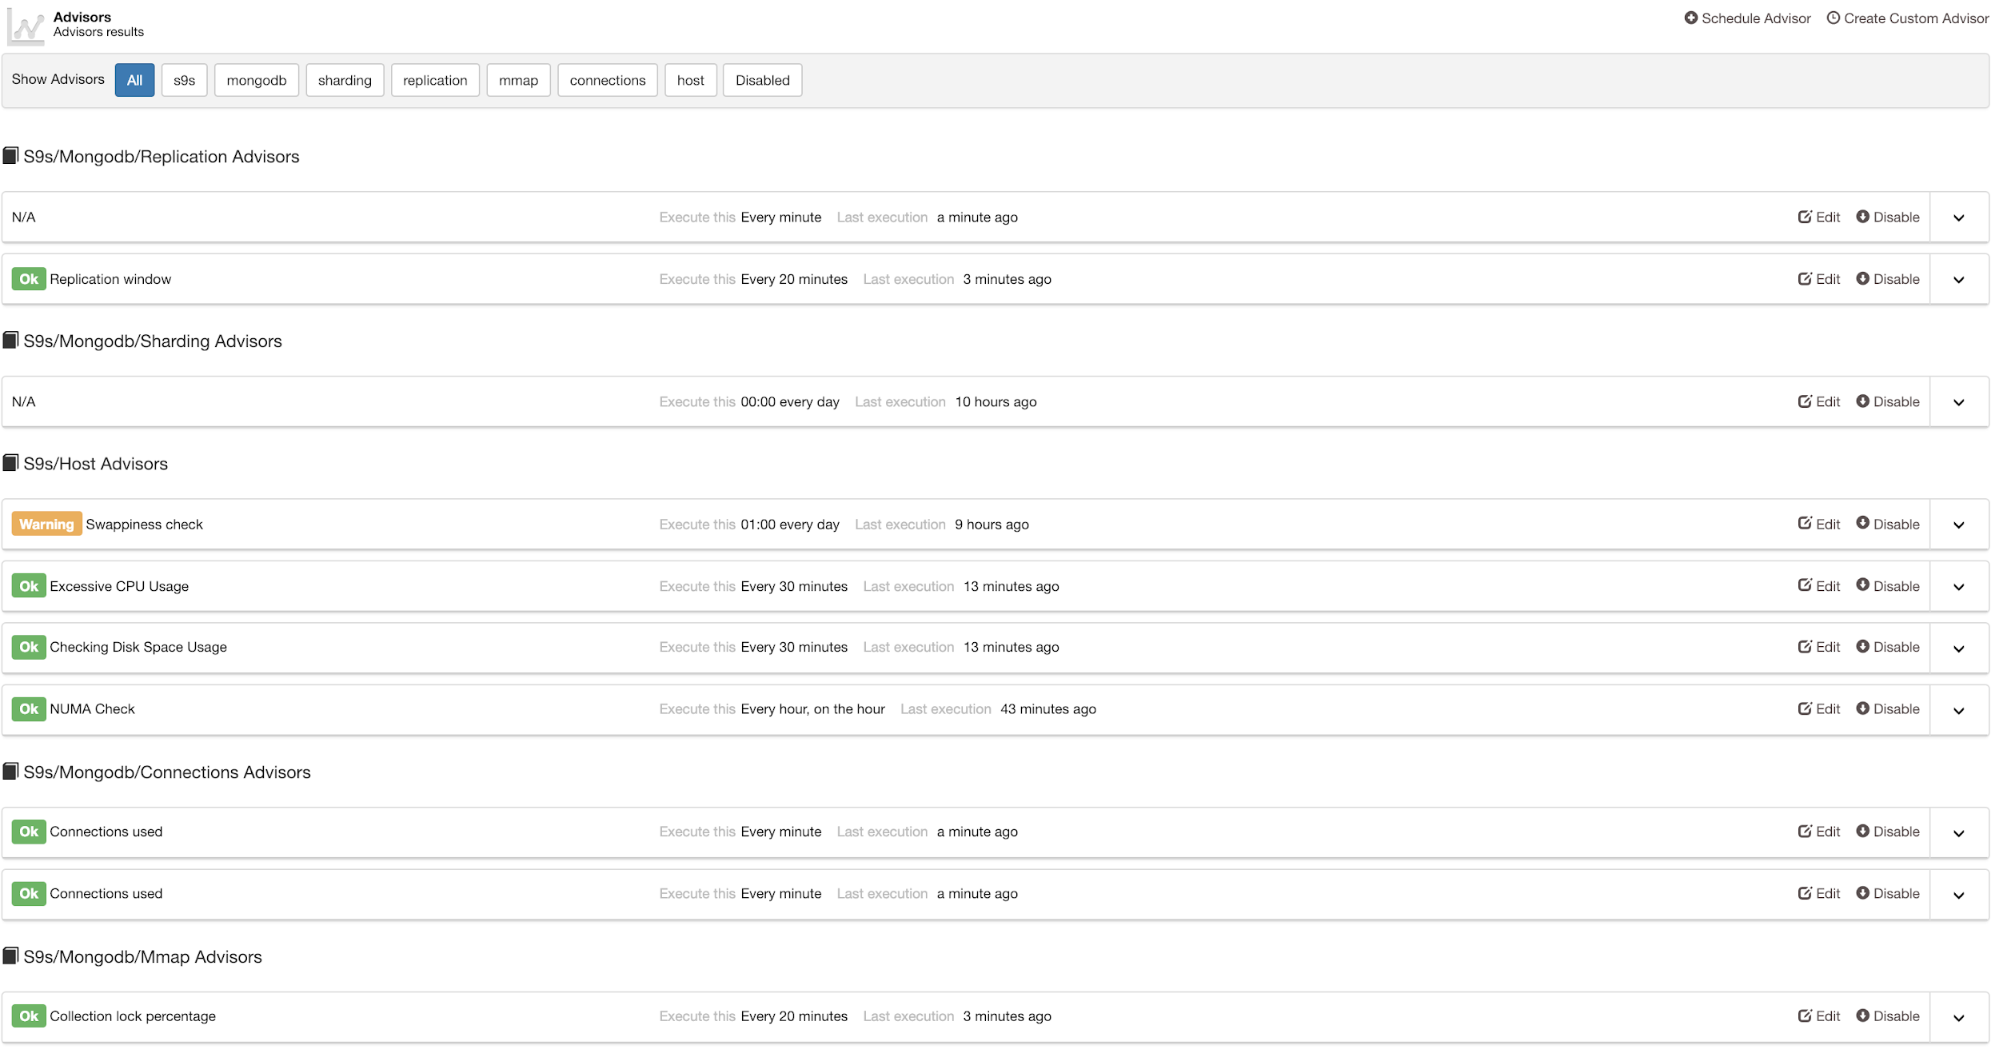
The last one is to involve sophisticated metrics analysis in Advisor section, where you can build intelligent checks and triggers. An example here could be an disk space usage prediction or cluster scaling by adding nodes when the workload reach preset level.
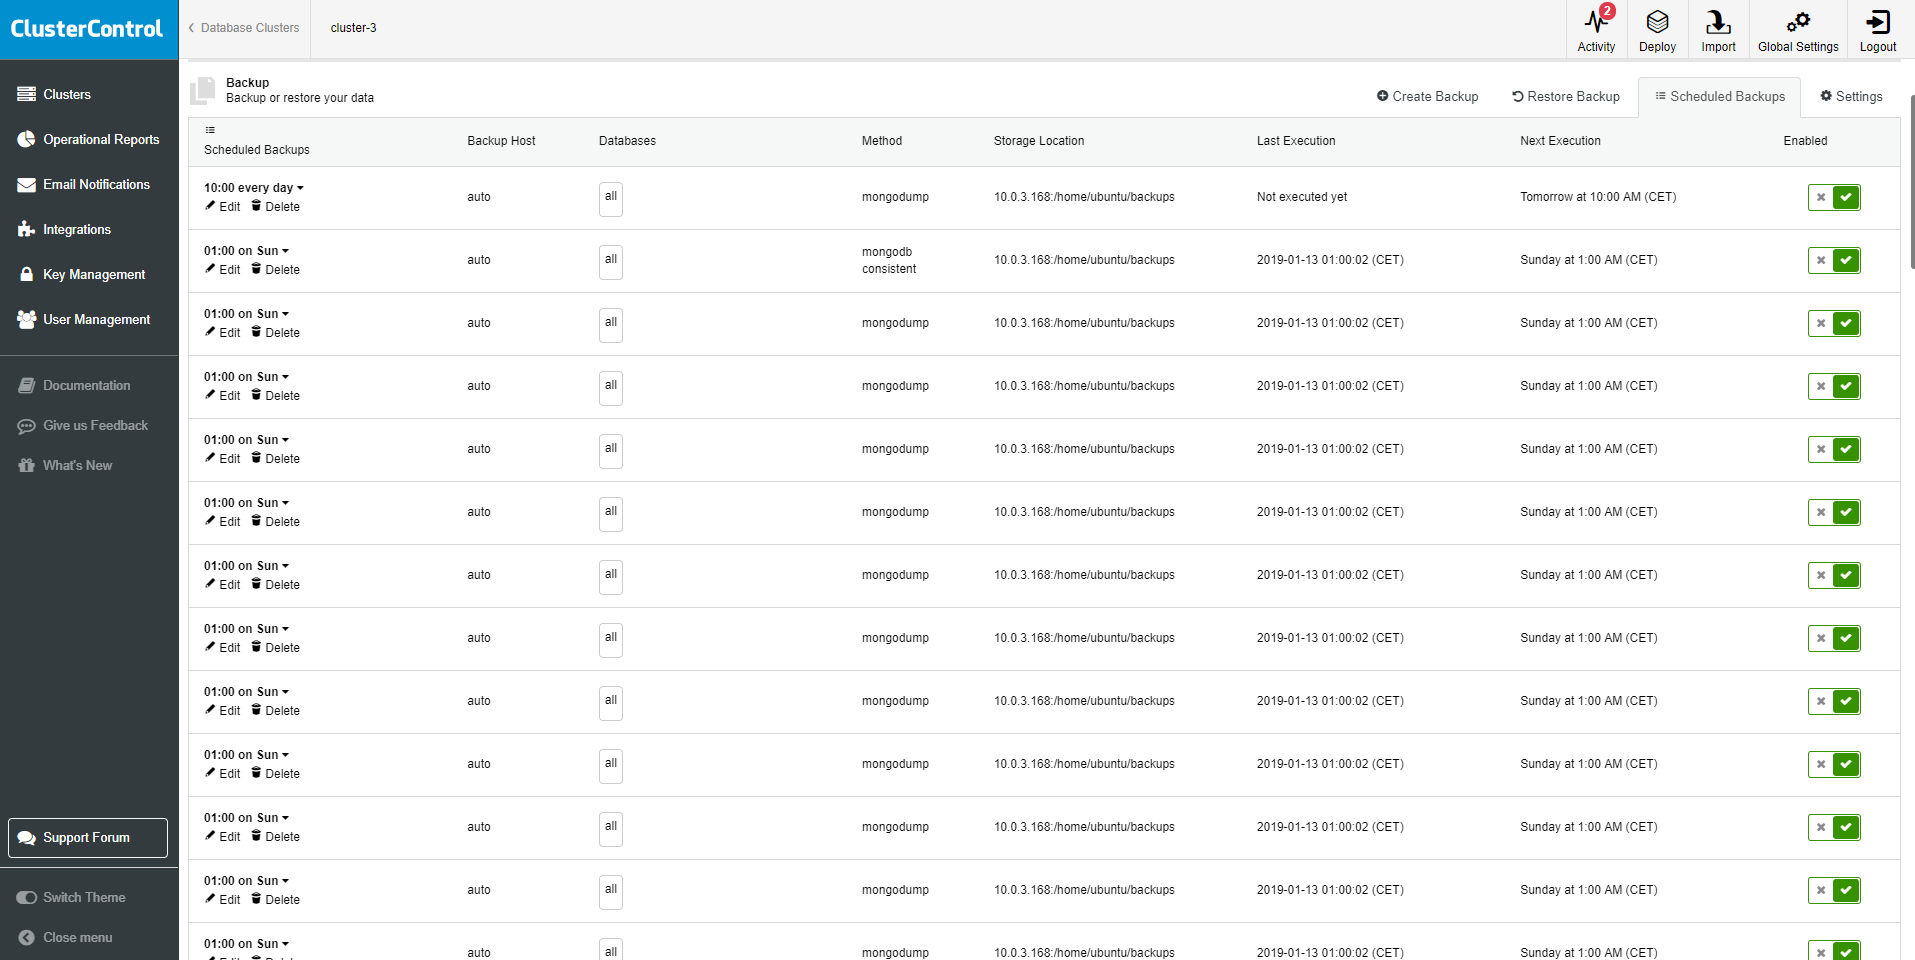
Backup and Recovery
Now that you have your MongoDB replicaSet up and running, and have your monitoring in place, it is time for the next step: ensure you have a backup of your data.
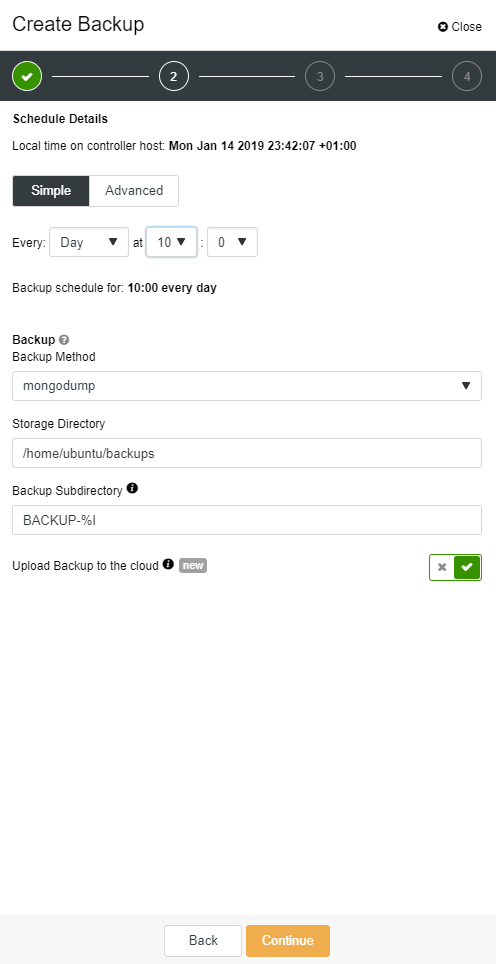
ClusterControl provides an interface for MongoDB backup management with support for scheduling and creative reports. It gives you two options for backup methods.
- Mongodump
- Mongodb consistent backup
Mongodump dumps all the data in Binary JSON (BSON) format to the specified location. Mongorestore can later on use the BSON files to restore your database. ClusterControl MongoDB consistent backup includes the transactions from the oplog that were executing while making the backup.
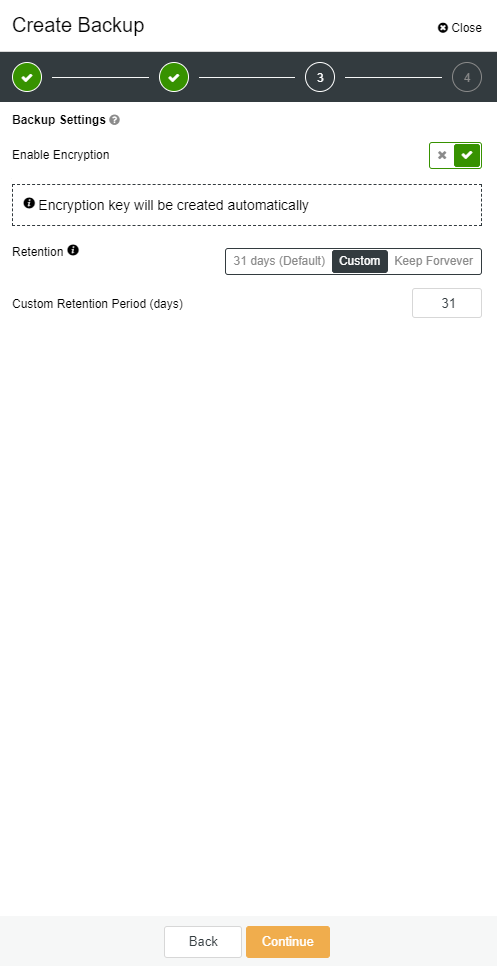
A good backup strategy is a critical part of any database management system. ClusterControl offers many options for backups and recovery/restore.
ClusterControl backup retention is configurable; you can choose to retain your backup for any time period or to never delete backups. AES256 encryption is employed to secure your backups against rogue elements. For rapid recovery, backups can be restored directly into the backup cluster – ClusterControl handles the full restore process from launch to cluster recovery, removing error-prone manual steps from the process.


