blog
MariaDB Cluster Offline Installation for CentOS

Most of the installation steps available on the Internet cover the standard online installation, presuming the database hosts are having an active internet connection to the package repositories and satisfy all dependencies. However, installation steps and commands are a bit different for offline installation. Offline installation is a common practice in a strict and secure environment like financial and military sectors for security compliance, reducing the exposure risks and maintaining confidentiality.
In this blog post, we are going to install a three-node MariaDB Cluster in an offline environment on CentOS hosts. Consider the following three nodes for this installation:
- mariadb1 – 192.168.0.241
- mariadb2 – 192.168.0.242
- mariadb3 – 192.168.0.243
Download Packages
The most time-consuming part is getting all the packages required for our installation. Firstly, go to the respective MariaDB repository that we want to install (in this example, our OS is CentOS 7 64bit):
- MariaDB 10.4: http://yum.mariadb.org/10.4/centos7-amd64/rpms/
- MariaDB 10.3: http://yum.mariadb.org/10.3/centos7-amd64/rpms/
- MariaDB 10.2: http://yum.mariadb.org/10.2/centos7-amd64/rpms/
- MariaDB 10.1: http://yum.mariadb.org/10.1/centos7-amd64/rpms/
- MariaDB 10.0: http://yum.mariadb.org/10.0/centos7-amd64/rpms/
Make sure you download the exact same minor version for all MariaDB-related packages. In this example, we downloaded MariaDB version 10.4.13. There are a bunch of packages in this repository but we don’t need them all just to run a MariaDB Cluster. Some of the packages are outdated and for debugging purposes. For MariaDB Galera 10.4 and CentOS 7, we need to download the following packages from the MariaDB 10.4 repository:
- jemalloc
- galera-3/galera-4
- libzstd
- MariaDB backup
- MariaDB server
- MariaDB client
- MariaDB shared
- MariaDB common
- MariaDB compat
The following wget commands would simplify the download process:
wget http://yum.mariadb.org/10.4/centos7-amd64/rpms/galera-4-26.4.4-1.rhel7.el7.centos.x86_64.rpm
wget http://yum.mariadb.org/10.4/centos7-amd64/rpms/jemalloc-3.6.0-1.el7.x86_64.rpm
wget http://yum.mariadb.org/10.4/centos7-amd64/rpms/libzstd-1.3.4-1.el7.x86_64.rpm
wget http://yum.mariadb.org/10.4/centos7-amd64/rpms/MariaDB-backup-10.4.13-1.el7.centos.x86_64.rpm
wget http://yum.mariadb.org/10.4/centos7-amd64/rpms/MariaDB-client-10.4.13-1.el7.centos.x86_64.rpm
wget http://yum.mariadb.org/10.4/centos7-amd64/rpms/MariaDB-common-10.4.13-1.el7.centos.x86_64.rpm
wget http://yum.mariadb.org/10.4/centos7-amd64/rpms/MariaDB-compat-10.4.13-1.el7.centos.x86_64.rpm
wget http://yum.mariadb.org/10.4/centos7-amd64/rpms/MariaDB-server-10.4.13-1.el7.centos.x86_64.rpm
wget http://yum.mariadb.org/10.4/centos7-amd64/rpms/MariaDB-shared-10.4.13-1.el7.centos.x86_64.rpm
Some of these packages have dependencies to other packages. To satisfy them all, it’s probably best to mount the operating system ISO image and point the yum package manager to use the ISO image as an offline base repository instead. Otherwise, we would waste a lot of time trying to download/transfer the packages from one host/media to another.
If you are looking for older MariaDB packages, look them up in its archive repository here. Once downloaded, transfer the packages into all the database servers via USB drive, DVD burner or any network storage connected to the database hosts.
Mount the ISO Image Locally
Some of the dependencies are needed to be satisfied during the installation and one way to achieve this easily is by setting up the offline yum repository on the database servers. Firstly, we have to download the CentOS 7 DVD ISO image from the nearest CentOS mirror site, under “isos” directory:
$ wget http://centos.shinjiru.com/centos/7/isos/x86_64/CentOS-7-x86_64-DVD-2003.isoYou can either transfer the image and mount it directly or burn it into a DVD and use the DVD drive and connect it to the server. In this example, we are going to mount the ISO image as a DVD in the server:
$ mkdir -p /media/CentOS
$ mount -o loop /root/CentOS-7-x86_64-DVD-2003.iso /media/CentOS
Then, enable the CentOS-Media (c7-media) repository and disable the standard online repositories (base,updates,extras):
$ yum-config-manager --disable base,updates,extras
$ yum-config-manager --enable c7-media
We are now ready for the installation.
Installing and Configuring the MariaDB Server
Installation steps are pretty straightforward if we have all the necessary packages ready. Firstly, it’s recommended to disable SElinux (or set it to permissive mode):
$ setenforce 0
$ sed -i 's/^SELINUX=.*/SELINUX=permissive/g' /etc/selinux/config
Navigate to the directory where all the packages are located, in this case, /root/installer/. Make sure all the packages are there:
$ cd /root/installer
$ ls -1
galera-4-26.4.4-1.rhel7.el7.centos.x86_64.rpm
jemalloc-3.6.0-1.el7.x86_64.rpm
libzstd-1.3.4-1.el7.x86_64.rpm
MariaDB-backup-10.4.13-1.el7.centos.x86_64.rpm
MariaDB-client-10.4.13-1.el7.centos.x86_64.rpm
MariaDB-common-10.4.13-1.el7.centos.x86_64.rpm
MariaDB-compat-10.4.13-1.el7.centos.x86_64.rpm
MariaDB-server-10.4.13-1.el7.centos.x86_64.rpm
MariaDB-shared-10.4.13-1.el7.centos.x86_64.rpm
Let’s install the mariabackup dependency called socat first and then run the yum localinstall command to install the RPM packages and satisfy all dependencies:
$ yum install socat
$ yum localinstall *.rpm
Start the MariaDB service and check the status:
$ systemctl start mariadb
$ systemctl status mariadb
Make sure you see no error in the process. Then, run the mysql_secure_installation script to configure the MySQL root password and hardening:
$ mysql_secure_installationMake sure the MariaDB root password is identical on all MariaDB hosts. Create a MariaDB user to perform backup and SST. This is important if we want to use the recommended mariabackup as the SST method for MariaDB Cluster, and also for backup purposes:
$ mysql -uroot -p
MariaDB> CREATE USER backup_user@localhost IDENTIFIED BY 'P455w0rd';
MariaDB> GRANT SELECT, INSERT, CREATE, RELOAD, PROCESS, SUPER, LOCK TABLES, REPLICATION CLIENT, SHOW VIEW, EVENT, CREATE TABLESPACE ON *.* TO backup_user@localhost;
We need to modify the default configuration file to load up MariaDB Cluster functionalities. Open /etc/my.cnf.d/server.cnf and make sure the following lines exist for minimal configuration:
[mysqld]
log_error = /var/log/mysqld.log

[galera]
wsrep_on=ON
wsrep_provider=/usr/lib64/galera-4/libgalera_smm.so
wsrep_cluster_address=gcomm://192.168.0.241,192.168.0.242,192.168.0.243
binlog_format=row
default_storage_engine=InnoDB
innodb_autoinc_lock_mode=2
bind-address=0.0.0.0
innodb_flush_log_at_trx_commit=2
wsrep_sst_method=mariabackup
wsrep_sst_auth=backup_user:P455w0rd
wsrep_node_address=192.168.0.241 # change this
Don’t forget to change the wsrep_node_address value with the IP address of the database node for MariaDB Cluster communication. Also, the wsrep_provider value might be different depending on the MariaDB server and MariaDB Cluster version that you have installed. Locate the libgalera_smm.so path and specify it accordingly here.
Repeat the same steps on all database nodes and we are now ready to start our cluster.
Bootstrapping the Cluster
Since this is a new cluster, we can pick any of the MariaDB nodes to become the reference node for the cluster bootstrapping process. Let’s pick mariadb1. Make sure the MariaDB is stopped first, then run the galera_new_cluster command to bootstrap:
$ systemctl stop mariadb
$ galera_new_cluster
$ systemctl status mariadb
On the other two nodes (mariadb2 and mariadb3), we are going to start it up using standard MariaDB start command:
$ systemctl stop mariadb
$ systemctl start mariadb
Verify if all nodes are part of the cluster by looking at the wsrep-related status on every node:
MariaDB> SHOW STATUS LIKE 'wsrep%';Make sure the reported status are as the following:
wsrep_local_state_comment     | Synced
wsrep_cluster_size            | 3
wsrep_cluster_status          | Primary
For MariaDB 10.4 and Galera Cluster 4, we can get the cluster member information directly from table mysql.wsrep_cluster_members on any MariaDB node:
$ mysql -uroot -p -e 'select * from mysql.wsrep_cluster_members'
Enter password:
+--------------------------------------+--------------------------------------+---------------+-----------------------+
| node_uuid                            | cluster_uuid                         | node_name     | node_incoming_address |
+--------------------------------------+--------------------------------------+---------------+-----------------------+
| 35177dae-a7f0-11ea-baa4-1e4604dc8f68 | de82efcb-a7a7-11ea-8273-b7a81016a75f | maria1.local  | AUTO                  |
| 3e6f9d0b-a7f0-11ea-a2e9-32f4a0481dd9 | de82efcb-a7a7-11ea-8273-b7a81016a75f | maria2.local  | AUTO                  |
| fd63108a-a7f1-11ea-b100-937c34421a67 | de82efcb-a7a7-11ea-8273-b7a81016a75f | maria3.local  | AUTO                  |
+--------------------------------------+--------------------------------------+---------------+-----------------------+
If something goes wrong during the cluster bootstrapping, check the MySQL error log at /var/log/mysqld.log on all MariaDB nodes. Once a cluster is bootstrapped and running, do not run galera_new_cluster script again to start a MariaDB service. It should be enough by using the standard “systemctl start/restart mariadb” command, unless there is no database node in PRIMARY state anymore. Check out this blog post, How to Bootstrap MySQL or MariaDB Cluster to understand why this step is critical.
Bonus Step
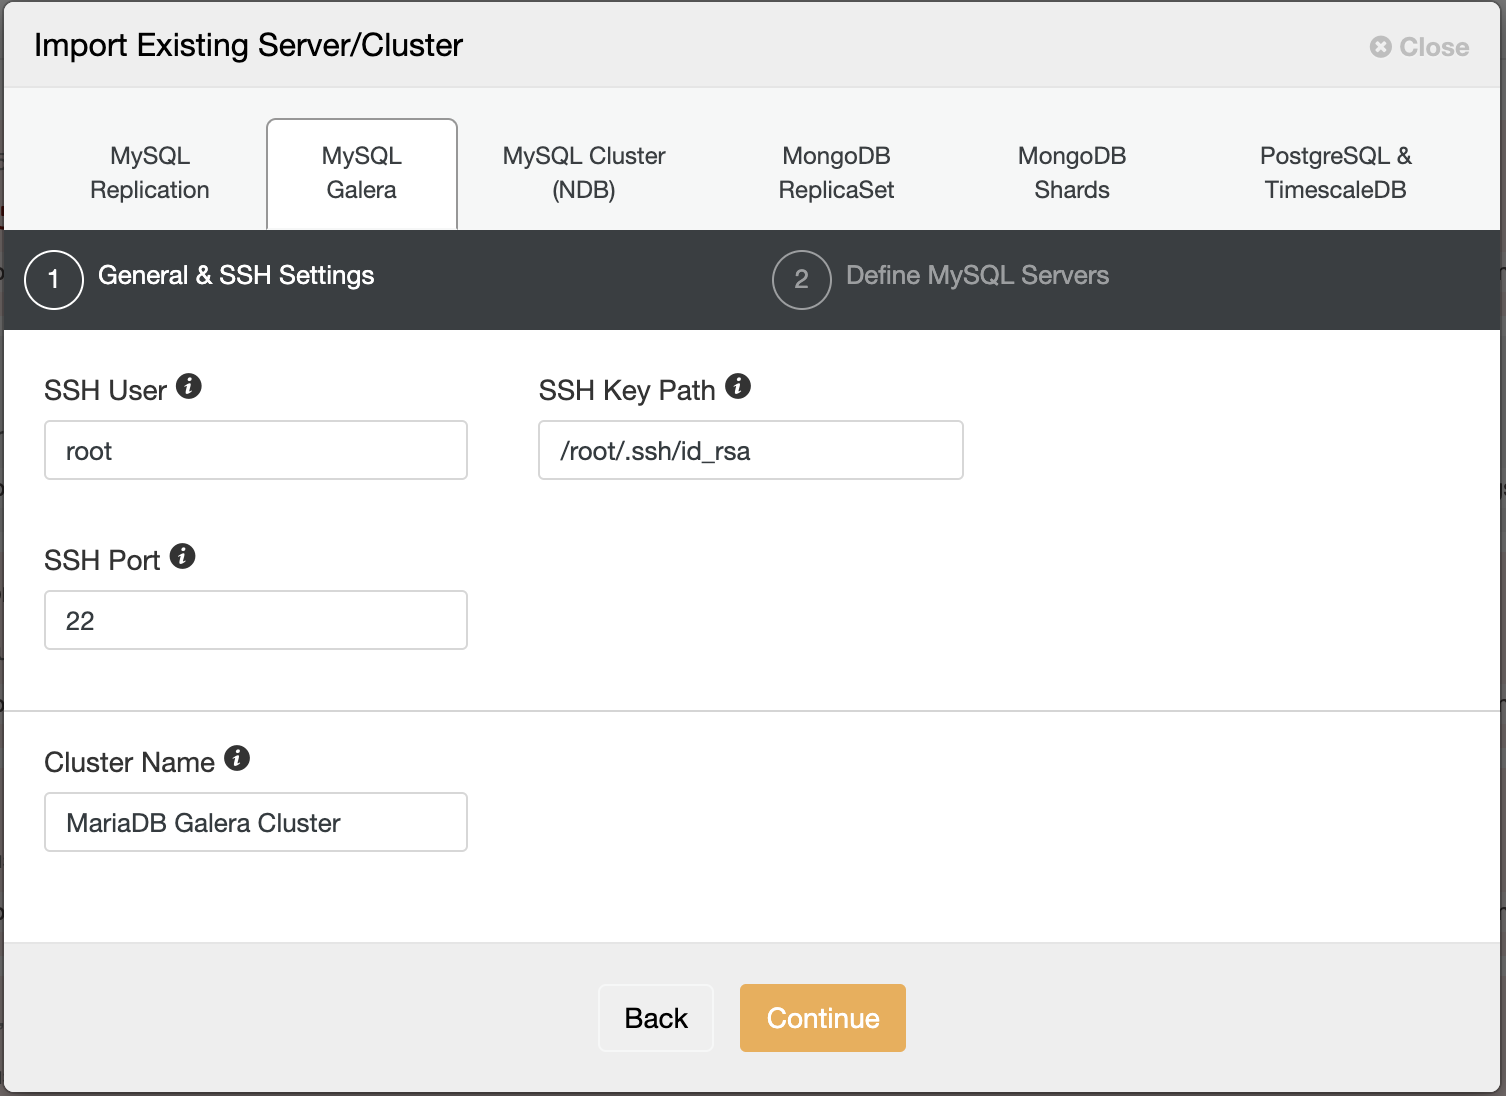
Now you already have a database cluster running without any monitoring and management features. Why don’t you import the database cluster into ClusterControl? Install ClusterControl on another separate server, and setup passwordless SSH from the ClusterControl server to all database nodes. Supposed the ClusterControl server IP is 192.168.0.240, run the following commands on ClusterControl server:
$ whoami
root

$ ssh-keygen -t rsa # generate key, press Enter for all prompts
$ ssh-copy-id [email protected] # root password on 192.168.0.241
$ ssh-copy-id [email protected] # root password on 192.168.0.242
$ ssh-copy-id [email protected] # root password on 192.168.0.243
Then go to ClusterControl -> Import -> MySQL Galera and enter the required SSH details:
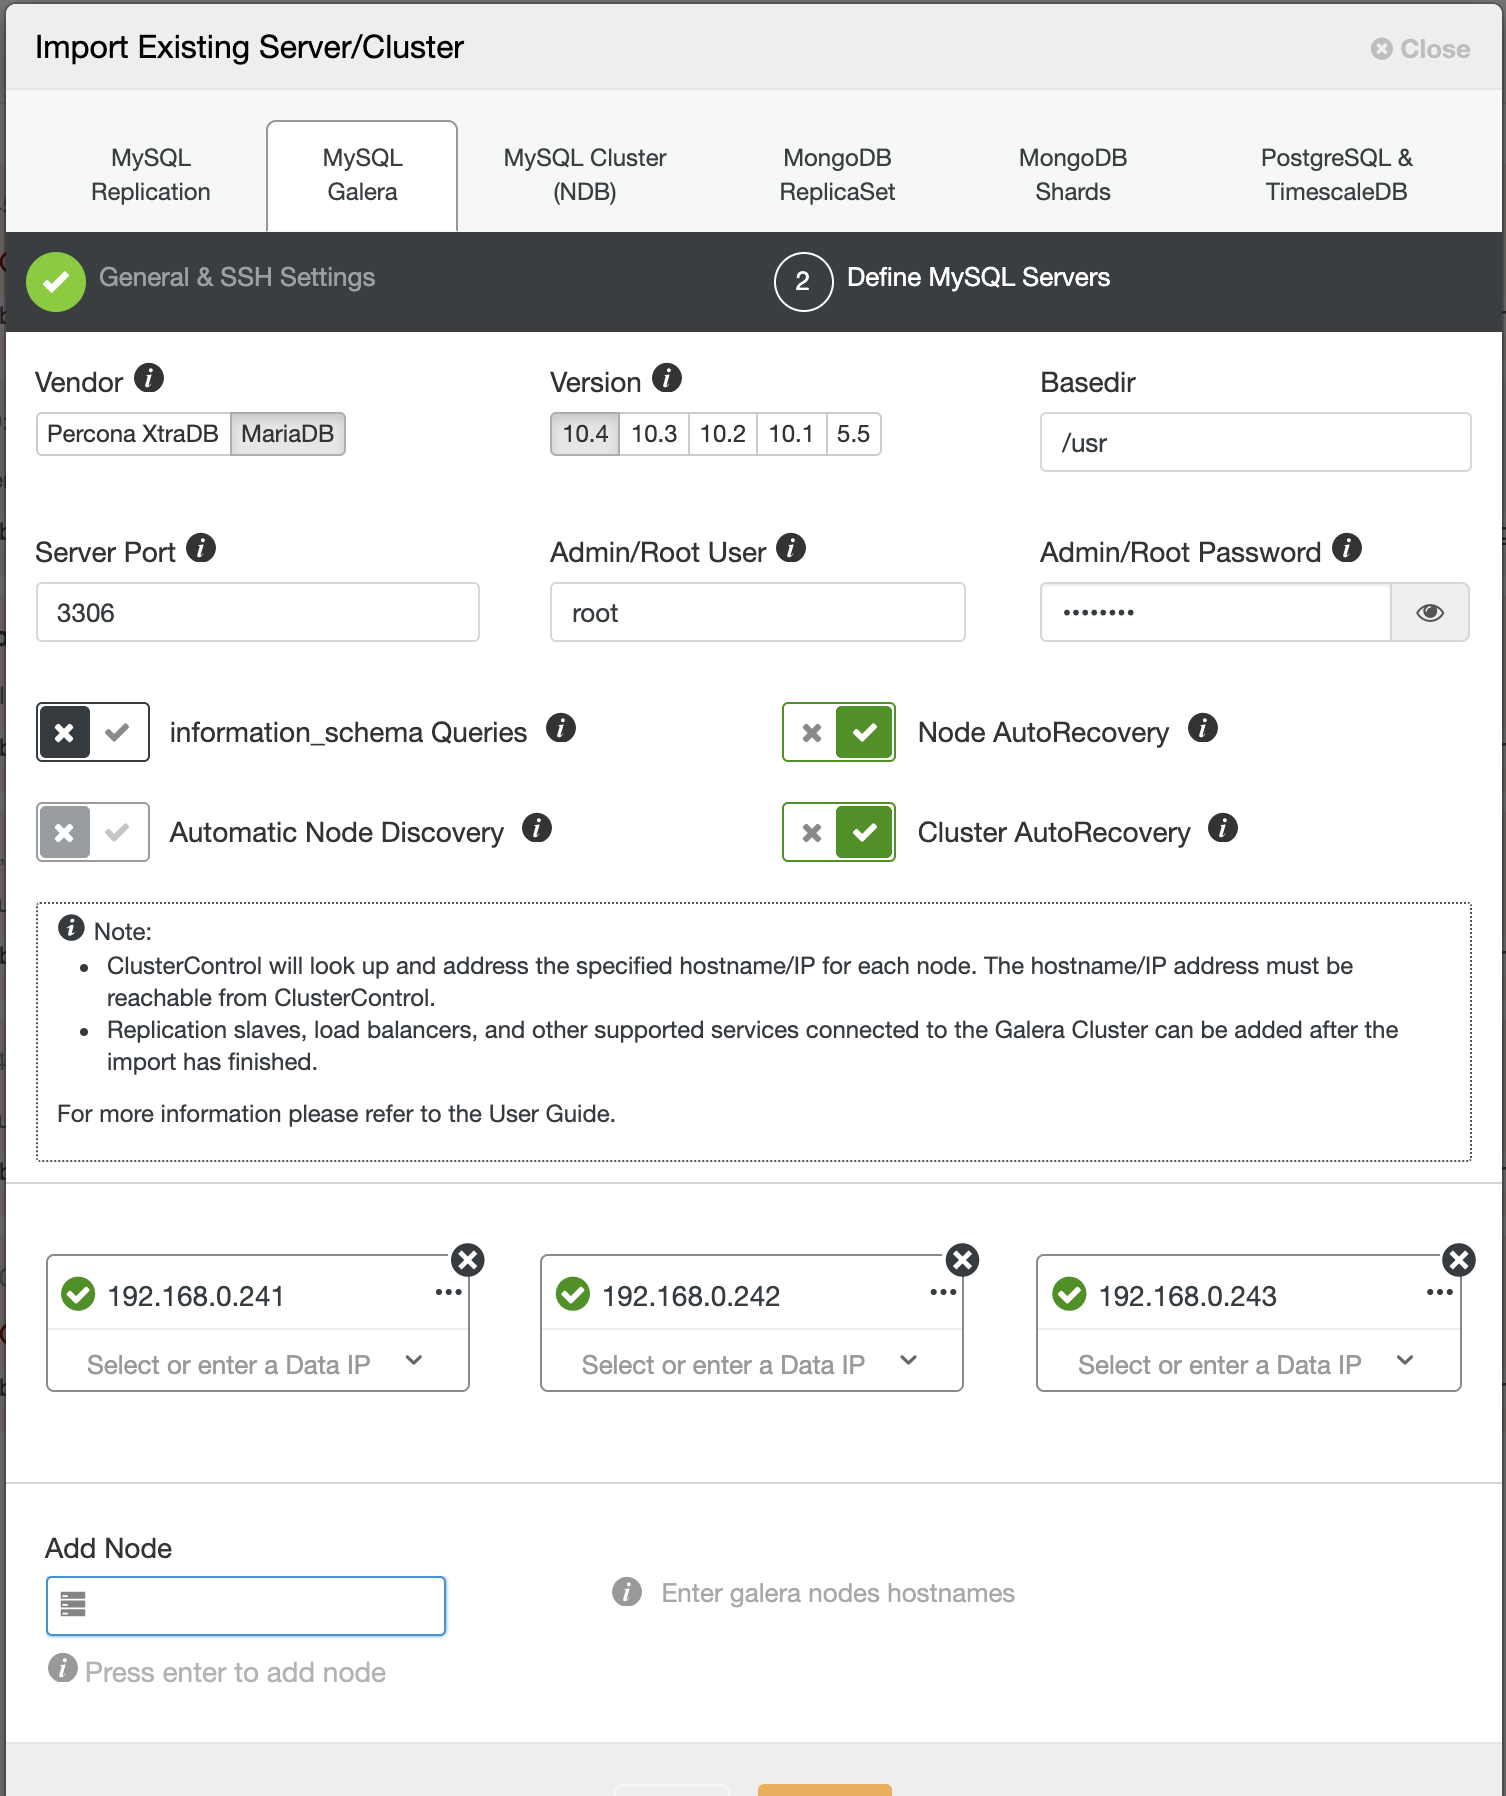
In the second step under Define MySQL Servers, toggle off “Automatic Node Discovery” and specify all the IP address of the database nodes, and make sure there is a tick green next to the IP address, indicating ClusterControl is able to reach the node via passwordless SSH:
Click Import and wait until the import job completes. You should see it under the cluster list:

You are in good hands now. Note that ClusterControl will default to 30-day full enterprise features and after it expires, it will default back to Community Edition, which is free forever.


