blog
How to Rebuild an Inconsistent MySQL Slave?

MySQL slaves may become inconsistent. You can try to avoid it, but it’s really hard. Setting super_read_only and using row-based replication can help a lot, but no matter what you do, it is still possible that your slave will become inconsistent.
What can be done to rebuild an inconsistent MySQL slave? In this blog post we’ll take a look at this problem.
First off, let’s discuss what has to happen in order to rebuild a slave. To bring a node into MySQL Replication, it has to be provisioned with data from one of the nodes in the replication topology. This data has to be consistent at the point in time when it was collected. You cannot take it on a table by table or schema by schema basis, because this will make the provisioned node inconsistent internally. Meaning some data would be older than some other part of the dataset.
In addition to data consistency, it should also be possible to collect information about the relationship between the data and the state of replication. You want to have either binary log position at which the collected data is consistent or Global Transaction ID of the transaction which was the last one executed on the node that is the source of the data.
This leads us to the following considerations. You can rebuild a slave using any backup tool as long as this tool can generate consistent backup and it includes replication coordinates for the point-in-time in which the backup is consistent. This allows us to pick from a couple of options.
Using Mysqldump to Rebuild an Inconsistent MySQL Slave
Mysqldump is the most basic tool that we have to achieve this. It allows us to create a logical backup in, among others, the form of SQL statements. What is important, while being basic, it still allows us to take a consistent backup: it can use transaction to ensure that the data is consistent at the beginning of the transaction. It can also write down replication coordinates for that point, even a whole CHANGE MASTER statement, making it easy to start the replication using the backup.
Using Mydumper to Rebuild an Inconsistent MySQL Slave
Another option is to use mydumper – this tool, just like mysqldump, generates a logical backup and, just like mysqldump, can be used to create a consistent backup of the database. The main difference between mydumper and mysqldump is that mydumper, when paired with myloader, can dump and restore data in parallel, improving the dump and, especially, restore time.
Using a Snapshot to Rebuild an Inconsistent MySQL Slave
For those who use cloud providers, a possibility is to take a snapshot of the underlying block storage. Snapshots generate a point-in-time view of the data. This process is quite tricky though, as the consistency of the data and the ability to restore it depends mostly on the MySQL configuration.
You should ensure that the database works in a durable mode (it is configured in a way that crash of the MySQL will not result in any data loss). This is because (from a MySQL standpoint) taking a volume snapshot and then starting another MySQL instance off the data stored in it is, basically, the same process like if you would kill -9 the mysqld and then start it again. The InnoDB recovery has to happen, replay transactions that have been stored in binary logs, rollback transactions that haven’t completed before the crash and so on.
The downside of snapshot-based rebuild process is that it is strongly tied to the current vendor. You cannot easily copy the snapshot data from one cloud provider to another one. You may be able to move it between different regions but it will still be the same provider.
Using a Xtrabackup or Mariabackup to Rebuild an Inconsistent MySQL Slave
Finally, xtrabackup/mariabackup – this is a tool written by Percona and forked by MariaDB that allows to generate a physical backup. It is way faster than logical backups – it’s limited mostly by the hardware performance – disk or network being the most probable bottlenecks. Most of the workload is related to copying files from MySQL data directory to another location (on the same host or over the network).
While not nearly as fast as block storage snapshots, xtrabackup is way more flexible and can be used in any environment. The backup it produces consists of files, therefore it is perfectly possible to copy the backup to any location you like. Another cloud provider, your local datacenter, it doesn’t matter as long as you can transfer files from your current location.
It doesn’t even have to have network connectivity – you can as well just copy the backup to some “transferable” device like USB SSD or even USB stick, as long as it can contain all of the data and store it in your pocket while you relocate from one datacenter to another.
How to Rebuild a MySQL Slave Using Xtrabackup?
We decided to focus on xtrabackup, given its flexibility and ability to work in most of the environments where MySQL can exist. How do you rebuild your slave using xtrabackup? Let’s take a look.
Initially, we have a master and a slave, which suffered from some replication issues:
mysql> SHOW SLAVE STATUSG

*************************** 1. row ***************************

               Slave_IO_State: Waiting for master to send event

                  Master_Host: 10.0.0.141

                  Master_User: rpl_user

                  Master_Port: 3306

                Connect_Retry: 10

              Master_Log_File: binlog.000004

          Read_Master_Log_Pos: 386

               Relay_Log_File: relay-bin.000008

                Relay_Log_Pos: 363

        Relay_Master_Log_File: binlog.000004

             Slave_IO_Running: Yes

            Slave_SQL_Running: No

              Replicate_Do_DB:

          Replicate_Ignore_DB:

           Replicate_Do_Table:

       Replicate_Ignore_Table:

      Replicate_Wild_Do_Table:

  Replicate_Wild_Ignore_Table:

                   Last_Errno: 1007

                   Last_Error: Error 'Can't create database 'mytest'; database exists' on query. Default database: 'mytest'. Query: 'create database mytest'

                 Skip_Counter: 0

          Exec_Master_Log_Pos: 195

              Relay_Log_Space: 756

              Until_Condition: None

               Until_Log_File:

                Until_Log_Pos: 0

           Master_SSL_Allowed: No

           Master_SSL_CA_File:

           Master_SSL_CA_Path:

              Master_SSL_Cert:

            Master_SSL_Cipher:

               Master_SSL_Key:

        Seconds_Behind_Master: NULL

Master_SSL_Verify_Server_Cert: No

                Last_IO_Errno: 0

                Last_IO_Error:

               Last_SQL_Errno: 1007

               Last_SQL_Error: Error 'Can't create database 'mytest'; database exists' on query. Default database: 'mytest'. Query: 'create database mytest'

  Replicate_Ignore_Server_Ids:

             Master_Server_Id: 1001

                  Master_UUID: 53d96192-53f7-11ea-9c3c-080027c5bc64

             Master_Info_File: mysql.slave_master_info

                    SQL_Delay: 0

          SQL_Remaining_Delay: NULL

      Slave_SQL_Running_State:

           Master_Retry_Count: 86400

                  Master_Bind:

      Last_IO_Error_Timestamp:

     Last_SQL_Error_Timestamp: 200306 11:47:42

               Master_SSL_Crl:

           Master_SSL_Crlpath:

           Retrieved_Gtid_Set: 53d96192-53f7-11ea-9c3c-080027c5bc64:9

            Executed_Gtid_Set: 53d96192-53f7-11ea-9c3c-080027c5bc64:1-8,

ce7d0c38-53f7-11ea-9f16-080027c5bc64:1-3

                Auto_Position: 1

         Replicate_Rewrite_DB:

                 Channel_Name:

           Master_TLS_Version:

       Master_public_key_path:

        Get_master_public_key: 0

            Network_Namespace:

1 row in set (0.00 sec)
As you can see, there is a problem with one of the schemas. Let’s assume we have to rebuild this node to bring it back into the replication. Here are the steps we have to perform.
First, we have to make sure xtrabackup is installed. In our case we use MySQL 8.0 therefore we have to use xtrabackup in version 8 to ensure compatibility:
root@master:~# apt install percona-xtrabackup-80

Reading package lists... Done

Building dependency tree

Reading state information... Done

percona-xtrabackup-80 is already the newest version (8.0.9-1.bionic).

0 upgraded, 0 newly installed, 0 to remove and 143 not upgraded.
Xtrabackup is provided by Percona repository and the guide to installing it can be found here:
https://www.percona.com/doc/percona-xtrabackup/8.0/installation/apt_repo.html
The tool has to be installed on both master and the slave that we want to rebuild.
As a next step we will remove all the data from the “broken” slave:
root@slave:~# service mysql stop

root@slave:~# rm -rf /var/lib/mysql/*
Next, we will take the backup on the master and stream it to the slave. Please keep in mind this particular one-liner requires passwordless SSH root connectivity from the master to the slave:
root@master:~# xtrabackup –backup –compress –stream=xbstream –target-dir=./ | ssh [email protected] “xbstream -x –decompress -C /var/lib/mysql/”
At the end you should see an important line:
200306 12:10:40 completed OK!This is an indicator that the backup completed OK. Couple of things may still go wrong but at least we got the data right. Next, on the slave, we have to prepare the backup.
root@slave:~# xtrabackup --prepare --target-dir=/var/lib/mysql/

.

.

.

200306 12:16:07 completed OK!
You should see, again, that the process completed OK. You may want now to copy the data back to the MySQL data directory. We don’t have to do that as we stored the streaming backup directly in /var/lib/mysql. What we want to do, though, is to ensure correct ownership of the files:
root@slave:~# chown -R mysql.mysql /var/lib/mysqlNow, let’s check the GTID coordinates of the backup. We will use them later when setting up the replication.
root@slave:~# cat /var/lib/mysql/xtrabackup_binlog_info

binlog.000007 195 53d96192-53f7-11ea-9c3c-080027c5bc64:1-9
Ok, all seems to be good, let’s start MySQL and proceed with configuring the replication:
root@slave:~# service mysql start

root@slave:~# mysql -ppass

mysql: [Warning] Using a password on the command line interface can be insecure.

Welcome to the MySQL monitor.  Commands end with ; or g.

Your MySQL connection id is 8

Server version: 8.0.18-9 Percona Server (GPL), Release '9', Revision '53e606f'


Copyright (c) 2009-2019 Percona LLC and/or its affiliates

Copyright (c) 2000, 2019, Oracle and/or its affiliates. All rights reserved.


Oracle is a registered trademark of Oracle Corporation and/or its

affiliates. Other names may be trademarks of their respective

owners.


Type 'help;' or 'h' for help. Type 'c' to clear the current input statement.


mysql>
Now we have to set the gtid_purged to the GTID set that we found in the backup. Those are GTID that have been “covered” by our backup. Only new GTID should replicate from the master.
mysql> SET GLOBAL gtid_purged='53d96192-53f7-11ea-9c3c-080027c5bc64:1-9';

Query OK, 0 rows affected (0.00 sec)

Now we can start the replication:

mysql> CHANGE MASTER TO MASTER_HOST='10.0.0.141', MASTER_USER='rpl_user', MASTER_PASSWORD='yIPpgNE4KE', MASTER_AUTO_POSITION=1;

Query OK, 0 rows affected, 2 warnings (0.02 sec)


mysql> START SLAVE;

Query OK, 0 rows affected (0.00 sec)

mysql> SHOW SLAVE STATUSG

*************************** 1. row ***************************

               Slave_IO_State: Waiting for master to send event

                  Master_Host: 10.0.0.141

                  Master_User: rpl_user

                  Master_Port: 3306

                Connect_Retry: 60

              Master_Log_File: binlog.000007

          Read_Master_Log_Pos: 380

               Relay_Log_File: relay-bin.000002

                Relay_Log_Pos: 548

        Relay_Master_Log_File: binlog.000007

             Slave_IO_Running: Yes

            Slave_SQL_Running: Yes

              Replicate_Do_DB:

          Replicate_Ignore_DB:

           Replicate_Do_Table:

       Replicate_Ignore_Table:

      Replicate_Wild_Do_Table:

  Replicate_Wild_Ignore_Table:

                   Last_Errno: 0

                   Last_Error:

                 Skip_Counter: 0

          Exec_Master_Log_Pos: 380

              Relay_Log_Space: 750

              Until_Condition: None

               Until_Log_File:

                Until_Log_Pos: 0

           Master_SSL_Allowed: No

           Master_SSL_CA_File:

           Master_SSL_CA_Path:

              Master_SSL_Cert:

            Master_SSL_Cipher:

               Master_SSL_Key:

        Seconds_Behind_Master: 0

Master_SSL_Verify_Server_Cert: No

                Last_IO_Errno: 0

                Last_IO_Error:

               Last_SQL_Errno: 0

               Last_SQL_Error:

  Replicate_Ignore_Server_Ids:

             Master_Server_Id: 1001

                  Master_UUID: 53d96192-53f7-11ea-9c3c-080027c5bc64

             Master_Info_File: mysql.slave_master_info

                    SQL_Delay: 0

          SQL_Remaining_Delay: NULL

      Slave_SQL_Running_State: Slave has read all relay log; waiting for more updates

           Master_Retry_Count: 86400

                  Master_Bind:

      Last_IO_Error_Timestamp:

     Last_SQL_Error_Timestamp:

               Master_SSL_Crl:

           Master_SSL_Crlpath:

           Retrieved_Gtid_Set: 53d96192-53f7-11ea-9c3c-080027c5bc64:10

            Executed_Gtid_Set: 53d96192-53f7-11ea-9c3c-080027c5bc64:1-10

                Auto_Position: 1

         Replicate_Rewrite_DB:

                 Channel_Name:

           Master_TLS_Version:

       Master_public_key_path:

        Get_master_public_key: 0

            Network_Namespace:

1 row in set (0.00 sec)
As you can see, our slave is replicating from its master.
How to Rebuild a MySQL Slave Using ClusterControl?
If you are a ClusterControl user, instead of going through this process you can rebuild the slave in just a couple of clicks. Initially we have a clear issue with the replication:
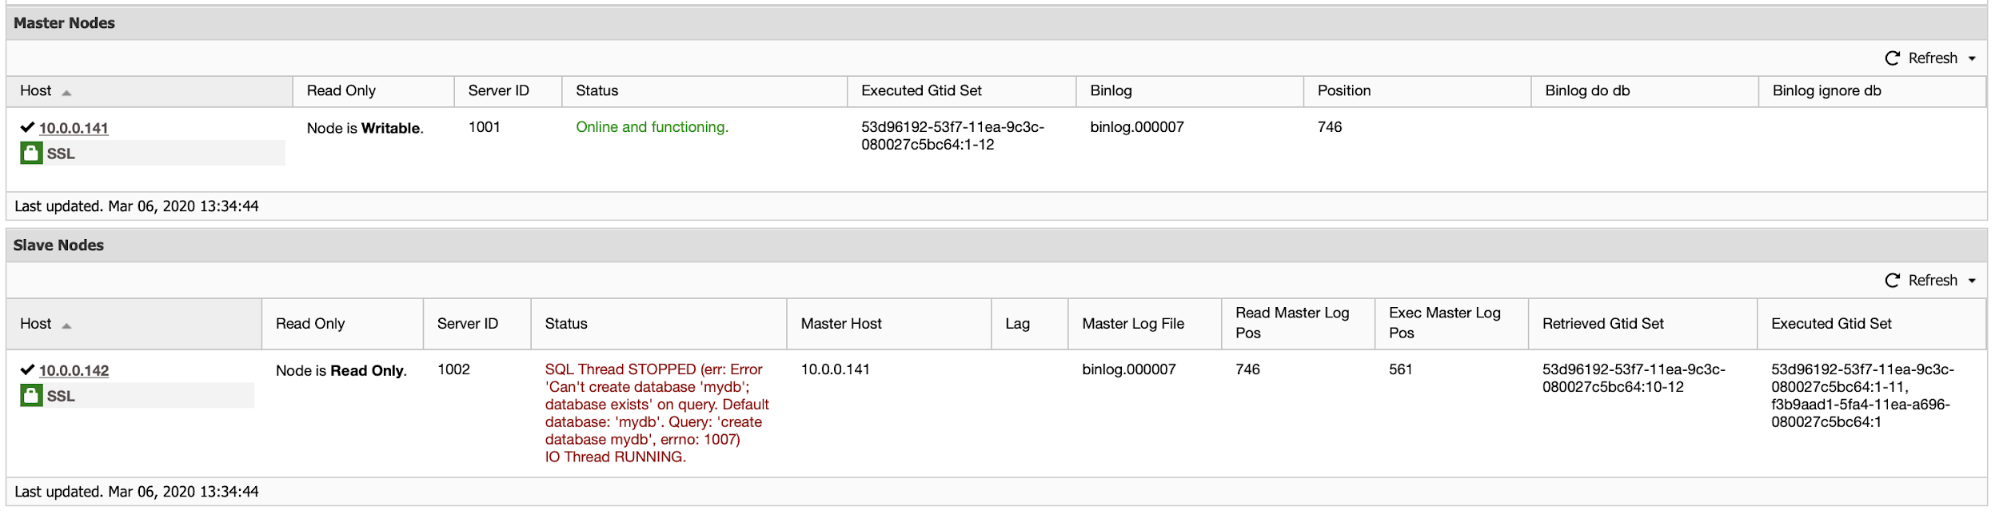
Our slave is not replicating properly due to an error.
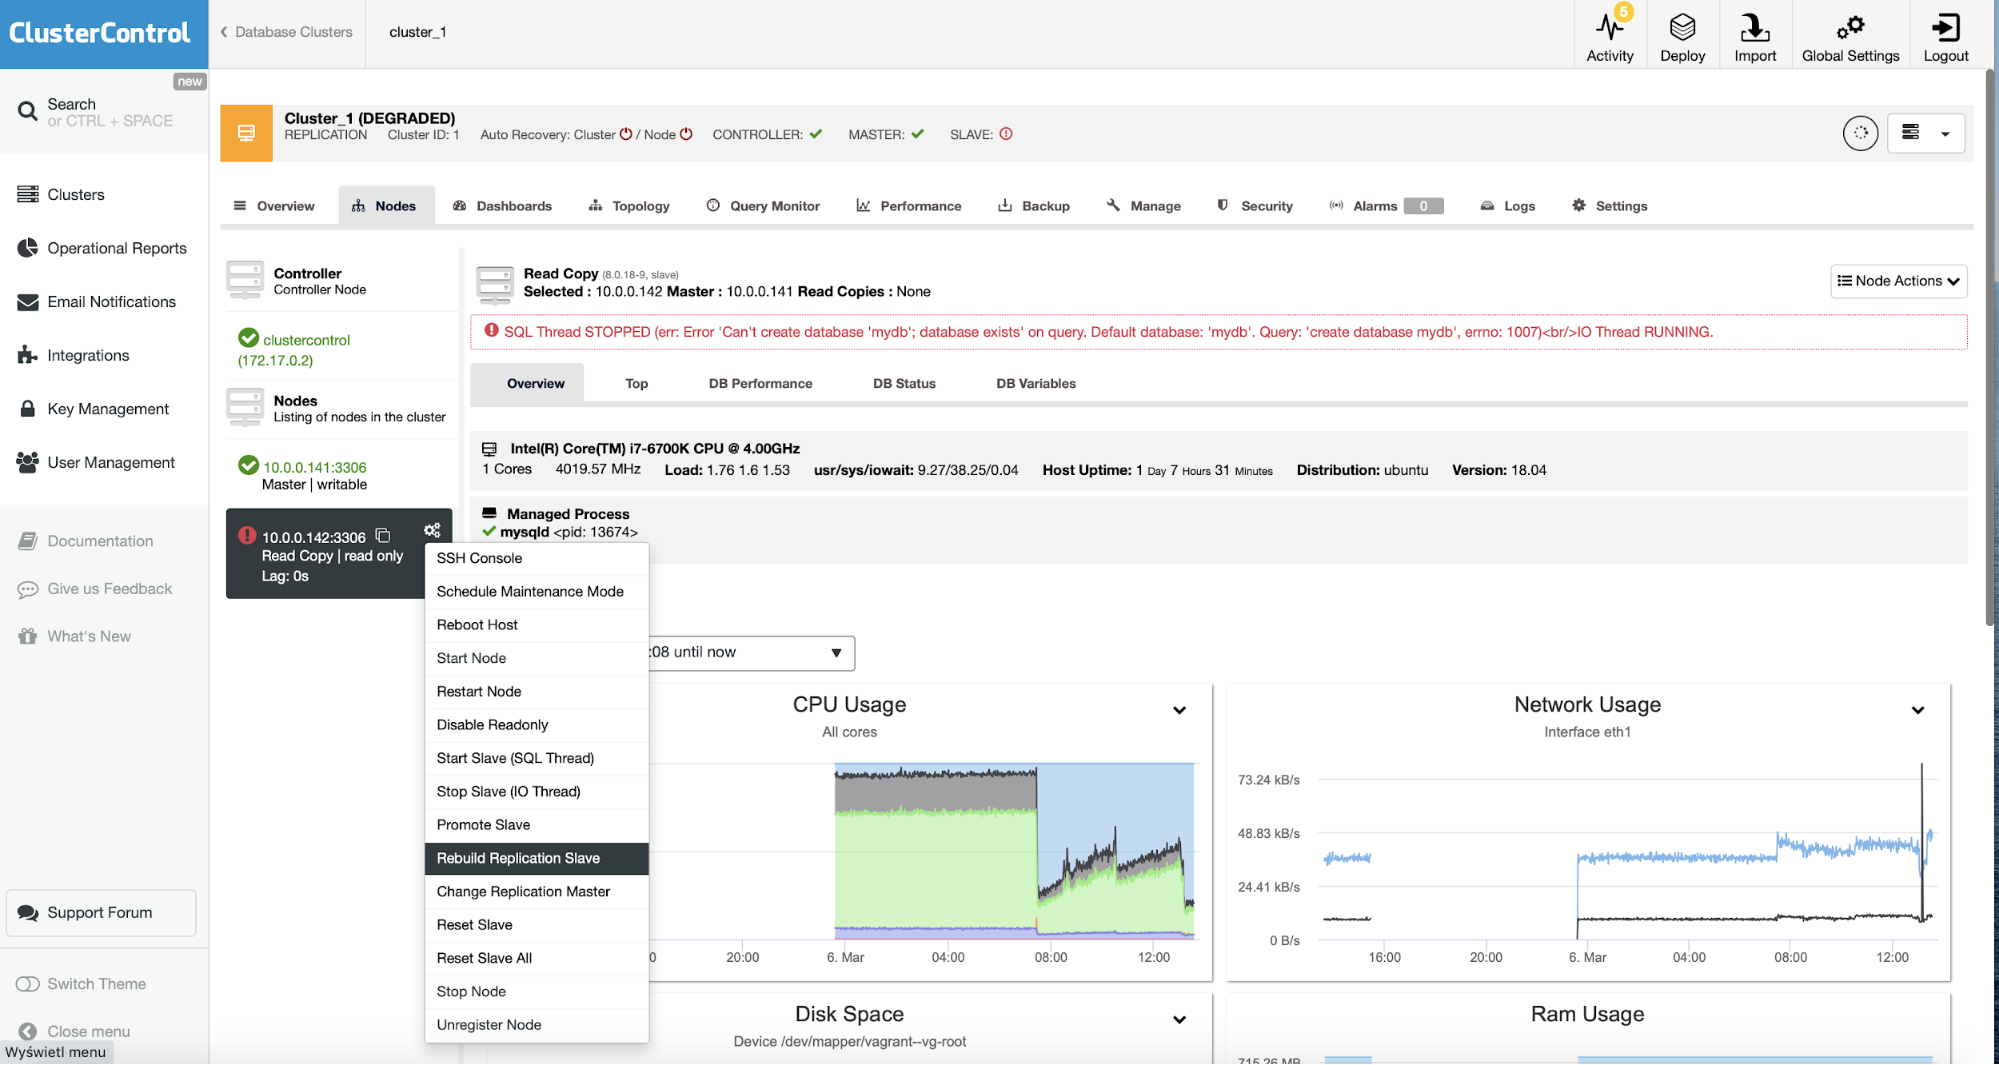
All we have to do is to run the “Rebuild Replication Slave” job.
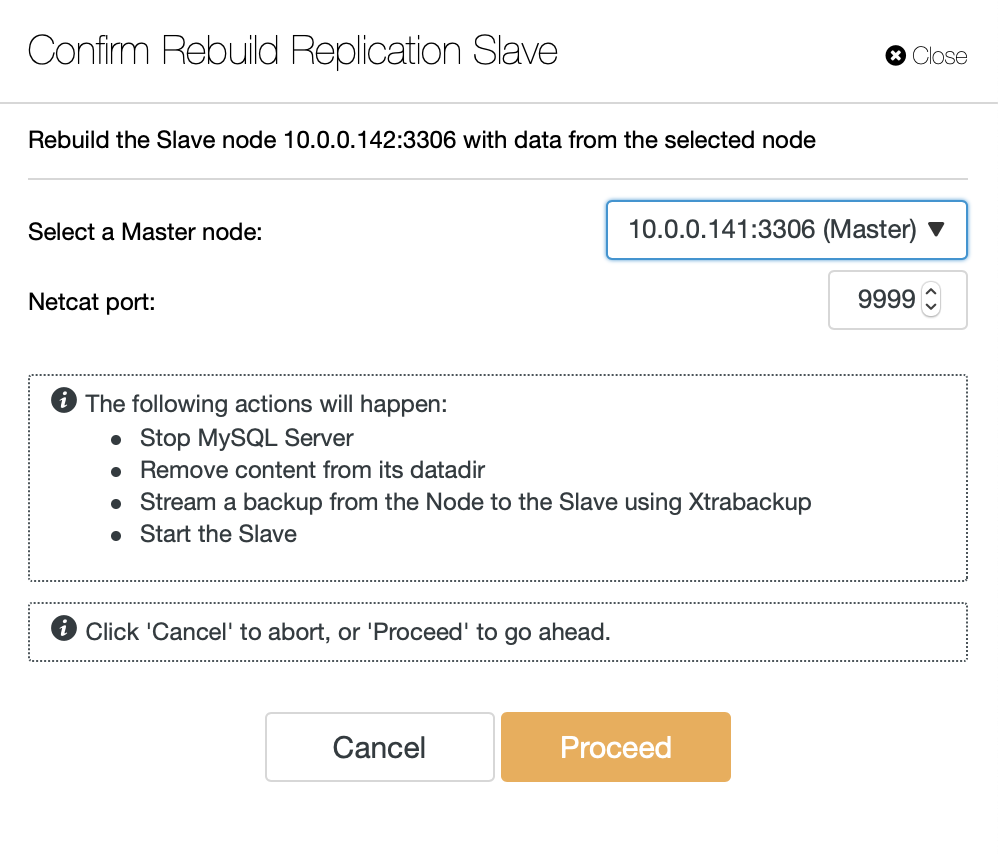
You will be presented with a dialog where you should pick a master node for the slave that you want to rebuild. Then, click on Proceed and you are all set. ClusterControl will rebuild the slave and set up the replication for you.
Shortly, based on the data set size, you should see working slave:
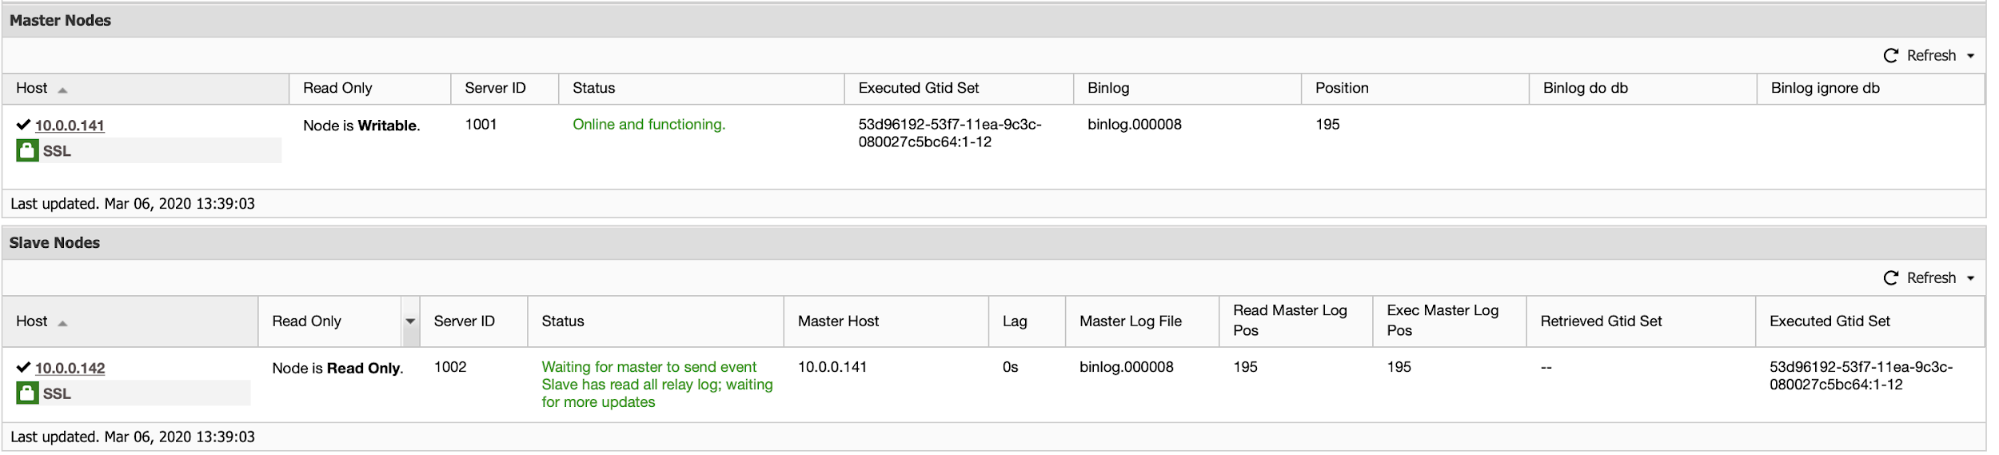
As you can see, with just a couple of clicks ClusterControl accomplished the task of rebuilding the inconsistent replication slave.