blog
How to Deploy MariaDB Cluster 10.5 for High Availability

MariaDB Cluster 10.5 deployment has been supported in ClusterControl since version 1.8.1.
MariaDB 10.5 is equipped with:
-
More Granular Privileges
-
InnoDB Performance Improvements
-
Full GTID Support for Galera Cluster
-
More Metadata for Replication and Binary Logs
-
More SQL syntax statements (RETURNING statement to INSERT, EXCEPT ALL and INTERSECT ALL, …)
-
Performance Schema Updates to Match MySQL 5.7
-
The S3 Storage Engine
You can check further on our previous blog
For more details about this particular version release, check out what’s new in MariaDB 10.5? Some of the most significant changes from version 10.4 to 10.5 include:
-
GTID consistency
-
Cluster inconsistency/error voting
-
non-blocking DDL operations (available only on enterprise version)
-
Black box (available only on enterprise version)
-
Upgraded its Galera wsrep Library, for which 26.4.6 is the latest version
Initially, XA Transaction Support was expected for this release (do not be confused as XA Transactions are supported by MariaDB Server but not on Galera Cluster). However, due to some performance implications, MariaDB Galera Cluster does not support XA transactions.
In this blog, we will discuss how to deploy MariaDB Cluster 10.5 for high availability.
MariaDB Cluster For High Availability
The MariaDB Cluster is essentially a Galera Cluster that uses the MariaDB implementation as the database layer to interface with the InnoDB or XtraDB engine. MariaDB Galera Cluster is a virtually synchronous multi-master cluster for MariaDB. It is available only on Linux and supports the XtraDB/InnoDB storage engines (although there is experimental support for MyISAM — see the wsrep_replicate_myisam system variable). When Galera Cluster is used, database reads and writes can be directed to any node. Any individual node can be lost without interruption in operations and without using complex failover procedures.
With Galera’s nature adapted within MariaDB Cluster, it’s a high availability solution with synchronous replication, failover, and resynchronization. It brings the benefits of no data loss, no slave lag, read and write scalability, and high availability in different data centers.
Deploying MariaDB Cluster 10.5
MariaDB provides a straightforward and easy setup for installing your MariaDB Cluster 10.5. The manual process can be tedious, but with automated scripts provided by MariaDB, repositories can be set up in accordance with your target database version, OS type, and OS version.
For this exercise, I have the following 3-node Galera Cluster setup with the following IP addresses: 192.168.40.210, 192.168.40.220, 192.168.40.230.
Set Up Your Repository
As mentioned earlier, MariaDB has a script named mariadb_repo_setup, and it’s easy to use. You can specify the target version of your database, the OS type, and your OS version.
For example, I am installing using EL 8:
curl -LsS https://downloads.mariadb.com/MariaDB/mariadb_repo_setup | sudo bash -s -- --mariadb-server-version="mariadb-10.5" --os-type=rhel --os-version=8or installing it in Ubuntu Focal Fossa,
curl -LsS https://downloads.mariadb.com/MariaDB/mariadb_repo_setup | sudo bash -s -- --mariadb-server-version="mariadb-10.5" --os-type=ubuntu --os-version=focalTake note that when using mariadb_repo_setup script, it requires the package apt-transport-https as a dependency. So install this package first before you can take advantage of the mariadb_repo_setup script.
apt update

apt install apt-transport-https
Now, run the command to your three nodes according to their OS. Of course, the MariaDB version has to be 10.5.
Setup MySQL Configuration
Configuration file depends on your server resources, type of server environment, and assigned IP address. For this blog, you can use this production-ready MariaDB Cluster/PXC configuration setup which we used to deploy in our Percona XtraDB Cluster/MariaDB Cluster databases using ClusterControl. Notable variables that you need or are subject to change are the following:
-
innodb_buffer_pool_size — Set the buffer pool from 70% – 80% available RAM of your server
-
wsrep_provider — Path of the Galera compiled library. For Enterprise Linux, the path shall be /usr/lib64/galera-4/libgalera_smm.so. Whereas Debian/Ubuntu is in /usr/lib/galera/libgalera_smm.so.
-
wsrep_node_address — This is the node IP address
-
wsrep_sst_method — Either you can change it, but we recommend you use mariabackup. Possible values you can choose are rsync, mysqldump, xtrabackup, xtrabackup-v2, mariabackup.
-
wsrep_cluster_name — The name of your MariaDB Cluster. It has to be identical to all your nodes in a single MariaDB Cluster.
-
wsrep_cluster_address — This contains the addresses of your nodes within the cluster. It has to be a valid IP, hostname, or FQDN.
-
wsrep_node_name — The name of your node. The name can be used in wsrep_sst_donor as a preferred donor. Note that multiple nodes in a cluster can have the same name.
For performing SST, the user and password for the following sections [mysqldump], [xtrabackup], and [mysqld] can change if you want. For this exercise, let’s keep it simple, and you can just let the values as is.
Now, copy the configuration file and place it to /etc/my.cnf. Do this to all of your three Galera nodes.
Installing Required Packages
Install the packages for all three Galera nodes. Follow the command below based on your target OS environment.
For RHEL/Rocky/AlmaLinux:
sudo yum install MariaDB-server MariaDB-client galera-4 MariaDB-backupFor Debian/Ubuntu:
sudo apt update

sudo apt-get install mariadb-server galera-4 mariadb-client libmariadb3 mariadb-backup mariadb-common
Once installation is complete, stop the MariaDB process and initialize the cluster as a single node. This shall bootstrap your Galera Cluster. At this stage, I’m running it on node 192.168.40.210.
$ /usr/bin/galera_new_clusterCreate SST/IST User
Create the backup user, which shall be used for SST or IST. Only run the following SQL statements below on the first node that you have initiated the cluster. At this stage, I have executed it in node 192.168.40.210.
CREATE USER backupuser@localhost IDENTIFIED BY 'backuppassword';

GRANT PROCESS, RELOAD, LOCK TABLES, REPLICATION CLIENT ON *.* TO 'backupuser'@'localhost';
At this point, we’re already set up and ready to connect the remaining nodes.
Start The MariaDB Server
Now we have already set up the first node. We are ready to connect the remaining nodes. Simply, just start the MariaDB service. Just run the command below:
systemctl start mariadbRun the command for the remaining nodes one at a time. At this point, all nodes are in sync.
Adding Steroids For Your MariaDB Cluster 10.5 for High Availability
Likely, deploying the MariaDB Cluster 10.5 for high availability might not suffice your needs in a production setup. Adding more steroids, such as installing HAProxy together with Keepalived for your redundancy, will bring more high availability for your database environment.
Setting up HAProxy and Keepalived to obtain the desired topology and environment may add more hassle. However, you can automate this with ClusterControl. Using ClusterControl, you can deploy your MariaDB Cluster 10.5 and add more solutions for load balancing, such as ProxySQL, MaxScale, or garbd. You can add Keepalived to your cluster to add redundancy and auto-failover solutions in case of disaster.
You can download a free trial of ClusterControl that will allow you to deploy these HA solutions and manage your entire database operations from a single pane of glass. We will walk through how to deploy your MariaDB 10.5 Cluster with ClusterControl.
Deploying MariaDB 10.5 Cluster with ClusterControl
Once you have installed ClusterControl, click the icon in the upper right corner, and you’ll see the deployment Wizard just like below.
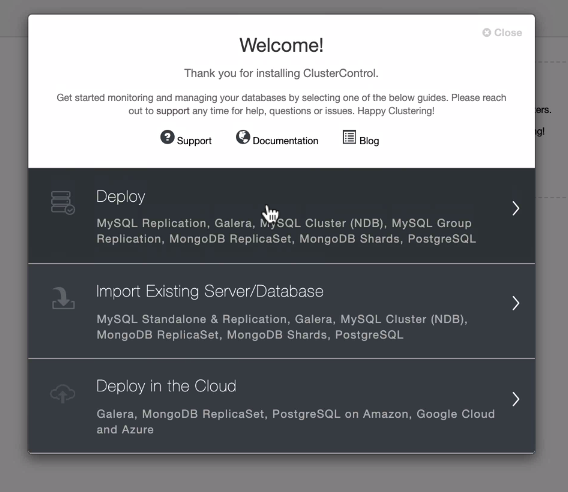
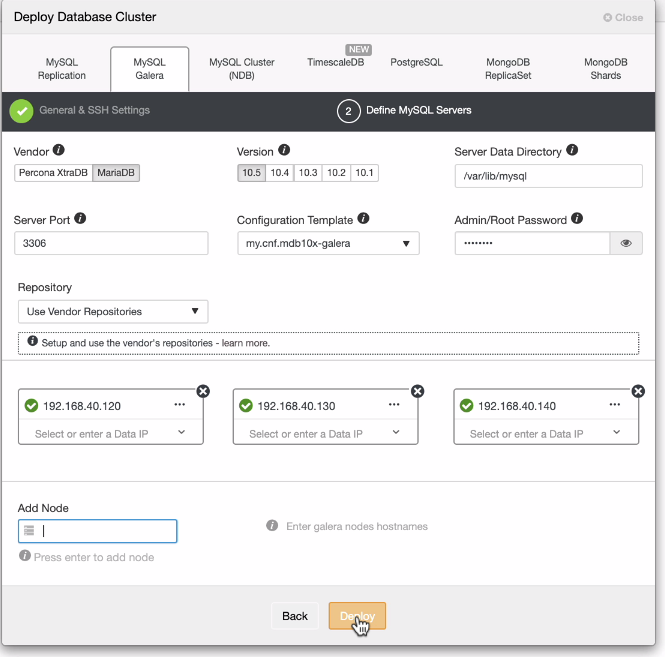
You can set it up easily. Just follow the series of steps based on the flow of the UI.
Deploy HAProxy For Load Balancing Management
At this point, I would assume you have your MariaDB Cluster 10.5 all set up. Now, let’s deploy the HAProxy:

Alternatively, you can go to Manage → Load Balancer → HAProxy.
Then select or type the address where the HAProxy is to be installed and select your Galera nodes that will be monitored by the HAProxy. See the example below:
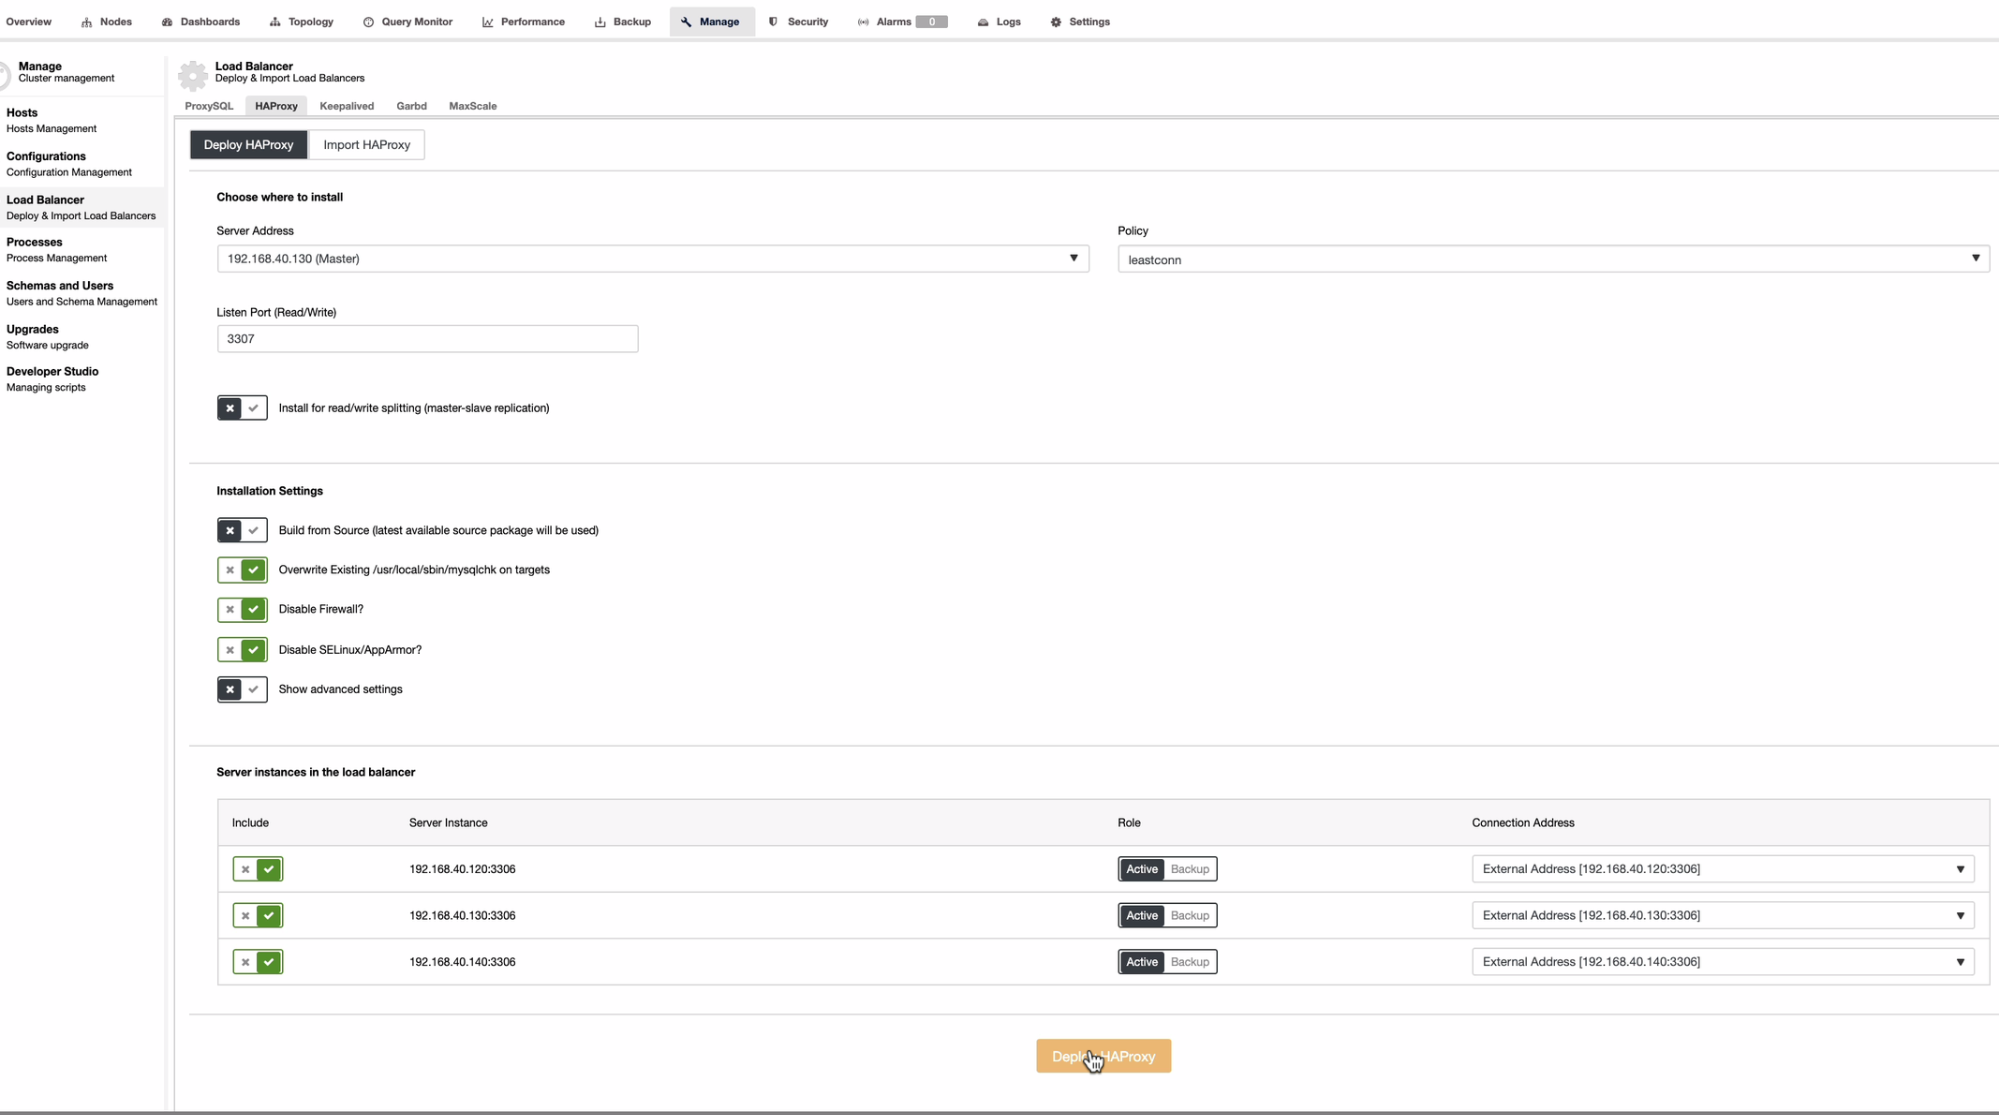
Add at least two deployments of HAProxy to add more availability. Whenever one of your HAProxy goes down, your application will route over to the other node that is still available or online. This is very important, especially when handling database or system upgrades, aside from catastrophic or disaster events.
Deploy Keepalived
You will use the same process above to deploy Keepalived, as shown below:
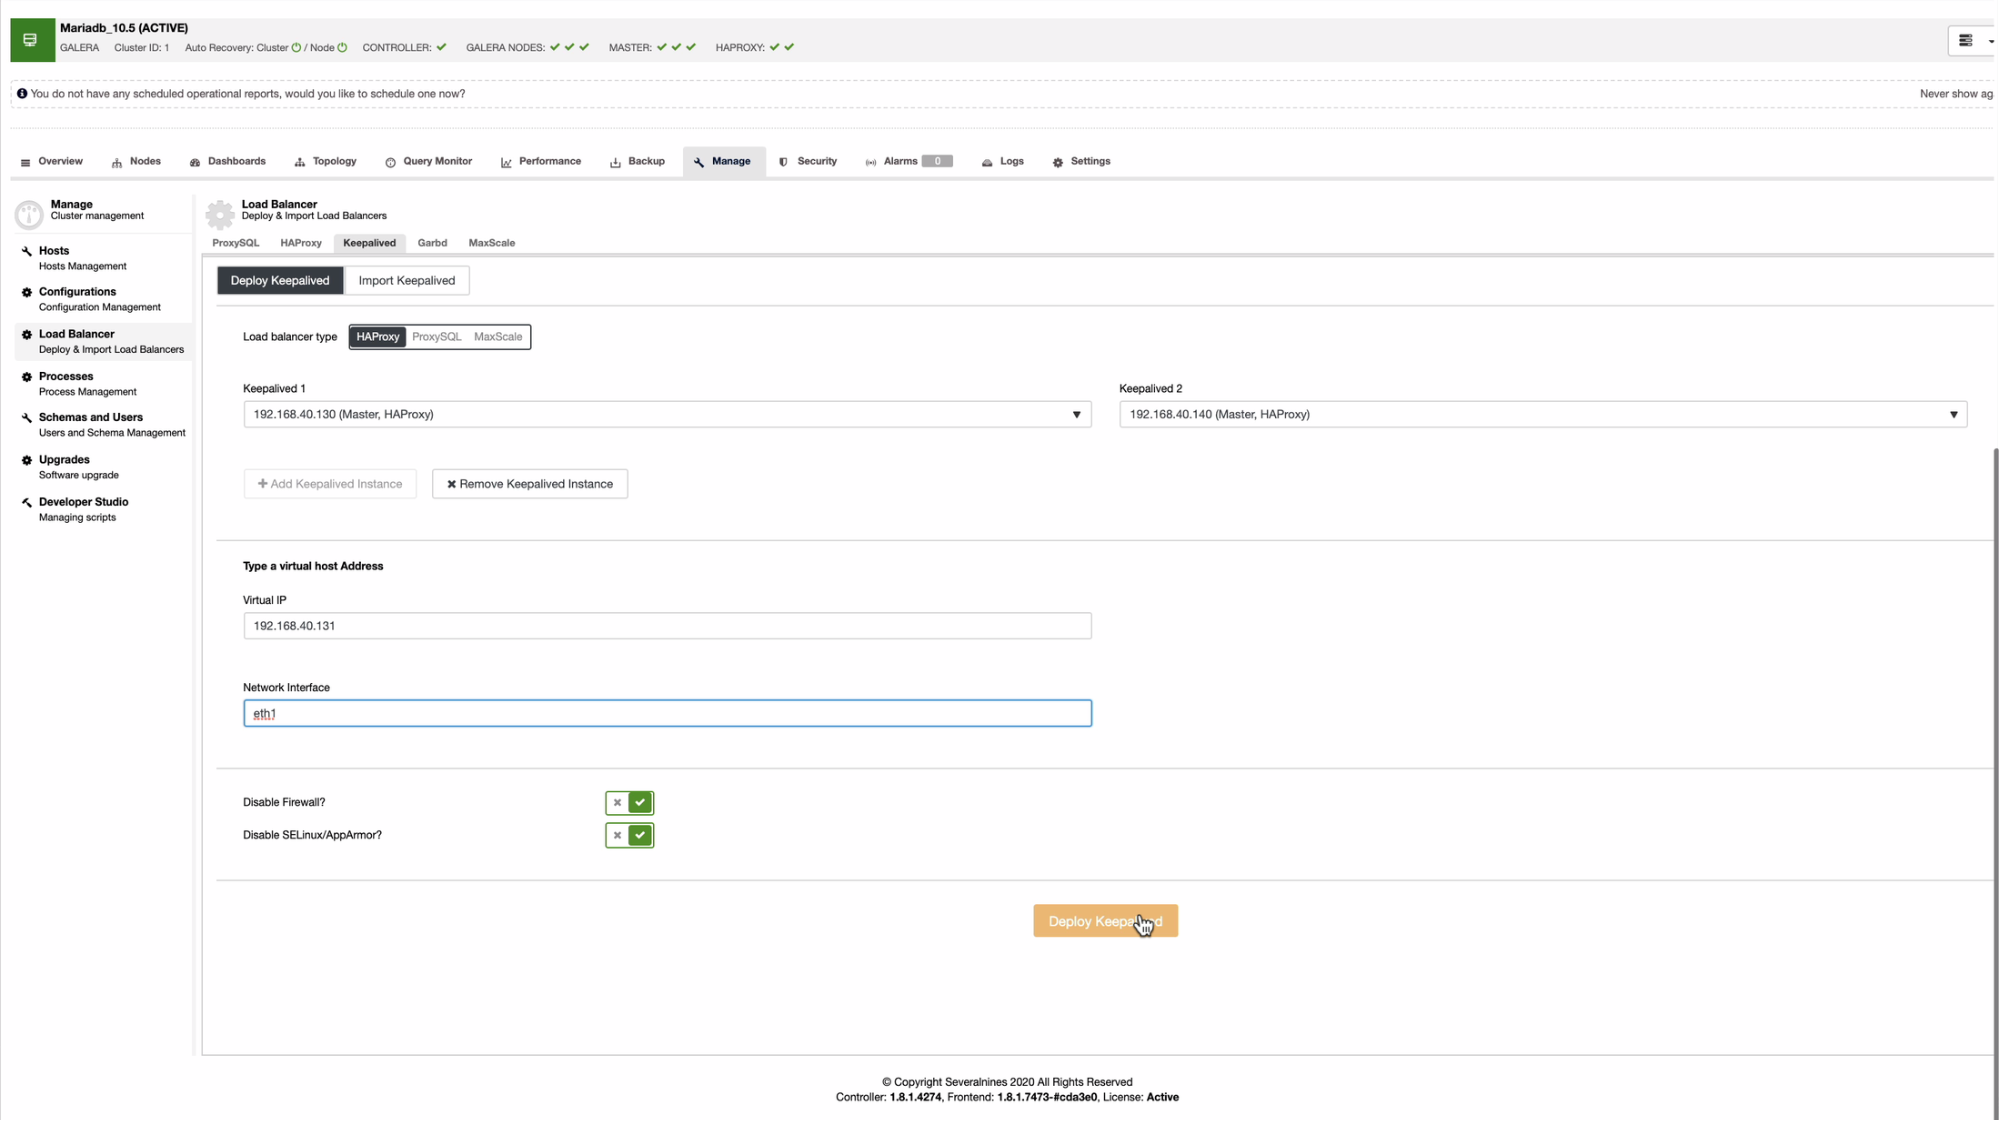
If you noticed, I have two HAProxy instances for which I will install Keepalived, which shall be present in every node where the HAProxy is running.
Finalizing your MariaDB Cluster 10.5 With High Availability
Now that we have everything set up, you should have an environment that looks like this:
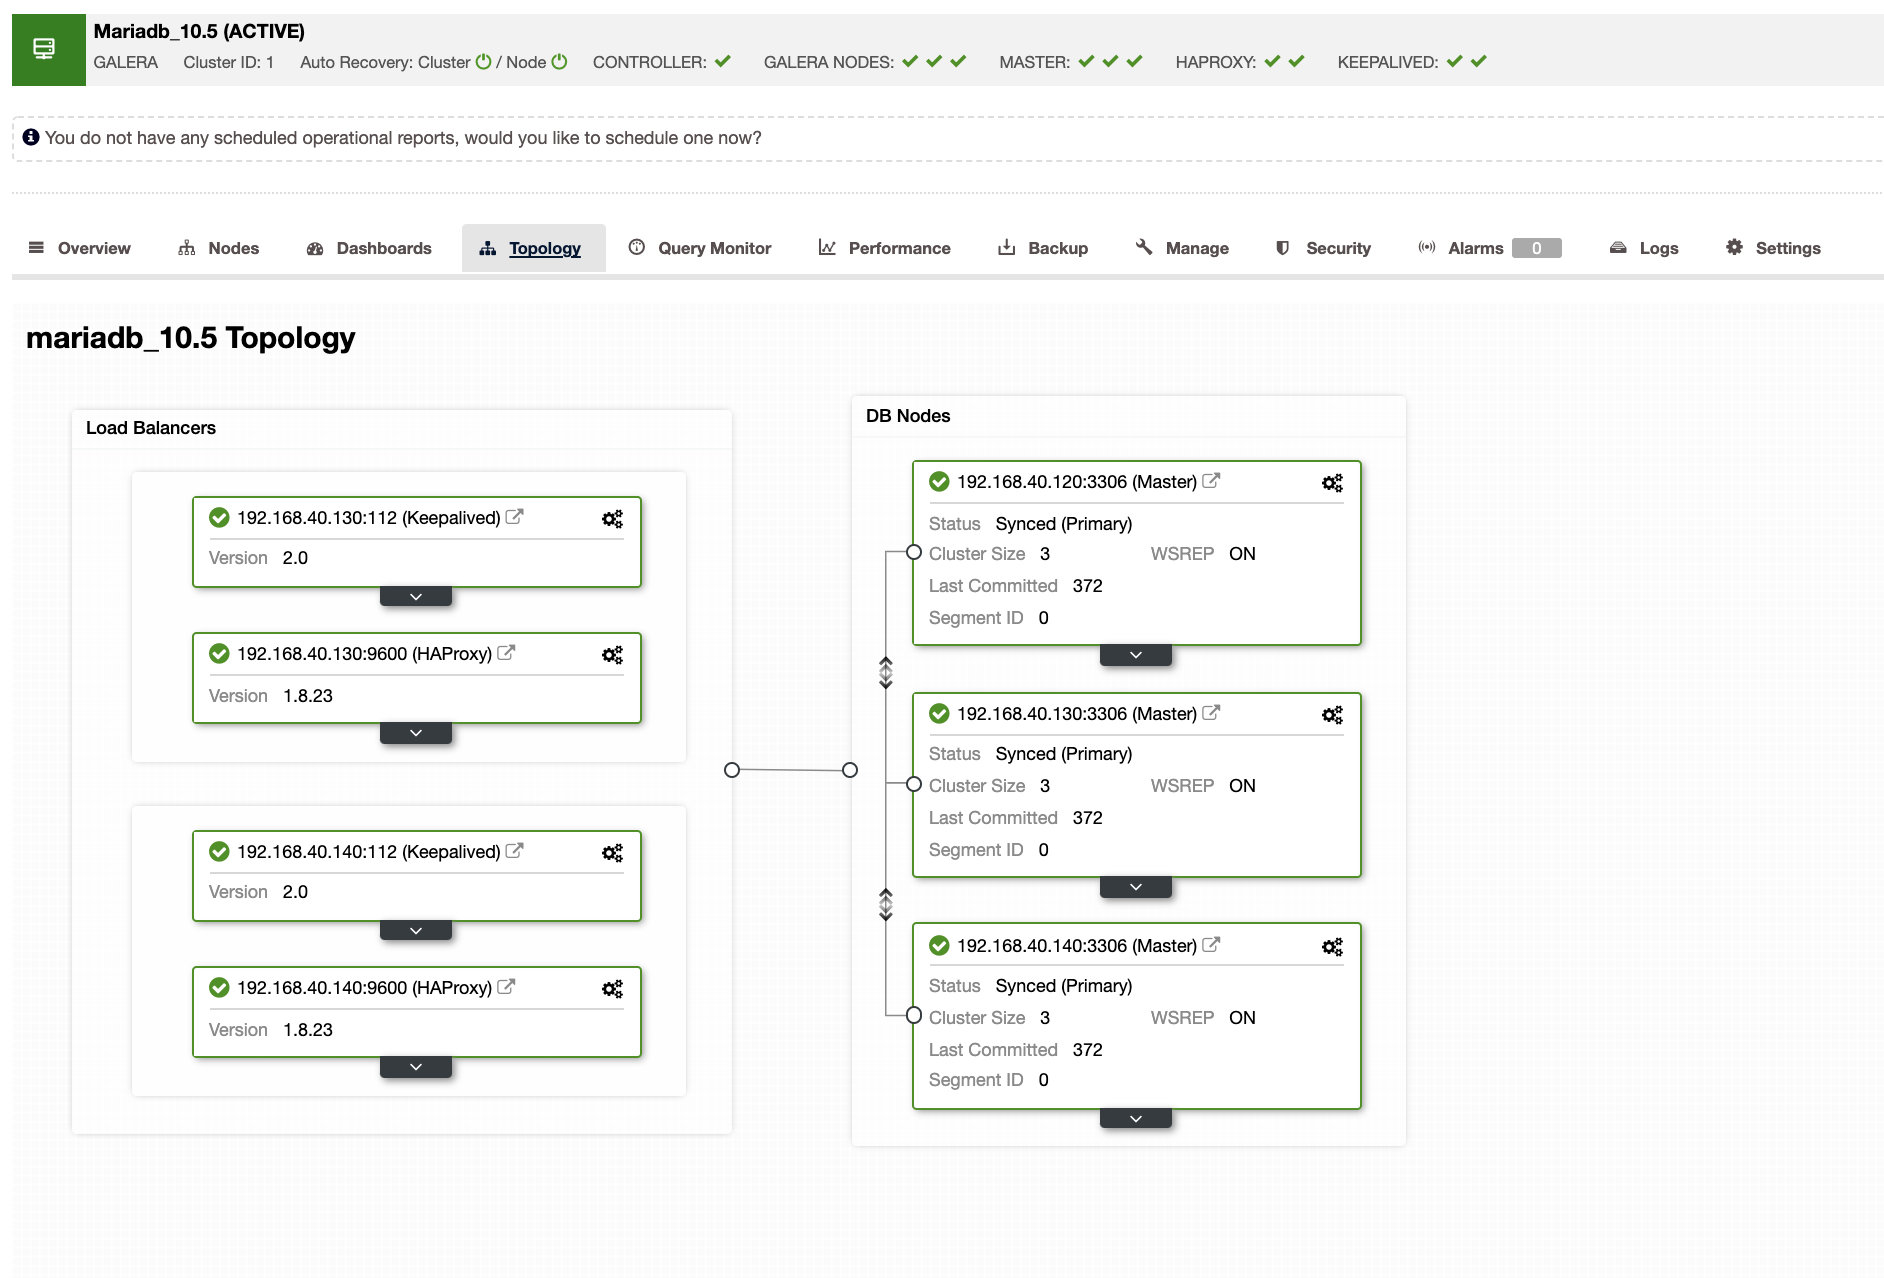
Wrapping Up
This setup for your MariaDB 10.5 Cluster gives you the benefits of achieving high availability with several nines. HAProxy provides you with more load balancing capabilities with its read and write separation, and Keepalived ensures that in case one of your HAProxy dies, it will failover to the next available node. Your application will only connect to the virtual IP address (which follows the VRRP) and won’t require extra configuration or setup.
To add even more flexibility and read/write separation by just playing only in one port, you could replace HAProxy with ProxySQL. Achieving a perfect setup for high availability can be difficult, and each comes with its drawbacks. However, what matters most is that low to no downtime is achieved.
For more tips on building a highly available MariaDB setup, check out this piece on deploying MariaDB replication.
If you’re looking to stay up to date on database trends and best practices, subscribe to our newsletter and follow us on Twitter and LinkedIn.


