blog
A Guide to MySQL Galera Cluster Restoration Using mysqldump

Using logical backup programs like mysqldump is a common practice performed by MySQL admins for backup and restore (the process of moving a database from one server to another) and is also the most efficient way to perform a database mass modification using a single text file.
When doing this for MySQL Galera Cluster, however, the same rules apply except for the fact that it takes a lot of time to restore a dump file into a running Galera Cluster. In this blog, we will look at the best way to restore a Galera Cluster using mysqldump.
Galera Cluster Restoration Performance
One of the most common misconceptions about Galera Cluster is that restoring a database into a three-node cluster is faster than doing it to a standalone node. This is definitely incorrect when talking about a stateful service, like datastore and filesystem. To keep in sync, every member has to keep up with whatever changes happened with the other members. This is where locking, certifying, applying, rollbacking, committing are forced to be involved into the picture to ensure no data loss along the process, because for a database service, data loss is a big no-no.
Let’s make some comparisons to see and understand the impact. Suppose we have a 2 GB of dump file for database ‘sbtest’. We usually would load the data into the cluster via two endpoints:
- load balancer host
- one of the database hosts
As for control measurement, we are also going to restore on a standalone node. Variable pxc_strict_mode is set to PERMISSIVE on all Galera nodes.
The backup was created on one of the Galera nodes with the following command:
$ mysqldump --single-transaction sbtest > sbtest.sqlWe are going to use ‘pv’ to observe the progress and measure the restoration performance. Thus, the restore command is:
$ pv sbtest.sql | mysql -uroot -p sbtestThe restorations were repeated 3 times for each host type as shown in the following table:
|
Endpoint Type |
Database Server |
Restoration Time (seconds) |
Restoration Speed (MiB/s) |
|
Standalone |
MySQL 5.7.25 |
3m 29s 3m 36s 3m 31s |
8.73 8.44 8.64 |
|
Load Balancer |
HAProxy -> PXC 5.7.25 (multiple DB hosts – all active, leastconn) |
5m 45s 6m 03s 5m 43s |
5.29 5.02 5.43 |
|
ProxySQL -> PXC 5.7.25 (single DB host – single writer hostgroup) |
6m 07s 7m 00s 6m 54s |
4.97 4.34 4.41 |
|
|
Galera Cluster |
PXC 5.7.25 (single DB host) |
5m 22s 6m 00s 5m 28s |
5.66 5.07 5.56 |
Note that the way pv measures the restoration speed is based on the mysqldump text file that is being passed through it through pipe. It’s not highly accurate but good enough to give us some measurements to compare. All hosts are having the same specs and running as a virtual machine on the same underlying physical hardware.
The following column chart summarizes the average time it takes to restore the mysqldump:
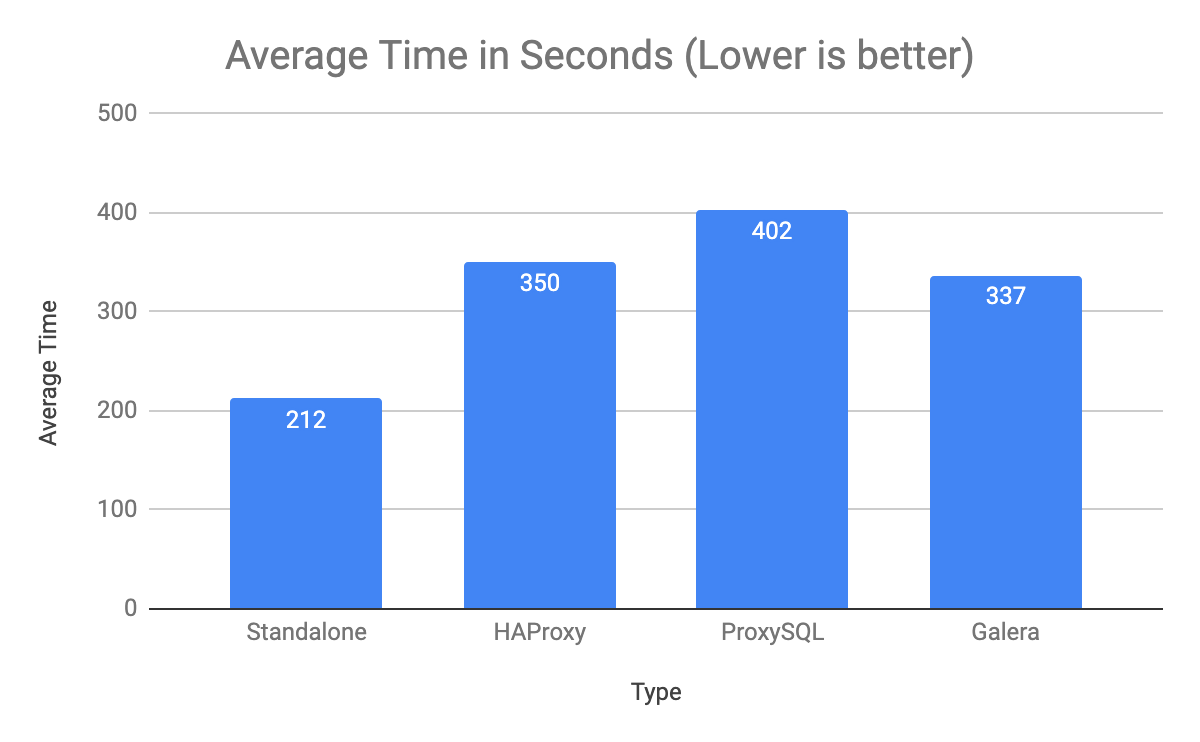
Standalone host is the clear winner with 212 seconds, while ProxySQL is the worst for this workload; almost two-times slower if compared to standalone.
The following column chart summarizes the average speed pv measures when restoring the mysqldump:
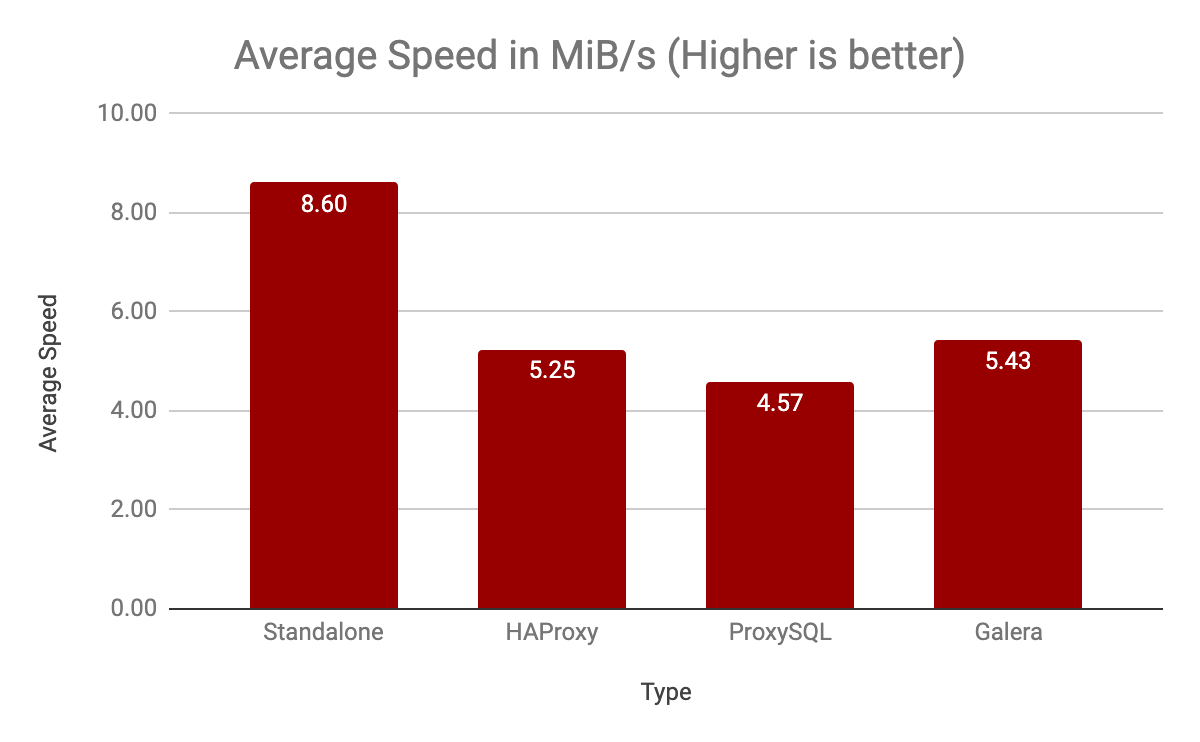
As expected, restoration on the standalone note is way faster with 8.6 MiB/s on average, 1.5x better than restoration directly on the Galera node.
To summarize our observation, restoring directly on a Galera Cluster node is way slower than a standalone host. Restoring through a load balancer is even worse.
Turning Off Galera Replication
Running mysqldump on a Galera Cluster will cause every single DML statement (INSERTs in this case) being broadcasted, certified and applied by Galera nodes through its group communication and replication library. Thus, the fastest way to restore a mysqldump is to perform the restoration on a single node, with Galera Replication turned off, kind of making it running like a standalone mode. The steps are:
- Pick one Galera node as the restore node. Stop the rest of the nodes.
- Turn off Galera Replication on the restore node.
- Perform the restoration.
- Stop and bootstrap the restore node.
- Force the remaining node to re-join and re-sync via SST.
For example, let’s say we choose db1 to be the restore node. Stop the other nodes (db2 and db3) one node at a time so the nodes would leave the cluster gracefully:
$ systemctl stop mysql #db2

$ systemctl stop mysql #db3
Note: For ClusterControl users, simply go to Nodes -> pick the DB node -> Node Actions -> Stop Node. Do not forget to turn off ClusterControl automatic recovery for cluster and nodes before performing this exercise.
Now, login to db1 and turn the Galera node into a standalone node by setting wsrep_provider variable to ‘none’:
$ mysql -uroot -p

mysql> SET GLOBAL wsrep_provider = 'none';

mysql> SHOW STATUS LIKE 'wsrep_connected';

+-----------------+-------+

| Variable_name   | Value |

+-----------------+-------+

| wsrep_connected | OFF   |

+-----------------+-------+
Then perform the restoration on db1:
$ pv sbtest.sql | mysql -uroot -p sbtest

1.78GiB 0:02:46 [  11MiB/s] [==========================================>] 100%
The restoration time has improved 2x to 166 seconds (down from ~337 seconds) with 11MiB/s (up from ~5.43MiB/s). Since this node is now has the most updated data, we have to bootstrap the cluster based on this node and let the other nodes rejoin the cluster and force to re-syncing everything back.
On db1, stop the MySQL service and start it again in bootstrap mode:
$ systemctl status mysql #check whether mysql or mysql@bootstrap is running

$ systemctl status mysql@bootstrap #check whether mysql or mysql@bootstrap is running

$ systemctl stop mysql # if mysql was running

$ systemctl stop mysql@bootstrap # if mysql@bootstrap was running

$ systemctl start mysql@bootstrap
While on every remaining node, wipe out the datadir (or you can just simply delete grastate.dat file) and start the MySQL service:
$ rm /var/lib/mysql/grastate.dat  # remove this file to force SST

$ systemctl start mysql
Do perform the start up process one node at a time. Once the working node is synced, proceed with the next node and so on.
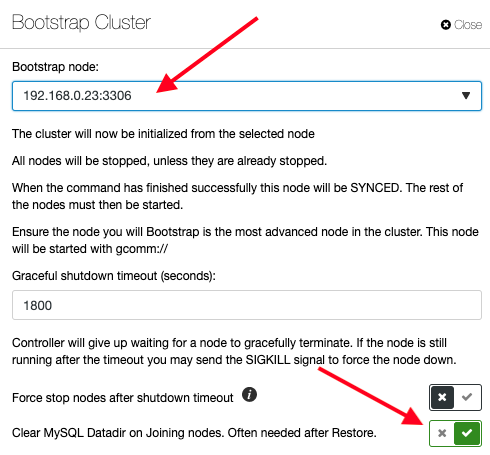
Note: For ClusterControl users, you could skip the above step because ClusterControl can be configured to force SST during the bootstrap process. Just click on the Cluster Actions -> Bootstrap Cluster and pick the db1 as the bootstrap node and toggle on the option for “Clear MySQL Datadir on Joining nodes“, as shown below:
We could also juice up the restoration process by allowing bigger packet size for the mysql client:
$ pv sbtest.sql | mysql -uroot -p --max_allowed_packet=2G sbtestAt this point, our cluster should be running with the restored data. Take note that in this test case, the total restoration time for the cluster is actually longer than if we performed the restoration directly on the Galera node thanks to our small dataset. If you have a huge mysqldump file to restore, believe us, this is one of the best ways you should do.
That’s it for now. Happy restoring!