blog
Deploying a Highly Available Nextcloud with MySQL Galera Cluster and GlusterFS

Nextcloud is an open source file sync and share application that offers free, secure, and easily accessible cloud file storage, as well as a number of tools that extend its feature set. It’s very similar to the popular Dropbox, iCloud and Google Drive but unlike Dropbox, Nextcloud does not offer off-premises file storage hosting.
In this blog post, we are going to deploy a high-available setup for our private “Dropbox” infrastructure using Nextcloud, GlusterFS, Percona XtraDB Cluster (MySQL Galera Cluster), ProxySQL with ClusterControl as the automation tool to manage and monitor the database and load balancer tiers.
Note: You can also use MariaDB Cluster, which uses the same underlying replication library as in Percona XtraDB Cluster. From a load balancer perspective, ProxySQL behaves similarly to MaxScale in that it can understand the SQL traffic and has fine-grained control on how traffic is routed.
Database Architecture for Nextcloud
In this blog post, we used a total of 6 nodes.
- 2 x proxy servers
- 3 x database + application servers
- 1 x controller server (ClusterControl)
The following diagram illustrates our final setup:
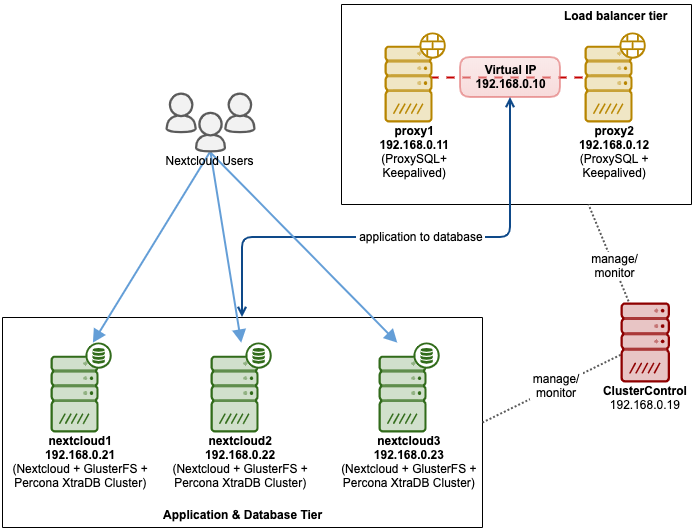
For Percona XtraDB Cluster, a minimum of 3 nodes is required for a solid multi-master replication. Nextcloud applications are co-located within the database servers, thus GlusterFS has to be configured on those hosts as well.
Load balancer tier consists of 2 nodes for redundancy purposes. We will use ClusterControl to deploy the database tier and the load balancer tiers. All servers are running on CentOS 7 with the following /etc/hosts definition on every node:
192.168.0.21 nextcloud1 db1

192.168.0.22 nextcloud2 db2

192.168.0.23 nextcloud3 db3

192.168.0.10 vip db

192.168.0.11 proxy1 lb1 proxysql1

192.168.0.12 proxy2 lb2 proxysql2
Note that GlusterFS and MySQL are highly intensive processes. If you are following this setup (GlusterFS and MySQL resides in a single server), ensure you have decent hardware specs for the servers.
Nextcloud Database Deployment
We will start with database deployment for our three-node Percona XtraDB Cluster using ClusterControl. Install ClusterControl and then setup passwordless SSH to all nodes that are going to be managed by ClusterControl (3 PXC + 2 proxies). On ClusterControl node, do:
$ whoami

root

$ ssh-copy-id 192.168.0.11

$ ssh-copy-id 192.168.0.12

$ ssh-copy-id 192.168.0.21

$ ssh-copy-id 192.168.0.22

$ ssh-copy-id 192.168.0.23
**Enter the root password for the respective host when prompted.
Open a web browser and go to https://{ClusterControl-IP-address}/clustercontrol and create a super user. Then go to Deploy -> MySQL Galera. Follow the deployment wizard accordingly. At the second stage ‘Define MySQL Servers’, pick Percona XtraDB 5.7 and specify the IP address for every database node. Make sure you get a green tick after entering the database node details, as shown below:
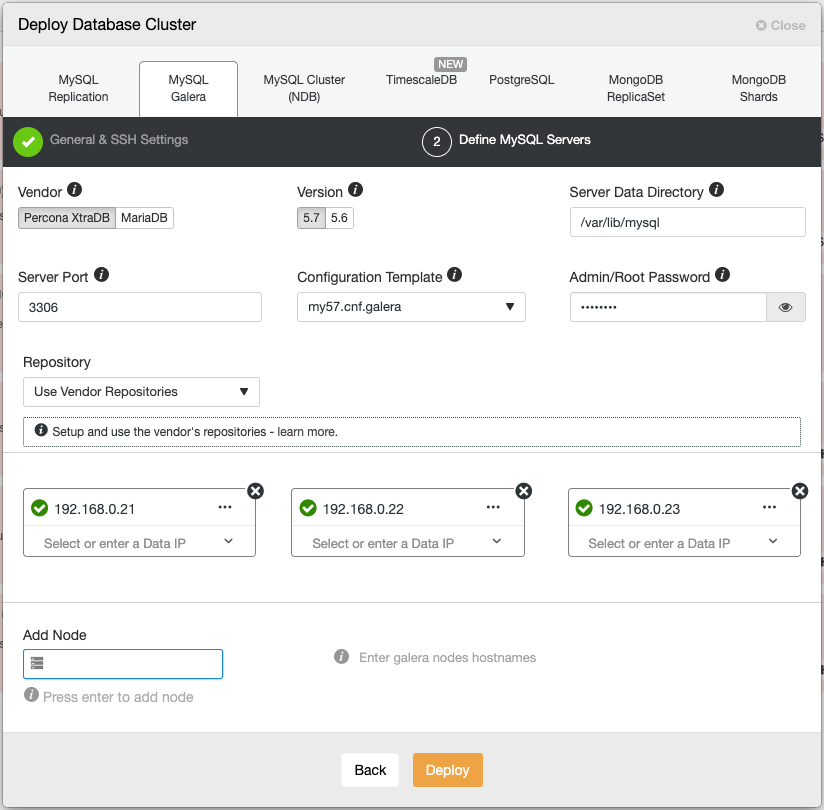
Click “Deploy” to start the deployment. The database cluster will be ready in 15~20 minutes. You can follow the deployment progress at Activity -> Jobs -> Create Cluster -> Full Job Details. The cluster will be listed under Database Cluster dashboard once deployed.
We can now proceed to database load balancer deployment.
Nextcloud Database Load Balancer Deployment
Nextcloud is recommended to run on a single-writer setup, where writes will be processed by one master at a time, and the reads can be distributed to other nodes. We can use ProxySQL 2.0 to achieve this configuration since it can route the write queries to a single master.
To deploy a ProxySQL, click on Cluster Actions > Add Load Balancer > ProxySQL > Deploy ProxySQL. Enter the required information as highlighted by the red arrows:
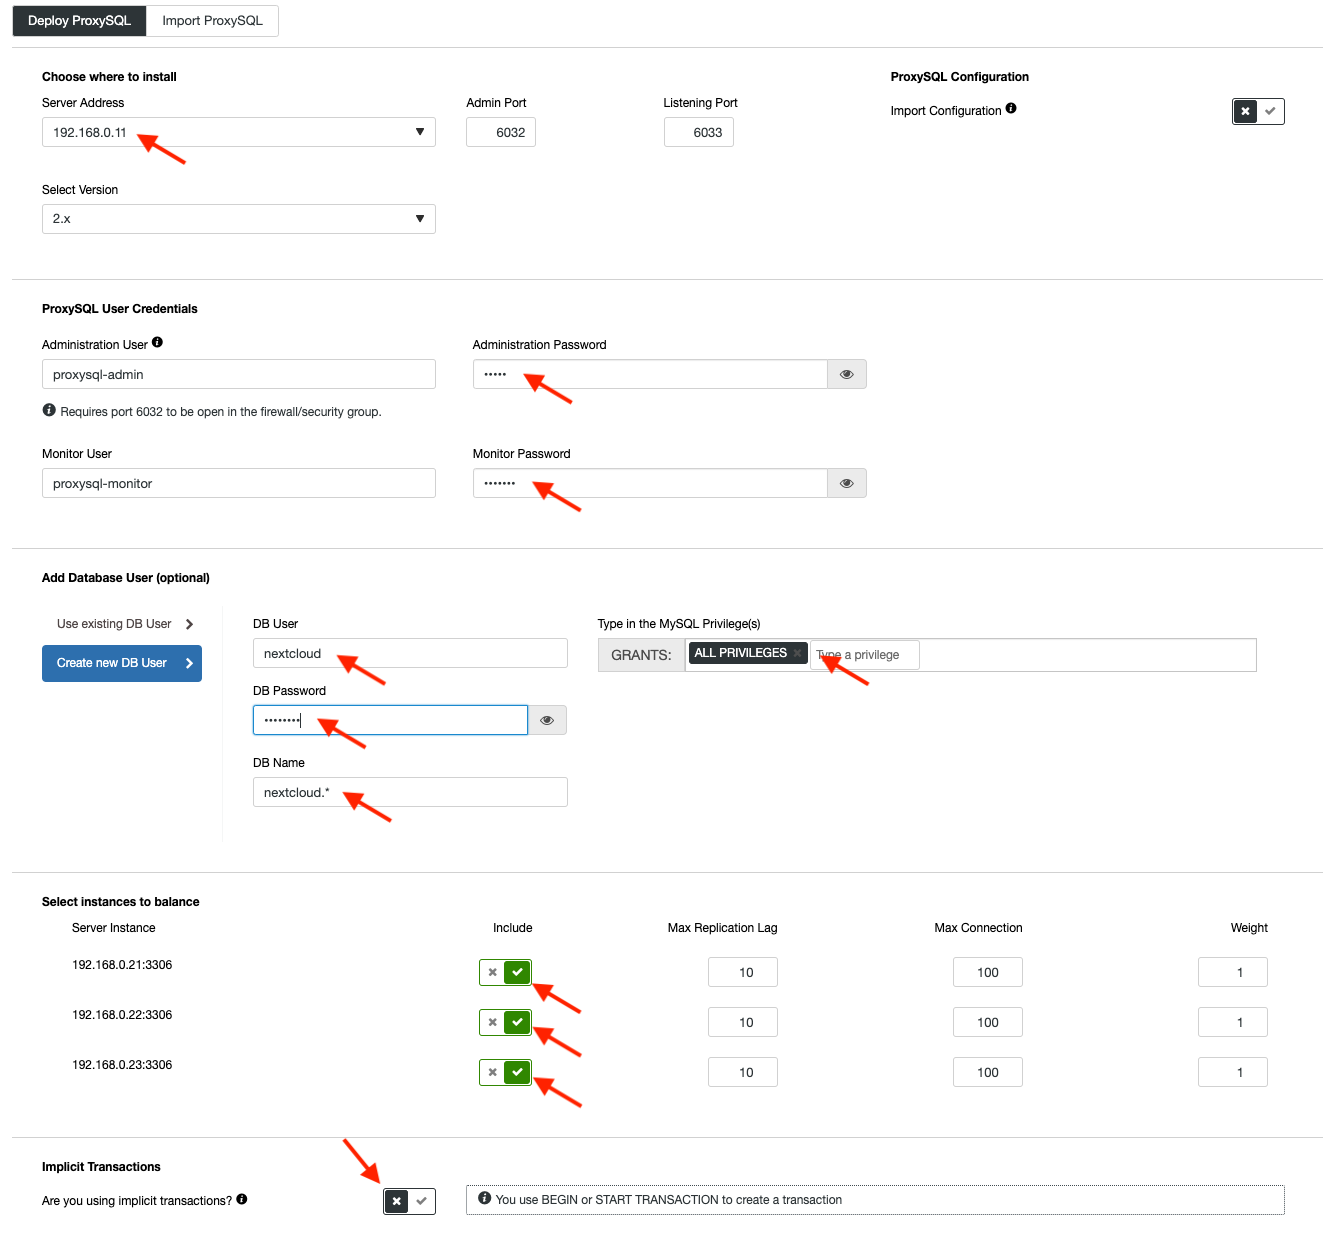
Fill in all necessary details as highlighted by the arrows above. The server address is the lb1 server, 192.168.0.11. Further down, we specify the ProxySQL admin and monitoring users’ password. Then include all MySQL servers into the load balancing set and then choose “No” in the Implicit Transactions section. Click “Deploy ProxySQL” to start the deployment.
Repeat the same steps as above for the secondary load balancer, lb2 (but change the “Server Address” to lb2’s IP address). Otherwise, we would have no redundancy in this layer.
Our ProxySQL nodes are now installed and configured with two host groups for Galera Cluster. One for the single-master group (hostgroup 10), where all connections will be forwarded to one Galera node (this is useful to prevent multi-master deadlocks) and the multi-master group (hostgroup 20) for all read-only workloads which will be balanced to all backend MySQL servers.
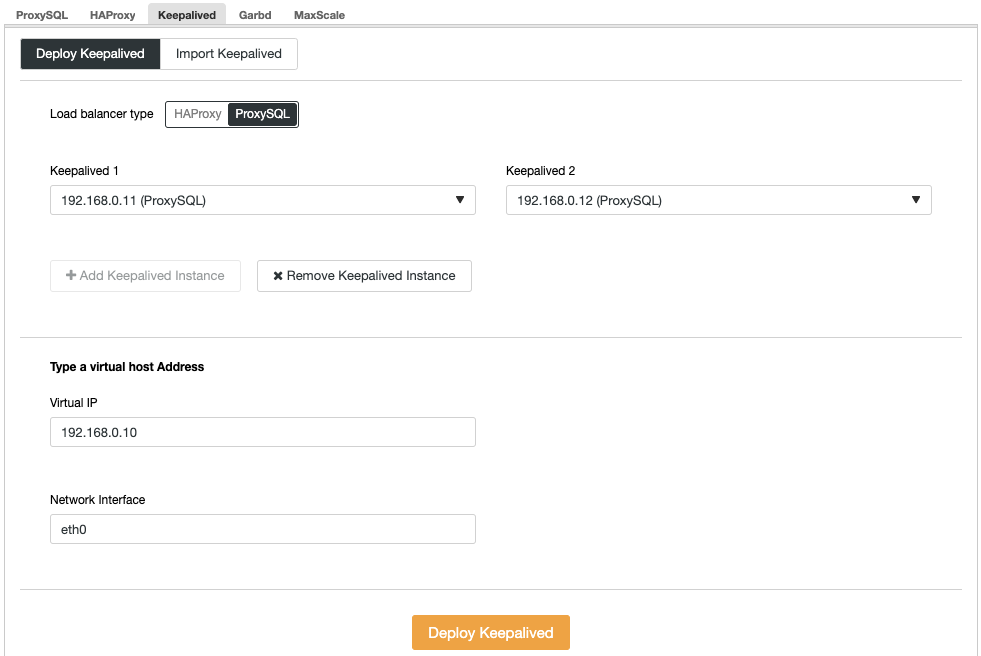
Next, we need to deploy a virtual IP address to provide a single endpoint for our ProxySQL nodes so your application will not need to define two different ProxySQL hosts. This will also provide automatic failover capabilities because virtual IP address will be taken over by the backup ProxySQL node in case something goes wrong to the primary ProxySQL node.
Go to ClusterControl -> Manage -> Load Balancers -> Keepalived -> Deploy Keepalived. Pick “ProxySQL” as the load balancer type and choose two distinct ProxySQL servers from the dropdown. Then specify the virtual IP address as well as the network interface that it will listen to, as shown in the following example:
Once the deployment completes, you should see the following details on the cluster’s summary bar:

Finally, create a new database for our application by going to ClusterControl -> Manage -> Schemas and Users -> Create Database and specify “nextcloud”. ClusterControl will create this database on every Galera node. Our load balancer tier is now complete.
GlusterFS Deployment for Nextcloud
The following steps should be performed on nextcloud1, nextcloud2, nextcloud3 unless otherwise specified.
Step One
It’s recommended to have a separate this for GlusterFS storage, so we are going to add additional disk under /dev/sdb and create a new partition:
$ fdisk /dev/sdbFollow the fdisk partition creation wizard by pressing the following key:
n > p > Enter > Enter > Enter > wStep Two
Verify if /dev/sdb1 has been created:
$ fdisk -l /dev/sdb1

Disk /dev/sdb1: 8588 MB, 8588886016 bytes, 16775168 sectors

Units = sectors of 1 * 512 = 512 bytes

Sector size (logical/physical): 512 bytes / 512 bytes

I/O size (minimum/optimal): 512 bytes / 512 bytes
Step Three
Format the partition with XFS:
$ mkfs.xfs /dev/sdb1Step Four
Mount the partition as /storage/brick:
$ mkdir /glusterfs

$ mount /dev/sdb1 /glusterfs
Verify that all nodes have the following layout:
$ lsblk

NAME   MAJ:MIN RM SIZE RO TYPE MOUNTPOINT

sda      8:0 0 40G  0 disk

└─sda1   8:1 0 40G  0 part /

sdb      8:16 0   8G 0 disk

└─sdb1   8:17 0   8G 0 part /glusterfs
Step Five
Create a subdirectory called brick under /glusterfs:
$ mkdir /glusterfs/brickStep Six
For application redundancy, we can use GlusterFS for file replication between the hosts. Firstly, install GlusterFS repository for CentOS:
$ yum install centos-release-gluster -y

$ yum install epel-release -y
Step Seven
Install GlusterFS server
$ yum install glusterfs-server -yStep Eight
Enable and start gluster daemon:
$ systemctl enable glusterd

$ systemctl start glusterd
Step Nine
On nextcloud1, probe the other nodes:
(nextcloud1)$ gluster peer probe 192.168.0.22

(nextcloud1)$ gluster peer probe 192.168.0.23
You can verify the peer status with the following command:
(nextcloud1)$ gluster peer status

Number of Peers: 2


Hostname: 192.168.0.22

Uuid: f9d2928a-6b64-455a-9e0e-654a1ebbc320

State: Peer in Cluster (Connected)


Hostname: 192.168.0.23

Uuid: 100b7778-459d-4c48-9ea8-bb8fe33d9493

State: Peer in Cluster (Connected)
Step Ten
On nextcloud1, create a replicated volume on probed nodes:
(nextcloud1)$ gluster volume create rep-volume replica 3 192.168.0.21:/glusterfs/brick 192.168.0.22:/glusterfs/brick 192.168.0.23:/glusterfs/brick

volume create: rep-volume: success: please start the volume to access data
Step Eleven
Start the replicated volume on nextcloud1:
(nextcloud1)$ gluster volume start rep-volume

volume start: rep-volume: success
Verify the replicated volume and processes are online:
$ gluster volume status

Status of volume: rep-volume

Gluster process                             TCP Port RDMA Port Online Pid

------------------------------------------------------------------------------

Brick 192.168.0.21:/glusterfs/brick         49152 0 Y 32570

Brick 192.168.0.22:/glusterfs/brick         49152 0 Y 27175

Brick 192.168.0.23:/glusterfs/brick         49152 0 Y 25799

Self-heal Daemon on localhost               N/A N/A Y 32591

Self-heal Daemon on 192.168.0.22            N/A N/A Y 27196

Self-heal Daemon on 192.168.0.23            N/A N/A Y 25820


Task Status of Volume rep-volume

------------------------------------------------------------------------------

There are no active volume tasks
Step Twelve
Mount the replicated volume on /var/www/html. Create the directory:
$ mkdir -p /var/www/htmlStep Thirteen
13) Add following line into /etc/fstab to allow auto-mount:
/dev/sdb1 /glusterfs xfs defaults,defaults 0 0

localhost:/rep-volume /var/www/html   glusterfs defaults,_netdev 0 0
Step Fourteen
Mount the GlusterFS to /var/www/html:
$ mount -aAnd verify with:
$ mount | grep gluster

/dev/sdb1 on /glusterfs type xfs (rw,relatime,seclabel,attr2,inode64,noquota)

localhost:/rep-volume on /var/www/html type fuse.glusterfs (rw,relatime,user_id=0,group_id=0,default_permissions,allow_other,max_read=131072)
The replicated volume is now ready and mounted in every node. We can now proceed to deploy the application.
Nextcloud Application Deployment
The following steps should be performed on nextcloud1, nextcloud2 and nextcloud3 unless otherwise specified.
Nextcloud requires PHP 7.2 and later and for CentOS distribution, we have to enable a number of repositories like EPEL and Remi to simplify the installation process.
Step One
If SELinux is enabled, disable it first:
$ setenforce 0

$ sed -i 's/^SELINUX=.*/SELINUX=permissive/g' /etc/selinux/config
You can also run Nextcloud with SELinux enabled by following this guide.
Step Two
Install Nextcloud requirements and enable Remi repository for PHP 7.2:
$ yum install -y epel-release yum-utils unzip curl wget bash-completion policycoreutils-python mlocate bzip2

$ yum install -y http://rpms.remirepo.net/enterprise/remi-release-7.rpm

$ yum-config-manager --enable remi-php72
Step Three
Install Nextcloud dependencies, mostly Apache and PHP 7.2 related packages:
$ yum install -y httpd php72-php php72-php-gd php72-php-intl php72-php-mbstring php72-php-mysqlnd php72-php-opcache php72-php-pecl-redis php72-php-pecl-apcu php72-php-pecl-imagick php72-php-xml php72-php-pecl-zipStep Four
Enable Apache and start it up:
$ systemctl enable httpd.service

$ systemctl start httpd.service
Step Five
Make a symbolic link for PHP to use PHP 7.2 binary:
$ ln -sf /bin/php72 /bin/phpStep Six
On nextcloud1, download Nextcloud Server from here and extract it:
$ wget https://download.nextcloud.com/server/releases/nextcloud-17.0.0.zip

$ unzip nextcloud*
Step Seven
On nextcloud1, copy the directory into /var/www/html and assign correct ownership:
$ cp -Rf nextcloud /var/www/html

$ chown -Rf apache:apache /var/www/html
**Note the copying process into /var/www/html is going to take some time due to GlusterFS volume replication.
Step Eight
Before we proceed to open the installation wizard, we have to disable pxc_strict_mode variable to other than “ENFORCING” (the default value). This is due to the fact that Nextcloud database import will have a number of tables without primary key defined which is not recommended to run on Galera Cluster. This is explained further details under Tuning section further down.
To change the configuration with ClusterControl, simply go to Manage -> Configurations -> Change/Set Parameters:
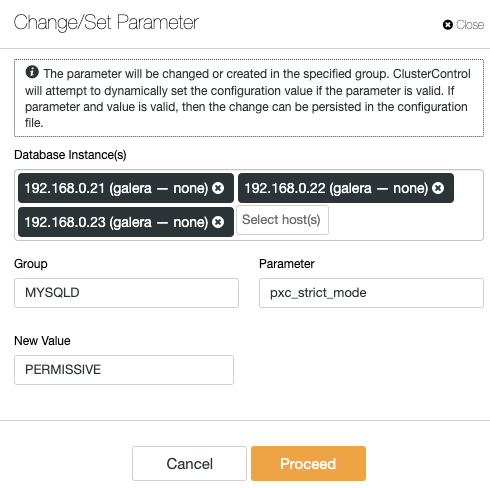
Choose all database instances from the list, and enter:
- Group: MYSQLD
- Parameter: pxc_strict_mode
- New Value: PERMISSIVE
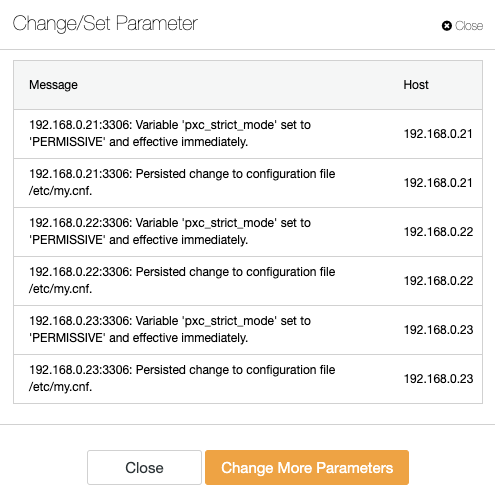
ClusterControl will perform the necessary changes on every database node automatically. If the value can be changed during runtime, it will be effective immediately. ClusterControl also configure the value inside MySQL configuration file for persistency. You should see the following result:
Step Nine
Now we are ready to configure our Nextcloud installation. Open the browser and go to nextcloud1’s HTTP server at http://192.168.0.21/nextcloud/ and you will be presented with the following configuration wizard:
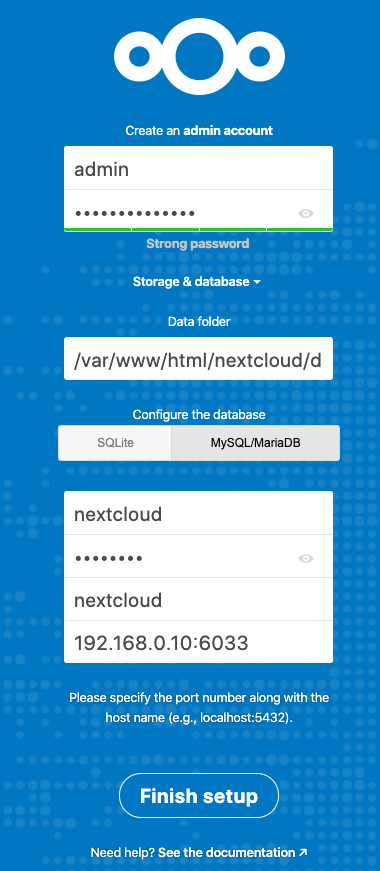
Configure the “Storage & database” section with the following value:
- Data folder: /var/www/html/nextcloud/data
- Configure the database: MySQL/MariaDB
- Username: nextcloud
- Password: (the password for user nextcloud)
- Database: nextcloud
- Host: 192.168.0.10:6603 (The virtual IP address with ProxySQL port)
Click “Finish Setup” to start the configuration process. Wait until it finishes and you will be redirected to Nextcloud dashboard for user “admin”. The installation is now complete. Next section provides some tuning tips to run efficiently with Galera Cluster.
Nextcloud Database Tuning
Primary Key
Having a primary key on every table is vital for Galera Cluster write-set replication. For a relatively big table without primary key, large update or delete transaction would completely block your cluster for a very long time. To avoid any quirks and edge cases, simply make sure that all tables are using InnoDB storage engine with an explicit primary key (unique key does not count).
The default installation of Nextcloud will create a bunch of tables under the specified database and some of them do not comply with this rule. To check if the tables are compatible with Galera, we can run the following statement:
mysql> SELECT DISTINCT CONCAT(t.table_schema,'.',t.table_name) as tbl, t.engine, IF(ISNULL(c.constraint_name),'NOPK','') AS nopk, IF(s.index_type = 'FULLTEXT','FULLTEXT','') as ftidx, IF(s.index_type = 'SPATIAL','SPATIAL','') as gisidx FROM information_schema.tables AS t LEFT JOIN information_schema.key_column_usage AS c ON (t.table_schema = c.constraint_schema AND t.table_name = c.table_name AND c.constraint_name = 'PRIMARY') LEFT JOIN information_schema.statistics AS s ON (t.table_schema = s.table_schema AND t.table_name = s.table_name AND s.index_type IN ('FULLTEXT','SPATIAL'))   WHERE t.table_schema NOT IN ('information_schema','performance_schema','mysql') AND t.table_type = 'BASE TABLE' AND (t.engine <> 'InnoDB' OR c.constraint_name IS NULL OR s.index_type IN ('FULLTEXT','SPATIAL')) ORDER BY t.table_schema,t.table_name;

+---------------------------------------+--------+------+-------+--------+

| tbl                                   | engine | nopk | ftidx | gisidx |

+---------------------------------------+--------+------+-------+--------+

| nextcloud.oc_collres_accesscache      | InnoDB | NOPK | | |

| nextcloud.oc_collres_resources        | InnoDB | NOPK | | |

| nextcloud.oc_comments_read_markers    | InnoDB | NOPK | | |

| nextcloud.oc_federated_reshares       | InnoDB | NOPK | | |

| nextcloud.oc_filecache_extended       | InnoDB | NOPK | | |

| nextcloud.oc_notifications_pushtokens | InnoDB | NOPK |       | |

| nextcloud.oc_systemtag_object_mapping | InnoDB | NOPK |       | |

+---------------------------------------+--------+------+-------+--------+
The above output shows there are 7 tables that do not have a primary key defined. To fix the above, simply add a primary key with auto-increment column. Run the following commands on one of the database servers, for example nexcloud1:
(nextcloud1)$ mysql -uroot -p

mysql> ALTER TABLE nextcloud.oc_collres_accesscache ADD COLUMN `id` INT PRIMARY KEY AUTO_INCREMENT;

mysql> ALTER TABLE nextcloud.oc_collres_resources ADD COLUMN `id` INT PRIMARY KEY AUTO_INCREMENT;

mysql> ALTER TABLE nextcloud.oc_comments_read_markers ADD COLUMN `id` INT PRIMARY KEY AUTO_INCREMENT;

mysql> ALTER TABLE nextcloud.oc_federated_reshares ADD COLUMN `id` INT PRIMARY KEY AUTO_INCREMENT;

mysql> ALTER TABLE nextcloud.oc_filecache_extended ADD COLUMN `id` INT PRIMARY KEY AUTO_INCREMENT;

mysql> ALTER TABLE nextcloud.oc_notifications_pushtokens ADD COLUMN `id` INT PRIMARY KEY AUTO_INCREMENT;

mysql> ALTER TABLE nextcloud.oc_systemtag_object_mapping ADD COLUMN `id` INT PRIMARY KEY AUTO_INCREMENT;
Once the above modifications have been applied, we can reconfigure back the pxc_strict_mode to the recommended value, “ENFORCING”. Repeat step #8 under “Application Deployment” section with the corresponding value.
READ-COMMITTED Isolation Level
The recommended transaction isolation level as advised by Nextcloud is to use READ-COMMITTED, while Galera Cluster is default to stricter REPEATABLE-READ isolation level. Using READ-COMMITTED can avoid data loss under high load scenarios (e.g. by using the sync client with many clients/users and many parallel operations).
To modify the transaction level, go to ClusterControl -> Manage -> Configurations -> Change/Set Parameter and specify the following:
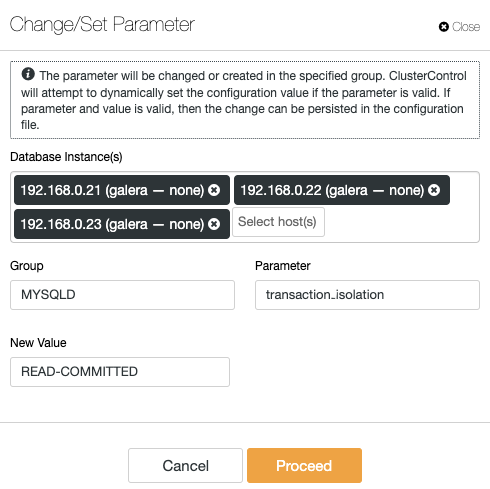
Click “Proceed” and ClusterControl will apply the configuration changes immediately. No database restart is required.
Multi-Instance Nextcloud
Since we performed the installation on nextcloud1 when accessing the URL, this IP address is automatically added into ‘trusted_domains’ variable inside Nextcloud. When you tried to access other servers, for example the secondary server, http://192.168.0.22/nextcloud, you would see an error that this is host is not authorized and must be added into the trusted_domain variable.
Therefore, add all the hosts IP address under “trusted_domain” array inside /var/www/html/nextcloud/config/config.php, as example below:
  'trusted_domains' =>

  array (

    0 => '192.168.0.21',

    1 => '192.168.0.22',

    2 => '192.168.0.23'

  ),
The above configuration allows users to access all three application servers via the following URLs:
- http://192.168.0.21/nextcloud (nextcloud1)
- http://192.168.0.22/nextcloud (nextcloud2)
- http://192.168.0.23/nextcloud (nextcloud3)
Note: You can add a load balancer tier on top of these three Nextcloud instances to achieve high availability for the application tier by using HTTP reverse proxies available in the market like HAProxy or nginx. That is out of the scope of this blog post.
Using Redis for File Locking
Nextcloud’s Transactional File Locking mechanism locks files to avoid file corruption during normal operation. It’s recommended to install Redis to take care of transactional file locking (this is enabled by default) which will offload the database cluster from handling this heavy job.
To install Redis, simply:
$ yum install -y redis

$ systemctl enable redis.service

$ systemctl start redis.service
Append the following lines inside /var/www/html/nextcloud/config/config.php:
  'filelocking.enabled' => true,

  'memcache.locking' => 'OCMemcacheRedis',

  'redis' => array(

     'host' => '192.168.0.21',

     'port' => 6379,

     'timeout' => 0.0,

   ),
For more details, check out this documentation, Transactional File Locking.
Conclusion
Nextcloud can be configured to be a scalable and highly available file-hosting service to cater for your private file sharing demands. In this blog, we showed how you can bring redundancy in the Nextcloud, file system and database layers.