blog
pghoard Alternatives – PostgreSQL Backup Management with ClusterControl

Managing backups could be a complex and risky task to do in a manual way. You must know that the backup is working according to your backup policy as you don’t want to be in the situation that you need the backup and it’s not working or it doesn’t exist. That will be a big problem for sure. So, the best here is to use a battle-tested backup management application, to avoid any issue in case of failure.
PGHoard is a PostgreSQL backup daemon and restore system that stores backup data in cloud object stores. It supports PostgreSQL 9.3 or later, until PostgreSQL 11, the latest supported version right now. The current PGHoard version is 2.1.0, released in May 2019 (1 year ago).
ClusterControl is an agentless management and automation software for database clusters. It helps deploy, monitor, manage, and scale your database server/cluster directly from the ClusterControl UI or using the ClusterControl CLI. It includes backup management features and supports PostgreSQL 9.6, 10, 11, and 12 versions. The current ClusterControl version is 1.7.6, released last month, in April 2020.
In this blog, we’ll compare PGHoard with the ClusterControl Backup Management feature and we’ll see how to install and use both systems. For this, we’ll use an Ubuntu 18.04 server and PostgreSQL11 (as it’s the latest supported version for using PGHoard). We’ll install PGHoard in the same database server, and import it to ClusterControl.
Backups Management Features Comparison
PGHoard
Some of the most important PGHoard features are:
- Automatic periodic base backups
- Automatic transaction log backups
- Standalone Hot Backup support
- Cloud object storage support (AWS S3, Google Cloud, OpenStack Swift, Azure, Ceph)
- Backup restoration directly from object storage, compressed and encrypted
- Point-in-time-recovery (PITR)
- Initialize a new standby from object storage backups, automatically configured as a replicating hot-standby
- Parallel compression and encryption
One of the ways to use it is to have a separate backup machine, so PGHoard can connect with pg_receivexlog to receive WAL files from the database. Another mode is to use pghoard_postgres_command as a PostgreSQL archive_command. In both cases, PGHoard creates periodic base backups using pg_basebackup.
ClusterControl
Let’s see also some of the most important features of this system:
- User-friendly UI
- Backup and Restore (in the same node or in a separate one)
- Schedule Backups
- Create a cluster from Backup
- Automatic Backup Verification
- Compression
- Encryption
- Automatic Cloud Upload
- Point-in-time-recovery (PITR)
- Different backup methods (Logical, Physical, Full, Incremental, etc)
- Backup Operational Reports
As this is not only a Backup Management system, we’ll also mention different important features not just the Backup related ones:
- Deploy/Import databases: Standalone, Cluster/Replication, Load Balancers
- Scaling: Add/Remove Nodes, Read Replicas, Cluster Cloning, Cluster-to-Cluster Replication
- Monitoring: Custom Dashboards, Fault Detection, Query Monitor, Performance Advisors, Alarms and Notifications, Develop Custom Advisors
- Automatic Recovery: Node and Cluster Recovery, Failover, High Availability Environments
- Management: Configuration Management, Database Patch Upgrades, Database User Management, Cloud Integration, Ops Reports, ProxySQL Management
- Security: Key Management, Role-Based Access Control, Authentication using LDAP/Active Directory, SSL Encryption
The recommended topology is to have a separate node to run ClusterControl, to make sure that, in case of failure, you can take advantage of the auto-recovery and failover ClusterControl features (among others useful features).
System Requirements
PGHoard
According to the documentation, PGHoard can backup and restore PostgreSQL versions 9.3 and above. The daemon is implemented in Python and works with CPython version 3.5 or newer. The following Python modules could be required depends on the requirements:
- psycopg2 to look up transaction log metadata
- requests for the internal client-server architecture
- azure for Microsoft Azure object storage
- botocore for AWS S3 (or Ceph-S3) object storage
- google-api-client for Google Cloud object storage
- cryptography for backup encryption and decryption (version 0.8 or newer required)
- snappy for Snappy compression and decompression
- zstandard for Zstandard (zstd) compression and decompression
- systemd for systemd integration
- swiftclient for OpenStack Swift object storage
- paramiko for sftp object storage
There is no mention of the supported Operating System, but it says that it was tested on modern Linux x86-64 systems, but should work on other platforms that provide the required modules.
ClusterControl
The following software is required by the ClusterControl server:
- MySQL server/client
- Apache web server (or nginx)
- mod_rewrite
- mod_ssl
- allow .htaccess override
- PHP (5.4 or later)
- RHEL: php, php-mysql, php-gd, php-ldap, php-curl
- Debian: php5-common, php5-mysql, php5-gd, php5-ldap, php5-curl, php5-json
- Linux Kernel Security (SElinux or AppArmor) – must be disabled or set to permissive mode
- OpenSSH server/client
- BASH (recommended: version 4 or later)
- NTP server – All servers’ time must be synced under one time zone
- socat or netcat – for streaming backups
And it supports different operating systems:
- Red Hat Enterprise Linux 6.x/7.x/8.x
- CentOS 6.x/7.x/8.x
- Ubuntu 12.04/14.04/16.04/18.04 LTS
- Debian 7.x/8.x/9.x/10.x
If ClusterControl is installed via installation script (install-cc) or package manager (yum/apt), all dependencies will be automatically satisfied.
For PostgreSQL, it supports 9.6/10.x/11.x/12.x versions. You can find a complete list of the supported databases in the documentation.
It just requires Passwordless SSH access to the database nodes (using private and public keys) and a privileged OS user (it could be root or sudo user).
The Installation Process
PGHoard Installation Process
We’ll assume you have your PostgreSQL database up and running, so let’s install the remaining packages. PGHoard is a Python package, so after you have the required packages installed, you can install it using the pip command:
$ apt install postgresql-server-dev-11 python3 python3-pip python3-snappy

$ pip3 install pghoard
As part of this installation process, you need to prepare the PostgreSQL instance to work with this tool. For this, you’ll need to edit the postgresql.conf to allow WAL archive and increase the max_wal_senders:
wal_level = logical

max_wal_senders = 4

archive_mode = on

archive_command = pghoard_postgres_command --mode archive --site default --xlog %f
This change will require a database restart:
$ service postgresql restartNow, let’s create a database user for PGHoard:
$ psql

CREATE USER pghoard PASSWORD 'Password' REPLICATION;
And add the following line in the pg_hba.conf file:
host replication pghoard 127.0.0.1/32/32 md5Reload the database service:
$ service postgresql reloadTo make it work, you’ll need to create a JSON configuration file for PGHoard. We’ll see this in the next “Usage” section.
ClusterControl Installation Process
There are different installation methods as it’s mentioned in the documentation. In the case of manual installation, the required packages are specified in the same documentation, and there is a step-by-step guide for all the process.
Let’s see an example using the automatic installation script.
$ wget https://severalnines.com/downloads/cmon/install-cc

$ chmod +x install-cc

$ sudo ./install-cc   # omit sudo if you run as root
The installation script will attempt to automate the following tasks:
- Install and configure a local MySQL server (used by ClusterControl to store monitoring data)
- Install and configure the ClusterControl controller package via package manager
- Install ClusterControl dependencies via package manager
- Configure Apache and SSL
- Configure ClusterControl API URL and token
- Configure ClusterControl Controller with minimal configuration options
- Enable the CMON service on boot and start it up
Running the mentioned script, you’ll receive a question about sending diagnostic data:
$ sudo ./install-cc

!!

Only RHEL/Centos 6.x|7.x|8.x, Debian 7.x|8.x|9.x|10.x, Ubuntu 14.04.x|16.04.x|18.04.x LTS versions are supported

Minimum system requirements: 2GB+ RAM, 2+ CPU cores

Server Memory: 1024M total, 922M free

MySQL innodb_buffer_pool_size set to 512M

Severalnines would like your help improving our installation process.

Information such as OS, memory and install success helps us improve how we onboard our users.

None of the collected information identifies you personally.

!!

=> Would you like to help us by sending diagnostics data for the installation? (Y/n):
Then, it’ll start installing the required packages. The next question is about the hostname that will be used:
=> The Controller hostname will be set to 192.168.100.116. Do you want to change it? (y/N):When the local database is installed, the installer will secure it creating a root password that you must enter:
=> Starting database. This may take a couple of minutes. Do NOT press any key.

Redirecting to /bin/systemctl start mariadb.service

=> Securing the MySQL Server ...

=> !! In order to complete the installation you need to set a MySQL root password !!

=> Supported special password characters: ~!@#$%^&*()_+{}<>?

=> Press any key to proceed ...
And a CMON user password, which will be used by ClusterControl:
=> Set a password for ClusterControl's MySQL user (cmon) [cmon]

=> Supported special characters: ~!@#$%^&*()_+{}<>?

=> Enter a CMON user password:
That’s it. In this way, you’ll have all in place without installing or configuring anything manually.
=> ClusterControl installation completed!

Open your web browser to http://192.168.100.116/clustercontrol and enter an email address and new password for the default Admin User.

Determining network interfaces. This may take a couple of minutes. Do NOT press any key.

Public/external IP => http://10.10.10.10/clustercontrol

Installation successful. If you want to uninstall ClusterControl then run install-cc --uninstall.
The first time you access the UI, you will need to register for the 30-day free trial period.
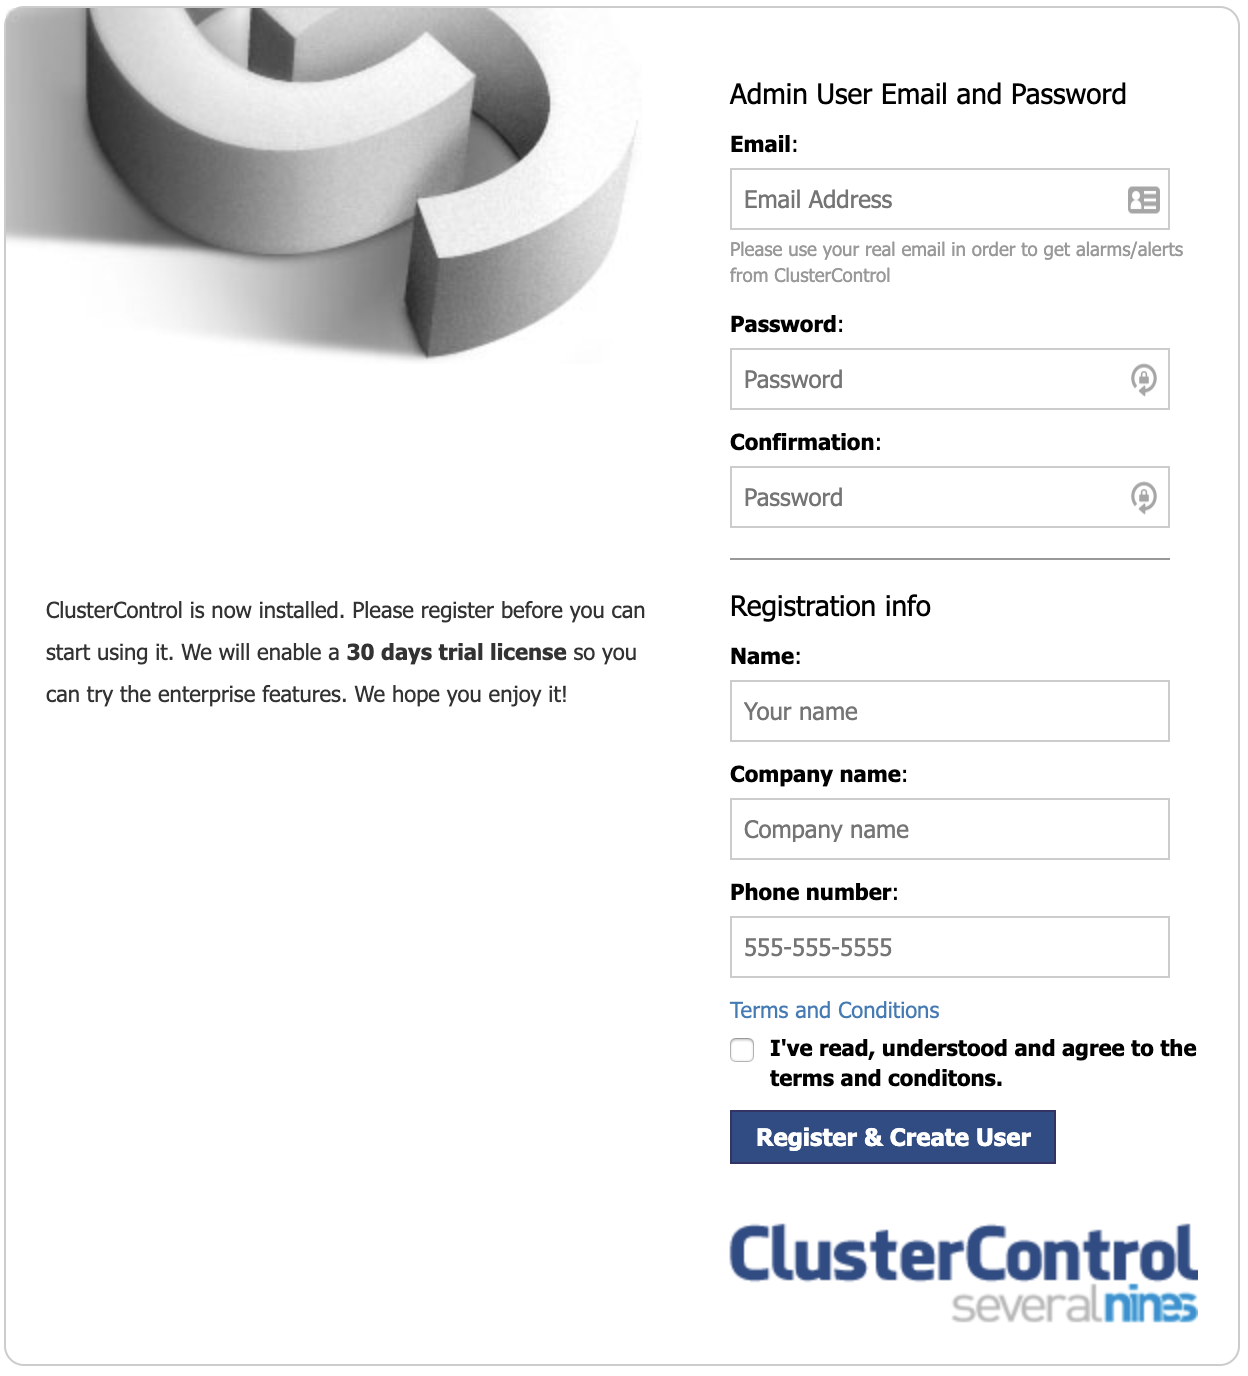
After your 30-day free trial ends, your installation will automatically convert to the community edition unless you have a commercial license.
Backups Management Usage
PGHoards Usage
After this tool is installed, you need to create a JSON file (pghoard.json) with the PGHoard configuration. This is an example:
{

"backup_location": "/var/lib/pghoard",

"backup_sites": {

"default": {

"nodes": [

{

"host": "127.0.0.1",

"password": "Password",

"port": 5432,

"user": "pghoard"

}

],

"object_storage": {

"storage_type": "local",

"directory": "./backups"

},

"pg_data_directory": "/var/lib/postgresql/11/main/"

}

}

}
In this example, we’ll take a backup and store it locally, but you can also configure a cloud account and store it there:
"object_storage": {

"aws_access_key_id": "AKIAQTUN************",

"aws_secret_access_key": "La8YZBvN********************************",

"bucket_name": "pghoard",

"region": "us-east-1",

"storage_type": "s3"

},
You can find more details about the configuration in the documentation.
Now, let run the backup using this JSON file:
$ pghoard --short-log --config pghoard.json

INFO pghoard initialized, own_hostname: 'pg1', cwd: '/root'

INFO Creating a new basebackup for 'default' because there are currently none

INFO Started: ['/usr/lib/postgresql/11/bin/pg_receivewal', '--status-interval', '1', '--verbose', '--directory', '/var/lib/pghoard/default/xlog_incoming', '--dbname', "dbname='replication' host='127.0.0.1' port='5432' replication='true' user='pghoard'"], running as PID: 19057

INFO Started: ['/usr/lib/postgresql/11/bin/pg_basebackup', '--format', 'tar', '--label', 'pghoard_base_backup', '--verbose', '--pgdata', '/var/lib/pghoard/default/basebackup_incoming/2020-05-21_13-13_0', '--wal-method=none', '--progress', '--dbname', "dbname='replication' host='127.0.0.1' port='5432' replication='true' user='pghoard'"], running as PID: 19059, basebackup_location: '/var/lib/pghoard/default/basebackup_incoming/2020-05-21_13-13_0/base.tar'

INFO Compressed 83 byte open file '/var/lib/pghoard/default/xlog_incoming/00000003.history' to 76 bytes (92%), took: 0.001s

INFO 'UPLOAD' transfer of key: 'default/timeline/00000003.history', size: 76, origin: 'pg1' took 0.001s

INFO Compressed 16777216 byte open file '/var/lib/postgresql/11/main/pg_wal/000000030000000000000009' to 799625 bytes (5%), took: 0.175s

INFO 'UPLOAD' transfer of key: 'default/xlog/000000030000000000000009', size: 799625, origin: 'pg1' took 0.002s

127.0.0.1 - - [21/May/2020 13:13:31] "PUT /default/archive/000000030000000000000009 HTTP/1.1" 201 -

INFO Compressed 16777216 byte open file '/var/lib/pghoard/default/xlog_incoming/000000030000000000000009' to 799625 bytes (5%), took: 0.190s

INFO 'UPLOAD' transfer of key: 'default/xlog/000000030000000000000009', size: 799625, origin: 'pg1' took 0.028s

INFO Compressed 16777216 byte open file '/var/lib/pghoard/default/xlog_incoming/00000003000000000000000A' to 789927 bytes (5%), took: 0.109s

INFO 'UPLOAD' transfer of key: 'default/xlog/00000003000000000000000A', size: 789927, origin: 'pg1' took 0.002s

INFO Compressed 16777216 byte open file '/var/lib/postgresql/11/main/pg_wal/00000003000000000000000A' to 789927 bytes (5%), took: 0.114s

INFO 'UPLOAD' transfer of key: 'default/xlog/00000003000000000000000A', size: 789927, origin: 'pg1' took 0.002s

127.0.0.1 - - [21/May/2020 13:13:32] "PUT /default/archive/00000003000000000000000A HTTP/1.1" 201 -

INFO Ran: ['/usr/lib/postgresql/11/bin/pg_basebackup', '--format', 'tar', '--label', 'pghoard_base_backup', '--verbose', '--pgdata', '/var/lib/pghoard/default/basebackup_incoming/2020-05-21_13-13_0', '--wal-method=none', '--progress', '--dbname', "dbname='replication' host='127.0.0.1' port='5432' replication='true' user='pghoard'"], took: 1.940s to run, returncode: 0

INFO Compressed 24337408 byte open file '/var/lib/pghoard/default/basebackup_incoming/2020-05-21_13-13_0/base.tar' to 4892408 bytes (20%), took: 0.117s

INFO 'UPLOAD' transfer of key: 'default/basebackup/2020-05-21_13-13_0', size: 4892408, origin: 'pg1' took 0.008s
In the “backup_location” directory (in this case /var/lib/pghoard), you’ll find a pghoard_state.json file with the current state:
$ ls -l /var/lib/pghoard

total 48

drwxr-xr-x 6 root root  4096 May 21 13:13 default

-rw------- 1 root root 42385 May 21 15:25 pghoard_state.json
And a site directory (in this case called “default/”) with the backup:
$ ls -l /var/lib/pghoard/default/

total 16

drwxr-xr-x 2 root root 4096 May 21 13:13 basebackup

drwxr-xr-x 3 root root 4096 May 21 13:13 basebackup_incoming

drwxr-xr-x 2 root root 4096 May 21 13:13 xlog

drwxr-xr-x 2 root root 4096 May 21 13:13 xlog_incoming
You can check the backup list using the follogin command:
$ pghoard_restore list-basebackups --config pghoard.json

Available 'default' basebackups:

Basebackup                                Backup size    Orig size  Start time

----------------------------------------  -----------  -----------  --------------------

default/basebackup/2020-05-21_13-13_0            4 MB        23 MB  2020-05-21T13:13:31Z
ClusterControl Usage
For this, we’ll assume you have your PostgreSQL database cluster imported in ClusterControl or you deployed it using this system.
In ClusterControl, select your cluster and go to the “Backup” section, then, select “Create Backup”.
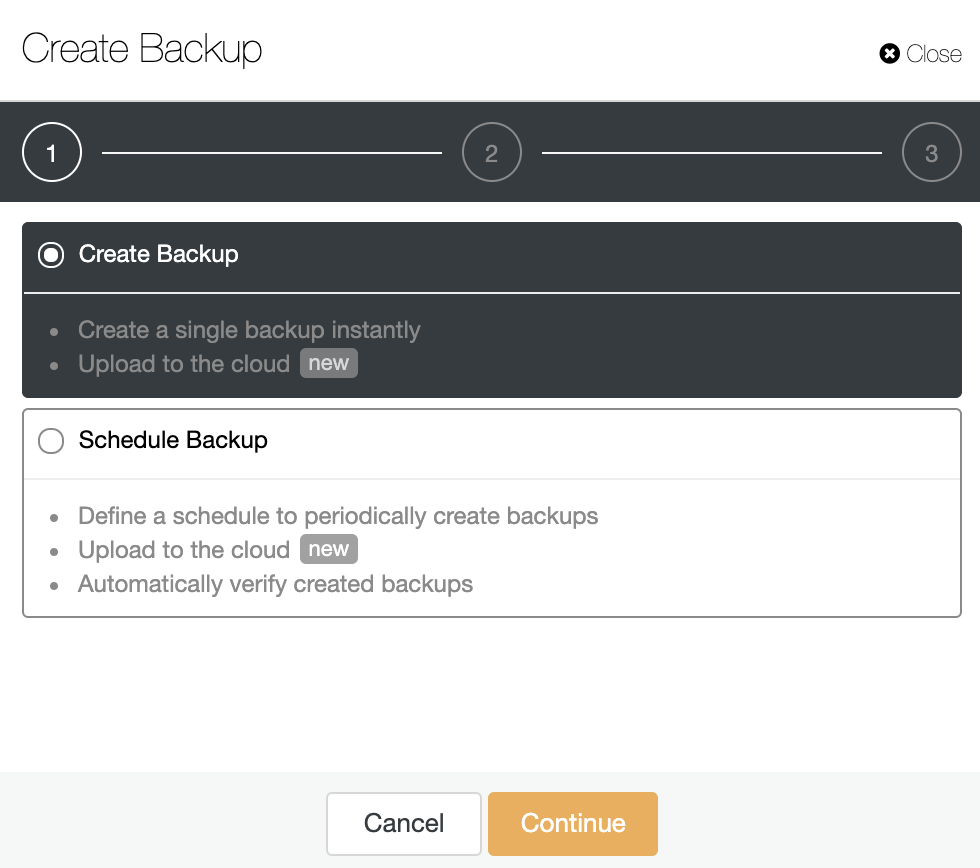
For this example, we’ll use the “Schedule Backup” option. When scheduling a backup, in addition to selecting the common options like method or storage, you also need to specify schedule/frequency.
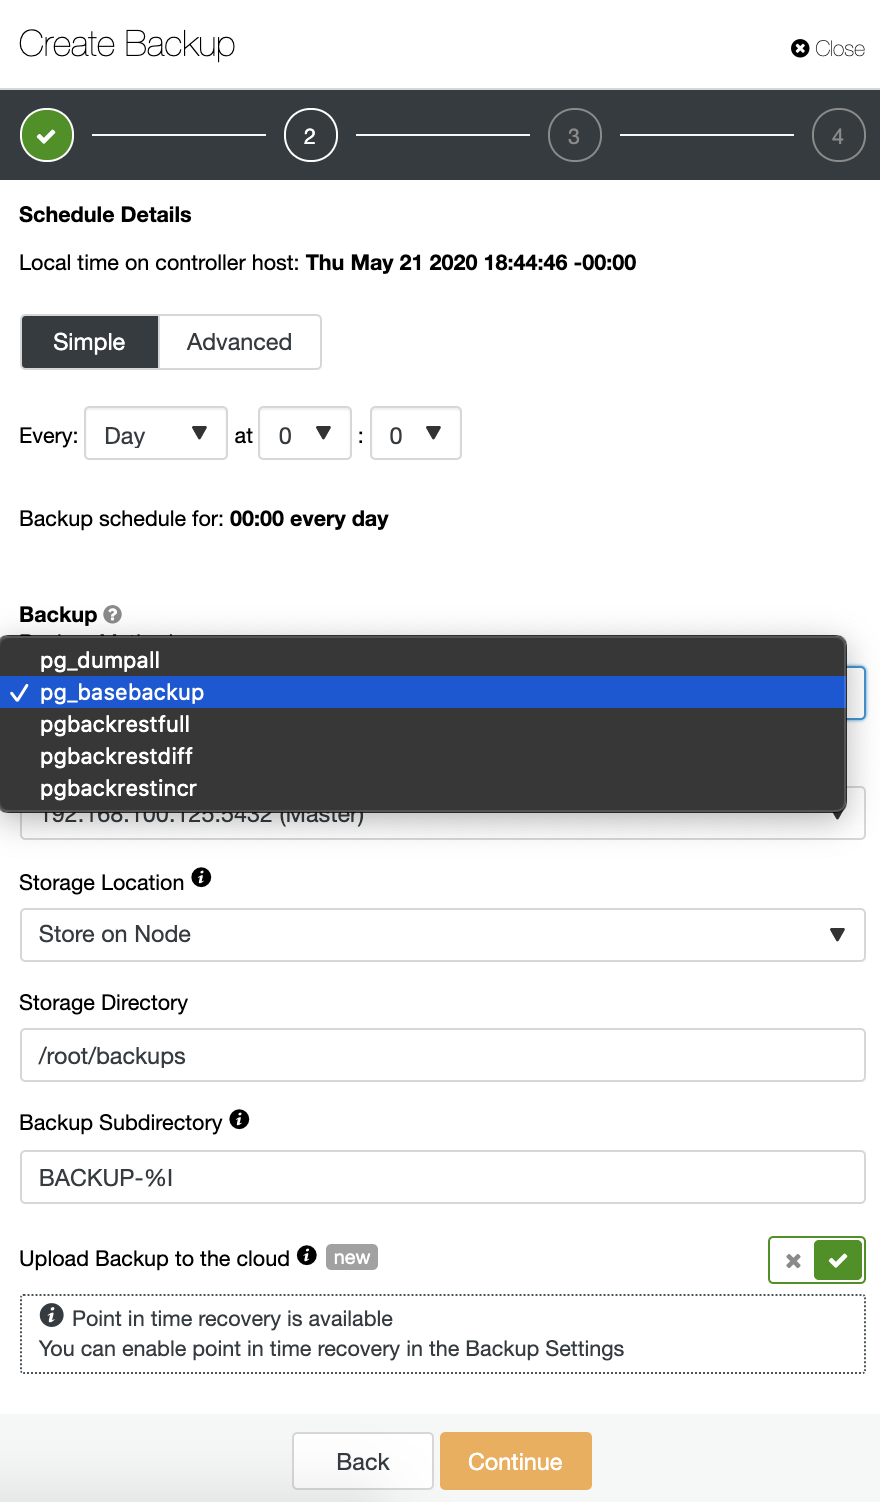
You must choose one method, the server from which the backup will be taken, and where you want to store it. You can also upload your backup to the cloud (AWS, Google, or Azure) by enabling the corresponding button.
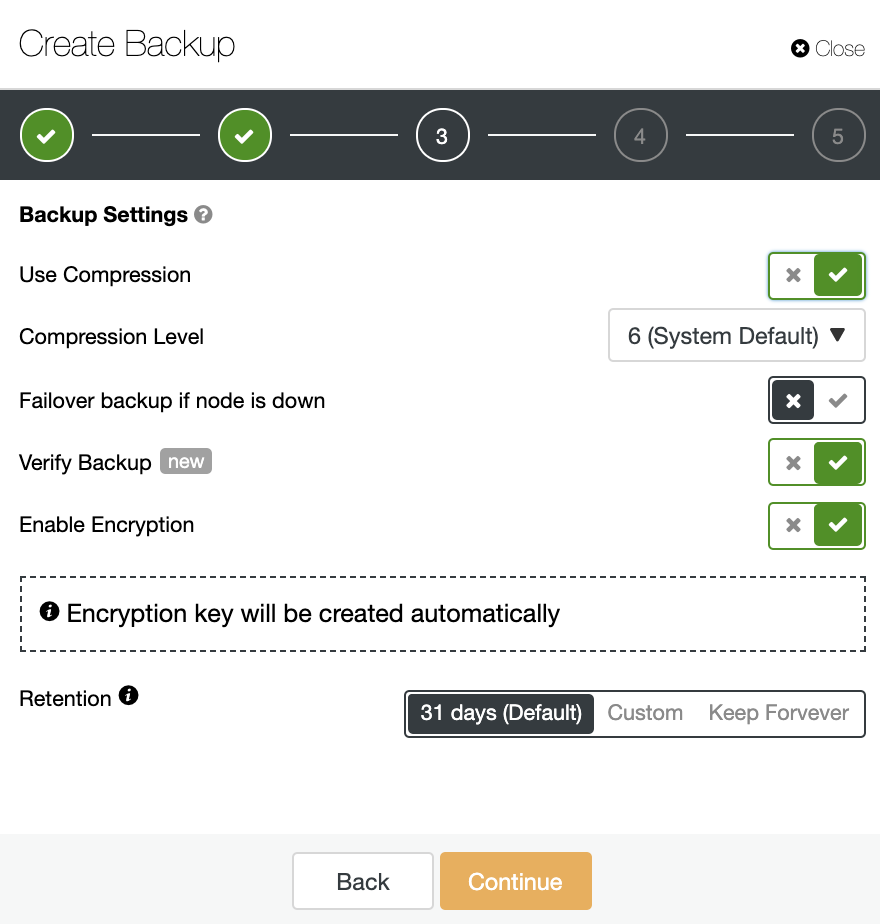
Then you need to specify the use of compression, encryption, and the retention of your backup. In this step, you can also enable the “Verify Backup” feature which allows you to confirm that the backup is usable by restoring it in a different node.
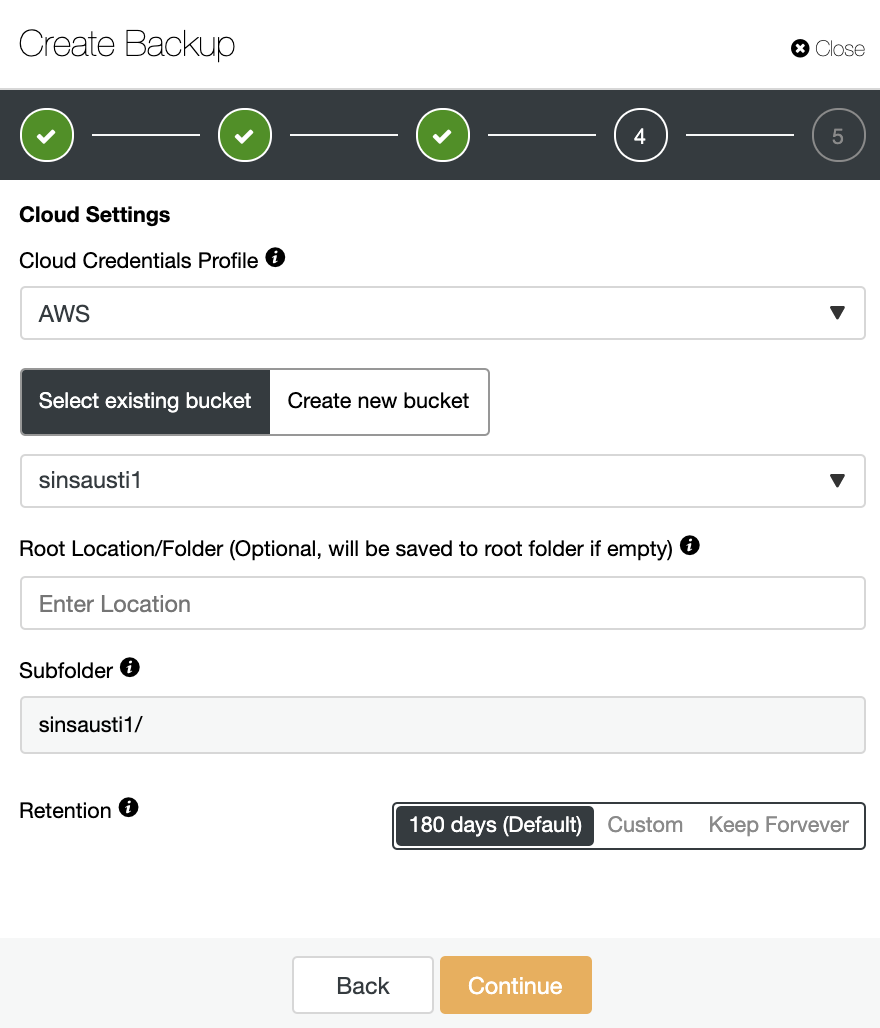
If you enable the “Upload backup to the cloud option”, you will see a section to specify the cloud provider and the credentials. If you don’t have integrated your cloud account with ClusterControl you must go to ClusterControl -> Integrations -> Cloud Providers to add it.
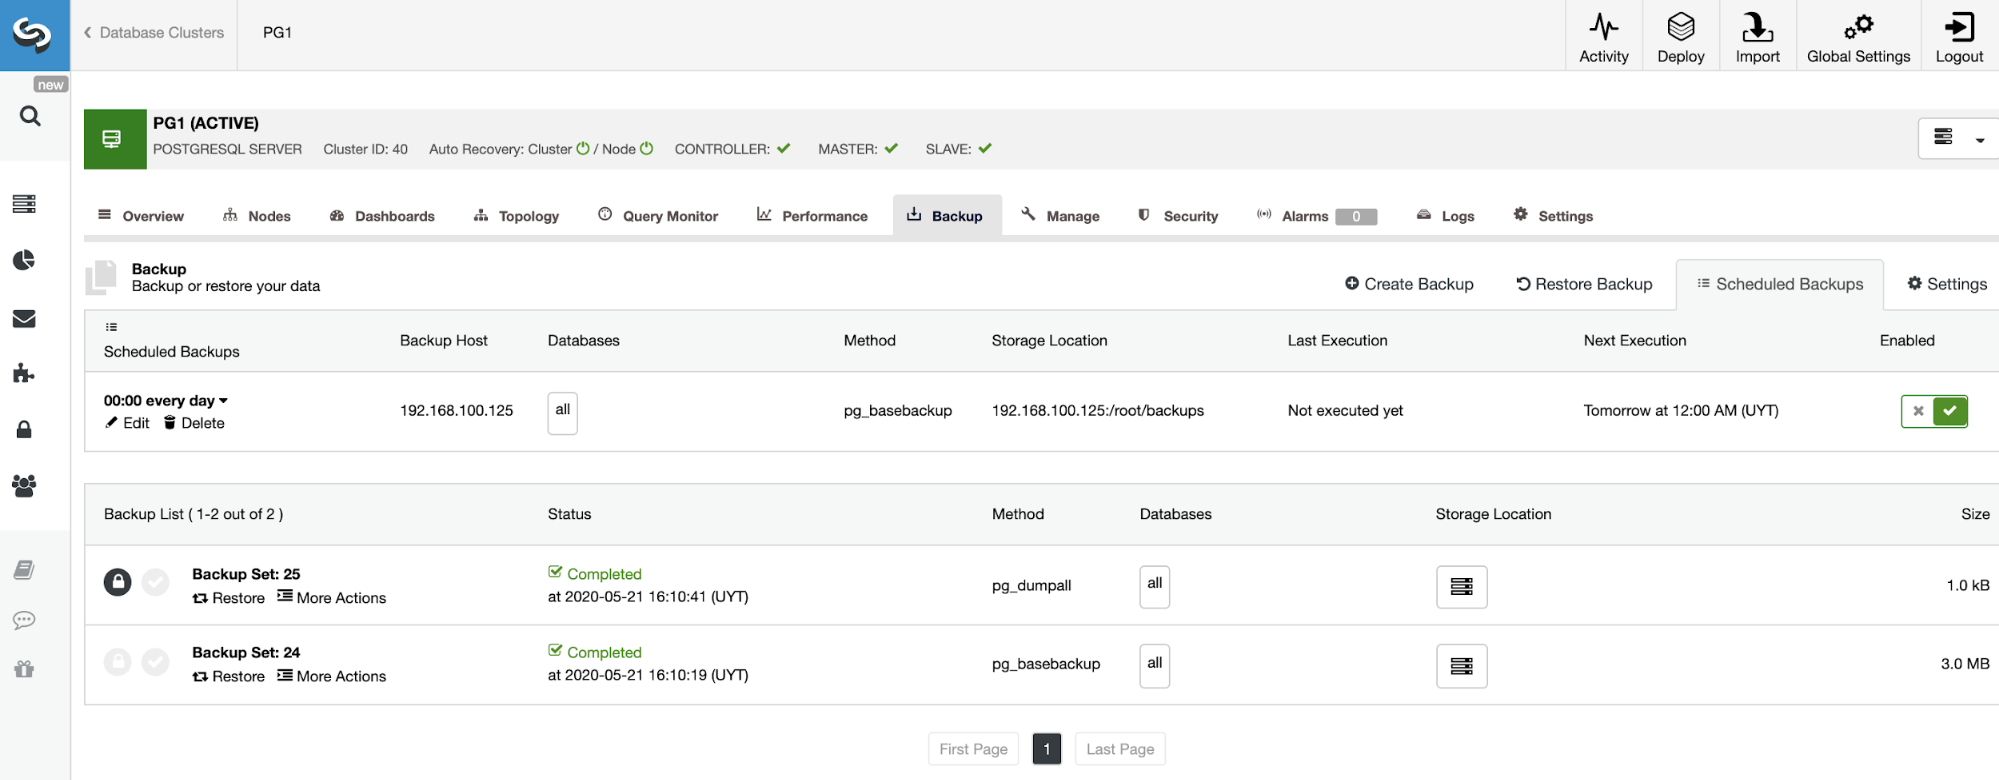
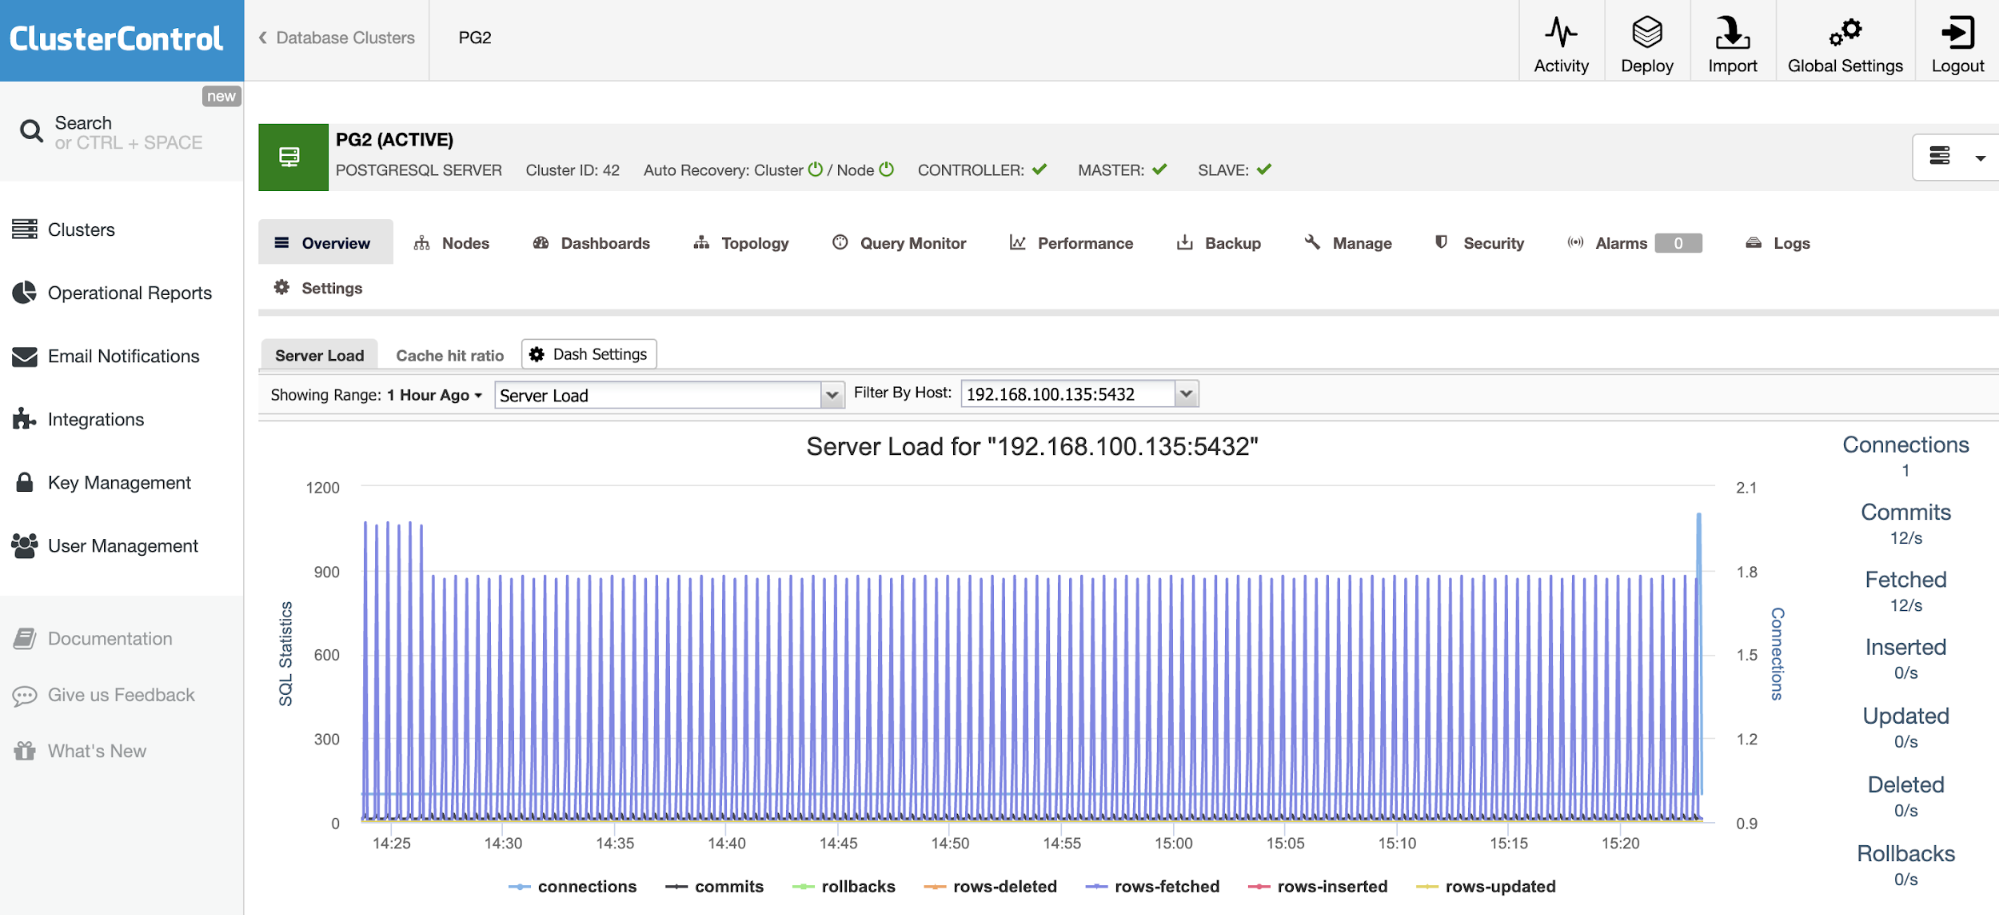
On the backup section, you can see the progress of the backup, and information like the method, size, location, and more.
ClusterControl Command Line (s9s)
For scripting and automating tasks, or even if you just prefer the command line, ClusterControl has the s9s tool. It’s a command-line tool for managing your database cluster. Let’s see an example of how to create and list backups using this tool:
$ s9s backup --list --cluster-id=40 --long --human-readable
$ s9s backup --create --backup-method=pg_basebackup --cluster-id=40 --nodes=192.168.100.125 --backup-directory=/tmp --wait
You can find more examples and information in the ClusterControl CLI documentation section.
Conclusion
As a conclusion of comparing these mentioned backup management systems, we can say that PGHoard is a free but complex solution for this task. You’ll need some time to understand how it works and how to configure it, as the official documentation is a bit poor on that. Also, it looks a bit out of date, as the latest release was 1 year ago. Moreover, ClusterControl is an all-in-one management system with a lot of features not only backup management, with an user-friendly and easy to use UI. It has community (with limited available features) and paid versions with a 30-day free trial period. The documentation is clear and complete, with examples and detailed information.
We hope this blog helps you to make the best decision to keep your data safe.