blog
How to Setup High Availability PrestaShop on Multiple Servers with MariaDB Galera Cluster

PrestaShop is a popular open source e-commerce software powering over 200,000 online stores, according to the company. We’ve seen a bit of interest into high availability PrestaShop setups, so this post will show you how to achieve that on multiple servers. Note that this setup not only caters for failures, but by load balancing traffic across multiple servers, it also allows the system to scale and handle more users.
![]()
This post is similar to our previous posts on web application scalability and high availability:
- Magento – nginx, MySQL Galera Cluster, OCFS2
- Drupal – Apache, MySQL Galera Cluster, csync2 with lsyncd
- WordPress – Apache, Percona XtraDB Cluster, GlusterFS
- Joomla – Apache, MariaDB Cluster, GFS2
We will focus on migrating Prestashop 1.6 from standalone server installation to three separate servers with MariaDB Galera Cluster and GFS2 (Global File System) running on CentOS 6.5 64 bit. We will use a server for shared storage and ClusterControl. Please review the above posts if you’d like to use a different clustered file system or MySQL Galera vendor.
The following diagram illustrates our setup:
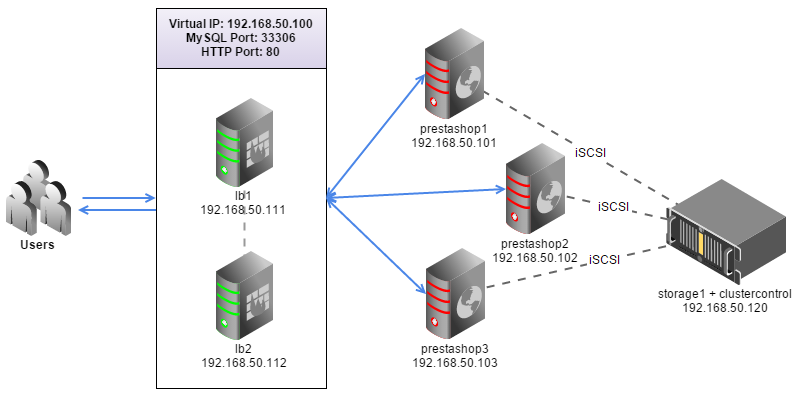
Our setup consists of 6 servers or nodes:
- prestashop1: web server + database server
- prestashop2: web server + database server
- prestashop3: web server + database server
- lb1: load balancer (master) + keepalived
- lb2: load balancer (backup) + keepalived
- storage1: shared storage + ClusterControl
Our major steps would be:
- Prepare 6 hosts
- Deploy MariaDB Galera Cluster onto prestashop1, prestashop2 and prestashop3 from storage1
- Configure iSCSI target on storage1
- Configure GFS2 and mount the shared disk onto prestashop1, prestashop2 and prestashop3
- Configure Apache on prestashop1, prestashop2 and prestashop3
- Configure Keepalived and HAProxy for web and database load balancing with auto failover
- Install Prestashop and connect it to the Web/DB cluster via the load balancer
Preparing Hosts
Add following hosts definition in /etc/hosts:
192.168.50.100		virtual-ip prestashop
192.168.50.101		prestashop1 web1 maria1
192.168.50.102		prestashop2 web2 maria2
192.168.50.103		prestashop3 web3 maria3
192.168.50.111		lb1
192.168.50.112		lb2
192.168.50.120		storage1 clustercontrol
To simplify the deployment process, we will turn off SElinux and iptables on all hosts:
$ setenforce 0
$ service iptables stop
$ sed -i 's|SELINUX=enforcing|SELINUX=disabled|g' /etc/selinux/config
$ chkconfig iptables off
Deploy MariaDB Galera Cluster 10
** The deployment of the database cluster will be done from storage1 aka ClusterControl node
1. To set up MariaDB Cluster, go to the Galera Configurator to generate a deployment package. In the wizard, we used the following values when configuring our database cluster:
Vendor: MariaDB Cluster
Infrastructure: none/on-premises
Operating System: RHEL6 – Redhat 6.4/Fedora/Centos 6.4/OLN 6.4/Amazon AMI
Number of Galera Servers: 3
OS user: root
ClusterControl Server: 192.168.50.120
Database Servers: 192.168.50.101 192.168.50.102 192.168.50.103
At the end of the wizard, a deployment package will be generated and emailed to you.
2. Download the deployment package and run deploy.sh:
$ wget https://severalnines.com/galera-configurator/tmp/5p7q2amjqf7pioummp2hgo6iu2/s9s-galera-mariadb-3.5.0-rpm.tar.gz
$ tar xvfz s9s-galera-mariadb-3.5.0-rpm.tar.gz
$ cd s9s-galera-mariadb-3.5.0-rpm/mysql/scripts/install
$ bash ./deploy.sh 2>&1 | tee cc.log
3. The deployment will take about 15 minutes, and once completed, the ClusterControl UI is accessible at http://192.168.50.120/clustercontrol. You will now see your MariaDB Cluster in the UI.

Configure iSCSI Target
** The following steps should be performed on storage1.
1. The storage server (storage1) needs to export a disk through iSCSI so it can be mounted on all three web servers (prestashop1, prestashop2 and prestashop3). iSCSI basically tells your kernel you have a SCSI disk, and it transports that access over IP. The “server” is called the “target” and the “client” that uses that iSCSI device is the “initiator”. Install iSCSI target in storage1:
$ yum install -y scsi-target-utils
2. Create a directory for disk image. This image will be exported as a shared disk through iSCSI protocol, so it can be mounted on all web servers:
$ mkdir -p /iscsi/disks
$ dd if=/dev/zero of=/iscsi/disks/shared_disk01.img count=0 bs=1 seek=5G
3. Define the iSCSI target configuration file by adding the following lines:
# /etc/tgt/targets.conf
<target iqn.2013-06.storage:shared_disk1>
	backing-store /iscsi/disks/shared_disk01.img
	initiator-address 192.168.50.101
	initiator-address 192.168.50.102
	initiator-address 192.168.50.103
target>
4. Start the iSCSI target service and enable the service to start on boot:
$ service tgtd start
$ chkconfig tgtd on
Verify the iSCSI target status:
$ tgtadm --mode target --op show
Create a Cluster for GFS2
** The following steps should be performed on prestashop1, prestashop2 and prestashop3 unless specified.
1. Install required packages in prestashop1, enable luci and ricci on boot and start them:
$ yum groupinstall -y "High Availability" "High Availability Management" "Resilient Storage"
$ chkconfig luci on
$ chkconfig ricci on
$ service luci start
$ service ricci start
2. Install required packages in prestashop2 and prestashop3, enable ricci on boot and start the service:
$ yum groupinstall -y "High Availability" "Resilient Storage"
$ chkconfig ricci on
$ service ricci start
3. Reset the user ricci password. It is recommended to use the same password across all nodes:
$ passwd ricci
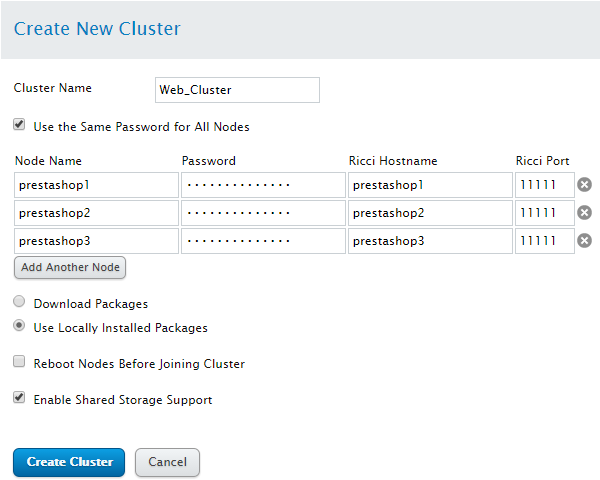
4. Open the management page at https://192.168.50.101:8084/. Login using root credential and go to Manage Clusters > Create and enter following details:
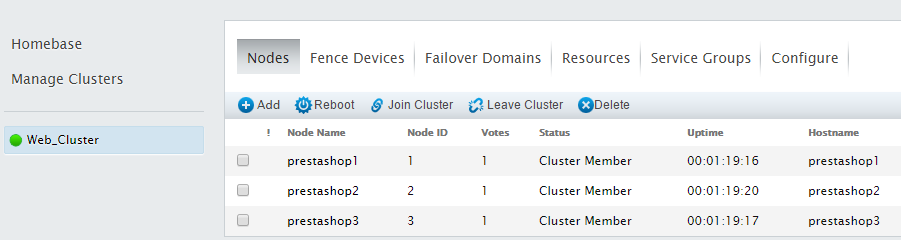
Ensure the Web_Cluster cluster is successfully created and joined:
Configure iSCSI Initiator and Mount GFS2
** The following steps should be performed on prestashop1, prestashop2 and prestashop3 unless specified.
1. Install iSCSI initiator on respective hosts:
$ yum install -y iscsi-initiator-utils
2. Discover iSCSI targets that we have setup earlier:
$ iscsiadm -m discovery -t sendtargets -p storage1
192.168.50.120:3260,1 iqn.2013-06.storage:shared_disk1
3. If you are able to see the above output, it means we can see and are able to connect to the iSCSI target. Set the iSCSI initiator to automatically start and restart the iSCSI initiator service to connect to the iSCSI disk:
$ chkconfig iscsi on
$ service iscsi restart
4. List out all disks and make sure you can see the new disk, /dev/sdb:
$ fdisk -l
5. Create a partition inside /dev/sdb which is mounted via iSCSI on prestashop1:
$ fdisk /dev/sdb
**Sequence during fdisk: n > p > 1 > enter > enter > w
6. Format the partition with GFS2 from prestashop1. Take note that our cluster name is Web_Cluster and the iSCSI partition is /dev/sdb1:
$ mkfs.gfs2 -p lock_dlm -t Web_Cluster:data -j 4 /dev/sdb1
7. Once finished, you will see some information on the newly created GFS2 partition. Get the UUID value and add it into /etc/fstab:
UUID="4e7f0049-f92e-8ec8-23b3-6cc940344381" /home/prestashop/public_html gfs2 noatime,nodiratime 0 0
8. Create a system user named “prestashop” and the web directory which we will used to mount GFS2:
$ useradd prestashop
$ mkdir -p /home/prestashop/public_html
$ chmod 755 /home/prestashop
9. Restart the iSCSI service again to get the updated partition table on the iSCSI disk:
$ service iscsi restart
10. Enable GFS2 on boot and start the service. This will mount GFS2 into /home/prestashop/public_html:
$ chkconfig gfs2 on
$ service gfs2 start
Note that you should take a backup of your shared storage server either by using DRBD or simple rsync for better redundancy and high availability. If you are not familiar with Red Hat Cluster and GFS2, we highly recommend the Red Hat Cluster Administration documentation.
Configure Apache and PHP
** The following steps should be performed on prestashop1, prestashop2 and prestashop3.
1. Install Apache and PHP and all related packages:
$ yum install -y httpd php php-cli php-gd php-mysql php-pdo php-mbstring php-mcrypt php-domxml-php4-php5 unzip
2. Create Apache logs directory for our Prestashop site with log files:
$ mkdir -p /home/prestashop/logs
$ touch /home/prestashop/logs/error_log
$ touch /home/prestashop/logs/access_log
3. Create a new configuration file for the site under /etc/httpd/conf.d/ and add following lines:
# /etc/httpd/conf.d/prestashop.conf
NameVirtualHost *:80
<VirtualHost *:80>
	ServerName myonlineshop.com
	ServerAlias www.myonlineshop.com
	ServerAdmin [email protected]
	DocumentRoot /home/prestashop/public_html
	ErrorLog /home/prestashop/logs/error_log
	CustomLog /home/prestashop/logs/access_log combined
VirtualHost>
4. Enable Apache on boot and start the service:
$ chkconfig httpd on
$ service httpd start
Load Balancers and Failover
1. Configure passwordless SSH from the storage1 to lb1 and lb2 so ClusterControl can provision the node:
$ ssh-copy-id -i ~/.ssh/id_rsa 192.168.50.111
$ ssh-copy-id -i ~/.ssh/id_rsa 192.168.50.112
2. Deploy HAProxy on lb1 and lb2 by using Add Load Balancer wizard.
3. Install Keepalived and configure 192.168.50.100 as virtual IP for HAproxy failover, similar to the screenshot below:

At the end of the deployment, the top summary bar in the ClusterControl UI should look like this:

4. Configure HAProxy to serve PrestaShop on port 80 by adding the following lines into /etc/haproxy/haproxy.cfg on lb1 and lb2:
listen prestashop_cluster
	bind *:80
	mode tcp
	option httpchk GET /
	balance leastconn
	server prestashop1 192.168.50.101:80 check inter 5000
	server prestashop2 192.168.50.102:80 check inter 5000
	server prestashop1 192.168.50.103:80 check inter 5000
Restart the HAProxy instance:
$ service haproxy restart
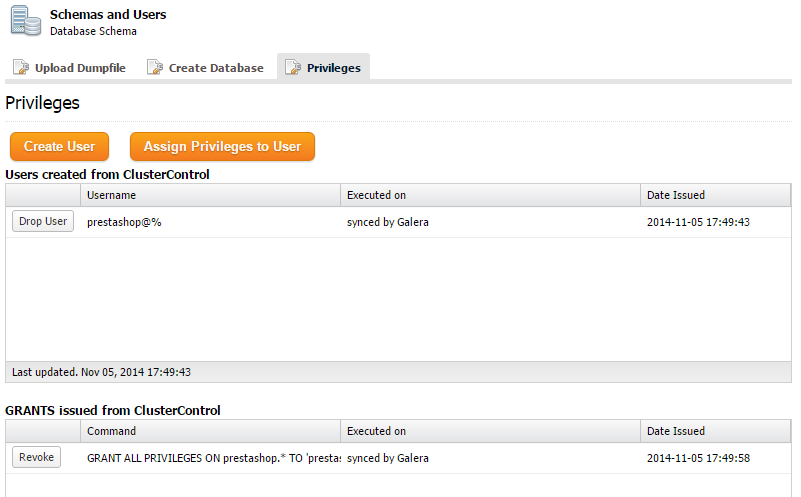
5. Create a schema for Alfresco by using Manage > Schemas and Users > Create Database and create a database called “prestashop”. Then assign all privileges to the schema with a wildcard host (‘%’).
At the moment, MariaDB Galera Cluster is load balanced with virtual IP, 192.168.50.100 listening on port 33306.
Migrating PrestaShop to the Cluster
1. It is advisable to put the shop in maintenance mode from the Administration interface. Go to Prestashop > Preferences > Maintenance > Enable Shop > No.
2. Assume standalone PrestaShop server is running under /home/prestashop/public_html, SSH into the old server and archive the web content:
$ cd /home/prestashop/
$ tar -cvzf public_html.tar.gz public_html
3. Export the old database using mysqldump:
$ mysqldump -uprestashop -p -h localhost -P 3306 --single-transaction prestashop > prestashop.sql
4. Copy the backups to the new server. For this purpose, we chose prestashop1:
$ scp public_html.tar.gz prestashop.sql [email protected]:~
5. On prestashop1, restore the web content backup to its respective path as well as MySQL database:
$ tar -xvzf public_html.tar.gz /home/prestashop
$ mysql -u prestashop -p prestashop < prestashop.sql
6. Update the new database server configuration value inside /home/prestashop/public_html/config/settings.inc.php:
define('_DB_SERVER_', '192.168.50.100:33306')<span>;< span="">
define('_DB_NAME_', 'prestashop')<span>;< span="">
define('_DB_USER_', 'prestashop')<span>;< span="">
define('_DB_PASSWD_', 'password')<span>;< span=""></span>;<></span>;<></span>;<></span>;<>
7. Once the migration is complete, you can access the website via virtual IP, 192.168.50.100. Do not forget to turn off Prestashop maintenance mode at Prestashop > Preferences > Maintenance > Enable Shop > Yes.
The migration of Prestashop to a clustered environment is now complete.
Verify the Architecture
1. Check the HAproxy statistics by logging into the HAProxy admin page at lb1 host port 9600. The default username/password is admin/admin. You should see some bytes in and out on the prestashop_cluster and s9s_33306_production sections:

2. Check and observe the traffic on your database cluster from the ClusterControl overview page at https://192.168.50.120/clustercontrol:

That’s it folks!


