blog
How to Set Up Asynchronous Replication Between MySQL Galera Clusters

The Galera Cluster enforces strong data consistency, where all nodes in the cluster are tightly coupled. Although network segmentation is supported, replication performance is still bound by two factors:
-
The round trip time (RTT) to the farthest node in the cluster from the originator node.
-
The size of a writeset to be transferred and certified for conflict on the receiver node.
While there are ways to boost the performance of Galera, it is not possible to work around these two limiting factors.
Luckily, Galera Cluster was built on top of MySQL, which also comes with a built-in replication feature (duh!). Both Galera replication and MySQL replication exist in the same server software independently. We can make use of these technologies to work together, where all replication within a data center will be on Galera, while inter-data center replication will be on standard MySQL Replication. The slave site can act as a hot-standby site, ready to serve data once the applications are redirected to the backup site. We covered this in a previous blog on MySQL architectures for disaster recovery.
Cluster-to-cluster replication was introduced in ClusterControl in version 1.7.4. In this blog post, we’ll show how straightforward it is to set up replication between two Galera Clusters (PXC 8.0). Then we’ll look at the more challenging part: handling failures at both node and cluster levels with the help of ClusterControl; failover and failback operations are crucial to preserving data integrity across the system.
Cluster Deployment
For the sake of our example, we’ll need at least two clusters and two sites – one for the primary and another one for the secondary. It works similarly to traditional MySQL master-slave replication but on a bigger scale with three database nodes in each site. With ClusterControl, you would achieve this by deploying a primary cluster, followed by deploying the secondary cluster on the disaster recovery site as a replica cluster, replicated by a bi-directional asynchronous replication.
The following diagram illustrates our final architecture:
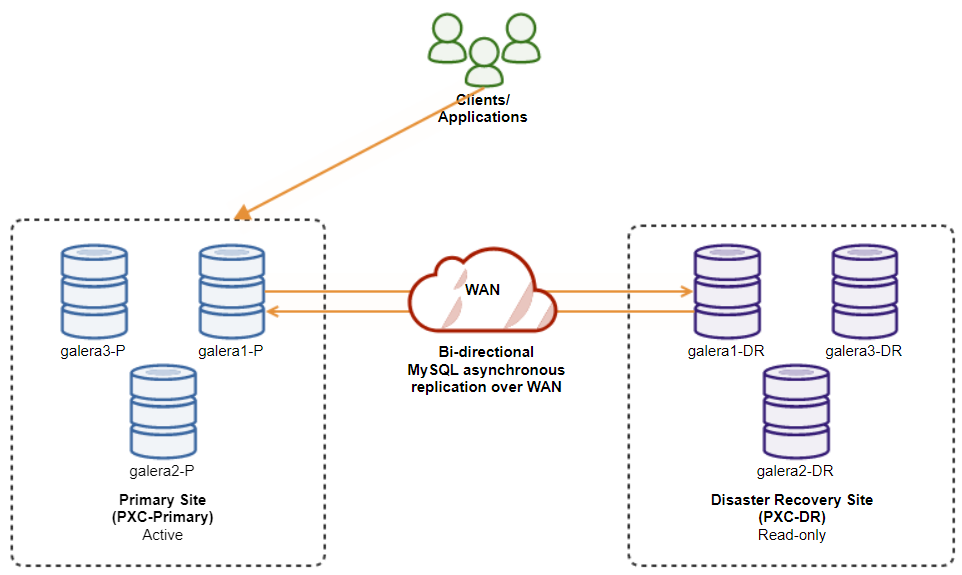
We have six database nodes in total, three on the primary site and another three on the disaster recovery site. To simplify the node representation, we will use the following notations:
-
Primary site:
-
galera1-P – 192.168.11.171 (master)
-
galera2-P – 192.168.11.172
-
galera3-P – 192.168.11.173
-
-
Disaster recovery site:
-
galera1-DR – 192.168.11.181 (slave)
-
galera2-DR – 192.168.11.182
-
galera3-DR – 192.168.11.183
-
First, simply deploy the first cluster, and we call it PXC-Primary. Open ClusterControl UI → Deploy → MySQL Galera, and enter all the required details:
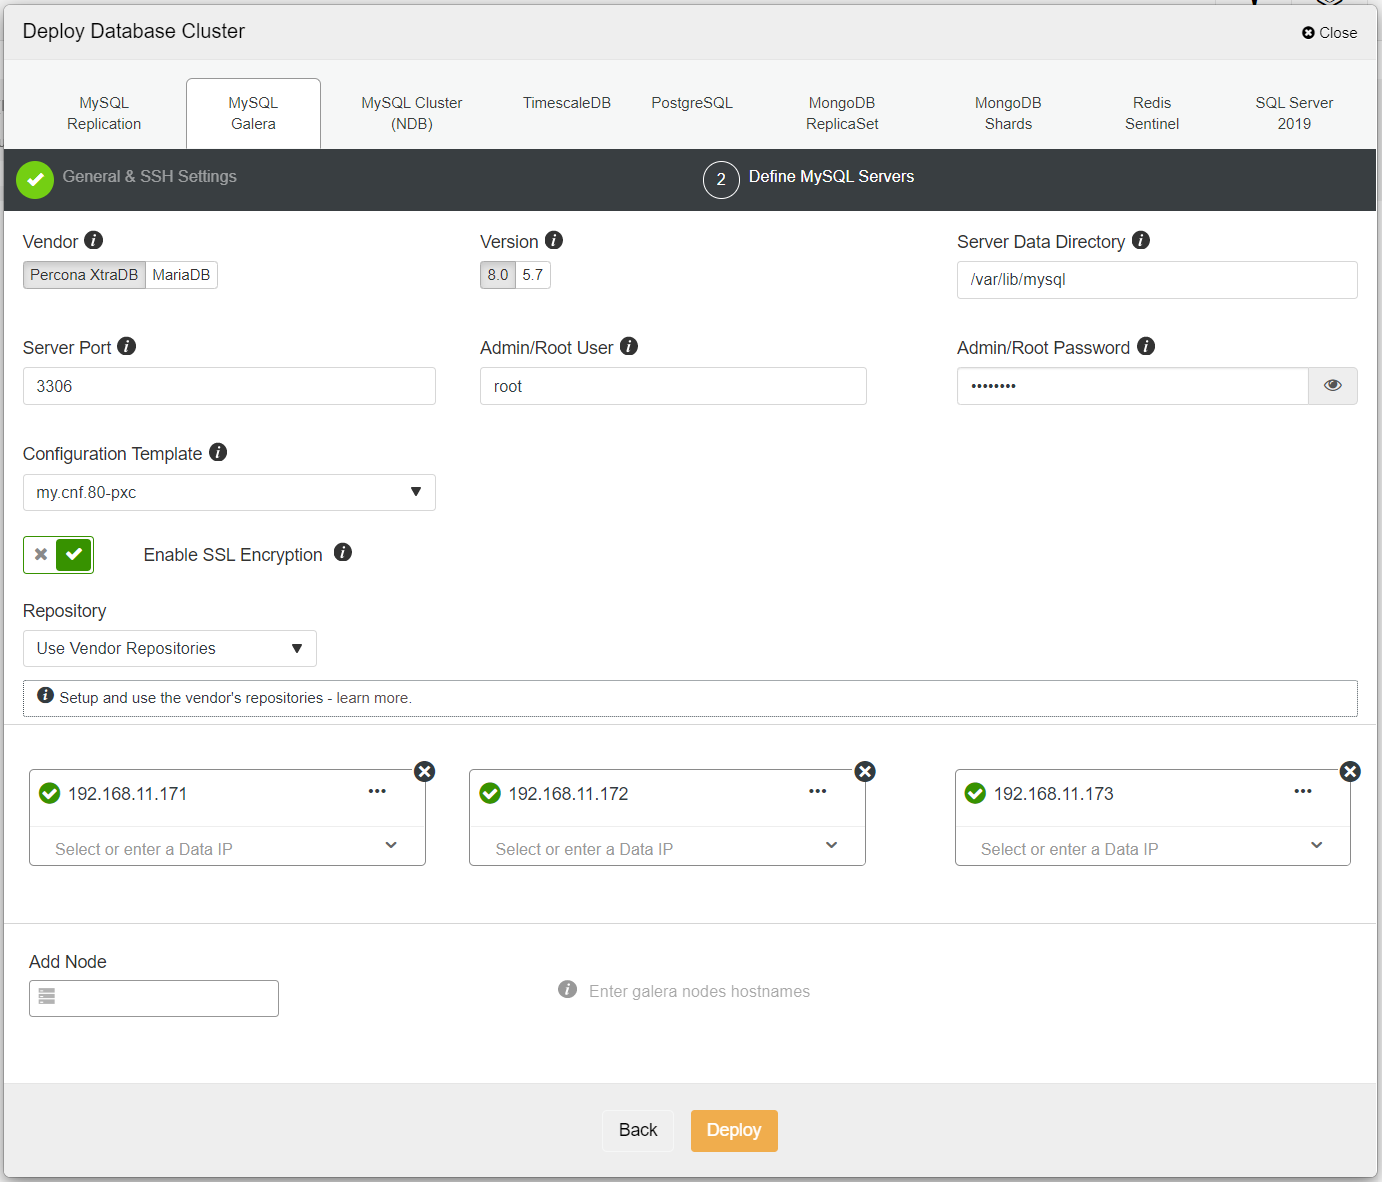
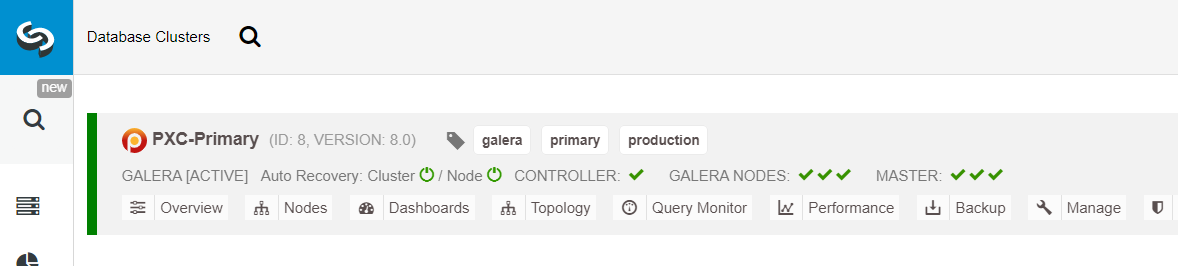
Ensure every specified node has a green tick next to it, indicating that ClusterControl can connect to the host via passwordless SSH. Click Deploy and wait for the deployment to complete. Once done, you should see the following cluster listed on the cluster dashboard page:
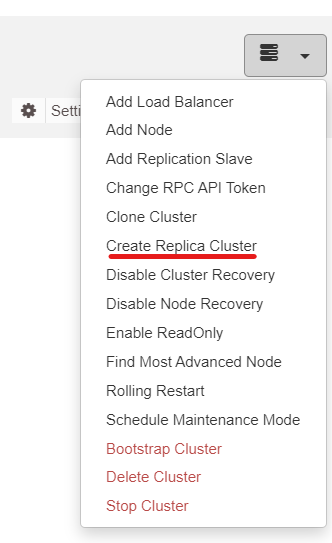
Next, we will use the ClusterControl feature called Create Replica Cluster, accessible from the Cluster Action dropdown:
You will be presented with the following sidebar popup:
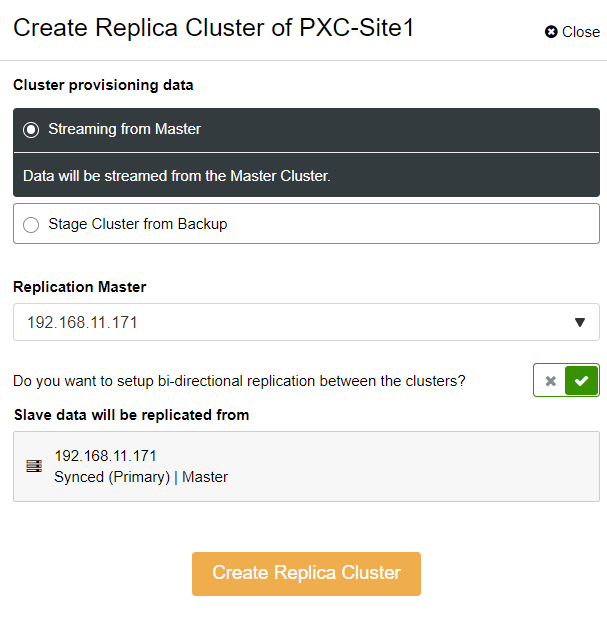
We chose the “Streaming from Master” option, where ClusterControl will use the chosen master to sync the replica cluster and configure the replication. Pay attention to the bi-directional replication option. If enabled, ClusterControl will set up a bi-directional replication between both sites (circular replication). The chosen master will be replicating from the first master defined for the replica cluster and vice versa. This setup will minimize the staging time required when recovering after failover or failback. Click “Create Replica Cluster,” where ClusterControl opens a new deployment wizard for the replica cluster, as shown below:
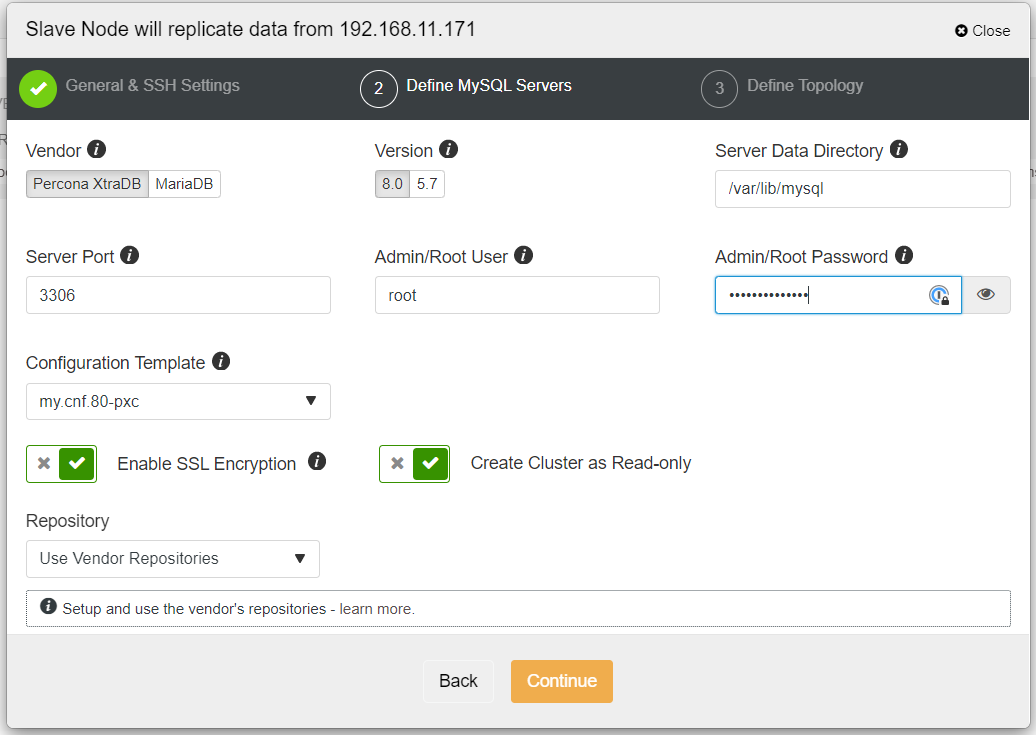
It’s recommended to enable SSL encryption if the replication involves untrusted networks like WAN, non-tunneled networks, or the Internet. Also, make sure that “Create Cluster as Read-only” is toggled; this is the protection against accidental writes and a good indicator to easily distinguish between the active cluster (read-write) and the passive cluster (read-only).
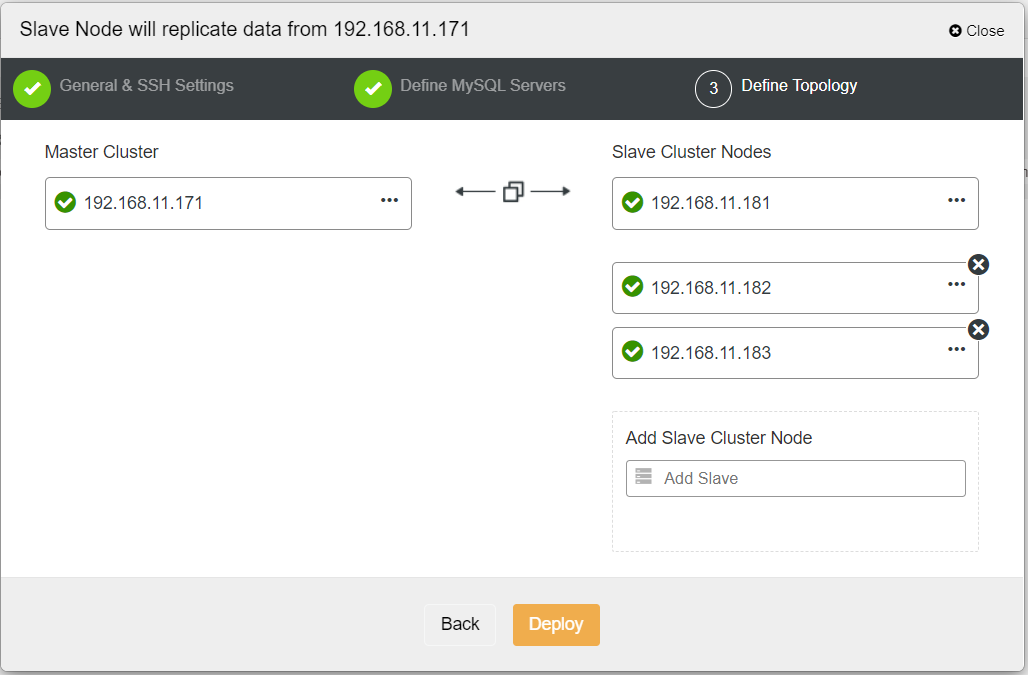
When filling out all the necessary information, you should reach the following stage to define the replica cluster topology:
From the ClusterControl dashboard, once the deployment is complete, you should see the DR site has a bidirectional arrow connected with the Primary site:
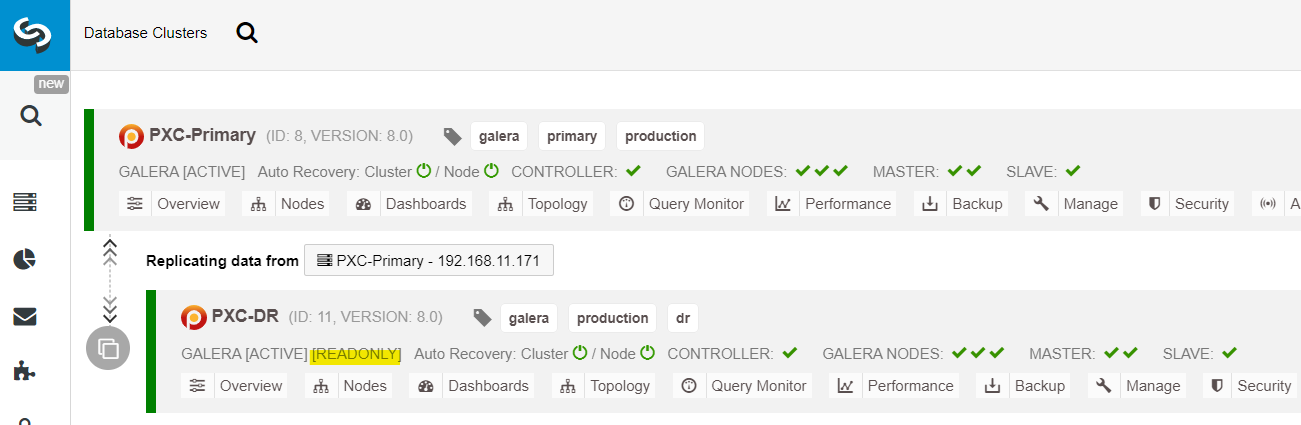
The deployment is now complete. Applications should send writes to the Primary Site only since this is the active site, and the DR site is configured for read-only (highlighted in yellow). Reads can be sent to both sites, although the DR site risks lagging behind due to the asynchronous replication nature. This setup will make the primary and disaster recovery sites independent of each other, loosely connected with asynchronous replication. One of the Galera nodes in the DR site will be a slave that replicates from one of the Galera nodes (master) in the primary site.
We now have a system where a cluster failure on the primary site will not affect the backup site. Performance-wise, WAN latency will not impact updates on the active cluster. These are shipped asynchronously to the backup site.
As a side note, it’s also possible to have a dedicated slave instance as a replication relay instead of using one of the Galera nodes as a slave.
Galera Node Failover Procedure
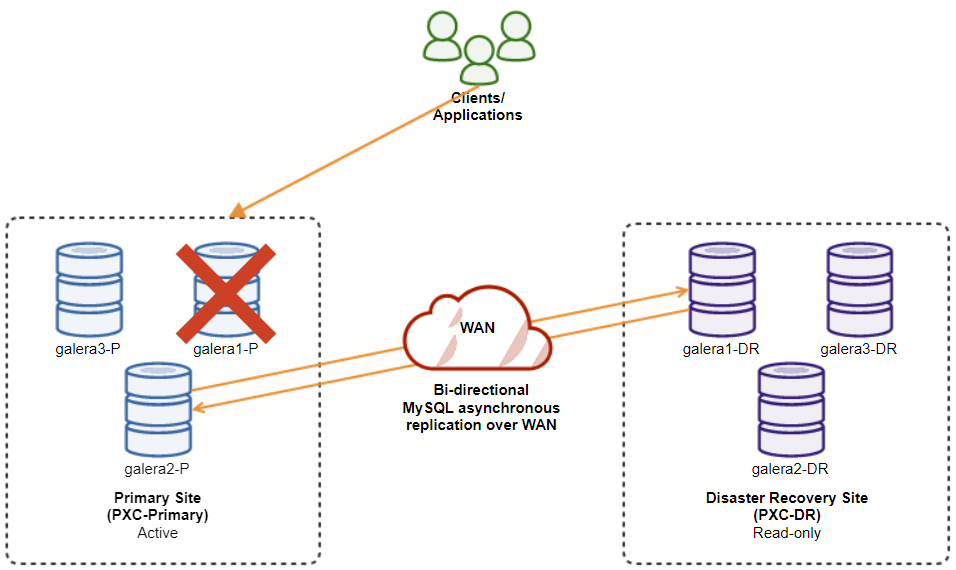
In case the current master (galera1-P) fails and the remaining nodes in the Primary Site are still up, the slave on the Disaster Recovery site (galera1-DR) should be directed to any available masters on the Primary Site, as shown in the following diagram:
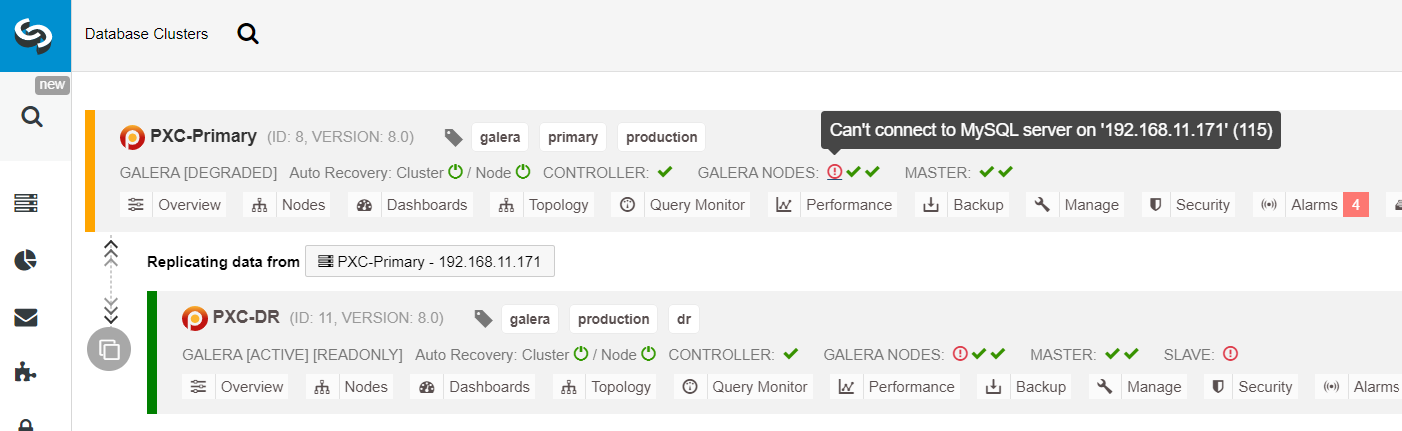
From the ClusterControl cluster list, you can see that the cluster status is degraded, and if you roll over on the exclamation mark icon, you can see the error for that particular node (galera1-P):
With ClusterControl, you can simply go to PXC-DR cluster → Nodes → pick galera1-DR → Node Actions → Rebuild Replication Slave, and you will be presented with the following configuration dialog:
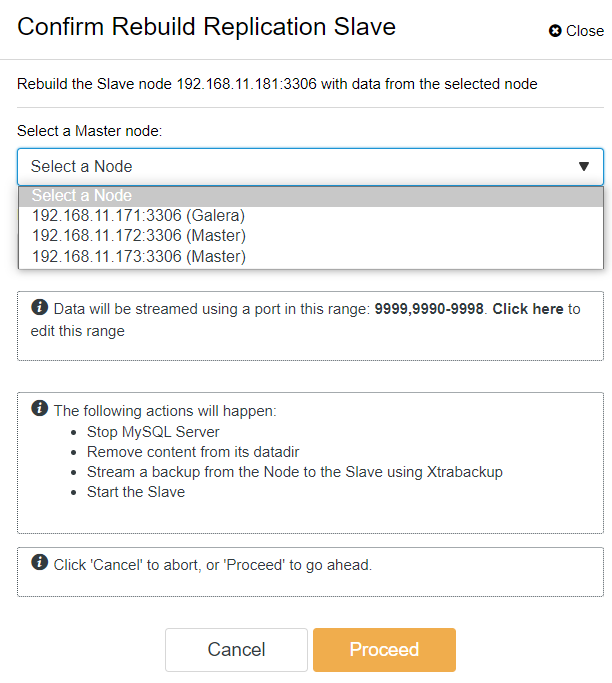
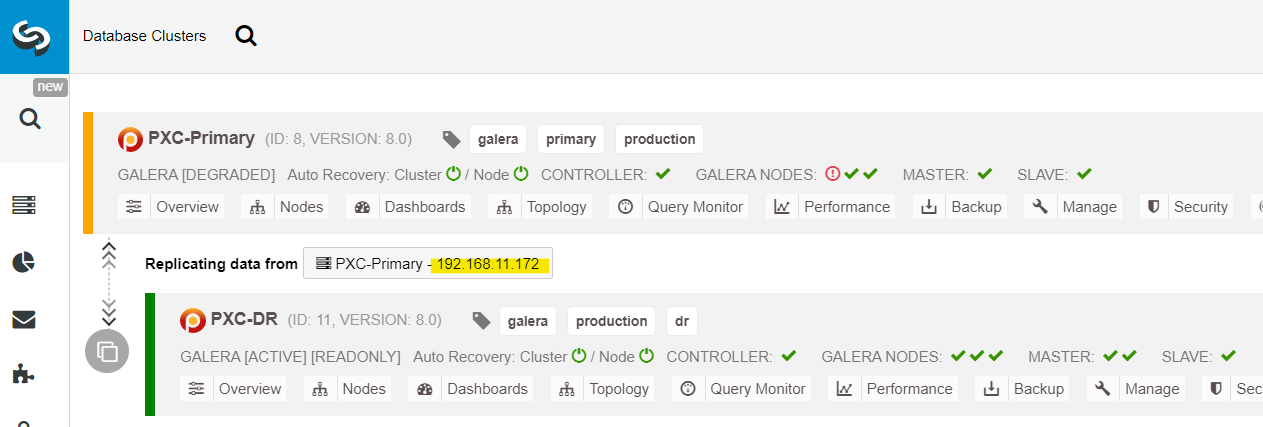
We can see all Galera nodes at the Primary Site (192.168.11.17x) from the drop-down list. Pick the secondary node, 192.168.11.172 (galera2-P), and click Proceed. ClusterControl will then configure the replication topology as it should be, setting up bidirectional replication from galera2-P to galera1-DR. You may confirm this from the cluster dashboard page (highlighted in yellow):
At this point, the primary cluster (PXC-Primary) is still serving as the active cluster for this topology. It should not impact the database service uptime of the primary cluster.
Galera Cluster Failover Procedure
If the primary cluster goes down, crashes, or simply loses connectivity from the application standpoint, the application can be directed to the DR site almost instantly. The SysAdmin simply needs to disable read-only on all Galera nodes on the disaster recovery site by using the following statement:
mysql> SET GLOBAL read_only = 0; -- repeat on galera1-DR, galera2-DR, galera3-DRFor ClusterControl users, you may use ClusterControl UI → Nodes → pick the DB node → Node Actions → Disable Read-only. ClusterControl CLI is also available, by executing the following commands on the ClusterControl node:
$ s9s node --nodes="192.168.11.181" --cluster-id=11 --set-read-write
$ s9s node --nodes="192.168.11.182" --cluster-id=11 --set-read-write
$ s9s node --nodes="192.168.11.183" --cluster-id=11 --set-read-write
The failover to the DR site is now complete, and the applications can start to send writes to the PXC-DR cluster. From the ClusterControl UI, you should see something like this:

The following diagram shows our architecture after the application failed over to the DR site:
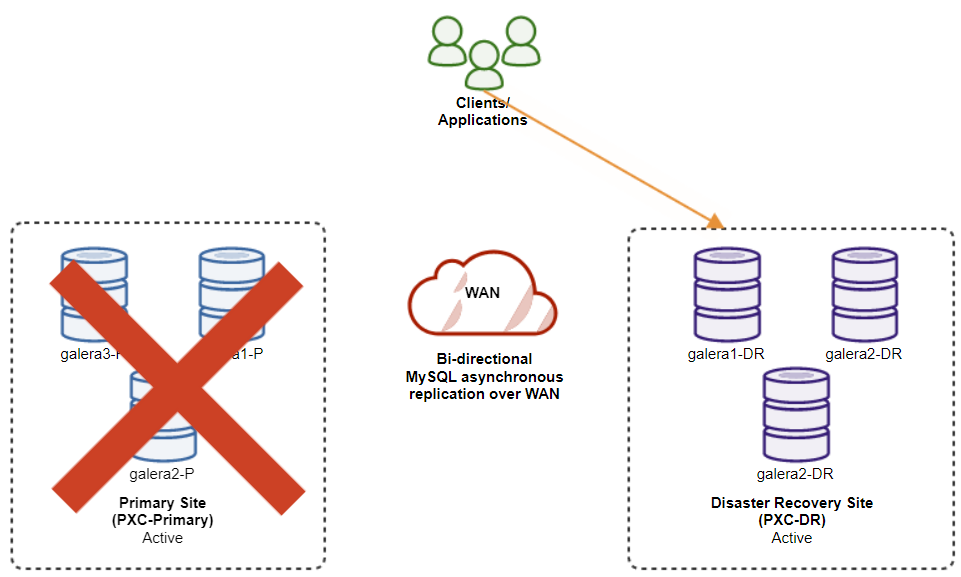
Assuming the Primary Site is still down, at this point, there is no replication between sites until the Primary Site comes back up.
Galera Cluster Failback Procedure
After the primary site comes up, it’s important to note that the primary cluster must be set to read-only, so we know that the active cluster is the one in the disaster recovery site. From ClusterControl, go to the cluster’s drop down menu and choose “Enable Read-only”, which will enable read-only on all nodes in the primary cluster and summarizes the current topology as below:
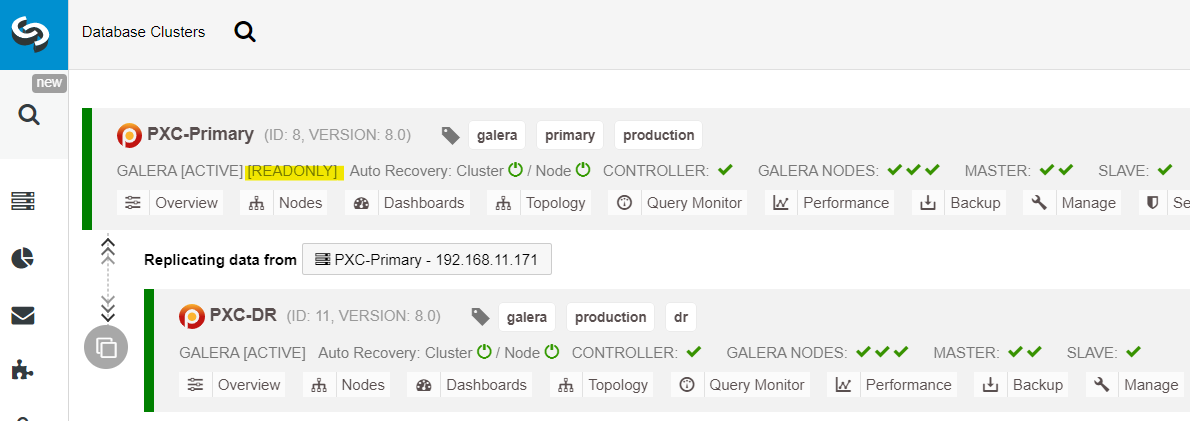
Make sure everything is green before planning to start the cluster failback procedure (green means all nodes are up and synced with each other). If there is a node in degrading status, for example, the replicating node is still lagging behind, or only some of the nodes in the primary cluster were reachable, do wait until the cluster is fully recovered, either by waiting for ClusterControl automatic recovery procedures to complete, or manual intervention.
At this point, the active cluster is still the DR’s cluster, and the primary cluster is acting as a secondary cluster. The following diagram illustrates the current architecture:
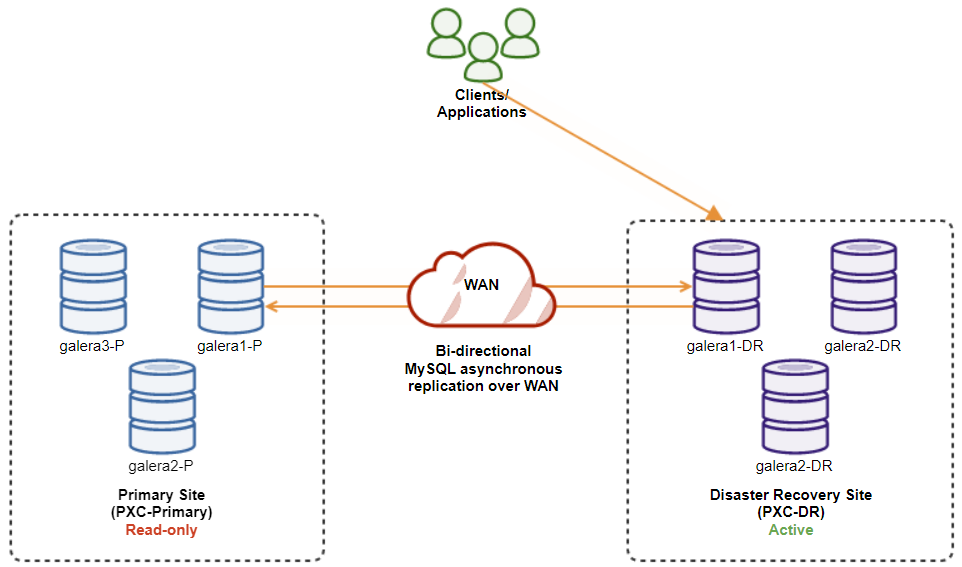
The safest way to failback to the Primary Site is to set read-only on the DR’s cluster, followed by disabling read-only on the Primary Site. Go to ClusterControl UI → PXC-DR (dropdown menu) → Enable Read-only. This will trigger a job to set read-only on all nodes on the DR’s cluster. Then, go to ClusterControl UI → PXC-Primary → Nodes, and disable read-only on all database nodes in the primary cluster.
You may also simplify the above procedures with ClusterControl CLI. Alternatively, execute the following commands on the ClusterControl host:
$ s9s cluster --cluster-id=11 --set-read-only # enable cluster-wide read-only
$ s9s node --nodes="192.168.11.171" --cluster-id=8 --set-read-write
$ s9s node --nodes="192.168.11.172" --cluster-id=8 --set-read-write
$ s9s node --nodes="192.168.11.173" --cluster-id=8 --set-read-write
Once done, the replication direction has gone back to its original configuration, where PXC-Primary is the active cluster and PXC-DR is the standby cluster. The following diagram illustrates the final architecture after the cluster failback operation:
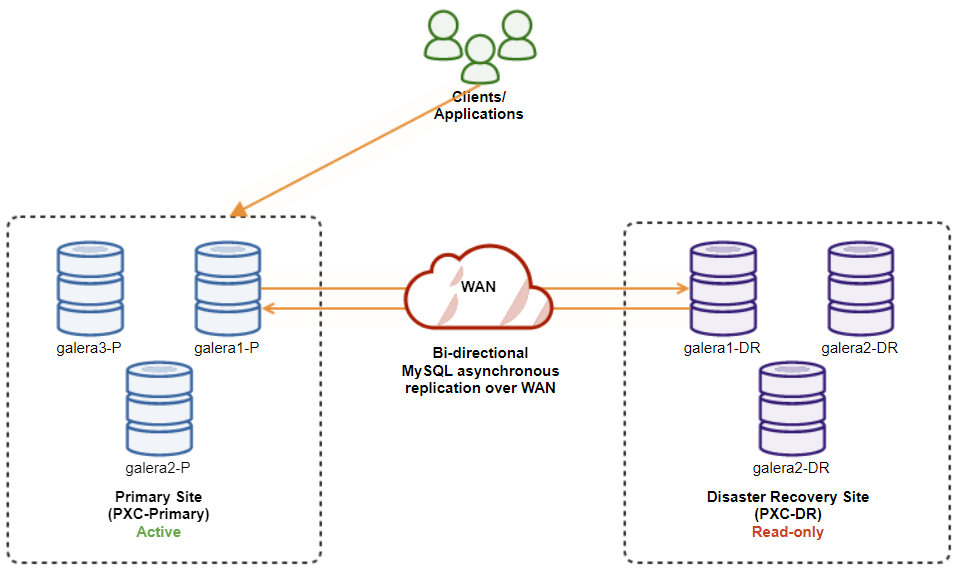
At this point, it is now safe to redirect the applications to write on the Primary Site.
Advantages of Cluster-to-Cluster Asynchronous Replication
Cluster-to-cluster with asynchronous replication comes with a number of advantages:
-
Minimal downtime during a database failover operation. Basically, you can redirect the write almost instantly to the slave site, only if you can protect writes not to reach the master site (as these writes would not be replicated, and will probably be overwritten when re-syncing from the DR site).
-
No impact of performance on the primary site since it is independent from the backup (DR) site. Replication from master to slave is performed asynchronously. The master site generates binary logs, the slave site replicates the events and applies the events at some later time.
-
Disaster recovery sites can be used for other purposes, for example, database backup, binary log backup and reporting, or heavy analytical queries (OLAP). Both sites can be used simultaneously, except for the replication lag and read-only operations on the slave side.
-
The DR cluster could potentially run on smaller instances in a public cloud environment, as long as they can keep up with the primary cluster. You can upgrade the instances if needed. In certain scenarios, it can save you some costs.
-
You only need one extra site for Disaster Recovery compared to active-active Galera multi-site replication setup, which requires at least three active sites to operate correctly.
Disadvantages of Cluster-to-Cluster Asynchronous Replication
There are also drawbacks to this setup, depending on if you’re using bidirectional or unidirectional replication:
-
There is a chance of missing some data during failover if the slave was behind, since replication is asynchronous. This could be improved with semi-synchronous and multi-threaded slaves replication, albeit there will be another set of challenges waiting (network overhead, replication gap, etc.).
-
In unidirectional replication, despite the failover procedures being fairly simple, the failback procedures can be tricky and prone to human error. It requires some expertise on switching master/slave role back to the primary site. It’s recommended to keep the procedures documented, rehearse the failover/failback operation regularly and use accurate reporting and monitoring tools.
-
It can be pretty costly, as you have to set up a similar number of nodes on the disaster recovery site. This is not black and white, as the cost justification usually comes from the requirements of your business. With some planning, it is possible to maximize usage of database resources at both sites, regardless of the database roles.
Wrapping Up
Setting up asynchronous replication for your MySQL Galera Clusters can be a relatively straightforward process — as long as you understand how to properly handle failures at both the node and cluster level. Ultimately, failover and failback operations are critical for ensuring data integrity.
For more tips on designing your Galera Clusters with failover and failback strategies in mind, check out this post on MySQL architectures for disaster recovery. If you’re looking for help automating these operations, evaluate ClusterControl free for 30 days and follow along with the steps in this post.
Don’t forget to follow us on Twitter or LinkedIn and subscribe to our newsletter stay updated on the latest news and best practices for managing your open-source database infrastructures.