blog
How to Deploy a Production-Ready MySQL or MariaDB Galera Cluster Using ClusterControl

Deploying a database cluster is not rocket science – there are many how-to’s on how to do that. But how do you know what you just deployed is production-ready? Manual deployments can also be tedious and repetitive. Depending on the number of nodes in the cluster, the deployment steps may be time-consuming and error-prone. Configuration management tools like Puppet, Chef and Ansible are popular in deploying infrastructure, but for stateful database clusters, you need to perform significant scripting to handle deployment of the whole database HA stack. Moreover, the chosen template/module/cookbook/role has to be meticulously tested before you can trust it as part of your infrastructure automation. Version changes require the scripts to be updated and tested again.
The good news is that ClusterControl automates deployments of the entire stack – and for free as well! We’ve deployed thousands of production clusters, and take a number of precautions to ensure they are production-ready Different topologies are supported, from master-slave replication to Galera, NDB and InnoDB cluster, with different database proxies on top.
A high availability stack, deployed through ClusterControl, consists of three layers:
- Database layer (e.g., Galera Cluster)
- Reverse proxy layer (e.g., HAProxy or ProxySQL)
- Keepalived layer, which, with use of Virtual IP, ensures high availability of the proxy layer
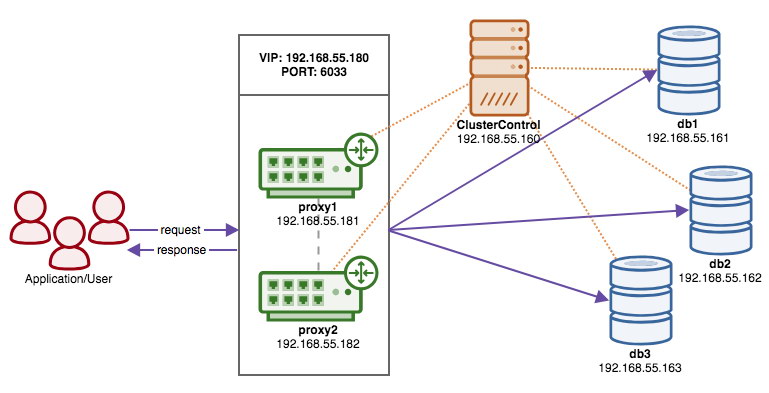
In this blog, we are going to show you how to deploy a production-grade Galera Cluster complete with load balancers for high availability setup. The complete setup consists of 6 hosts:
- 1 host – ClusterControl (deployment, monitoring, management server)
- 3 hosts – MySQL Galera Cluster
- 2 hosts – Reverse proxies act as load balancers in front of the cluster.
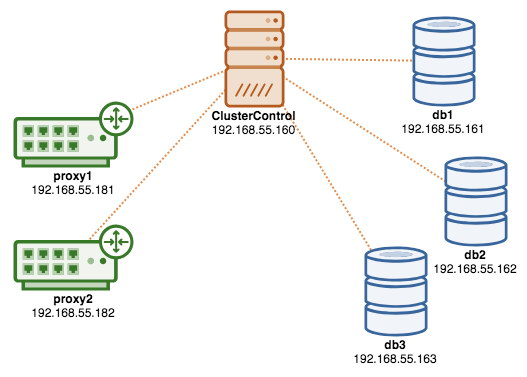
The following diagram illustrates our end result once deployment is complete:
Prerequisites
ClusterControl must reside on an independant node which is not part of the cluster. Download ClusterControl, and the page will generate a license unique for you and show the steps to install ClusterControl:
$ wget -O install-cc https://severalnines.com/scripts/install-cc
$ chmod +x install-cc
$ ./install-cc # as root or sudo user
Follow the instructions where you will be guided with setting up MySQL server, MySQL root password on the ClusterControl node, cmon password for ClusterControl usage and so on. You should get the following line once the installation has completed:
Determining network interfaces. This may take a couple of minutes. Do NOT press any key.
Public/external IP => http://{public_IP}/clustercontrol
Installation successful. If you want to uninstall ClusterControl then run install-cc --uninstall.
Then, on the ClusterControl server, generate an SSH key which we will use to setup the passwordless SSH later on. You can use any user in the system but it must have the ability to perform super-user operations (sudoer). In this example, we picked the root user:
$ whoami
root
$ ssh-keygen -t rsa
Set up passwordless SSH to all nodes that you would like to monitor/manage via ClusterControl. In this case, we will set this up on all nodes in the stack (including ClusterControl node itself). On ClusterControl node, run the following commands and specify the root password when prompted:
$ ssh-copy-id [email protected] # clustercontrol
$ ssh-copy-id [email protected] # galera1
$ ssh-copy-id [email protected] # galera2
$ ssh-copy-id [email protected] # galera3
$ ssh-copy-id [email protected] # proxy1
$ ssh-copy-id [email protected] # proxy2
You can then verify if it’s working by running the following command on ClusterControl node:
$ ssh [email protected] "ls /root"Make sure you are able to see the result of the command above without the need to enter password.
Deploying the Cluster
ClusterControl supports all vendors for Galera Cluster (Codership, Percona and MariaDB). There are some minor differences which may influence your decision for choosing the vendor. If you would like to learn about the differences between them, check out our previous blog post – Galera Cluster Comparison – Codership vs Percona vs MariaDB.
For production deployment, a three-node Galera Cluster is the minimum you should have. You can always scale it out later once the cluster is deployed, manually or via ClusterControl. We’ll open our ClusterControl UI at https://192.168.55.160/clustercontrol and create the first admin user. Then, go to the top menu and click Deploy -> MySQL Galera and you will be presented with the following dialog:
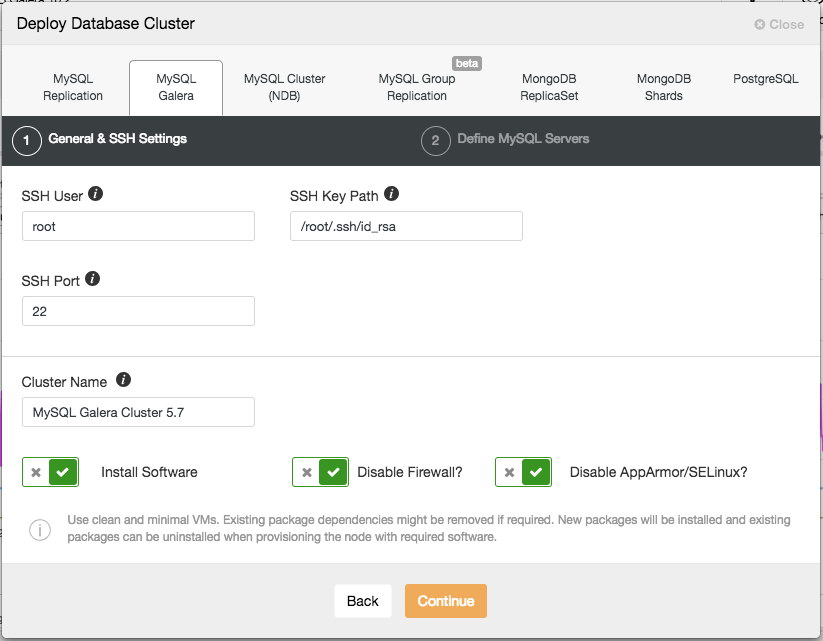
There are two steps, the first one is the “General & SSH Settings”. Here we need to configure the SSH user that ClusterControl should use to connect to the database nodes, together with the path to the SSH key (as generated under Prerequisite section) as well as the SSH port of the database nodes. ClusterControl presumes all database nodes are configured with the same SSH user, key and port. Next, give the cluster a name, in this case we will use “MySQL Galera Cluster 5.7”. This value can be changed later on. Then select the options to instruct ClusterControl to install the required software, disable the firewall and also disable the security enhancement module on the particular Linux distribution. All of these are recommended to be toggled on to maximize the potential of successful deployment.
Click Continue and you will be presented with the following dialog:

In the next step, we need to configure the database servers – vendor, version, datadir, port, etc – which are pretty self-explanatory. “Configuration Template” is the template filename under /usr/share/cmon/templates of the ClusterControl node. “Repository” is how ClusterControl should configure the repository on the database node. By default, it will use the vendor repository and install the latest version provided by the repository. However, in some cases, the user might have a pre-existing repository mirrored from the original repository due to security policy restriction. Nevertheless, ClusterControl supports most of them, as described in the user guide, under Repository.
Lastly, add the IP address or hostname (must be a valid FQDN) of the database nodes. You will see a green tick icon on the left of the node, indicating ClusterControl was able to connect to the node via passwordless SSH. You are now good to go. Click Deploy to start the deployment. This may take 15 to 20 minutes to complete. You can monitor the deployment progress under Activity (top menu) -> Jobs -> Create Cluster:
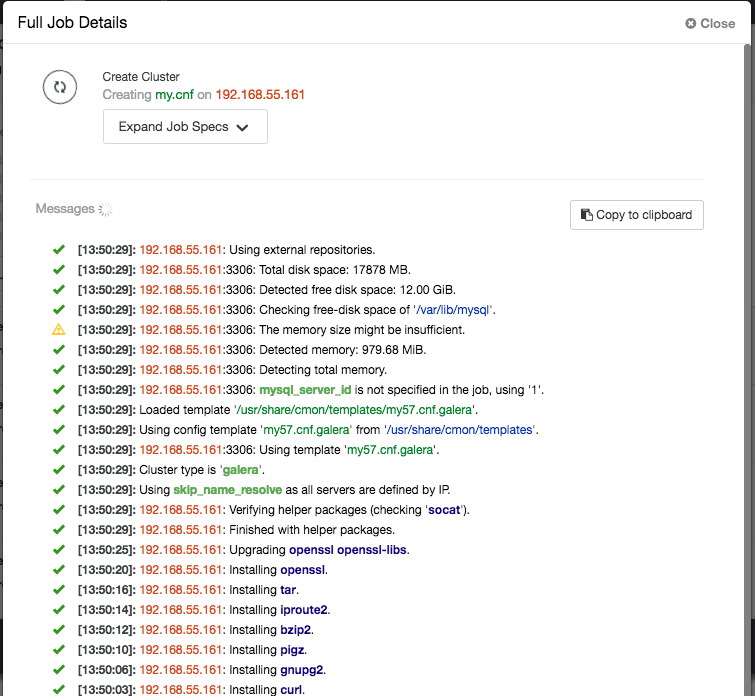
Once the deployment completed, at this point, our architecture can be illustrated as below:

Deploying the Load Balancers
In Galera Cluster, all nodes are equal – each node holds the same role and same dataset. Therefore, there is no failover within the cluster if a node fails. Only the application side requires failover, to skip the inoperational nodes while the cluster is partitioned. Therefore, it’s highly recommended to place load balancers on top of a Galera Cluster to:
- Unify the multiple database endpoints to a single endpoint (load balancer host or virtual IP address as the endpoint).
- Balance the database connections between the backend database servers.
- Perform health checks and only forward the database connections to healthy nodes.
- Redirect/rewrite/block offending (badly written) queries before they hit the database servers.
There are three main choices of reverse proxies for Galera Cluster – HAProxy, MariaDB MaxScale or ProxySQL – all can be installed and configured automatically by ClusterControl. In this deployment, we picked ProxySQL because it checks all the above plus it understands the MySQL protocol of the backend servers.
In this architecture, we want to use two ProxySQL servers to eliminate any single-point-of-failure (SPOF) to the database tier, which will be tied together using a floating virtual IP address. We’ll explain this in the next section. One node will act as the active proxy and the other one as hot-standby. Whichever node that holds the virtual IP address at a given time is the active node.
To deploy the first ProxySQL server, simply go to the cluster action menu (right-side of the summary bar) and click on Add Load Balancer -> ProxySQL -> Deploy ProxySQL and you will see the following:
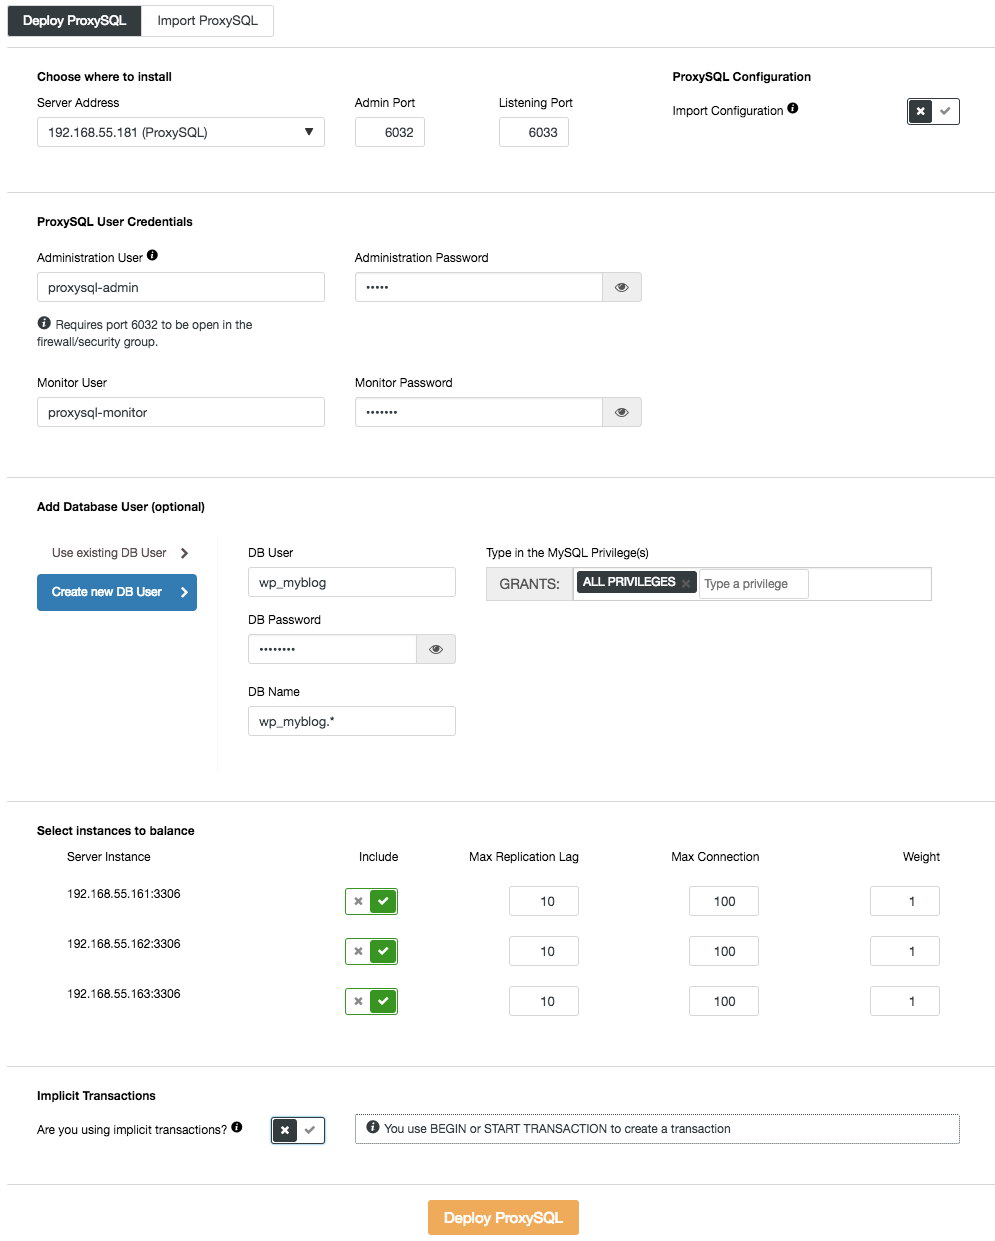
Again, most of the fields are self-explanatory. In the “Database User” section, ProxySQL acts as a gateway through which your application connects to the database. The application authenticates against ProxySQL, therefore you have to add all of the users from all the backend MySQL nodes, along with their passwords, into ProxySQL. From ClusterControl, you can either create a new user to be used by the application – you can decide on its name, password, access to which databases are granted and what MySQL privileges that user will have. Such user will be created on both MySQL and ProxySQL side. Second option, more suitable for existing infrastructures, is to use the existing database users. You need to pass username and password, and such user will be created only on ProxySQL.
The last section, “Implicit Transaction”, ClusterControl will configure ProxySQL to send all of the traffic to the master if we started transaction with SET autocommit=0. Otherwise, if you use BEGIN or START TRANSACTION to create a transaction, ClusterControl will configure read/write split in the query rules. This is to ensure ProxySQL will handle transactions correctly. If you have no idea how your application does this, you can pick the latter.
Repeat the same configuration for the second ProxySQL node, except the “Server Address” value which is 192.168.55.182. Once done, both nodes will be listed under “Nodes” tab -> ProxySQL where you can monitor and manage them directly from the UI:
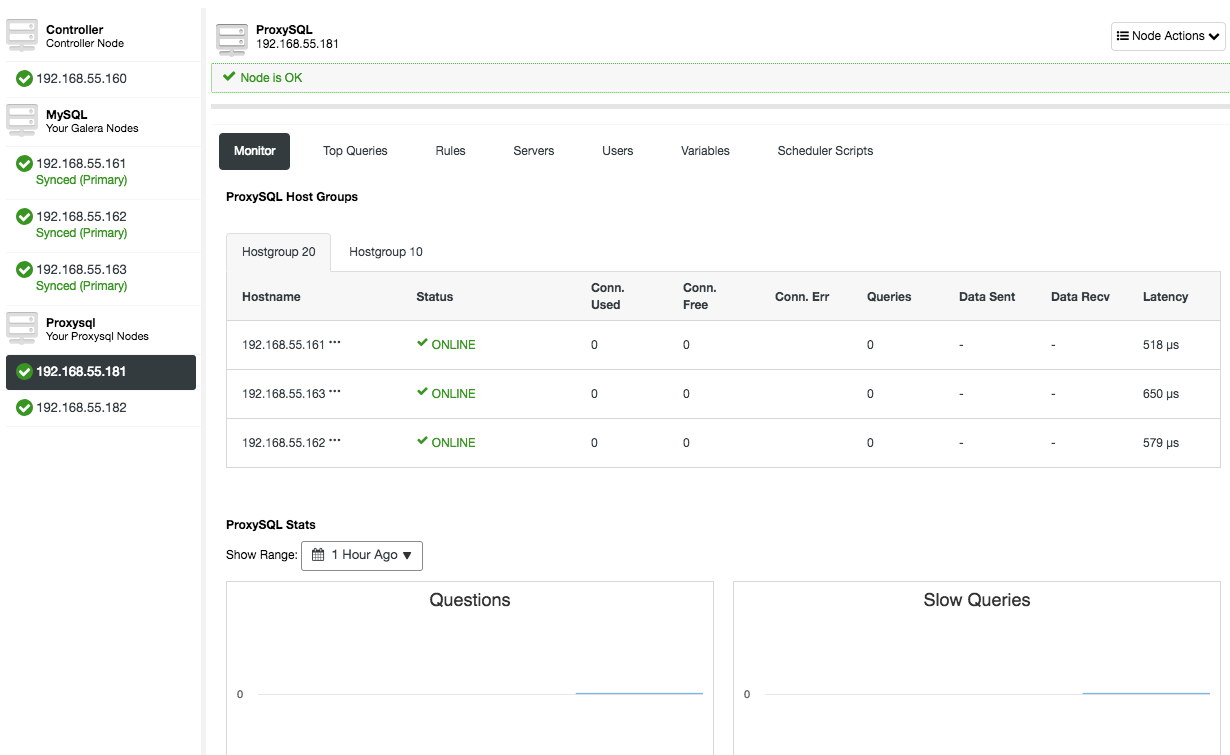
At this point, our architecture is now looking like this:
If you would like to learn more about ProxySQL, do check out this tutorial – Database Load Balancing for MySQL and MariaDB with ProxySQL – Tutorial.
Deploying the Virtual IP Address
The final part is the virtual IP address. Without it, our load balancers (reverse proxies) would be the weak link as they would be a single-point of failure – unless the application has the ability to automatically redirect failed database connections to another load balancer. Nevertheless, it’s good practice to unify them both using virtual IP address and simplify the connection endpoint to the database layer.
From ClusterControl UI -> Add Load Balancer -> Keepalived -> Deploy Keepalived and select the two ProxySQL hosts that we have deployed:
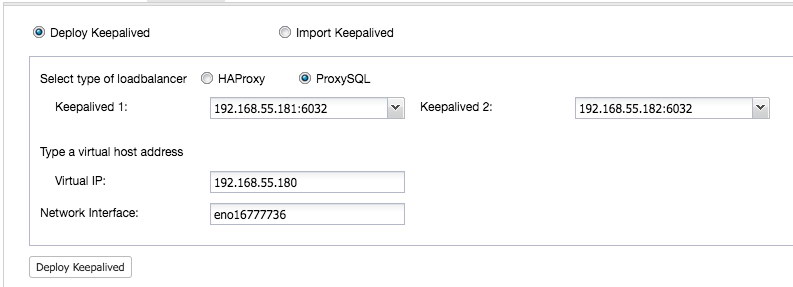
Also, specify the virtual IP address and the network interface to bind the IP address. The network interface must exist on both ProxySQL nodes. Once deployed, you should see the following green checks in the summary bar of the cluster:

At this point, our architecture can be illustrated as below:
Our database cluster is now ready for production usage. You can import your existing database into it or create a fresh new database. You can use the Schemas and Users Management feature if the trial license hasn’t expired.
To understand how ClusterControl configures Keepalived, check out this blog post, How ClusterControl Configures Virtual IP and What to Expect During Failover.
Connecting to the Database Cluster
From the application and client standpoint, they need to connect to 192.168.55.180 on port 6033 which is the virtual IP address floating on top of the load balancers. For example, the WordPress database configuration will be something like this:
/** The name of the database for WordPress */
define( 'DB_NAME', 'wp_myblog' );

/** MySQL database username */
define( 'DB_USER', 'wp_myblog' );

/** MySQL database password */
define( 'DB_PASSWORD', 'mysecr3t' );

/** MySQL hostname - virtual IP address with ProxySQL load-balanced port*/
define( 'DB_HOST', '192.168.55.180:6033' );
If you would like to access the database cluster directly, bypassing the load balancer, you can just connect to port 3306 of the database hosts. This is usually required by the DBA staff for administration, management, and troubleshooting. With ClusterControl, most of these operations can be performed directly from the user interface.
Final Thoughts
As shown above, deploying a database cluster is no longer a difficult task. Once deployed, there a full suite of free monitoring features as well as commercial features for backup management, failover/recovery and others. Fast deployment of different types of cluster/replication topologies can be useful when evaluating high availability database solutions, and how they fit to your particular environment.


