Whitepapers
Database load balancing for MySQL and MariaDB with ProxySQL
ProxySQL is a lightweight yet complex protocol-aware proxy that sits between the MySQL clients and servers. It is a gate, which basically separates clients from databases, and is therefore an entry point used to access all the database servers.
What we’ll cover in this white paper
- Introduction
- ProxySQL internals
- ProxySQL concepts
- Installing ProxySQL in ClusterControl
- Managing ProxySQL in ClusterControl
- Managing multiple ProxySQL instances in ClusterControl
- Failover handling in ProxySQL
- Use cases for ProxySQL
- Getting started with ProxySQL
- Frequently Asked questions
1. ProxySQL – introduction
Before ProxySQL, a database administrator only had a limited arsenal of tricks to manage “bad queries” in a live database environment, or when needing to perform a failover with minimal impact to an application in production. Now, thanks to ProxySQL, the admin has much more control over database traffic and queries that are issued against the databases.
ProxySQL became a production-ready in late 2015. It was created by René Cannaò, himself a DBA, to solve problems that a typical DBA (or ops person) would face while working with a large, sharded MySQL environment.
ProxySQL provides a number of benefits:
- It provides ‘intelligent’ load balancing of application requests onto multiple databases
- It understands the MySQL traffic that passes through it, and can split reads from writes. This is especially useful in a Master-Slave replication setup, when writes should only go to the master.
- It understands the underlying database topology, whether the instances are up or down, and therefore can route requests to healthy databases
- It shields applications from the complexity of the underlying database topology, as well as any changes to it
- It provides query workload analytics, which is useful when analyzing and improving performance
- It provides administrators with powerful control mechanisms to cache queries at the proxy layer for faster query response, re-route queries, or even re-write a badly written query
- It empowers the administrator to maintain efficient operations of the overall infrastructure
2. ProxySQL Internals
ProxySQL, when started, immediately spawns a new process – the parent process works as an angel process and restarts ProxySQL within milliseconds of a crash. If you are familiar with MySQL, this is fairly similar to mysqld_safe. By default, ProxySQL needs two ports: 6033, on which it listens for traffic and 6032, which works as a gateway for managing ProxySQL. The command line admin interface can be accessed by a MySQL client – the majority of the configuration is done using SQL. Even though the underlying database that ProxySQL uses to store its configuration is SQLite, an effort was put into making the experience as close to MySQL as possible. You can use some of the MySQL syntax to check the ProxySQL configuration (SHOW GLOBAL VARIABLES) or set a new one (SET GLOBAL variable_name = value). The backend configuration is stored in tables – all changes are made through SQL: INSERT, UPDATE, DELETE. We will cover this in details in the next chapter.
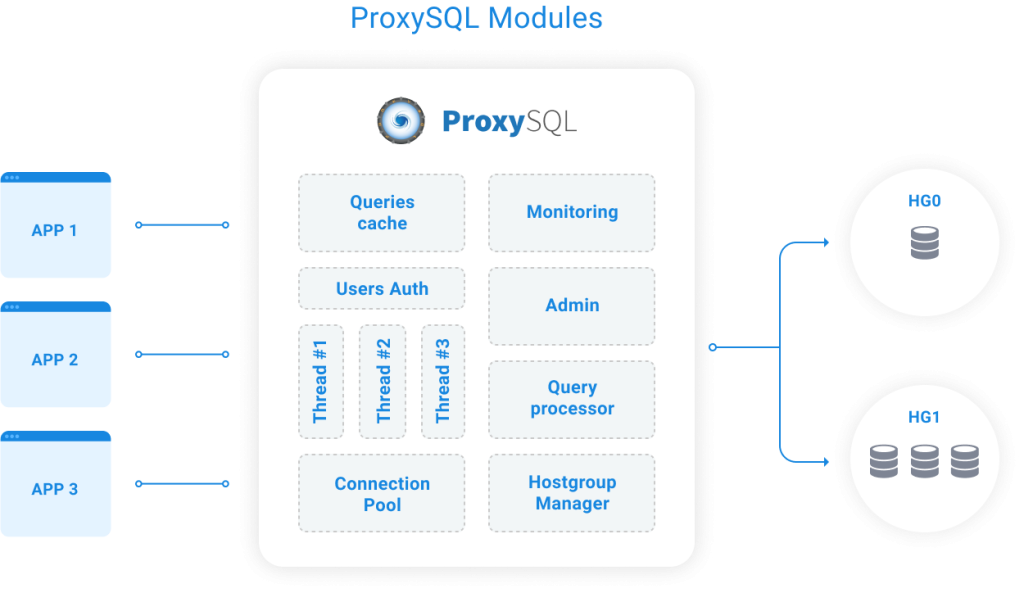
Query processor/rules engine – ProxySQL understands the MySQL protocol. The rules engine matches incoming traffic, and defines whether to cache a query, or block, re-route, re-write or mirror it onto a hostgroup target.
User authentication – User credentials for the underlying databases are hashed and stored in the proxy.
Hostgroup manager – This manages the groups of servers to send traffic to, and tracks their state.
Connection pool – This manages the connections to the backend databases. A pool of connections is established towards the backends, and that is shared/reused by all applications.
Monitoring – This monitors the backends and collects metrics. It monitors e.g. for unresponsive hosts or replication lag and shuns them as necessary.
We will discuss use cases in detail, towards the end of this tutorial, but let’s get some ideas on how ProxySQL could be used in your infrastructure. As it understands SQL traffic, it can do extensive routing – you can match queries by numerous attributes: schema, user, host, port or even regular expression. This gives you a great deal of flexibility regarding which query you want to make changes to. There’s quite an impressive list of actions that can be taken on a query. You can cache it for a defined amount of time (TTL), which reduces query latency. This also eliminates the need for external caching layer, which usually introduces additional complexity in the application as it has to manage the cache. It is also a much better solution than the MySQL query cache (which, finally, has been removed in 8.0). You can also throttle a query – do you have a heavy query that affects performance? You can have it run not more than, say, once per second or once per minute – it’s fully customizable. Another feature is query mirroring. This is not a production-ready feature, and don’t expect to see all of your traffic mirrored. But under certain circumstances, this can be very useful – for a given query, you can send it not only to your production hosts but also to a separate location – to capture it in the slow log or to do some debugging. Query re-writing allows you to rewrite a query on the fly. Have you been in a situation where simple FORCE INDEX would solve your issue, but you couldn’t add it without going through a time-consuming process to modify the app, test it, roll new code etc? Now it is possible to rewrite a query in ProxySQL and e.g., add index hints.
3. ProxySQL concepts
In this chapter we’d like to discuss some of the most important concepts of ProxySQL. We will cover how backends are configured, how the configuration system works, as well as the mechanism behind query rules.
3.1. Configuration
Configuration is done using SQL and it’s stored in an SQLite database. This is just a part of the whole picture: there are three configuration layers in ProxySQL:
- Disk: a persistent storage which survives a ProxySQL restart (and this is where SQLite is used);
- Memory: in memory copy of the configuration, this is where user makes changes;
- Runtime: a copy of the configuration which is currently used by ProxySQL.
Those of you who worked with Cisco hardware may find this concept similar. There are commands to propagate changes each way: you can save changes to runtime and ProxySQL will start using the new configuration. Once you verify everything is good, you can save it to disk. Whenever you decide it’s time to rollback changes, you can always load old configuration back from disk and then save it to memory.
This design makes it easy to perform, test and if needed, revert configuration changes. It also makes it possible to implement changes in a “transactional” fashion – whenever you need to make couple of changes at once, you can easily make them one by one on a working copy of the configuration in memory and, once you are done, save all of them to runtime.
3.2. Hostgroups
If you work with HAProxy, you should be familiar with the following approach: you define one or more backends, a backend being a group of nodes. Each backend is assigned to a separate port, on which HAProxy listens. HAProxy routes traffic on that port to the respective backend. This is a useful approach which makes it possible to send reads and writes to different locations (assuming your application can do read/write split). ProxySQL uses hostgroups, which are quite similar: You can have one or more hostgroups and each hostgroup can contain one or more hosts serving similar purpose. For example, one hostgroup may contain master (write traffic) and a second hostgroup may contain slaves (read-only traffic).
mysql> SELECT hostgroup_id, hostname, comment FROM mysql_servers;
+--------------+------------+-----------------------+
| hostgroup_id | hostname   | comment               |
+--------------+------------+-----------------------+
| 20           | 10.0.0.128 | read server           |
| 20           | 10.0.0.126 | read server           |
| 20           | 10.0.0.127 | read server           |
| 10           | 10.0.0.126 | read and write server |
+--------------+------------+-----------------------+
4 rows in set (0.00 sec)
One host can be a part of many hostgroups: a master can also handle read traffic so it can be part of both hostgroups. You may also want to create more hostgroups – one that contains those slaves which are also acting as backup hosts, another one that contains a slave which is used for reporting/analytics. If you work in a sharding environment, different hostgroups may be dedicated to different shards.
3.3. Query rules
Once you have your hostgroups created, you need to define rules about how traffic should be routed – for this you will need to create query rules in ProxySQL. They define how exactly a given query should behave, where it should be routed to and if some additional action (like caching) should be performed on it. ProxySQL has a table, mysql_query_rules, where query rules are stored. It has following structure:
mysql> SHOW CREATE TABLE mysql_query_rules\G
*************************** 1. row ***************************
       table: mysql_query_rules
Create Table: CREATE TABLE mysql_query_rules (
    rule_id INTEGER PRIMARY KEY AUTOINCREMENT NOT NULL,
    active INT CHECK (active IN (0,1)) NOT NULL DEFAULT 0,
    username VARCHAR,
    schemaname VARCHAR,
    flagIN INT NOT NULL DEFAULT 0,
    client_addr VARCHAR,
    proxy_addr VARCHAR,
    proxy_port INT,
    digest VARCHAR,
    match_digest VARCHAR,
    match_pattern VARCHAR,
    negate_match_pattern INT CHECK (negate_match_pattern IN (0,1)) NOT NULL DEFAULT 0,
    re_modifiers VARCHAR DEFAULT 'CASELESS',
    flagOUT INT,
    replace_pattern VARCHAR,
    destination_hostgroup INT DEFAULT NULL,
    cache_ttl INT CHECK(cache_ttl > 0),
    reconnect INT CHECK (reconnect IN (0,1)) DEFAULT NULL,
    timeout INT UNSIGNED,
    retries INT CHECK (retries>=0 AND retries <=1000),
    delay INT UNSIGNED,
    next_query_flagIN INT UNSIGNED,
    mirror_flagOUT INT UNSIGNED,
    mirror_hostgroup INT UNSIGNED,
    error_msg VARCHAR,
    OK_msg VARCHAR,
    sticky_conn INT CHECK (sticky_conn IN (0,1)),
    multiplex INT CHECK (multiplex IN (0,1,2)),
    log INT CHECK (log IN (0,1)),
    apply INT CHECK(apply IN (0,1)) NOT NULL DEFAULT 0,
    comment VARCHAR)
1 row in set (0.01 sec)
There are quite a few columns, and we will not go through each of them (you can check that in the documentation), but let’s look at some of them. Let’s take a look at the simple example of query rules that define read/write split in ProxySQL:
mysql> SELECT rule_id, active, match_pattern, destination_hostgroup, cache_ttl, apply FROM mysql_query_rules;
+---------+--------+-----------------------+-----------------------+-----------+-------+
| rule_id | active | match_pattern         | destination_hostgroup | cache_ttl | apply |
+---------+--------+-----------------------+-----------------------+-----------+-------+
| 100     | 1      | ^SELECT .* FOR UPDATE | 10                    | NULL      | 1     |
| 200     | 1      | ^SELECT .*            | 20                    | NULL      | 1     |
| 300     | 1      | .*                    | 10                    | NULL      | 1     |
+---------+--------+-----------------------+-----------------------+-----------+-------+
3 rows in set (0.00 sec)3 rows in set (0.00 sec)
As you can see, there are three rules only. ProxySQL processes them in a rule_id order so it’s important to make sure you have them all in the correct order. The first rule will catch queries which match SELECT … FOR UPDATE and it will route them to hostgroup 10 (which is a hostgroup of writers in this case). Last column, “apply” defines if this is the final rule for queries that match it, or if further rules should also be processed. In this case, it’s a final rule and no further processing will be done. So, all queries which matched rule 100 will go to hostgroup 10 and all remaining will be tested against second rule, rule 200. Here all queries which match “SELECT …” will be detected and routed to hostgroup 20, a reader hostgroup. Again, this is the final rule so all selects, except for SELECT … FOR UPDATE will be sent to this hostgroup. The third and the final rule – it matches everything which has not yet been matched (so, everything except SELECT … FOR UPDATE and SELECT …) – those queries will be sent to hostgroup 10 (write hostgroup).
4. Installing ProxySQL in ClusterControl
ClusterControl has had support for ProxySQL since version 1.4.0 – it not only installs it but an extensive UI is available for configuration and management. In this chapter, we are going to show you how to deploy ProxySQL from within ClusterControl and what high-availability options are available. In next chapter, we will discuss more in-depth management of the ProxySQL using ClusterControl. Let’s get started with the installation.
4.1. Deploying ProxySQL from ClusterControl
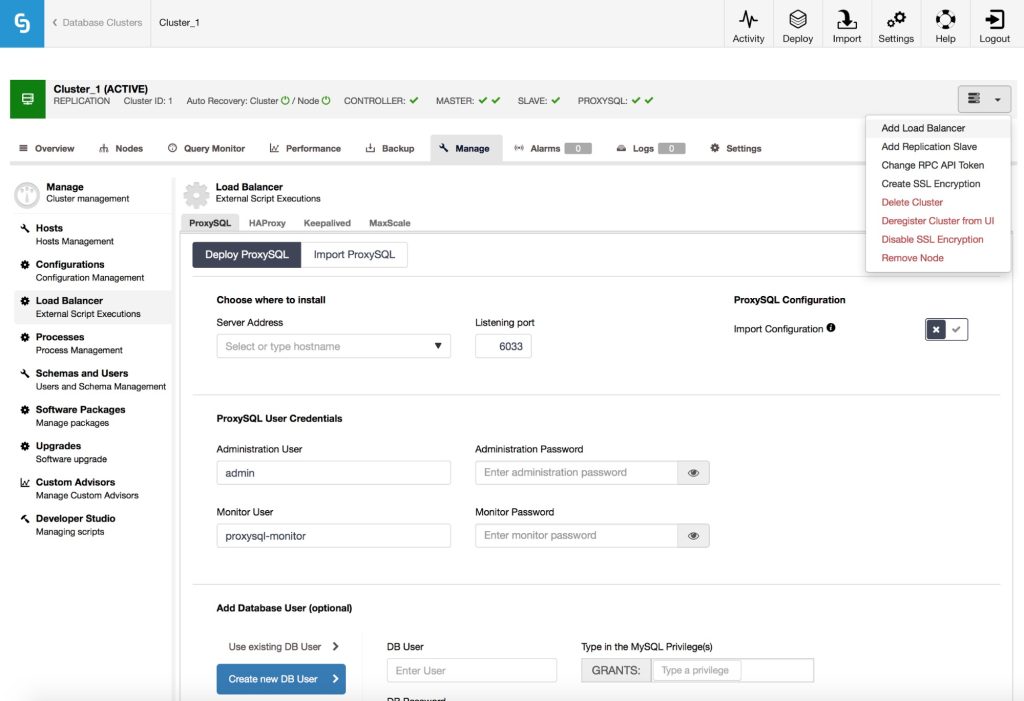
It is pretty straightforward to install ProxySQL on top of an existing master-slave replication or cluster setup, by choosing the “Add Load Balancer” option in the cluster actions menu. When you do that, you’ll be presented with the above screen. Please note the “Import Configuration” box – we will get back to it later.
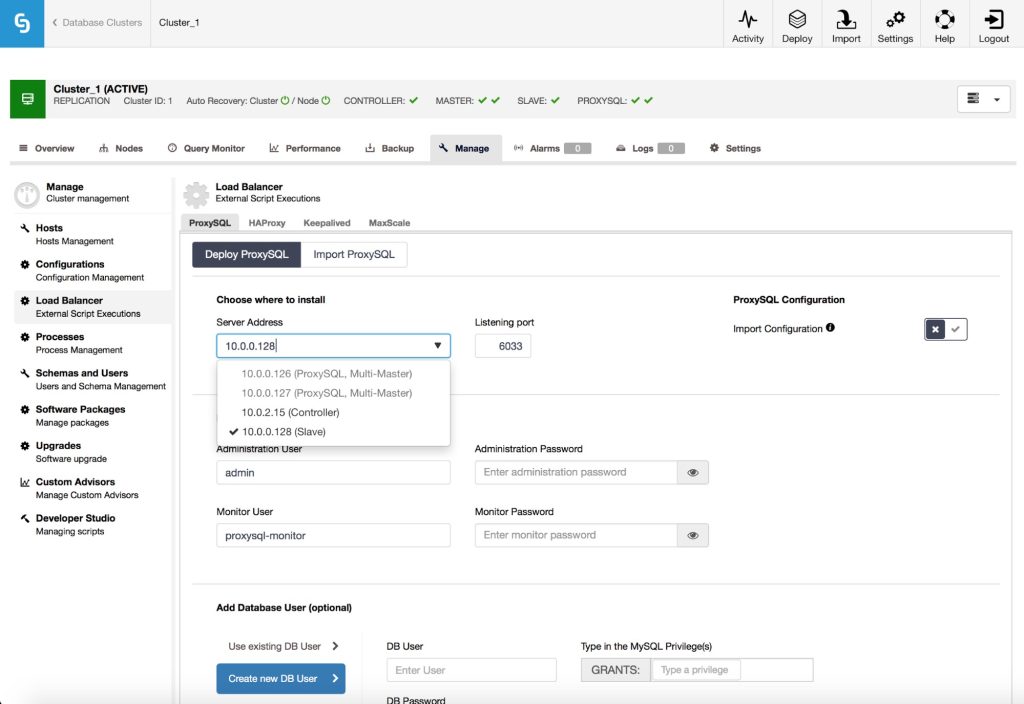
First, you need to pick where to install ProxySQL. ClusterControl proposes the hosts it knows about: you’ll see database nodes in the dropdown list. Typically you’d want to install ProxySQL on application hosts, therefore you may want to manually type the IP in the form. Please keep in mind that to install and manage ProxySQL, ClusterControl has to have SSH access to the destination node.
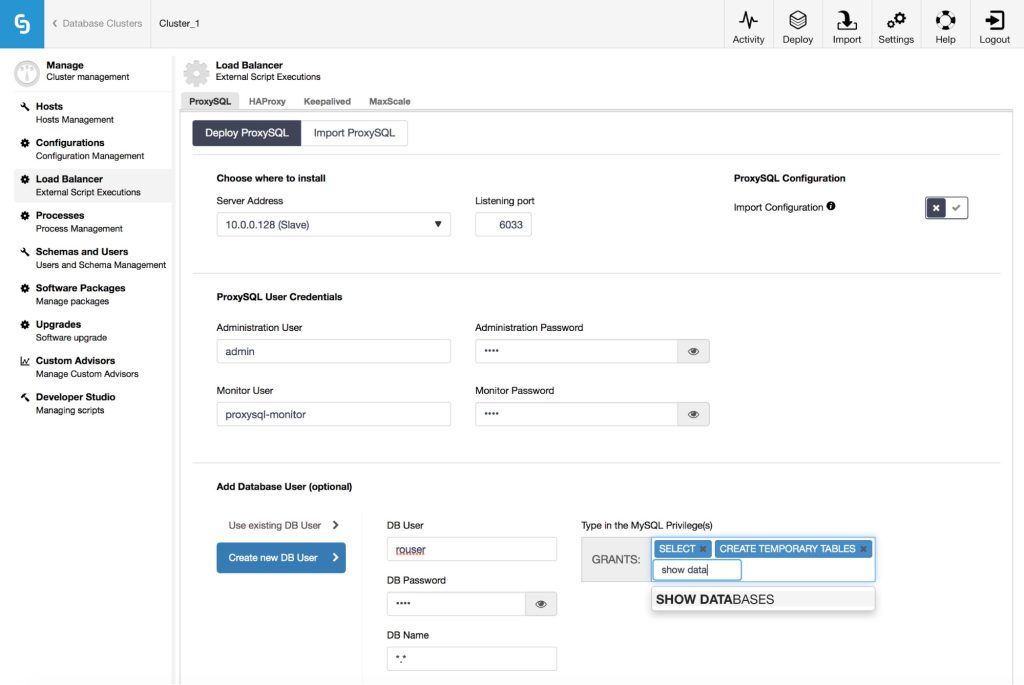
As a next step, you need to decide on username and password for the administration user that ClusterControl will use to connect to ProxySQL. You also have to configure the monitor user – this user will be used by ProxySQL to connect to MySQL backends and verify their status and monitor state like replication lag or value of the read_only variable. Then it’s time to configure users. ProxySQL acts as a gateway through which your application connects to database. The application authenticates against ProxySQL, therefore you have to add all of the users from all the backend MySQL nodes, along with their passwords into ProxySQL. From ClusterControl, you can either create a new user to be used by the application – you can decide on its name, password, access to which databases are granted and what MySQL privileges that user will have. Such user will be created on both MySQL and ProxySQL side. Second option, more suitable for existing infrastructures, is to use the existing database users. You need to pass username and password, and such user will be created only on ProxySQL. If you are concerned about storing MySQL user passwords in ProxySQL, you can relax – ProxySQL can store passwords in the same format as MySQL does and ClusterControl ensures those passwords are indeed hashed in the ProxySQL configuration.
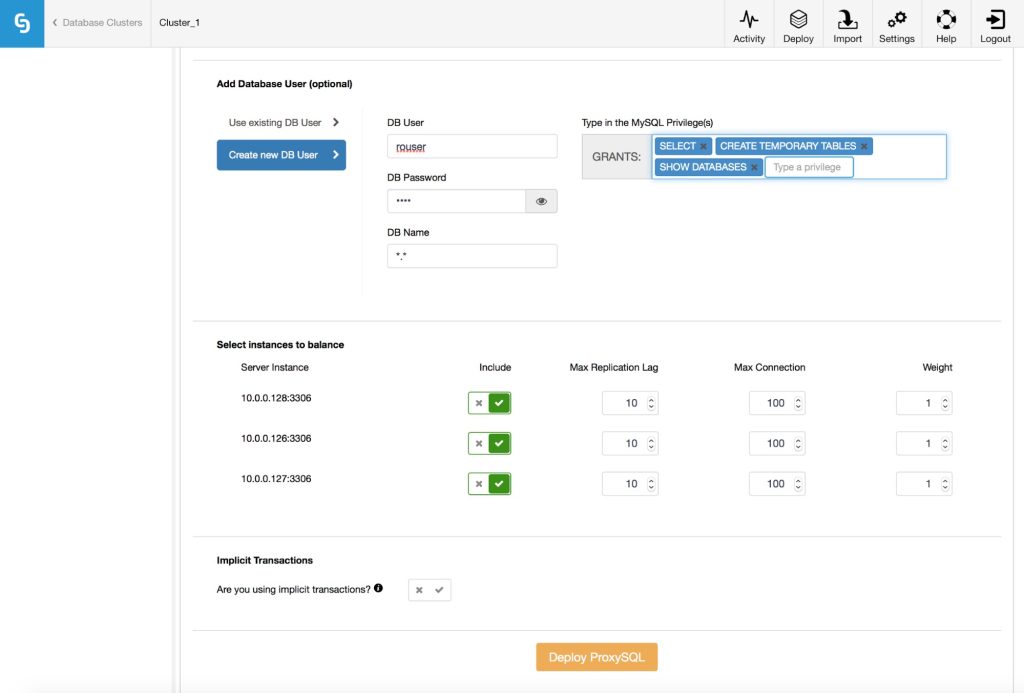
Next, you need to pick which MySQL hosts should be added to ProxySQL, you can also make some configuration decisions here. What is the maximum replication lag allowed on the host? If the node will start lagging beyond this limit, ProxySQL will mark it as not available. This mechanism is intended to cover read-after-write consistency: if your application can tolerate only a slight lag, you can take hosts out of rotation whenever the lag on those hosts cross the threshold.
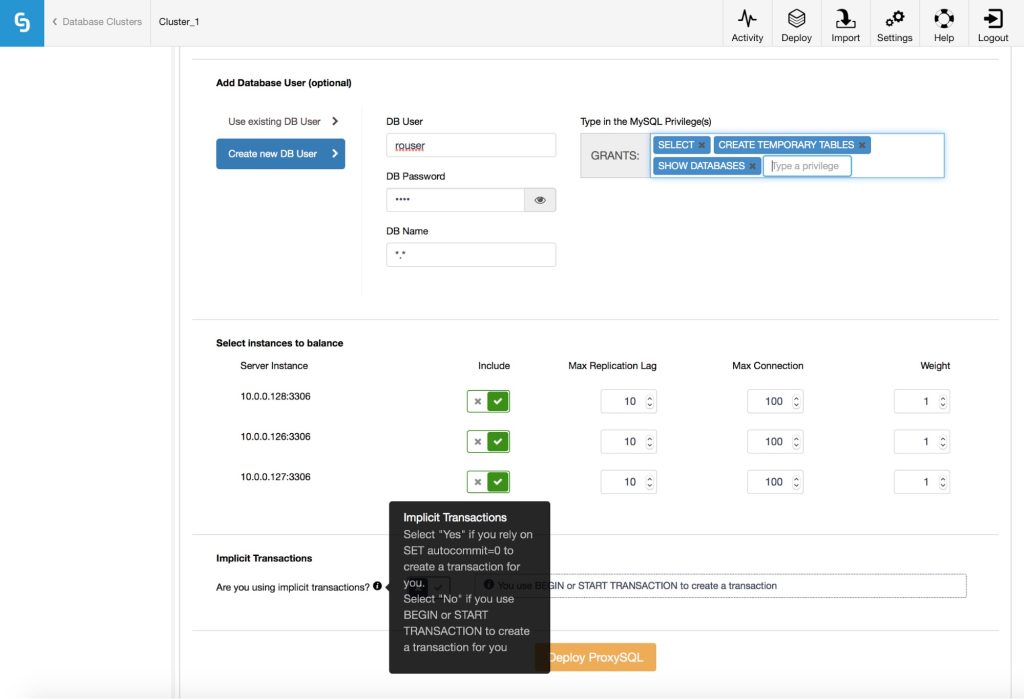
Finally, you need to answer a question: are you using implicit transactions? By that we understand transactions started by running SET autocommit=0; If you do use it, ClusterControl will configure ProxySQL to send all of the traffic to the master. This is required to ensure ProxySQL will handle transactions correctly in ProxySQL 1.3.x and earlier. If you don’t use SET autocommit=0 to create new transaction, ClusterControl will configure read/write split. You have to decide on one of those options, at least for version 1.3.x of ProxySQL.
Do you remember the Import Configuration” box which we mentioned earlier? It gives you an option to load an existing configuration from another ProxySQL, which is already managed by ClusterControl.
As you can see, majority of the options disappeared – it’s expected because the configuration will be collected from an existing ProxySQL node. All you need to do is to decide where the new ProxySQL should be installed and which existing ProxySQL, managed by ClusterControl, should be used as a source of the configuration. This option is quite useful when you want to deploy multiple ProxySQL to maintain high availability. In such case, you’d want all of them to have the same configuration.
4.2. High availability for ProxySQL
To deploy an instance is a first step, a very important one, but not enough for a production-ready environment. You have to make sure that the ProxySQL layer you deploy won’t become a single point of failure. Let’s see how ClusterControl can assist here.
Go to “Add Load Balancer” and into the Keepalived tab. Here, you can deploy Keepalived for HAProxy and ProxySQL. You can have up to three ProxySQL nodes to be combined into a high-availability cluster. Keepalived, when installed, will assign Virtual IP to one of the ProxySQL hosts and it will monitor the state of ProxySQL on all of the nodes. VIP will be assigned to just one ProxySQL but in case it fails, VIP will be moved to one of the remaining ProxySQL nodes, minimizing the impact on your application.
5. Managing ProxySQL in ClusterControl
In addition to deployment and high availability, ClusterControl also provides management features for ProxySQL. In this chapter you’ll see what you can accomplish with it.
5.1. Hostgroup management
As we mentioned earlier, ProxySQL uses hostgroups to group backend MySQL servers. ClusterControl can be used to add a server into an existing hostgroup or to create a new hostgroup.
In the Servers tab, you can check the current configuration related to hostgroups. In our example (and this is how ClusterControl sets ProxySQL for read/write split) we have two hostgroups, one for writes and one for reads, and a couple of hosts split between them.
When you click on “Add Server”, a set of options will show up: you can define which host you’d like to add and some details on its configuration. Most important ones are hostgroup (use an existing hostgroup or maybe create a brand new one?), replication lag and maximum number of allowed connections to that hostgroup.
As you can see above, we’ve added a new host into a new hostgroup (hostgroup 30). You can edit an existing host or remove it from the list.
5.2. User management
We mentioned earlier that ProxySQL acts as a middle-man in the authentication process and therefore, it has to have a list of application users and their passwords.
The users tab is the place to look for all of the users created in ProxySQL. You can edit or remove an existing user, or create a new one.
This is a slightly expanded screen from the deployment process. You can either create a new user on both ProxySQL and MySQL or you can add an existing MySQL user to ProxySQL. If you want to create a new user, you have to fill all of the details like username, password, grants etc. On the right side you can see a list of checkboxes. You can find a description of them in the documentation, but the most important ones are: “Active” – if the user is actually used or not, “Use SSL” – should user use SSL to connect or not, “Transaction Persistent” – if enabled, all transactions opened by the user will stick to the current connection – connection multiplexing will be disabled.
If you already have a ProxySQL deployed, you can utilize the “Import Users” button and open the import wizard. This allows you to import multiple users from MySQL database.
You can easily pick which users to import.
You can also search for particular users or hosts and then select them. Once you are ready, you can proceed to the next step.
Then you need to pick a default hostgroup for users. It can be one for all, or you can define it on a per-user basis. This feature is intended to help with deploying ProxySQL in environments where multiple users are used by the application, and importing them one by one would take too much time.
5.3. Query rule management
We briefly mentioned query rules earlier in this tutorial – they govern how traffic is routed by ProxySQL. Let’s take a closer look. ClusterControl allows you to view query rules that have been created, or to add new ones.
In the screenshot above, you can see the default query rule setup for read/write splits. We discussed earlier how it works so we won’t go into details. It shows the most important parameters like hits, whether the query is active, match pattern and hostgroup. If needed, you can click on any of the rules to show its full content.
You can edit or delete an existing query rule, or create a new one.
By default some of the options are hidden (search for “Show advanced options” in bottom right), but it is possible to display all the settings and configure them.
5.4. ProxySQL configuration management
ClusterControl makes it very easy to manage the configuration of ProxySQL – when you go to “Variables” tab, you’ll see full list of variables with their respective values.
As you can see on the screenshot above, you can also search for a particular variable and then change its value.
5.5. Query performance monitoring
ProxySQL works as a gateway for the application to connect to the database, so most (if not all) of the database traffic passes through it. ProxySQL collects some performance metrics on the queries. ClusterControl presents that data, and allows to perform some actions related to these queries.
The list of queries can be sorted in different ways. You can also perform actions on each of the entries: create a query rule based on the query, or cache a given query. These options make it possible to quickly add query rules related to a particular query, and therefore modify the way ProxySQL handles them. For example, you can limit how often query can be executed. You can force some timeout on a query and if it doesn’t finish within that time, it gets killed. This gives you more flexibility in the way you can react to fluctuations of the load, or to newly introduced, inefficient queries.
6. Managing multiple ProxySQL instances in ClusterControl
We earlier covered high availability setups for ProxySQL. With ClusterControl it is very easy to deploy such setup, but once you have it up and running, there is one serious problem you have to solve. Let us quickly remind you how the setup looks like: multiple ProxySQL instances, and we have Keepalived on each of them to monitor the state of ProxySQL. One ProxySQL is used at the time via Virtual IP (VIP). If that ProxySQL dies, the VIP is moved to another node and that node takes over the traffic. As you may have figured out, the main problem is that all of the ProxySQL instances have to have exactly the same configuration. If you add a query rule on an “active” instance, you have to add it also on all remaining ones. Otherwise, after failover to the next ProxySQL, your query routing behavior will change because not all of the query rules have been added. Of course, repeating all of the changes manually is time-consuming and error prone. ClusterControl gives you a way to synchronize all changes between different ProxySQL instances – you can do it using the “Sync Instances” job from Node Actions dropdown.
Here, you can pick the source instance (usually it’ll be the active one) and a destination instance – the one which you want to sync with the source. As you can see on the screen above, it is also possible to export a configuration and import it – those can be used as a way to create and restore a backup of a ProxySQL configuration.
7. Failover handling in ProxySQL
No matter what you do, sooner or later, a database will crash. As long as some of the nodes survive, the proxy layer should be able to handle the situation. ProxySQL is no different – it helps you to keep your database layer accessible to the application. Please keep in mind, though, that ProxySQL does not handle failover on its own – all it does is to react on a topology change and redirects traffic. For triggering failover, you need to rely on external tools. There is a difference in how ProxySQL handles failover in a MySQL replication setup and Galera cluster. We’ll discuss both scenarios.
7.1. MySQL Replication
In MySQL replication, there are two main methods in which ProxySQL can handle topology changes. First of all, direct modifications of mysql_servers table. If you want, you can easily outsource all of the failover handling logic to external scripts, should you wish to create them. All they have to do is to connect to ProxySQL through the CLI and execute SQL needed to bring mysql_servers table in sync with reality.
Another method would be to utilize an internal mechanism in ProxySQL, which is intended to monitor and track topology changes. This is also the way how ClusterControl deploys ProxySQL. To be able to use it, you have to have a monitoring user (mysql-monitor_username and mysql-monitor_password) configured correctly on database nodes – it requires REPLICATION CLIENT privilege if you want it to monitor replication lag, otherwise USAGE is enough. ClusterControl takes care of this for you during deployment. The monitoring user is required so that ProxySQL can connect to the backend databases and check their read_only variable. Another thing which has to be done is to configure mysql_replication_hostgroups table – this is also handled by the ClusterControl when you use it to deploy ProxySQL.
mysql> select * from mysql_replication_hostgroups;
+------------------+------------------+-------------+
| writer_hostgroup | reader_hostgroup | comment     |
+------------------+------------------+-------------+
| 10               | 20               | host groups |
+------------------+------------------+-------------+
1 row in set (0.00 sec)
In short, this table contains information about which hostgroup handles writes and which one is used as a reader. This is enough for ProxySQL to start monitoring the topology. It does so through testing the read_only variable. If a host has read_only enabled, ProxySQL assumes it’s a slave. If read_only is disabled, ProxySQL assumes that node is the master. This is enough information for ProxySQL to move hosts to correct hostgroups – all hosts with read_only=1 are added to the reader hostgroup while all hosts with read_only=0 are added to the writer hostgroup. What you need to keep in mind is that you can’t have multiple hosts with disabled read_only – ProxySQL will add all of such hosts to the writer hostgroup.
This behavior makes it extremely easy to integrate ProxySQL with external replication monitoring tools – as long as the tool sets the read_only value correctly, ProxySQL can work with it. This translates into a wide range of tools that are compatible with ProxySQL. ClusterControl, but also MHA, MRM or Orchestrator can be easily integrated.
7.2. Galera Cluster
ProxySQL works differently with Galera cluster, as compared with MySQL replication – as of version 1.4.1, there is no internal support for Galera, just like it is for replication or group replication. Instead, ProxySQL can use external scripts to handle the logic and make changes into ProxySQL configuration. Such scripts can be executed from within ProxySQL, using “scheduler” – a cron-like feature which gives you better granularity (starting from 100 ms) than normal cron. There are a couple of such scripts available, one of them is bundled with ProxySQL. We will briefly cover some of them.
First of all, though, let’s discuss what the galera checker script should do. The main task will be to monitor the state of Galera nodes – Primary or non-Primary, Joiner, Joined, Donor etc. It should watch some of the variables – for example wsrep_sst_donor_rejects_queries and wsrep_rejects_queries. It also should be configurable – do you want to use single or multiple writers? Do you want your writers to also handle reads? Do you want your nodes in Donor/Desync state to be used as the last resort or not? Based on all this, the script should make some decisions – should the last node in a donor state be shown as online or not? What if a couple of segments are configured? The role of the script will be to ensure that, as long as it is possible, some of the Galera nodes will be available for writing and reading. In our tests, we decided to cover the following scenarios:
- 3 nodes in the cluster, 1 down, SST is running
- 3 nodes in the cluster, 2 down, SST is running
- 3 nodes in the cluster, 1 node with wsrep_desync=1
- 3 nodes in the cluster, 2 nodes with wsrep_desync=1
- 3 nodes in the cluster, 3 nodes with wsrep_desync=1
- 3 nodes in the cluster, 2 nodes up, 2 nodes with wsrep_desync=1
- 3 nodes in the cluster, 1 node up, 1 node with wsrep_desync=1
- 3 nodes in the cluster, writer node with wsrep_reject_queries=ALL
- 3 nodes in the cluster, 1 node up, 1 node with wsrep_reject_queries=ALL
- 3 nodes in the cluster, 1 node up, 1 node with wsrep_sst_donor_rejects_queries = ON, SST running
Let’s take a quick look at how some of the available scripts handle those tasks.
7.2.1. Bundled proxysql_galera_checker.sh
For a long time, the default check that came with ProxySQL was quite limited – it supported correctly only the first case above. Variables like wsrep_reject_queries or wsrep_sst_donor_rejects_queries were not supported, nor were the more complex cases. We took a look at that script and made some modifications so that it now covers cases 1 – 7, which covers probably more than 95% of the cases you’d need to deal with in production. If you are running ProxySQL in version 1.4.2 or later, then you are using the updated version of the script. We also made sure that for ProxySQL deployed through the ClusterControl, we use the correct version of the script, no matter which ProxySQL version is deployed.
7.2.2. TwinDB’s proxysql-tool
TwinDB created an utility tool related to ProxySQL. Written in Python, covered by unit tests – an example of a nicely maintained project. Its feature list grows in time (recently, some user administration features had been added) but we are interested in one particular feature – ability to work with ProxySQL to handle discovery of the Galera nodes’ state. To be able to use it, you need to follow a couple of steps:
First, you need to install the tool:
apt-get install python-pip python-dev
pip install proxysql_tools
Then, you need to create a configuration file:
1
2
3
4
5
6
7
8
9
10
11
12
13
14
15
16
17
18
19
20
root@vagrant-ubuntu-trusty-64:~# cat /etc/twindb/proxysql-tools.cfg
[proxysql]
host=127.0.0.1
admin_port=6032
admin_username=admin
admin_password=pass

monitor_username=monitor
monitor_password=pass

[galera]
cluster_host=10.0.0.101:3306,10.0.0.102:3306,10.0.0.103:3306
cluster_port=3306
cluster_username=sbtest
cluster_password=sbtest

load_balancing_mode=singlewriter

writer_hostgroup_id=10
reader_hostgroup_id=20
That’s all, now you can execute the proxysql-tool as below:
root@vagrant-ubuntu-trusty-64:~# proxysql-tool galera registerand it will make necessary changes in ProxySQL configuration. Of course, you may want to configure it in ProxySQL’s scheduler, to make sure that the script checks Galera nodes quite often (typically 1 – 2 seconds is enough).
Unfortunately, right now, proxysql-tool supports only cases 1, 3 and 4, leaving some still quite common scenarios not handled correctly. Please keep in mind that this is work-in-progress and there are already issues and pull requests opened to cover some of the missing functionality.
7.2.3. Percona’s check
Percona developed a set of helper scripts for ProxySQL which can also be used to configure a Galera checker script bundled with it.
Unfortunately, the story repeats here – only the first case from the list is covered correctly. To some extent, it also works with cases 3, 4 and 5 – by “to some extent” we mean that it keeps the cluster reachable but it does not respect Donor/Desynced state. When you set wsrep_desync=1, you probably want to move all of the traffic from the node as it may start to lag (this state disables flow control – the node won’t issue flow control messages to ask the rest of the cluster to slow down and let it catch up). Here, even though you set a node to Donor/Desynced state, traffic will still be sent to it.
7.2.4. Which script to use?
As of now, we’d suggest to use the default proxysql_galera_checker.sh, just make sure it is updated. It is not perfect but currently it covers the majority of the cases that you are likely to see in real life. What’s important is to keep in mind its weak points and cases it does not support. Of course, as always, testing is crucial so please make sure you do some tests and try to break Galera cluster in different ways. Last but not least, those are just scripts. It is perfectly fine to come up with a solution of your own, something which will work correctly in your environment.
8. Use cases for ProxySQL
In this section we’d like to go through some of the use cases where ProxySQL could be a great fit.
8.1. Query caching
It’s quite widely known that MySQL’s query cache is not a good solution. It does not scale for highly concurrent traffic, it serializes the requests because only one thread at a time can access it. A query cache is not a bad idea though. Quite the contrary – the more traffic you can offload from the database, the better performance you’ll see. Given the limitations of the MySQL query cache, different solutions were introduced. Most of them used some sort of key-value store like memcached, Redis, Couchbase etc. From a DBA/DevOps standpoint, the main issue with such approach is that any change in how queries are cached requires changes in the application code. This could be a serious drawback when you need to cache a query on the fly, especially when an admin has identified that particular query to be creating a high load on the databases right now. Luckily, with ProxySQL, this is no longer a problem as it can cache the query.
To do that, you need to create a query rule which will match the query and then you need to define a cache TTL in that query rule; TTL is the time (in milliseconds) during which the query should be cached. As we described earlier, ProxySQL presents some statistics on the traffic that passes through it – it’s a good source of queries to cache.
ClusterControl leverages it, and gives you an ability to cache every query from the list.
All important defaults will be prefilled regular expression to match and schema name. The form itself is also simplified – to focus on all that’s really needed to define a caching query rule. To verify if a query is indeed cached, you may want to go to the Rules section.
Here, look for hits – if the counter is not equal to zero, it means that some of the queries matched this particular query rule and, as a result, used the results from the cache.
8.2. Query rewriting
Another common situation you may find yourself in is that you may want to rewrite a query. Reasons for this are numerous. Most common reasons are: the MySQL optimizer uses an incorrect index for the query, or uses no index at all. Unfortunately, index statistics, for performance reasons, are based on a small sample of data and they are not perfect. Sure, more and more work is done to improve MySQL’s awareness of the data, but you will still see cases when the query execution plan is not optimal. Sometimes it’s just enough to use one of the index hints, to either force MySQL to use an index or make sure it won’t use it. Adding FORCE INDEX or IGNORE INDEX to a query is a simple change, yet it may take time to be applied as developers have to modify the code, test it, and then deploy. This alone may take hours if not days and, during this time, database performance will be affected. Luckily, thanks to ProxySQL, a DBA can be self-sufficient and use the proxy to rewrite a query. What we can’t stress enough, such rewrite has to produce a result set that is compatible with the original query: your application expects some data in a specific format, you should not change it to something different. For example, your query looks like this:
SELECT col1, col2, col3 FROM mytable WHERE col5=10 AND col6=123;Your application expects to receive three columns. You should not rewrite it to:
SELECT col1, col3 FROM mytable WHERE col5=10 AND col6=123;On the other hand, the following rewrite will work just fine:
SELECT col1, col2, col3 FROM mytable FORCE INDEX (idx_col6) WHERE col5=10 AND col6=123;This does not change the logic of the query nor the result set format. We just ensure that an index on column col6 will be always used.
Let’s take a look at how ClusterControl can help you create rules which will rewrite your queries.
We will assume the following query which uses a sysbench dataset:
mysql> EXPLAIN SELECT * FROM sbtest.sbtest1 WHERE id IN (1000, 100, 10, 1, 2, 3, 4, 5, 6, 56, 45, 52, 893, 223) AND k=235\G
*************************** 1. row ***************************
           id: 1
  select_type: SIMPLE
        table: sbtest1
   partitions: NULL
         type: range
possible_keys: PRIMARY,k_1
          key: k_1
      key_len: 8
          ref: NULL
         rows: 14
     filtered: 100.00
        Extra: Using index condition
1 row in set, 1 warning (0.00 sec)
As you can see, it uses an index on column ‘k’. Let’s assume that we want this query to use the primary key. This is only an example, we won’t investigate if it improves performance or not. In the real world, you’ll find such cases quite often. First of all, let’s see if we can see the query in ClusterControl’s UI for ProxySQL, in the Top Queries section.
It’s there and we can use it to create a query rule.
Some changes are required in the Match Pattern, we also need to fill the Replace Pattern field, decide on the destination hostgroup and we have to make sure that the rule id is lower than the id of a rule which would match this query. You have to keep in mind that ProxySQL parses query rules starting from the lowest id number and then up. In our case we set the rule id to 1.
Once added, you should see the query rule getting hits, which means that our rewrite is being used.
8.3. Query redirection
Sometimes your database might be affected by a particularly heavy query. It could be, for example, as part of a reporting or OLAP process. As a result, such query may slow down the database to an extent which affects all of the traffic that passes through it. A typical solution is to setup a slave to the production database, and have it handle all of the read-only analytic traffic. This is quite a nice solution, but it requires to have all of the analytics traffic to be send to the slave. This requires multiple changes in the application, to make sure it will send the correct queries to the correct destination. From a DBA standpoint, this is yet another challenge when looking after production databases – you are forced to work with developers and you are limited by their lack of time and speed of writing, testing and deploying the code. With ClusterControl and ProxySQL, this is no more an issue.
You can easily deploy a replication slave from ClusterControl, off your Galera cluster (as in the above screenshot) or off a non-clustered master server. Then with ProxySQL, using query rules and hostgroups, you can route any part of the traffic to that host.
Typical approach is to group your analytic slaves in one hostgroup and then create query rules which will route all of the analytic traffic to that hostgroup.
You can determine which queries to route by looking at the “Top Queries” section in ClusterControl.
As you can see, this requires multiple query rules to be created. If you happen to use a specific user for your OLAP processes, this makes things even easier to setup – remember, in ProxySQL you can route traffic based on the user. What is needed here is to create rules for SELECTs and other traffic, and route SELECTs executed by the analytics user to the specific hostgroup. You can see below how it can be done.
If we did everything correctly, the hit counter should increase on our new query rule.
You can also verify the load on the slave host – depending on how heavy the queries are, it can be quite visible.
8.4. Sharding
Sharding is a topic for a book and utilizing ProxySQL to shard is also something which could be a topic for a whitepaper on its own (we touched upon the subject in one of our whitepapers, where we described a setup using MySQL Fabric and ProxySQL). With ProxySQL’s flexibility, external tools are not always needed – it all depends on what you’d like to achieve. In this chapter we’d like to discuss two examples of how ProxySQL and its query rules can be used to build a sharded environment.
8.4.1. Schema-based sharding
Simple idea – split your data across multiple schemas and relocate each schema to a different host. It could be used to implement functional sharding when different schemas store data for different parts of the application. It can also be used to split data based on some sharding key. For example, you can apply some modulo function to one of the unique columns (let’s say id % 1024) and the result will determine in which shard the given row should be located (id = 1 will be located in shard 1, id = 2 – shard 2, id = 1025 – shard 1 and so on). It can also be used in connection with central metadata storage – an application would make a lookup into a metadata database, and learn that row with id of 12345 is located in schema ‘shard86’.
ProxySQL can create query rules based on the schema – when your application connects to a schema (use schemaname or even at the connection creation moment), ProxySQL can route it to a correct host. This approach has both pros and cons. Huge pro is that such query rules are pretty lightweight – there’s no need for expensive SQL parsing. Less CPU cycles would be used for handling schema-based query rules than the ones which require regular expression parsing and matching. Important drawback is that ProxySQL cannot handle intra-schema queries. You can run:
USE schema1;
SELECT * FROM schema2.table;
and such query would be executed on the host that is pointed out by the ‘schema1’ query rule.
8.4.2. Sharding based on a sharding key
Another approach would be to implement query rules based on a sharding key. If you shard your data based on some function (like modulo which we described earlier), you should be able to derive the destination shard knowing only the sharding key – some unique column which, when applied to sharding function, will tell us which shard the row is in. If a function is simple, it could be possible to create query rules which will route traffic accordingly. For example, let’s assume we have 100 million rows in a table and we want to shard it. We could locate each million in a separate shard and then build query rules which will utilize regular expressions to check the value of the sharding key, and the location. You can find an example of how to do that in our whitepaper.
If the sharding function is more complex, you can leverage the application to calculate where a query should be executed and, for example, pass the result to ProxySQL as a part of comment in SQL code. Queries could look like:
/* shard=sbtest1 */ SELECT * FROM sbtest1 WHERE id=347;
/* shard=sbtest2 */ SELECT * FROM sbtest2 WHERE id=347;
/* shard=sbtest3 */ SELECT * FROM sbtest3 WHERE id=347;
To cover them, we’d need to create query rules in ProxySQL:
If you’d like to test this setup using MySQL command line client, please keep in mind that you need to use -c:
-c, --comments      Preserve comments. Send comments to the server. The
                    default is --skip-comments (discard comments), enable
                    with --comments.
8.5. Data masking
It may happen that your application uses the database to store some data which should be kept private. It can be personal data about users like name, address, bank account number, health records etc. On the other hand, you want to follow good practices and use your real data in your staging environment. Or, maybe you have a development slave, which is replicating off production master and is used for SELECT tests by your developers. Of course, your application will have to be able to access real data but your developers shouldn’t have such access. What can you do? One of the ways is to implement data masking and ProxySQL can help you with that. Let’s go through a simple example, we will use the “Employees” database which can be downloaded from a GitHub repository.
In our example, we will focus on the ‘last_name’ column of ‘employees’ table, we’ll try to obfuscate it. Let’s see how a single record looks like:
mysql> SELECT * FROM employees LIMIT 1\G
*************************** 1. row ***************************
    emp_no: 10001
birth_date: 1953-09-02
first_name: Georgi
 last_name: Facello
    gender: M
 hire_date: 1986-06-26
1 row in set (0.01 sec)
First of all, we need to create a user on both MySQL and ProxySQL, which will be used by developers. Let’s call it ‘devel’.
Now, it’s time to create some query rules. There are two goals we need to achieve:
- We have to prevent any SELECT * queries from being executed as we will be relying on a column name to trigger the masking
- We have to create query rules to mask the contents of ‘last_name’ column in all the variants it can be used
All the query rules above are intended to catch different ways of writing the SELECT query and, eventually, mask the output. We can also add some rules to block queries which use “*”.
Those query rules should prevent any access without explicitly stating the column name.
Here’s the result of all of the query rules above:
mysql> select * from employees;
+---------------------------+
| This query is not allowed |
+---------------------------+
| This query is not allowed |
+---------------------------+
1 row in set (0.00 sec)
mysql> select first_name, `employees`.`last_name` from employees LIMIT 1;
+------------+--------------+
| first_name | last_name |
+------------+--------------+
| Georgi | FaXXXXXXXXXX |
+------------+--------------+
1 row in set (0.00 sec)mysql> select first_name, `last_name` from employees LIMIT 1;
+------------+--------------+
| first_name | last_name |
+------------+--------------+
| Georgi | FaXXXXXXXXXX |
+------------+--------------+
1 row in set (0.01 sec)mysql> select first_name, last_name from employees LIMIT 1;
+------------+--------------+
| first_name | last_name |
+------------+--------------+
| Georgi | FaXXXXXXXXXX |
+------------+--------------+
1 row in set (0.01 sec)mysql> select last_name from employees LIMIT 1;
+--------------+
| last_name |
+--------------+
| FaXXXXXXXXXX |
+--------------+
1 row in set (0.01 sec)9. How to get started with ProxySQL?
One may wonder what’s the best way to deploy and start using ProxySQL. Which steps are required and which are not? In this section we’d like to share some tips about getting started with ProxySQL.
9.1. Deployment tips
You can deploy ProxySQL anywhere, but not always it makes sense to do so. We’ll focus on more simple setups as larger (hundreds of servers) deployments tend to have their own, specific ways. Typically the choice is between deploying ProxySQL on database hosts, deploying them on their own instances and deploying them on application hosts. We’d propose against utilizing database nodes for anything else than databases – ProxySQL, in fact any proxy, can significantly increase CPU utilization on the host it’s deployed on. As a result, this may lead to performance issues with your database cluster – something you want to avoid.
This leaves us with two options – use dedicated hardware for ProxySQL or collocate it with the application. Both choices have their own pros and cons. Utilizing dedicated hardware helps to separate load-wise the proxy and application, making it hardly possible for ProxySQL to impact the application’s performance. It also allows to implement high availability setups like the one used by ClusterControl – keepalived and floating Virtual IP. On the other hand, you have to pay for the hardware, even if it is not fully utilized. The fact that (as of the time of writing) ProxySQL does not support SSL connectivity between the application and the proxy can also be a serious factor. Client-side SSL support for ProxySQL is work in progress but even if it’ll be solved, there’s one more important thing to consider: ProxySQL’s query cache. If you have plans to use it, you have to keep in mind that the network round trip, just to get some output from the cache, slows the process significantly.
This is why deployment on application hosts is fairly popular. First of all, lack of client-side SSL is not a problem as connection will go through Unix socket. Second of all, for the same reason, connectivity between the application and the ProxySQL will be very fast, making ProxySQL a really great tool for caching query results. High availability is not that big of a problem for two reasons. First of all, the application node connects to the ProxySQL locally so if the server goes down, this particular application server will also be down and, well, it’s not affected by the lack of the ProxySQL availability. If, for whatever reason, the ProxySQL process dies, ProxySQL utilizes an angel process, which will, almost instantly, restart ProxySQL. This reduces downtime to minimum. Such restart, typically, is fast enough that external tools like keepalived won’t even detect it. Keepalived will help when the server, on which ProxySQL has been deployed, dies, but, as we mentioned, this is not a problem when you collocate ProxySQL with the app.
9.2. First steps
After you deploy ProxySQL, you have to add servers and split them into hostgroups. In small setups you use two hostgroups: readers and writers. Of course, nothing prevents you from creating more of them. ClusterControl automatically sets this up for you, if you deploy ProxySQL using ClusterControl.
Next step will be to create a user, which would be used by your application to connect to ProxySQL and, through it, to MySQL. It can be just one user, or multiple users. If you use ClusterControl to deploy ProxySQL, a wizard will guide you through the process of adding existing MySQL users to ProxySQL or creating new users. Afterwards, you’ll have an option to import more users, should you have a need for that.
Finally, query rules. You need to decide how you want ProxySQL to route your traffic. Which queries should go to which hostgroup? Again, ClusterControl helps you to pick the safest way of routing queries, based on your workload, and it creates query rules for you. When possible, we create a read/write split. If not, all of the traffic will be sent to the writer hostgroup.
Once all of this is done, your applications can connect to port 6033 (by default) of the ProxySQL instance, and send the database requests. ProxySQL will be configured to do the read-write split for you. In case one of the slaves will fail, traffic will be redirected to remaining slaves.
10. Frequently asked questions
- What are hostgroups?Hostgroups are groups of backend hosts which serve the same purpose. It can be a hostgroup for master and a hostgroup for slaves. One backend host can be a part of multiple hostgroups.
- What query rules are for?Query rules govern how ProxySQL routes traffic. By default no query rules are defined. If you use ClusterControl, by default ClusterControl will define query rules to either perform read/write split or send all traffic to a single host – all depends on whether you use SET AUTOCOMMIT=0 to start transaction or not.
- Can ProxySQL handle read/write split?Yes, as long as you define query rules for that. ClusterControl, if it is safe, does it for you when deploying ProxySQL.
- Can ProxySQL perform a failover?No, ProxySQL has never been designed to be high availability manager. It is just a proxy, which routes traffic based on defined rules. To handle failover you should use an external tool which, in addition to performing a failover, either manages ProxySQL configuration or which set read_only variable properly. One such tool is ClusterControl.
- Does ProxySQL automatically manage query rules?No, ProxySQL does not make any changes to the query rules. Under some circumstances, ProxySQL makes changes in configuration of backends, but it never touches query rules.
- What database technologies ProxySQL has support for?ProxySQL supports different flavors of MySQL and Clickhouse. For MySQL ProxySQL has internal support for MySQL replication and MySQL Group Replication. For those, ProxySQL can be configured to track the state of the backends and manage entries in backend table, reacting to the state and topology changes. Galera cluster is also supported via external script. Internal support for Galera is planned at some point.
- Does ProxySQL supports SSL?As of version 1.4.6 ProxySQL has support only for server-side SSL. There’s no support for client-side SSL thus, if security is needed, it’s recommended to deploy ProxySQL on application hosts and use Unix sockets to connect to it. Client-side SSL is in the roadmap and has pretty high priority.
- Are there any limitations to the SQL that is routed?There are no limitations in terms of the SQL syntax that is supported for MySQL backends. Some limitations are in place for Clickhouse backends.
To summarize, ProxySQL is a flexible tool that can be used to build complex, highly available setups. As we have seen in this tutorial, it can also make your life easier if you are in a devops role managing production databases. You have a significantly wider arsenal of options to choose from, so as to react quickly to problematic queries.