blog
How ClusterControl Configures Virtual IP and What to Expect During Failover

Virtual IP address is an IP address that does not correspond to an actual physical network interface. It floats between multiple network interfaces and only one active interface will be holding the IP address for fault tolerance and mobility. ClusterControl uses Keepalived to provide virtual IP address integration with database load balancers to eliminate any single point of failure (SPOF) at the load balancer level.
In this blog post, we’ll show you how ClusterControl configures virtual IP address and what you can expect when failover or failback happens. Understanding this behaviour is vital in order to minimize any service interruption, and smoothen up maintenance operations that need to be performed occasionally.
Requirements
There are some requirements to run Keepalived in your network:
- IP protocol 112 (Virtual Router Redundancy Protocol – VRRP) must be supported in the network. Some networks disable support for VRRP, especially inter-VLAN communications. Please verify this with the network administrator.
- If you use multicast, the network must support multicast request (use ip a | grep -i multicast). Otherwise, you can use unicast via unicast_src_ip and unicast_peer options. Using multicast is useful when you have a dynamic environment like a cloud environment, or when IP assignment is performed through DHCP.
- A set of VRRP instances must use a unique virtual_router_id value, that cannot be shared among other instances. Otherwise, you will see bogus packets and will likely break the master-backup switch over.
- If you are running on a cloud environment like AWS, you probably need to use an external script (hint: use “notify” option) to dissociate and associate the virtual IP address (Elastic IP) so it is recognized and routable by the router.
Deploying Keepalived
In order to install Keepalived through ClusterControl, you need two or more load balancers installed by or imported into ClusterControl. For production usage, we highly recommend the load balancer software to be running on a standalone host and not co-located with your database nodes.
After you have at least two load balancers managed by ClusterControl, to install Keepalived and enable virtual IP address, just go to ClusterControl -> pick the cluster -> Manage -> Load Balancer -> Keepalived:
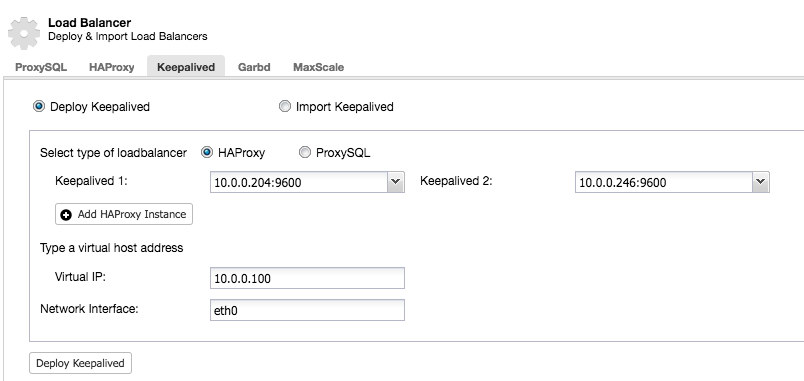
Most of the fields are self-explanatory. You can deploy a new set of Keepalived or import existing Keepalived instances. The important fields include the actual virtual IP address and the network interface where the virtual IP address will exist. If the hosts are using two different interface names, specify the interface name of the Keepalived 1 host, then manually modify the configuration file on Keepalived 2 with a correct interface name later on.
VRRP Instance
At the current time of writing, ClusterControl v1.5.1 installs Keepalived v1.3.5 (depending on the host operation system) and the following is what is configured for the VRRP instance:
vrrp_instance VI_PROXYSQL {
   interface eth0                # interface to monitor
   state MASTER
   virtual_router_id 51          # Assign one ID for this route
   priority 100
   unicast_src_ip 10.0.0.246
   unicast_peer {
      10.0.0.204
   }
   virtual_ipaddress {
       10.0.0.100                        # the virtual IP
   }
   track_script {
       chk_proxysql
   }
#    notify /usr/local/bin/notify_keepalived.sh
}
ClusterControl configures the VRRP instance to communicate through unicast. With unicast, we must define all unicast peers of the other Keepalived nodes. It is less dynamic but works most of the time. With multicast, you can remove those lines (unicast_*) and rely on multicast IP address for host discovery and peering. It’s simpler but it is commonly blocked by network administrators.
The next part is the virtual IP address. You can specify multiple virtual IP addresses per VRRP instance, separated by new line. Load balancing in HAProxy/ProxySQL and Keepalived at the same time also requires the ability to bind to an IP address that is nonlocal, meaning that it is not assigned to a device on the local system. This allows a running load balancer instance to bind to an IP that is not local for failover. Thus ClusterControl also configures net.ipv4.ip_nonlocal_bind=1 inside /etc/sysctl.conf.
The next directive is the track_script, where you can specify the script to the health check process which is explained in the next section.
Health Checks
ClusterControl configures Keepalived to perform health checks by examining the error code returned by the track_script. In the Keepalived configuration file, which by default, is located at /etc/keepalived/keepalived.conf, you should see something like this:
   track_script {
       chk_proxysql
   }
Where it calls chk_proxysql which contains:
vrrp_script chk_proxysql {
   script "killall -0 proxysql"   # verify the pid existence
   interval 2                    # check every 2 seconds
   weight 2                      # add 2 points of prio if OK
}
The “killall -0” command returns exit code 0 if there is a process called “proxysql” running on the host. Otherwise, the instance would have to demote itself and start initiating failover as explained in the next section. Take note that Keepalived also supports Linux Virtual Server (LVS) components to perform health checks, where it’s also capable of load balancing TCP/IP connections, similar to HAProxy, but that’s out of the scope of this blog post.
Simulating Failover
For VRRP components, Keepalived uses VRRP protocol (IP protocol 112) to communicate between VRRP instances. The higher priority value of a MASTER means the master will always have the higher privilege to hold the virtual IP address, unless you configure the instance with “nopreempt”. Let’s use an example to better explain the failover and failback flow. Consider the following diagram:
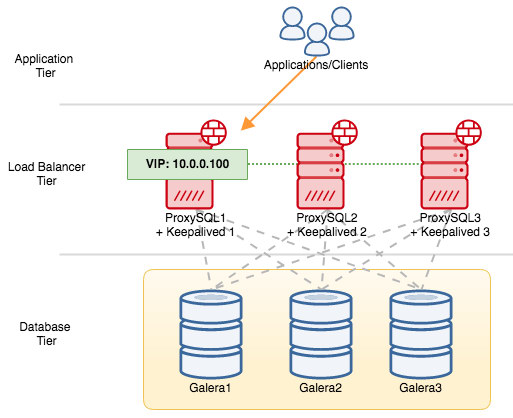
There are three ProxySQL instances in front of three MySQL Galera nodes. Every ProxySQL host is configured with Keepalived as MASTER with the following priority number:
- ProxySQL1 – priority 101
- ProxySQL2 – priority 100
- ProxySQL3 – priority 99
When Keepalived is started as a MASTER, it will first advertise the priority number to the members and then associate itself with the virtual IP address. As opposed to the BACKUP instance, it will only observe the advertisement and only assign the virtual IP address once it has confirmed it can elevate itself to a MASTER.
Take note that if you kill the “proxysql” or “haproxy” process manually via kill command, systemd process manager will by default attempt to recover the process that is being ungracefully stopped. Also, if you have ClusterControl auto recovery turned on, ClusterControl will always attempt to start the process even if you perform a clean shutdown via systemd (systemctl stop proxysql). To best simulate the failure, we suggest the user to turn off ClusterControl’s automatic recovery feature or simply shut down the ProxySQL server to break the communication.
If we shut down ProxySQL1, the virtual IP address will be failed over to the next host which holds higher priority at that particular time (which is ProxySQL2) :
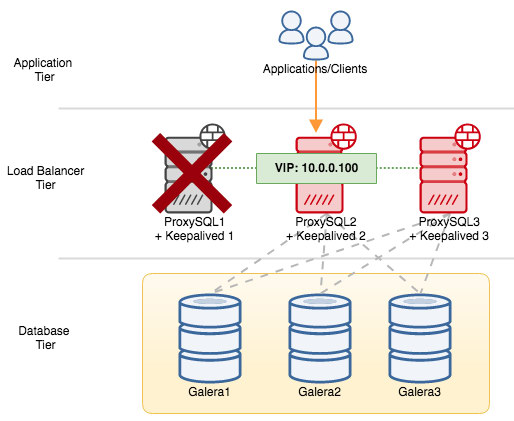
You would see the following in the syslog of the failed node:
Feb 27 05:21:59 proxysql1 systemd: Unit proxysql.service entered failed state.
Feb 27 05:21:59 proxysql1 Keepalived_vrrp[12589]: /usr/bin/killall -0 proxysql exited with status 1
Feb 27 05:21:59 proxysql1 Keepalived_vrrp[12589]: VRRP_Script(chk_proxysql) failed
Feb 27 05:21:59 proxysql1 Keepalived_vrrp[12589]: VRRP_Instance(VI_PROXYSQL) Changing effective priority from 103 to 101
Feb 27 05:22:00 proxysql1 Keepalived_vrrp[12589]: VRRP_Instance(VI_PROXYSQL) Received advert with higher priority 102, ours 101
Feb 27 05:22:00 proxysql1 Keepalived_vrrp[12589]: VRRP_Instance(VI_PROXYSQL) Entering BACKUP STATE
Feb 27 05:22:00 proxysql1 Keepalived_vrrp[12589]: VRRP_Instance(VI_PROXYSQL) removing protocol VIPs.
While on the secondary node, the following happened:
Feb 27 05:22:00 proxysql2 Keepalived_vrrp[7794]: VRRP_Instance(VI_PROXYSQL) forcing a new MASTER election
Feb 27 05:22:01 proxysql2 Keepalived_vrrp[7794]: VRRP_Instance(VI_PROXYSQL) Transition to MASTER STATE
Feb 27 05:22:02 proxysql2 Keepalived_vrrp[7794]: VRRP_Instance(VI_PROXYSQL) Entering MASTER STATE
Feb 27 05:22:02 proxysql2 Keepalived_vrrp[7794]: VRRP_Instance(VI_PROXYSQL) setting protocol VIPs.
Feb 27 05:22:02 proxysql2 Keepalived_vrrp[7794]: Sending gratuitous ARP on eth0 for 10.0.0.100
Feb 27 05:22:02 proxysql2 Keepalived_vrrp[7794]: VRRP_Instance(VI_PROXYSQL) Sending/queueing gratuitous ARPs on eth0 for 10.0.0.100
Feb 27 05:22:02 proxysql2 Keepalived_vrrp[7794]: Sending gratuitous ARP on eth0 for 10.0.0.100
Feb 27 05:22:02 proxysql2 avahi-daemon[346]: Registering new address record for 10.0.0.100 on eth0.IPv4.
In this case, the failover took around 3 seconds, with maximum failover time would be interval + advert_int. Behind the scenes, the database endpoint has changed and database traffic is being routed through ProxySQL2 without applications noticing.
When ProxySQL1 comes back online, it will force for a new MASTER election and take over the IP address due to higher priority:
Feb 27 05:38:34 proxysql1 Keepalived_vrrp[12589]: VRRP_Script(chk_proxysql) succeeded
Feb 27 05:38:35 proxysql1 Keepalived_vrrp[12589]: VRRP_Instance(VI_PROXYSQL) Changing effective priority from 101 to 103
Feb 27 05:38:36 proxysql1 Keepalived_vrrp[12589]: VRRP_Instance(VI_PROXYSQL) forcing a new MASTER election
Feb 27 05:38:37 proxysql1 Keepalived_vrrp[12589]: VRRP_Instance(VI_PROXYSQL) Transition to MASTER STATE
Feb 27 05:38:38 proxysql1 Keepalived_vrrp[12589]: VRRP_Instance(VI_PROXYSQL) Entering MASTER STATE
Feb 27 05:38:38 proxysql1 Keepalived_vrrp[12589]: VRRP_Instance(VI_PROXYSQL) setting protocol VIPs.
Feb 27 05:38:38 proxysql1 Keepalived_vrrp[12589]: Sending gratuitous ARP on eth0 for 10.0.0.100
Feb 27 05:38:38 proxysql1 Keepalived_vrrp[12589]: VRRP_Instance(VI_PROXYSQL) Sending/queueing gratuitous ARPs on eth0 for 10.0.0.100
Feb 27 05:38:38 proxysql1 avahi-daemon[343]: Registering new address record for 10.0.0.100 on eth0.IPv4.
At the same time, ProxySQL2 demotes itself to BACKUP state and removes the virtual IP address from the network interface:
Feb 27 05:38:36 proxysql2 Keepalived_vrrp[7794]: VRRP_Instance(VI_PROXYSQL) Received advert with higher priority 103, ours 102
Feb 27 05:38:36 proxysql2 Keepalived_vrrp[7794]: VRRP_Instance(VI_PROXYSQL) Entering BACKUP STATE
Feb 27 05:38:36 proxysql2 Keepalived_vrrp[7794]: VRRP_Instance(VI_PROXYSQL) removing protocol VIPs.
Feb 27 05:38:36 proxysql2 avahi-daemon[346]: Withdrawing address record for 10.0.0.100 on eth0.
At this point, ProxySQL1 is back online and becomes the active load balancer that serves the connections from applications and clients. VRRP will normally preempt a lower priority server when a higher priority server comes online. If you would like to make the IP address stay on ProxySQL2 after ProxySQL1 backs online, use “nopreempt” option. This allows the lower priority machine to maintain the master role, even when a higher priority machine comes back online. However, for this to work, the initial state of this entry must be BACKUP. Otherwise, you will notice the following line:
Feb 27 05:50:33 proxysql2 Keepalived_vrrp[6298]: (VI_PROXYSQL): Warning - nopreempt will not work with initial state MASTERSince by default ClusterControl configures all nodes as MASTER, you have to configure the following configuration option for the respective VRRP instance accordingly:
vrrp_instance VI_PROXYSQL {
...
   state BACKUP
   nopreempt
...
}
Restart the Keepalived process to load these changes. The virtual IP address will only be failed over to ProxySQL1 or ProxySQL3 (depending on the priority and which node is available at that point of time) if the health check fails on ProxySQL2. In many cases, running Keepalived on two hosts will suffice.