blog
Database-Aware Load Balancing: How to Migrate from HAProxy to ProxySQL

HAProxy and ProxySQL are both very popular load balancers in MySQL world, but there is a significant difference between both those proxies. We will not go into details here, you can read more about HAProxy in HAProxy Tutorial and ProxySQL in ProxySQL Tutorial. The most important difference is that ProxySQL is SQL-aware proxy, it parses the traffic and understands MySQL protocol and, as such, it can be used for advanced traffic shaping – you can block queries, rewrite them, direct them to particular hosts, cache them and many more. HAProxy, on the other hand, is a very simple yet efficient layer 4 proxy and all it does is to send packets to backend. ProxySQL can be used to perform a read-write split – it understands the SQL and it can be configured to detect if a query is SELECT or not and route them accordingly: SELECTs to all nodes, other queries to master only. This feature is unavailable in HAProxy, which has to use two separate ports and two separate backends for master and slaves – the read-write split has to be performed on the application side.
Why Migrate to ProxySQL?
Based on the differences we explained above, we would say that the main reason why you might want to switch from HAProxy to ProxySQL is because of the lack of the read-write split in HAProxy. If you use a cluster of MySQL databases, and it doesn’t really matter if it is asynchronous replication or Galera Cluster, you probably want to be able to split reads from writes. For MySQL replication, obviously, this would be the only way to utilize your database cluster as writes always have to be sent to the master. Therefore if you cannot do the read-write split, you can only send queries to the master only. For Galera read-write split is not a must-have but definitely a good-to-have. Sure, you can configure all Galera nodes as one backend in HAProxy and send traffic to all of them in round-robin fashion but this may result in writes from multiple nodes conflicting with each other, leading to deadlocks and performance drop. We have also seen issues and bugs within Galera cluster, for which, until they have been fixed, the workaround was to direct all the writes to a single node. Thus, the best practice is to send all the writes to one Galera node as this leads to more stable behavior and better performance.
Another very good reason for migration to ProxySQL is a need to have better control over the traffic. With HAProxy you cannot do anything – it just sends the traffic to its backends. With ProxySQL you can shape your traffic using query rules (matching traffic using regular expressions, user, schema, source host and many more). You can redirect OLAP SELECTs to analytics slave (it is true for both replication and Galera). You can offload your master by redirecting some of the SELECTs off it. You can implement SQL firewall. You can add a delay to some of the queries, you can kill queries if they take more than a predefined time. You can rewrite queries to add optimizer hints. All those are not possible with HAProxy.
How to Migrate From HAProxy to ProxySQL?
First, let’s consider the following topology…
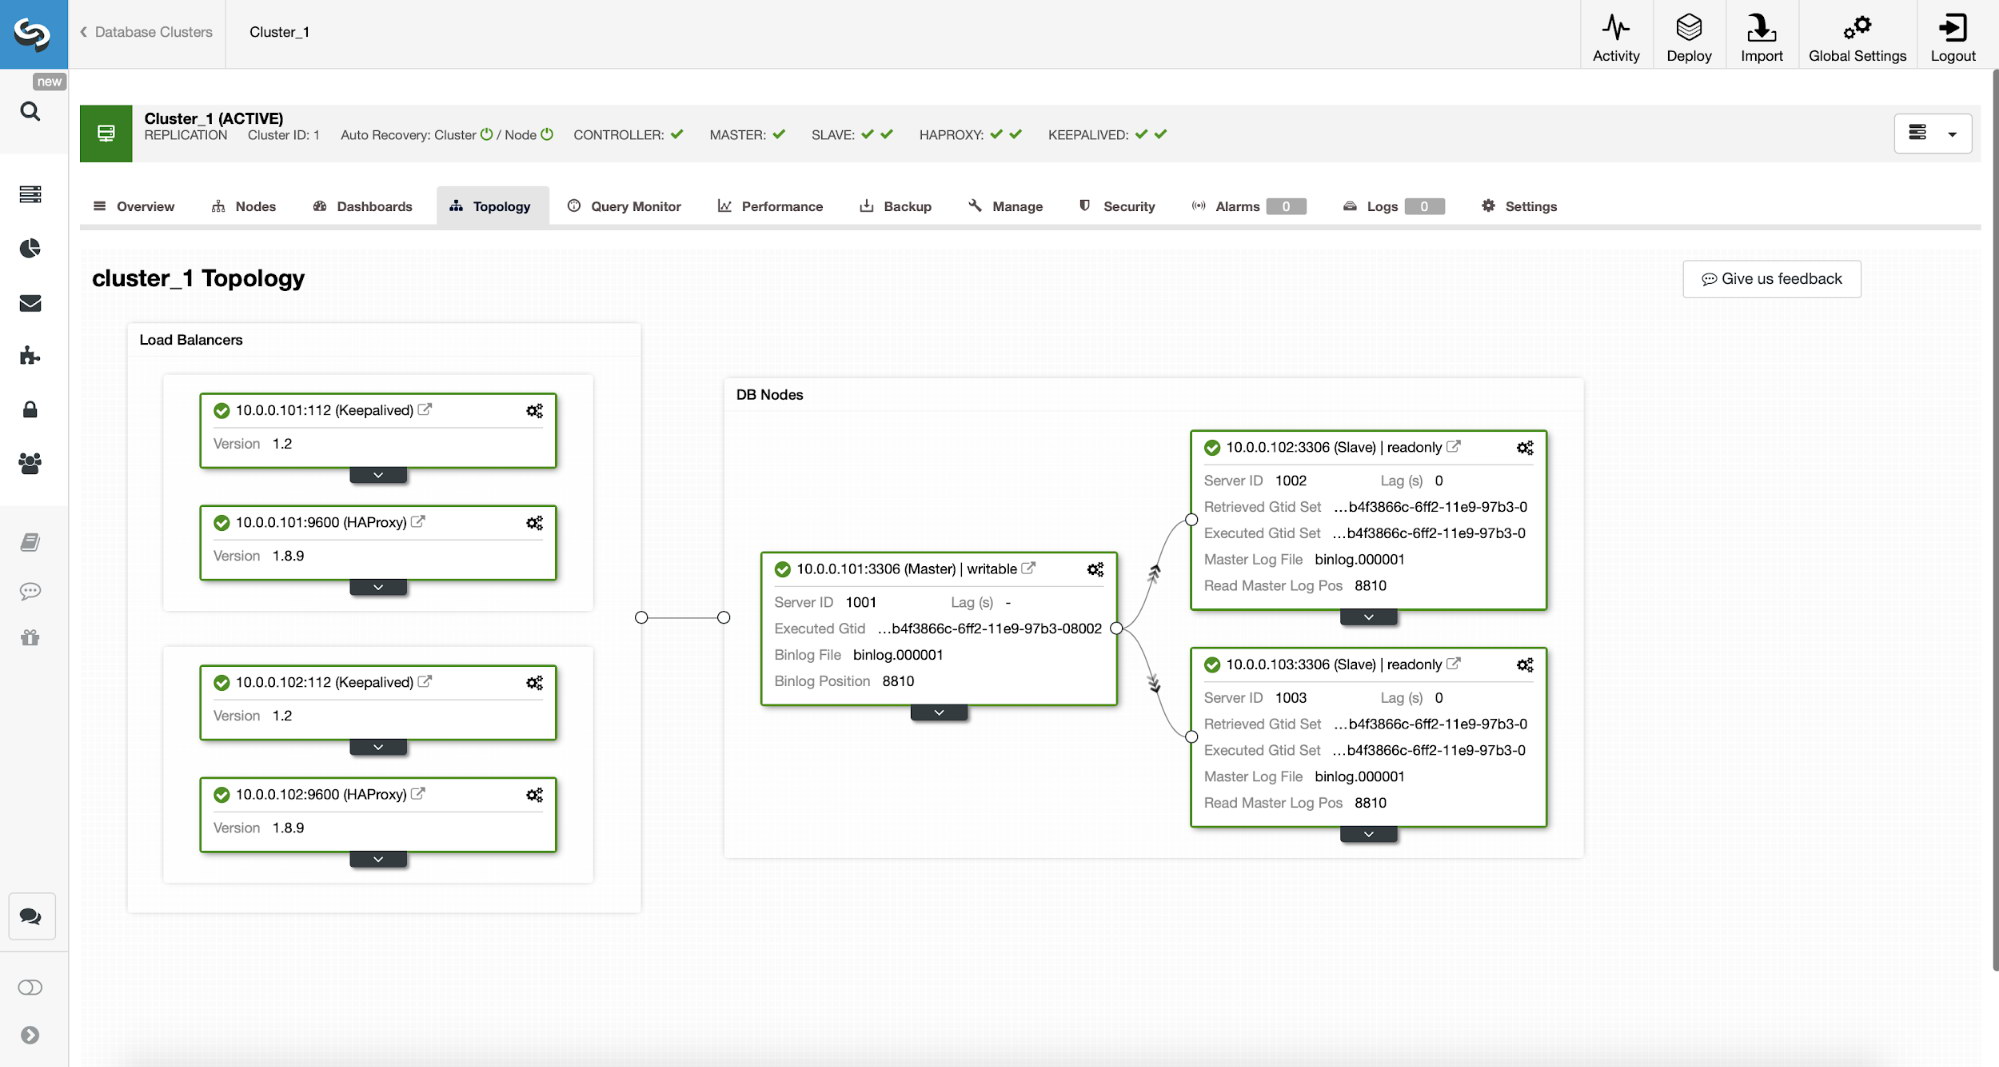
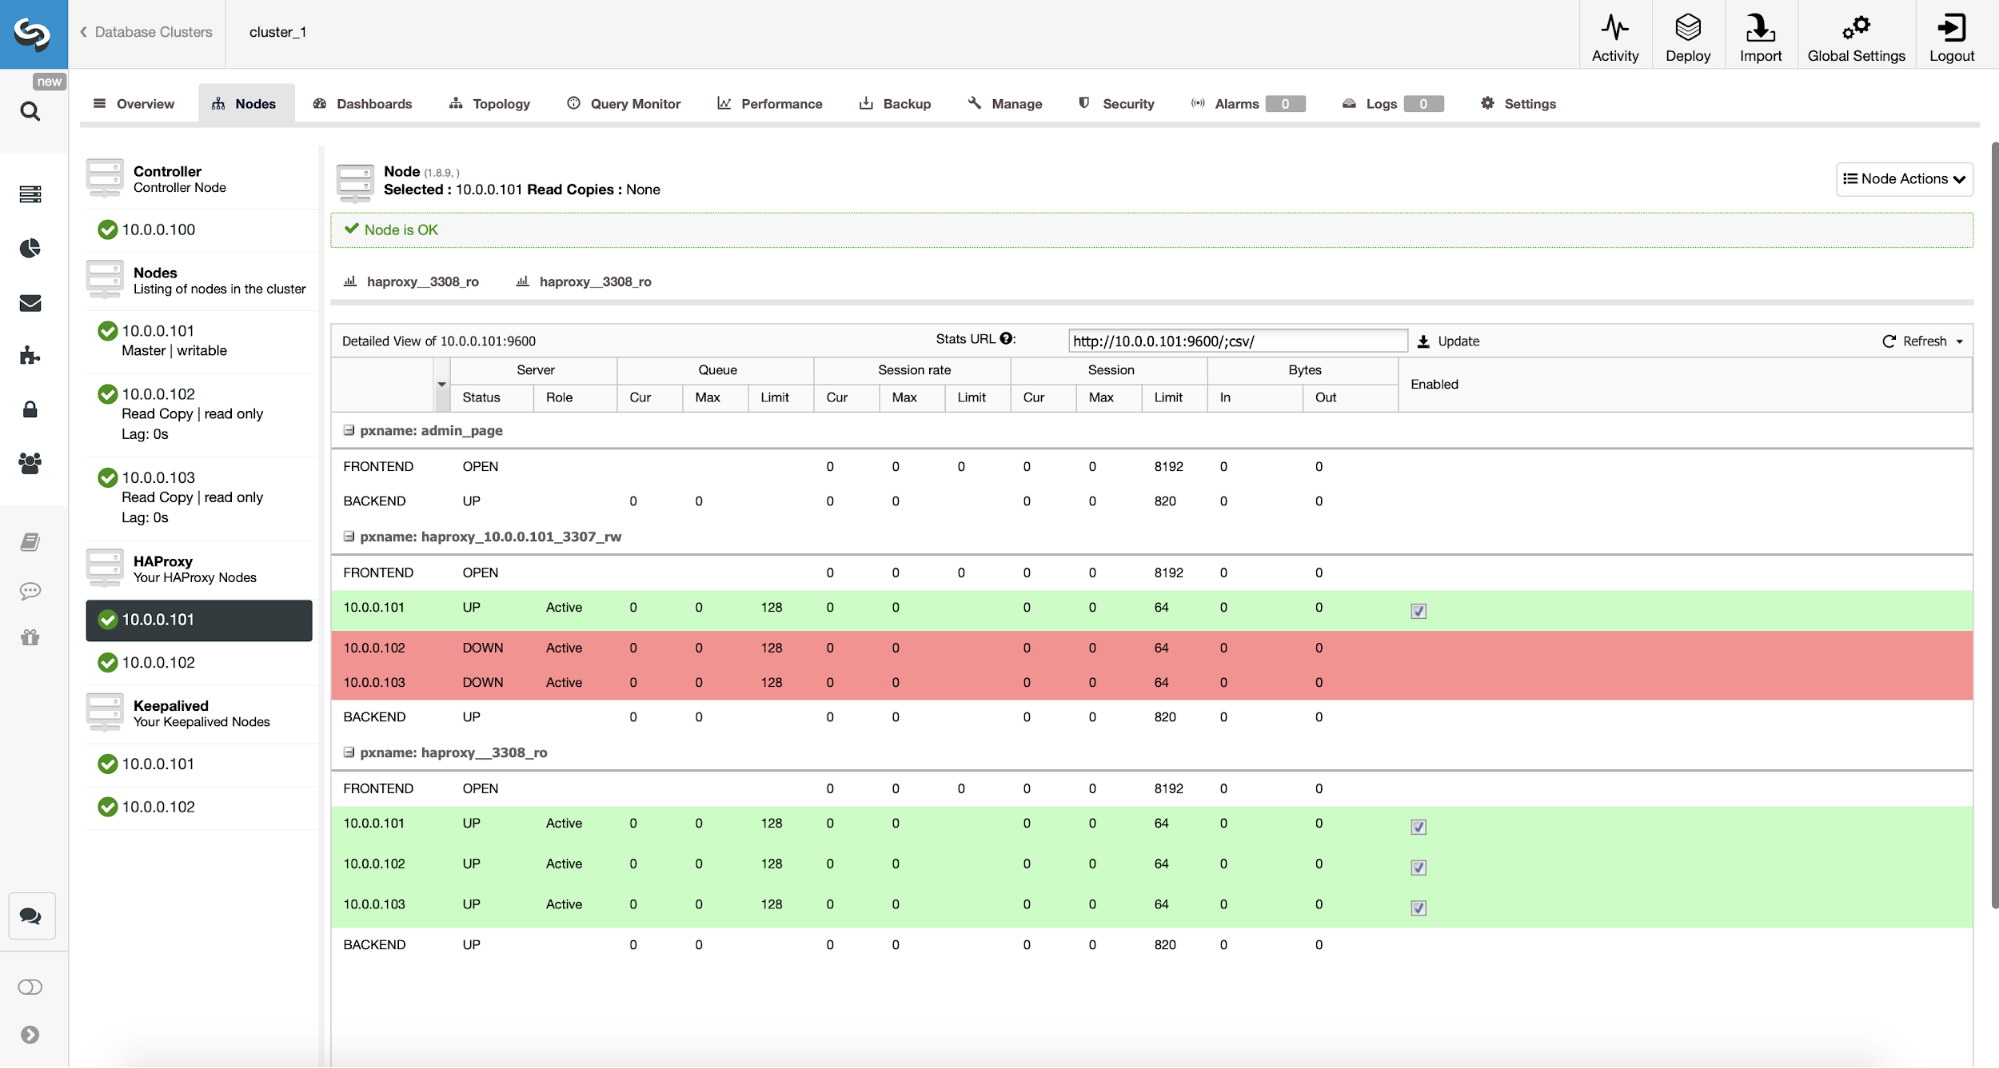
We have here a replication cluster consisting of a master and two slaves. We have two HAProxy nodes deployed, each use two backends – on port 3307 for master (writes) and 3308 for all nodes (reads). Keepalived is used to provide a Virtual IP across those two HAProxy instances – should one of them fail, another one will be used. Our application connects directly to the VIP, through it to one of the HAProxy instances. Let’s assume our application (we will use Sysbench) cannot do the read-write split therefore we have to connect to the “writer” backend. As a result, the majority of the load is on our master (10.0.0.101).
What would be the steps to migrate to ProxySQL? Let’s think about it for a moment. First, we have to deploy and configure ProxySQL. We will have to add servers to ProxySQL, create required monitoring users and create proper query rules. Finally, we will have to deploy Keepalived on top of ProxySQL, create another Virtual IP and then ensure as seamless switch as possible for our application from HAProxy to ProxySQL .
Let’s take a look at how we can accomplish that…
How to Install ProxySQL
One can install ProxySQL in many ways. You can use repository, either from ProxySQL itself (https://repo.proxysql.com) or if you happen to use Percona XtraDB Cluster, you may also install ProxySQL from Percona repository although it may require some additional configuration as it relies on CLI admin tools created for PXC. Given we are talking about replication, using them may just make things more complex. Finally, you can as well install ProxySQL binaries after you download them from ProxySQL GitHub. Currently there are two stable versions, 1.4.x and 2.0.x. There are differences between ProxySQL 1.4 and ProxySQL 2.0 in terms of features, for this blog we will stick to the 1.4.x branch, as it is better tested and the feature set is enough for us.
We will use ProxySQL repository and we will deploy ProxySQL on two additional nodes: 10.0.0.103 and 10.0.0.104.
First, we’ll install ProxySQL using the official repository. We will also ensure that MySQL client is installed (we will use it to configure ProxySQL). Please keep in mind that the process we go through is not production-grade. For production you will want to at least change default credentials for the administrative user. You will also want to review the configuration and ensure it is in line with your expectations and requirements.
apt-get install -y lsb-release
wget -O - 'https://repo.proxysql.com/ProxySQL/repo_pub_key' | apt-key add -
echo deb https://repo.proxysql.com/ProxySQL/proxysql-1.4.x/$(lsb_release -sc)/ ./ | tee /etc/apt/sources.list.d/proxysql.list
apt-get -y update
apt-get -y install proxysql
service proxysql start
Now, as ProxySQL has been started, we will use the CLI to configure ProxySQL.
mysql -uadmin -padmin -P6032 -h127.0.0.1First, we will define backend servers and replication hostgroups:
mysql> INSERT INTO mysql_servers (hostgroup_id, hostname) VALUES (10, '10.0.0.101'), (20, '10.0.0.102'), (20, '10.0.0.103');
Query OK, 3 rows affected (0.91 sec)
mysql> INSERT INTO mysql_replication_hostgroups (writer_hostgroup, reader_hostgroup) VALUES (10, 20);
Query OK, 1 row affected (0.00 sec)We have three servers, we also defined that ProxySQL should use hostgroup 10 for master (node with read_only=0) and hostgroup 20 for slaves (read_only=1).
As next step, we need to add a monitoring user on the MySQL nodes so that ProxySQL could monitor them. We’ll go with defaults, ideally you will change the credentials in ProxySQL.
mysql> SHOW VARIABLES LIKE 'mysql-monitor_username';
+------------------------+---------+
| Variable_name          | Value   |
+------------------------+---------+
| mysql-monitor_username | monitor |
+------------------------+---------+
1 row in set (0.00 sec)
mysql> SHOW VARIABLES LIKE 'mysql-monitor_password';
+------------------------+---------+
| Variable_name | Value |
+------------------------+---------+
| mysql-monitor_password | monitor |
+------------------------+---------+
1 row in set (0.00 sec)So, we need to create user ‘monitor’ with password ‘monitor’. To do that we will need to execute following grant on the master MySQL server:
mysql> create user monitor@'%' identified by 'monitor';
Query OK, 0 rows affected (0.56 sec)
Back to ProxySQL – we have to configure users that our application will use to access MySQL and query rules, which are intended to give us a read-write split.
mysql> INSERT INTO mysql_users (username, password, default_hostgroup) VALUES ('sbtest', 'sbtest', 10);
Query OK, 1 row affected (0.34 sec)
mysql> INSERT INTO mysql_query_rules (rule_id,active,match_digest,destination_hostgroup,apply) VALUES (100, 1, '^SELECT.*FOR UPDATE$',10,1), (200,1,'^SELECT',20,1), (300,1,'.*',10,1);
Query OK, 3 rows affected (0.01 sec)Please note that we used password in the plain text and we will rely on ProxySQL to hash it. For the sake of security you should explicitly pass here the MySQL password hash.
Finally, we need to apply all the changes.
mysql> LOAD MYSQL SERVERS TO RUNTIME;
Query OK, 0 rows affected (0.02 sec)
mysql> LOAD MYSQL USERS TO RUNTIME;
Query OK, 0 rows affected (0.01 sec)mysql> LOAD MYSQL QUERY RULES TO RUNTIME;
Query OK, 0 rows affected (0.01 sec)mysql> SAVE MYSQL SERVERS TO DISK;
Query OK, 0 rows affected (0.07 sec)mysql> SAVE MYSQL QUERY RULES TO DISK;
Query OK, 0 rows affected (0.02 sec)We also want to load the hashed passwords from runtime: plain text passwords are hashed when loaded into the runtime configuration, to keep it hashed on disk we need to load it from runtime and then store on disk:
mysql> SAVE MYSQL USERS FROM RUNTIME;
Query OK, 0 rows affected (0.00 sec)
mysql> SAVE MYSQL USERS TO DISK;
Query OK, 0 rows affected (0.02 sec)This is it when it comes to ProxySQL. Before making further steps you should check if you can connect to proxies from your application servers.
root@vagrant:~# mysql -h 10.0.0.103 -usbtest -psbtest -P6033 -e "SELECT * FROM sbtest.sbtest4 LIMIT 1G"
mysql: [Warning] Using a password on the command line interface can be insecure.
*************************** 1. row ***************************
 id: 1
  k: 50147
  c: 68487932199-96439406143-93774651418-41631865787-96406072701-20604855487-25459966574-28203206787-41238978918-19503783441
pad: 22195207048-70116052123-74140395089-76317954521-98694025897
In our case, everything looks good. Now it’s time to install Keepalived.
Keepalived installation
Installation is quite simple (at least on Ubuntu 16.04, which we used):
apt install keepalivedThen you have to create configuration files for both servers:
Master keepalived node:
vrrp_script chk_haproxy {
   script "killall -0 haproxy"   # verify the pid existance
   interval 2                    # check every 2 seconds
   weight 2                      # add 2 points of prio if OK
}
vrrp_instance VI_HAPROXY {
   interface eth1                # interface to monitor
   state MASTER
   virtual_router_id 52          # Assign one ID for this route
   priority 101
   unicast_src_ip 10.0.0.103
   unicast_peer {
      10.0.0.104

   }
   virtual_ipaddress {
       10.0.0.112                        # the virtual IP
   }
   track_script {
       chk_haproxy
   }
#    notify /usr/local/bin/notify_keepalived.sh
}
Backup keepalived node:
vrrp_script chk_haproxy {
   script "killall -0 haproxy"   # verify the pid existance
   interval 2                    # check every 2 seconds
   weight 2                      # add 2 points of prio if OK
}
vrrp_instance VI_HAPROXY {
   interface eth1                # interface to monitor
   state MASTER
   virtual_router_id 52          # Assign one ID for this route
   priority 100
   unicast_src_ip 10.0.0.103
   unicast_peer {
      10.0.0.104

   }
   virtual_ipaddress {
       10.0.0.112                        # the virtual IP
   }
   track_script {
       chk_haproxy
   }
#    notify /usr/local/bin/notify_keepalived.sh
This is it, you can start keepalived on both nodes:
service keepalived startYou should see information in the logs that one of the nodes entered MASTER state and that VIP has been brought up on that node.
May  7 09:52:11 vagrant systemd[1]: Starting Keepalive Daemon (LVS and VRRP)...
May  7 09:52:11 vagrant Keepalived[26686]: Starting Keepalived v1.2.24 (08/06,2018)
May  7 09:52:11 vagrant Keepalived[26686]: Opening file '/etc/keepalived/keepalived.conf'.
May  7 09:52:11 vagrant Keepalived[26696]: Starting Healthcheck child process, pid=26697
May  7 09:52:11 vagrant Keepalived[26696]: Starting VRRP child process, pid=26698
May  7 09:52:11 vagrant Keepalived_healthcheckers[26697]: Initializing ipvs
May  7 09:52:11 vagrant Keepalived_vrrp[26698]: Registering Kernel netlink reflector
May  7 09:52:11 vagrant Keepalived_vrrp[26698]: Registering Kernel netlink command channel
May  7 09:52:11 vagrant Keepalived_vrrp[26698]: Registering gratuitous ARP shared channel
May  7 09:52:11 vagrant systemd[1]: Started Keepalive Daemon (LVS and VRRP).
May  7 09:52:11 vagrant Keepalived_vrrp[26698]: Unable to load ipset library
May  7 09:52:11 vagrant Keepalived_vrrp[26698]: Unable to initialise ipsets
May  7 09:52:11 vagrant Keepalived_vrrp[26698]: Opening file '/etc/keepalived/keepalived.conf'.
May  7 09:52:11 vagrant Keepalived_vrrp[26698]: Using LinkWatch kernel netlink reflector...
May  7 09:52:11 vagrant Keepalived_healthcheckers[26697]: Registering Kernel netlink reflector
May  7 09:52:11 vagrant Keepalived_healthcheckers[26697]: Registering Kernel netlink command channel
May  7 09:52:11 vagrant Keepalived_healthcheckers[26697]: Opening file '/etc/keepalived/keepalived.conf'.
May  7 09:52:11 vagrant Keepalived_healthcheckers[26697]: Using LinkWatch kernel netlink reflector...
May  7 09:52:11 vagrant Keepalived_vrrp[26698]: pid 26701 exited with status 256
May  7 09:52:12 vagrant Keepalived_vrrp[26698]: VRRP_Instance(VI_HAPROXY) Transition to MASTER STATE
May  7 09:52:13 vagrant Keepalived_vrrp[26698]: pid 26763 exited with status 256
May  7 09:52:13 vagrant Keepalived_vrrp[26698]: VRRP_Instance(VI_HAPROXY) Entering MASTER STATE
May  7 09:52:15 vagrant Keepalived_vrrp[26698]: pid 26806 exited with status 256
root@vagrant:~# ip a
1: lo: mtu 65536 qdisc noqueue state UNKNOWN group default qlen 1
link/loopback 00:00:00:00:00:00 brd 00:00:00:00:00:00
inet 127.0.0.1/8 scope host lo
valid_lft forever preferred_lft forever
inet6 ::1/128 scope host
valid_lft forever preferred_lft forever
2: eth0: mtu 1500 qdisc pfifo_fast state UP group default qlen 1000
link/ether 08:00:27:ee:87:c4 brd ff:ff:ff:ff:ff:ff
inet 10.0.2.15/24 brd 10.0.2.255 scope global eth0
valid_lft forever preferred_lft forever
inet6 fe80::a00:27ff:feee:87c4/64 scope link
valid_lft forever preferred_lft forever
3: eth1: mtu 1500 qdisc pfifo_fast state UP group default qlen 1000
link/ether 08:00:27:fc:ac:21 brd ff:ff:ff:ff:ff:ff
inet 10.0.0.103/24 brd 10.0.0.255 scope global eth1
valid_lft forever preferred_lft forever
inet 10.0.0.112/32 scope global eth1
valid_lft forever preferred_lft forever
inet6 fe80::a00:27ff:fefc:ac21/64 scope link
valid_lft forever preferred_lft forever As you can see, on node 10.0.0.103 a VIP (10.0.0.112) has been raised. We can now conclude with moving the traffic from old setup into the new one.
Switching Traffic to a ProxySQL Setup
There are many methods on how to do it, it mostly depends on your particular environment. If you happen to use DNS to maintain a domain pointing to your HAProxy VIP, , you can just make a change there and, gradually, over time all connections will repoint to the new VIP. You can also make a change in your application, especially if the connection details are hardcoded – once you roll out the change, nodes will start connecting to the new setup. No matter how you do it, it would be great to test the new setup before you make a global switch. You sure tested it on your staging environment but it’s not a bad idea to pick a handful of app servers and redirect them to the new proxy, monitoring how they look like performance-wise. Below is a simple example utilizing iptables, which can be useful for testing.
On the ProxySQL hosts, redirect traffic from host 10.0.0.11 and port 3307 to host 10.0.0.112 and port 6033:
iptables -t nat -A OUTPUT -p tcp -d 10.0.0.111 --dport 3307 -j DNAT --to-destination 10.0.0.112:6033Depending on your application you may need to restart the web server or other services (if your app creates a constant pool of connections to the database) or just wait as new connections will be opened against ProxySQL. You can verify that ProxySQL is receiving the traffic:
mysql> show processlist;
+-----------+--------+--------+-----------+---------+---------+-----------------------------------------------------------------------------+
| SessionID | user   | db     | hostgroup | command | time_ms | info                                                                        |
+-----------+--------+--------+-----------+---------+---------+-----------------------------------------------------------------------------+
| 12        | sbtest | sbtest | 20        | Sleep   | 0       |                                                                             |
| 13        | sbtest | sbtest | 10        | Query   | 0       | DELETE FROM sbtest23 WHERE id=49957                                         |
| 14        | sbtest | sbtest | 10        | Query   | 59      | DELETE FROM sbtest11 WHERE id=50185                                         |
| 15        | sbtest | sbtest | 20        | Query   | 59      | SELECT c FROM sbtest8 WHERE id=46054                                        |
| 16        | sbtest | sbtest | 20        | Query   | 0       | SELECT DISTINCT c FROM sbtest27 WHERE id BETWEEN 50115 AND 50214 ORDER BY c |
| 17        | sbtest | sbtest | 10        | Query   | 0       | DELETE FROM sbtest32 WHERE id=50084                                         |
| 18        | sbtest | sbtest | 10        | Query   | 26      | DELETE FROM sbtest28 WHERE id=34611                                         |
| 19        | sbtest | sbtest | 10        | Query   | 16      | DELETE FROM sbtest4 WHERE id=50151                                          |
+-----------+--------+--------+-----------+---------+---------+-----------------------------------------------------------------------------+
That was it, we have moved the traffic from HAProxy into ProxySQL setup. It took some steps but it is definitely doable with very small disruption to the service.
How to Migrate From HAProxy to ProxySQL Using ClusterControl?
In the previous section we explained how to manually deploy ProxySQL setup and then migrate into it. In this section we would like to explain how to accomplish the same objective using ClusterControl. The initial setup is exactly the same therefore we need to proceed with deployment of ProxySQL.
Deploying ProxySQL Using ClusterControl
Deployment of ProxySQL in ClusterControl is just a matter of a handful of clicks.
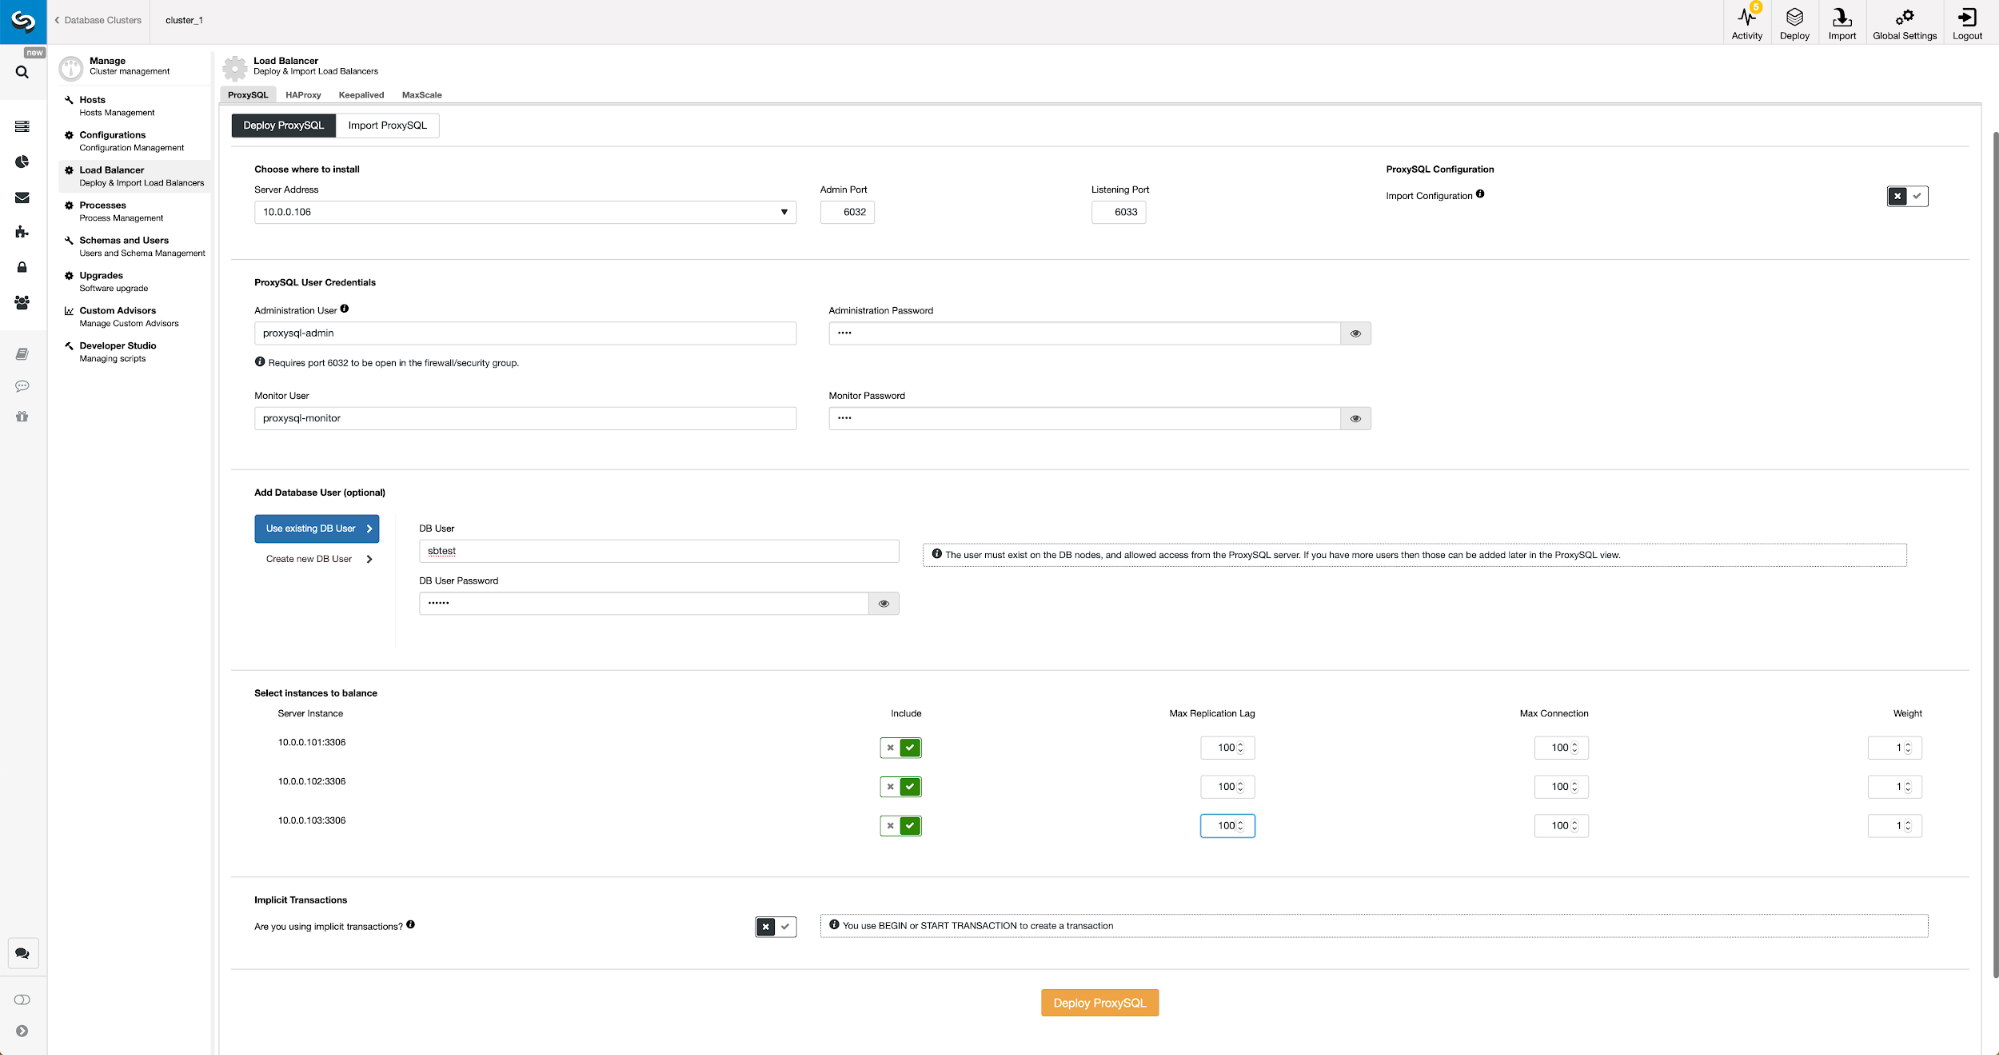
We had to pick a node’s IP or hostname, pass credentials for CLI administrative user and MySQL monitoring user. We decided to use existing MySQL and we passed access details for ‘sbtest’@’%’ user that we use in the application. We picked which nodes we want to use in the load balancer, we also increased max replication lag (if that threshold is crossed, ProxySQL will not send the traffic to that slave) from default 10 seconds to 100 as we are already suffering from the replication lag. After a short while ProxySQL nodes will be added to the cluster.
Deploying Keepalived for ProxySQL Using ClusterControl
When ProxySQL nodes have been added it’s time to deploy Keepalived.
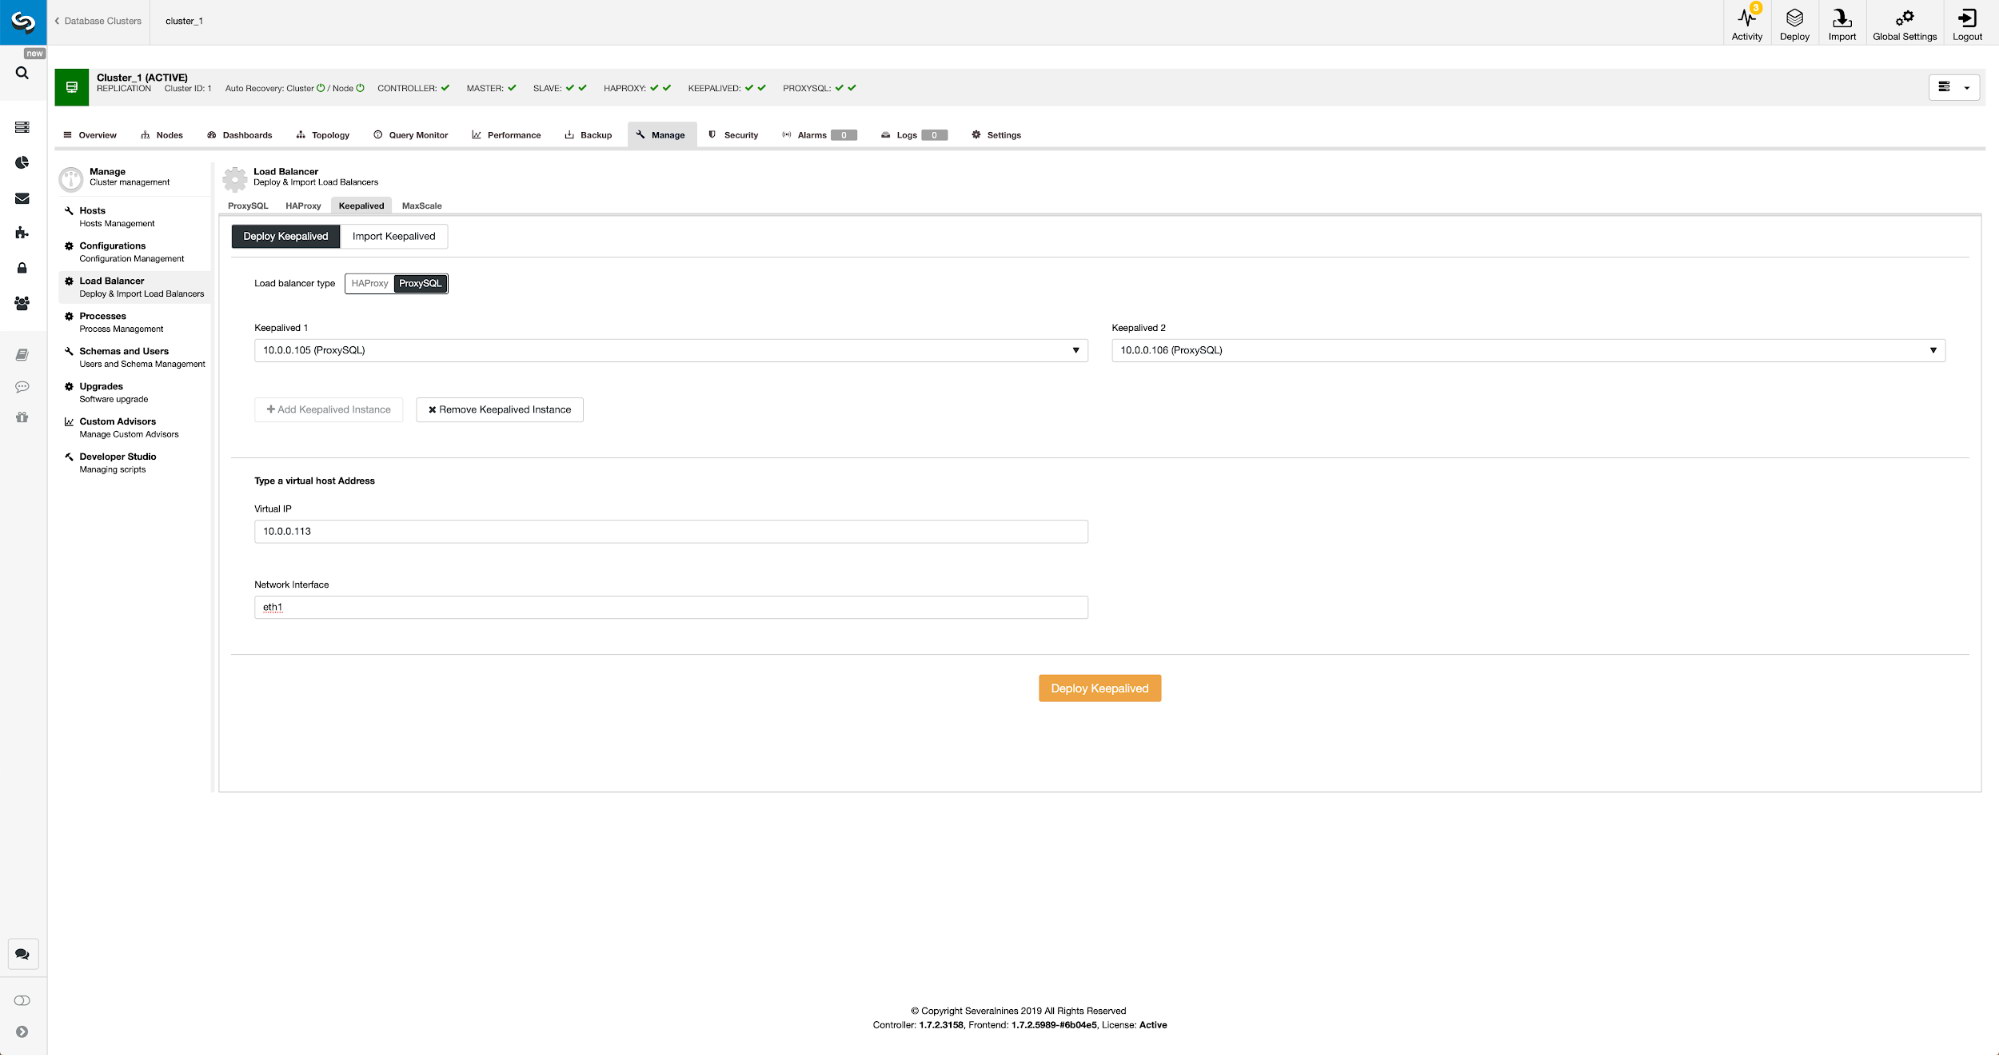
All we had to do is to pick which ProxySQL nodes we want Keepalived to deploy on, virtual IP and interface to which VIP will be bound. When deployment will be completed, we will switch the traffic to the new setup using one of the methods mentioned in the “Switching traffic to ProxySQL setup” section above.
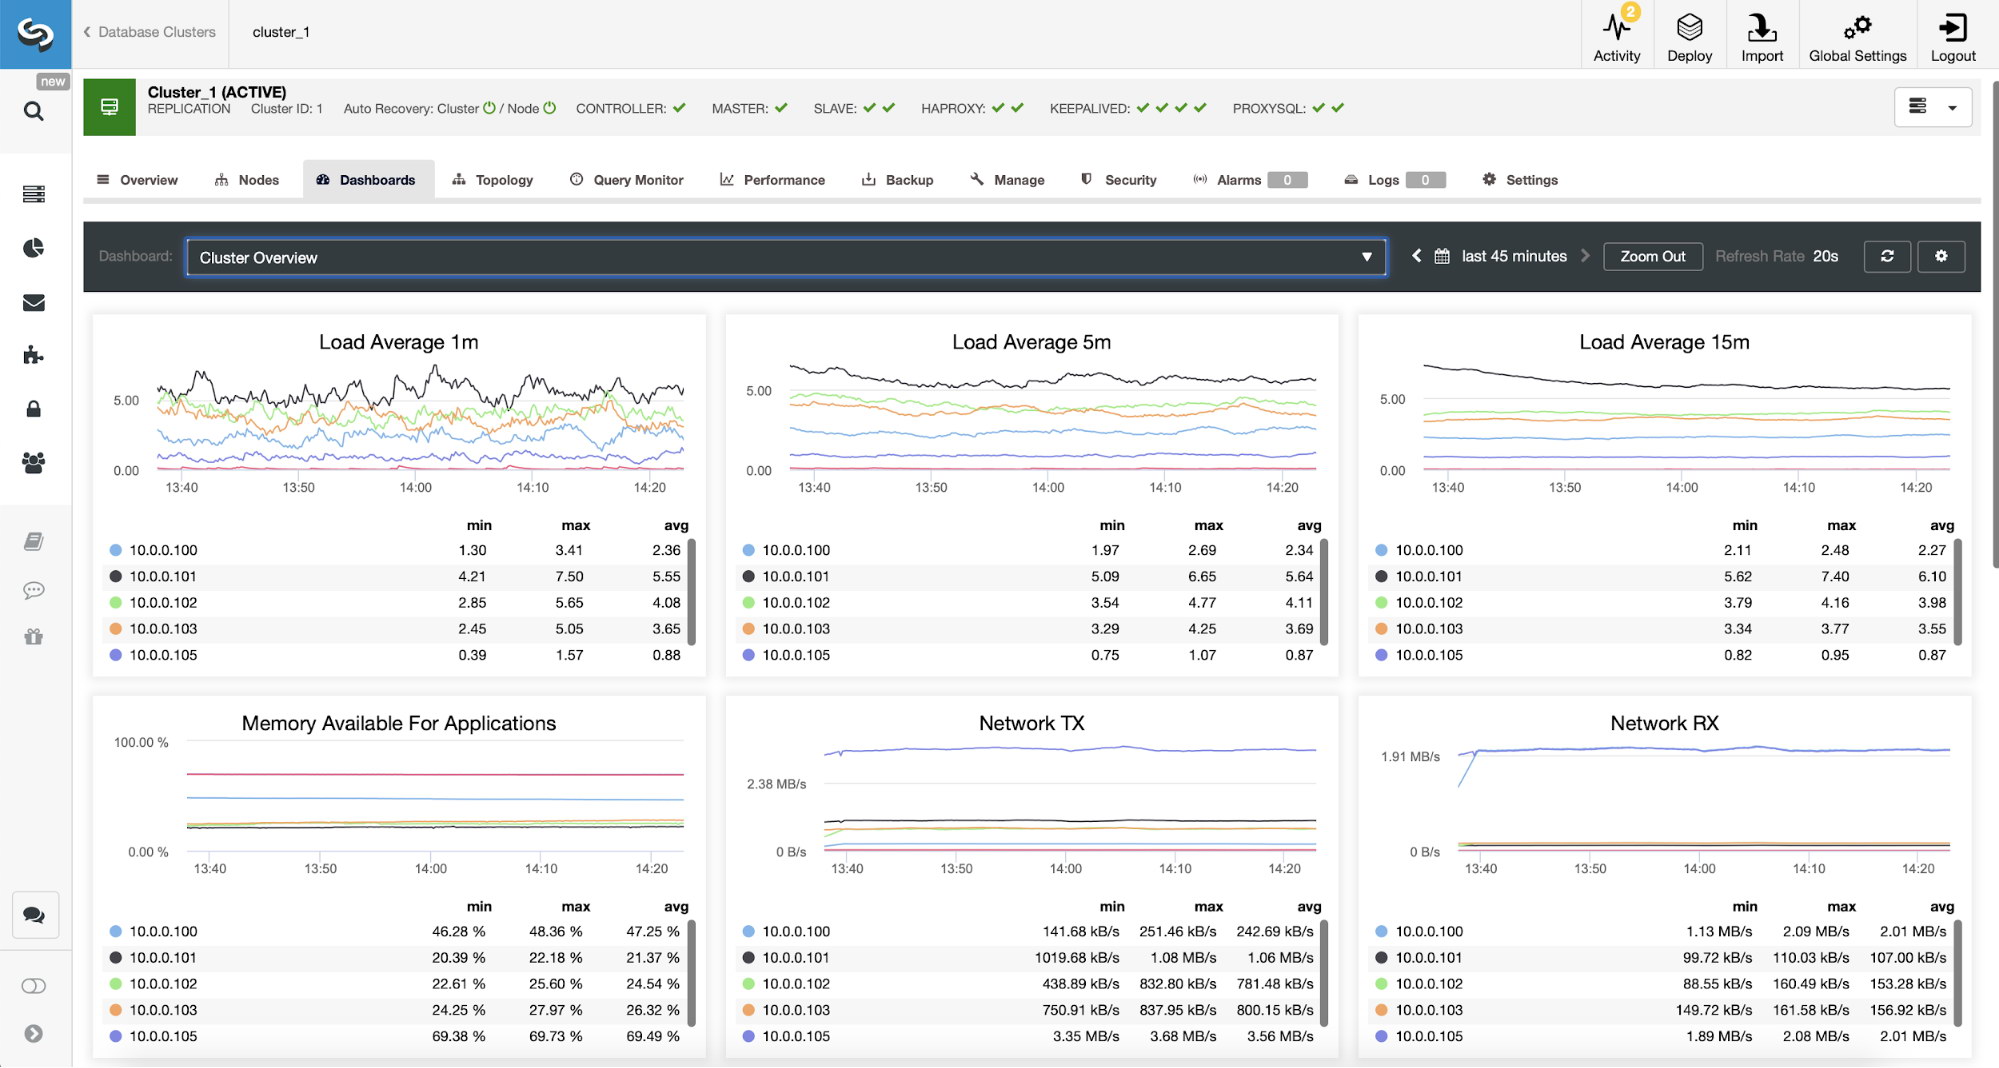
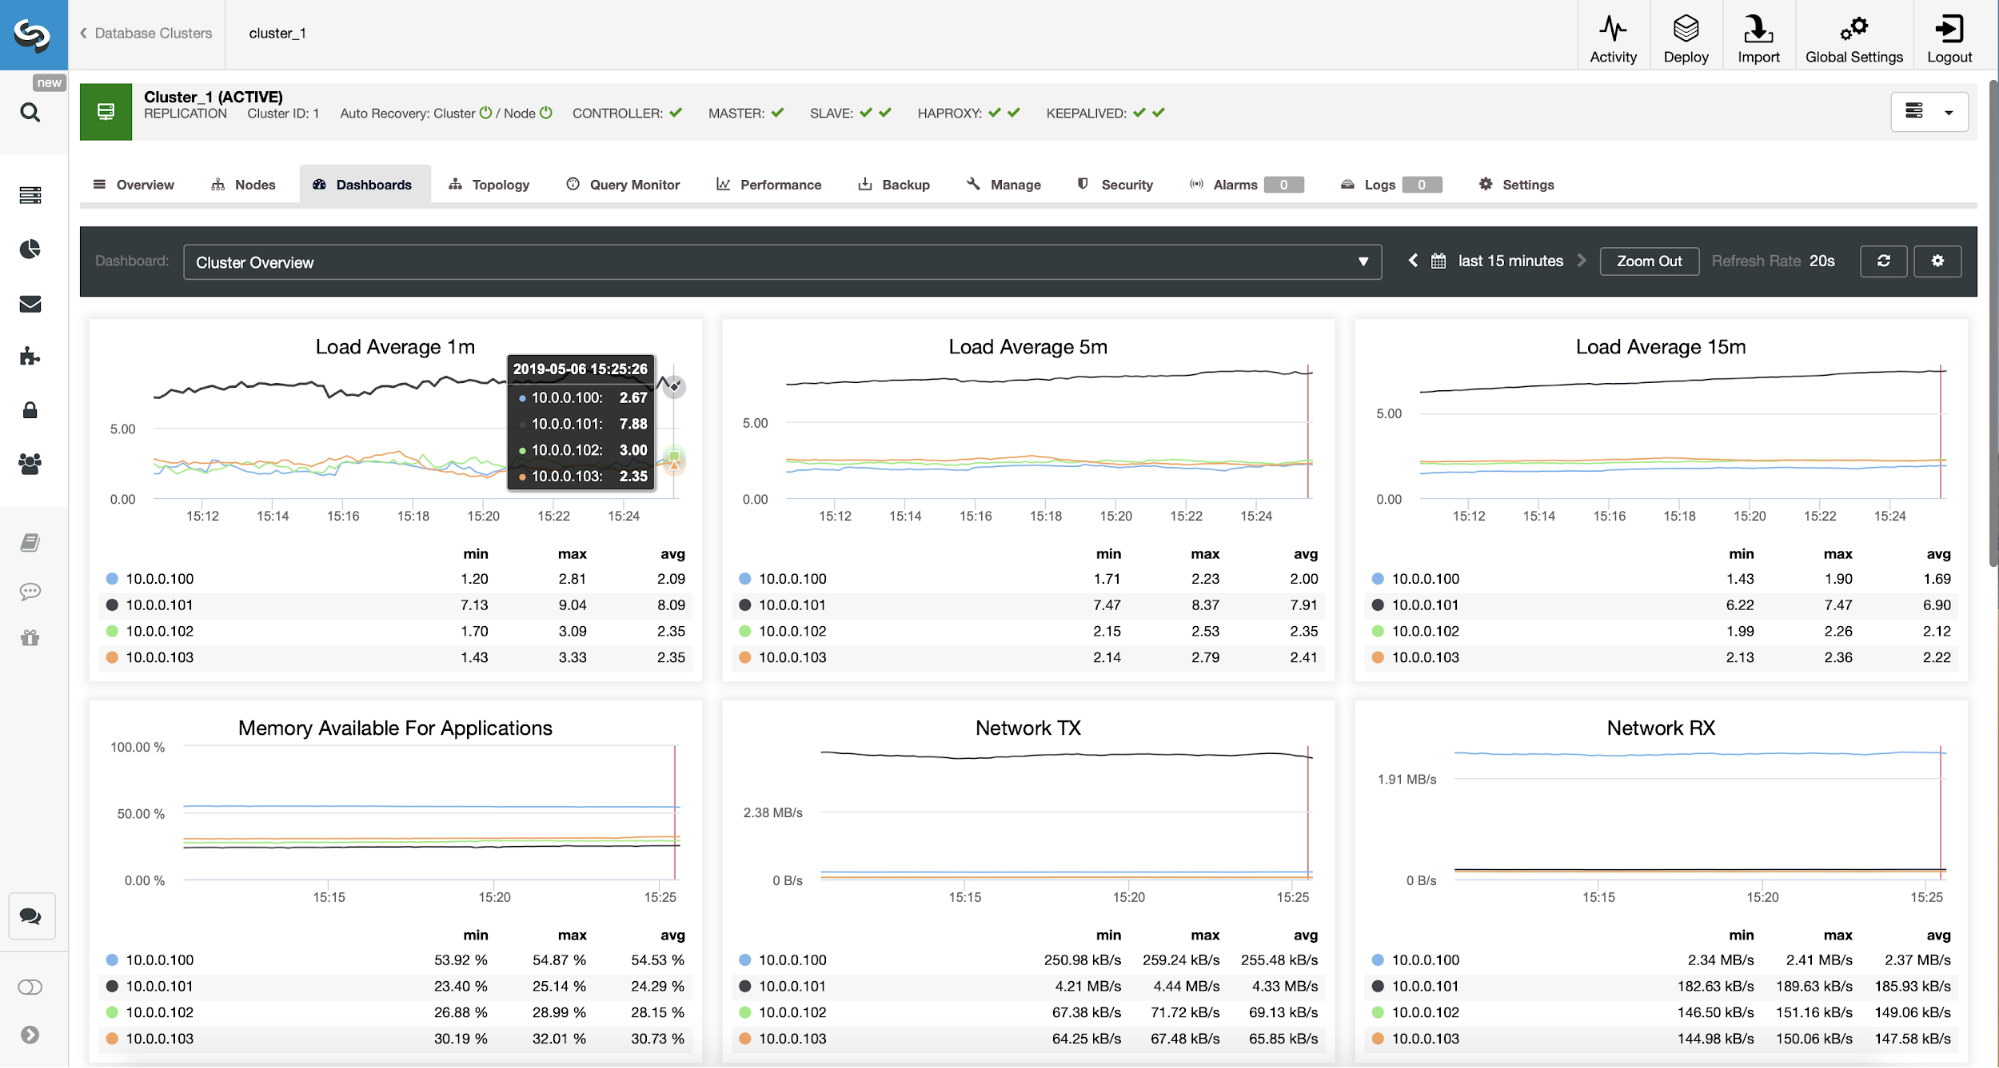
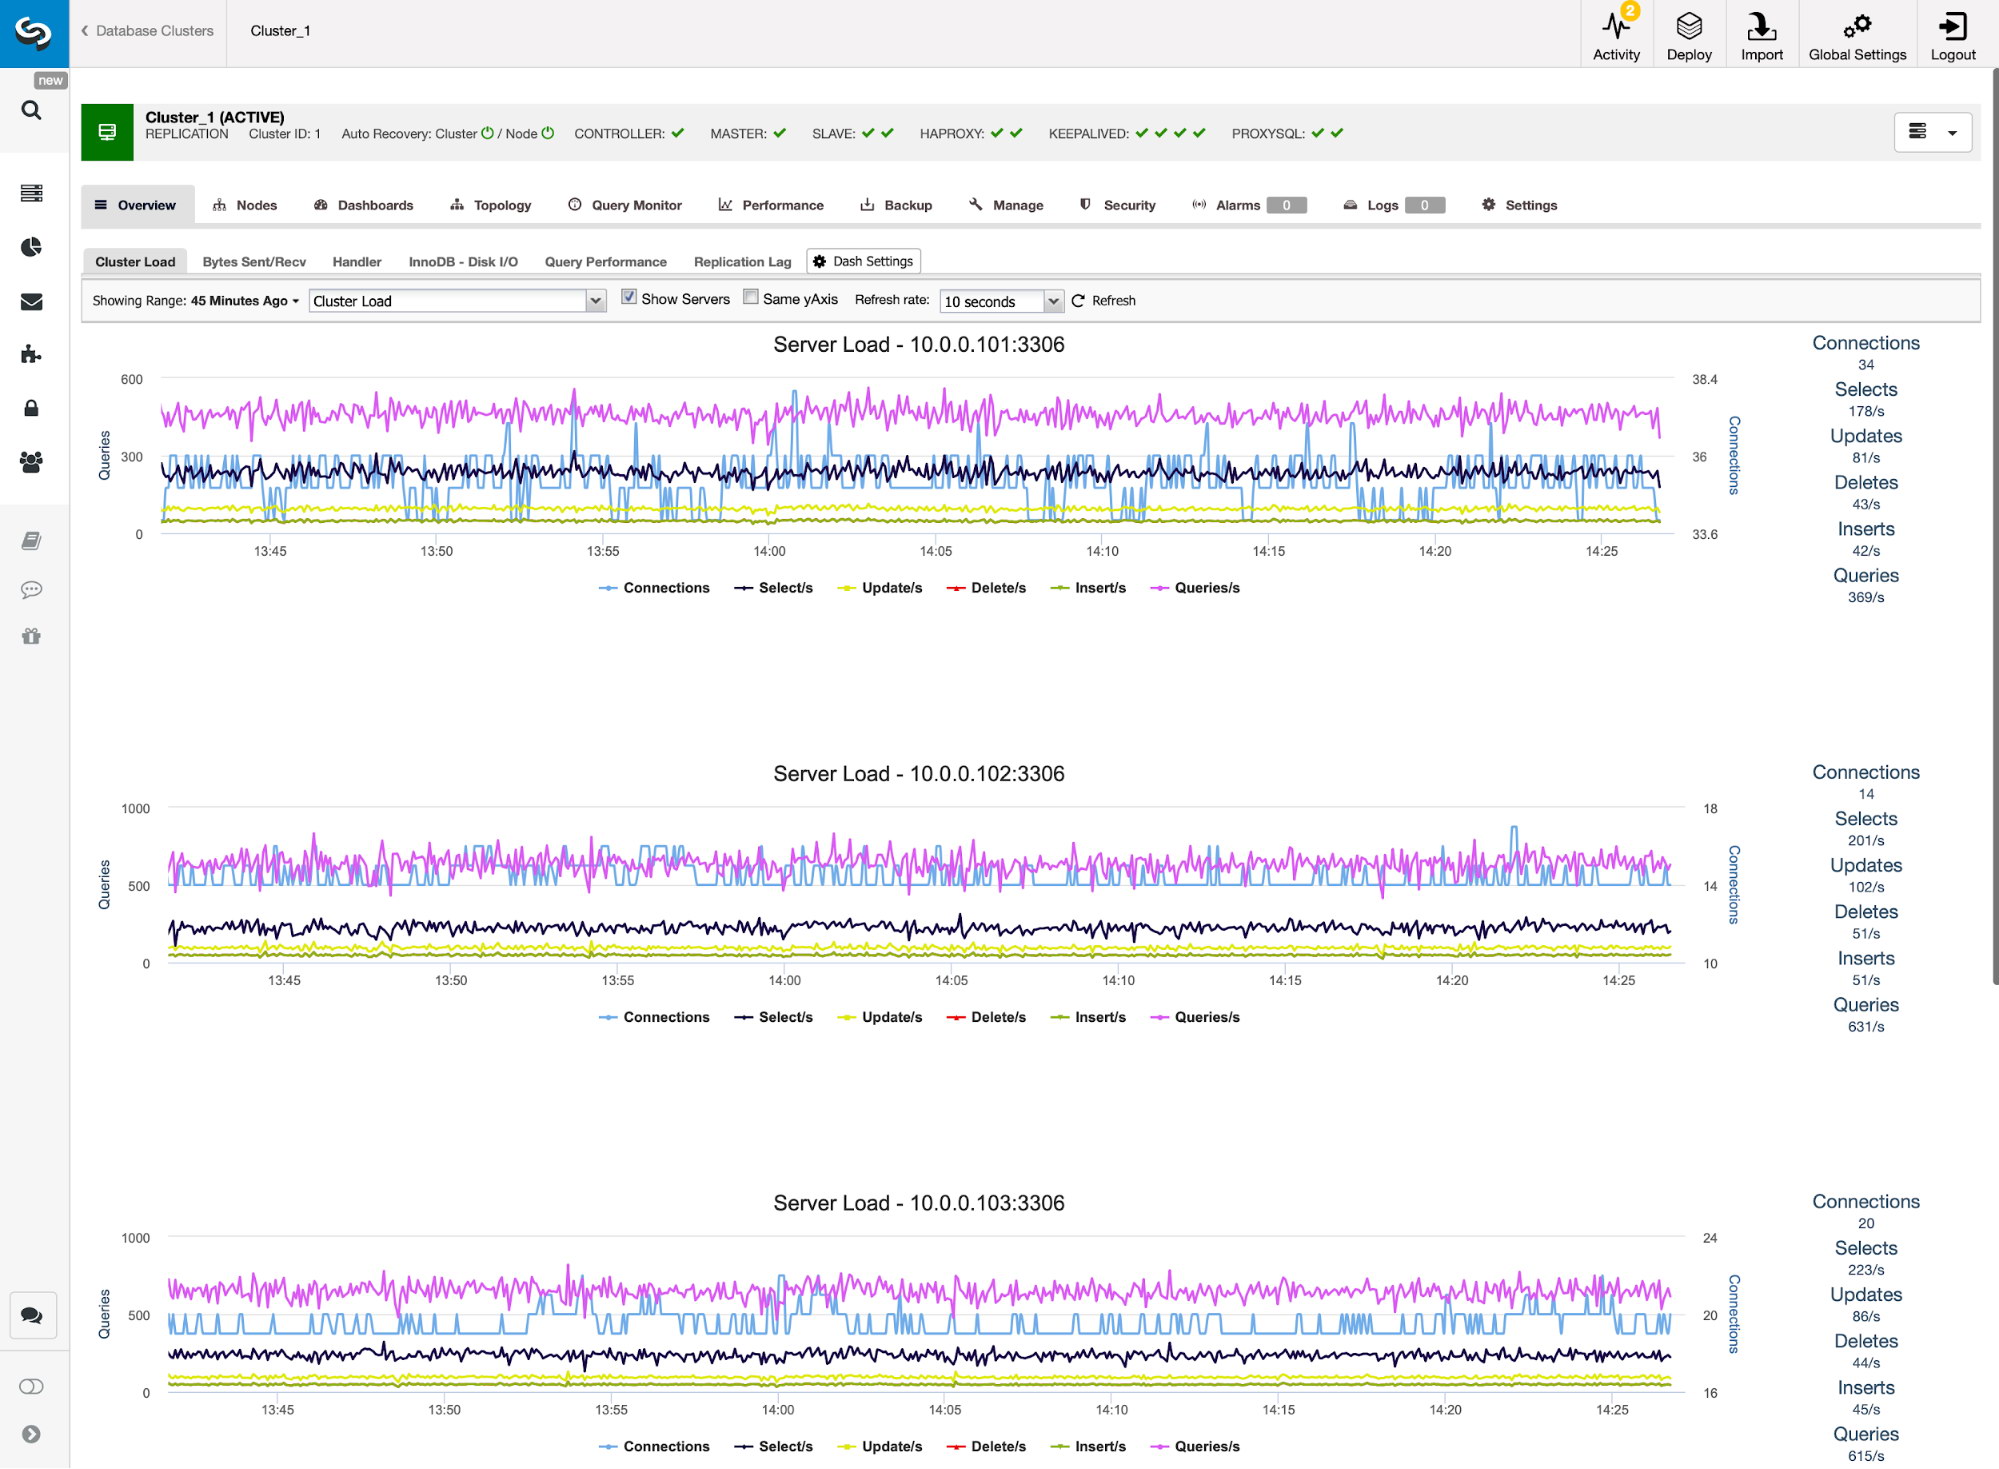
We can verify that the traffic has switched to ProxySQL by looking at the load graph – as you can see, load is much more distributed across the nodes in the cluster. You can also see it on the graph below, which shows the queries distribution across the cluster.
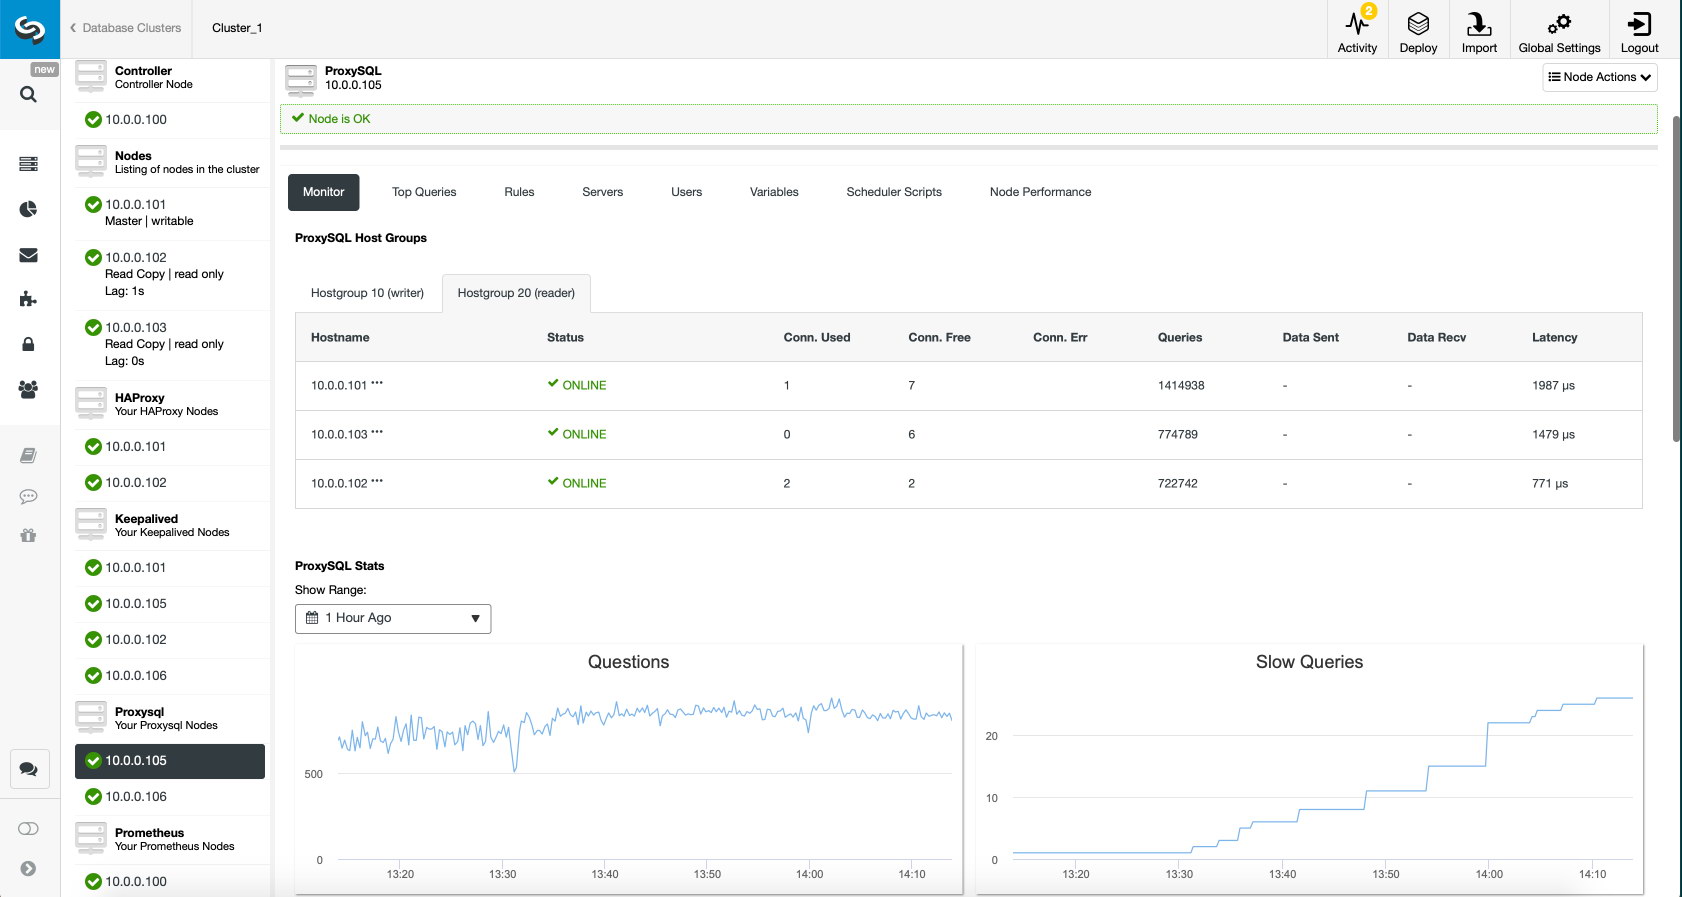
Finally, ProxySQL dashboard also shows that the traffic is distributed across all the nodes in the cluster:
We hope you will benefit from this blog post, as you can see, with ClusterControl deploying the new architecture takes just a moment and requires just a handful of clicks to get things running. Let us know about your experience in such migrations.


