blog
Using MariaDB Flashback on a MySQL Server

MariaDB has introduced a very cool feature called Flashback. Flashback is a feature that will allow instances, databases or tables to be rolled back to an old snapshot. Traditionally, to perform a point-in-time recovery (PITR), one would restore a database from a backup, and replay the binary logs to roll forward the database state at a certain time or position.
With Flashback, the database can be rolled back to a point of time in the past, which is way faster if we just want to see the past that just happened not a long time ago. Occasionally, using flashback might be inefficient if you want to see a very old snapshot of your data relative to the current date and time. Restoring from a delayed slave, or from a backup plus replaying the binary log might be the better options.
This feature is only available in the MariaDB client package, but that doesn’t mean we can not use it with our MySQL servers. This blog post showcases how we can use this amazing feature on a MySQL server.
MariaDB Flashback Requirements
For those who want to use MariaDB flashback feature on top of MySQL, we can basically do the following:
- Enable binary log with the following setting:
- binlog_format = ROW (default since MySQL 5.7.7).
- binlog_row_image = FULL (default since MySQL 5.6).
- Use msqlbinlog utility from any MariaDB 10.2.4 and later installation.
- Flashback is currently supported only over DML statements (INSERT, DELETE, UPDATE). An upcoming version of MariaDB will add support for flashback over DDL statements (DROP, TRUNCATE, ALTER, etc.) by copying or moving the current table to a reserved and hidden database, and then copying or moving back when using flashback.
The flashback is achieved by taking advantage of existing support for full image format binary logs, thus it supports all storage engines. Note that the flashback events will be stored in memory. Therefore, you should make sure your server has enough memory for this feature.
How Does MariaDB Flashback Work?
MariaDB‘s mysqlbinlog utility comes with two extra options for this purpose:
- -B, –flashback – Flashback feature can rollback your committed data to a special time point.
- -T, –table=[name] – List entries for just this table (local log only).
By comparing the mysqlbinlog output with and without the –flashback flag, we can easily understand how it works. Consider the following statement is executed on a MariaDB server:
MariaDB> DELETE FROM sbtest.sbtest1 WHERE id = 1;Without flashback flag, we will see the actual DELETE binlog event:
$ mysqlbinlog -vv
--start-datetime="$(date '+%F %T' -d 'now - 10 minutes')"
--database=sbtest
--table=sbtest1
/var/lib/mysql/binlog.000003

...
# at 453196541
#200227 12:58:18 server id 37001  end_log_pos 453196766 CRC32 0xdaa248ed Delete_rows: table id 238 flags: STMT_END_F

BINLOG '
6rxXXhOJkAAAQwAAAP06AxsAAO4AAAAAAAEABnNidGVzdAAHc2J0ZXN0MQAEAwP+/gTu4P7wAAEB
AAID/P8AFuAQfA==
6rxXXiCJkAAA4QAAAN47AxsAAO4AAAAAAAEAAgAE/wABAAAAVJ4HAHcAODM4Njg2NDE5MTItMjg3
NzM5NzI4MzctNjA3MzYxMjA0ODYtNzUxNjI2NTk5MDYtMjc1NjM1MjY0OTQtMjAzODE4ODc0MDQt
NDE1NzY0MjIyNDEtOTM0MjY3OTM5NjQtNTY0MDUwNjUxMDItMzM1MTg0MzIzMzA7Njc4NDc5Njcz
NzctNDgwMDA5NjMzMjItNjI2MDQ3ODUzMDEtOTE0MTU0OTE4OTgtOTY5MjY1MjAyOTHtSKLa
'/*!*/;

### DELETE FROM `sbtest`.`sbtest1`
### WHERE
###   @1=1 /* INT meta=0 nullable=0 is_null=0 */
###   @2=499284 /* INT meta=0 nullable=0 is_null=0 */
###   @3='83868641912-28773972837-60736120486-75162659906-27563526494-20381887404-41576422241-93426793964-56405065102-33518432330' /* STRING(480) meta=61152 nullable=0 is_null=0 */
###   @4='67847967377-48000963322-62604785301-91415491898-96926520291' /* STRING(240) meta=65264 nullable=0 is_null=0 */
...
By extending the above mysqlbinlog command with –flashback, we can see the DELETE event is converted to an INSERT event and similarly to the respective WHERE and SET clauses:
$ mysqlbinlog -vv
--start-datetime="$(date '+%F %T' -d 'now - 10 minutes')"
--database=sbtest
--table=sbtest1
/var/lib/mysql/binlog.000003
--flashback

...
BINLOG '
6rxXXhOJkAAAQwAAAP06AxsAAO4AAAAAAAEABnNidGVzdAAHc2J0ZXN0MQAEAwP+/gTu4P7wAAEB
AAID/P8AFuAQfA==
6rxXXh6JkAAA4QAAAN47AxsAAO4AAAAAAAEAAgAE/wABAAAAVJ4HAHcAODM4Njg2NDE5MTItMjg3
NzM5NzI4MzctNjA3MzYxMjA0ODYtNzUxNjI2NTk5MDYtMjc1NjM1MjY0OTQtMjAzODE4ODc0MDQt
NDE1NzY0MjIyNDEtOTM0MjY3OTM5NjQtNTY0MDUwNjUxMDItMzM1MTg0MzIzMzA7Njc4NDc5Njcz
NzctNDgwMDA5NjMzMjItNjI2MDQ3ODUzMDEtOTE0MTU0OTE4OTgtOTY5MjY1MjAyOTHtSKLa
'/*!*/;

### INSERT INTO `sbtest`.`sbtest1`
### SET
###   @1=1 /* INT meta=0 nullable=0 is_null=0 */
###   @2=499284 /* INT meta=0 nullable=0 is_null=0 */
###   @3='83868641912-28773972837-60736120486-75162659906-27563526494-20381887404-41576422241-93426793964-56405065102-33518432330' /* STRING(480) meta=61152 nullable=0 is_null=0 */
###   @4='67847967377-48000963322-62604785301-91415491898-96926520291' /* STRING(240) meta=65264 nullable=0 is_null=0 */
...
In row-based replication (binlog_format=ROW), each row change event contains two images, a “before” image (except INSERT) whose columns are matched against when searching for the row to be updated, and an “after” image (except DELETE) containing the changes. With binlog_row_image=FULL, MariaDB logs full rows (that is, all columns) for both the before and after images.
The following example shows binary log events for UPDATE. Consider the following statement is executed on a MariaDB server:
MariaDB> UPDATE sbtest.sbtest1 SET k = 0 WHERE id = 5;When looking at the binlog event for the above statement, we will see something like this:
$ mysqlbinlog -vv
--start-datetime="$(date '+%F %T' -d 'now - 5 minutes')"
--database=sbtest
--table=sbtest1
/var/lib/mysql/binlog.000001

...
### UPDATE `sbtest`.`sbtest1`
### WHERE
###   @1=5 /* INT meta=0 nullable=0 is_null=0 */
###   @2=499813 /* INT meta=0 nullable=0 is_null=0 */
###   @3='44257470806-17967007152-32809666989-26174672567-29883439075-95767161284-94957565003-35708767253-53935174705-16168070783' /* STRING(480) meta=61152 nullable=0 is_null=0 */
###   @4='34551750492-67990399350-81179284955-79299808058-21257255869' /* STRING(240) meta=65264 nullable=0 is_null=0 */
### SET
###   @1=5 /* INT meta=0 nullable=0 is_null=0 */
###   @2=0 /* INT meta=0 nullable=0 is_null=0 */
###   @3='44257470806-17967007152-32809666989-26174672567-29883439075-95767161284-94957565003-35708767253-53935174705-16168070783' /* STRING(480) meta=61152 nullable=0 is_null=0 */
###   @4='34551750492-67990399350-81179284955-79299808058-21257255869' /* STRING(240) meta=65264 nullable=0 is_null=0 */
# Number of rows: 1
...
With the –flashback flag, the “before” image is swapped with the “after” image of the existing row:
$ mysqlbinlog -vv
--start-datetime="$(date '+%F %T' -d 'now - 5 minutes')"
--database=sbtest
--table=sbtest1
/var/lib/mysql/binlog.000001
 --flashback

...
### UPDATE `sbtest`.`sbtest1`
### WHERE
###   @1=5 /* INT meta=0 nullable=0 is_null=0 */
###   @2=0 /* INT meta=0 nullable=0 is_null=0 */
###   @3='44257470806-17967007152-32809666989-26174672567-29883439075-95767161284-94957565003-35708767253-53935174705-16168070783' /* STRING(480) meta=61152 nullable=0 is_null=0 */
###   @4='34551750492-67990399350-81179284955-79299808058-21257255869' /* STRING(240) meta=65264 nullable=0 is_null=0 */
### SET
###   @1=5 /* INT meta=0 nullable=0 is_null=0 */
###   @2=499813 /* INT meta=0 nullable=0 is_null=0 */
###   @3='44257470806-17967007152-32809666989-26174672567-29883439075-95767161284-94957565003-35708767253-53935174705-16168070783' /* STRING(480) meta=61152 nullable=0 is_null=0 */
###   @4='34551750492-67990399350-81179284955-79299808058-21257255869' /* STRING(240) meta=65264 nullable=0 is_null=0 */
...
We can then redirect the flashback output to the MySQL client, thus rolling back the database or table to the point of time that we want. More examples are shown in the next sections.
MariaDB has a dedicated knowledge base page for this feature. Check out MariaDB Flashback knowledge base page.
MariaDB Flashback With MySQL
To have the flashback ability for MySQL, one has to do the following:
- Copy the mysqlbinlog utility from any MariaDB server (10.2.4 or later).
- Disable MySQL GTID before applying the flashback SQL file. Global variables gtid_mode and enforce_gtid_consistency can be set in runtime since MySQL 5.7.5.
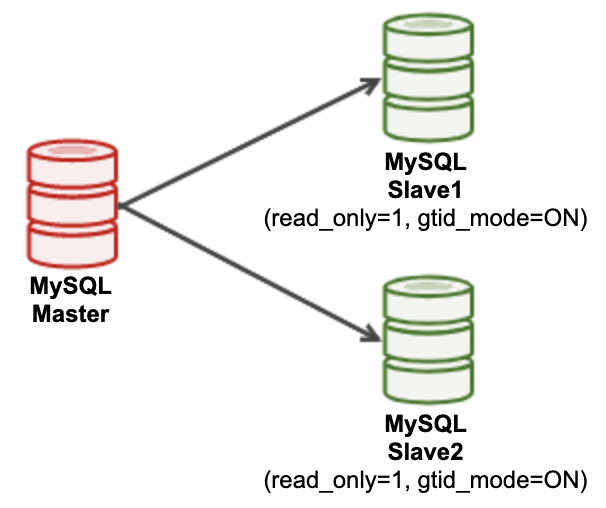
Suppose we are having the following simple MySQL 8.0 replication topology:
In this example, we copied mysqlbinlog utility from the latest MariaDB 10.4 on one of our MySQL 8.0 slave (slave2):
(mariadb-server)$ scp /bin/mysqlbinlog root@slave2-mysql:/root/
(slave2-mysql8)$ ls -l /root/mysqlbinlog
-rwxr-xr-x. 1 root root 4259504 Feb 27 13:44 /root/mysqlbinlog
Our MariaDB’s mysqlbinlog utility is now located at /root/mysqlbinlog on slave2. On the MySQL master, we executed the following disastrous statement:
mysql> DELETE FROM sbtest1 WHERE id BETWEEN 5 AND 100;
Query OK, 96 rows affected (0.01 sec)
96 rows were deleted in the above statement. Wait a couple of seconds to let the events replicate from master to all slaves before we can try to find the binlog position of the disastrous event on the slave server. The first step is to retrieve all the binary logs on that server:
mysql> SHOW BINARY LOGS;
+---------------+-----------+-----------+
| Log_name      | File_size | Encrypted |
+---------------+-----------+-----------+
| binlog.000001 |       850 |        No |
| binlog.000002 |     18796 |        No |
+---------------+-----------+-----------+
Our disastrous event should exist inside binlog.000002, the latest binary log in this server. We can then use the MariaDB’s mysqlbinlog utility to retrieve all binlog events for table sbtest1 since 10 minutes ago:
(slave2-mysql8)$ /root/mysqlbinlog -vv
--start-datetime="$(date '+%F %T' -d 'now - 10 minutes')"
--database=sbtest
--table=sbtest1
/var/lib/mysql/binlog.000002

...
# at 195
#200228 15:09:45 server id 37001  end_log_pos 281 CRC32 0x99547474 Ignorable
# Ignorable event type 33 (MySQL Gtid)
# at 281
#200228 15:09:45 server id 37001  end_log_pos 353 CRC32 0x8b12bd3c Query thread_id=19 exec_time=0 error_code=0
SET TIMESTAMP=1582902585/*!*/;
SET @@session.pseudo_thread_id=19/*!*/;
SET @@session.foreign_key_checks=1, @@session.sql_auto_is_null=0, @@session.unique_checks=1, @@session.autocommit=1, @@session.check_constraint_checks=1/*!*/;
SET @@session.sql_mode=524288/*!*/;
SET @@session.auto_increment_increment=1, @@session.auto_increment_offset=1/*!*/;
SET @@session.character_set_client=255,@@session.collation_connection=255,@@session.collation_server=255/*!*/;
SET @@session.lc_time_names=0/*!*/;
SET @@session.collation_database=DEFAULT/*!*/;

BEGIN
/*!*/;
# at 353
#200228 15:09:45 server id 37001  end_log_pos 420 CRC32 0xe0e44a1b Table_map: `sbtest`.`sbtest1` mapped to number 92

# at 420
# at 8625
# at 16830
#200228 15:09:45 server id 37001  end_log_pos 8625 CRC32 0x99b1a8fc Delete_rows: table id 92
#200228 15:09:45 server id 37001  end_log_pos 16830 CRC32 0x89496a07 Delete_rows: table id 92
#200228 15:09:45 server id 37001  end_log_pos 18765 CRC32 0x302413b2 Delete_rows: table id 92 flags: STMT_END_F
To easily look up for the binlog position number, pay attention on the lines that start with “# at “. From the above lines, we can see the DELETE event was happening at position 281 inside binlog.000002 (starts at “# at 281“). We can also retrieve the binlog events directly inside a MySQL server:
mysql> SHOW BINLOG EVENTS IN 'binlog.000002';
+---------------+-------+----------------+-----------+-------------+-------------------------------------------------------------------+
| Log_name      | Pos   | Event_type     | Server_id | End_log_pos | Info                                                              |
+---------------+-------+----------------+-----------+-------------+-------------------------------------------------------------------+
| binlog.000002 |     4 | Format_desc    |     37003 | 124         | Server ver: 8.0.19, Binlog ver: 4                                 |
| binlog.000002 |   124 | Previous_gtids |     37003 | 195         | 0d98d975-59f8-11ea-bd30-525400261060:1                            |
| binlog.000002 |   195 | Gtid           |     37001 | 281         | SET @@SESSION.GTID_NEXT= '0d98d975-59f8-11ea-bd30-525400261060:2' |
| binlog.000002 |   281 | Query          |     37001 | 353         | BEGIN                                                             |
| binlog.000002 |   353 | Table_map      |     37001 | 420         | table_id: 92 (sbtest.sbtest1)                                     |
| binlog.000002 |   420 | Delete_rows    |     37001 | 8625        | table_id: 92                                                      |
| binlog.000002 |  8625 | Delete_rows    |     37001 | 16830       | table_id: 92                                                      |
| binlog.000002 | 16830 | Delete_rows    |     37001 | 18765       | table_id: 92 flags: STMT_END_F                                    |
| binlog.000002 | 18765 | Xid            |     37001 | 18796       | COMMIT /* xid=171006 */                                           |
+---------------+-------+----------------+-----------+-------------+-------------------------------------------------------------------+

9 rows in set (0.00 sec)
We can now confirm that position 281 is where we want our data to revert to. We can then use the –start-position flag to generate accurate flashback events. Notice that we omit the “-vv” flag and add the –flashback flag:
(slave2-mysql8)$ /root/mysqlbinlog
--start-position=281
--database=sbtest
--table=sbtest1
/var/lib/mysql/binlog.000002
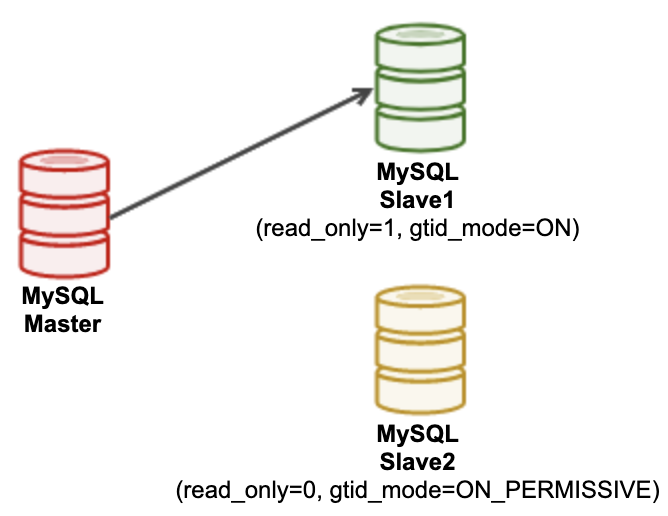
--flashback > /root/flashback.binlogThe flashback.binlog contains all the required events to undo all changes happened on table sbtest1 on this MySQL server. Since this is a slave node of a replication cluster, we have to break the replication on the chosen slave (slave2) in order to use it for flashback purposes. To do this, we have to stop the replication on the chosen slave, set MySQL GTID to ON_PERMISSIVE and make the slave writable:
mysql> STOP SLAVE;
SET GLOBAL gtid_mode = ON_PERMISSIVE;
SET GLOBAL enforce_gtid_consistency = OFF;
SET GLOBAL read_only = OFF;
At this point, slave2 is not part of the replication and our topology is looking like this:
Import the flashback via mysql client and we do not want this change to be recorded in MySQL binary log:
(slave2-mysql8)$ mysql -uroot -p --init-command='SET sql_log_bin=0' sbtest < /root/flashback.binlogWe can then see all the deleted rows, as proven by the following statement:
mysql> SELECT COUNT(id) FROM sbtest1 WHERE id BETWEEN 5 and 100;
+-----------+
| COUNT(id) |
+-----------+
|        96 |
+-----------+
1 row in set (0.00 sec)
We can then create an SQL dump file for table sbtest1 for our reference:
(slave2-mysql8)$ mysqldump -uroot -p --single-transaction sbtest sbtest1 > sbtest1_flashbacked.sqlOnce the flashback operation completes, we can rejoin the slave node back into the replication chain. But firstly, we have to bring back the database into a consistent state, by replaying all events starting from the position we had flashbacked. Don't forget to skip binary logging as we do not want to "write" onto the slave and risking ourselves with errant transactions:
(slave2-mysql8)$ /root/mysqlbinlog
--start-position=281
--database=sbtest
--table=sbtest1
/var/lib/mysql/binlog.000002 | mysql -uroot -p --init-command='SET sql_log_bin=0' sbtest
Finally, prepare the node back to its role as MySQL slave and start the replication:
mysql> SET GLOBAL read_only = ON;
SET GLOBAL enforce_gtid_consistency = ON;
SET GLOBAL gtid_mode = ON;
START SLAVE;
Verify that the slave node is replicating correctly:
mysql> SHOW SLAVE STATUSG
...
             Slave_IO_Running: Yes
            Slave_SQL_Running: Yes
...
At this point, we have re-joined the slave back into the replication chain and our topology is now back to its original state:
Shout out to the MariaDB team for introducing this astounding feature!