blog
Setting Up a Geo-Distributed Database Cluster Using MySQL Replication

A single point of failure (SPOF) is a common reason why organizations are working towards distributing the presence of their database environments to another location geographically. It’s part of the Disaster Recovery and Business Continuity strategic plans.
Disaster Recovery (DR) planning embodies technical procedures which cover the preparation for unanticipated issues such as natural disasters, accidents (such as human error), or incidents (such as criminal acts).
For the past decade, distributing your database environment across multiple geographical locations has been a pretty common setup, as public clouds offer a lot of ways to deal with this. The challenge comes in setting up database environments. It creates challenges when you try to manage the database(s), move your data to another geo-location, or apply security with a high level of observability.
In this blog, we’ll showcase how you can do this using MySQL Replication. We’ll cover how you are able to copy your data to another database node located in a different country distant from the current geography of the MySQL cluster. For this example, our target region is based on us-east, while my on-prem is in Asia located in the Philippines.
Why Do I Need A Geo-Location Database Cluster?
Even Amazon AWS, the top public cloud provider, claims they suffer from downtime or unintended outages (like the one that happened in 2017). Let’s say you are using AWS as your secondary datacenter aside from your on-prem. You cannot have any internal access to its underlying hardware or to those internal networks that are managing your compute nodes. These are fully managed services which you paid for, but you cannot avoid the fact that it can suffer from an outage anytime. If such a geographic location suffers an outage then you can have a long downtime.
This type of problem must be foreseen during your business continuity planning. It must have been analyzed and implemented based on what has been defined. Business continuity for your MySQL databases should include high uptime. Some environments are doing benchmarks and set a high bar of rigorous tests including the weak side in order to expose any vulnerability, how resilient it can be, and how scalable your technology architecture including your database infrastructure. For business especially those handling high transactions, it is imperative to ensure that production databases are available for the applications all the time even when catastrophe occurs. Otherwise, downtime can be experienced and it might cost you a large amount of money.
With these identified scenarios, organizations start extending their infrastructure to different cloud providers and putting nodes to different geo-location to have more high uptime (if possible at 99.99999999999), lower RPO, and has no SPOF.
To ensure production databases survive a disaster, a Disaster Recovery (DR) site must be configured. Production and DR sites must be part of two geographically distant datacenters. This means, a standby database must be configured at the DR site for every production database so that, the data changes occurring on production database are immediately synced across to the standby database via transaction logs. Some setups also use their DR nodes to handle reads so as to provide load balancing between application and the data layer.
The Desired Architectural Setup
In this blog, the desired setup is simple and yet very common implementation nowadays. See below on the desired architectural setup for this blog:
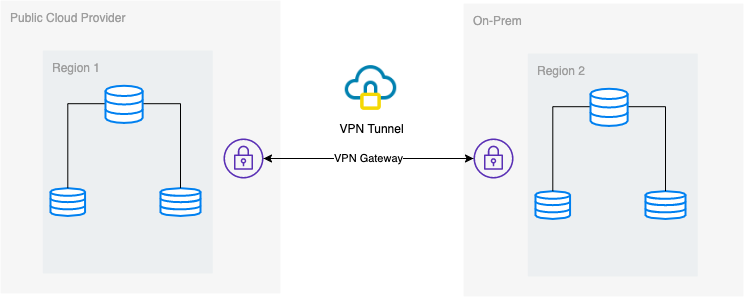
In this blog, I choose Google Cloud Platform (GCP) as the public cloud provider, and using my local network as my on-prem database environment.
It is a must that when using this type of design, you always need both environment or platform to communicate in a very secure manner. Using VPN or using alternatives such as AWS Direct Connect. Although these public clouds nowadays offer managed VPN services which you can use. But for this setup, we’ll be using OpenVPN since I don’t need sophisticated hardware or service for this blog.
Best and Most Efficient Way
For MySQL/Percona/MariaDB database environments, the best and efficient way is to take a backup copy of your database, send to the target node to be deployed or instantiated. There are different ways to use this approach either you can use mysqldump, mydumper, rsync, or use Percona XtraBackup/Mariabackup and stream the data going to your target node.
Using mysqldump
mysqldump creates a logical backup of your whole database or you can selectively choose a list of databases, tables, or even specific records that you wanted to dump.
A simple command that you can use to take a full backup can be,
$ mysqldump --single-transaction --all-databases --triggers --routines --events --master-data | mysql -h -p -vvv --show-warnings With this simple command, it will directly run the MySQL statements to the target database node, for example your target database node on a Google Compute Engine. This can be efficient when data is smaller or you have a fast bandwidth. Otherwise, packing your database to a file then send it to the target node can be your option.
$ mysqldump --single-transaction --all-databases --triggers --routines --events --master-data | gzip > mydata.db

$ scp mydata.db :/some/path
Then run mysqldump to the target database node as such,
zcat mydata.db | mysqlThe downside with using logical backup using mysqldump is it’s slower and consumes disk space. It also uses a single thread so you cannot run this in parallel. Optionally, you can use mydumper especially when your data is too huge. mydumper can be run in parallel but it’s not as flexible compared to mysqldump.
Using xtrabackup
xtrabackup is a physical backup where you can send the streams or binary to the target node. This is very efficient and is mostly used when streaming a backup over the network especially when the target node is of different geography or different region. ClusterControl uses xtrabackup when provisioning or instantiating a new slave regardless where it is located as long as access and permission has been setup prior to the action.
If you are using xtrabackup to run it manually, you can run the command as such,
## Target node
$ socat -u tcp-listen:9999,reuseaddr stdout 2>/tmp/netcat.log | xbstream -x -C /var/lib/mysql## Source node
$ innobackupex --defaults-file=/etc/my.cnf --stream=xbstream --socket=/var/lib/mysql/mysql.sock --host=localhost --tmpdir=/tmp /tmp | socat -u stdio TCP:192.168.10.70:9999To elaborate those two commands,the first command has to be executed or run first on the target node. The target node command does listen on port 9999 and will write any stream that is received from port 9999 in the target node. It is dependent on commands socat and xbstream which means you must ensure you have these packages installed.
On the source node, it executes the innobackupex perl script which invokes xtrabackup in the background and uses xbstream to stream the data that will be sent over the network. The socat command opens the port 9999 and sends its data to the desired host, which is 192.168.10.70 in this example. Still, ensure that you have socat and xbstream installed when using this command. Alternative way of using socat is nc but socat offers more advanced features compared to nc such as serialization like multiple clients can listen on a port.
ClusterControl uses this command when rebuilding a slave or building a new slave. It is fast and guarantees the exact copy of your source data will be copied to your target node. When provisioning a new database into a separate geo-location, using this approach offers more efficiency and offers you more speed to finish the job. Although there can be pros and cons when using logical or binary backup when streamed through the wire. Using this method is a very common approach when setting up a new geo-location database cluster to a different region and create an exact copy of your database environment.
Efficiency, Observability, and Speed
Questions left by most people who are not familiar with this approach always covers the “HOW, WHAT, WHERE” problems. In this section, we’ll cover how you can efficiently setup your geo-location database with less work to deal with and with observability why it fails. Using ClusterControl is very efficient. In this current setup I have, the following environment as initially implemented:
Extending Node to GCP
Starting to setup your geo-Location database cluster, to extend your cluster and create a snapshot copy of your cluster, you can add a new slave. As mentioned earlier, ClusterControl will use xtrabackup (mariabackup for MariaDB 10.2 onwards) and deploy a new node within your cluster. Before you can register your GCP compute nodes as your target nodes, you need to setup first the appropriate system user the same as the system user you registered in ClusterControl. You can verify this in your /etc/cmon.d/cmon_X.cnf, where X is the cluster_id. For example, see below:
# grep 'ssh_user' /etc/cmon.d/cmon_27.cnf

ssh_user=maximus
maximus (in this example) must be present in your GCP compute nodes. The user in your GCP nodes must have the sudo or super admin privileges. It must also be setup with a password-less SSH access. Please read our documentation more about the system user and it’s required privileges.
Let’s have an example list of servers below (from GCP console: Compute Engine dashboard):
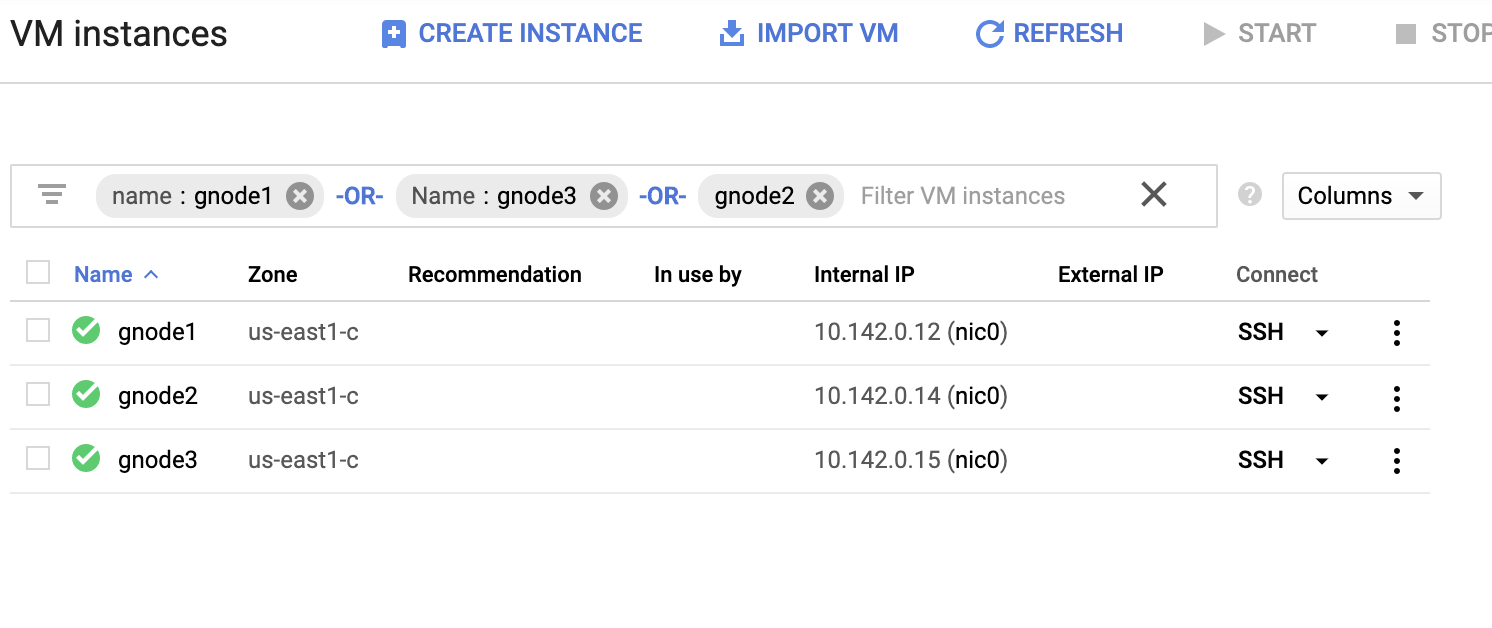
In the screenshot above, our target region is based on the us-east region. As noted earlier, my local network is setup over a secure layer going through GCP (vice-versa) using OpenVPN. So communication from GCP going to my local network is also encapsulated over the VPN tunnel.
Add a Slave Node To GCP
The screenshot below reveals how you can do this. See images below:

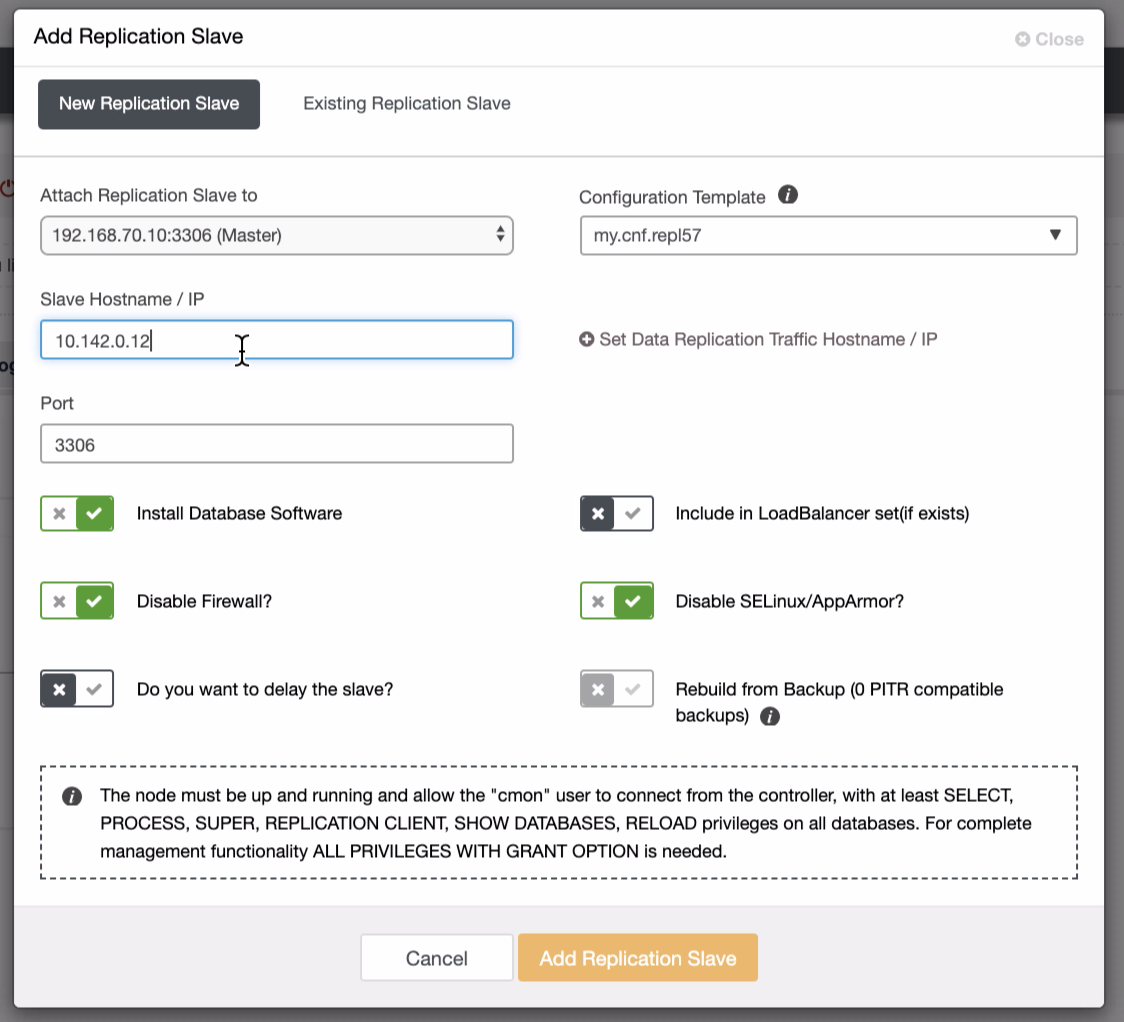
As seen in the second screenshot, we’re targeting node 10.142.0.12 and its source master is 192.168.70.10. ClusterControl is smart enough to determine firewalls, security modules, packages, configuration, and setup that needs to be done. See below an example of job activity log:
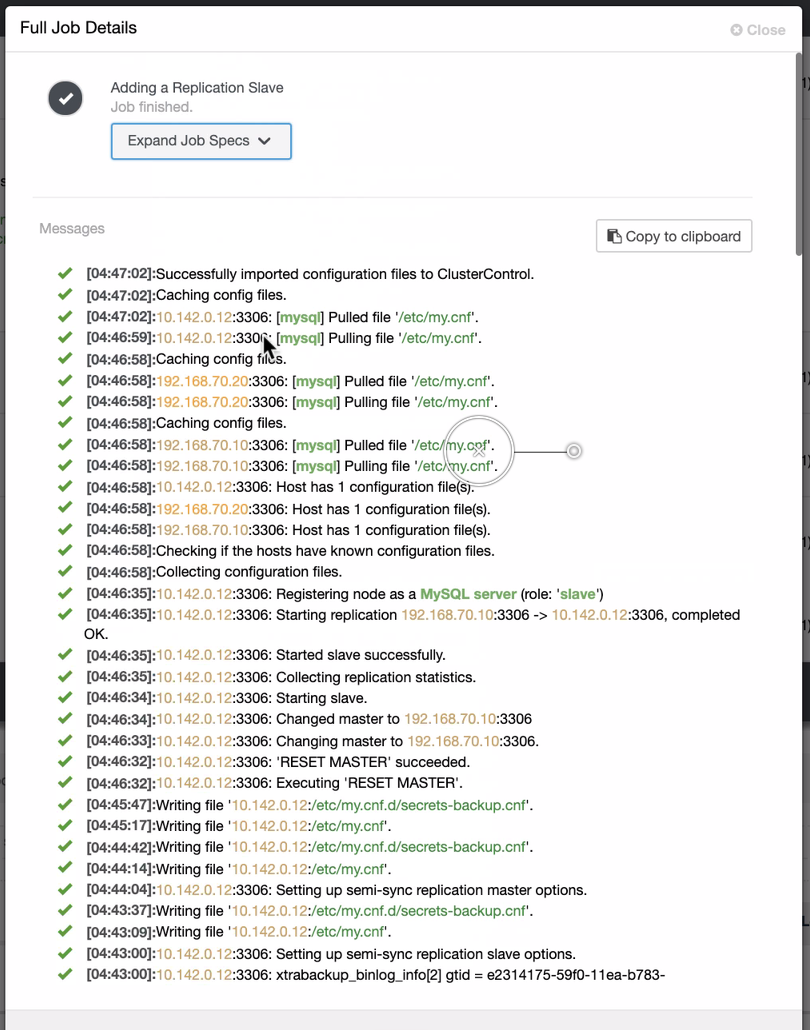
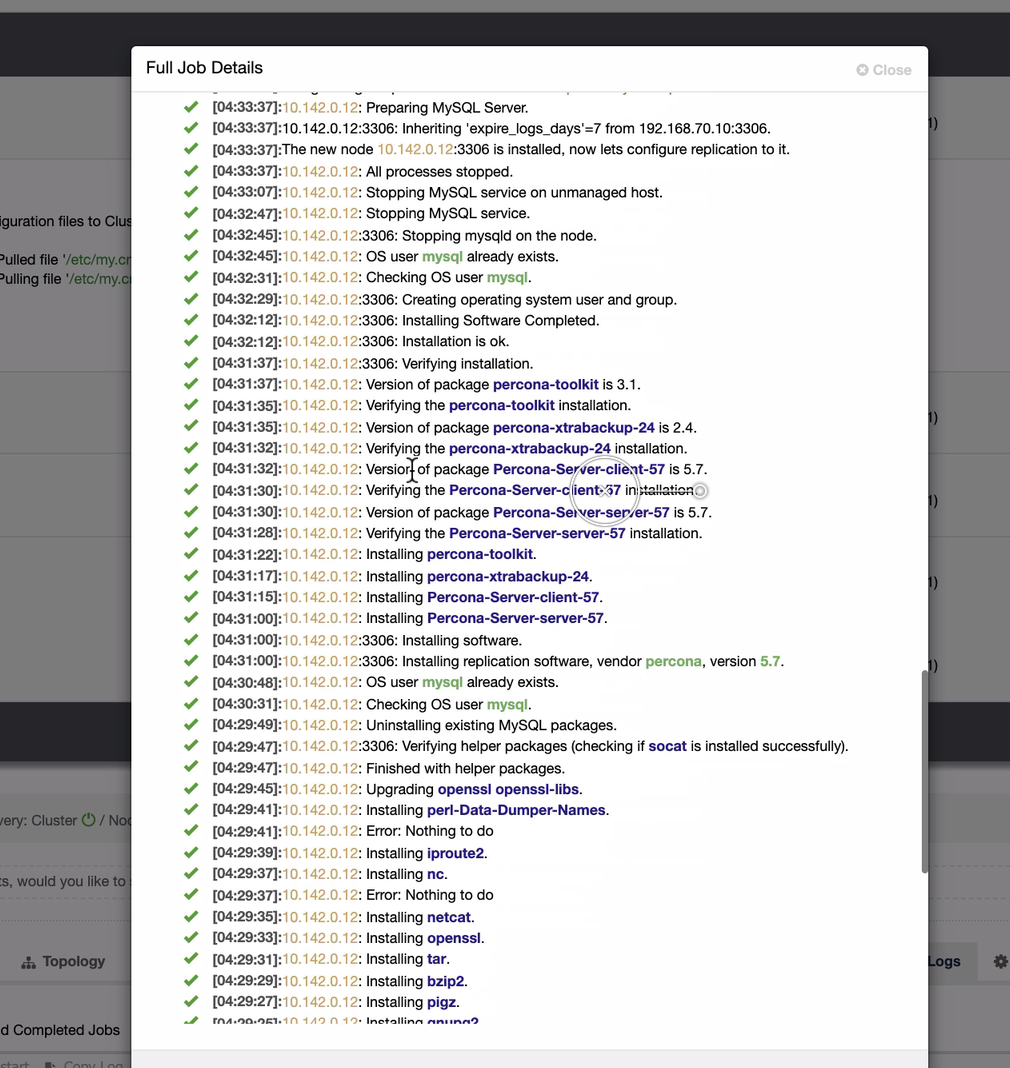
Quite a simple task, isn’t it?
Complete The GCP MySQL Cluster
We need to add two nodes more to the GCP cluster to have a balance topology as we did have in the local network. For the second and third node, ensure that the master must be pointing to your GCP node. In this example, the master is 10.142.0.12. See below how to do this,
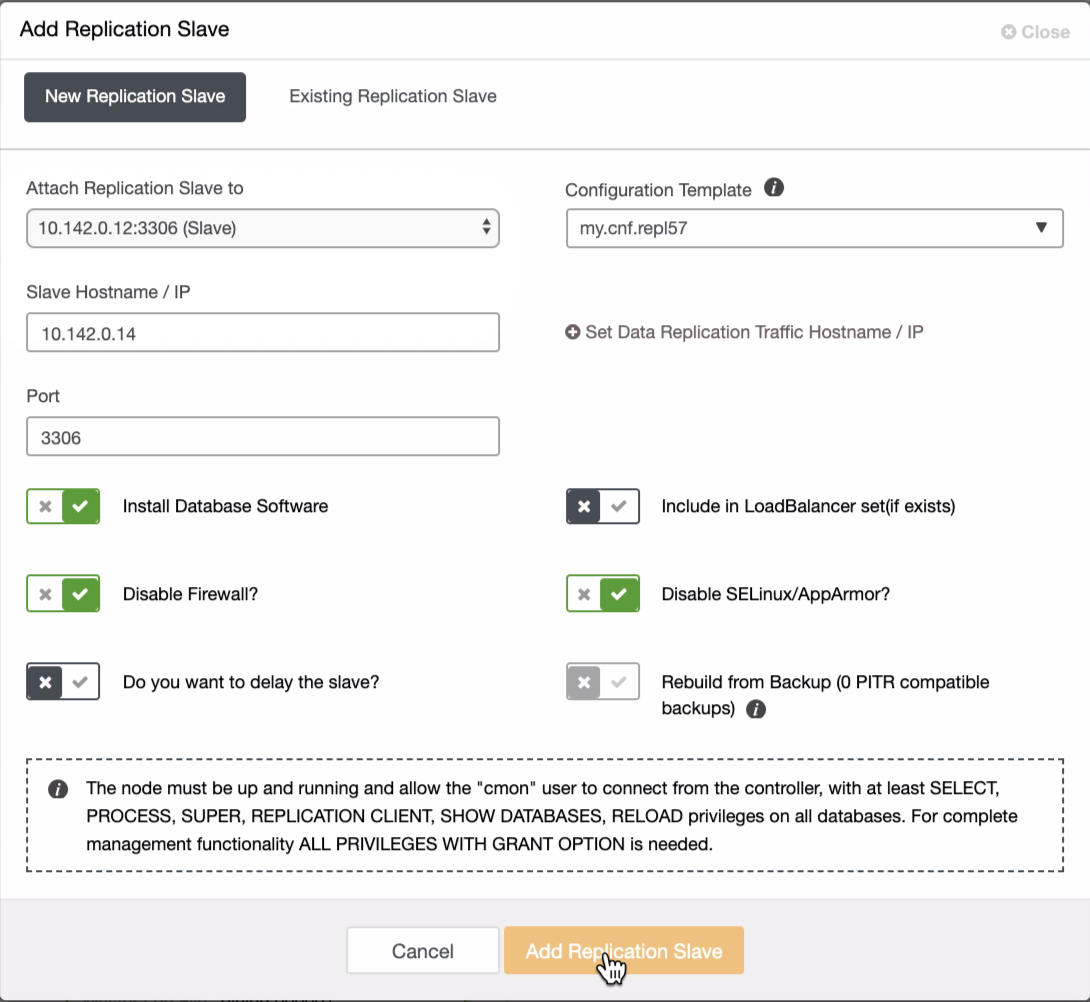
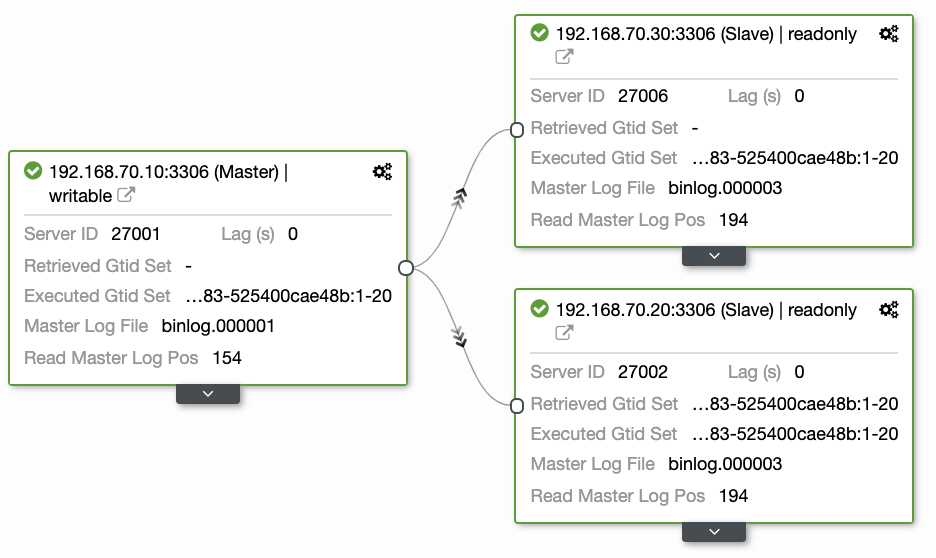
As seen in the screenshot above, I selected the 10.142.0.12 (slave) which is the first node we have added into the cluster. The complete result shows as follows,
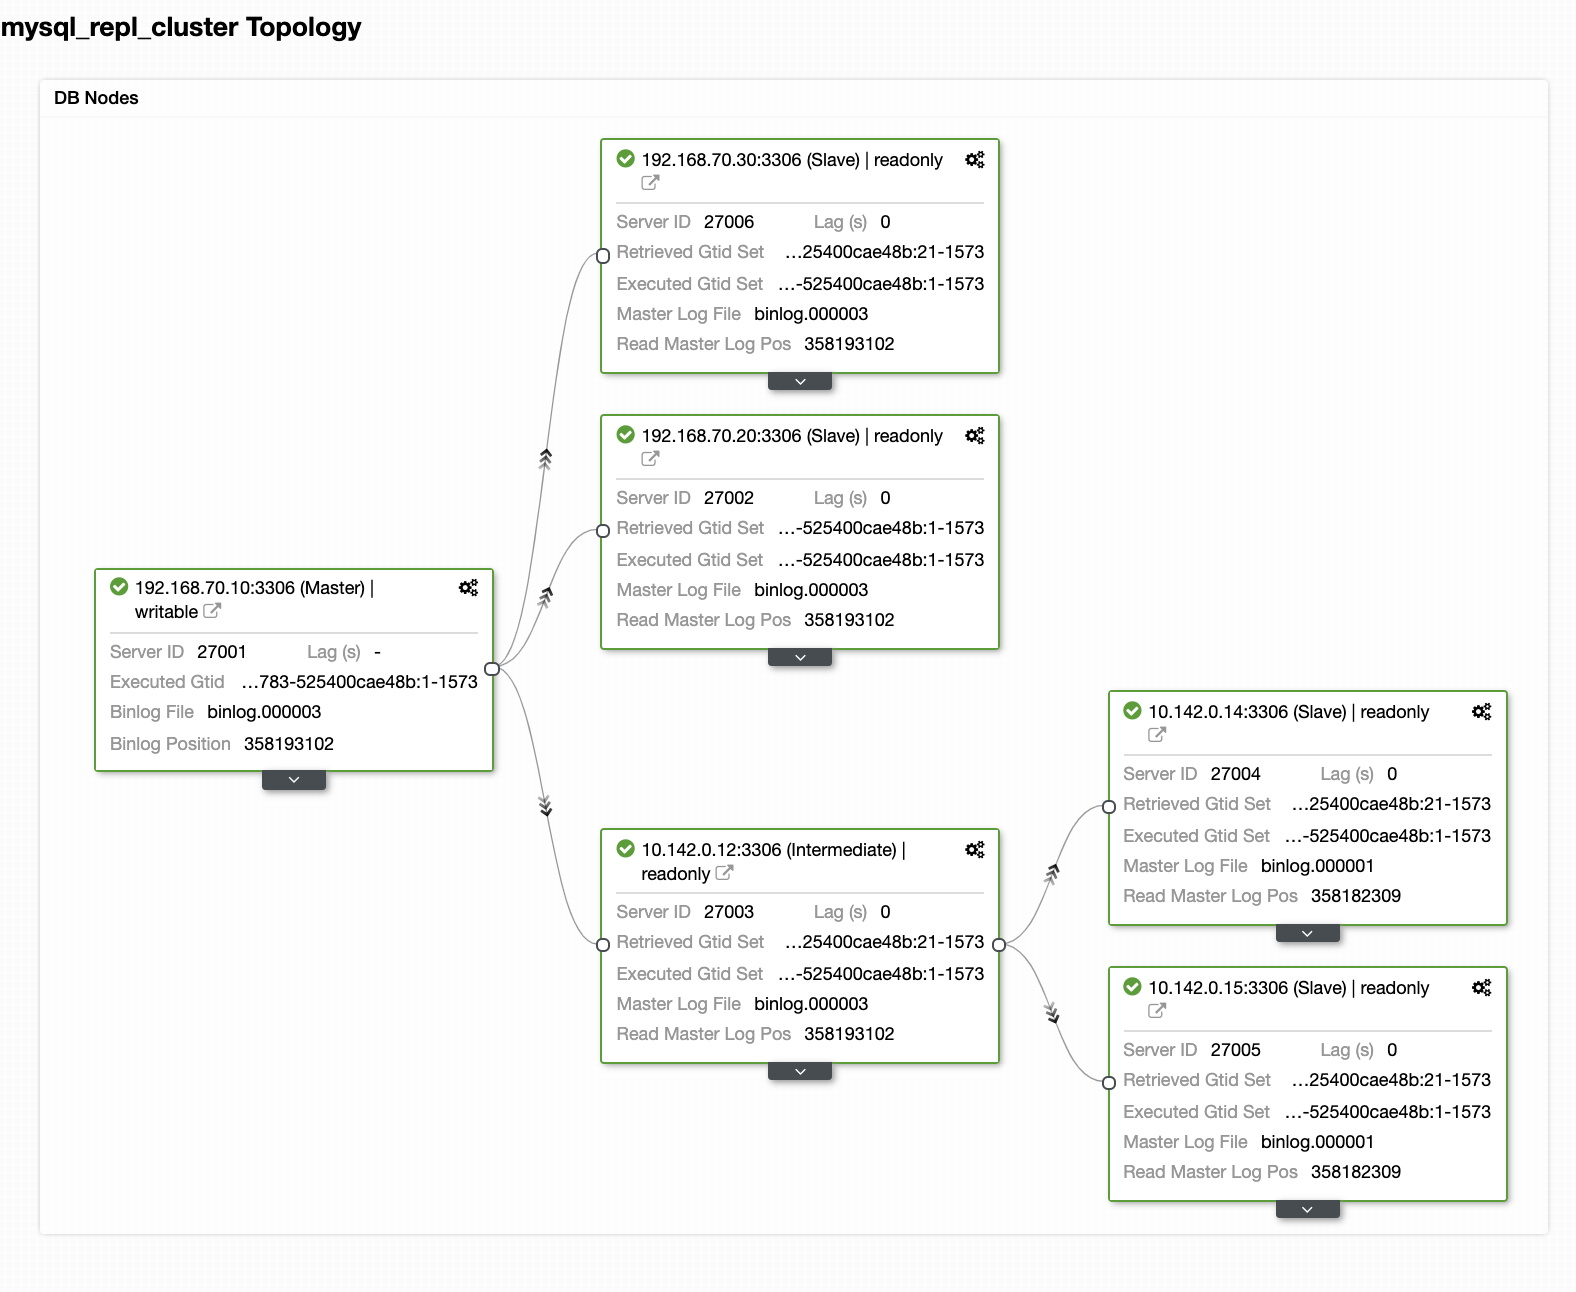
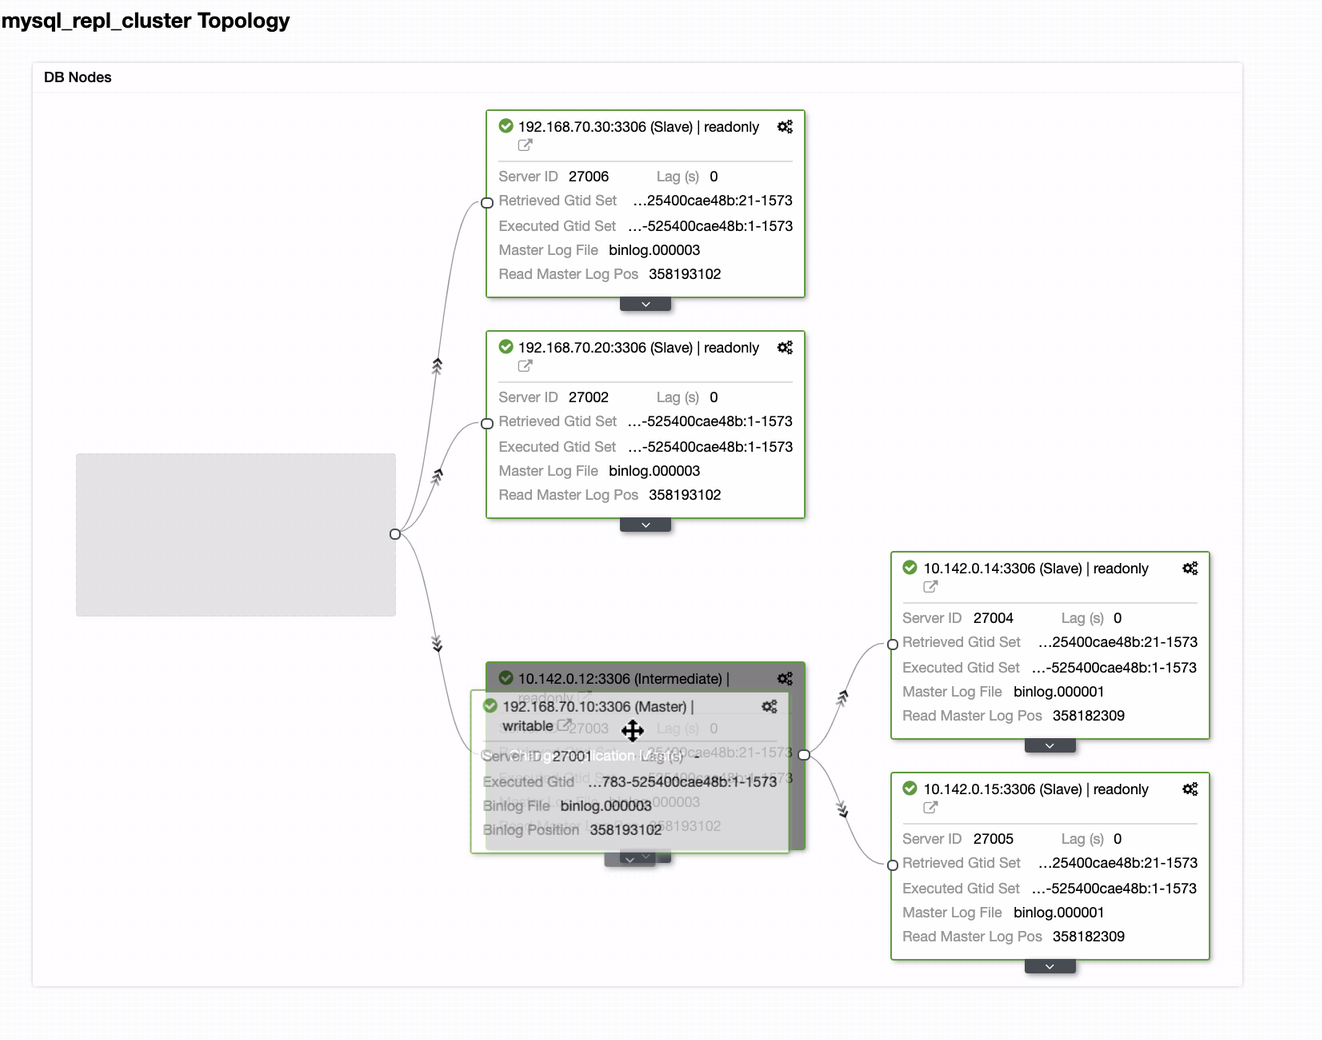
Your Final Setup of Geo-Location Database Cluster
From the last screenshot, this kind of topology might not be your ideal setup. Mostly, it has to be a multi-master setup, where your DR cluster serves as the standby cluster, where as your on-prem serves as the primary active cluster. To do this, it’s quite simple in ClusterControl. See the following screenshots to achieve this goal.
You can just drag your current master to the target master that has to be setup as a primary-standby writer just in case your on-prem in harm. In this example, we drag targeting host 10.142.0.12 (GCP compute node). The end result is shown below:
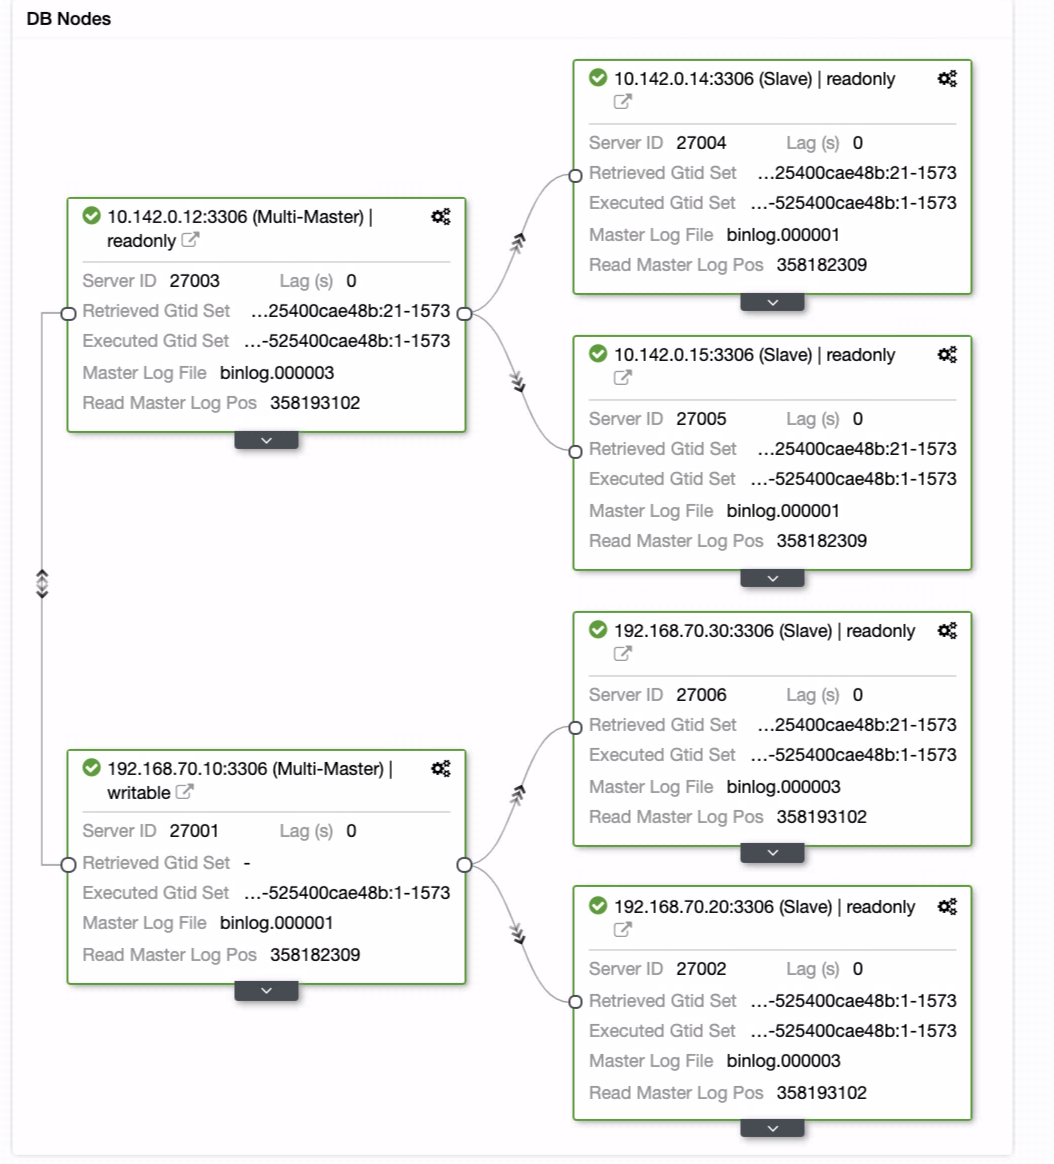
Then it achieves the desired result. Easy, and very quick to spawn your Geo-Location Database cluster using MySQL Replication.
Conclusion
Having a Geo-Location Database Cluster is not new. It has been a desired setup for companies and organizations avoiding SPOF who want resilience and a lower RPO.
The main takeaways for this setup are security, redundancy, and resilience. It also covers how feasible and efficient you can deploy your new cluster to a different geographic region. While ClusterControl can offer this, expect we can have more improvement on this sooner where you can create efficiently from a backup and spawn your new different cluster in ClusterControl, so stay tuned.


