blog
Multi-DC PostgreSQL: Setting Up a Standby Node at a Different Geo-Location Over a VPN

Previously, we wrote about Setting Up a Geo-Distributed Database Cluster Using MySQL Replication. This time, it’s about PostgreSQL. Setting up a geo-distributed cluster for PostgreSQL is not a new concept and the topology is quite common.
To achieve high availability, organizations and companies are dispersing their database nodes so that when a catastrophic event happens in a specific region (which affects your data center) you have your standby nodes available for failover.
This is a very common practice (using this type of topology) as part of your organization’s Business Continuity and Disaster Recovery plans. This type of topology removes having a single point of failure (SPOF). A common requirement especially if you have a low RPO and a higher uptime (if possible at 99.999999999%).
In this blog, I’ll take a simple implementation on how to do this using ClusterControl. ClusterControl is an agentless management and automation software for database clusters. It helps deploy, monitor, manage, and scale your database server/cluster directly from ClusterControl user interface.
The Desired Architectural Setup
The target outcome here is to deploy efficiently in a secure environment. To do this, it’s important that you need to place your established connection in between using VPN and would be more secure if you also setup your database nodes over TLS/SSL connection. For this setup in our blog, we simply deploy a node over a VPN and showcase to you how you can easily do this approach. See below for the diagram of the target setup:
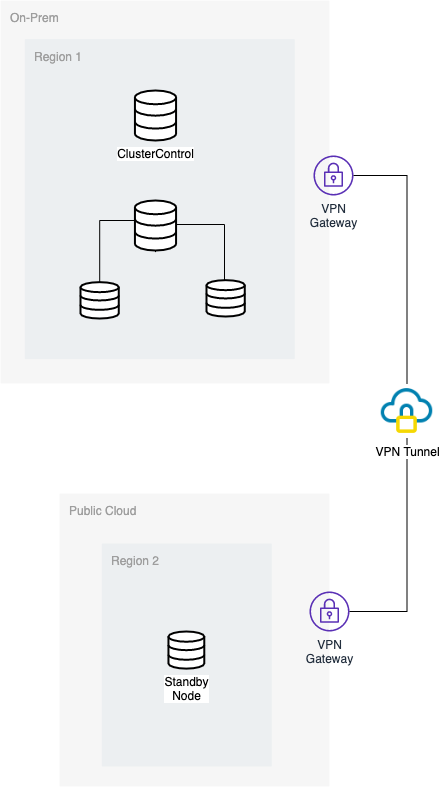
To elaborate the setup, the on-premise network shall communicate over the public cloud using a VPN tunnel and both of these networks shall have a VPN gateway so both can communicate or establish a connection. ClusterControl requires you to oversee all the nodes that have to be registered as it will collect information about your nodes for data metrics. Aside from that, it requires that your on-prem active-writer node can also reach the standby node into the other domain, which is for this blog, hosted in Google Cloud Platform (GCP).
Setting Up Your OpenVPN
OpenVPN setup is very tricky for both network domains. The gist of this is that, it must have the following consideration:
- Nodes from your on-prem shall be able to establish a connection to the target public cloud domain nodes
- Nodes from your on-prem can be able to have internet access to download packages that are required to set up. Unless you have all the repositories stored locally that are required, this can be not the case
- Nodes from your public cloud domain shall be able to establish a connection to the on-premise nodes
- Nodes from your public cloud domain can be able to have internet access to download packages that are required to set up. Unless you have all the repositories stored locally that are required, this can be not the case
OpenVPN Installation and Configuration
Step One
Install the openvpn package (and easy-rsa packages for Ubuntu/Debian distros)
$ sudo apt-get install openvpn easy-rsaFor CentOS/RHEL based OS,
$ sudo yum install openvpn wget

$ wget -O /tmp/easyrsa https://github.com/OpenVPN/easy-rsa-old/archive/2.3.3.tar.gz
Step Two
Generate your certificates such as certification authority (CA), server, and client certificates.
For Ubuntu/Debian, you ca do the following actions:
$ /usr/bin/make-cadir CAChange to CA directory
$ cd CAAt this point, you might likely to edit vars file in accordance to your needs, e.g.
export KEY_COUNTRY="SE"

export KEY_PROVINCE="SMD"

export KEY_CITY="Kalmar"

export KEY_ORG="Severalnines"

export KEY_EMAIL="[email protected]"

export KEY_CN="S9s"

export KEY_NAME="server"

export KEY_OU="Support Unit"
Then execute the vars script to define the required env variables
[ ~/CA ]$ source ./vars

NOTE: If you run ./clean-all, I will be doing a rm -rf on /CA/keys
Run a clean-up
[ ~/CA ]$ ./clean-allThen build the certificates for your CA, server, and client.
[ ~/CA ]$ ./build-ca

[ ~/CA ]$ ./build-key-server server

 $ ./build-dh 2048

[ ~/CA ]$ ./build-key client
Lastly, generate a Perfect Forward Secrecy key.
$ openvpn --genkey --secret pfs.keyIf you’re using CentOS/RHEL type distros, you can do the following:
$ tar xfz /tmp/easyrsa

$ sudo mkdir /etc/openvpn/easy-rsa

$ sudo cp -rf easy-rsa-old-2.3.3/easy-rsa/2.0/* /etc/openvpn/easy-rsa
# Ensure your RSA keys are on the right permission for security purposes
$ sudo chown vagrant /etc/openvpn/easy-rsa/

$ sudo cp /usr/share/doc/openvpn-2.4.4/sample/sample-config-files/server.conf /etc/openvpn

$ sudo mkdir /etc/openvpn/easy-rsa/keys

$ sudo nano /etc/openvpn/easy-rsa/vars

$ cd /etc/openvpn/easy-rsa
At this point, you might likely to edit vars file in accordance to your needs, e.g.
export KEY_COUNTRY="SE"

export KEY_PROVINCE="SMD"

export KEY_CITY="Kalmar"

export KEY_ORG="Severalnines"

export KEY_EMAIL="[email protected]"

export KEY_CN="S9s"

export KEY_NAME="server"

export KEY_OU="Support Unit"
Then execute the vars script to define the required env variables
$ source ./vars

NOTE: If you run ./clean-all, I will be doing a rm -rf on /CA/keys
Run a clean-up
$ ./clean-allThen build the certificates for your CA, server, and client.
$ ./build-ca

$ ./build-key-server server

$ ./build-dh 2048

$ cd /etc/openvpn/easy-rsa

$ ./build-key client

$ cp /etc/openvpn/easy-rsa/openssl-1.0.0.cnf /etc/openvpn/easy-rsa/openssl.cnf
Once you have all setup, you must take into account where your keys and certificates are in place. If you’re using systemd or service in Linux to run this, then you might place your certificates and keys to /etc/openvpn. Likely, you might have to run the following command:
sudo cp dh2048.pem ca.crt server.crt server.key /etc/openvpnStep Three
At this point, I end up with the following server and client configuration. See my configuration files accordingly,
OpenVPN Server Config
$ cat /etc/openvpn/server-ovpn.conf

port 1194

proto udp

dev tun

ca /etc/openvpn/keys/ca.crt

cert /etc/openvpn/keys/server.crt

key /etc/openvpn/keys/server.key # This file should be kept secret

dh /etc/openvpn/keys/dh2048.pem

cipher AES-256-CBC

auth SHA512

server 10.8.0.0 255.255.255.0

client-to-client

topology subnet

push "route 192.168.30.0 255.255.255.0"

#push "redirect-gateway def1 bypass-dhcp"

#push "redirect-gateway"

push "dhcp-option DNS 8.8.8.8"

push "dhcp-option DNS 8.8.4.4"

ifconfig-pool-persist ipp.txt

keepalive 10 120

comp-lzo

persist-key

persist-tun

#status openvpn-status.log

#log-append  openvpn.log

verb 3

tls-server

tls-auth /etc/openvpn/keys/pfs.key
The most important thing you need to take into account are these following options as noted as follows.
client-to-client – Very important so nodes in the VPN can ping the other nodes in different network domain. Say, ClusterControl is located in on-prem, it can ping the nodes in GCP.
push “route 192.168.30.0 255.255.255.0” – I push the routing tables so that GCP node/s connected to VPN can ping my nodes in the on-premise domain. In my GCP VPN gateway, I have the following routing tables as push “route 10.142.0.0 255.255.255.0”
#push "redirect-gateway def1 bypass-dhcp" ,#push “redirect-gateway” – Both these sections are not required since I need internet connection for both to setup my repo and dependent packages upon installation.
push "dhcp-option DNS 8.8.8.8", push “dhcp-option DNS 8.8.4.4” – Both these sections can be changed to your desired DNS if needed. This is for your desired DNS especially when you need internet connection.
OpenVPN Client Config
$ cat openvpn/client-vpn.ovpn

client

dev tun

proto udp

remote 34.73.238.239  1194

ca ca.crt

cert client.crt

key client.key

tls-version-min 1.2

tls-cipher TLS-ECDHE-RSA-WITH-AES-128-GCM-SHA256:TLS-ECDHE-ECDSA-WITH-AES-128-GCM-SHA256:TLS-ECDHE-RSA-WITH-AES-256-GCM-SHA384:TLS-DHE-RSA-WITH-AES-256-CBC-SHA256

cipher AES-256-CBC

auth SHA512

resolv-retry infinite

auth-retry none

nobind

persist-key

persist-tun

ns-cert-type server

comp-lzo

verb 3

tls-client

tls-auth pfs.key
The most important thing here is you need to be sure of your key paths, and also replace the params in this section,
remote 34.73.238.239 1194 which can be the hostname/IP address of your VPN server gateway to connect to.
Step Four
Lastly, setup proxy VPN server to have the network packets routed to the network interface on the server and allow the kernel to forward IPV4 traffic
sudo iptables -t nat -A POSTROUTING -s 10.8.0.0/24 -o eth0 -j MASQUERADE

sudo echo 1 > /proc/sys/net/ipv4/ip_forward
For more in-depth installation, I suggest you look at these posts for CentOS and on Ubuntu.
Extending Over the Cloud Efficiently
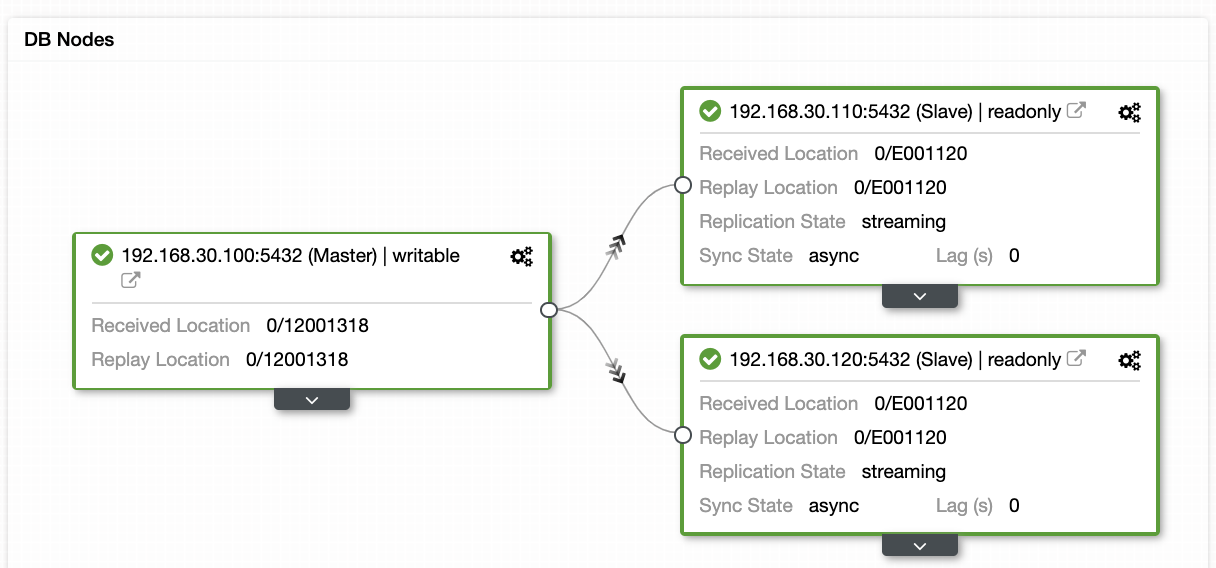
Suppose you have the following topology in your on-prem domain,
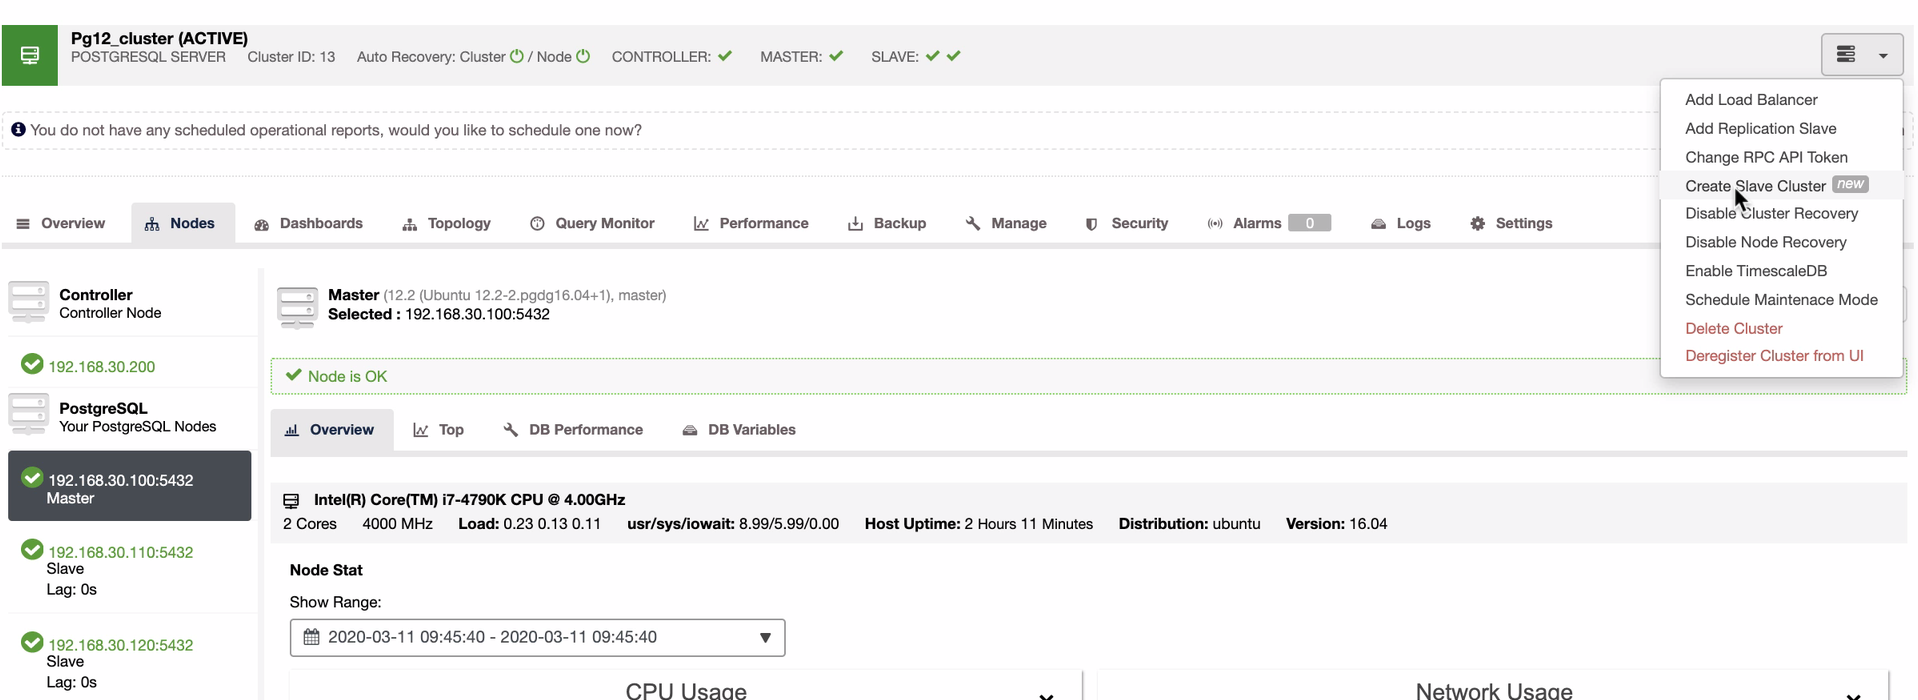
and you now want to extend your availability over another datacenter, which is GCP for this blog. Deploying using ClusterControl is very straightforward. You can do the following procedure stated below,
Step One
Create A Slave Cluster
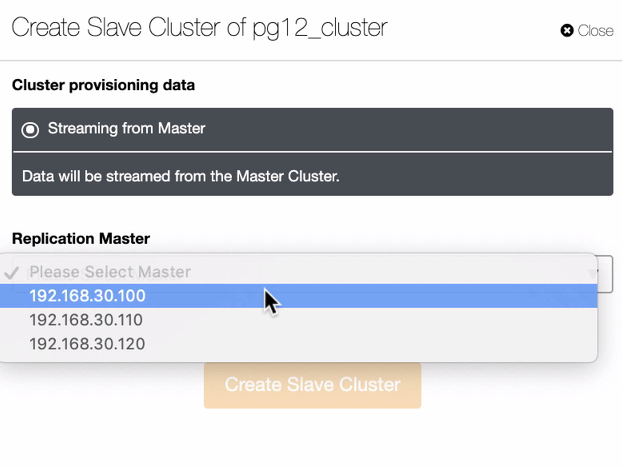
Step Two
Choose your master for replication,
Step Three
Setup the access to your public cloud environment
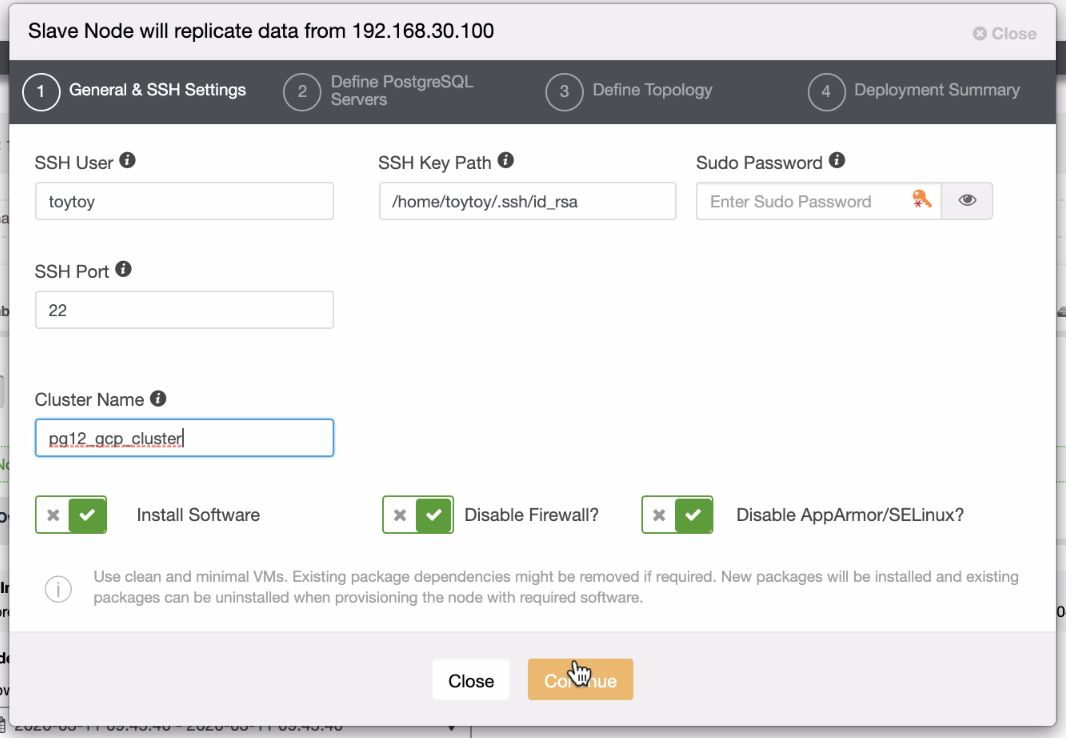
Step Four
Specify the hostname/IP of your node to be extended into your PG replication cluster,
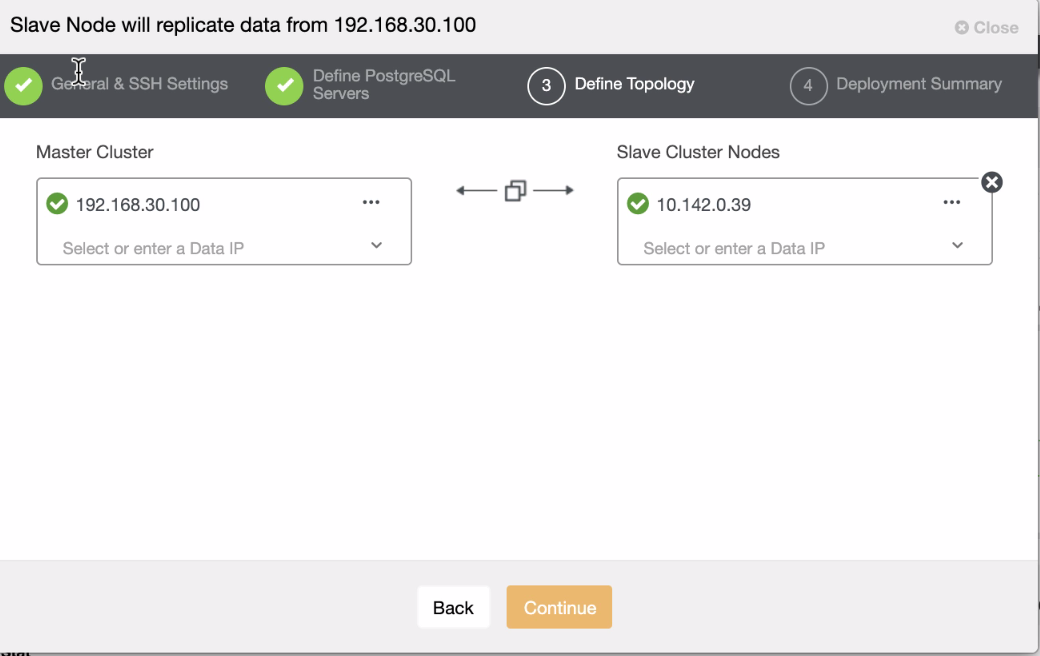
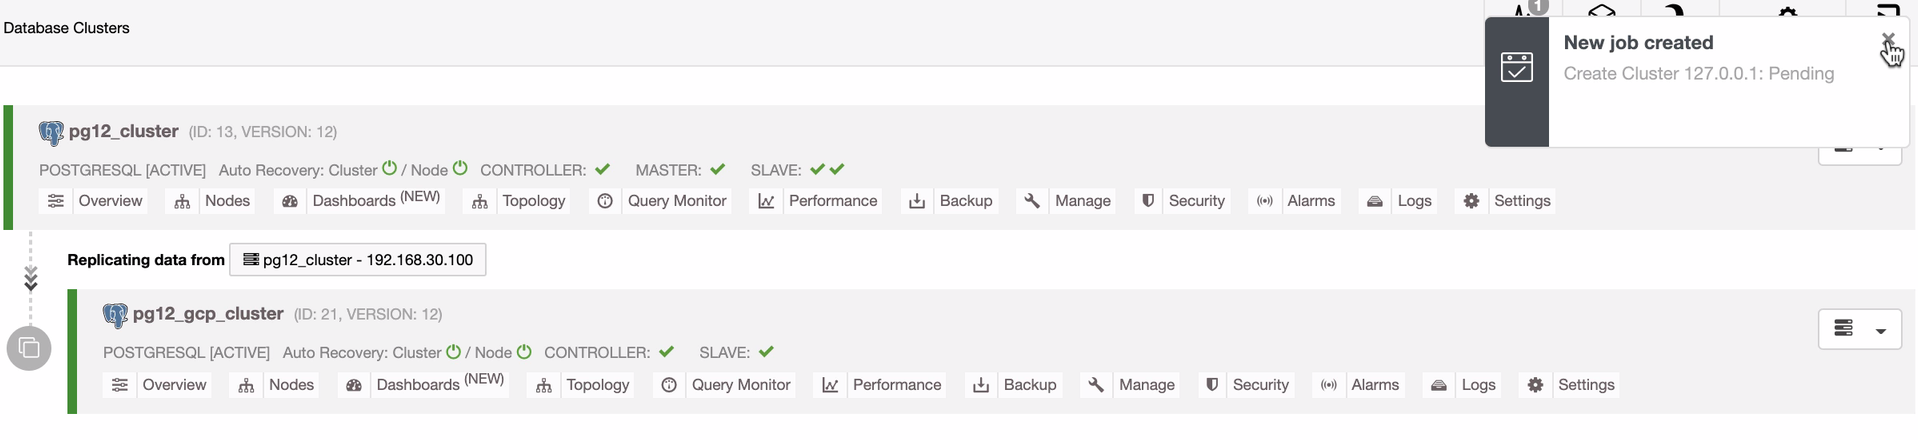
Step Five
Lastly, monitor the job activity how does ClusterControl reacts to this type of action
The outcome will show you the linkage between your on-prem and your extended datacenter, which is in this blog, our GCP PostgreSQL standby node. See below for the result
Conclusion
Setting up a geo-location standby node is not difficult, but the main issue is how secure will this be in your architectural design. Using a VPN can alleviate the main concern of the problem. Using OpenVPN is just a simple way to implement this but for heavy transactional applications, organizations are likely to invest on upscale services or hardware to deal with this setup. Also by adding a TLS/SSL can be easier than done. We’ll discuss this on how you can use TLS/SSL with PostgreSQL in our next blogs.


