blog
Introduction to Docker Swarm Mode and Multi-Host Networking

In the previous blog post, we looked into Docker’s single-host networking for MySQL containers. This time, we are going to look into the basics of multi-host networking and Docker swarm mode, a built-in orchestration tool to manage containers across multiple hosts.
Docker Engine – Swarm Mode
Running MySQL containers on multiple hosts can get a bit more complex depending on the clustering technology you choose.
Before we try to run MySQL on containers + multi-host networking, we have to understand how the image works, how much resources to allocate (disk,memory,CPU), networking (the overlay network drivers – default, flannel, weave, etc) and fault tolerance (how is the container relocated, failed over and load balanced). Because all these will impact the overall operations, uptime and performance of the database. It is recommended to use an orchestration tool to get more manageability and scalability on top of your Docker engine cluster. The latest Docker Engine (version 1.12, released on July 14th, 2016) includes swarm mode for natively managing a cluster of Docker Engines called a Swarm. Take note that Docker Engine Swarm mode and Docker Swarm are two different projects, with different installation steps despite they both work in a similar way.
Some of the noteworthy parts that you should know before entering the swarm world:
- The following ports must be opened:
- 2377 (TCP) – Cluster management
- 7946 (TCP and UDP) – Nodes communication
- 4789 (TCP and UDP) – Overlay network traffic
- There are 2 types of nodes:
- Manager – Manager nodes perform the orchestration and cluster management functions required to maintain the desired state of the swarm. Manager nodes elect a single leader to conduct orchestration tasks.
- Worker – Worker nodes receive and execute tasks dispatched from manager nodes. By default, manager nodes are also worker nodes, but you can configure managers to be manager-only nodes.
More details in the Docker Engine Swarm documentation.
In this blog, we are going to deploy application containers on top of a load-balanced Galera Cluster on 3 Docker hosts (docker1, docker2 and docker3), connected through an overlay network as a proof of concept for MySQL clustering in multiple Docker hosts environment. We will use Docker Engine Swarm mode as the orchestration tool.
“Swarming” Up
Let’s cluster our Docker nodes into a Swarm. Swarm mode requires an odd number of managers (obviously more than one) to maintain quorum for fault tolerance. So, we are going to use all the physical hosts as manager nodes. Note that by default, manager nodes are also worker nodes.
-
Firstly, initialize Swarm mode on docker1. This will make the node as manager and leader:
[root@docker1]$ docker swarm init --advertise-addr 192.168.55.111 Swarm initialized: current node (6r22rd71wi59ejaeh7gmq3rge) is now a manager. To add a worker to this swarm, run the following command: docker swarm join --token SWMTKN-1-16kit6dksvrqilgptjg5pvu0tvo5qfs8uczjq458lf9mul41hc-dzvgu0h3qngfgihz4fv0855bo 192.168.55.111:2377 To add a manager to this swarm, run 'docker swarm join-token manager' and follow the instructions. -
We are going to add two more nodes as manager. Generate the join command for other nodes to register as manager:
[docker1]$ docker swarm join-token manager To add a manager to this swarm, run the following command: docker swarm join --token SWMTKN-1-16kit6dksvrqilgptjg5pvu0tvo5qfs8uczjq458lf9mul41hc-7fd1an5iucy4poa4g1bnav0pt 192.168.55.111:2377 -
On docker2 and docker3, run the following command to register the node:
$ docker swarm join --token SWMTKN-1-16kit6dksvrqilgptjg5pvu0tvo5qfs8uczjq458lf9mul41hc-7fd1an5iucy4poa4g1bnav0pt 192.168.55.111:2377 -
Verify if all nodes are added correctly:
[docker1]$ docker node ls
ID                           HOSTNAME       STATUS  AVAILABILITY  MANAGER STATUS
5w9kycb046p9aj6yk8l365esh    docker3.local  Ready   Active        Reachable
6r22rd71wi59ejaeh7gmq3rge *  docker1.local  Ready   Active        Leader
awlh9cduvbdo58znra7uyuq1n    docker2.local  Ready   Active        Reachable
At the moment, we have docker1.local as the leader.
Overlay Network
The only way to let containers running on different hosts connect to each other is by using an overlay network. It can be thought of as a container network that is built on top of another network (in this case, the physical hosts network). Docker Swarm mode comes with a default overlay network which implements a VxLAN-based solution with the help of libnetwork and libkv. You can however choose another overlay network driver like Flannel, Calico or Weave, where extra installation steps are necessary. We are going to cover more on that later in an upcoming blog post.
In Docker Engine Swarm mode, you can create an overlay network only from a manager node and it doesn’t need an external key-value store like etcd, consul or Zookeeper.
The swarm makes the overlay network available only to nodes in the swarm that require it for a service. When you create a service that uses an overlay network, the manager node automatically extends the overlay network to nodes that run service tasks.
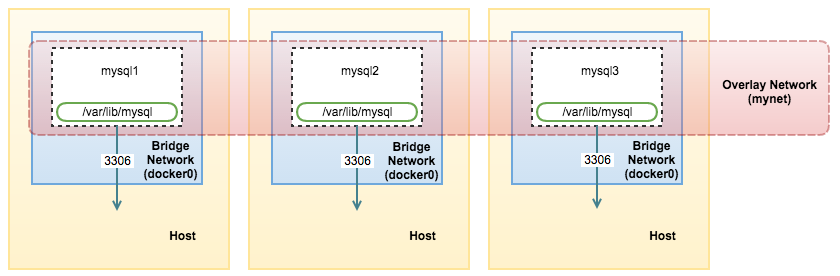
Let’s create an overlay network for our containers. We are going to deploy Percona XtraDB Cluster and application containers on separate Docker hosts to achieve fault tolerance. These containers must be running on the same overlay network so they can communicate with each other.
We are going to name our network “mynet”. You can only create this on the manager node:
[docker1]$ docker network create --driver overlay mynetLet’s see what networks we have now:
[docker1]$ docker network ls
NETWORK ID          NAME                DRIVER              SCOPE
213ec94de6c9        bridge              bridge              local
bac2a639e835        docker_gwbridge     bridge              local
5b3ba00f72c7        host                host                local
03wvlqw41e9g        ingress             overlay             swarm
9iy6k0gqs35b        mynet               overlay             swarm
12835e9e75b9        none                null                local
There are now 2 overlay networks with a Swarm scope. The “mynet” network is what we are going to use today when deploying our containers. The ingress overlay network comes by default. The swarm manager uses ingress load balancing to expose the services you want externally to the swarm.
Deployment using Services and Tasks
We are going to deploy the Galera Cluster containers through services and tasks. When you create a service, you specify which container image to use and which commands to execute inside running containers. There are two type of services:
- Replicated services – Distributes a specific number of replica tasks among the nodes based upon the scale you set in the desired state, for examples “–replicas 3”.
- Global services – One task for the service on every available node in the cluster, for example “–mode global”. If you have 7 Docker nodes in the Swarm, there will be one container on each of them.
Docker Swarm mode has a limitation in managing persistent data storage. When a node fails, the manager will get rid of the containers and create new containers in place of the old ones to meet the desired replica state. Since a container is discarded when it goes down, we would lose the corresponding data volume as well. Fortunately for Galera Cluster, the MySQL container can be automatically provisioned with state/data when joining.
Deploying Key-Value Store
The docker image that we are going to use is from Percona-Lab. This image requires the MySQL containers to access a key-value store (supports etcd only) for IP address discovery during cluster initialization and bootstrap. The containers will look for other IP addresses in etcd, if there are any, start the MySQL with a proper wsrep_cluster_address. Otherwise, the first container will start with the bootstrap address, gcomm://.
-
Let’s deploy our etcd service. We will use etcd image available here. It requires us to have a discovery URL on the number of etcd node that we are going to deploy. In this case, we are going to setup a standalone etcd container, so the command is:
[docker1]$ curl -w "n" 'https://discovery.etcd.io/new?size=1' https://discovery.etcd.io/a293d6cc552a66e68f4b5e52ef163d68 -
Then, use the generated URL as “-discovery” value when creating the service for etcd:
[docker1]$ docker service create
--name etcd
--replicas 1
--network mynet
-p 2379:2379
-p 2380:2380
-p 4001:4001
-p 7001:7001
elcolio/etcd:latest
-name etcd
-discovery=https://discovery.etcd.io/a293d6cc552a66e68f4b5e52ef163d68
At this point, Docker swarm mode will orchestrate the deployment of the container on one of the Docker hosts.
-
Retrieve the etcd service virtual IP address. We are going to use that in the next step when deploying the cluster:
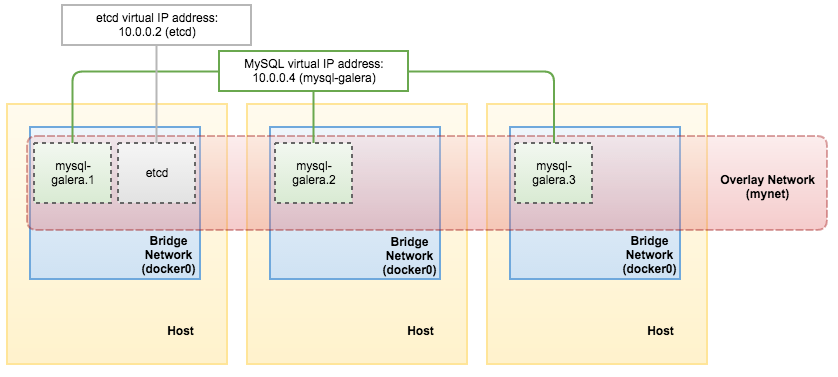
[docker1]$ docker service inspect etcd -f "{{ .Endpoint.VirtualIPs }}"
[{03wvlqw41e9go8li34z2u1t4p 10.255.0.5/16} {9iy6k0gqs35bn541pr31mly59 10.0.0.2/24}]
At this point, our architecture looks like this:

Deploying Database Cluster
-
Specify the virtual IP address for etcd in the following command to deploy Galera (Percona XtraDB Cluster) containers:
[docker1]$ docker service create --name mysql-galera --replicas 3 -p 3306:3306 --network mynet --env MYSQL_ROOT_PASSWORD=mypassword --env DISCOVERY_SERVICE=10.0.0.2:2379 --env XTRABACKUP_PASSWORD=mypassword --env CLUSTER_NAME=galera perconalab/percona-xtradb-cluster:5.6 -
It takes some time for the deployment where the image will be downloaded on the assigned worker/manager node. You can verify the status with the following command:
[docker1]$ docker service ps mysql-galera ID NAME IMAGE NODE DESIRED STATE CURRENT STATE ERROR 8wbyzwr2x5buxrhslvrlp2uy7 mysql-galera.1 perconalab/percona-xtradb-cluster:5.6 docker1.local Running Running 3 minutes ago 0xhddwx5jzgw8fxrpj2lhcqeq mysql-galera.2 perconalab/percona-xtradb-cluster:5.6 docker3.local Running Running 2 minutes ago f2ma6enkb8xi26f9mo06oj2fh mysql-galera.3 perconalab/percona-xtradb-cluster:5.6 docker2.local Running Running 2 minutes ago -
We can see that the mysql-galera service is now running. Let’s list out all services we have now:
[docker1]$ docker service ls ID NAME REPLICAS IMAGE COMMAND 1m9ygovv9zui mysql-galera 3/3 perconalab/percona-xtradb-cluster:5.6 au1w5qkez9d4 etcd 1/1 elcolio/etcd:latest -name etcd -discovery=https://discovery.etcd.io/a293d6cc552a66e68f4b5e52ef163d68 -
Swarm mode has an internal DNS component that automatically assigns each service in the swarm a DNS entry. So you use the service name to resolve to the virtual IP address:
[docker2]$ docker exec -it $(docker ps | grep etcd | awk {'print $1'}) ping mysql-galera
PING mysql-galera (10.0.0.4): 56 data bytes
64 bytes from 10.0.0.4: seq=0 ttl=64 time=0.078 ms
64 bytes from 10.0.0.4: seq=1 ttl=64 time=0.179 ms
Or, retrieve the virtual IP address through the “docker service inspect” command:
[docker1]# docker service inspect mysql-galera -f "{{ .Endpoint.VirtualIPs }}"
[{03wvlqw41e9go8li34z2u1t4p 10.255.0.7/16} {9iy6k0gqs35bn541pr31mly59 10.0.0.4/24}]
Our architecture now can be illustrated as below:
Deploying Applications
Finally, you can create the application service and pass the MySQL service name (mysql-galera) as the database host value:
[docker1]$ docker service create
--name wordpress
--replicas 2
-p 80:80
--network mynet
--env WORDPRESS_DB_HOST=mysql-galera
--env WORDPRESS_DB_USER=root
--env WORDPRESS_DB_PASSWORD=mypassword
wordpress
Once deployed, we can then retrieve the virtual IP address for wordpress service through the “docker service inspect” command:
[docker1]# docker service inspect wordpress -f "{{ .Endpoint.VirtualIPs }}"
[{p3wvtyw12e9ro8jz34t9u1t4w 10.255.0.11/16} {kpv8e0fqs95by541pr31jly48 10.0.0.8/24}]
At this point, this is what we have:

Our distributed application and database setup is now deployed by Docker containers.
Connecting to the Services and Load Balancing
At this point, the following ports are published (based on the -p flag on each “docker service create” command) on all Docker nodes in the cluster, whether or not the node is currently running the task for the service:
- etcd – 2380, 2379, 7001, 4001
- MySQL – 3306
- HTTP – 80
If we connect directly to the PublishedPort, with a simple loop, we can see that the MySQL service is load balanced among containers:
[docker1]$ while true; do mysql -uroot -pmypassword -h127.0.0.1 -P3306 -NBe 'select @@wsrep_node_address'; sleep 1; done
10.255.0.10
10.255.0.8
10.255.0.9
10.255.0.10
10.255.0.8
10.255.0.9
10.255.0.10
10.255.0.8
10.255.0.9
10.255.0.10
^C
At the moment, Swarm manager manages the load balancing internally and there is no way to configure the load balancing algorithm. We can then use external load balancers to route outside traffic to these Docker nodes. In case of any of the Docker nodes goes down, the service will be relocated to the other available nodes.
**Warning: The setup shown in this page is just a proof of concept. It may be incomplete for production use and does not cover a full single point of failure (SPOF) setup.
That’s all for now. In the next blog post, we’ll take a deeper look at Docker overlay network drivers for MySQL containers.


