blog
Full MariaDB Encryption At-Rest and In-Transit for Maximum Data Protection – Part One

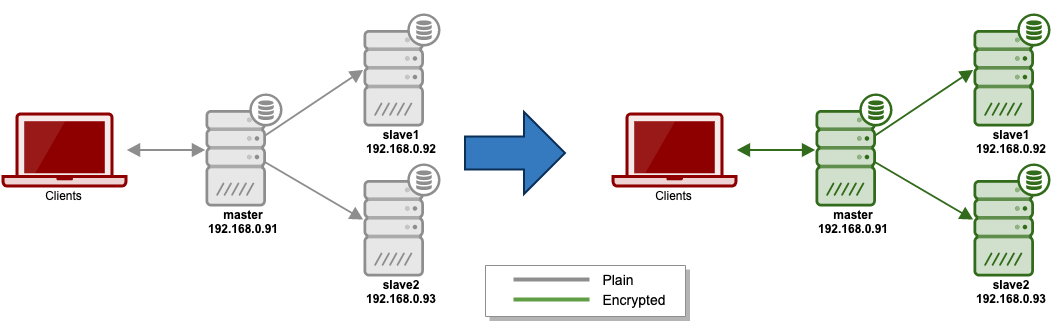
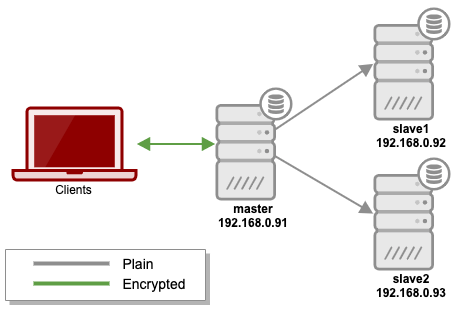
In this blog series, we are going to give you a complete walkthrough on how to configure a fully encrypted MariaDB server for at-rest and in-transit encryption, to ensure maximum protection of the data from being stolen physically or while transferring and communicating with other hosts. The basic idea is we are going to turn our “plain” deployment into a fully encrypted MariaDB replication, as simplified in the following diagram:
We are going to configure a number of encryption components:
- In-transit encryption, which consists of:
- Client-server encryption
- Replication encryption
- At-rest encryption, which consists of:
- Data file encryption
- Binary/relay log encryption.
Note that this blog post only covers in-transit encryption. We are going to cover at-rest encryption in the second part of this blog series.
This deployment walkthrough assumed that we already have an already running MariaDB replication server. If you don’t have one, you can use ClusterControl to deploy a new MariaDB replication within minutes, with fewer than 5 clicks. All servers are running on MariaDB 10.4.11 on CentOS 7 system.
In-Transit Encryption
Data can be exposed to risks both in transit and at rest and requires protection in both states. In-transit encryption protects your data if communications are intercepted while data moves between hosts through network, either from your site and the cloud provider, between services or between clients and the server.
For MySQL/MariaDB, data is in motion when a client connects to a database server, or when a slave node replicates data from a master node. MariaDB supports encrypted connections between clients and the server using the TLS (Transport Layer Security) protocol. TLS is sometimes referred to as SSL (Secure Sockets Layer) but MariaDB does not actually use the SSL protocol for encrypted connections because its encryption is weak. More details on this at MariaDB documentation page.
Client-Server Encryption
In this setup we are going to use self-signed certificates, which means we do not use external parties like Google, Comodo or any popular Certificate Authority provider out there to verify our identity. In SSL/TLS, identity verification is the first step that must be passed before the server and client exchange their certificates and keys.
MySQL provides a very handy tool called mysql_ssl_rsa_setup which takes care of the key and certificate generation automatically. Unfortunately, there is no such tool for MariaDB server yet. Therefore, we have to manually prepare and generate the SSL-related files for our MariaDB TLS needs.
The following is a list of the files that we will generate using OpenSSL tool:
- CA key – RSA private key in PEM format. Must be kept secret.
- CA certificate – X.509 certificate in PEM format. Contains public key and certificate metadata.
- Server CSR – Certificate signing request. The Common Name (CN) when filling the form is important, for example CN=mariadb-server
- Server key – RSA private key. Must be kept secret.
- Server cert – X.509 certificate signed by CA key. Contains public key and certificate metadata.
- Client CSR – Certificate signing request. Must use a different Common Name (CN) than Server’s CSR, for example CN=client1
- Client key – RSA private key. Must be kept secret.
- Client cert – X.509 certificate signed by CA key. Contains public key and certificate metadata.
First and foremost, create a directory to store our certs and keys for in-transit encryption:
$ mkdir -p /etc/mysql/transit/
$ cd /etc/mysql/transit/
Just to give you an idea why we name the directory as mentioned is because in the next part of this blog series, we will create another directory for at-rest encryption at /etc/mysql/rest.
Certificate Authority
Generate a key file for our own Certificate Authority (CA):
$ openssl genrsa 2048 > ca-key.pem
Generating RSA private key, 2048 bit long modulus
.......................+++
...............................................................................................................................................................................................................................................+++
e is 65537 (0x10001)
Generate a certificate for our own Certificate Authority (CA) based on the ca-key.pem generated before with expiration of 3650 days:
$ openssl req -new -x509 -nodes -days 3650 -key ca-key.pem -out ca.pem
You are about to be asked to enter information that will be incorporated
into your certificate request.
What you are about to enter is what is called a Distinguished Name or a DN.
There are quite a few fields but you can leave some blank
For some fields there will be a default value,
If you enter '.', the field will be left blank.
-----
Country Name (2 letter code) [XX]:SE
State or Province Name (full name) []:Stockholm
Locality Name (eg, city) [Default City]:Stockholm
Organization Name (eg, company) [Default Company Ltd]:Severalnines
Organizational Unit Name (eg, section) []:
Common Name (eg, your name or your server's hostname) []:CA
Email Address []:[email protected]
Now we should have ca-key.pem and ca.pem under this working directory.
Key and Certificate for Server
Next, generate private key for the MariaDB server:
$ openssl genrsa 2048 > server-key.pem
Generating RSA private key, 2048 bit long modulus
.............................................................................................................+++
..................................................................................................................+++
e is 65537 (0x10001)
A trusted certificate must be a certificate signed by a Certificate Authority whereby here, we are going to use our own CA because we trust the hosts in the network. Before we can create a signed certificate, we need to generate a request certificate called Certificate Signing Request (CSR).
Create a CSR for MariaDB server. We are going to call the certificate as server-req.pem. This is not the certificate that we are going to use for MariaDB server. The final certificate is the one that will be signed by our own CA private key (as shown in the next step):
$ openssl req -new -key server-key.pem -out server-req.pem
You are about to be asked to enter information that will be incorporated
into your certificate request.
What you are about to enter is what is called a Distinguished Name or a DN.
There are quite a few fields but you can leave some blank
For some fields there will be a default value,
If you enter '.', the field will be left blank.
-----
Country Name (2 letter code) [XX]:SE
State or Province Name (full name) []:Stockholm
Locality Name (eg, city) [Default City]:Stockholm
Organization Name (eg, company) [Default Company Ltd]:Severalnines
Organizational Unit Name (eg, section) []:
Common Name (eg, your name or your server's hostname) []:MariaDBServer
Email Address []:[email protected]

Please enter the following 'extra' attributes
to be sent with your certificate request
A challenge password []:
An optional company name []:
Take note on the Common Name where we specified “MariaDBServer”. This can be any name but the value must not be the same as the client certificate. Commonly, if the applications connect to the MariaDB server via FQDN or hostname (skip-name-resolve=OFF), you probably want to specify the MariaDB server’s FQDN as the Common Name.
We can then generate the final X.509 certificate (server-cert.pem) and sign the CSR (server-req.pem) with CA’s certificate (ca.pem) and CA’s private key (ca-key.pem):
$ openssl x509 -req -in server-req.pem -CA ca.pem -CAkey ca-key.pem -CAcreateserial -out server-cert.pem -days 3650 -sha256
Signature ok
subject=/C=SE/ST=Stockholm/L=Stockholm/O=Severalnines/CN=MariaDBServer/[email protected]
Getting CA Private Key
At this point, this is what we have now:
$ ls -1 /etc/mysql/transite
ca-key.pem
ca.pem
server-cert.pem
server-key.pem
server-req.pem
We only need the CA certificate (ca.pem), the server’s signed certificate (server-cert.pem) and the server’s private key (server-key.pem) for the MariaDB server. The CSR (server-req.pem) is no longer required.
Key and Certificate for the Client
Next, we need to generate key and certificate files for the MariaDB client. The MariaDB server will only accept remote connection from the client who has these certificate files.
Start by generating a 2048-bit key for the client:
$ openssl genrsa 2048 > client-key.pem
Generating RSA private key, 2048 bit long modulus
.............................................................................................................+++
..................................................................................................................+++
e is 65537 (0x10001)
Create CSR for the client called client-req.pem:
$ openssl req -new -key client-key.pem -out client-req.pem
You are about to be asked to enter information that will be incorporated
into your certificate request.
What you are about to enter is what is called a Distinguished Name or a DN.
There are quite a few fields but you can leave some blank
For some fields there will be a default value,
If you enter '.', the field will be left blank.
-----
Country Name (2 letter code) [XX]:SE
State or Province Name (full name) []:Stockholm
Locality Name (eg, city) [Default City]:Stockholm
Organization Name (eg, company) [Default Company Ltd]:Severalnines
Organizational Unit Name (eg, section) []:
Common Name (eg, your name or your server's hostname) []:Client1
Email Address []:[email protected]

Please enter the following 'extra' attributes
to be sent with your certificate request
A challenge password []:
An optional company name []:
Pay attention to the Common Name where we specify “Client1”. Specify any name that represents the client. This value must be different from the server’s Common Name. For advanced usage, you can use this Common Name to allow certain user with certificate matching this value, for example:
MariaDB> GRANT SELECT ON schema1.* TO 'client1'@'192.168.0.93' IDENTIFIED BY 's' REQUIRE SUBJECT '/CN=Client2';We can then generate the final X.509 certificate (client-cert.pem) and sign the CSR (client-req.pem) with CA’s certificate (ca.pem) and CA’s private key (ca-key.pem):
$ openssl x509 -req -in client-req.pem -CA ca.pem -CAkey ca-key.pem -CAcreateserial -out client-cert.pem -days 3650 -sha256
Signature ok
subject=/C=SE/ST=Stockholm/L=Stockholm/O=Severalnines/CN=Client1/[email protected]
Getting CA Private Key
All certificates that we need for in-transit encryption setup are generated. Verify both certificates are correctly signed by the CA:
$ openssl verify -CAfile ca.pem server-cert.pem client-cert.pem
server-cert.pem: OK
client-cert.pem: OK
Configuring SSL for MariaDB
Create a new directory on the every slave:
(slave1)$ mkdir -p /etc/mysql/transit/
(slave2)$ mkdir -p /etc/mysql/transit/
Copy the encryption files to all slaves:
$ scp -r /etc/mysql/transit/* root@slave1:/etc/mysql/transit/
$ scp -r /etc/mysql/transit/* root@slave2:/etc/mysql/transit/
Make sure the owner of the certs directory to the “mysql” user and change the permissions of all key files so it won’t be readable globally:
$ cd /etc/mysql/transit
$ chown -R mysql:mysql *
$ chmod 600 client-key.pem server-key.pem ca-key.pem
Here is what you should see when listing out files under “transit” directory:
$ ls -al /etc/mysql/transit
total 32
drwxr-xr-x. 2 root  root 172 Dec 14 04:42 .
drwxr-xr-x. 3 root  root 24 Dec 14 04:18 ..
-rw-------. 1 mysql mysql 1675 Dec 14 04:19 ca-key.pem
-rw-r--r--. 1 mysql mysql 1383 Dec 14 04:22 ca.pem
-rw-r--r--. 1 mysql mysql 1383 Dec 14 04:42 client-cert.pem
-rw-------. 1 mysql mysql 1675 Dec 14 04:42 client-key.pem
-rw-r--r--. 1 mysql mysql 1399 Dec 14 04:42 client-req.pem
-rw-r--r--. 1 mysql mysql 1391 Dec 14 04:34 server-cert.pem
-rw-------. 1 mysql mysql 1679 Dec 14 04:28 server-key.pem
-rw-r--r--. 1 mysql mysql 1415 Dec 14 04:31 server-req.pem
Next, we will enable the SSL connection for MariaDB. On every MariaDB host (master and slaves) edit the configuration file and add the following lines under [mysqld] section:
ssl-ca=/etc/mysql/transit/ca.pem
ssl-cert=/etc/mysql/transit/server-cert.pem
ssl-key=/etc/mysql/transit/server-key.pem
Restart MariaDB server one node at a time, starting from slaves and finally on the master:
(slave1)$ systemctl restart mariadb
(slave2)$ systemctl restart mariadb
(master)$ systemctl restart mariadb
After restarted, MariaDB is now capable of accepting plain connections by connecting to it without any SSL-related parameters or with encrypted connections, when you specify SSL-related parameter in the connection string.
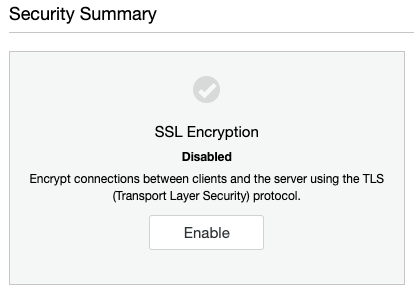
For ClusterControl users, you can enable client-server encryption a matter of clicks. Just go to ClusterControl -> Security -> SSL Encryption -> Enable -> Create Certificate -> Certificate Expiration -> Enable SSL:
ClusterControl will generate the required keys, X.509 certificate and CA certificate and set up SSL encryption for client-server connections for all the nodes in the cluster. For MySQL/MariaDB replication, the SSL files will be located under /etc/ssl/replication/cluster_X, where X is the cluster ID on every database node. The same certificates will be used on all nodes and the existing ones might be overwritten. The nodes must be restarted individually after this job completes. We recommend that you first restart a replication slave and verify that the SSL settings work.
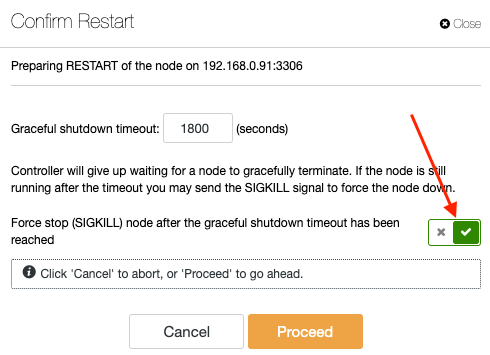
To restart every node, go to ClusterControl -> Nodes -> Node Actions -> Restart Node. Do restart one node at a time, starting with the slaves. The last node should be the master node with force stop flag enabled:
You can tell if a node is able to handle client-server encryption by looking at the green lock icon right next to the database node in the Overview grid:
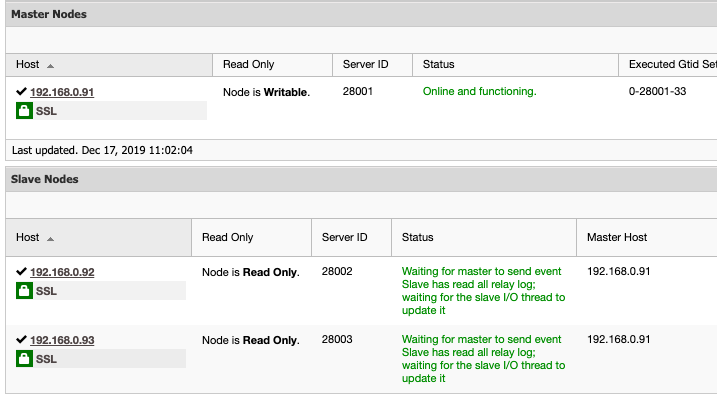
At this point, our cluster is now ready to accept SSL connection from MySQL users.
Connecting via Encrypted Connection
The MariaDB client requires all client-related SSL files that we have generated inside the server. Copy the generated client certificate, CA certificate and client key to the client host:
$ cd /etc/mysql/transit
$ scp client-cert.pem client-key.pem ca.pem root@client-host:~
**ClusterControl generates the client SSL files under /etc/ssl/replication/cluster_X/on every database node, where X is the cluster ID.
Create a database user that requires SSL on the master:
MariaDB> CREATE SCHEMA sbtest;
MariaDB> CREATE USER sbtest@'%' IDENTIFIED BY 'mysecr3t' REQUIRE SSL;
MariaDB> GRANT ALL PRIVILEGES ON sbtest.* to sbtest@'%';
From the client host, connect to the MariaDB server with SSL-related parameters. We can verify the connection status by using “STATUS” statement:
(client)$ mysql -usbtest -p -h192.168.0.91 -P3306 --ssl-cert client-cert.pem --ssl-key client-key.pem --ssl-ca ca.pem -e 'status'
...
Current user: [email protected]
SSL: Cipher in use is DHE-RSA-AES256-GCM-SHA384
...
Pay attention to the SSL line where the cipher is used for the encryption. This means the client is successfully connected to the MariaDB server via encrypted connection.
At this point, we have encrypted the client-server connection to the MariaDB server, as represented by the green two-headed arrow in the following diagram:
In the next part, we are going to encrypt replication connections between nodes.
Replication Encryption
Setting up encrypted connections for replication is similar to doing so for client/server connections. We can use the same client certificates, key and CA certificate to let the replication user access the master’s server via encryption channel. This will indirectly enable encryption between nodes when slave IO thread pulls replication events from the master.
Let’s configure this on one slave at a time. For the first slave, 192.168.0.92, add the following line under [client] section inside MariaDB configuration file:
[client]
ssl-ca=/etc/mysql/transit/ca.pem
ssl-cert=/etc/mysql/transit/client-cert.pem
ssl-key=/etc/mysql/transit/client-key.pem
Stop the replication thread on the slave:
(slave)MariaDB> STOP SLAVE;On the master, alter the existing replication user to force it to connect using SSL:
(master)MariaDB> ALTER USER [email protected] REQUIRE SSL;On the slave, test the connectivity to the master, 192.168.0.91 via mysql command line with –ssl flag:
(slave)MariaDB> mysql -urpl_user -p -h192.168.0.91 -P 3306 --ssl -e 'status'
...
Current user: [email protected]
SSL: Cipher in use is DHE-RSA-AES256-GCM-SHA384
...
Make sure you can get connected to the master host without error. Then, on the slave, specify the CHANGE MASTER statement with SSL parameters as below:
(slave)MariaDB> CHANGE MASTER TO MASTER_SSL = 1, MASTER_SSL_CA = '/etc/mysql/transit/ca.pem', MASTER_SSL_CERT = '/etc/mysql/transit/client-cert.pem', MASTER_SSL_KEY = '/etc/mysql/transit/client-key.pem';Start the replication slave:
(slave)MariaDB> START SLAVE;Verify that the replication is running okay with related SSL parameters:
MariaDB> SHOW SLAVE STATUSG
...
              Slave_IO_Running: Yes
             Slave_SQL_Running: Yes
            Master_SSL_Allowed: Yes
            Master_SSL_CA_File: /etc/mysql/transit/ca.pem
               Master_SSL_Cert: /etc/mysql/transit/client-cert.pem
                Master_SSL_Key: /etc/mysql/transit/client-key.pem
...
The slave is now replicating from the master securely via TLS encryption.
Repeat all of the above steps on the remaining slave, 192.168.0.93. The only difference is the alter user statement to be executed on the master where we have to change to its respective host:
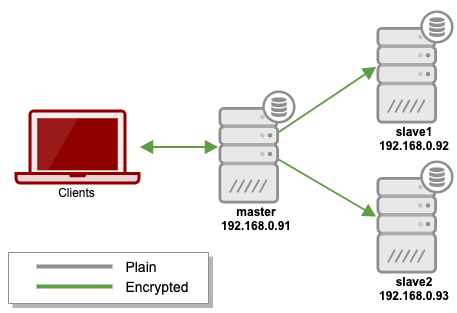
(master)MariaDB> ALTER USER [email protected] REQUIRE SSL;At this point we have completed in-transit encryption as illustrated by the green lines from master to slaves in the following diagram:
You can verify the encryption connection by looking at the tcpdump output for interface eth1 on the slave. The following is an example of standard replication without encryption:
(plain-slave)$ tcpdump -i eth1 -s 0 -l -w - 'src port 3306 or dst port 3306' | strings
tcpdump: listening on eth1, link-type EN10MB (Ethernet), capture size 262144 bytes
H"-'
binlog.000008Ulw
binlog.000008Ulw
sbtest
sbtest
create table t1 (id INT AUTO_INCREMENT PRIMARY KEY, data VARCHAR(255))
binlog.000008
sbtest
BEGIN3
sbtest
test data3
Ok*Z
binlog.000008*Z

^C11 packets captured
11 packets received by filter
0 packets dropped by kernel
We can clearly see the text as read by the slave from the master. While on an encrypted connection, you should see gibberish characters like below:
(encrypted-slave)$ tcpdump -i eth1 -s 0 -l -w - 'src port 3306 or dst port 3306' | strings
tcpdump: listening on eth1, link-type EN10MB (Ethernet), capture size 262144 bytes
:|f^yb#
O5~_
@#PFh
k)]O
jtk3c
@NjN9_a
!-@
NrF
?7&Y

^C6 packets captured
6 packets received by filter
0 packets dropped by kernel
Conclusion
In the next part of this blog series, we are going to look into completing our fully encrypted setup with MariaDB at-rest encryption. Stay tuned!


