blog
Building a MySQL or MariaDB Database Cold Standby on Amazon AWS

High Availability is a must these days as most organizations can’t allow itself to lose its data. High Availability, however, always comes with a price tag (which can vary a lot.) Any setups which require nearly-immediate action would typically require an expensive environment which would mirror precisely the production setup. But, there are other options that can be less expensive. These may not allow for an immediate switch to a disaster recovery cluster, but they will still allow for business continuity (and won’t drain the budget.)
An example of this type of setup is a “cold-standby” DR environment. It allows you to reduce your expenses while still being able to spin up a new environment in an external location should the disaster strikes. In this blog post we will demonstrate how to create such a setup.
The Initial Setup
Let’s assume we have a fairly standard Master / Slave MySQL Replication setup in our own datacenter. It is highly available setup with ProxySQL and Keepalived for Virtual IP handling. The main risk is that the datacenter will become unavailable. It is a small DC, maybe it’s only one ISP with no BGP in place. And in this situation, we will assume that if it would take hours to bring back the database that it’s ok as long as it’s possible to bring it back.
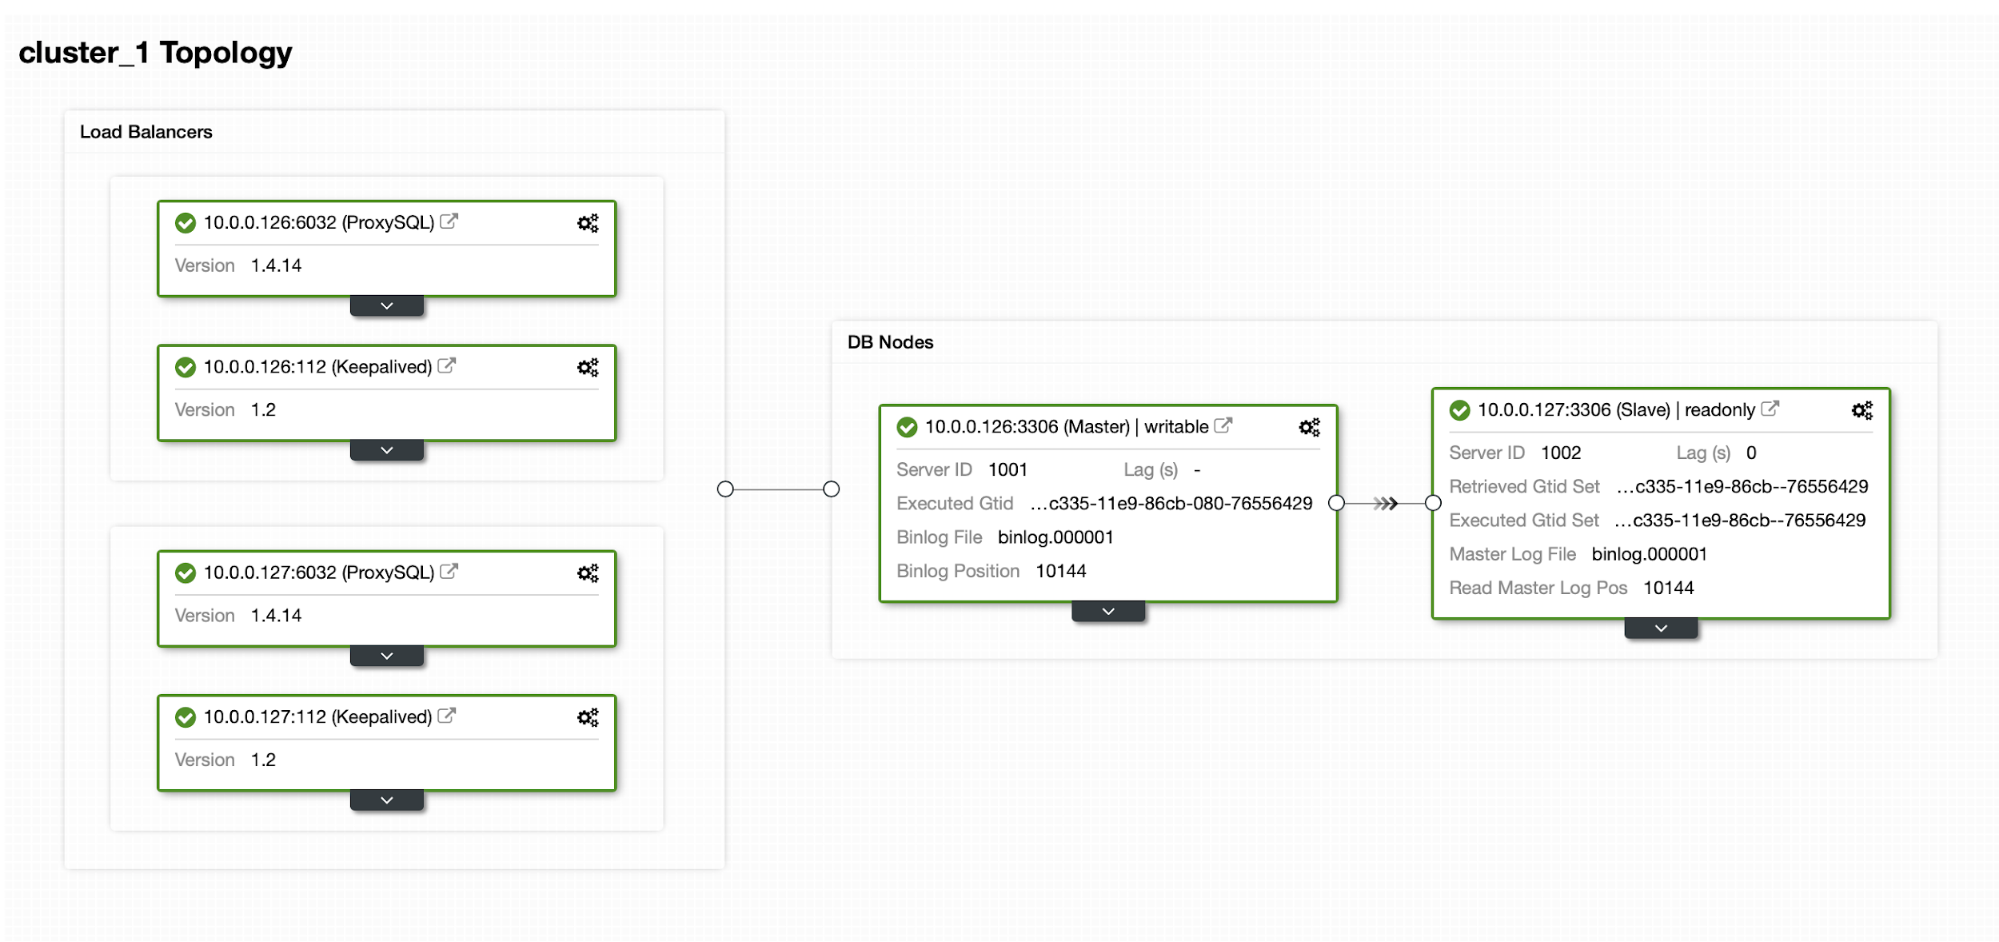
To deploy this cluster we used ClusterControl, which you can download for free. For our DR environment we will use EC2 (but it could also be any other cloud provider.)
The Challenge
The main issue we have to deal with is how should we ensure we do have a fresh data to restore our database in the disaster recovery environment? Of course, ideally we would have a replication slave up and running in EC2… but then we have to pay for it. If we are tight on the budget, we could try to get around that with backups. This is not the perfect solution as, in the worst case scenario, we will never be able to recover all the data.
By “the worst case scenario” we mean a situation in which we won’t have access to the original database servers. If we will be able to reach them, data would not have been lost.
The Solution
We are going to use ClusterControl to setup a backup schedule to reduce the chance that the data would be lost. We will also use the ClusterControl feature to upload backups to the cloud. If the datacenter will not be available, we can hope that the cloud provider we have chosen will be reachable.
Setting up the Backup Schedule in ClusterControl
First, we will have to configure ClusterControl with our cloud credentials.
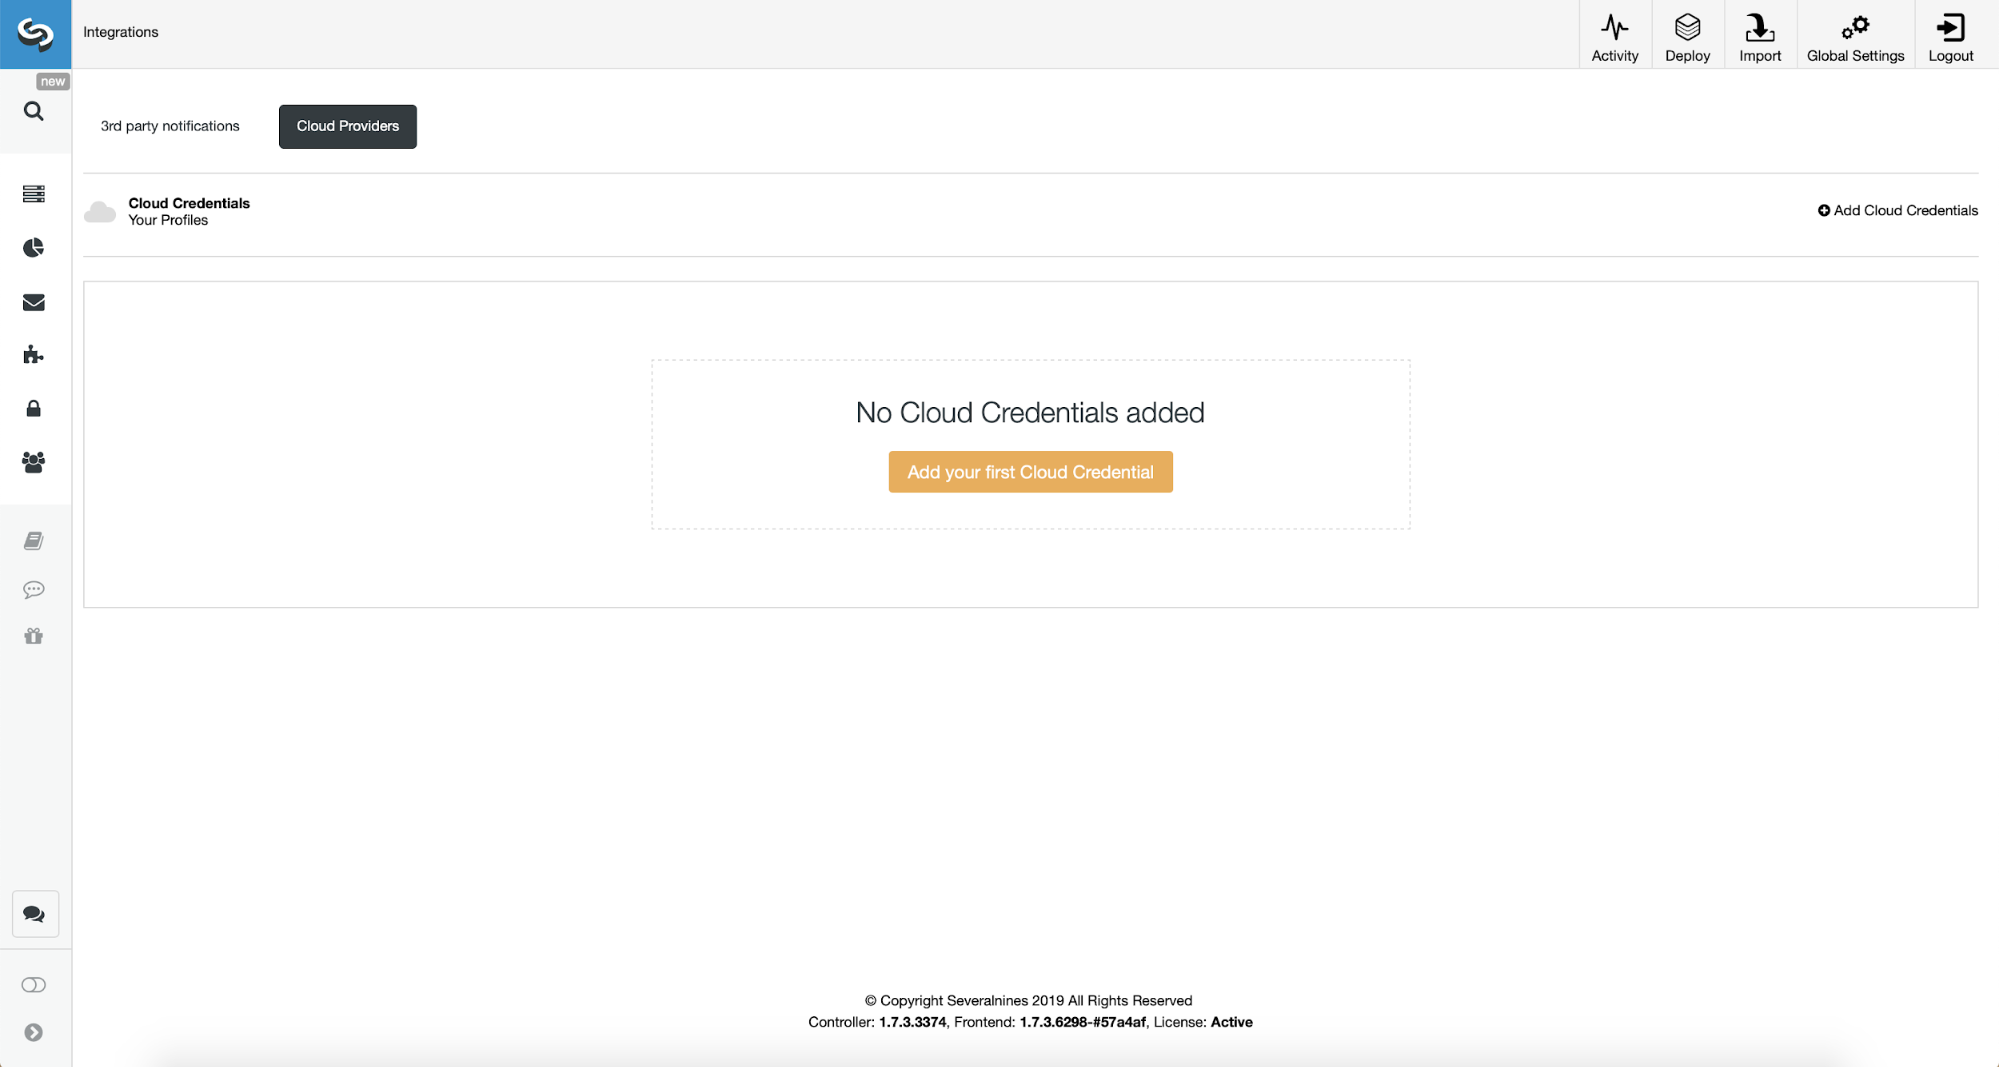
We can do this by using “Integrations” from the left side menu.
You can pick Amazon Web Services, Google Cloud or Microsoft Azure as the cloud you want ClusterControl to upload backups to. We will go ahead with AWS where ClusterControl will use S3 to store backups.
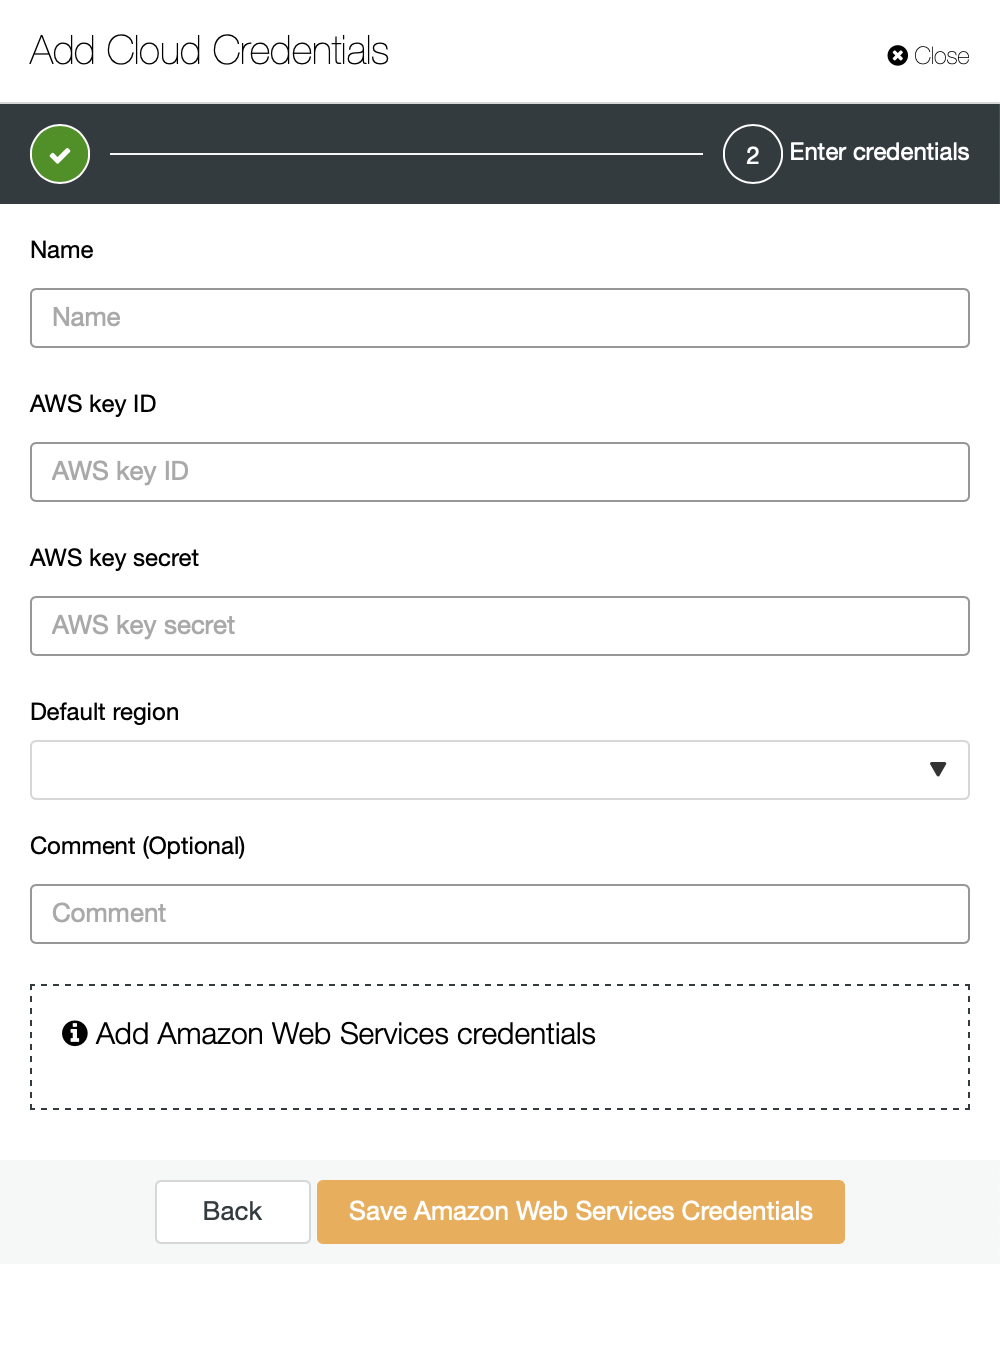
We then need to pass key ID and key secret, pick the default region and pick a name for this set of credentials.
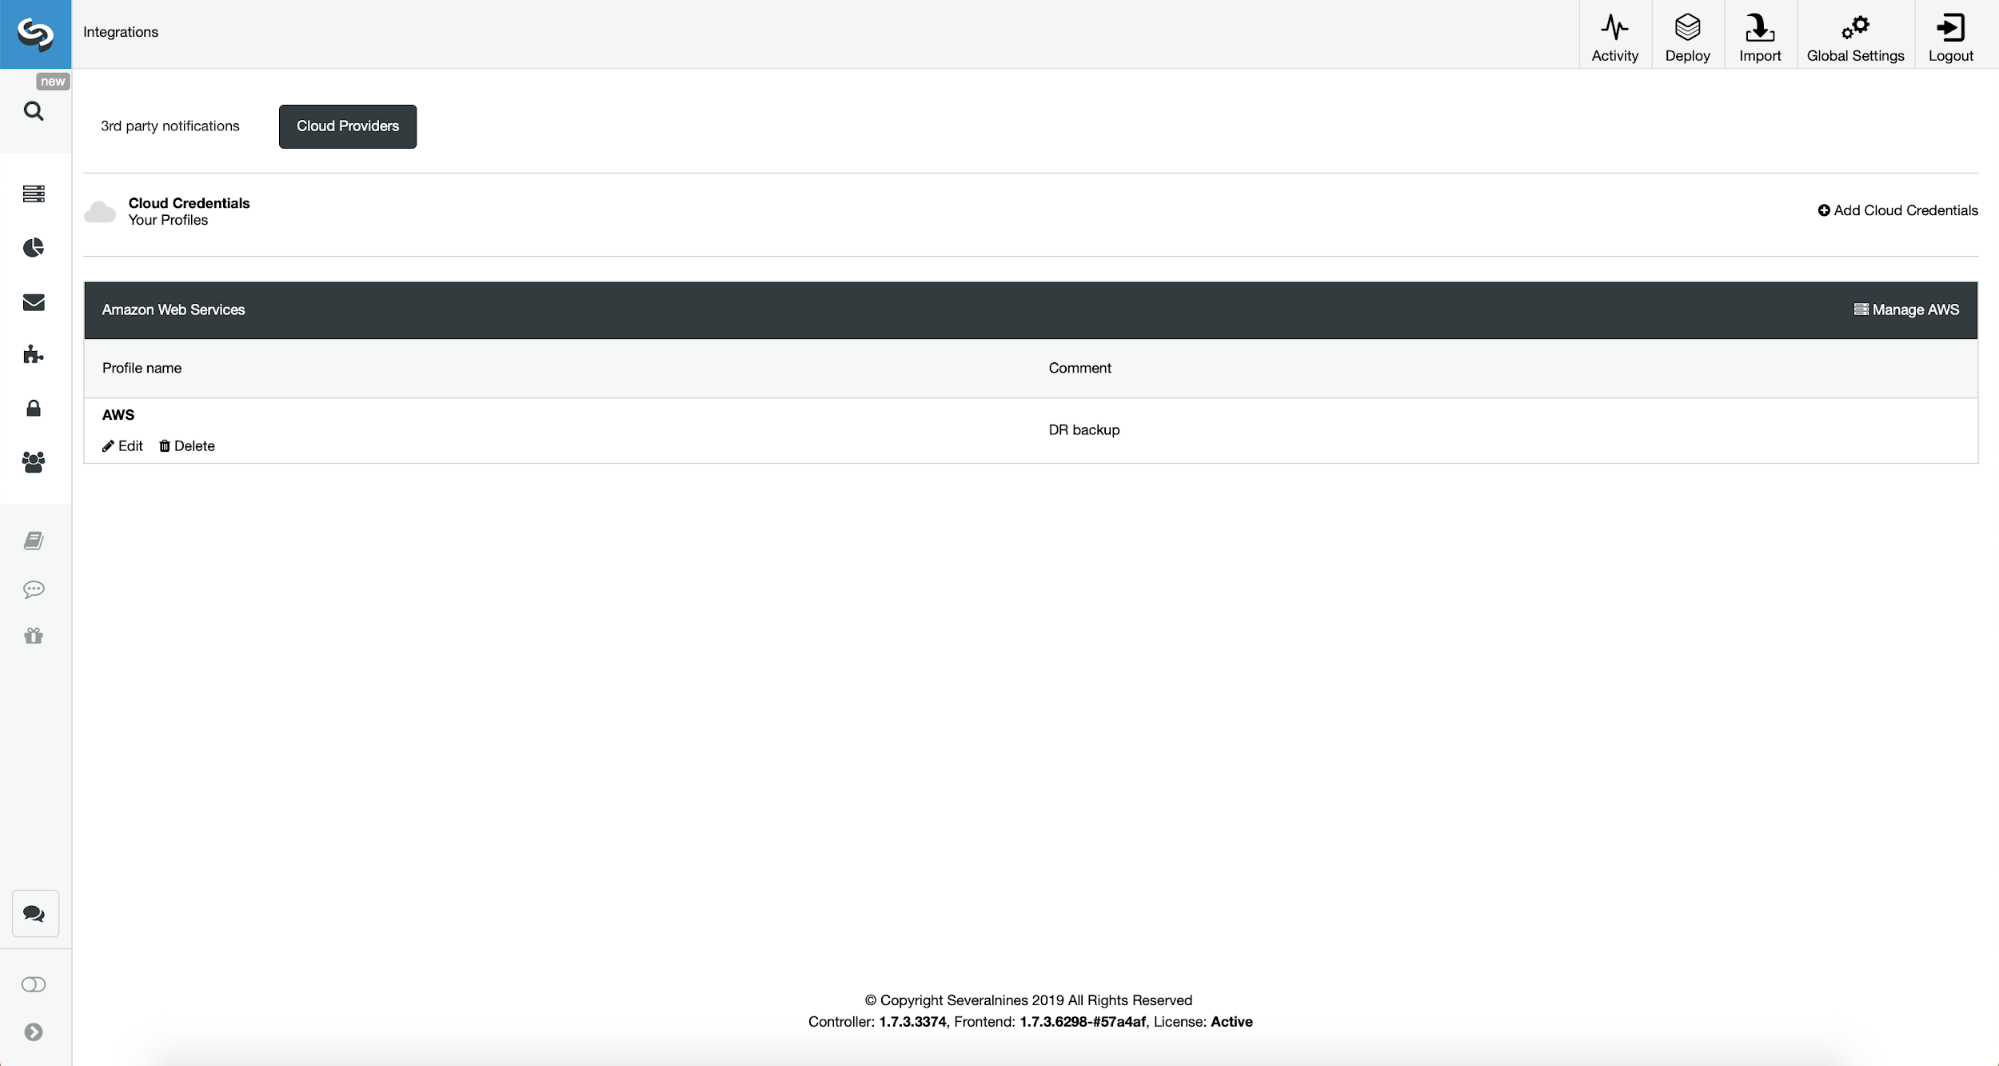
Once this is done, we can see the credentials we just added listed in ClusterControl.
Now, we shall proceed with setting up backup schedule.
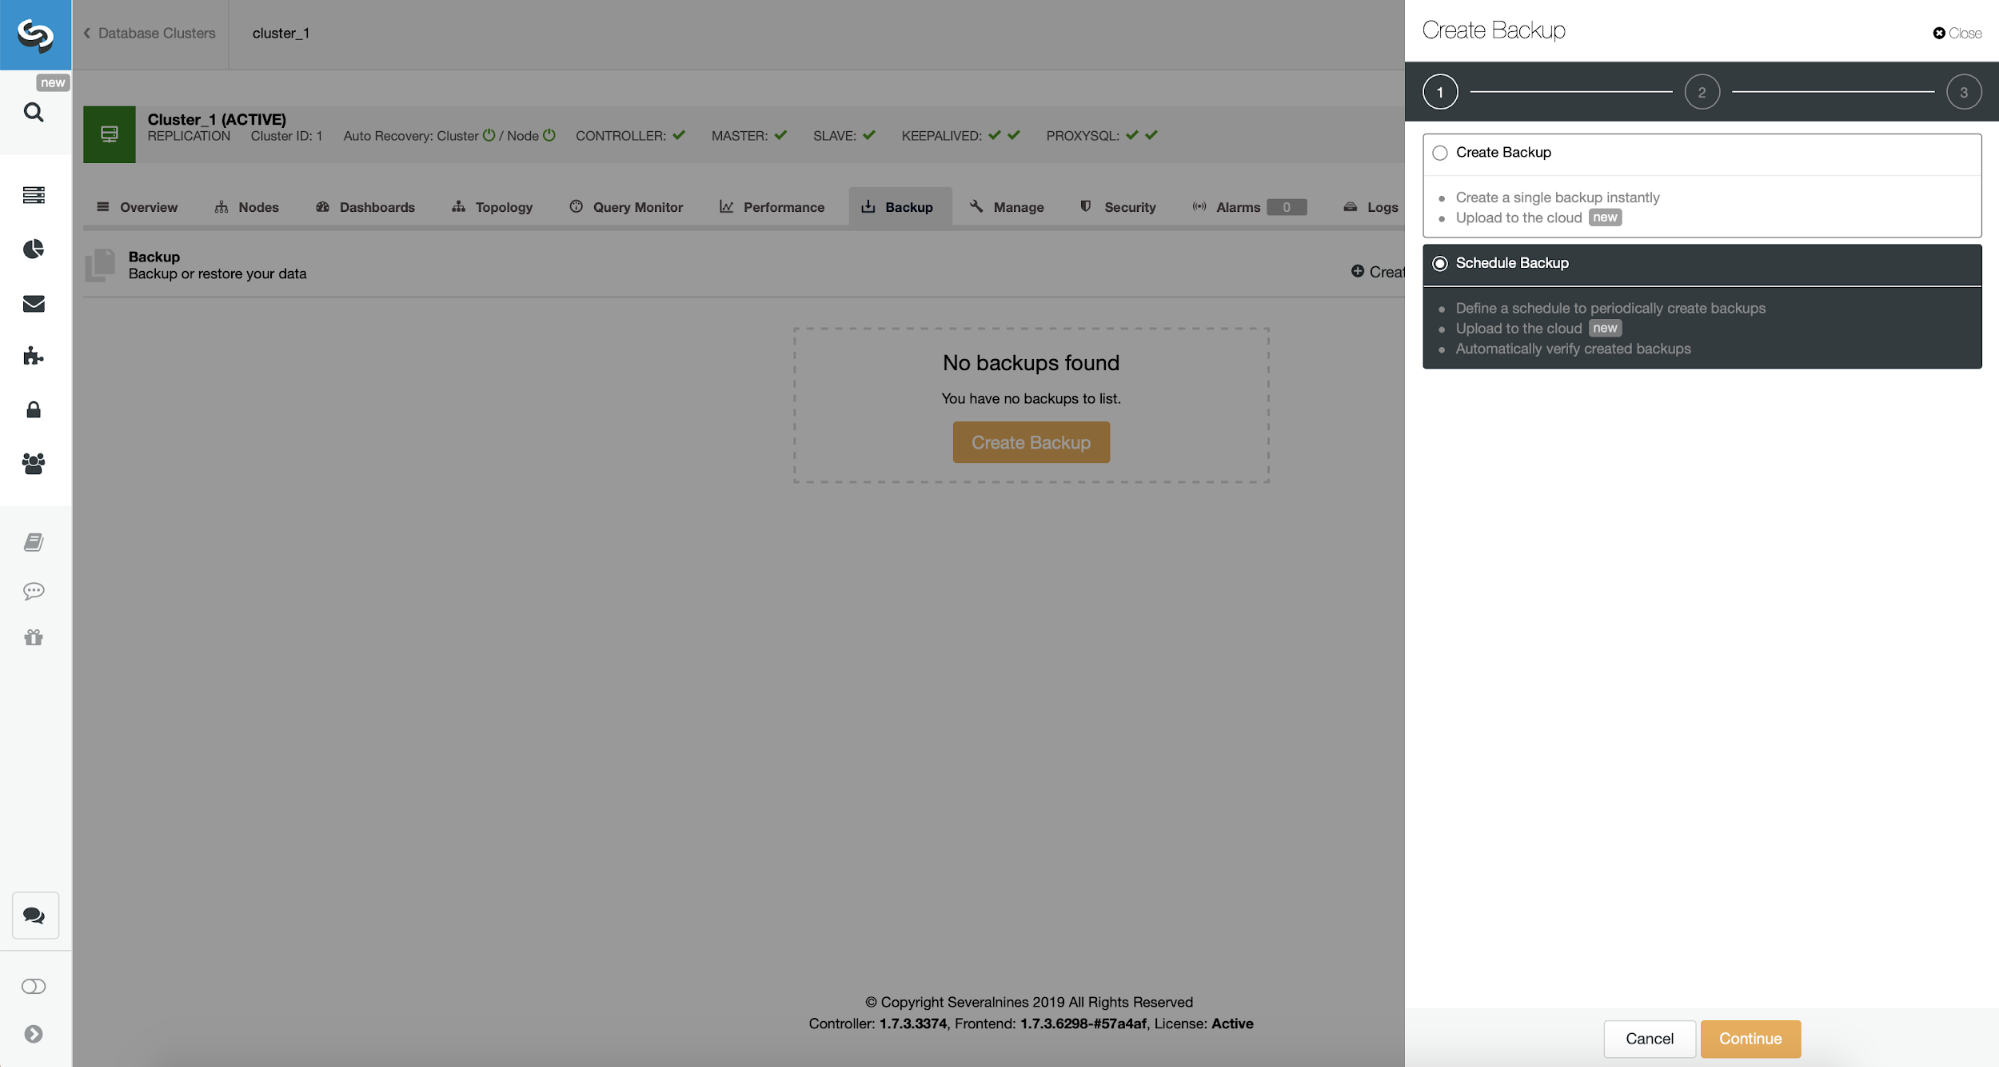
ClusterControl allows you to either create backup immediately or schedule it. We’ll go with the second option. What we want is to create a following schedule:
- Full backup created once per day
- Incremental backups created every 10 minutes.
The idea here is like follows. Worst case scenario we will lose only 10 minutes of the traffic. If the datacenter will become unavailable from outside but it would work internally, we could try to avoid any data loss by waiting 10 minutes, copying the latest incremental backup on some laptop and then we can manually send it towards our DR database using even phone tethering and a cellular connection to go around ISP failure. If we won’t be able to get the data out of the old datacenter for some time, this is intended to minimize the amount of transactions we will have to manually merge into DR database.
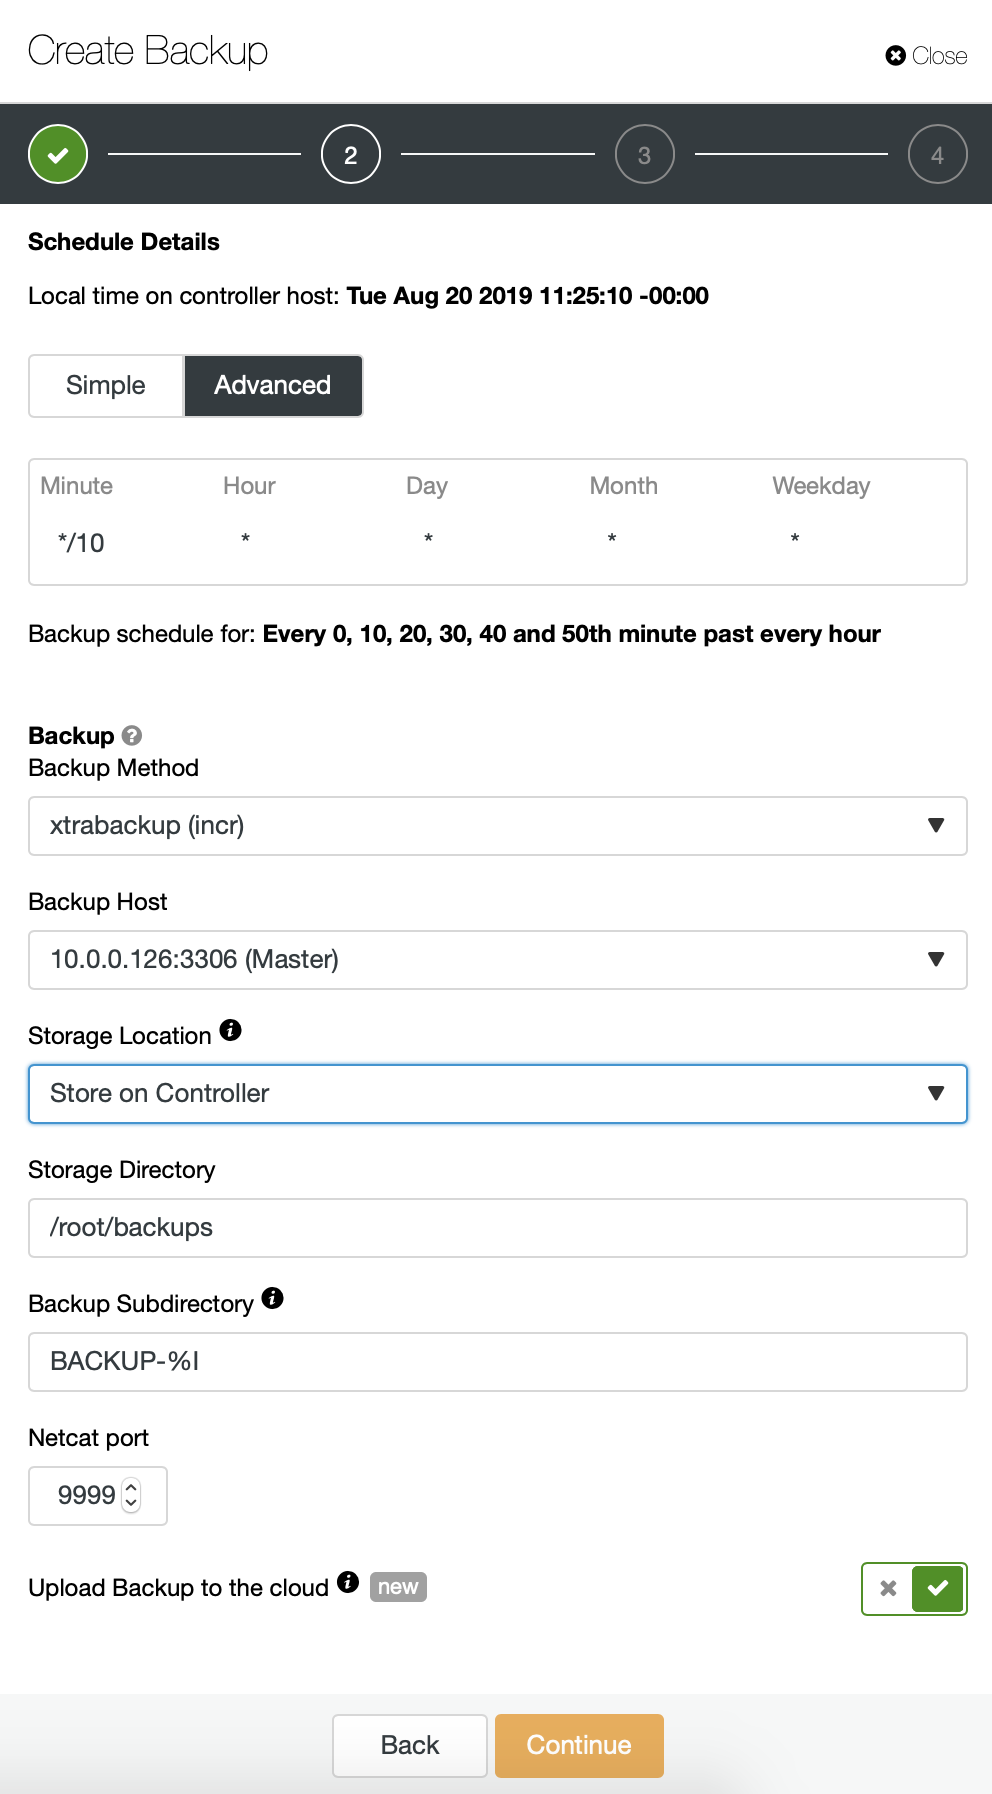
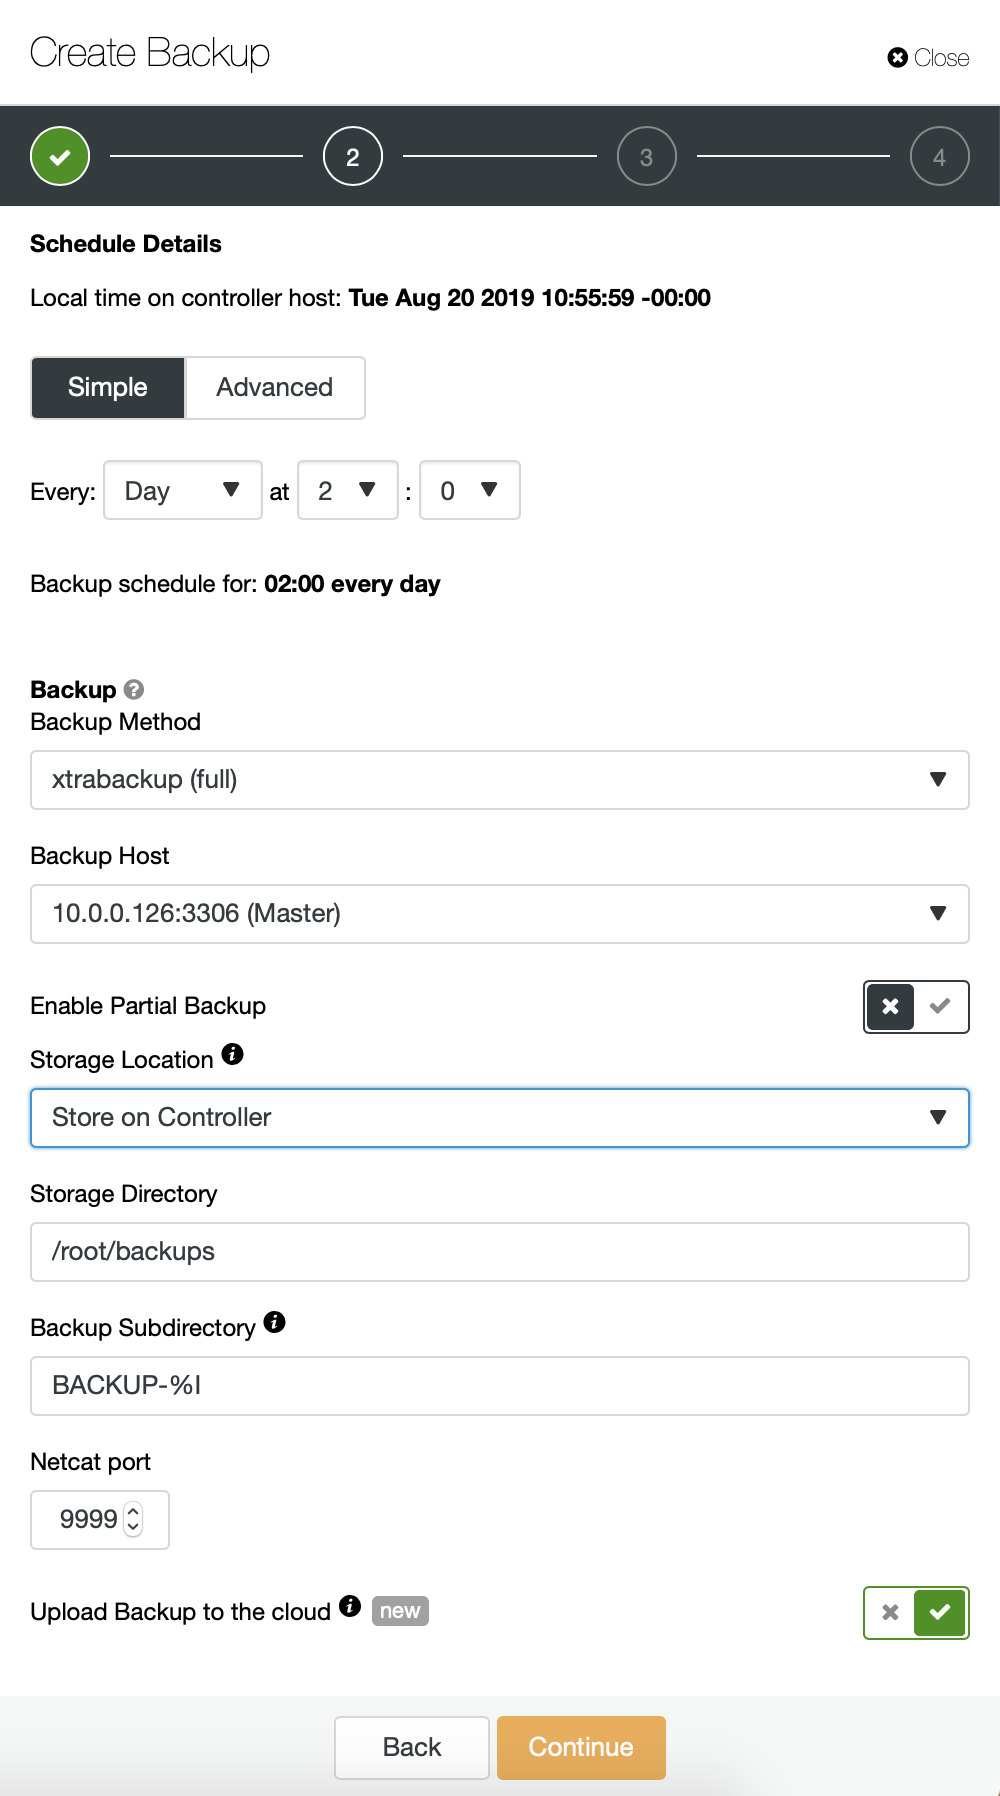
We start with full backup which will happen daily at 2:00 am. We will use the master to take the backup from, we will store it on controller under /root/backups/ directory. We will also enable “Upload Backup to the cloud” option.
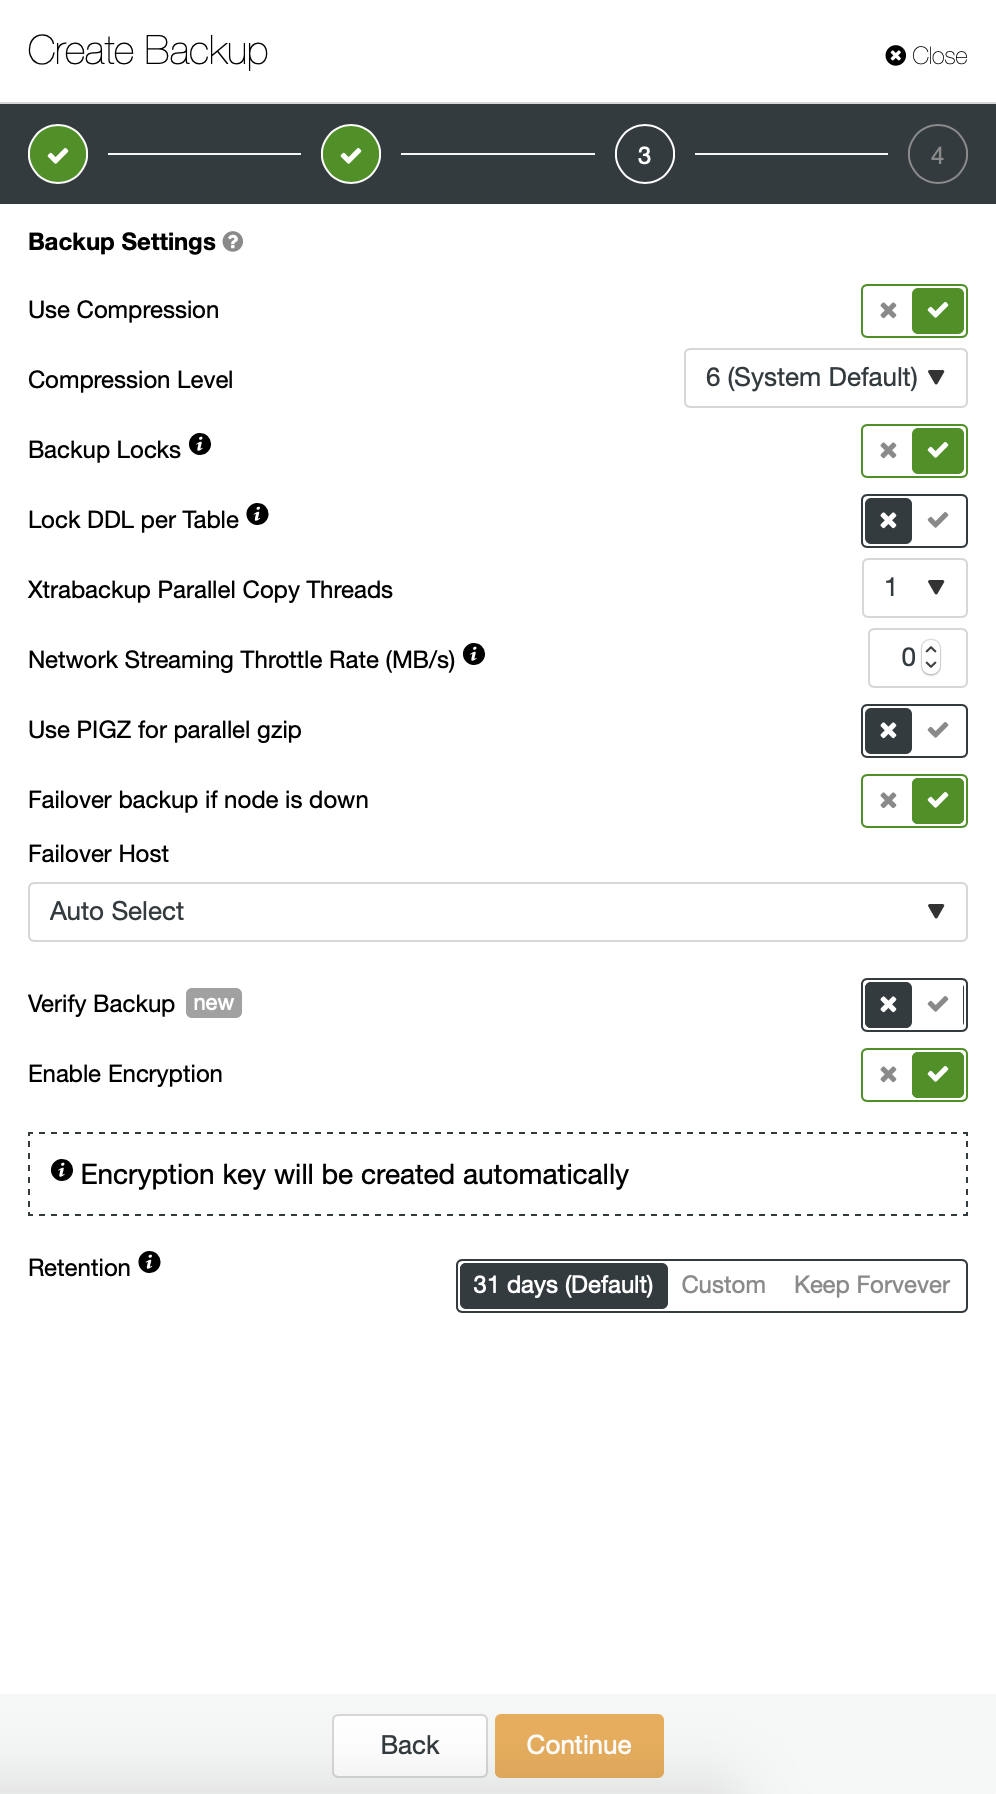
Next, we want to make some changes in the default configuration. We decided to go with automatically selected failover host (in case our master would be unavailable, ClusterControl will use any other node which is available). We also wanted to enable encryption as we will be sending our backups over the network.
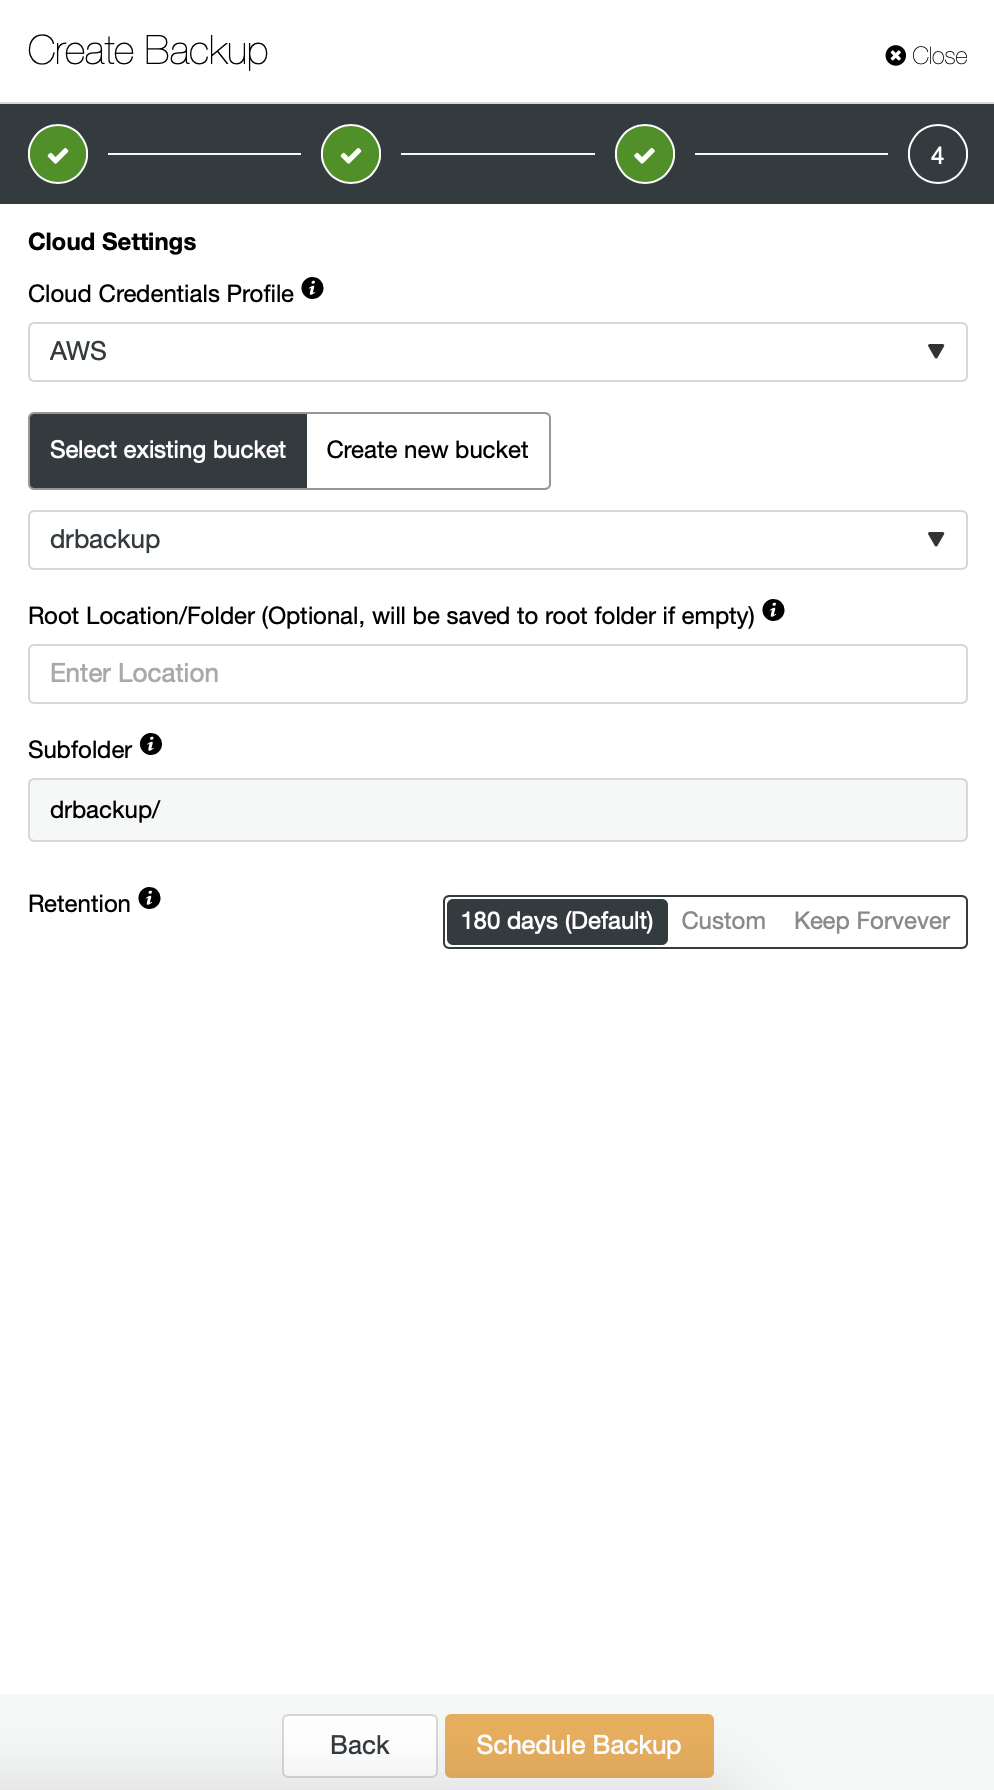
Then we have to pick the credentials, select existing S3 bucket or create a new one if needed.
We are basically repeating the process for the incremental backup, this time we used the “Advanced” dialog to run the backups every 10 minutes.
The rest of the settings is similar, we also can reuse the S3 bucket.
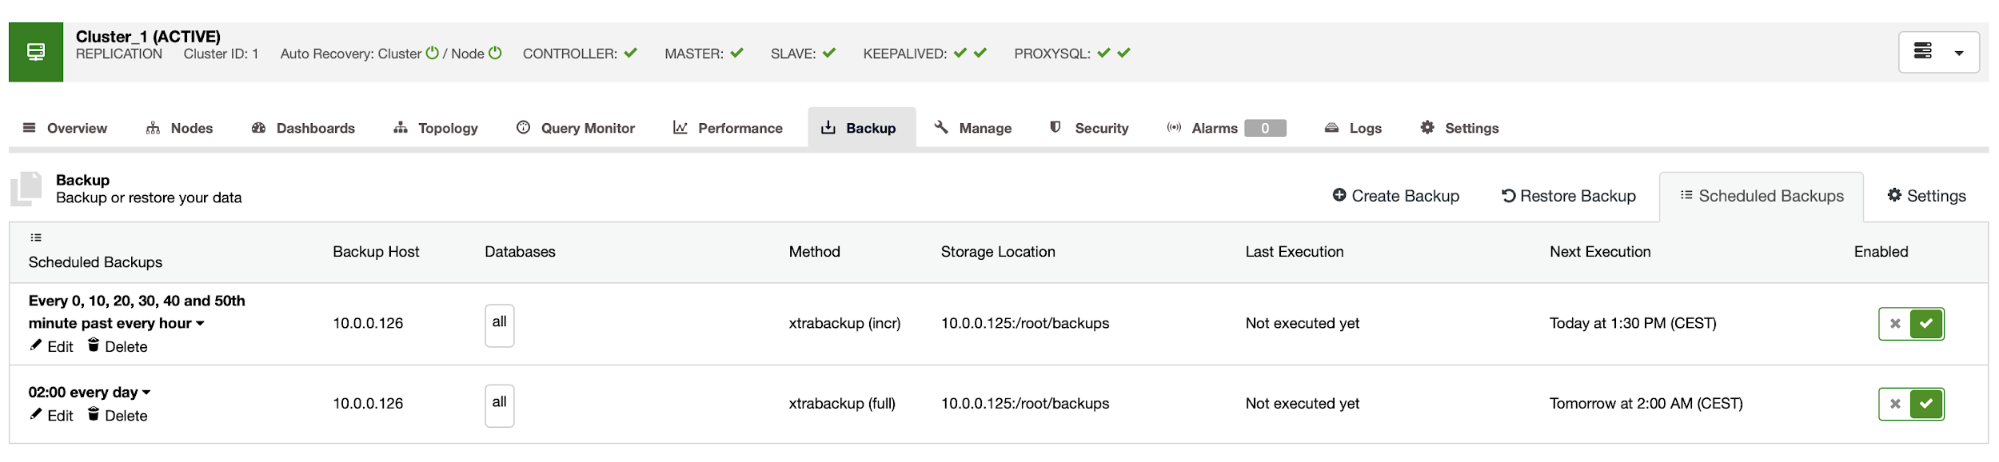
The backup schedule looks as above. We don’t have to start full backup manually, ClusterControl will run incremental backup as scheduled and if it detects there’s no full backup available, it will run a full backup instead of the incremental.
With such setup we can be safe to say that we can recover the data on any external system with 10 minute granularity.
Manual Backup Restore
If it happens that you will need to restore the backup on the disaster recovery instance, there are a couple of steps you have to take. We strongly recommend to test this process from time to time, ensuring it works correctly and you are proficient in executing it.
First, we have to install AWS command line tool on our target server:
root@vagrant:~# apt install python3-pip

root@vagrant:~# pip3 install awscli --upgrade --user
Then we have to configure it with proper credentials:
root@vagrant:~# ~/.local/bin/aws configure

AWS Access Key ID [None]: yourkeyID

AWS Secret Access Key [None]: yourkeySecret

Default region name [None]: us-west-1

Default output format [None]: json
We can now test if we have the access to the data in our S3 bucket:
root@vagrant:~# ~/.local/bin/aws s3 ls s3://drbackup/

                           PRE BACKUP-1/

                           PRE BACKUP-2/

                           PRE BACKUP-3/

                           PRE BACKUP-4/

                           PRE BACKUP-5/

                           PRE BACKUP-6/

                           PRE BACKUP-7/
Now, we have to download the data. We will create directory for the backups – remember, we have to download whole backup set – starting from a full backup to the last incremental we want to apply.
root@vagrant:~# mkdir backups

root@vagrant:~# cd backups/
Now there are two options. We can either download backups one by one:
root@vagrant:~# ~/.local/bin/aws s3 cp s3://drbackup/BACKUP-1/ BACKUP-1 --recursive

download: s3://drbackup/BACKUP-1/cmon_backup.metadata to BACKUP-1/cmon_backup.metadata

Completed 30.4 MiB/36.2 MiB (4.9 MiB/s) with 1 file(s) remaining

download: s3://drbackup/BACKUP-1/backup-full-2019-08-20_113009.xbstream.gz.aes256 to BACKUP-1/backup-full-2019-08-20_113009.xbstream.gz.aes256


root@vagrant:~# ~/.local/bin/aws s3 cp s3://drbackup/BACKUP-2/ BACKUP-2 --recursive

download: s3://drbackup/BACKUP-2/cmon_backup.metadata to BACKUP-2/cmon_backup.metadata

download: s3://drbackup/BACKUP-2/backup-incr-2019-08-20_114009.xbstream.gz.aes256 to BACKUP-2/backup-incr-2019-08-20_114009.xbstream.gz.aes256
We can also, especially if you have tight rotation schedule, sync all contents of the bucket with what we have locally on the server:
root@vagrant:~/backups# ~/.local/bin/aws s3 sync s3://drbackup/ .

download: s3://drbackup/BACKUP-2/cmon_backup.metadata to BACKUP-2/cmon_backup.metadata

download: s3://drbackup/BACKUP-4/cmon_backup.metadata to BACKUP-4/cmon_backup.metadata

download: s3://drbackup/BACKUP-3/cmon_backup.metadata to BACKUP-3/cmon_backup.metadata

download: s3://drbackup/BACKUP-6/cmon_backup.metadata to BACKUP-6/cmon_backup.metadata

download: s3://drbackup/BACKUP-5/cmon_backup.metadata to BACKUP-5/cmon_backup.metadata

download: s3://drbackup/BACKUP-7/cmon_backup.metadata to BACKUP-7/cmon_backup.metadata

download: s3://drbackup/BACKUP-3/backup-incr-2019-08-20_115005.xbstream.gz.aes256 to BACKUP-3/backup-incr-2019-08-20_115005.xbstream.gz.aes256

download: s3://drbackup/BACKUP-1/cmon_backup.metadata to BACKUP-1/cmon_backup.metadata

download: s3://drbackup/BACKUP-2/backup-incr-2019-08-20_114009.xbstream.gz.aes256 to BACKUP-2/backup-incr-2019-08-20_114009.xbstream.gz.aes256

download: s3://drbackup/BACKUP-7/backup-incr-2019-08-20_123008.xbstream.gz.aes256 to BACKUP-7/backup-incr-2019-08-20_123008.xbstream.gz.aes256

download: s3://drbackup/BACKUP-6/backup-incr-2019-08-20_122008.xbstream.gz.aes256 to BACKUP-6/backup-incr-2019-08-20_122008.xbstream.gz.aes256

download: s3://drbackup/BACKUP-5/backup-incr-2019-08-20_121007.xbstream.gz.aes256 to BACKUP-5/backup-incr-2019-08-20_121007.xbstream.gz.aes256

download: s3://drbackup/BACKUP-4/backup-incr-2019-08-20_120007.xbstream.gz.aes256 to BACKUP-4/backup-incr-2019-08-20_120007.xbstream.gz.aes256

download: s3://drbackup/BACKUP-1/backup-full-2019-08-20_113009.xbstream.gz.aes256 to BACKUP-1/backup-full-2019-08-20_113009.xbstream.gz.aes256
As you remember, the backups are encrypted. We have to have encryption key which is stored in ClusterControl. Make sure you have its copy stored somewhere safe, outside of the main datacenter. If you cannot reach it, you won’t be able to decrypt backups. The key can be found in ClusterControl configuration:
root@vagrant:~# grep backup_encryption_key /etc/cmon.d/cmon_1.cnf

backup_encryption_key='aoxhIelVZr1dKv5zMbVPLxlLucuYpcVmSynaeIEeBnM='
It is encoded using base64 thus we have to decode it first and store it in the file before we can start decrypting the backup:
echo “aoxhIelVZr1dKv5zMbVPLxlLucuYpcVmSynaeIEeBnM=” | openssl enc -base64 -d > pass
Now we can reuse this file to decrypt backups. For now, let’s say we will do one full and two incremental backups.
mkdir 1

mkdir 2

mkdir 3

cat BACKUP-1/backup-full-2019-08-20_113009.xbstream.gz.aes256 | openssl enc -d -aes-256-cbc -pass file:/root/backups/pass | zcat | xbstream -x -C /root/backups/1/

cat BACKUP-2/backup-incr-2019-08-20_114009.xbstream.gz.aes256 | openssl enc -d -aes-256-cbc -pass file:/root/backups/pass | zcat | xbstream -x -C /root/backups/2/

cat BACKUP-3/backup-incr-2019-08-20_115005.xbstream.gz.aes256 | openssl enc -d -aes-256-cbc -pass file:/root/backups/pass | zcat | xbstream -x -C /root/backups/3/
We have the data decrypted, now we have to proceed with setting up our MySQL server. Ideally, this should be exactly the same version as on the production systems. We will use Percona Server for MySQL:
cd ~
wget https://repo.percona.com/apt/percona-release_latest.generic_all.deb

sudo dpkg -i percona-release_latest.generic_all.deb

apt-get update

apt-get install percona-server-5.7
Nothing complex, just regular installation. Once it’s up and ready we have to stop it and remove the contents of its data directory.
service mysql stop

rm -rf /var/lib/mysql/*
To restore the backup we will need Xtrabackup – a tool CC uses to create it (at least for Perona and Oracle MySQL, MariaDB uses MariaBackup). It is important that this tool is installed in the same version as on the production servers:
apt install percona-xtrabackup-24That’s all we have to prepare. Now we can start restoring the backup. With incremental backups it is important to keep in mind that you have to prepare and apply them on top of the base backup. Base backup also has to be prepared. It is crucial to run the prepare with ‘–apply-log-only’ option to prevent xtrabackup from running the rollback phase. Otherwise you won’t be able to apply next incremental backup.
xtrabackup --prepare --apply-log-only --target-dir=/root/backups/1/

xtrabackup --prepare --apply-log-only --target-dir=/root/backups/1/ --incremental-dir=/root/backups/2/

xtrabackup --prepare --target-dir=/root/backups/1/ --incremental-dir=/root/backups/3/
In the last command we allowed xtrabackup to run the rollback of not completed transactions – we won’t be applying any more incremental backups afterwards. Now it is time to populate the data directory with the backup, start the MySQL and see if everything works as expected:
root@vagrant:~/backups# mv /root/backups/1/* /var/lib/mysql/

root@vagrant:~/backups# chown -R mysql.mysql /var/lib/mysql

root@vagrant:~/backups# service mysql start

root@vagrant:~/backups# mysql -ppass

mysql: [Warning] Using a password on the command line interface can be insecure.

Welcome to the MySQL monitor.  Commands end with ; or g.

Your MySQL connection id is 6

Server version: 5.7.26-29 Percona Server (GPL), Release '29', Revision '11ad961'


Copyright (c) 2009-2019 Percona LLC and/or its affiliates

Copyright (c) 2000, 2019, Oracle and/or its affiliates. All rights reserved.


Oracle is a registered trademark of Oracle Corporation and/or its

affiliates. Other names may be trademarks of their respective

owners.


Type 'help;' or 'h' for help. Type 'c' to clear the current input statement.


mysql> show schemas;

+--------------------+

| Database           |

+--------------------+

| information_schema |

| mysql              |

| performance_schema |

| proxydemo          |

| sbtest             |

| sys                |

+--------------------+

6 rows in set (0.00 sec)


mysql> select count(*) from sbtest.sbtest1;

+----------+

| count(*) |

+----------+

|    10506 |

+----------+

1 row in set (0.01 sec)
As you can see, all is good. MySQL started correctly and we were able to access it (and the data is there!) We successfully managed to bring our database back up-and-running in a separate location. The total time required depends strictly on the size of the data – we had to download data from S3, decrypt and decompress it and finally prepare the backup. Still, this is a very cheap option (you have to pay for S3 data only) which gives you an option for business continuity should a disaster strikes.


