blog
Building a Highly Available Database for Moodle Using PostgreSQL

Impacted by the COVID-19 pandemic, a lot of SMBs/SMEs are transitioning to online platforms. Face-to-face or physical classes are also affected by this pandemic and a lot of schools and universities are also transitioning to online and are looking for tools that are available to be used so as to continue serving the students or pupils, as education has not to be hampered. One of the famous platforms that are available for educational online or online learning purposes is Moodle.
What is Moodle?
Moodle is an open source software for online learning management system, or LMS (also known as Virtual Learning Environment or VLE) under the GPL licence. It enables educators to create their own private website filled with dynamic courses that extend learning, any time, anywhere. Moodle has an all support with easy access and features for teachers, students, or administrators.
Since it’s an open source and a free software platform, you can use this software free of charge and no royalty fees just like other open source software. The costs only incurs when this software is hosted on a paid hosting platform, or if you are hosting it with their Moodle Cloud. Moodle is also available for handheld devices such as mobile or tablets.
Why Do You Need A Highly Available Database?
In the 1990s, a very simple solution for High Availability (HA) was invented, namely Heartbeat. A Heartbeat cluster basically could do two things: it monitored two nodes (and not more than two), and it was configured to start one or more services on those two nodes. If the node that was currently hosting the resources went down, it restarted the cluster resources on the remaining node. Though the initial release of Heartbeat had no monitoring of the resources themselves this changes until the release of Heartbeat 2.0 in the early 2000s where it allows to manage more than two nodes to the cluster. Basically, this comprises the state of Linux HA clustering which is based in large part on Heartbeat 2.0. From this onwards, a lot of HA solutions were impacted and have been developed and created to minimize the downtime especially for critical resources.
Being highly available does not only mean minimizing the downtime. It also covers the degree of responsibility to being able to continuously operate and maintain the services you are offering and promised to your customers. Being available to the customers doesn’t mean also you are capable of responding to them in case they need help. It has to put your business application and system to fully functional as if it’s always the normal state of operations even if an unprecedented disaster has occurred.
You cannot operate your VLE application using Moodle while your database is under maintenance. If you have only a single database server, which is very common for simple and lightweight application setup, once the server goes down then your application stops. If you have a database cluster using master-slave replication then encounters an unprecedented incident which in turns that your application is writing on two masters after the incident, then that could be a huge mess which in turns causes data corruption to your whole business application and data layer. If there were ongoing payments that occurred that time, that could be a huge disaster and involves a great amount of work when performing data recovery.
So why does your database need to be highly available? It is because it has to be,
- Able to perform maintenance or planned outage feasibly and on the allowed maintenance window
- Uptime is vital and has to avoid downtime when necessary
- SLA is important as to its higher extent of degree to achieve high quality customer service
- Provide continuous service and usability
- No single point of failure
- Able to perform failover when master breaks or crashes
- Avoid split-brain scenario where multiple masters acting as active writers at the same time
Building The Database Cluster
Now that we have emphasized the importance of having HA as a plan and as a solution for your database cluster, especially for PostgreSQL, let’s focus on building the cluster from top to bottom in order to achieve a highly available setup ready for Moodle application setup.
Installing PostgreSQL
First of all, why PostgreSQL? PostgreSQL has great advantages when compared to other databases supported by Moodle. It’s a matter of preference if I have to summarize as all databases supported by Moodle are all capable of handling the data and are subject for optimization as well. It depends on how skilled and experienced you are using the database. Though to summarize why using PostgreSQL, it is a reliable database and its sophisticated open source software especially in databases which can be compared to other vendors that are proprietary, such as Oracle and MS SQL. It does support query parallelism, able to manage large or huge databases, has wide support for JSON, and a lot more. You may check it out here for reasons why to choose PostgreSQL. Now let’s proceed on installing the PostgreSQL
For this blog, we’ll use PostgreSQL 12 using Ubuntu 18.04 (Bionic Beaver). Then, for High Availability setup, you must have a primary and at least a standby node (replica) for which it will take over once the master goes down.
- Setup the repository and signing key
sudo sh -c 'echo "deb http://apt.postgresql.org/pub/repos/apt $(lsb_release -cs)-pgdg main" > /etc/apt/sources.list.d/postgresql.list' wget --quiet -O - https://www.postgresql.org/media/keys/ACCC4CF8.asc | sudo apt-key add - - Install the PG 12 server
# Update the package lists:

sudo apt-get update

# Install server and client

apt install postgresql-12 postgresql-client-12
Do this on the target replica as well but you need to configure it as a standby or a replica. Alternatively, I suggest you use ClusterControl and download it as it’s free. It would be faster and quicker to install and setup a primary/standby setup. For my setup using ClusterControl and using the Topology view tab, I got the following topology:
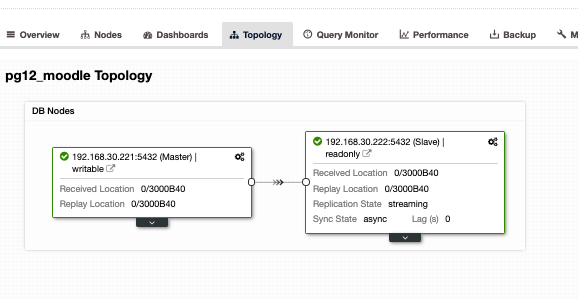
Having a master/slave or primary/standby setup, it doesn’t mean that you are fully covered for a high-available database cluster. It’s not yet highly available. Once the primary or master goes down, there’s no failover that is bound to occur. Another thing is, there’s no balancing of connections from clients that is going to the master against the slave. Although load balancing between the master/slave does not entail that it has to be setup or it has to be applied to fulfill a highly available setup. Having a load balancing between the master/primary and a slave/standby helps your master node from stressing out high load performance especially on very high traffic hours.
Setting up Load Balancing
As mentioned earlier, load balancing between the master and slave helps your master from singling out the load. It’s not ideal if you let your standby just only use for replication or will take over in case the master goes down. Although that can work, however, that entails downtime and manual work if master goes down, as you need to switch over the role of your standby node to a master. That also is fine but again, having a load balancer can help direct the writes to the master, then direct the reads between the master and the slave. This basically provides you read/write splitting. To do this, there’s a lot of options you can choose from with PostgreSQL. Basically, the most common yet simple setup and is a lightweight is using HAProxy.
Although there are options such as using PgBouncer or pgpool-II. For simplicity of this blog, let’s use HAProxy. To install HAProxy, it’s pretty straightforward if you use ClusterControl. Let’s do that via ClusterControl. To do that, you can just go to Manage tab, select Load Balancer as shown below,
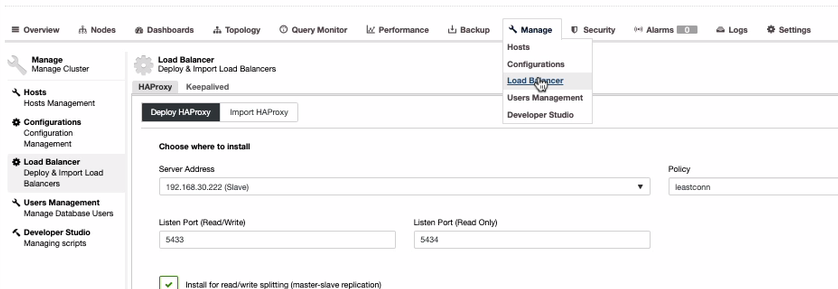
Since we need to have a highly available setup for your PostgreSQL database cluster, we should have at least two nodes. So if your primary HAProxy node goes down, then the passive or standby HAProxy can take over. Let’s see how does it looks like on my end,

Although that looks good. This setup is still insufficient. If you think we’re good for a highly available setup with that topology, there’s no failover in case the HAProxy goes down on node 192.168.30.222 at port 9600 or if 192.168.30.223:9600 goes down and if your application is setup to that host, there’s still downtime if no proactive setup has been made. By that means, you have downtime if it has to be setup manually. In this case, we’ll use and setup Keepalived in order for the HAProxy instances to be closely monitored for its health and failover in case the other node encounters a problem.
Keeping the Load Balancers Highly Available
Now that we have load balancers on top of our databases, yet we need our HAProxy to be always alive in case the primary node for application endpoint goes down. Basically, what HAProxy can do with the setup we have as of the previous section, the applications can use the 192.168.30.223 or 192.168.30.222 with ports 5433 (read-write port) and 5434 (read-only port) respectively. Now there’s a hassle in case you need to switch in case the other nodes goes down, plus the bad thing is that you are hurting the business as it covers downtime if there’s no automatic failover to deal with it. Avoiding downtime is the best route here unless you have a very low SLA and a high RTO and RPO.
In order to relieve such disaster or downtime, we suggest to setup Keepalived on top of HAProxy. Basically, HAProxy will load balance between read and writes providing you read-write splitting and Keepalived only monitors the health of the HAProxy nodes and will manage to pick up the most healthy node according to its desired configuration. Keepalived is a tool you can use for making the HAProxy nodes to be monitored, though it’s not as complex to manage databases. Keepalived uses VIP (Virtual IP) which assigns to the default primary HAProxy node and then re-assigns that VIP in case the primary HAProxy node fails and points it to the subsequent or standby HAProxy node.
Now let’s set this up using ClusterControl as it’s faster and easier to manage with ClusterControl. To do this, it’s basically the same approach as how we setup the HAProxy but instead select Keepalived as shown below,
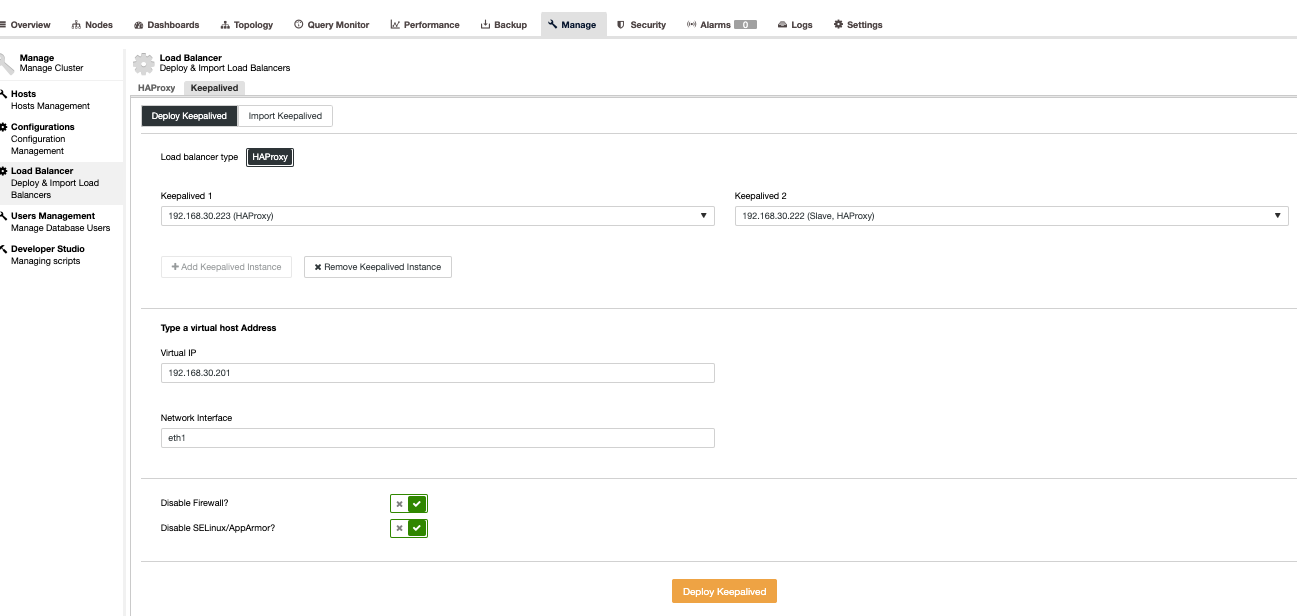
Basically, if you install the Keepalived manually, we are selecting the primary against the secondary in case primary HAProxy fails. Let’s see how does our Topology view looks like,
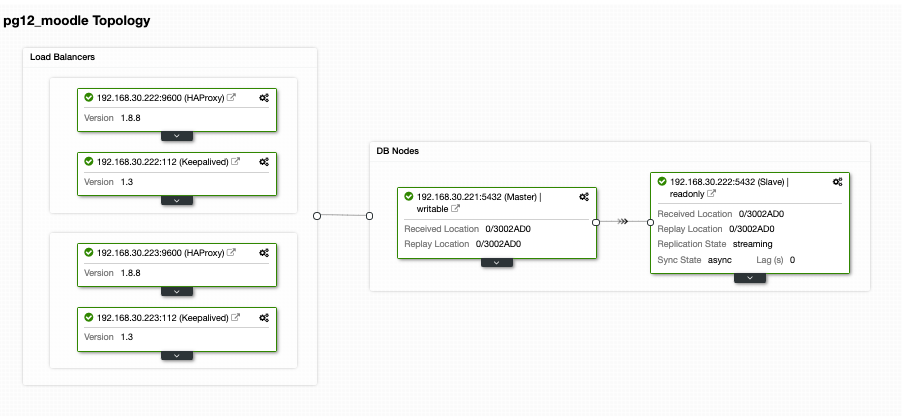
This might look very promising. Basically, the Moodle application client will connect to the VIP i.e. 192.168.30.201 under ports 5433 (read-write port) and 5434 (read-only port). For example, verifying it on an external host I have,
[root@testccnode ~]# psql -h 192.168.30.201 -U dbapgadmin -W postgres -p 5433

Password:

psql (11.2, server 12.4 (Ubuntu 12.4-1.pgdg18.04+1))

WARNING: psql major version 11, server major version 12.

         Some psql features might not work.

SSL connection (protocol: TLSv1.2, cipher: ECDHE-RSA-AES256-GCM-SHA384, bits: 256, compression: off)

Type "help" for help.


postgres=# select inet_server_addr();

 inet_server_addr

------------------

 192.168.30.221

(1 row)
which reveals that only the writer node I have points to my master node, i.e. 192.168.30.22. Then, my read-only port must go both master and slave nodes as shown below,
[root@testccnode ~]# psql -h 192.168.30.201 -U dbapgadmin -W postgres -p 5434

Password:

psql (11.2, server 12.4 (Ubuntu 12.4-1.pgdg18.04+1))

WARNING: psql major version 11, server major version 12.

         Some psql features might not work.

SSL connection (protocol: TLSv1.2, cipher: ECDHE-RSA-AES256-GCM-SHA384, bits: 256, compression: off)

Type "help" for help.


postgres=# select inet_server_addr();

 inet_server_addr

------------------

 192.168.30.221

(1 row)


postgres=# q

[root@testccnode ~]# psql -h 192.168.30.201 -U dbapgadmin -W postgres -p 5434

Password:

psql (11.2, server 12.4 (Ubuntu 12.4-1.pgdg18.04+1))

WARNING: psql major version 11, server major version 12.

         Some psql features might not work.

Type "help" for help.


postgres=# select inet_server_addr();

 inet_server_addr

------------------

 192.168.30.222

(1 row)
This reveals that both my primary and standby nodes are identified as “read database” nodes.
Now this looks very promising as what I have said earlier. Still, there’s one lacking part here that is actually a very important one. There’s no database failover mechanism that is ready for this type of setup. Yet, we have Keepalived that monitors HAProxy and then does a failover by switching the VIP in case the primary HAProxy fails or dies. Yet, Keepalived is not setup to handle the complex setup that PostgreSQL has. There’s a very decent one that is available and free to set this up. You can use Slony-I, a third party replication system.
Having Failover Mechanism For your PostgreSQL Cluster
There are ways to provide a failover mechanism for your PostgreSQL. Slony-I or commonly called as just Slony is one of the common tools that are used. Although Slony requires that your setup has to be a logical replication as it requires a publisher/subscriber setup, it might not be ideal for other setup that are using a standard streaming replication. The downside with using Slony is that it does not provide any automatic detection for failed systems or no node fencing support. Therefore, a commonly called STONITH (shoot the other node in the head or shoot the failed node in the head) which basically knocks off the failed not to avoid split-brain scenarios where multiple master nodes (active writer nodes) are accepting writes at the same time. Although this can be setup appropriately but still it can be time consuming and complicated if it’s created with less experience and insights of what scenarios are bound to happen for PostgreSQL when a disaster occurs. For Slony, abandoning committed transactions is a business decision that cannot be made by a database system. If someone wants to put the commands below into a script executed automatically from the network monitoring system, then it just leaves to your own disposal that it’s your data, and it’s your failover policy.
Alternatively, if you are looking for enterprise options yet can take your money at a reasonable expense, then ClusterControl has auto recovery for PostgreSQL clusters. Basically, the auto recovery answers the problems stated above with Slony. Though our auto recovery is best tested with streaming replication and is only supported for streaming replication type of PostgreSQL setup. So how does it work? Basically you just have to turn on the auto recovery buttons just like below,
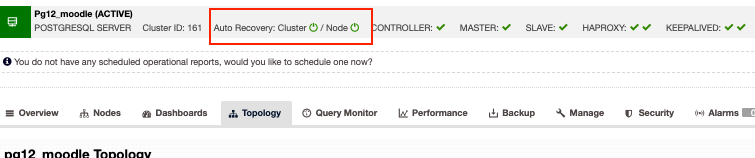
This supports node fencing which means it will knock off the failing node in case the node goes back alive for some reason that’s not anticipated. Aside from that, the auto recovery by ClusterControl supports node and cluster recovery that if a master or a slave node was accidentally shutdown or killed, ClusterControl will attempt to revive that especially if it occurs outside a planned outage or maintenance window. This just feature covers you from having worn out of database fears and at the same time also provides you proactive monitoring which will notify you for some possible disaster to occur before it’s too late to recover.
Conclusion
Highly available setups for your database cluster, especially for Moodle, can vary depending on what type of setup and requirements you need. Whether it’s purely reliant on free and open source technologies or there are other options that are worth the money to invest for your enterprise application as long as the budget can accommodate as it can provide you a win-win situation especially if you want more focus only on the business side of things than focusing on other tools such as administration and devops type of work.