blog
Automated Deployment of MySQL Galera Cluster to Amazon AWS with Puppet

Deployment and management your database environment can be a tedious task. It’s very common nowadays to use tools for automating your deployment to make these tasks easier. Automation solutions such as Chef, Puppet, Ansible, or SaltStack are just some of the ways to achieve these goals.
This blog will show you how to use Puppet to deploy a Galera Cluster (specifically Percona XtraDB Cluster or PXC) utilizing ClusterControl Puppet Modules. This module makes the deployment, setup, and configuration easier than coding yourself from scratch. You may also want to check out one of our previous blogs about deploying a Galera Cluster using Chef, “How to Automate Deployment of MySQL Galera Cluster Using S9S CLI and Chef.”
Our S9S CLI tools are designed to be used in the terminal (or console) and can be utilized to automatically deploy databases. In this blog, we’ll show you how to do deploy a Percona XtraDB Cluster on AWS using Puppet, using ClusterControl and its s9s CLI tools to help automate the job.
Installation and Setup For The Puppet Master and Agent Nodes
On this blog, I used Ubuntu 16.04 Xenial as the target Linux OS for this setup. It might be an old OS version for you, but we know it works with RHEL/CentOS and Debian/Ubuntu recent versions of the OS. I have two nodes that I used on this setup locally with the following host/IP:
Master Hosts:
IP = 192.168.40.200
Hostname = master.puppet.local
Agent Hosts:
IP = 192.168.40.20
Hostname = clustercontrol.puppet.local
Let’s go over through the steps.
1) Setup the Master
## Install the packages required
wget https://apt.puppetlabs.com/puppet6-release-xenial.deb

sudo dpkg -i puppet6-release-xenial.deb

sudo apt update

sudo apt install -y puppetserver
## Now, let’s do some minor configuration for Puppet
sudo vi /etc/default/puppetserver## edit from
JAVA_ARGS="-Xms2g -Xmx2g -Djruby.logger.class=com.puppetlabs.jruby_utils.jruby.Slf4jLogger"## to
JAVA_ARGS="-Xms512m -Xmx512m -Djruby.logger.class=com.puppetlabs.jruby_utils.jruby.Slf4jLogger"## add alias hostnames in /etc/hosts
sudo vi /etc/hosts## and add
192.168.40.10 client.puppet.local

192.168.40.200 server.puppet.local
## edit the config for server settings.
sudo vi /etc/puppetlabs/puppet/puppet.conf## This can be depending on your setup so you might approach it differently than below.
[master]

vardir = /opt/puppetlabs/server/data/puppetserver

logdir = /var/log/puppetlabs/puppetserver

rundir = /var/run/puppetlabs/puppetserver

pidfile = /var/run/puppetlabs/puppetserver/puppetserver.pid

codedir = /etc/puppetlabs/code


dns_alt_names = master.puppet.local,master


[main]

certname = master.puppet.local

server = master.puppet.local

environment = production

runinterval = 15m
## Generate a root and intermediate signing CA for Puppet Server
sudo /opt/puppetlabs/bin/puppetserver ca setup## start puppet server
sudo systemctl start puppetserver

sudo systemctl enable puppetserver
2) Setup the Agent/Client Node
## Install the packages required
wget https://apt.puppetlabs.com/puppet6-release-xenial.deb

sudo dpkg -i puppet6-release-xenial.deb

sudo apt update

sudo apt install -y puppet-agent
## Edit the config settings for puppet client
sudo vi /etc/puppetlabs/puppet/puppet.confAnd add the example configuration below,
[main]

certname = clustercontrol.puppet.local

server = master.puppet.local

environment = production

runinterval = 15m
3) Authenticating (or Signing the Certificate Request) for Master/Client Communication
## Go back to the master node and run the following to view the view outstanding requests.
sudo /opt/puppetlabs/bin/puppetserver ca list## The Result
Requested Certificates:

    clustercontrol.puppet.local   (SHA256) 0C:BA:9D:A8:55:75:30:27:31:05:6D:F1:8C:CD:EE:D7:1F:3C:0D:D8:BD:D3:68:F3:DA:84:F1:DE:FC:CD:9A:E1
## sign a request from agent/client
sudo /opt/puppetlabs/bin/puppetserver ca sign --certname clustercontrol.puppet.local## The Result
Successfully signed certificate request for clustercontrol.puppet.local## or you can also sign all request
sudo /opt/puppetlabs/bin/puppetserver ca sign --all## in case you want to revoke, just do
sudo /opt/puppetlabs/bin/puppetserver ca revoke --certname ## to list all unsigned,
sudo /opt/puppetlabs/bin/puppetserver ca list --all## Then verify or test in the client node,
## verify/test puppet agent
sudo /opt/puppetlabs/bin/puppet agent --testScripting Your Puppet Manifests and Setting up the ClusterControl Puppet Module
Our ClusterControl Puppet module can be downloaded here https://github.com/severalnines/puppet. Otherwise, you can also easily grab the Puppet Module from Puppet-Forge. We’re regularly updating and modifying the Puppet Module, so we suggest you grab the github copy to ensure the most up-to-date version of the script.
You should also take into account that our Puppet Module is tested on CentOS/Ubuntu running with the most updated version of Puppet (6.7.x.). For this blog, the Puppet Module is tailored to work with the most recent release of ClusterControl (which as of this writing is 1.7.3). In case you missed it, you can check out our releases and patch releases over here.
1) Setup the ClusterControl Module in the Master Node
# Download from github and move the file to the module location of Puppet:
wget https://github.com/severalnines/puppet/archive/master.zip -O clustercontrol.zip; unzip -x clustercontrol.zip; mv puppet-master /etc/puppetlabs/code/environments/production/modules/clustercontrol2) Create Your Manifest File and Add the Contents as Shown Below
vi /etc/puppetlabs/code/environments/production/manifests/site.ppNow, before we proceed, we need to discuss the manifest script and the command to be executed. First, we’ll have to define the type of ClusterControl and its variables we need to provide. ClusterControl requires every setup to have token and SSH keys be specified and provided accordingly. Hence, this can be done by running the following command below:
## Generate the key
bash /etc/puppetlabs/code/environments/production/modules/clustercontrol/files/s9s_helper.sh --generate-key## Then, generate the token
bash /etc/puppetlabs/code/environments/production/modules/clustercontrol/files/s9s_helper.sh --generate-tokenNow, let’s discuss what we’ll have to input within the manifest file one by one.
node 'clustercontrol.puppet.local' { # Applies only to mentioned node. If nothing mentioned, applies to all.

        class { 'clustercontrol':

            is_controller => true,

ip_address => '',

mysql_cmon_password => '',

                  api_token => ''

        }
Now, we’ll have to define the
Afterwards, we’ll use ClusterControl RPC to send a POST request to create an AWS entry:
exec { 'add-aws-credentials':

            path  => ['/usr/bin', '/usr/sbin', '/bin'],

    command => "echo '{"operation" : "add_credentials", "provider" : aws, "name" : "", "comment" : "", "credentials":{"access_key_id":"","access_key_secret" : "","access_key_region" : ""}}'  | curl -sX POST -H"Content-Type: application/json" -d @- http://localhost:9500/0/cloud"

}
The placeholder variables I set are self-explanatory. You need to provide the desired credential name for your AWS, provide a comment if you wanted to, provided the AWS access key id, your AWS key secret and AWS region where you’ll be deploying the Galera nodes.
Lastly, we’ll have to run the command using s9s CLI tools.
exec { 's9s':

  path        => ['/usr/bin', '/usr/sbin', '/bin'],

  onlyif      => "test -f $(/usr/bin/s9s cluster --list --cluster-format='%I' --cluster-name '' 2> /dev/null) > 0 ",

  command     => "/usr/bin/s9s cluster --create --cloud=aws --vendor percona --provider-version 5.7  --containers=,, --nodes=,, --cluster-name= --cluster-type= --image  --template  --subnet-id  --region  --image-os-user= --os-user= --os-key-file  --vpc-id  --firewalls  --db-admin  --db-admin-passwd  --wait --log",

  timeout     => 3600,

  logoutput   => true

}
Let’s look at the key-points of this command. First, the “onlyif” is defined by a conditional check to determine if such cluster name exists, then do not run since it’s already added in the cluster. We’ll proceed on running the command which utilizes the S9S CLI Tools. You’ll need to specify the AWS IDs in the placeholder variables being set. Since the placeholder names are self-explanatory, its values will be taken from your AWS Console or by using the AWS CLI tools.
Now, let’s check the succeeding steps remaining.
3) Prepare the Script for Your Manifest File
# Copy the example contents below (edit according to your desired values) and paste it to the manifest file, which is the site.pp.
node 'clustercontrol.puppet.local' { # Applies only to mentioned node. If nothing mentioned, applies to all.

        class { 'clustercontrol':

is_controller => true,

ip_address => '192.168.40.20',

mysql_cmon_password => 'R00tP@55',

mysql_server_addresses => '192.168.40.30,192.168.40.40',

api_token => '0997472ab7de9bbf89c1183f960ba141b3deb37c'

        }


exec { 'add-aws-credentials':

path  => ['/usr/bin', '/usr/sbin', '/bin'],

command => "echo '{"operation" : "add_credentials", "provider" : aws, "name" : "paul-aws-sg", "comment" : "my SG AWS Connection", "credentials":{"access_key_id":"XXXXXXXXXXX","access_key_secret" : "XXXXXXXXXXXXXXX","access_key_region" : "ap-southeast-1"}}'  | curl -sX POST -H"Content-Type: application/json" -d @- http://localhost:9500/0/cloud"

}


exec { 's9s':

path        => ['/usr/bin', '/usr/sbin', '/bin'],

onlyif      => "test -f $(/usr/bin/s9s cluster --list --cluster-format='%I' --cluster-name 'cli-aws-repl' 2> /dev/null) > 0 ",

command     => "/usr/bin/s9s cluster --create --cloud=aws --vendor percona --provider-version 5.7  --containers=db1,db2,db3 --nodes=db1,db2,db3 --cluster-name=cli-aws-repl --cluster-type=galera --image ubuntu18.04 --template t2.small --subnet-id subnet-xxxxxxxxx  --region ap-southeast-1 --image-os-user=s9s --os-user=s9s --os-key-file /home/vagrant/.ssh/id_rsa --vpc-id vpc-xxxxxxx --firewalls sg-xxxxxxxxx --db-admin root --db-admin-passwd R00tP@55 --wait --log",

timeout     => 3600,

logoutput   => true

}

}
Let’s Do the Test and Run Within the Agent Node
/opt/puppetlabs/bin/puppet agent --test The End Product
Now, let’s have a look once the agent is being ran. Once you have this running, visiting the URL http://
Now, you wonder where’s the result after we had run the RPC request with resource name ‘add-aws-credentials’ in our manifest file, it’ll be found in the Integrations section within the ClusterControl. Let’s see how it looks like after the Puppet perform the runbook.
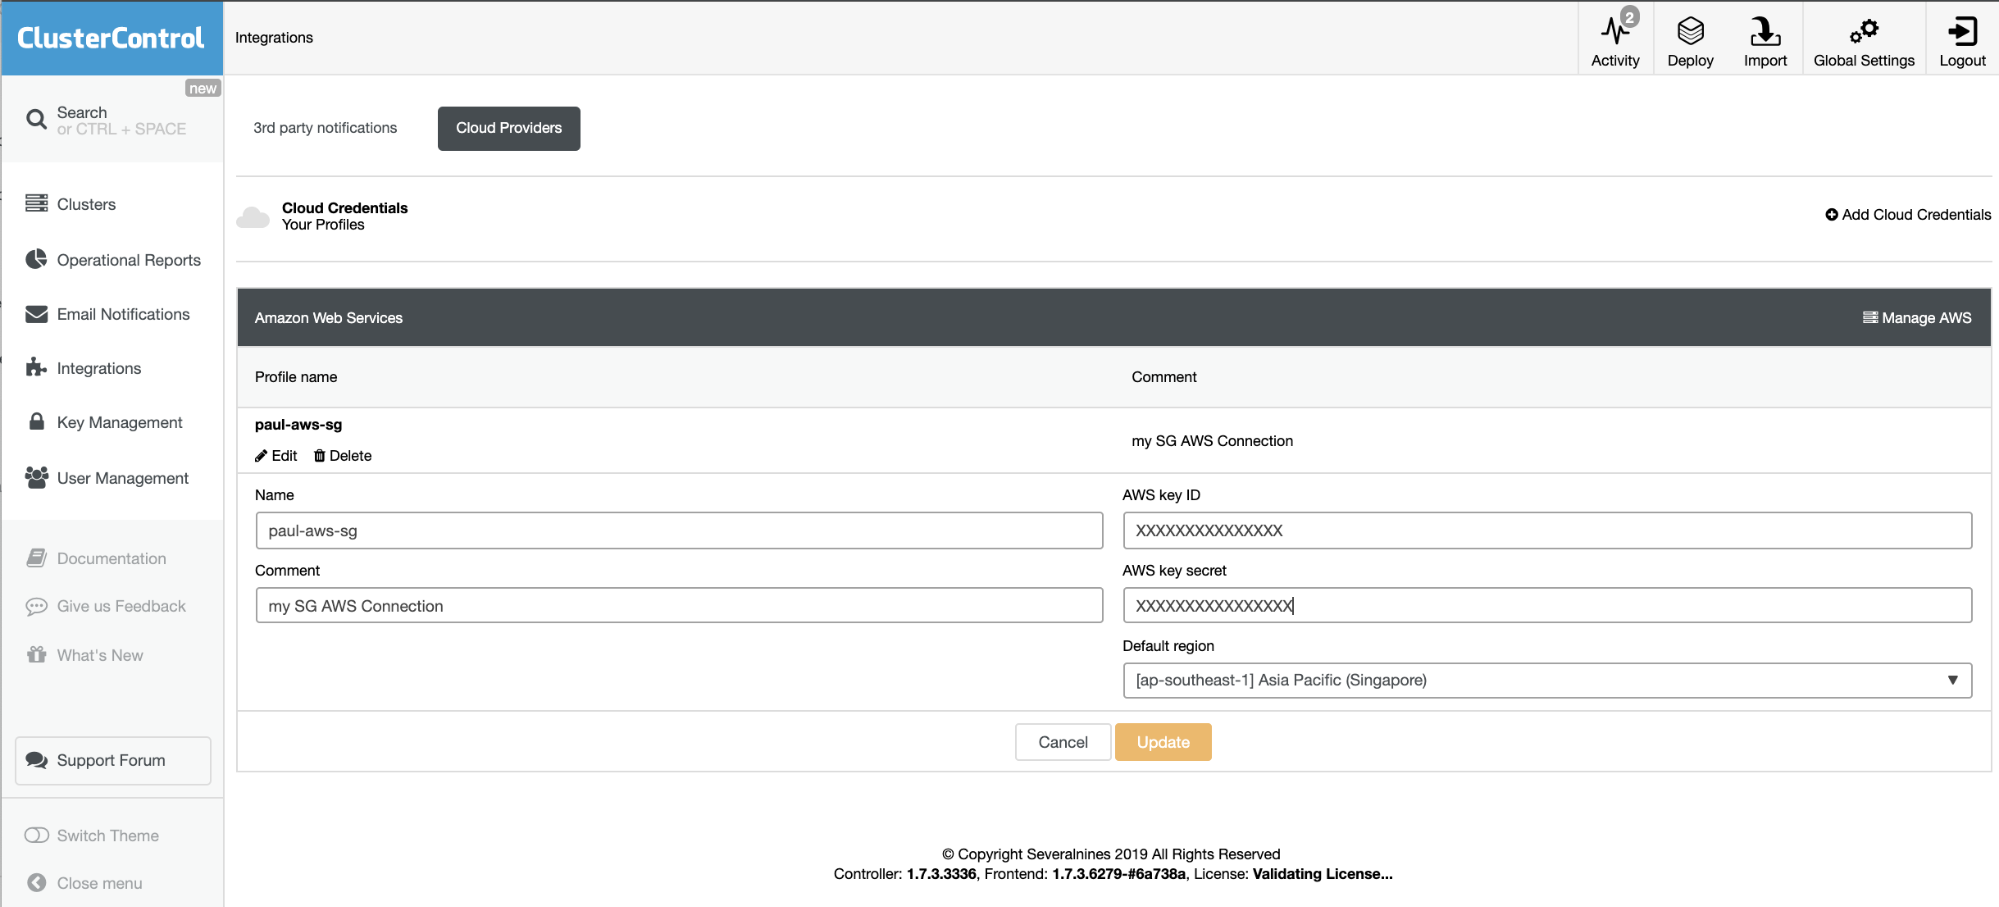
You can modify this in accordance to your like through the UI but you can also modify this by using our RPC API.
Now, let’s check the cluster,
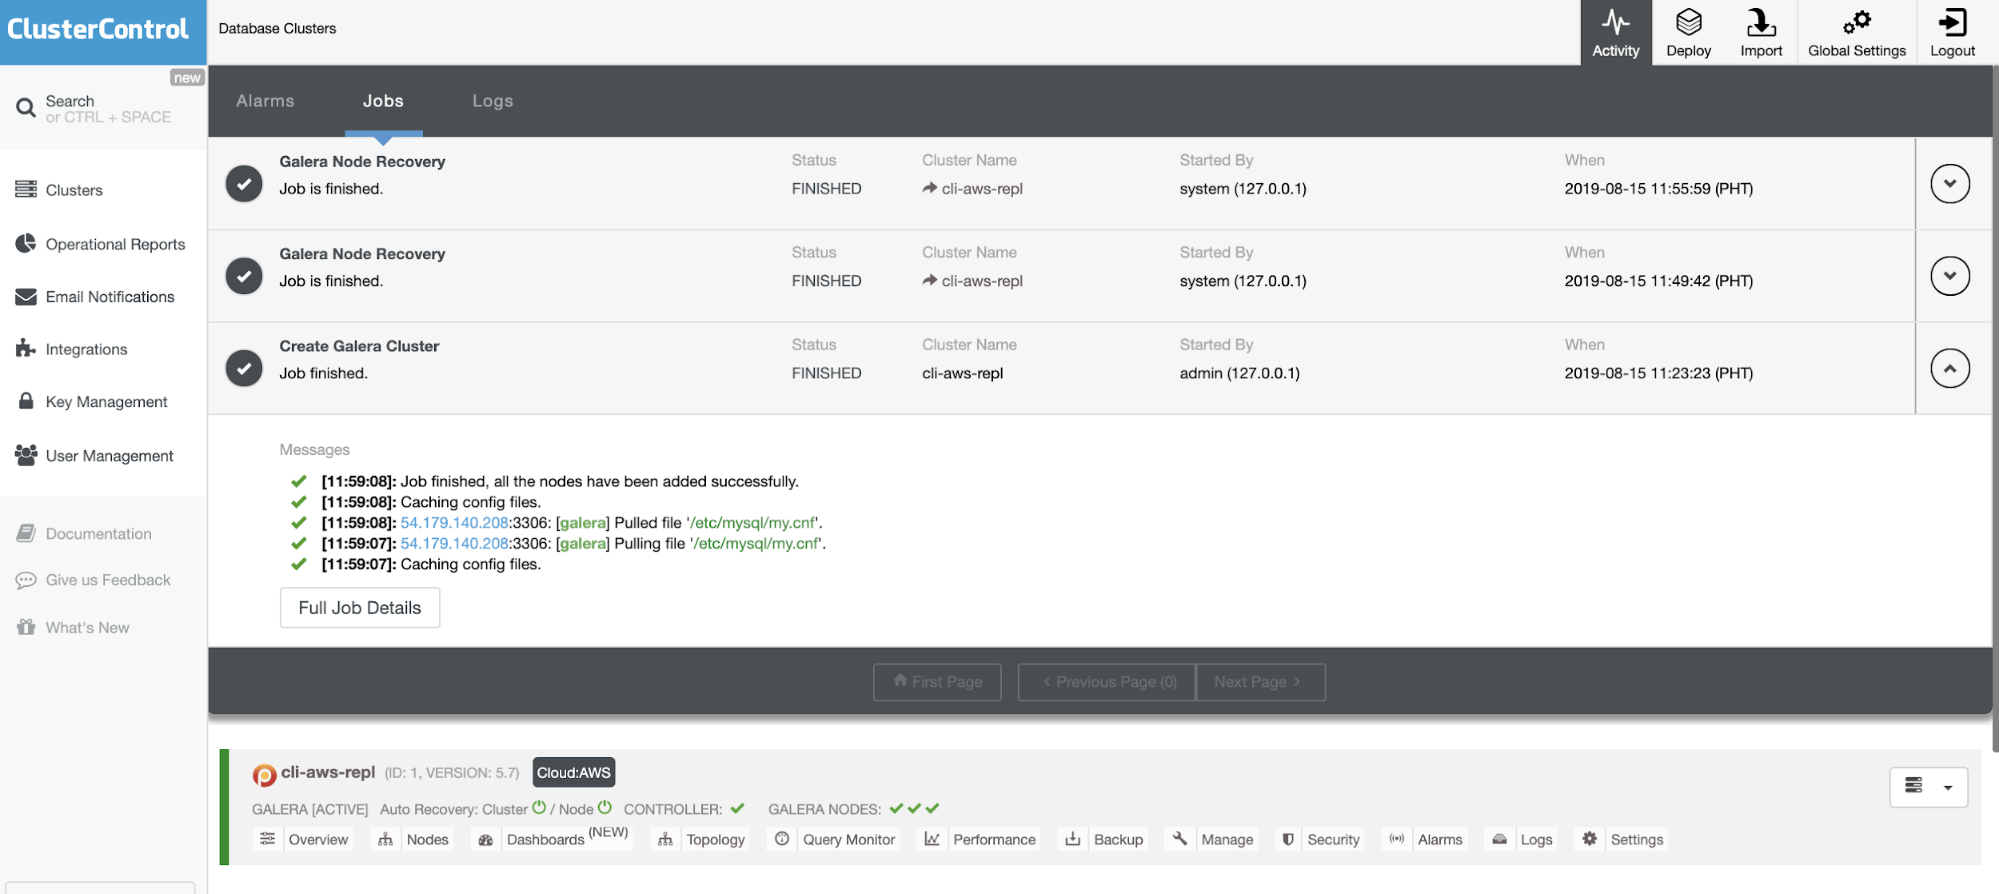
From the UI view, it shows that it has been able to create the cluster, display the cluster in the dashboard, and also shows the job activities that were performed in the background.
Lastly, our AWS nodes are already present now in our AWS Console. Let’s check that out,
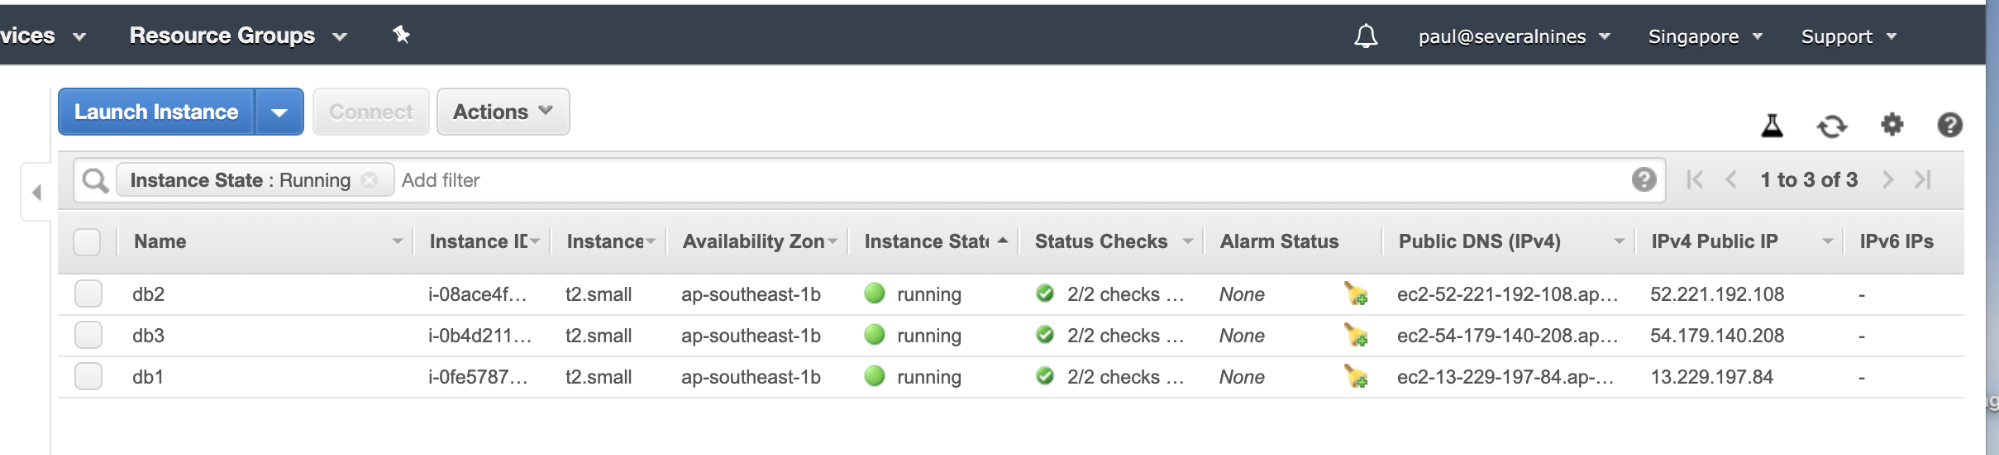
All nodes are running healthy and are expected to its designated names and region.
Conclusion
In this blog, we are able to deploy a Galera/Percona Xtradb Cluster using automation with Puppet. We did not create the code from scratch, nor did we use any external tools that would have complicated the task. Instead, we used the CusterControl Module and the S9S CLI tool to build and deploy a highly available Galera Cluster.


