blog
Using Barman for PostgreSQL Disaster Recovery

There must be many powerful tools available as a backup and restore option for PostgreSQL in general; Barman, PgBackRest, BART are to name a few in this context. What caught our attention was that Barman is a tool which is catching up fast with production deployment and market trends.
Be it a docker based deployment, need to store backup in a different cloud storage or highly customisable disaster recovery architecture needs – Barman is a very strong contender in all such cases.
This blog explores Barman with few assumptions about deployment, however in no case this should be considered only possible feature-set. Barman is way beyond what we can capture in this blog and must be explored further if ‘backup and restore of PostgreSQL instance’ is considered.
DR Ready Deployment Assumption
RPO=0 generally comes at a cost – synchronous standby server deployment would often meet that, but then it impacts the TPS of the primary server quite often.
Like PostgreSQL, Barman gives numerous deployment options to meet your needs when it comes to RPO vs performance. Think of deployment simplicity, RPO=0 or near zero performance impact; Barman fits in all.
We considered the following deployment to establish a disaster recovery solution for our backup and restore architecture.
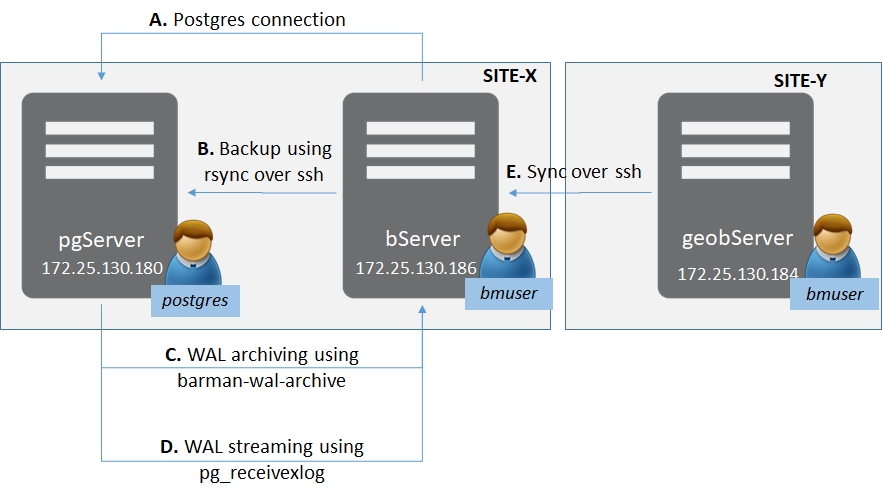
There are two sites (as in general for disaster-recovery sites) – Site-X and Site-Y.
In Site-X there is:
- One server ‘pgServer’ hosting a PostgreSQL server instance pgServer, and one OS user ‘postgres’
- PostgreSQL instance also to host a superuser role ‘bmuser’
- One server ‘bServer’ hosting the Barman binaries and an OS user ‘bmuser’
In Site-Y there is:
- One server ‘geobServer’ hosting the Barman binaries and an OS user ‘bmuser’
There are multiple types of connection involved in this setup.
- Between ‘bServer’ and ‘pgServer’:
- Management-plane connectivity from Barman to the PostgreSQL Instance
- rsync connectivity to do actual base backup from Barman to the PostgreSQL Instance
- WAL archiving using barman-wal-archive from the PostgreSQL Instance to Barman
- WAL streaming using pg_receivexlog at Barman
- Between ‘bServer’ and ‘geobserver’:
- Synchronisation between Barman servers to provide geo-replication
Connectivity First
The primary connectivity needs between the servers is via ssh. In order to make it password-less ssh-keys are used. Let’s establish the ssh keys and exchange them.
On pgServer:
postgres@pgserver$ ssh-keygen -q -t rsa -N '' -f ~/.ssh/id_rsa <<&1 >/dev/null

postgres@pgserver$ ssh-copy-id -i ~/.ssh/id_rsa.pub bmuser@bserver

postgres@pgserver$ ssh bmuser@bserver "chmod 600 ~/.ssh/authorized_keys"
On bServer:
bmuser@bserver$ ssh-keygen -q -t rsa -N '' -f ~/.ssh/id_rsa <<&1 >/dev/null

bmuser@bserver$ ssh-copy-id -i ~/.ssh/id_rsa.pub postgres@pgserver

bmuser@bserver$ ssh postgres@pgserver "chmod 600 ~/.ssh/authorized_keys"
On geobServer:
bmuser@geobserver$ ssh-keygen -q -t rsa -N '' -f ~/.ssh/id_rsa <<&1 >/dev/null

bmuser@geobserver$ ssh-copy-id -i ~/.ssh/id_rsa.pub bmuser@bserver

bmuser@geobserver$ ssh bmuser@bserver "chmod 600 ~/.ssh/authorized_keys"
PostgreSQL Instance Configuration
There are two main things that we need to re-constitute a postgres instance – The base directory and the WAL / Transactions logs generated thereafter. Barman server intelligently keeps track of them. What we need is to ensure that proper feeds are generated for Barman to collect these artefacts.
Add following lines to postgresql.conf:
listen_addresses = '172.25.130.180'     #as per above deployment assumption

wal_level = replica                     #or higher

archive_mode = on

archive_command = 'barman-wal-archive -U bmuser bserver pgserver %p'
Archive command is ensuring that when WAL is to be archived by postgres instance, barman-wal-archive utility submits it to the Barman Server. It should be noted that the barman-cli package hence should be made available on ‘pgServer’. There is another option of using rsync if we don’t want to use barman-wal-archive utility.
Add following to pg_hba.conf:
host     all                    all     172.25.130.186/32     md5

host     replication            all     172.25.130.186/32     md5
It is basically allowing a replication and a normal connection from ‘bmserver’ to this postgres instance.
Now just restart the instance and create a super user role called bmuser:
postgres@pgserver$ pg_ctl restart

postgres@pgserver$ createuser -s -P bmuser
If required, we can avoid using bmuser as a super-user too; that would need privileges assigned to this user. For the above example, we used bmuser as password too. But that’s pretty much all, as far as a PostgreSQL instance configuration is required.
Barman Configuration
Barman has three basic component on its configuration:
- Global configuration
- Server level configuration
- User who will be running the barman
In our case, since Barman is installed using rpm, we have had our global configuration files stored at:
/etc/barman.confWe wanted to store the server level configuration in bmuser home directory, hence our global configuration file had the following content:
[barman]

barman_user = bmuser

configuration_files_directory = /home/bmuser/barman.d

barman_home = /home/bmuser

barman_lock_directory = /home/bmuser/run

log_file = /home/bmuser/barman.log

log_level = INFO
Primary Barman Server Configuration
In the deployment above, we decided to keep the primary Barman server in the same data-centre / site where the PostgreSQL instance is kept. The benefit of the same is that there is less lag and faster recovery in case required. Needless to say, less computing and/or network bandwidth needs are required on the PostgreSQL server as well.
In order to let Barman manage the PostgreSQL instance on the pgServer, we need to add a configuration file (we named pgserver.conf) with the following content:
[pgserver]

description =  "Example pgserver configuration"

ssh_command = ssh postgres@pgserver

conninfo = host=pgserver user=bmuser dbname=postgres

backup_method = rsync

reuse_backup = link

backup_options = concurrent_backup

parallel_jobs = 2

archiver = on

archiver_batch_size = 50

path_prefix = "/usr/pgsql-12/bin"


streaming_conninfo = host=pgserver user=bmuser dbname=postgres

streaming_archiver=on

create_slot = auto
And a .pgpass file containing the credentials for bmuser in the PostgreSQL instance:
echo 'pgserver:5432:*:bmuser:bmuser' > ~/.pgpass To understand the important configuration items a little more:
- ssh_command : Used to establish connection over which rsync will be done
- conninfo : Connection string to let Barman establish connection with postgres server
- reuse_backup : To allow incremental backup with less storage
- backup_method : method to take backup of base directory
- path_prefix : location where pg_receivexlog binaries are stored
- streaming_conninfo : Connection string used to stream WAL
- create_slot : To make sure slots been created by postgres instance
Passive Barman Server Configuration
The configuration of a geo-replication site is pretty simple. All it needs is a ssh connection information over which this passive node site will do the replication.
What is interesting is that such a passive node can work in mix-mode; in other words – they can act as active Barman servers to do backups for PostgreSQL sites and in parallel act as a replication/cascaded site for other Barman servers.
Since, in our case this instance of Barman (on Site-Y) need to be just a passive node, all we need is create the file /home/bmuser/barman.d/pgserver.conf with the following configuration:
[pgserver]

description =  "Geo-replication or sync for pgserver"

primary_ssh_command = ssh bmuser@bserver
With an assumption that the keys have been exchanged and the global configuration on this node is done like previously mentioned – we are pretty much done with the configuration.
And Here is Our First Backup and Restore
On the bserver ensure that the background process to receive WAL has been triggered; and then check the configuration of the server:
bmuser@bmserver$ barman cron

bmuser@bmserver$ barman check pgserver
The check should be OK for all substeps. If not, refer to /home/bmuser/barman.log.
Issue backup command on Barman to ensure there is a base DATA on which WAL can be applied:
bmuser@bmserver$ barman backup pgserverOn the ‘geobmserver’ ensure that the replication is done by executing following commands:
bmuser@geobmserver$ barman cron

bmuser@bmserver$ barman list-backup pgserver
The cron should be inserted into the crontab file (if not present). For the sake of simplicity, I have not shown it here. The last command will show that the backup folder has been created on the geobmserver as well.
Now on the Postgres instance, let’s create some dummy data:
postgres@pgserver$ psql -U postgres -c "CREATE TABLE dummy_data( i INTEGER);"

postgres@pgserver$ psql -U postgres -c "insert into dummy_data values ( generate_series (1, 1000000 ));"
The replication of the WAL from the PostgreSQL instance can be seen using the below command:
postgres@pgserver$ psql -U postgres -c "SELECT * from pg_stat_replication ;”In order to re-create an instance on Site-Y, first ensure that WAL records are switch-over. or this example, to create a clean recovery:
bmuser@bmserver$ barman switch-xlog --force --archive pgserverOn the Site-X, let’s bring up a standalone PostgreSQL instance to check if backup is sane:
bmuser@geobmserver$ barman cron

barman recover --get-wal pgserver latest /tmp/data
Now, edit the postgresql.conf and the postgresql.auto.conf files as per the needs. Following explain the changes done for this example:
- postgresql.conf : listen_addresses commented so as to default to localhost
- postgresql.auto.conf : removed sudo bmuser from restore_command
Bring up this DATA in /tmp/data and check the existence of your records.
Conclusion
This was just the tip of an iceberg. Barman is way deeper than this because of the functionality it provides – e.g. acting as a synchronised standby, hook scripts and so forth. Needless to say, the documentation in totality should be explored to configure it as per the needs of your production environment.