blog
Introduction to MaxScale Administration Using maxctrl for MariaDB Cluster

MariaDB Cluster consists of MariaDB Server with Galera Cluster and MariaDB MaxScale. As a multi-master replication solution, any MariaDB Server with Galera Cluster can operate as a primary server. This means that changes made to any node in the cluster replicate to every other node in the cluster, using certification-based replication and global ordering of transactions for the InnoDB storage engine. MariaDB MaxScale is a database proxy, sitting on top of the MariaDB Server that extends the high availability, scalability, and security while at the same time simplifying application development by decoupling it from the underlying database infrastructure.
In this blog series, we are going to look at the MaxScale administration using maxctrl for our MariaDB Cluster. In this first installment of the blog series, we are going to cover the introduction and some basics of maxctrl command-line utility. Our setup consists of one MaxScale server and a 3-node MariaDB 10.4 with Galera 4, as illustrated in the following diagram:
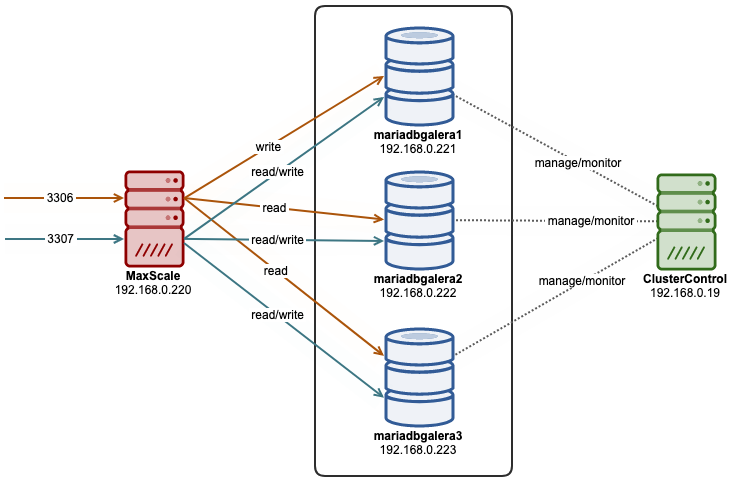
Our MariaDB Cluster was deployed and managed by ClusterControl, while our MaxScale host is a new host in the cluster and was not deployed by ClusterControl for the purpose of this walkthrough.
MaxScale Installation
The MaxScale installation is pretty straightforward. Choose the right operating system from the MariaDB download page for MaxScale and download it. The following example shows how one would install MaxScale on a CentOS 8 host:
$ wget https://dlm.mariadb.com/1067156/MaxScale/2.4.10/centos/8/x86_64/maxscale-2.4.10-1.centos.8.x86_64.rpm
$ yum localinstall maxscale-2.4.10-1.centos.8.x86_64.rpm
$ systemctl enable maxscale
$ systemctl start maxscale
After the daemon is started, by default, MaxScale components will be running on the following ports:
- 0.0.0.0:4006 – Default read-write splitting listener.
- 0.0.0.0:4008 – Default round-robin listener.
- 127.0.0.1:8989 – MaxScale Rest API.
The above ports are changeable. It is common for a standalone MaxScale server in production to be running with the read/write split on port 3306 and round-robin on port 3307. This configuration is what we are going to deploy in this blog post.
Important Files and Directory Structure
Once the package is installed, you will get the following utilities/programs:
- maxscale – The MaxScale itself.
- maxctrl – The command-line administrative client for MaxScale which uses the MaxScale REST API for communication.
- maxadmin – The deprecated MaxScale administrative and monitor client. Use maxctrl instead.
- maxkeys – This utility writes into the file .secrets, in the specified directory, the AES encryption key and init vector that is used by the utility maxpasswd, when encrypting passwords used in the MariaDB MaxScale configuration file.
- maxpasswd – This utility creates an encrypted password using a .secrets file that has earlier been created using maxkeys.
MaxScale will load all the configuration options from the following locations, in the particular order:
- /etc/maxscale.cnf
- /etc/maxscale.cnf.d/*.cnf
- /var/lib/maxscale/maxscale.cnf.d/*.cnf
To understand further on MaxScale configuration, check out the MaxScale Configuration Guide.
Once MaxScale is initialized, the default files and directory structures are:
- MaxScale data directory: /var/lib/maxscale
- MaxScale PID file: /var/run/maxscale/maxscale.pid
- MaxScale log file: /var/log/maxscale/maxscale.log
- MaxScale documentation: /usr/share/maxscale
MaxCtrl – The CLI
Once started, we can use the MaxCtrl command-line client to administer the MaxScale by using the MaxScale REST API listens on port 8989 on the localhost. The default credentials for the REST API are “admin:mariadb”. The users used by the REST API are the same that are used by the MaxAdmin network interface. This means that any users created for the MaxAdmin network interface should work with the MaxScale REST API and MaxCtrl.
We can use the maxctrl utility in interactive mode, similar to the mysql client. Just type “maxctrl” and you will get into the interactive mode (where the prompt changed from the shell prompt to maxctrl prompt), just like the following screenshot:
Alternatively, we can execute the very same command directly in the shell prompt, for example:
MaxCtrl command options are depending on the MaxScale version that comes with it. At the time of this writing, the MaxScale version is 2.4 and you should look into this documentation for a complete list of commands. MaxCtrl utilizes the MaxScale REST API interface, which explains in detail here.
Adding MariaDB Servers into MaxScale
When we first start our MaxScale, it will generate a configuration file at /etc/maxscale.cnf with some default parameters and examples. We are not going to use this configuration and we are going to create our own instead. Create a backup of this file because we want to empty it later on:
$ mv /etc/maxscale.cnf /etc/maxscale.cnf.bak
$ cat /dev/null > /etc/maxscale.cnf # empty the file
Restart the MaxScale to start everything fresh:
$ systemctl restart maxscaleThe term “server” in MaxScale basically means the backend MariaDB server, as in this case, all 3 nodes of our MariaDB Cluster. To add all the 3 MariaDB Cluster servers into MaxScale runtime, use the following commands:
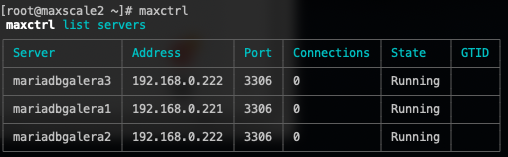
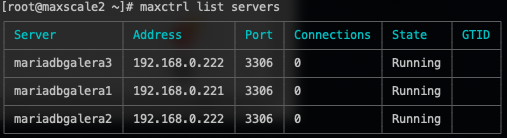
$ maxctrl create server mariadbgalera1 192.168.0.221 3306
$ maxctrl create server mariadbgalera2 192.168.0.222 3306
$ maxctrl create server mariadbgalera3 192.168.0.222 3306
To verify the added servers, use the list command:
$ maxctrl list serversAnd you should see the following output:
Adding Monitoring into MaxScale
The next thing is to configure the monitoring service for MaxScale usage. MaxScale supports a number of monitoring modules depending on the database type, namely:
- MariaDB Monitor
- Galera Monitor
- Clustrix Monitor
- ColumnStore Monitor
- Aurora Monitor
In this setup, we are going to use the Galera Monitor module called “galeramon”. Firstly, we need to create a database user to be used by MaxScale on one of the servers in the MariaDB Cluster. In this example we picked mariadbgalera1, 192.168.0.221 to run the following statements:
MariaDB> CREATE USER maxscale_monitor@'192.168.0.220' IDENTIFIED BY 'MaXSc4LeP4ss';
MariaDB> GRANT SELECT ON mysql.* TO 'maxscale_monitor'@'192.168.0.220';
MariaDB> GRANT SHOW DATABASES ON *.* TO 'maxscale_monitor'@'192.168.0.220';
Where 192.168.0.220 is the IP address of our MaxScale server.
It’s not safe to store the maxscale_monitor user password in plain text. It’s highly recommended to store the password in an encrypted format instead. To achieve this, we need to generate a secret key specifically for this MaxScale instance. Use the “maxkeys” utility to generate the secret key that will be used by MaxScale for encryption and decryption purposes:
$ maxkeys
Generating .secrets file in /var/lib/maxscale.
Now we can use the maxpasswd utility to generate the encrypted value of our password:
$ maxpasswd MaXSc4LeP4ss
D91DB5813F7C815B351CCF7D7F1ED6DB
We will always use the above value instead when storing our monitoring user credentials inside MaxScale. Now we are ready to add the Galera monitoring service into MaxScale using maxctrl:
maxctrl> create monitor galera_monitor galeramon servers=mariadbgalera1,mariadbgalera2,mariadbgalera3 user=maxscale_monitor password=D91DB5813F7C815B351CCF7D7F1ED6DBVerify with the following command:

Adding Services into MaxScale
Service is basically how MaxScale should route the queries to the backend servers. MaxScale 2.4 supports multiple services (or routers), namely:
- Avrorouter
- Binlogrouter
- Cat
- CLI
- HintRouter
- Readconnroute
- Readwritesplit
- SchemaRouter
- SmartRouter
For our MariaDB Cluster, we only need two routing services – Read-write split and round-robin load balancing. For read-write splitting, write queries will be forwarded to only a single MariaDB server until the server is unreachable, where MaxScale will then forward the write queries to the next available node. For round-robin balancing, the queries will be forwarded to all of the backend nodes in a round-robin fashion.
Create a routing service for round-robin (or multi-master):
maxctrl> create service Round-Robin-Service readconnroute user=maxscale_monitor password=D91DB5813F7C815B351CCF7D7F1ED6DB --servers mariadbgalera1 mariadbgalera2 mariadbgalera3Create another routing service for read-write splitting (or single-master):
maxctrl> create service Read-Write-Service readwritesplit user=maxscale_monitor password=D91DB5813F7C815B351CCF7D7F1ED6DB --servers mariadbgalera1 mariadbgalera2 mariadbgalera3Verify with:

All the successfully created components by MaxCtrl will generate its own configuration file under /var/lib/maxscale/maxscale.cnf.d. At this point, the directory looks like this:
$ ls -l /var/lib/maxscale/maxscale.cnf.d
total 24
-rw-r--r--. 1 maxscale maxscale  532 Jul  5 13:18 galera_monitor.cnf
-rw-r--r--. 1 maxscale maxscale  250 Jul  5 12:55 mariadbgalera1.cnf
-rw-r--r--. 1 maxscale maxscale  250 Jul  5 12:55 mariadbgalera2.cnf
-rw-r--r--. 1 maxscale maxscale  250 Jul  5 12:56 mariadbgalera3.cnf
-rw-r--r--. 1 maxscale maxscale 1128 Jul  5 16:01 Read-Write-Service.cnf
-rw-r--r--. 1 maxscale maxscale  477 Jul  5 16:00 Round-Robin-Service.cnf
Adding Listeners into MaxScale
Listeners represent the ports the service will listen to incoming connections. It can be a port or UNIX socket file and the component type must be “listener”. Commonly, listeners are tied to services. In our setup, we are going to create two listeners – Read-Write Listener on port 3306 and Round-Robin Listener on port 3307:
maxctrl> create listener Read-Write-Service Read-Write-Listener 3306 --interface=0.0.0.0 --authenticator=MariaDBAuth
maxctrl> create listener Round-Robin-Service Round-Robin-Listener 3307 --interface=0.0.0.0 --authenticator=MariaDBAuth
Verify with the following commands:

At this point, our MaxScale is now ready to load balance the queries to our MariaDB Cluster. From the applications, send the queries to the MaxScale host on port 3306, where the write queries will always hit the same database node while the read queries will be sent to the other two nodes. This is also known as a single-writer setup. If you would like to use a multi-writer setup, where writes will be forwarded to all backend MariaDB nodes based on round-robin balancing algorithms. You can further fine-tune the balancing by using priority and weight.
Again, when changing the configuration options via maxctrl, all successfully created components will have its own configuration file inside /var/lib/maxscale/maxscale.cnf.d, as shown in the following output:
$ ls -l /var/lib/maxscale/maxscale.cnf.d
-rw-r--r--. 1 maxscale maxscale  532 Jul  5 13:18 galera_monitor.cnf
-rw-r--r--. 1 maxscale maxscale  250 Jul  5 12:55 mariadbgalera1.cnf
-rw-r--r--. 1 maxscale maxscale  250 Jul  5 12:55 mariadbgalera2.cnf
-rw-r--r--. 1 maxscale maxscale  250 Jul  5 12:56 mariadbgalera3.cnf
-rw-r--r--. 1 maxscale maxscale  259 Jul  5 16:06 Read-Write-Listener.cnf
-rw-r--r--. 1 maxscale maxscale 1128 Jul  5 16:06 Read-Write-Service.cnf
-rw-r--r--. 1 maxscale maxscale  261 Jul  5 16:06 Round-Robin-Listener.cnf
-rw-r--r--. 1 maxscale maxscale  477 Jul  5 16:06 Round-Robin-Service.cnf
The above configuration options can be directly modified to further suit your needs, but it requires the MaxScale service to be restarted to load the new changes. If you would like to start fresh again, you could wipe everything under this directory and restart MaxScale.
In the next episode, we will look into MaxCtrl’s management and monitoring commands for our MariaDB Cluster.


