blog
Integrating ClusterControl with SNMP – A Proof of Concept : Part One

ClusterControl comes with a number of distinctive alerts (or alarms) which you won’t find in other monitoring systems. ClusterControl understands a database cluster topology as a whole – all database nodes and the relation between them, including the dependent nodes or clusters like slave cluster, reverse-proxy and arbitrator nodes. For example, ClusterControl is able to detect and report a partitioned cluster, time drift between all nodes in the cluster, cluster recovery failure, cluster-to-cluster replication failure and many more cluster-wide specific alarms. Hence, it would be great if we could integrate ClusterControl alarms with any existing SNMP-based monitoring or paging system.
In this blog series, we are going to showcase a proof of concept on how to integrate ClusterControl with SNMP protocol. At the end of the blog series, we would ultimately be able to send an SNMP trap to an SNMP manager (Nagios, Zabbix, etc). In this part, we are going to cover the following parts:
- MIB (SNMP object definition)
- SNMP agent (reporting)
Architecture
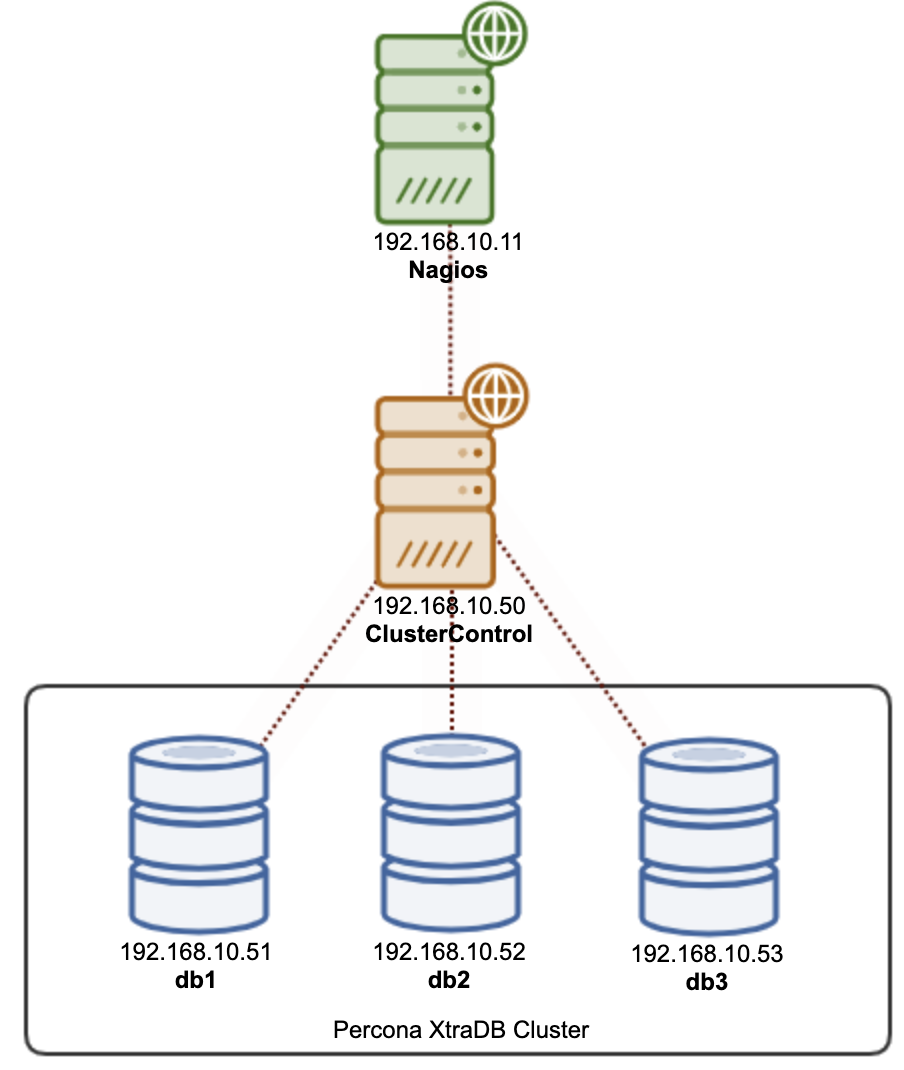
In this example, we have a Nagios server as the SNMP manager, with a ClusterControl server (SNMP agent) monitoring a 3-node Galera Cluster as illustrated in the following diagram:
All Instructions in this post are based on CentOS 7.
Installing SNMP on the ClusterControl server
1) Install SNMP-related packages:
$ yum -y install net-snmp net-snmp-perl net-snmp-utils perl-Net-SNMP perl-CPAN2) Make sure the content of /etc/snmp/snmpd.conf has the following:
$ grep -v '^s*$|^s*#' /etc/snmp/snmpd.conf
com2sec   notConfigUser  default              public
com2sec   mynet          192.168.10.0/16      private
com2sec   mynet          localhost            private
group   notConfigGroup v1            notConfigUser
group   notConfigGroup v2c           notConfigUser
group   myGroup        v2c           mynet
view    all           included   .1
view    systemview    included   .1.3.6.1.2.1.1
view    systemview    included   .1.3.6.1.2.1.25.1.1
access  notConfigGroup ""      any       noauth    exact  systemview none none
access  myGroup        ""      any       noauth    exact  all        all  none
master agentx
syslocation Unknown (edit /etc/snmp/snmpd.conf)
syscontact Root  (configure /etc/snmp/snmp.local.conf)
dontLogTCPWrappersConnects yes
A bit of explanation:
-
Severalnines’s MIB is a private component, therefore, we need to allow only our network, 192.168.10.0/16 and localhost to query the SNMP data. We define this in the “com2sec” section.
-
Then we create a security group called “myGroup”, which only allows connections from “mynet” network, and accepts protocol SNMP version 2c.
-
Then we define the view (what can be seen from the requester). “all” means the SNMP requester can see everything (starting from OID .1). “systemview” is only limited to safe-to-public information like hostname, datetime, etc which is the default for public SNMP users.
-
Then we allow “myGroup” to have an “all” view.
3) Restart the SNMP service to load the changes:
$ systemctl restart snmpd4) Now, you should be able to see some MIBs if we perform snmpwalk:
$ snmpwalk -v2c -cpublic localhost # should return limited entries
$ snmpwalk -v2c -cprivate localhost # should return thousands of entries because the private view starts with .1
Installing ClusterControl MIBs on the ClusterControl server
MIB stands for Management Information Base. It is a formatted text file that lists the data objects used by a particular piece of SNMP equipment. Without MIB, the OID used by SNMP can’t be translated into a “thing”. The SNMP MIB definitions are written in concise MIB format in accordance with RFC 1212. Severalnines has its own Private Enterprise Number (PEN), 57397. You can check the registered enterprise number database here.
1) Copy the SEVERALNINES-CLUSTERCONTROL-MIB.txt and put it under /usr/share/snmp/mibs. To check which MIB path SNMP would look for, use this command:
$ net-snmp-config --default-mibdirs2) To load our custom MIB, we need to create a new configuration file at /etc/snmp/snmp.conf (notice without the “d”) and add the following line:
mibs +SEVERALNINES-CLUSTERCONTROL-MIB3) Add the following line inside /etc/sysconfig/snmpd to allow remote access to SNMP service:
OPTIONS="-Lsd -Lf /dev/null -p /var/run/snmpd.pid -a"4) Restart SNMP daemon to load the change:
$ systemctl restart snmpd5) To see if the MIB is loaded properly, use the snmptranslate command:
$ snmptranslate -IR -On -Tp severalnines
+--severalnines(57397)
   |
   +--clustercontrolMIB(1)
      |
      +--alarms(1)
         |
         +--alarmSummary(1)
         |  |
         |  +-- -R-- Integer32 totalAlarms(1)
         |  |        Range: 0..2147483647
         |  +-- -R-- Integer32 totalCritical(2)
         |  |        Range: 0..2147483647
         |  +-- -R-- Integer32 totalWarning(3)
         |  |        Range: 0..2147483647
         |  +-- -R-- Integer32 clusterId(4)
         |           Range: 0..2147483647
         |
         +--alarmSummaryGroup(2)
         |
         +--alarmNotification(3)
            |
            +--criticalAlarmNotification(1)
            +--criticalAlarmNotificationEnded(2)
The above output shows that we have loaded our ClusterControl’s MIB. For this proof-of-concept, we only have one main component called “alarms”, and underneath it, we have 3 sub-components alongside their datatype:
-
alarmSummary – Summary of alarms. Just showing critical, warning and the corresponding cluster ID.
-
alarmSummaryGroup – Grouping of our SNMP objects.
-
alarmNotification – This is for SNMP trap definition. Without this, our SNMP trap won’t be understandable by the SNMP manager.
The numbering next to it indicates the object identifier (OID). For example, totalWarning OID is .1.3.6.1.4.1.57397.1.1.1.3 and criticalAlarmNotification OID is .1.3.6.1.4.1.57397.1.1.3.1. For private organizations, OID always starts with “.1.3.6.1.4.1”, followed by the enterprise number (57397 is Severalnines’ PEN) and then the MIB objects.
Installing the SNMP agent on the ClusterControl server
To “serve” the SNMP object output (the number of critical alarms, cluster id and so on), we need to extend the SNMP daemon with an SNMP agent. In SNMP, they call this protocol as AgentX, which we have defined in the snmpd.conf under this section:
master agentxFor this proof-of-concept, I have prepared a script written in Perl to retrieve and report the alarm’s summary into SNMP/OID formatting.
1) Install Perl SNMP component:
$ yum install perl-Net-SNMP2) Put clustercontrol-snmp-agent.pl anywhere accessible by the SNMP process. It is recommended to put it under the /usr/share/snmp directory.
$ ls -al /usr/share/snmp/clustercontrol-snmp-agent.pl
-rwxr-xr-x 1 root root 2974 May 10 14:16 /usr/share/snmp/clustercontrol-snmp-agent.pl
3) Configure the following lines inside the script (line 14 to 17):
my $clusterId = 23; # cluster ID that you want to monitor
my $totalAlarm = `/bin/s9s alarms --list --cluster-id=$clusterId --batch | wc -l`;
my $criticalAlarm = `/bin/s9s alarms --list --cluster-id=$clusterId --batch | grep CRITICAL | wc -l`;
my $warningAlarm = `/bin/s9s alarms --list --cluster-id=$clusterId --batch | grep WARNING | wc -l`;
4) Set the script with executable permission:
$ chmod 755 /usr/share/snmp/clustercontrol-snmp-agent.pl5) Run the script:
$ perl /usr/share/snmp/clustercontrol-snmp-agent.pl
NET-SNMP version 5.7.2 AgentX subagent connected
Make sure you see the “subagent connected” line. At this point, the ClusterControl alarm should be reported correctly via SNMP protocol. To check, simply use the snmpwalk command and execute it from a remote server, for example from the Nagios server (snmpwalk is provided by net-snmp-utils package):
$ snmpwalk -v2c -c private 192.168.10.50 .1.3.6.1.4.1.57397.1.1.1
SEVERALNINES-CLUSTERCONTROL-MIB::totalAlarms = INTEGER: 3
SEVERALNINES-CLUSTERCONTROL-MIB::totalCritical = INTEGER: 2
SEVERALNINES-CLUSTERCONTROL-MIB::totalWarning = INTEGER: 1
SEVERALNINES-CLUSTERCONTROL-MIB::clusterId = INTEGER: 23
Alternatively, you can also use the MIB object name instead which produces the same result:
$ snmpwalk -v2c -c private 192.168.10.50 SEVERALNINES-CLUSTERCONTROL-MIB::alarmSummary
SEVERALNINES-CLUSTERCONTROL-MIB::totalAlarms = INTEGER: 3
SEVERALNINES-CLUSTERCONTROL-MIB::totalCritical = INTEGER: 2
SEVERALNINES-CLUSTERCONTROL-MIB::totalWarning = INTEGER: 1
SEVERALNINES-CLUSTERCONTROL-MIB::clusterId = INTEGER: 23
Final Thoughts
This is just a very simple proof-of-concept (PoC) on how ClusterControl can be integrated with the SNMP protocol. In the next episode, we are going to look into sending SNMP traps from the ClusterControl server to the SNMP manager like Nagios, Zabbix or Sensu.