blog
Exploring the Different Ways to Encrypt Your MariaDB Data

Encrypting your MariaDB database, whether it is in-transit and at-rest, is one of the most important things that an organization should consider if you value your data.
Organizations that deal with financial transactions, medical records, confidential information, or even personal data must require this type of data protection. Fundamentally, database encryption will transform your readable data into a format that is unreadable (or at least hard to be decrypted) by any unauthorized user.
Encrypting your data prevents the misuse or malicious intent by hackers or unauthorized personnel that could damage your business. Unencrypted data is prone to attack by hackers who inject malicious data that could damage your infrastructure or steal information. Quartz recently released an article about the biggest breach that happened along these lines and it’s alarming that data has been stolen from billions of accounts over the past two decades.
In this blog, we will discuss various ways to encrypt your MariaDB data whether it’s at-rest and in-transit. We will provide you with a basic understanding of encryption and how to use it so you can utilize these approaches to keep your data secure.
Encrypting MariaDB Data: In-Transit
MariaDB does not, by default, use encryption during data transmission over the network from server to client. However, using the default setup could provoke a potential hacker to eavesdrop on an unsecured / unencrypted channel. If you are operating on an isolated or highly secure environment, this default state may be acceptable. This, however, is not ideal when your client and network are on different network as it setups your database up for a potential “man-in-the-middle” attack.
To avoid these attacks, MariaDB allows you to encrypt data in-transit between the server and clients using the Transport Layer Security (TLS) protocol (formerly known as Secure Socket Layer or SSL). To start, you need to ensure that your MariaDB server was compiled with TLS support. You can verify this by running SHOW GLOBAL VARIABLES statement as shown below:
MariaDB [(none)]> SHOW GLOBAL VARIABLES LIKE 'version_ssl_library';
+---------------------+---------------------------------+
| Variable_name       | Value                           |
+---------------------+---------------------------------+
| version_ssl_library | OpenSSL 1.0.1e-fips 11 Feb 2013 |
+---------------------+---------------------------------+
1 row in set (0.001 sec)
You might be confused in how SSL & TSL differ. Documentation may use the term SSL and variables for configuration uses ssl_* as prefix as well, however, MariaDB only supports its secure successors and no longer the older SSL versions. You might have to identify and use the correct versions of MariaDB that requires the right support of TLS versions you require to use. For example, PCI DSS v3.2 recommends using a minimum protocol version of TLSv1.2 which old versions of MariaDB supports. However, with TLS 1.3, requires OpenSSL 1.1.1, is faster due to a more efficient handshake between the two systems communicating and this is supported since MariaDB 10.2.16 and MariaDB 10.3.8.
To utilize the ciphers available for a specific TLS version, you can define it using the –ssl-cipher in the mysqld command or ssl-cipher variable in the configuration file. Take note that TLSv1.3 ciphers cannot be excluded when using OpenSSL, even by using the ssl_cipher system variable.
Configuration Parameters To Encrypt Data In-Transit
To encrypt your data in-transit, you can do the sequence of commands listed below:
Generate A CA Certificate
openssl genrsa 2048 > ca-key.pem
openssl req -new -x509 -nodes -days 365000 -subj "/C=PH/ST=Davao Del Sur/L=Davao City/O=Maximus Aleksandre/CN=CA Server"  -key ca-key.pem -out ca-cert.pem
Generate A Server Certificate
openssl req -newkey rsa:2048 -days 365000 -nodes -keyout server-key.pem -out server-req.pem -subj "/C=PH/ST=Davao Del Sur/L=Davao City/O=Maximus Aleksandre/CN=DB Server"
openssl  rsa -in server-key.pem -out server-key.pem
openssl x509 -req -in server-req.pem -days 365000 -CA ca-cert.pem -CAkey ca-key.pem -set_serial 01 -out server-cert.pem
Generate A Client Certificate
openssl req -newkey rsa:2048 -days 365000 -nodes -keyout client-key.pem -out client-req.pem  -subj "/C=PH/ST=Davao Del Sur/L=Davao City/O=Maximus Aleksandre/CN=Client Server"
openssl rsa -in client-key.pem -out client-key.pem
openssl  x509 -req -in client-req.pem -days 365000 -CA ca-cert.pem -CAkey ca-key.pem -set_serial 01 -out client-cert.pem
Take note that your Common Name (CN) in the -subj argument must be unique against your CA, server and client certificates you are generating. Technically, CA and Server can have same CN but it’s best to make it unique identifier for these three. Otherwise, you’ll receive an error as such:
ERROR 2026 (HY000): SSL connection error: tlsv1 alert unknown caAlright, certificates and keys are in place. You need to specify the path using the ssl_* variables in your MySQL configuration file (e.g. /etc/my.cnf for RHEL-based OS or /etc/mysql/my.cnf for Debian/Ubuntu OS). See the example config below:
[msqld]
...
ssl_ca=/etc/ssl/galera/self-gen/ca-cert.pem
ssl_cert=/etc/ssl/galera/self-gen/server-cert.pem
ssl_key=/etc/ssl/galera/self-gen/server-key.pem
Of course, you must specify the correct path where have you placed your certificate and keys.
Then place these parameters under the [client-mariadb] section of your configuration file as such below:
[client-mariadb]
ssl_ca = /etc/ssl/galera/self-gen/ca-cert.pem
ssl_cert=/etc/ssl/galera/self-gen/client-cert.pem
ssl_key=/etc/ssl/galera/self-gen/client-key.pem
As mentioned earlier, you can specify what type of cipher that your SSL/TLS configuration can use. This can be done by specifying the configuration setup below:
[mysqld]
…
ssl_ca=/etc/ssl/galera/self-gen/ca-cert.pem
ssl_cert=/etc/ssl/galera/self-gen/server-cert.pem
ssl_key=/etc/ssl/galera/self-gen/server-key.pem
ssl-cipher=AES256-GCM-SHA384
Or you can use the following configuration as such below:
ssl-cipher=TLSv1.2      ### This will use all Ciphers available in TLS v1.2
ssl-cipher=HIGH:!DSS:!RCA-SHA:!DES-CBC3-SHA:!aNULL@STRENGTH       ### Will list strong ciphers available and exclude ciphers in prefix.
The last line denotes the equivalent of this command:
openssl ciphers -v 'HIGH:!DSS:!RCA-SHA:!DES-CBC3-SHA:!aNULL@STRENGTH'This will exclude weak ciphers and those ciphers that are in the prefix form such as DHE-DSS-AES256-GCM-SHA384 cipher for example.
Generating your Certificate using ClusterControl
Alternatively, you can use ClusterControl to generate the certificates and keys for you. To do this, you can do the following as seen below:
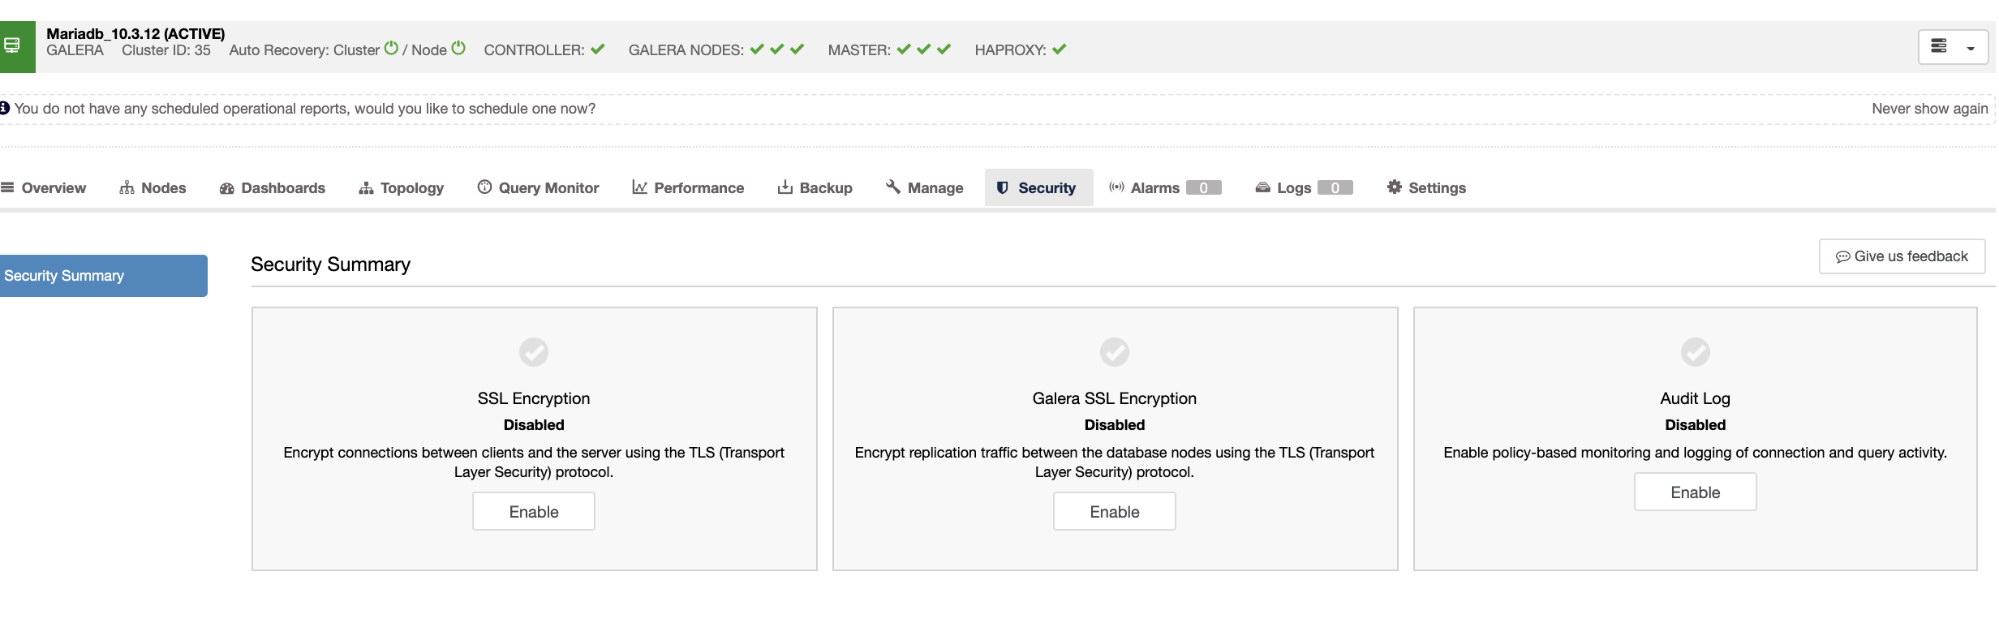
- Select your MariaDB Cluster, then go to the Security tab and select SSL Encryption. In my example below, this is a MariaDB Galera Cluster:
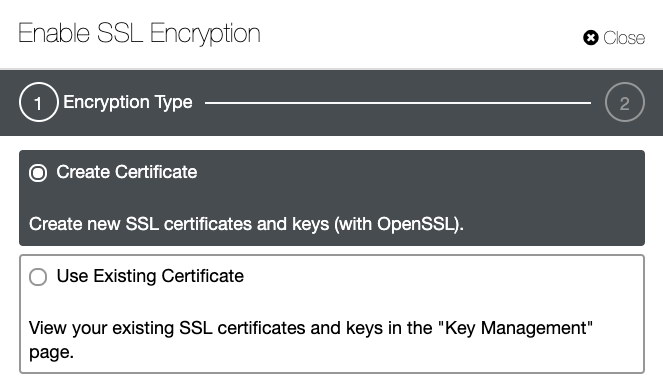
- Select the SSL Encryption and enable it. You’ll be able to create a new certificate or choose an existing one. For this sample, I’ll be choosing the “Create Certificate” option:
- The last step is to configure the days of expiration for your certificate. See below:
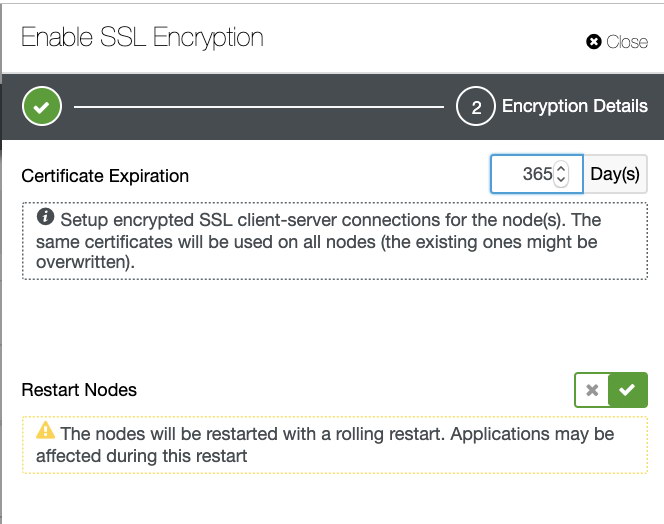
If you click “Restart Nodes,” ClusterControl will perform a rolling restart. Take note, if you are using MariaDB 10.4 (which is currently on its RC version) you can use SSL without restarting your MariaDB server. Just use the FLUSH SSL command which is a new feature added in MariaDB 10.4 version.
Another way to handle your TLS/SSL certificates/keys, you can also use the Key Management under ClusterControl. Check out this blog to learn more about how to do this.
Create Your TLS/SSL MariaDB User
In case you thought you’re done, you’re not. You need to ensure that your users are required to use SSL when they connect to the server. This user will be required to always interact with the server through a private channel. This is very important because you need to make sure that all your clients will be interacting with your server in a very secure and private manner.
To do this, just do the following example:
MariaDB [(none)]> CREATE USER mysecure_user@'192.168.10.200' IDENTIFIED BY 'myP@55w0rd';
Query OK, 0 rows affected (0.005 sec)
MariaDB [(none)]> GRANT ALL ON *.* TO mysecure_user@'192.168.10.200' REQUIRE SSL;
Query OK, 0 rows affected (0.005 sec)Make sure that upon connecting to your client/application host, copy the certificate that you have generated based on the previous steps.
Verifying Your Connection
Testing your connection if it’s encrypted or not is very important to determine the status. To do that, you can do the following command below:
mysql -e "status"|grep -i 'cipher'
SSL:                    Cipher in use is DHE-RSA-AES256-GCM-SHA384
Alternatively, OpenSSL version 1.1.1 added support for -starttls mysql. There’s an available statically compiled openssl binary which you can get here https://testssl.sh/openssl-1.0.2k-dev-chacha.pm.ipv6.Linux+FreeBSD.tar.gz (or checkout this presentation in PDF format). Then you can do the following command below:
echo | bin/openssl.Linux.x86_64.static s_client -starttls mysql -connect localhost:3306 -CAfile /etc/ssl/galera/self-gen/ca-cert.pemThe example result would be like below:
$ echo | bin/openssl.Linux.x86_64.static s_client -starttls mysql -connect localhost:3306 -CAfile /etc/ssl/galera/self-gen/ca-cert.pem
CONNECTED(00000003)
depth=1 C = PH, ST = Davao Del Sur, L = Davao City, O = Maximus Aleksandre, CN = CA Server
verify return:1
depth=0 C = PH, ST = Davao Del Sur, L = Davao City, O = Maximus Aleksandre, CN = DB Server
verify return:1
---
Certificate chain
 0 s:/C=PH/ST=Davao Del Sur/L=Davao City/O=Maximus Aleksandre/CN=DB Server
   i:/C=PH/ST=Davao Del Sur/L=Davao City/O=Maximus Aleksandre/CN=CA Server
 1 s:/C=PH/ST=Davao Del Sur/L=Davao City/O=Maximus Aleksandre/CN=CA Server
   i:/C=PH/ST=Davao Del Sur/L=Davao City/O=Maximus Aleksandre/CN=CA Server
---
Server certificate
-----BEGIN CERTIFICATE-----
MIIDTDCCAjQCAQEwDQYJKoZIhvcNAQELBQAwazELMAkGA1UEBhMCUEgxFjAUBgNV
BAgMDURhdmFvIERlbCBTdXIxEzARBgNVBAcMCkRhdmFvIENpdHkxGzAZBgNVBAoM
Ek1heGltdXMgQWxla3NhbmRyZTESMBAGA1UEAwwJQ0EgU2VydmVyMCAXDTE5MDYx
MDAyMTMwNFoYDzMwMTgxMDExMDIxMzA0WjBrMQswCQYDVQQGEwJQSDEWMBQGA1UE
CAwNRGF2YW8gRGVsIFN1cjETMBEGA1UEBwwKRGF2YW8gQ2l0eTEbMBkGA1UECgwS
TWF4aW11cyBBbGVrc2FuZHJlMRIwEAYDVQQDDAlEQiBTZXJ2ZXIwggEiMA0GCSqG
SIb3DQEBAQUAA4IBDwAwggEKAoIBAQDNwFuoqJg8YlrDinxDZN4+JjFUTGlDfhmy
9H/1C4fZToegvd3RzU9mz3/Fgyuoez4szHDgkn7o4rqmKAH6tMm9R44qtBNGlxka
fn12PPXudDvij4A9C3nVatBJJXTSvSD4/eySY33kAS1DpKsgsTgKAKOsyadcvXYU
IP5nfFc7pxX/8qZADVmyeik4M+oLxO6ryurt0wmUhOmlz5zQghh9kFZLA49l+p95
m5D53d/O+Qj4HSb2ssZD2ZaRc2k4dMCVpa87xUbdP/VVLeu0J4BE3OJiwC0N1Jfi
ZpP2DOKljsklaAYQF+tPnWi5pgReEd47/ql0fNEjeheF/MJiJM1NAgMBAAEwDQYJ
KoZIhvcNAQELBQADggEBAAz7yB+UdNYJ1O5zJI4Eb9lL+vNVKhRJ8IfNrwKVbpAT
eQk9Xpn9bidfcd2gseqDTyixZhWjsjO2LXix7jRhH1DrJvhGQ7+1w36ujtzscTgy
ydLH90CnE/oZHArbBhmyuqmu041w5rB3PpI9i9SveezDrbVcaL+qeGo8s4ATB2Yr
Y3T3OTqw6o/7cTJJ8S1aXBLTyUq5HAtOTM2GGZMSYwVqUsmBHA3d7M8i7yp20RVH
78j1H6+/hSSY4SDhwr04pSkzmm6HTIBCgOYrmEV2sQ/YeMHqVrSplLRY3SZHvqHo
gbSnasOQAE1oJnSNyxt9CRRAghM/EHEnsA2OlFa9iXQ=
-----END CERTIFICATE-----
subject=/C=PH/ST=Davao Del Sur/L=Davao City/O=Maximus Aleksandre/CN=DB Server
issuer=/C=PH/ST=Davao Del Sur/L=Davao City/O=Maximus Aleksandre/CN=CA Server
---
No client certificate CA names sent
Client Certificate Types: RSA fixed DH, DSS fixed DH, RSA sign, DSA sign, ECDSA sign
Requested Signature Algorithms: RSA+SHA512:DSA+SHA512:ECDSA+SHA512:RSA+SHA384:DSA+SHA384:ECDSA+SHA384:RSA+SHA256:DSA+SHA256:ECDSA+SHA256:RSA+SHA224:DSA+SHA224:ECDSA+SHA224:RSA+SHA1:DSA+SHA1:ECDSA+SHA1
Shared Requested Signature Algorithms: RSA+SHA512:DSA+SHA512:ECDSA+SHA512:RSA+SHA384:DSA+SHA384:ECDSA+SHA384:RSA+SHA256:DSA+SHA256:ECDSA+SHA256:RSA+SHA224:DSA+SHA224:ECDSA+SHA224:RSA+SHA1:DSA+SHA1:ECDSA+SHA1
Peer signing digest: SHA512
Server Temp Key: DH, 2048 bits
---
SSL handshake has read 3036 bytes and written 756 bytes
---
New, TLSv1/SSLv3, Cipher is DHE-RSA-AES256-GCM-SHA384
Server public key is 2048 bit
Secure Renegotiation IS supported
Compression: NONE
Expansion: NONE
No ALPN negotiated
SSL-Session:
    Protocol  : TLSv1.2
    Cipher    : DHE-RSA-AES256-GCM-SHA384
    Session-ID: 46E0F6FA42779DB210B4DF921A68E9E4CC39ADD87D28118DB0073726B98C0786
    Session-ID-ctx:
    Master-Key: 2A2E6137929E733051BE060953049A0553F49C2F50A183EEC0C40F7EFB4E2749E611DF54A88417518A274EC904FB3CE6
    Key-Arg   : None
    PSK identity: None
    PSK identity hint: None
    SRP username: None
    TLS session ticket lifetime hint: 300 (seconds)
    TLS session ticket:
    0000 - 4a dd f3 7f 1e b7 9e cb-77 58 b9 75 53 34 5c 61   J.......wX.uS4a
    0010 - 3a 4d 0e aa e2 6b 27 8e-11 ff be 24 ad 66 88 49   :M...k'....$.f.I
    0020 - c1 ba 20 20 d8 9f d5 5c-23 9d 64 dc 97 f2 fa 77   ..  ...#.d....w
    0030 - bf e6 26 1f 2c 98 ee 3b-71 66 0c 04 05 3e 54 c1   ..&.,..;qf...>T.
    0040 - 88 b6 f7 a9 fd b8 f9 84-cd b8 99 9f 6e 50 3b 13   ............nP;.
    0050 - 90 30 91 7d 48 ea 11 f7-3f b7 6b 65 2e ea 7e 61   .0.}H...?.ke..~a
    0060 - 70 cd 4e b8 43 54 3d a0-aa dc e5 44 a7 41 3a 5e   p.N.CT=....D.A:^
    0070 - 3e cb 45 57 33 2b a4 8f-75 d8 ce a5 9e 00 16 50   >.EW3+..u......P
    0080 - 24 aa 7a 54 f8 26 65 74-11 d7 f3 d6 66 3b 14 60   $.zT.&et....f;.`
    0090 - 33 98 4a ef e2 17 ba 33-4e 7f 2b ce 46 d7 e9 11   3.J....3N.+.F...

    Start Time: 1560133350
    Timeout   : 300 (sec)
    Verify return code: 0 (ok)
---
DONEEncrypting MariaDB Data: At-Rest
Encrypted data that is stored physically inside your hardware storage (i.e. at rest) provides more stability and protection against a data breach. If a malicious attacker can login to your MariaDB database, then they can read the data in plain text. Similar to using a strings command in Linux, you’d be able to easily retrieve the data from the database. Moreover, it adds more danger if the attacker has an advanced understanding of the file format of the tablespace.
Encryption at-rest is an additional protection, but it is not a replacement for a good firewall, strong passwords, correct user permissions, and in-transit encryption between the client and server.
MariaDB’s support for encryption on tables and tablespaces was added in version 10.1.3. With your tables being encrypted, your data is almost impossible for someone to steal. This type of encryption also allows your organization to be compliant with government regulations like GPDR.,
Once you have enabled data-at-rest encryption in MariaDB, tables that are defined with ENCRYPTED=YES or with innodb_encrypt_tables=ON, will have your stored data encrypted. It’s decrypted only when accessed via MariaDB’s database, otherwise, the data is unreadable.
For example, reading a data that is unencrypted, it will show you as such:
$ strings admin_logs.ibd|head -10
=r7N
infimum
supremum
infimum
supremum/
failThe verification code you entered is incorrect.KK
elmo1234failThe password or username you entered is invalidKK
elmo1234failThe password or username you entered is invalidKK
elmoasfdfailThe verification code you entered is incorrect.KK
safasffailThe verification code you entered is incorrect.KK
but with encrypted data, your tablespace won’t be readable just like the example below:
# strings user_logs.ibd |head -10
E?*Pa
[+YQ
KNmbUtQ
T_lPAW
GbQ.
] e2
#Rsd
ywY%o
kdUY
{]~GE
It is also noteworthy that MariaDB’s Data-At-Rest encryption adds a data size overhead of roughly 3-5%. MariaDB encryption is also fully supported when using the XtraDB and InnoDB storage engines. Encryption is also supported for the Aria storage engine, but only for tables created with ROW_FORMAT=PAGE (the default) and for the binary log (replication log). MariaDB even allows the user flexibly in what to encrypt. In XtraDB or InnoDB, one can choose to encrypt:
- everything — all tablespaces (with all tables)
- individual tables
- everything, excluding individual tables
Additionally, one can choose to encrypt XtraDB/InnoDB log files (which is recommended).
MariaDB does have it’s limitations. Galera Cluster gcache, for example, is not encrypted but it is planned as part of the MariaDB 10.4 version. You can find a full list of limitations here.
How to Setup and Configure MariaDB for Data-At-Rest Encryption
- Generate a random encryption keys using openssl rand command.
$ mkdir -p /etc/mysql/encryption
$ for i in {1..5}; do openssl rand -hex 32 >> /etc/mysql/encryption/keyfile;  done;
Now, open and edit the file /etc/mysql/encryption/keyfile and add the key ID’s which this will be reference when creating encrypted tables as it’s encryption key id. See ENCRYPTION_KEY_ID for more details. Hence, the following format should be as follows:
In my example keyfile, this looks as the following:
$ cat keyfile 1;687a90b4423c10417f2483726a5901007571c16331d2ee9534333fef4e323075 2;e7bf20f1cbde9632587c2996871cff74871890d19b49e273d13def123d781e17 3;9284c9c80da9a323b3ac2c82427942dfbf1718b57255cc0bc0e2c3d6f15ac3ac 4;abf80c3a8b10643ef53a43c759227304bcffa263700a94a996810b0f0459a580 5;bdbc5f67d34a4904c4adc9771420ac2ab2bd9c6af1ec532e960335e831f02933 - Let’s create or generate a random password using the similar command from step 1:
$ openssl rand -hex 128 > /etc/mysql/encryption/keyfile.key - Before proceeding to the next step, it’s important to take note of the following details about encrypting the key file:
- The only algorithm that MariaDB currently supports to encrypt the key file is Cipher Block Chaining (CBC) mode of Advanced Encryption Standard (AES).
- The encryption key size can be 128-bits, 192-bits, or 256-bits.
- The encryption key is created from the SHA-1 hash of the encryption password.
- The encryption password has a max length of 256 characters.
Now, to encrypt the key file using openssl enc command, run the following command below:
$ openssl enc -aes-256-cbc -md sha1 -pass file:/etc/mysql/encryption/keyfile.key -in /etc/mysql/encryption/keyfile -out /etc/mysql/encryption/keyfile.enc - Add the following variables in your MySQL configuration file (i.e. /etc/my.cnf on RHEL-based Linux OS or /etc/mysql/my.cnf in Debian/Ubuntu Linux based OS)
[mysqld] … #################### DATABASE ENCRYPTION ############################## plugin_load_add = file_key_management file_key_management_filename = /etc/mysql/encryption/keyfile.enc file_key_management_filekey = FILE:/etc/mysql/encryption/keyfile.key file_key_management_encryption_algorithm = aes_cbc encrypt_binlog = 1 innodb_encrypt_tables = ON innodb_encrypt_log = ON innodb_encryption_threads = 4 innodb_encryption_rotate_key_age = 0 # Do not rotate key - Restart MariaDB Server now
$ systemctl start mariadb
Verify and Test The Encryption
To verify and test the encryption, just create a sample table. For example, create the table by doing the following SQL statements below:
MariaDB [test]> CREATE TABLE a (i int) ENGINE=InnoDB ENCRYPTED=YES;
Query OK, 0 rows affected (0.018 sec)
MariaDB [test]> CREATE TABLE b (i int) ENGINE=InnoDB;
Query OK, 0 rows affected (0.003 sec)Then, let’s add some data to the tables:
MariaDB [test]> insert into a values(1),(2);
Query OK, 2 rows affected (0.001 sec)
Records: 2  Duplicates: 0  Warnings: 0
MariaDB [test]> insert into b values(1),(2);
Query OK, 2 rows affected (0.001 sec)
Records: 2 Duplicates: 0 Warnings: 0To check and see what are the tables that are encrypted, just run the following SELECT query below:
MariaDB [test]> SELECT * FROM information_schema.innodb_tablespaces_encryptionG
*************************** 1. row ***************************
                       SPACE: 4
                        NAME: mysql/gtid_slave_pos
           ENCRYPTION_SCHEME: 1
          KEYSERVER_REQUESTS: 1
             MIN_KEY_VERSION: 1
         CURRENT_KEY_VERSION: 1
    KEY_ROTATION_PAGE_NUMBER: NULL
KEY_ROTATION_MAX_PAGE_NUMBER: NULL
              CURRENT_KEY_ID: 1
        ROTATING_OR_FLUSHING: 0
*************************** 2. row ***************************
                       SPACE: 2
                        NAME: mysql/innodb_index_stats
           ENCRYPTION_SCHEME: 1
          KEYSERVER_REQUESTS: 1
             MIN_KEY_VERSION: 1
         CURRENT_KEY_VERSION: 1
    KEY_ROTATION_PAGE_NUMBER: NULL
KEY_ROTATION_MAX_PAGE_NUMBER: NULL
              CURRENT_KEY_ID: 1
        ROTATING_OR_FLUSHING: 0
*************************** 3. row ***************************
                       SPACE: 1
                        NAME: mysql/innodb_table_stats
           ENCRYPTION_SCHEME: 1
          KEYSERVER_REQUESTS: 1
             MIN_KEY_VERSION: 1
         CURRENT_KEY_VERSION: 1
    KEY_ROTATION_PAGE_NUMBER: NULL
KEY_ROTATION_MAX_PAGE_NUMBER: NULL
              CURRENT_KEY_ID: 1
        ROTATING_OR_FLUSHING: 0
*************************** 4. row ***************************
                       SPACE: 3
                        NAME: mysql/transaction_registry
           ENCRYPTION_SCHEME: 1
          KEYSERVER_REQUESTS: 0
             MIN_KEY_VERSION: 1
         CURRENT_KEY_VERSION: 1
    KEY_ROTATION_PAGE_NUMBER: NULL
KEY_ROTATION_MAX_PAGE_NUMBER: NULL
              CURRENT_KEY_ID: 1
        ROTATING_OR_FLUSHING: 0
*************************** 5. row ***************************
                       SPACE: 5
                        NAME: test/a
           ENCRYPTION_SCHEME: 1
          KEYSERVER_REQUESTS: 1
             MIN_KEY_VERSION: 1
         CURRENT_KEY_VERSION: 1
    KEY_ROTATION_PAGE_NUMBER: NULL
KEY_ROTATION_MAX_PAGE_NUMBER: NULL
              CURRENT_KEY_ID: 1
        ROTATING_OR_FLUSHING: 0
*************************** 6. row ***************************
                       SPACE: 6
                        NAME: test/b
           ENCRYPTION_SCHEME: 1
          KEYSERVER_REQUESTS: 1
             MIN_KEY_VERSION: 1
         CURRENT_KEY_VERSION: 1
    KEY_ROTATION_PAGE_NUMBER: NULL
KEY_ROTATION_MAX_PAGE_NUMBER: NULL
              CURRENT_KEY_ID: 1
        ROTATING_OR_FLUSHING: 0
6 rows in set (0.000 sec)
Creating the InnoDB table does not need to specify ENCRYPTED=YES keyword. It’s created automatically as we specified in the configuration file to have innodb_encrypt_tables = ON.
If you want to specify the encryption id of the table to used, you can do the following as well:
MariaDB [test]> CREATE TABLE c (i int) ENGINE=InnoDB ENCRYPTION_KEY_ID = 4;
Query OK, 0 rows affected (0.003 sec)
The ENCRYPTION_KEY_ID was taken from the encryption keyfile which we generated earlier.
Additionally, if you want more testing through shell, you can use the strings command I showed you earlier.
Additional Information on MariaDB Encryption
If your MariaDB instance should not contain any unencrypted tables, just setup the variable in your my.cnf configuration file within the [mysqld] section as follows:
innodb_encrypt_tables = FORCE.For binlog encryption, just add the following
encrypt_binlog = 1InnoDB’s redo-log is not encrypted by default. To encrypt it just add the variable below after the [mysqld] section,
innodb-encrypt-logIf you need encryption for your on-disk temporary tables and temporary files, you can add the following:
encrypt-tmp-disk-tables=1
encrypt-tmp-files=1


