blog
Automated Testing of the Upgrade Process for PostgreSQL

Testing is a time-consuming task, but it is a must before any upgrade process on any technology. Depending on the type of upgrade, it could be harder or easier, but it is always necessary if you want to make sure your data will be safe. There are different approaches for upgrading, depending on the business and the downtime tolerance. For example, the process could be testing your application in a separate environment with the new version, so, you will need to create a new cluster for this. Another option is to clone your current production environment and upgrade it, which could be useful as you can emulate all the upgrade process and avoid surprises in the future.
By doing all this testing process manually, there is a big chance of human error and the process will be slow which could affect the Recovery Time Objective (RTO). In this blog, we will see how to automate testing for upgrading your PostgreSQL databases using ClusterControl.
Type of Database Upgrades
There are two types of upgrades: Minor Upgrades and Major Upgrades.
Minor Upgrades
It is the most common and safe upgrade, and in most cases, this is performed in place. As nothing is 100% secure, you must always have backups and standby nodes, so in case something goes wrong with the upgrade, you can promote a standby node in the previous version, and your systems can still work without interruption.
You can perform this kind of upgrade using ClusterControl. For this, go to ClusterControl -> Select your PostgreSQL Cluster -> Manage -> Upgrades.
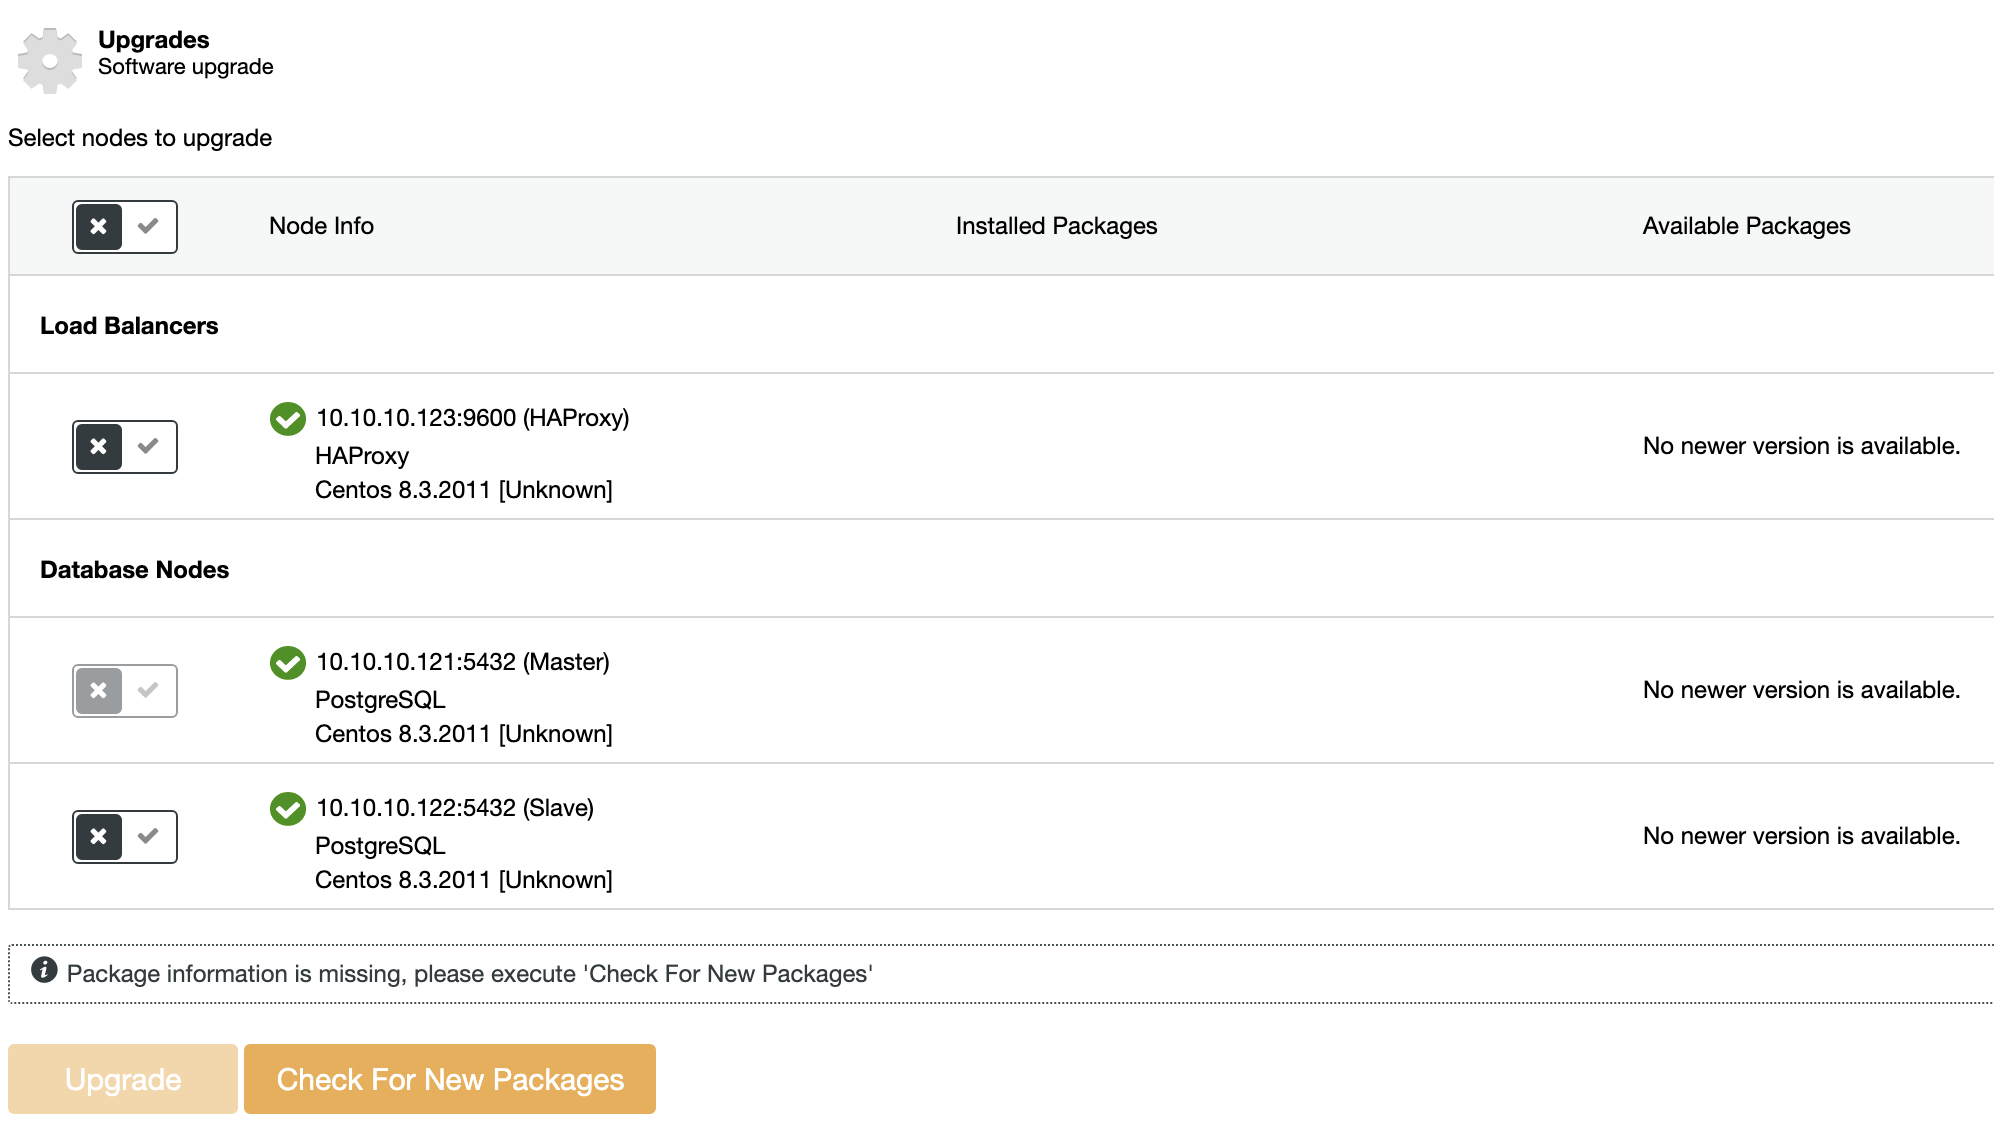
On each selected node, the upgrade procedure will:
-
Stop Node
-
Upgrade Node
-
Start Node
The Master node in a PostgreSQL Topology won’t be upgraded. To upgrade the Master, another node must be promoted to become the new Master first.
Major Upgrades
For Major Upgrades, it is not recommended the in-place upgrade, as the risk of something going wrong is too high for a production environment. Instead of this, there are different approaches for doing upgrades.
You can clone your current database cluster, upgrade it, and test your application there, and when you finish, if everything went fine, you can re-create it to repeat the process to make the real upgrade, or you can also create a new cluster in the new version, test your application, and switch the traffic when it is ready, and there are more options… The usage of Load Balancers is useful here to improve High Availability. The best approach depends on the downtime tolerance and the Recovery Time Objective (RTO).
You can’t perform Major Upgrades with ClusterControl directly, because, as we mentioned, you need to test everything first, to make sure that the upgrade is safe, but you can use different ClusterControl features to make this task easier. So let’s see some of these features.
Deploying a Test Environment
For this, you don’t need to create everything from scratch. Instead of this, you can use ClusterControl for doing this in a manual or automated way.
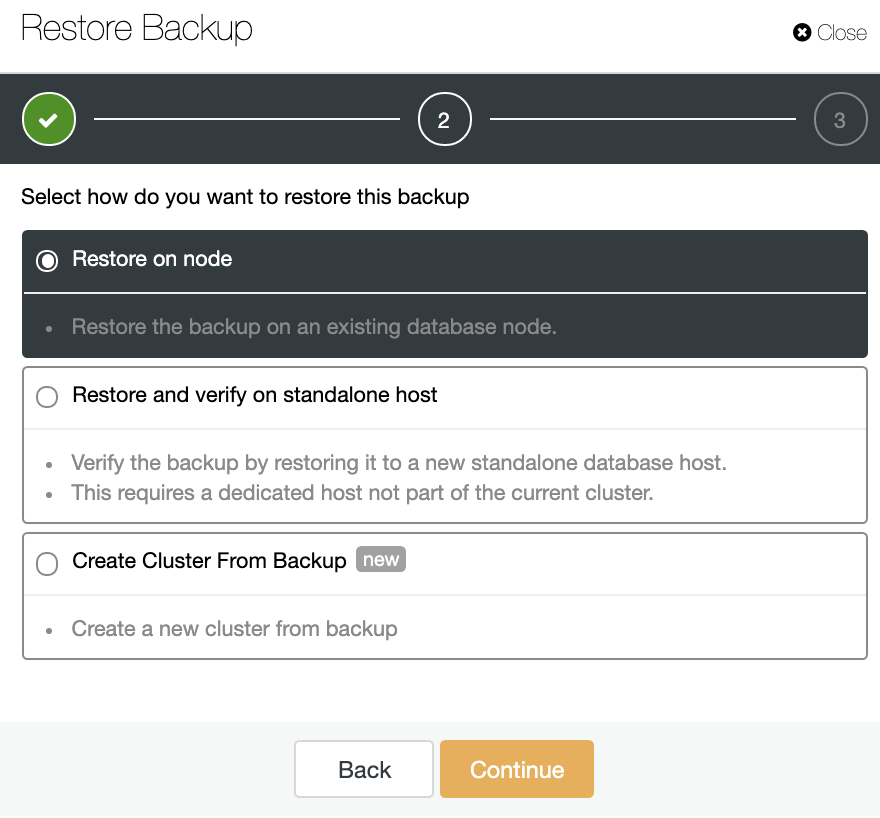
Restore Backup on Standalone Host
In the Backup section, choose a backup and you will see the option “Restore and verify on standalone host” to restore a backup in a separate node.
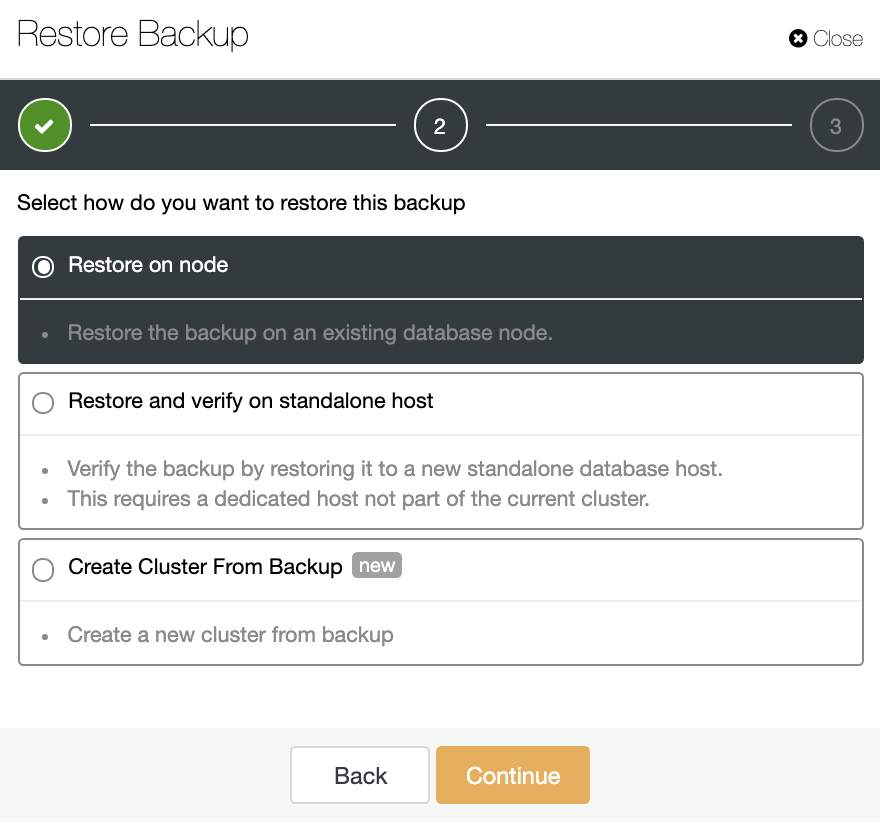
Here you can specify if you want ClusterControl to install the software in the new node, and disable the firewall or AppArmor/SELinux (depending on the OS). For this, you need a dedicated host (or VM) that is not part of the cluster.

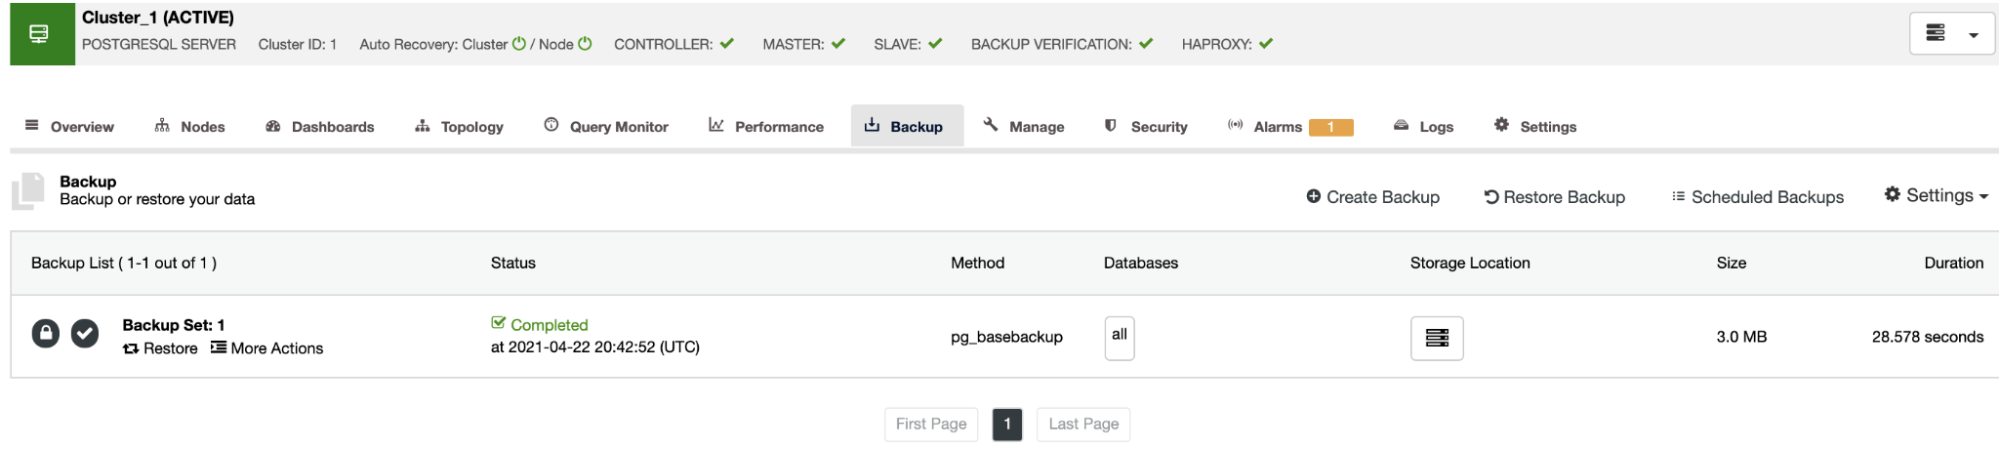
You can keep the node up and running, or ClusterControl can shutdown the database service until the next restore job. When it finishes, you will see the restored/verified backup in the backup list marked with a tick.
If you don’t want to do this task manually, you can schedule this process using the Verify Backup Feature, to repeat this job periodically in a Backup Job. We are going to see how to do this in the next section.
Automatic ClusterControl Backup Verification
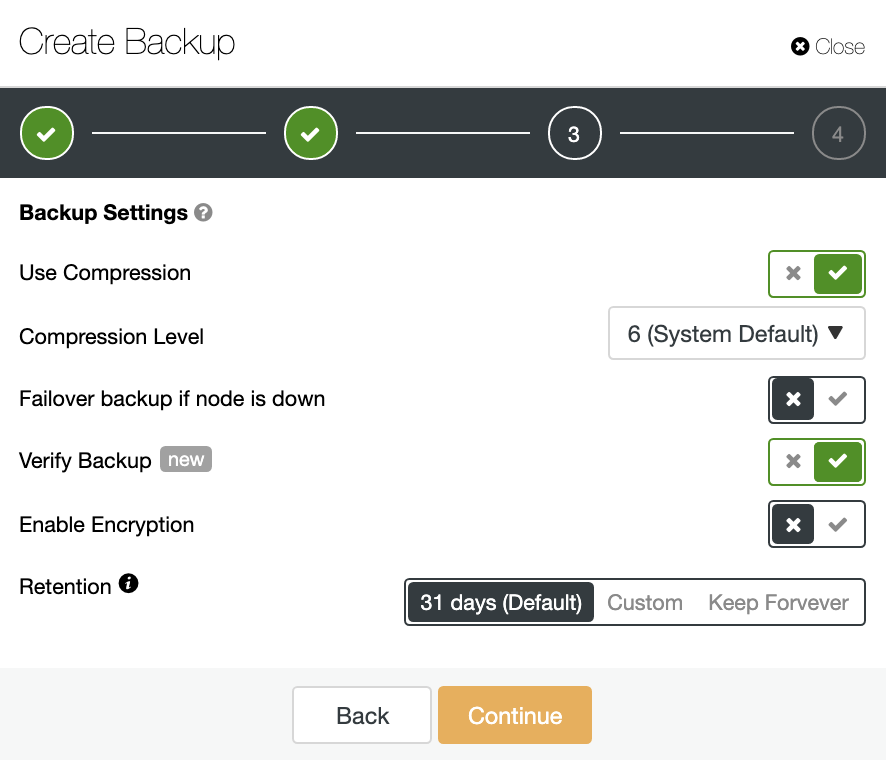
To automate this task, go to ClusterControl -> Select your PostgreSQL Cluster -> Backup -> Create Backup, and choose the Scheduled Backup option. The automatic Verify Backup feature is only available for scheduled backups.
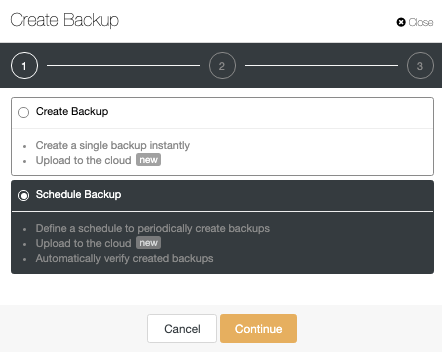
In the second step, make sure you have enabled the Verify Backup option, and complete the required information.
When the job is finished, you can see the verification icon in the ClusterControl Backup section, the same that you will have by doing the verification in the manual way, with the difference that you don’t need to worry about the restoration task. ClusterControl will restore the backup every time automatically, and you can test your application with the most recent data.
Create Cluster from Backup
Another way to create a test environment is by creating a new cluster from a backup of your Primary Cluster. For this, go to ClusterControl -> Select your PostgreSQL cluster -> Backup. There, choose the backup to be restored from the list, and select Restore -> Create Cluster From Backup.
This option will create a new PostgreSQL Cluster from the selected backup.
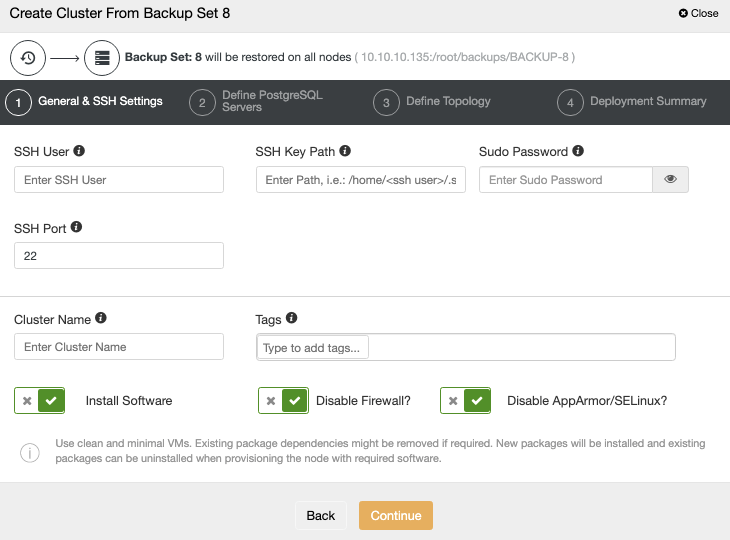
You need to add the OS and database credentials and the information to deploy the new cluster. When this job finishes, you will see the new cluster in the ClusterControl UI.

Cluster-to-Cluster Replication
Since ClusterControl 1.7.4 there is a feature called Cluster-to-Cluster Replication. It allows you to have a replication running between two autonomous clusters.
Creating a Cluster-to-Cluster Replication
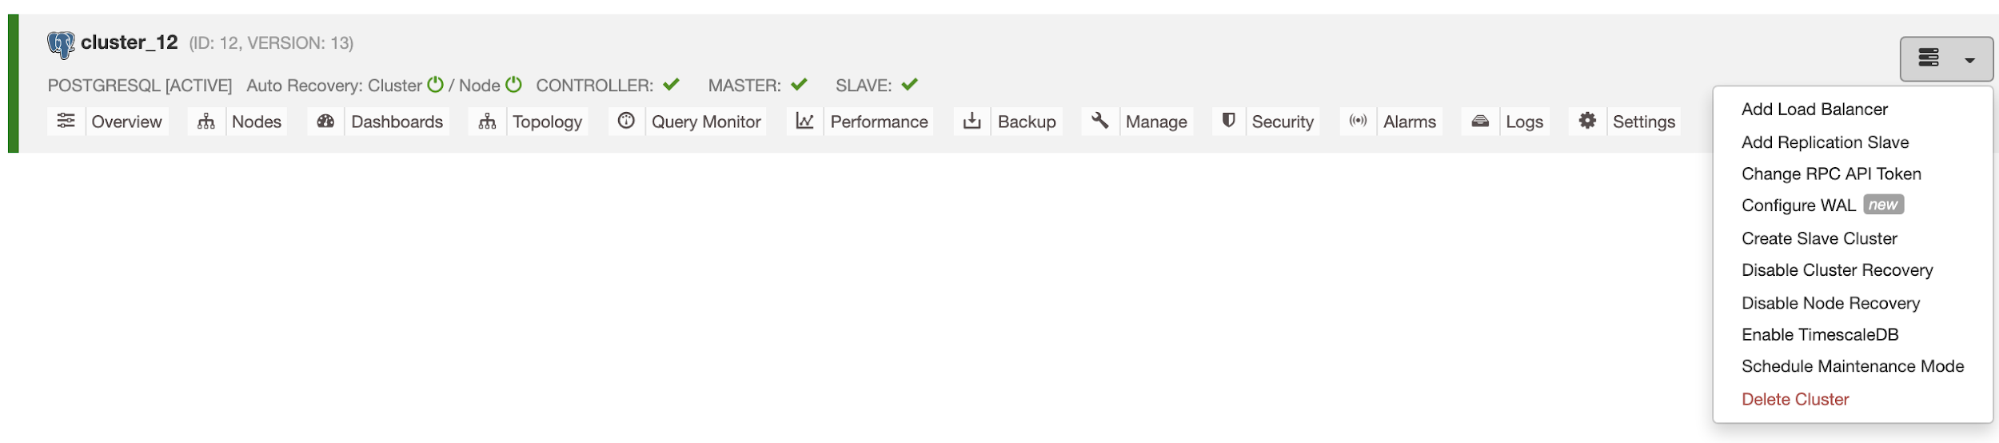
Go to ClusterControl -> Select your PostgreSQL Cluster -> Cluster Actions -> Create Slave Cluster.
The Slave Cluster will be created by streaming data from the current Primary Cluster.
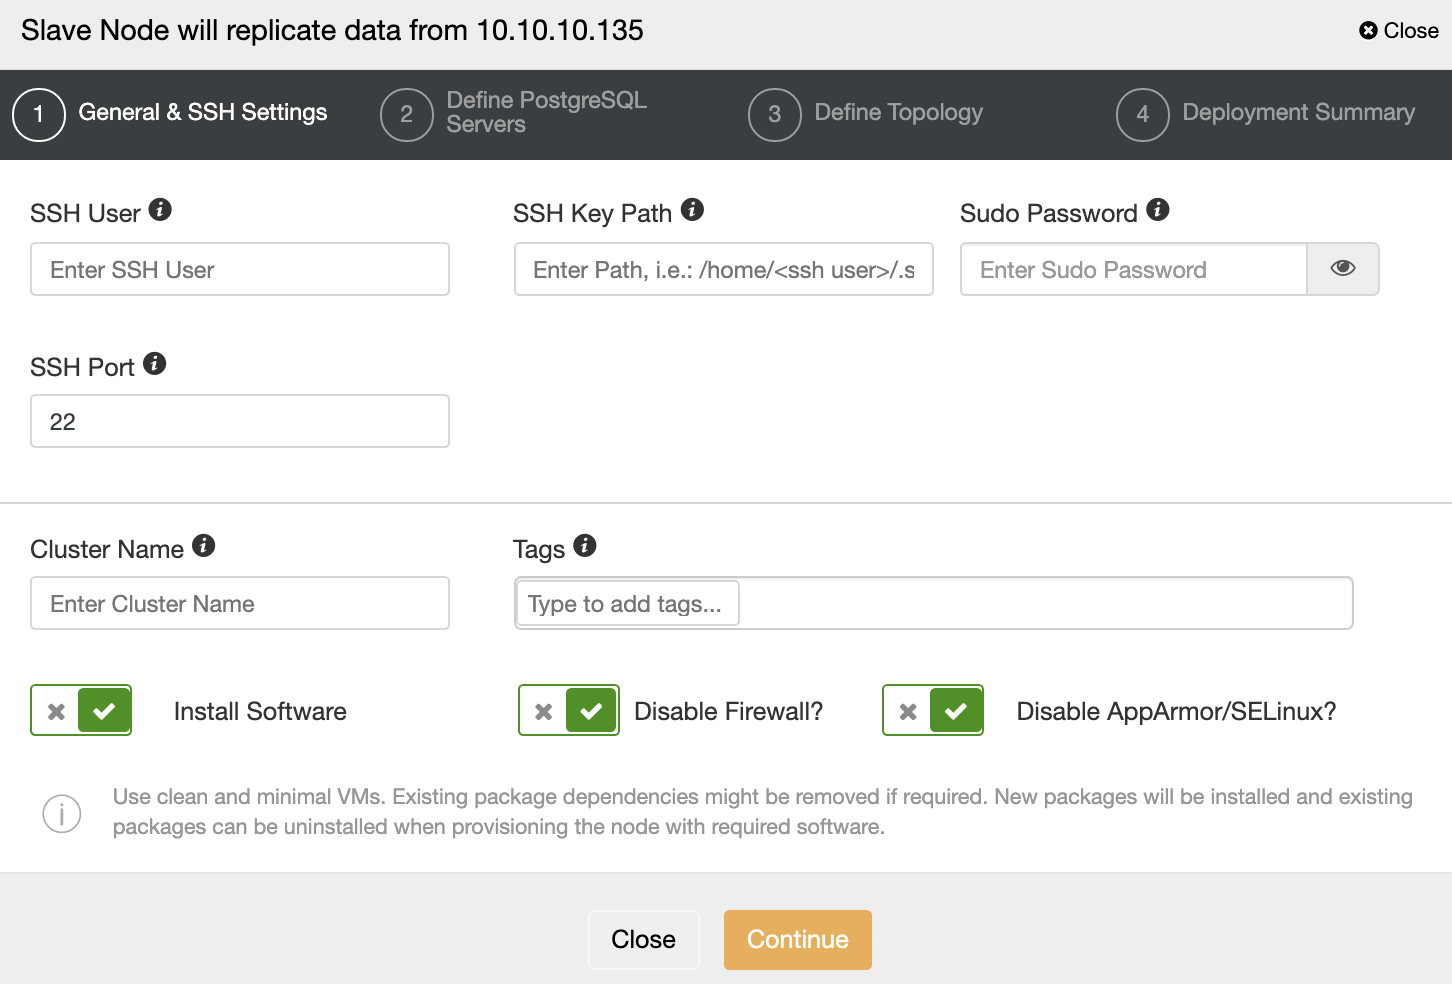
You must specify SSH credentials and port, a name for your Slave Cluster, and if you want ClusterControl to install the corresponding software and configurations for you.
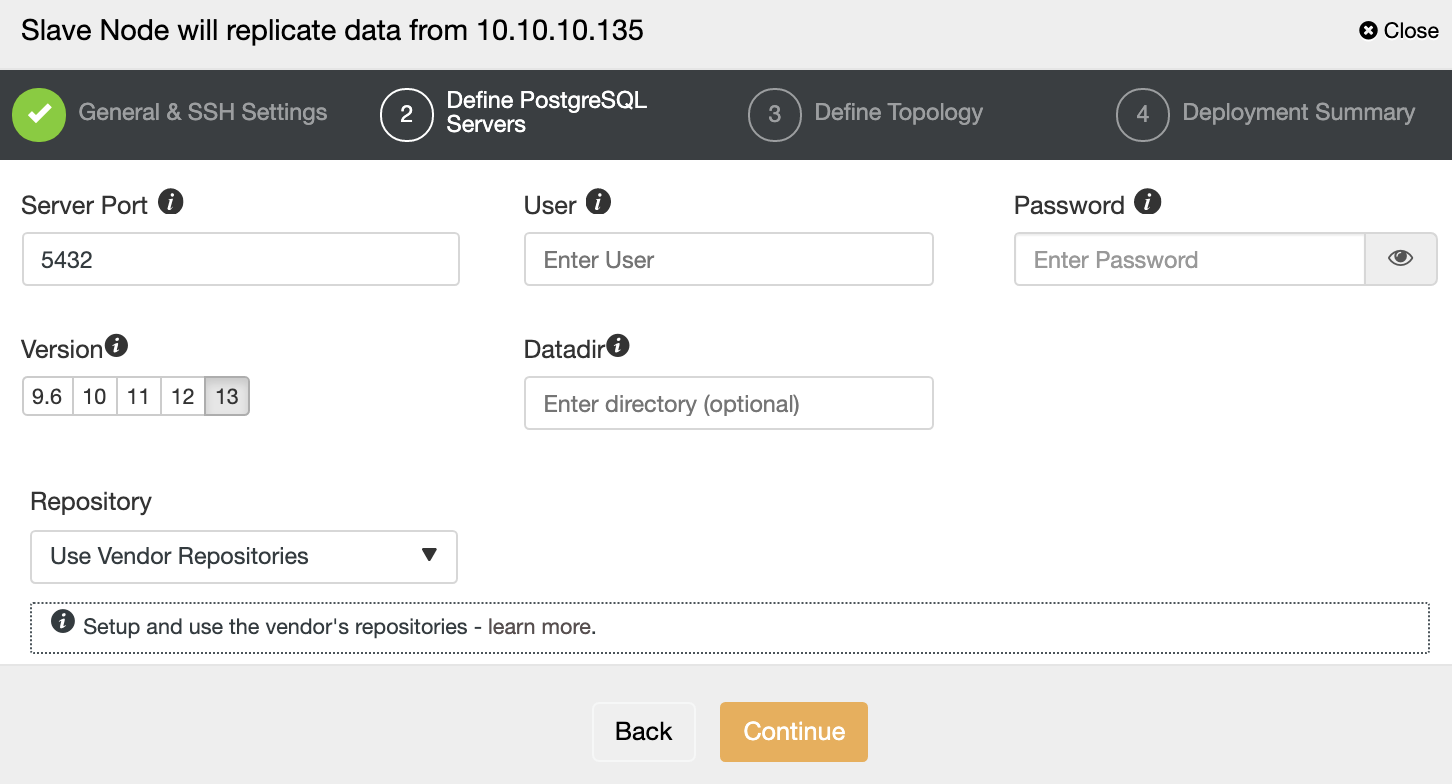
After setting up the SSH access information, you must define the database version, datadir, port, and admin credentials. As it will use streaming replication, make sure you use the same database version, and the credentials must be the same used by the Primary Cluster.
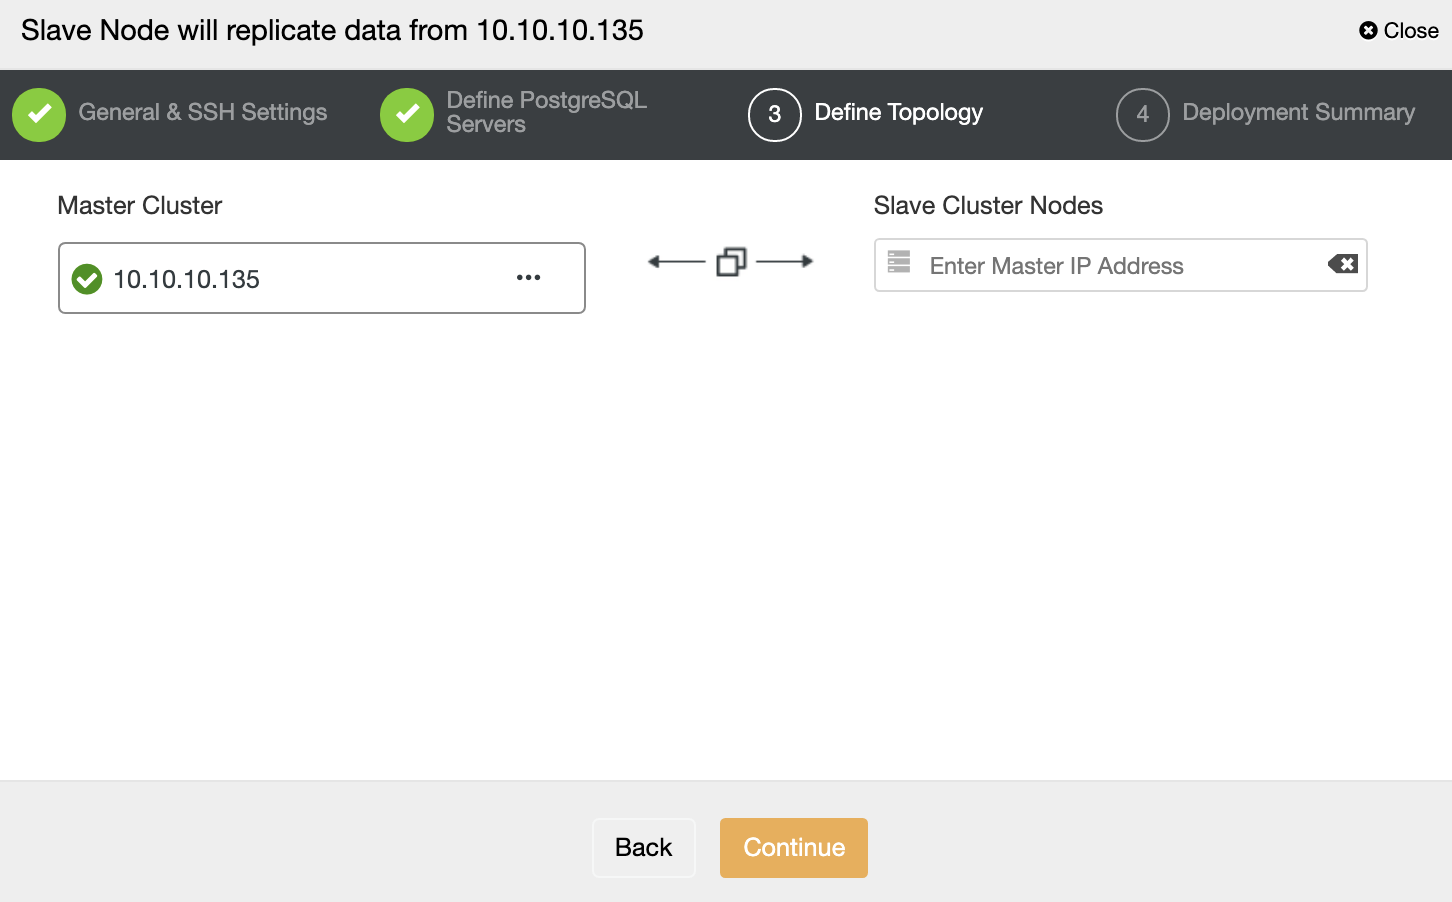
In this step, you need to add the server to the new Slave Cluster. For this task, you can enter both IP Address or Hostname of the database node.
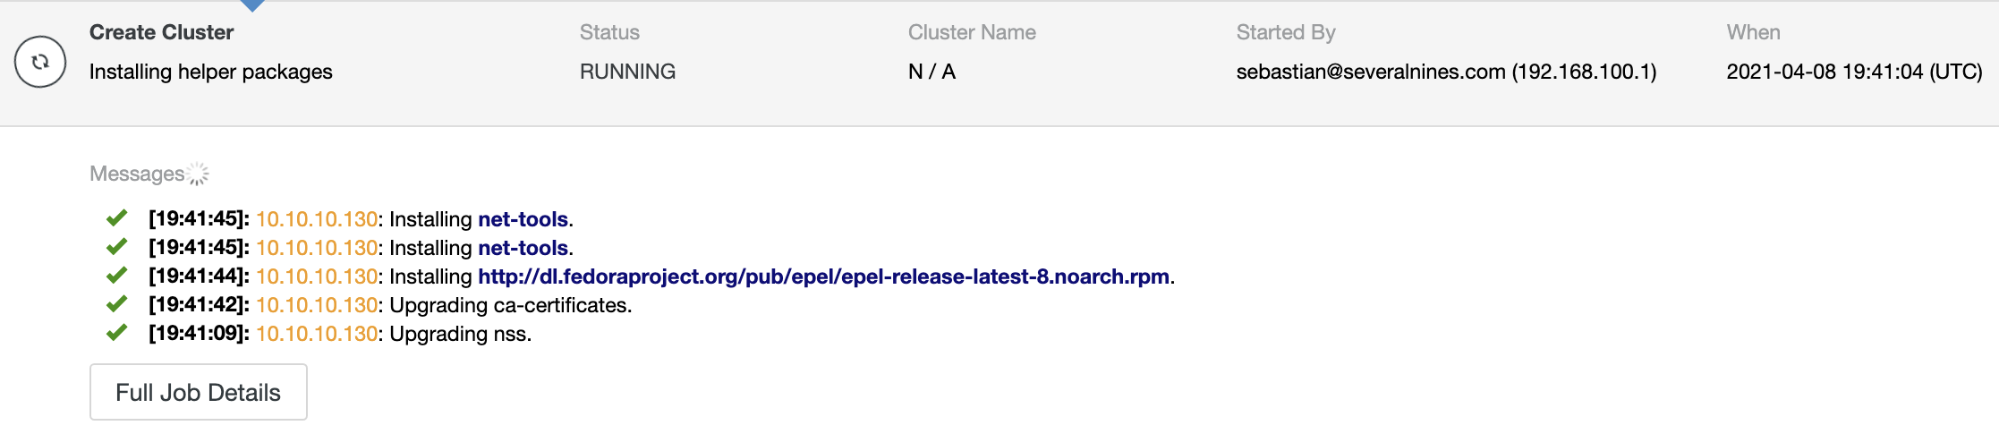
You can monitor the job status in the ClusterControl activity monitor. Once the task is finished, you can see the cluster in the main ClusterControl screen.

Autorecovery and Failover
Having the Autorecovery feature enabled, in case of failure, ClusterControl will promote the most advanced standby node to primary as well as notify you of the problem. It also fails over the rest of the standby nodes to replicate from the new primary server.
If there are Load Balancers in the topology, ClusterControl will reconfigure them to apply the topology changes.
You can also run a Failover manually if needed. Go to ClusterControl -> Select your PostgreSQL Cluster -> Nodes -> Select the Node to be promoted -> Node Actions -> Promote Slave.
In this way, if something goes wrong during the upgrade, you can use ClusterControl to fix it ASAP.
Automating Things with ClusterControl CLI
ClusterControl CLI, also known as s9s, is a command-line tool introduced in ClusterControl version 1.4.1 to interact, control, and manage database clusters using the ClusterControl system. ClusterControl CLI opens a door for cluster automation where you can easily integrate it with existing deployment automation tools like Ansible, Puppet, Chef, etc. Let’s see now some examples of this tool.
Upgrade
$ s9s cluster --cluster-id=9
--check-pkg-upgrades
--log
$ s9s cluster --cluster-id=9
--available-upgrades
--nodes=10.10.10.122
--log
--print-json
$ s9s cluster --cluster-id=9
--upgrade-cluster
--nodes=10.10.10.122
--log
Verify Backups
$ s9s backup --verify
--backup-id=2
--test-server=10.10.10.124
--cluster-id=9
--log
Cluster-to-Cluster Replication
$ s9s cluster --create
--cluster-name=PostgreSQL-c2c
--cluster-type=postgresql
--provider-version=13
--nodes=10.10.10.125
--os-user=root
--os-key-file=/root/.ssh/id_rsa
--db-admin=admin
--db-admin-passwd=*********
--vendor=postgres
--remote-cluster-id=9
--log
Promote Slave Node
$ s9s cluster --promote-slave
--cluster-id=9
--nodes='10.10.10.122'
--log
Conclusion
Upgrades are necessary but time-consuming tasks as you need to test your application to avoid any issues during the process. Deploying a test environment every time you need to upgrade and maintain this up-to-date without any automatization tool could be hard.
ClusterControl allows you to perform minor upgrades from the ClusterControl UI or CLI, or even deploy the test environment to make the upgrade task easier and safer. You can also integrate it with different automation tools like Ansible, Puppet, and more.