blog
A MySQL backup and recovery tutorial on K8s using the MySQL Operator for Kubernetes

Supported by the growing maturity of operators, many organizations have graduated from using Kubernetes to deploy and manage stateless applications to adopting it for all kinds of stateful workload deployment in the last 4 years.
But, running databases on Kubernetes is much more than deployment and can include Day 2 operations like backup and recovery, which are critical in any database lifecycle, regardless of where they are deployed.
For high availability, you would store your backups externally outside of your database node and a very common place organizations store them is an s3 compatible object storage service — let’s start there.
I will walk you through the steps involved in setting up backup and recovery to Amazon s3 for your MySQL database clusters deployed on Kubernetes with the “MySQL Operator for Kubernetes”.
Prerequisites
To follow along with this article, ensure you have the following prerequisites in place:
- A Kubernetes cluster. The demo in this article was done on a DigitalOcean cluster, but you can use minikube — a local single Node Kubernetes cluster.
- The kubectl command-line tool configured to communicate with the cluster.
- An AWS account for S3 access. You can create a free account if you don’t have one.
In your AWS account, create an S3 bucket with a choice name. Be sure to remember the bucket name and region you created it in, as you will use these details in the operator’s configuration.
The demo in this blog post will use the following:
- Bucket name: k8s-mysql-dev-bucket
- Region: us-east-1
Installing MySQL Operator for Kubernetes
There are several ways to install the MySQL Operator for Kubernetes. The documentation highlights two methods: using Helm or manually applying manifests using kubectl. Throughout this post, we will apply manifests using kubectl for better clarity and understanding.
To install the operator, first deploy the Custom Resource Definition (CRDs) it uses with the following command:
kubectl apply -f https://raw.githubusercontent.com/mysql/mysql-operator/trunk/deploy/deploy-crds.yamlNote: “trunk” in the URL references the latest MySQL Operator for Kubernetes release on Github.
The above CRDs create the required custom objects (MySQLBackup, InnoDB clusters, etc.) that tell Kubernetes how to handle the special operator’s resources.
After running the command, the output would be similar to the image below.

Next, deploy the operator, which also includes RBAC definitions, as noted in the output below.
kubectl apply -f https://raw.githubusercontent.com/mysql/mysql-operator/trunk/deploy/deploy-operator.yaml
You can switch the kubectl context to the mysql-operator namespace for future commands.
kubectl config set-context --current --namespace=mysql-operatorNext, you will deploy a MySQL InnoDB Cluster. The backups you will create will be of the cluster.
Deploying a MySQL InnoDB Cluster on Kubernetes
To create a MySQL InnoDB Cluster, first you need to create a secret with credentials for your intended MySQL root user to use in performing administrative tasks in the cluster.
kubectl create secret generic mypwds \
  --from-literal=rootUser=root \
  --from-literal=rootHost=% \
  --from-literal=rootPassword="test"
The above generic K8s secret creates a root user root and password test for demo purposes.
Now define your MySQL InnoDB Cluster, with a reference to the mypwds secret. For this demo, you can create a file mysql-backup-cluster.yaml :
apiVersion: mysql.oracle.com/v2
kind: InnoDBCluster
metadata:
  name: mysqlcluster
spec:
  secretName: mypwds
  tlsUseSelfSigned: true
  instances: 3
  router:
    instances: 1
The above configuration creates an InnoDB Cluster with three MySQL Server instances and one MySQL Router instance. Apply the configuration with the following command:
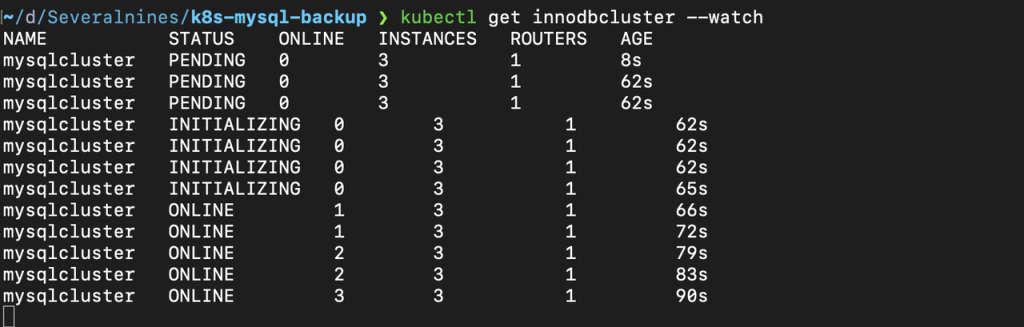
kubectl apply -f mysql-backup-cluster.yamlYou can watch the cluster creation process with the kubectl --watch flag
After the cluster is created, you can connect to it with the InnoDB Cluster Service by using the MySQL shell or port forwarding. To use port fowarding, run the following command:
kubectl port-forward service/mysqlcluster mysqlThe above port forwarding creates a redirection from your local machine to use a MySQL client, such as mysql. With the port forward running, open another terminal and run the following command to open up the MySQL shell:
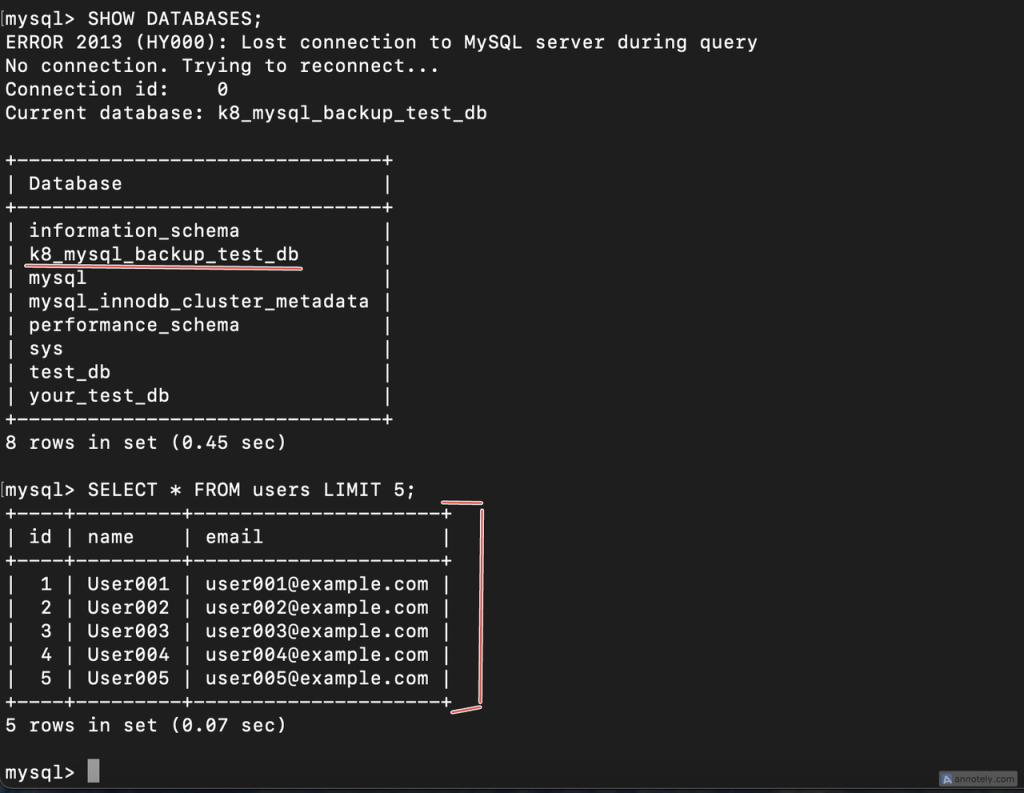
mysql -h127.0.0.1 -P3306 -uroot -pWith the shell running, to test the recovery of the backup later on in this demo, create a test database k8_mysql_backup_test_db and populate it with some test data using the SQL queries below.
CREATE DATABASE k8_mysql_backup_test_db;
USE k8_mysql_backup_test_db;
CREATE TABLE users (
    id INT PRIMARY KEY AUTO_INCREMENT,
    name VARCHAR(50),
    email VARCHAR(100)
);
INSERT INTO users (name, email)
SELECT CONCAT('User', LPAD(ROW_NUMBER() OVER(), 3, '0')),
       CONCAT('user', LPAD(ROW_NUMBER() OVER(), 3, '0'), '@example.com')
FROM information_schema.columns
LIMIT 100;


SHOW DATABASES;
SELECT * FROM users LIMIT 5;
Verify that the data has been created with the SHOW DATABASES; and SELECT * FROM users LIMIT 5; queries as in the image below.
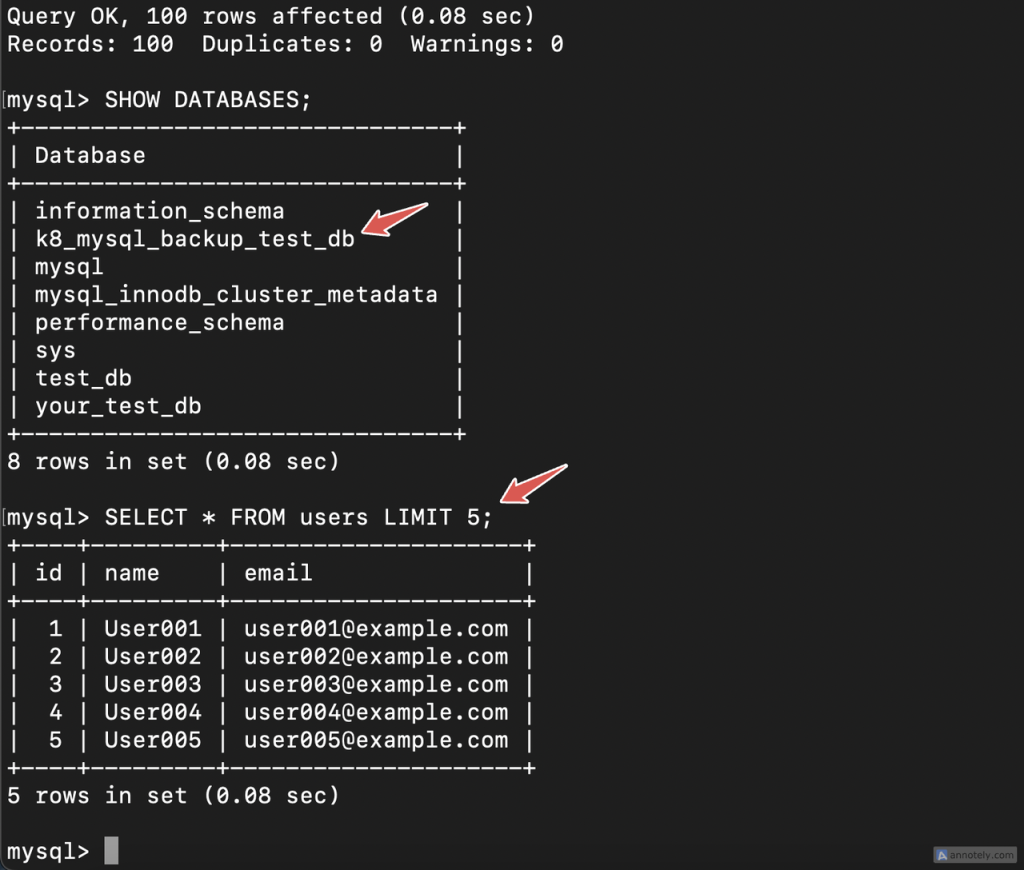
You can see the database and test users in the screenshot above. Note them as you will use it to verify the backup.
Setting up MySQL backups on Kubernetes to AWS S3
Now that you have an InnoDB cluster running, you can take backups and send them to S3 for storage.
The MySQL operator for Kubernetes requires two components to successfully create a backup:
- Backup profile: Configures the general backup structure, from storage location to MySQL export options.
- Backup schedule: Defines when the backup will run. You specify this as a cron expression for regular backups, or with no schedule when performing one-off backups.
You create backup profiles and schedules independently of each other. This lets you run multiple backups on different schedules using the same profile.
Each profile and schedule is associated with a specific database cluster. They’re created as nested resources within the InnoDBCluster objects. Each database you create with the operator needs its own backup configuration.
Before you create a backup profile and schedule, create a Kubernetes secret that contains your AWS credentials so that the operator can upload your backups straight to S3 object storage.
Note: There is another main object related to MySQL backups, “Backup request”. With this object, requesting a backup initiates a new object that creates a new pod to perform the backup. To learn more about “Backup request” and other MySQLBackup resource options, see its documentation.
Creating a Kubernetes secret for AWS s3
Create a YAML file s3-secret.yaml, add the following configuration, replacing the placeholders with your credentials and region:
apiVersion: v1
kind: Secret
metadata:l
  name: s3-secret
type: Opaque
stringData:
  credentials: |
    [default]
    aws_access_key_id = <YOUR-ACCESS-KEY-ID without encoding>
    aws_secret_access_key = <YOUR-SECRET-KEY without encoding>
  config: |
    [default]
    region=<YOUR-REGION>
Then, use kubectl to create the secret:
kubectl apply -f s3-secret.yamlCreating a backup profile for the MySQL operator for Kubernetes
You define backup profiles and schedules in your database’s spec.backupProfiles and spec.backupSchedules fields respectively.
To create a backup profile for this demo, copy and paste the following YAML configuration into your mysql-backup-cluster.yaml file spec.
backupProfiles:
    - name: s3-backup
      dumpInstance:
        dumpOptions:
        storage:
          s3:
            bucketName: k8s-mysql-backup-bucket
            prefix: /mysql-backup
            config: s3-secret
            profile: default
            endpoint: https://s3.us-east-1.amazonaws.com
In the above backup profile:
namedefines the name of the backup profile which the backup schedules would reference.dumpInstanceis the parent spec for the dumpOptions and storage configuration.dumpOptions, if left blank, performs a MySQL Shell Dump by default.- S3 storage configuration:
bucketNamedefines the name of the S3 bucket where the dump will be stored, and this must be an existing bucket as earlier highlighted in this blog.prefixdefines the path in the bucket where the dump files are stored.configdefines the name of the secret with S3 configuration and credentials.profiledefines the profile being used in configuration files.endpointis an override endpoint URL to specify the AWS region where the bucket is hosted.
Next, we will define a backup schedule that references the backup profile to create backups.
Creating a backup schedule for the MySQL operator for Kubernetes
As mentioned earlier, you create backup schedules in spec.backupSchedules field. The following YAML configuration defines a backup schedule referencing the s3-backup profile you defined earlier.
backupSchedules:
    - name: test-s3-backup-schedule
      schedule: "* * * * *"
      backupProfileName: s3-backup
      enabled: true
In the above schedule:
- The
namedefines the name of the schedule scheduledefines the cron expression for the backup. The above expression schedules the every minute. You can edit this to per day, bi-weekly, month, etc.backupProfileNamereferences the desired backup profiles’s name.enabledlet’s you enable or disable a backup schedule.
Putting it all together, the full configuration of mysql-backup-cluster.yaml will be:
apiVersion: mysql.oracle.com/v2
kind: InnoDBCluster
metadata:
  name: mysqlcluster
spec:
  secretName: mypwds
  tlsUseSelfSigned: true
  instances: 3
  router:
    instances: 1
  backupProfiles:
    - name: s3-backup
      dumpInstance:
        dumpOptions:
        storage:
          s3:
            bucketName: k8s-mysql-backup-bucket
            prefix: /mysql-backup
            config: s3-secret
            profile: default
            endpoint: https://s3.us-east-1.amazonaws.com
  backupSchedules:
    - name: test-s3-backup-schedule
      schedule: "* * * * *"
      backupProfileName: s3-backup
      enabled: true
Apply this configuration to tell the operator to create the backups based on the schedule (every 1 minute).
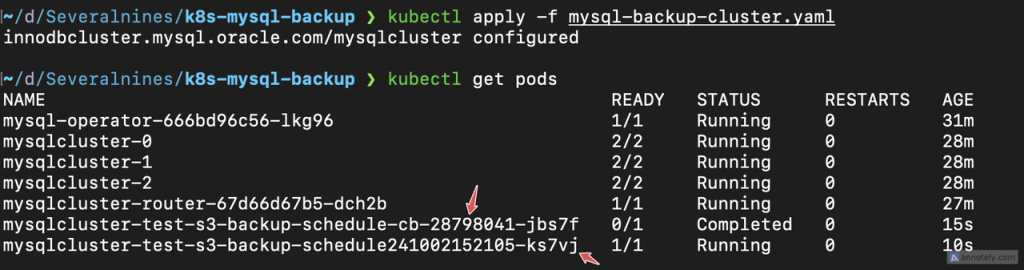
kubectl apply -f mysql-backup-cluster.yamlAfter applying the configuration, you will see that backup creation jobs (pods) are created every minute per backup, as in the image below.
Verifying the backup creation
To verify that the backups are done according to the schedule and sent to Amazon s3, head over to your AWS console and click on the s3 bucket you set; in the mysql-backup directory you set as the prefix, you will see all the backups the operator creates as in the image below.
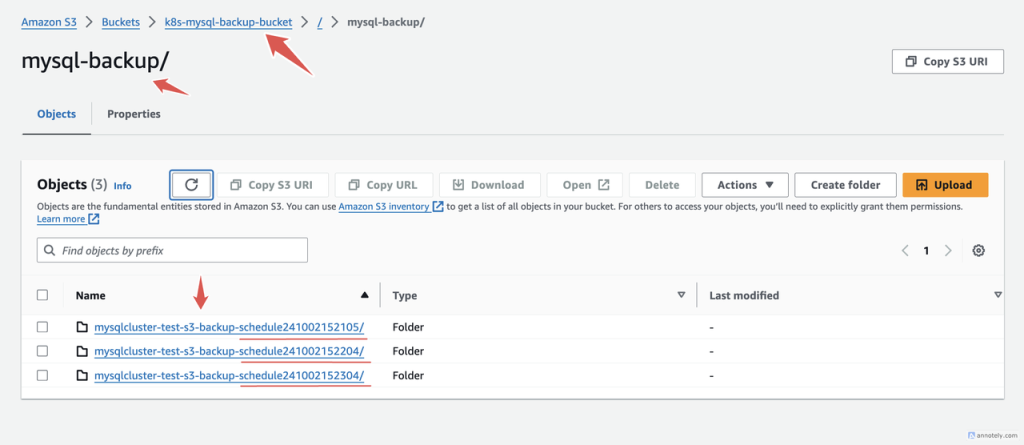
Looking closely in the image above, you will notice the timestamp at the end of each folder name. You can compare the three folders and see that their timestamps are one minute apart, as specified in the backup schedule.
We will now validate the backup by performing a test restore.
Restoring a backup with the MySQL operator for Kubernetes
Using the spec.initDB, the operator can initialize new database clusters using previously created files from the dumpInstance object. This allows you to restore your backups straight into your Kubernetes cluster, which is useful in validating your backup, in recovery situations or when migrating an existing database to Kubernetes.
As mentioned, we will perform a restore in the context of validating our backup. To validate the backup, you can create a new Kubernetes cluster, install the operator with the same steps as above and create an InnoDB cluster telling Kubernetes to initialize the database cluster with the backup.
apiVersion: mysql.oracle.com/v2
kind: InnoDBCluster
metadata:
  name: mysql-recovery-cluster
spec:
  secretName: mypwds
  tlsUseSelfSigned: true
  instances: 3
  router:
    instances: 1
  initDB:
    dump:
      name: initdb-dump
      storage:
        s3:
          prefix: /mysql-backup/mysqlcluster-test-s3-backup-schedule241007114206
          config: s3-secret
          bucketName: k8s-mysql-backup-bucket
          profile: default
          endpoint: https://s3.us-east-1.amazonaws.com
In the above configuration, the prefix indicates the path to the dump folder from which to recover the backup. Also recall the timestamp so you will be sure to recover with the exact backup you need.
Assuming you save the configuration in a file named recovery.yaml, apply it with the following command:
kubectl apply -f recovery.yaml
Verifying the recovery
With all the pods running, using the same port forwarding methods as earlier explained in the article you can connect to the cluster and verify that the recovery was successful.

In the above image, you can see that the database and its dataset were added to the new cluster upon creation.
Note: It is important to note that sometimes the InnoDB Cluster pod can be stuck in a terminating state due to issues preventing graceful termination of the pod, such as “node deletion.” You can resolve this by removing the finalizer from the pod’s metadata, and the pod will be in a ready state again. For example:
kubectl patch pod <mysql-pod-name> -p '{"metadata":{"finalizers":[]}}' --type=mergeWrapping up
This walkthrough showed you the steps in setting up backup and recovery to S3-compatible storage using the “MySQL Operator for Kubernetes.” Beyond backup and recovery, there are other critical Day 2 operations, such as scaling up/out, upgrades, security, etc., that go into managing a database on Kubernetes.
In most production use cases, you won’t want to do this manually and/or need to provide a seamless user interface to your database end users who may not be familiar with how Kubernetes works. In these cases, you can use CCX, a Kubernetes-based DBaaS that can be implemented by organizations who want to provide DBaaS internally, e.g., platform engineering teams, or externally, e.g., Cloud Service Providers (CSPs).
To learn more about CCX, explore our CCX for CSP page, or reach out today to discover how CCX can elevate your business to new heights!