blog
Using PgBouncer Connection Pooler for PostgreSQL with ClusterControl 1.8.2

Modern apps like microservices typically require a lot of database connections, they also use and release those connections very quickly. When PostgreSQL was developed almost 25 years ago, its developers decided not to use threads for new requests, but to create a new process for each request instead. While that decision probably made sense back then, many connections can be a serious issue today. One of the solutions for this problem is a connection pool. In this blog post, we will discuss PgBouncer Connection Pool and how to utilize it in ClusterControl 1.8.2.
Why Use Connection Pool
Well, the short answer to this question is it’s a simple yet effective solution in improving the performance of your apps, at the same time reduces the load on the PostgreSQL server. Let’s go a little deeper on this, shall we?
A connection pool can be defined as a cache of open database connections that is reusable by the clients. In other words, it will mitigate the load on the database by reducing the requests on every new connection. Those new connections are basically spawned by the postmaster process each time a connection is established which commonly will take around 2 to 3 MB memory per connection.
Without a connection pool, this will lead to a problem whenever the number of connections is too high since the postmaster needs to provide a lot of memory. In PostgreSQL, the connection pool is managed by PgBouncer.
What is PgBouncer
PgBouncer is a lightweight, single-binary, open-source and probably the most popular connection pooler for PostgreSQL. PgBouncer is a simple utility that does exactly one thing, it sits between the database and the clients and talks the PostgreSQL protocol, copying a PostgreSQL server. At the time of writing, the latest version of PgBouncer is 1.15.0.
Let’s see what are some of the best features that it offers, and probably the reason why it’s so popular in the PostgreSQL world:
-
Lightweight – only one single process, all requests from the client and responses from the server passthrough PgBouncer without any additional processing
-
Easy Setup – requires no client-side code changes and one of the simplest PostgreSQL connection poolers to setup
-
Scalability & Performance – it scales well to a large number of clients and at the same time significantly increase the transactions per second that the PostgreSQL server can support
Steps To Setup PgBouncer With ClusterControl
There are a few steps in order for you to install and configure PgBouncer with ClusterControl. In this section, we will go through the steps providing that you have the PostgreSQL cluster deployed already. If you don’t have the cluster yet, you may follow the guide in this blog post.
From your web UI > Select PostgreSQL Cluster > Manage > Load Balancer > Select PgBouncer tab and the following screenshot will appear. Here you can choose whether to Deploy or Import PgBouncer, in this example, we will choose Deploy.:
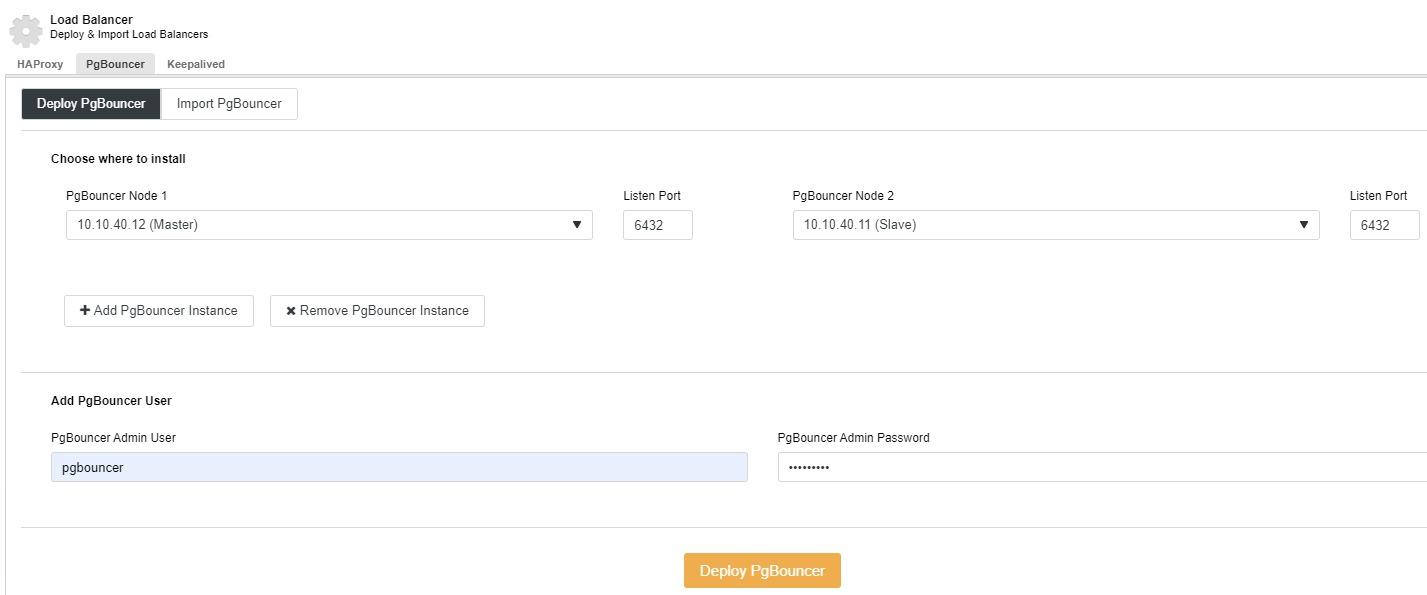
You may select the node from the dropdown, specify the port, add ‘PgBouncer Admin User’ as well as the password and click on ‘Deploy PgBouncer’. The job will start running and the status will start appearing in this screen, you also can monitor it in the ‘Activity’ tab.
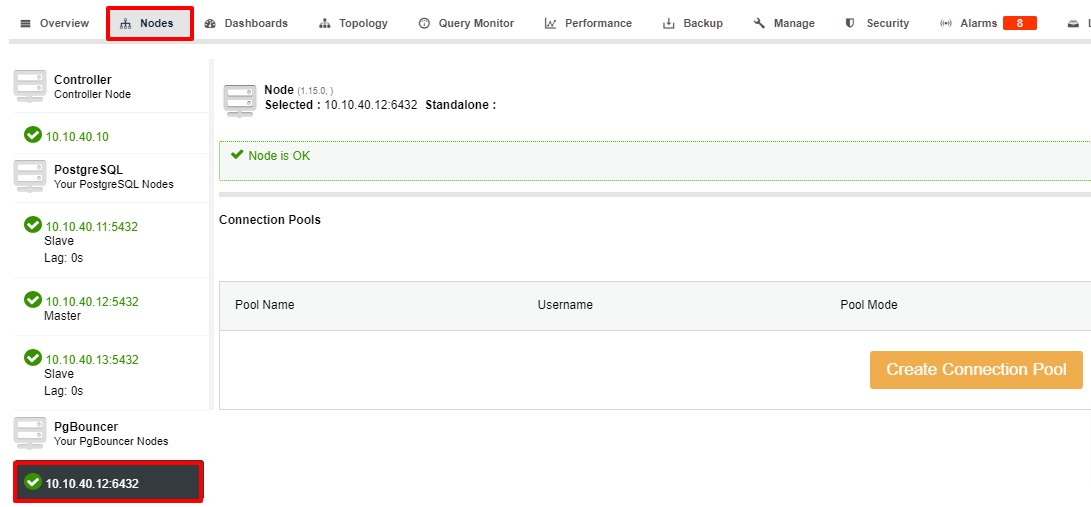
After PgBouncer node is successfully deployed, the next step is to create the connection pool. From your Cluster > Nodes > Select PgBouncer node and the following screenshot will appear:
The connection screen will appear once you click on the ‘Create Connection Pool’ button. You may fill in all the information and update the value depending on your setup, for this example we will use the default value for ‘Pool Mode’, ‘Pool Size’ and ‘Max Database Connection’:
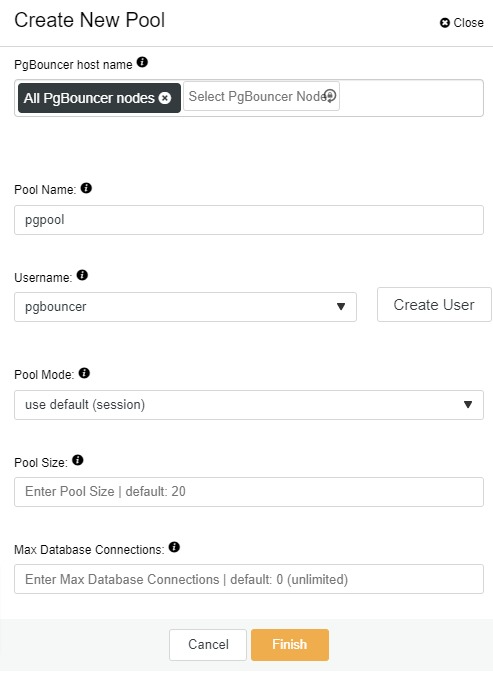
Here you will need to add the following information:
-
PgBouncer hostname: Select the node hosts to create the connection pool.
-
Pool Name: Pool and database names must be the same.
-
Username: Select a user from the PostgreSQL master node or create a new one.
-
Pool Mode: session (default), transaction, or statement pooling.
-
session (default): Server is released back to the pool after client disconnects
-
transaction: Server is released back to the pool after transaction finishes
-
statement: Server is released back to the pool after query finishes. Transactions spanning multiple statements are disallowed in this mode
-
-
Pool Size: Maximum size of pools for this database. The default value is 20.
-
Max Database Connections: Configure a database-wide maximum. The default value is 0, which means unlimited.
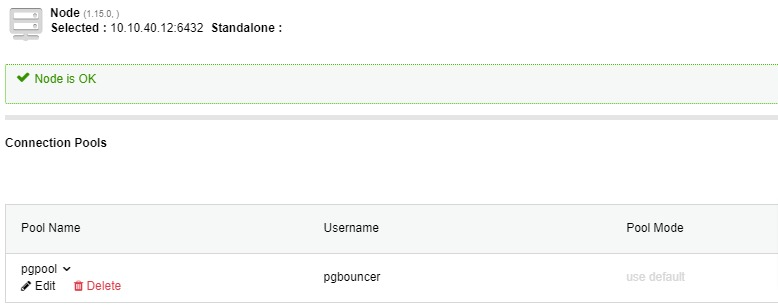
The connection pool will appear after you click the ‘Finish’ button as per the screenshot below and both PgBouncer and connection pool is now ready:
Conclusion
Using connection pool and PgBouncer are some of the steps to improve the performance of your application when it comes to high availability. With ClusterControl, you can deploy PgBouncer as well as create a connection pool easily and quick.
To make it even better, we also suggest deploying HAProxy in addition to PgBouncer. HAProxy feature is available in ClusterControl and at the time of writing, the version that we are using is 1.8.23.


