blog
PostgreSQL v13 Deployment and Scaling with ClusterControl 1.8.2

PostgreSQL is one of the databases that can be deployed via ClusterControl, along with MySQL, MariaDB and MongoDB. ClusterControl not only simplifies the deployment of the database cluster, but has a function for scalability in case your application grows and requires that functionality.
By scaling up your database, your application will run much smoother and better in the event the application load or traffic increases. In this blog post, we will review the steps on how to do the deployment as well as scale-up of PostgreSQL v13 with ClusterControl 1.8.2.
User Interface (UI) Deployment
There are two ways of deployment in ClusterControl, web User Interface (UI) as well as Command Line Interface (CLI). The user has the freedom to choose any of the deployment options depending on their liking and need. Both of the options are easy to follow and well documented in our documentation. In this section, we will go through the deployment process using the first option – web UI.
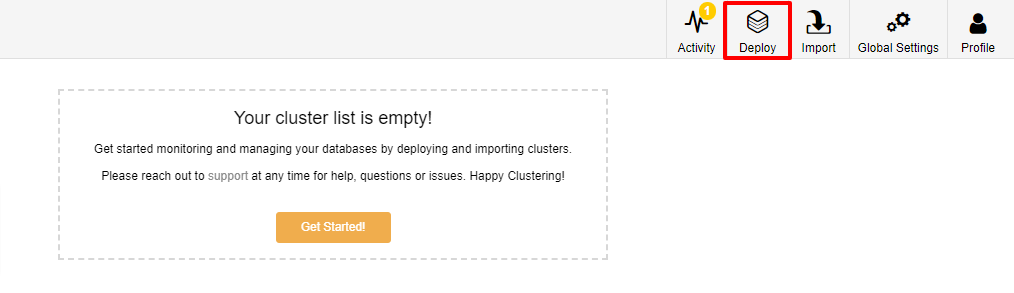
The first step is to log in to your ClusterControl and click on Deploy:
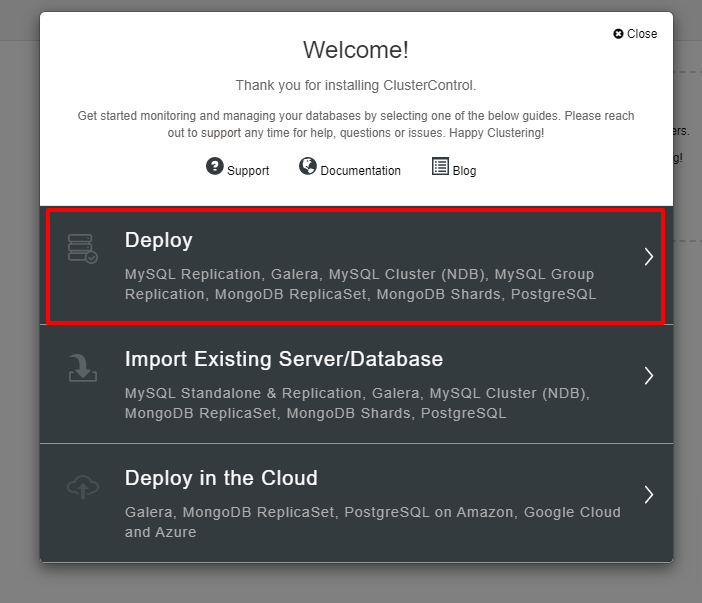
You will be presented with the screenshot below for the next step of the deployment, choose the PostgreSQL tab to continue:
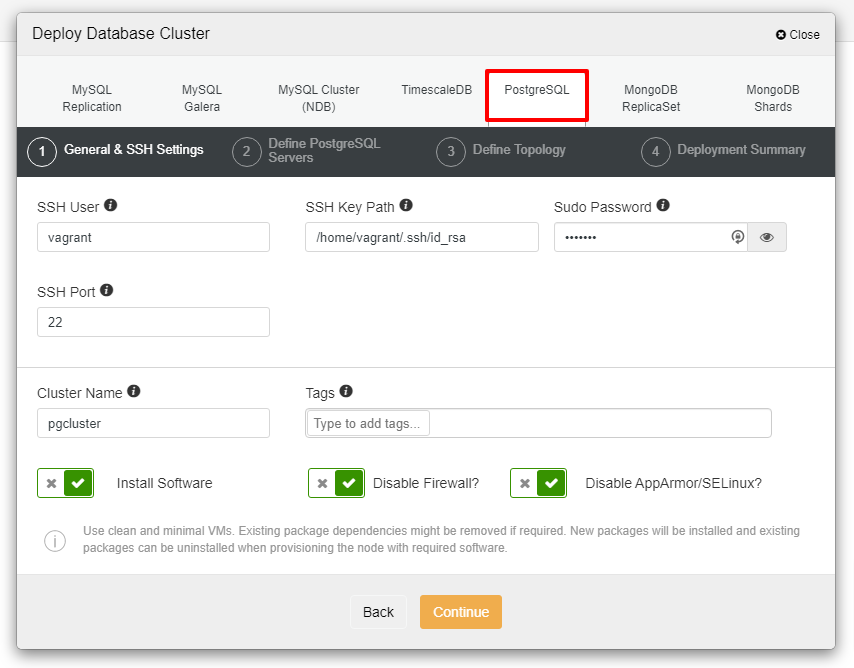
Before we move further, I would like to remind you that the connection between the ClusterControl node and the databases nodes must be passwordless. Prior to deployment, all we need to do is to generate the ssh-keygen from the ClusterControl node and then copy it to all the nodes. Fill in the input for the SSH User, Sudo Password as well as Cluster Name as per your requirement and click Continue.
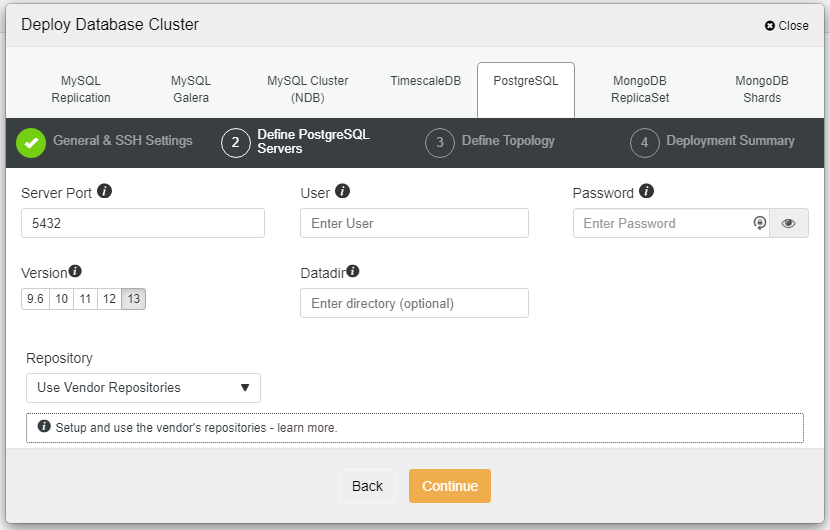
In the screenshot above, you will need to define the Server Port (in case you would like to use others), the user that you would like to as well as the password and make sure to choose Version 13 that you want to install.
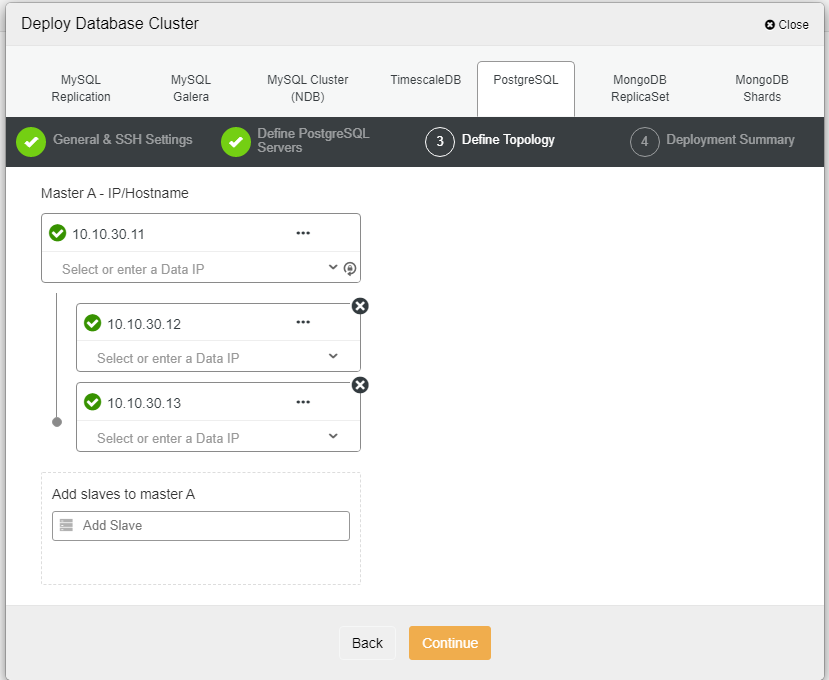
Here we need to define the servers either using the hostname or the IP address, like in this case 1 master and 2 slaves. The final step is to choose the replication mode for our cluster.
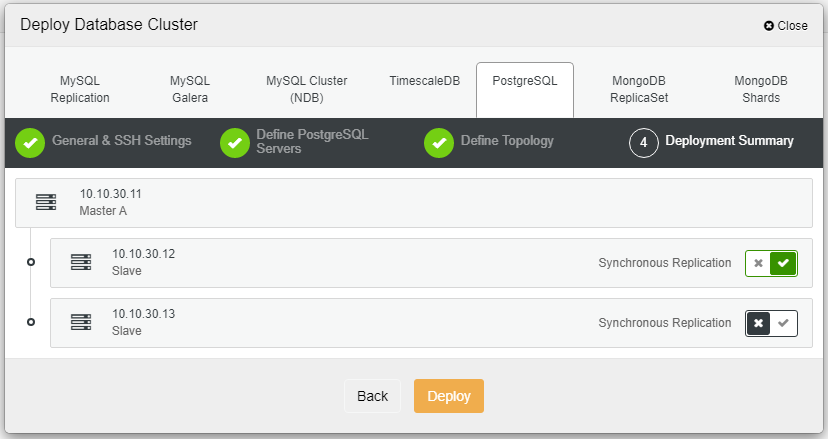
After you click Deploy, the deployment process will start and we can monitor the progress in the Activity tab.
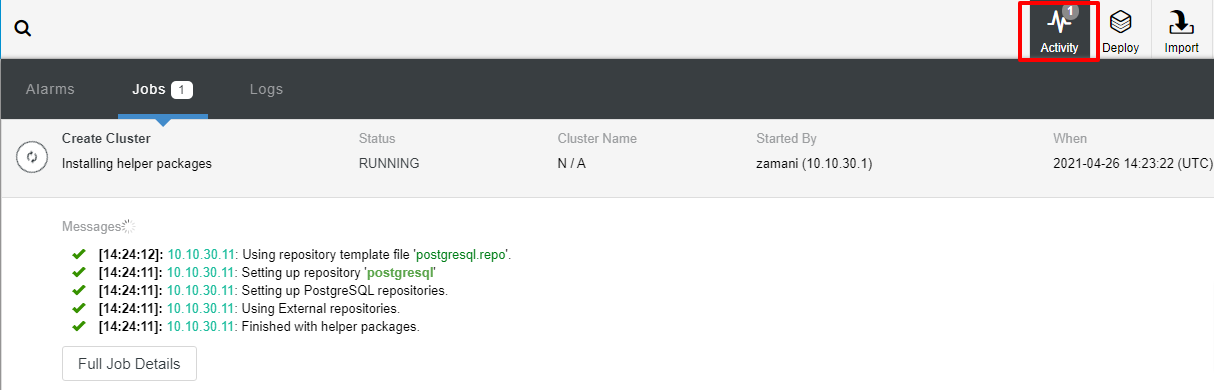
The deployment will normally take a couple of minutes, performance depends mostly on the network and the spec of the server.

Now that we have the PostgreSQL v13 installed using ClusterControl GUI which is pretty straightforward.
Command Line Interface (CLI) PostgreSQL Deployment
From the above, we can see that the deployment is pretty straightforward using web UI. The important note is that all the nodes must have passwordless SSH connections prior to the deployment. In this section, we are going to see how to deploy using the ClusterControl CLI or “s9s” tools command line.
We assumed that ClusterControl has been installed prior to this, let’s get started by generating the ssh-keygen. In the ClusterControl node, run the following commands:
$ whoami
root
$ ssh-keygen -t rsa # generate the SSH key for the user
$ ssh-copy-id 10.10.40.11 # pg node1
$ ssh-copy-id 10.10.40.12 # pg node2
$ ssh-copy-id 10.10.40.13 # pg node3
Once all the commands above ran successfully, we may verify the passwordless connection by using the following command:
$ ssh 10.10.40.11 "whoami" # make sure can ssh without passwordIf the above command runs with success, the cluster deployment can be started from the ClusterControl server using the following line of command:
$ s9s cluster --create --cluster-type=postgresql --nodes="10.10.40.11?master;10.10.40.12?slave;10.10.40.13?slave" --provider-version='13' --db-admin="postgres" --db-admin-passwd="P@$$W0rd" --cluster-name=PGCluster --os-user=root --os-key-file=/root/.ssh/id_rsa --logRight after you run the command above, you will see something like this which means the task has started running:
Cluster will be created on 3 data node(s).
Verifying job parameters.
10.10.40.11: Checking ssh/sudo with credentials ssh_cred_job_6656.
10.10.40.12: Checking ssh/sudo with credentials ssh_cred_job_6656.
10.10.40.13: Checking ssh/sudo with credentials ssh_cred_job_6656.
…
…
This will take a few moments and the following message will be displayed once the cluster is deployed:
…
…
Directory is '/etc/cmon.d'.
Filename is 'cmon_1.cnf'.
Configuration written to 'cmon_1.cnf'.
Sending SIGHUP to the controller process.
Waiting until the initial cluster starts up.
Cluster 1 is running.
Registering the cluster on the web UI.
Waiting until the initial cluster starts up.
Cluster 1 is running.
Generated & set RPC authentication token.
You can also verify it by logging into the web console, using the username that you have created. Now we have a PostgreSQL cluster deployed using 3 nodes. If you like to learn more about the deployment command above, here is the best reference for you.
Scaling Up PostgreSQL with ClusterControl UI
PostgreSQL is a relational database and we know that scaling out this type of database is not easy compared to a non-relational database. These days, most applications need scalability in order to provide better performance and speed. There are a lot of ways on how to get this implemented depending on your infrastructure and environment.
Scalability is one of the features that can be facilitated by ClusterControl and can be accomplished in both using UI as well as CLI. In this section, we are going to see how we can scale out PostgreSQL using ClusterControl UI. The first step is to login to your UI and choose the cluster, once the cluster is chosen you can click on the option as per the screenshot below:
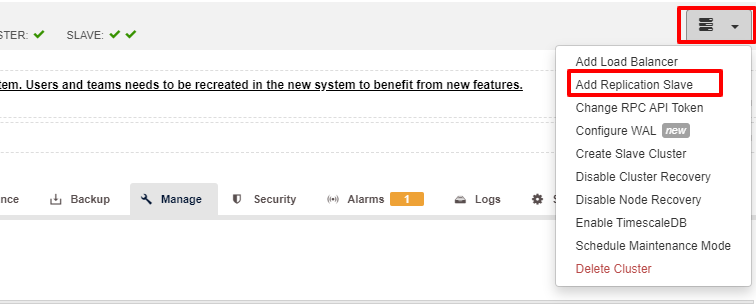
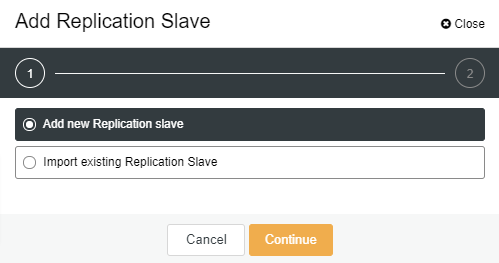
Once the “Add Replication Slave” clicked, you will see the following page. You can either pick “Add new…” or “Import…” depending on your situation. In this example we will choose the first option:
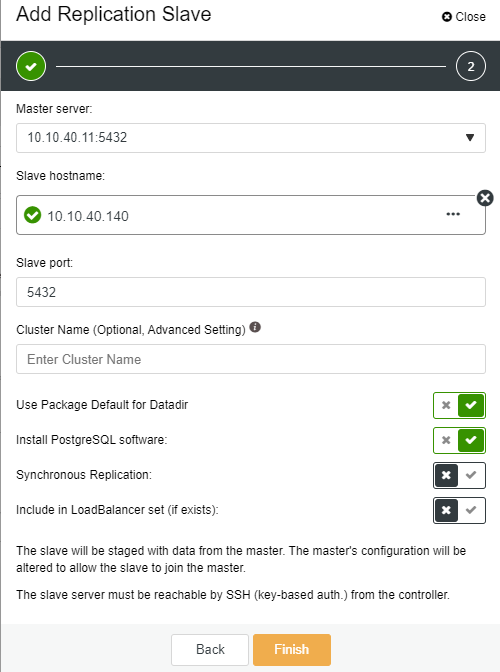
The following screen will be presented once you clicked on it:
-
Slave Hostname: the hostname/IP address of the new slave or node
-
Slave Port: the PostgreSQL port of the slave, default is 5432
-
Cluster Name: the name of the cluster, you can either add or leave it blank
-
Use Package Default for Datadir: you can have this option checked on uncheck if you want to have a different location for Datadir
-
Install PostgreSQL software: you can leave this option checked
-
Synchronous Replication: you can choose what type of replication you want in this one
-
Include in LoadBalancer set (if exists): this option to be checked if you have LoadBalancer configured for the cluster
The key important note here is that you need to configure the new slave host to be passwordless before you can run this setup. Once everything is confirmed, we can click on the “Finish” button to complete the setup. In this example, I have added IP “10.10.40.140”.
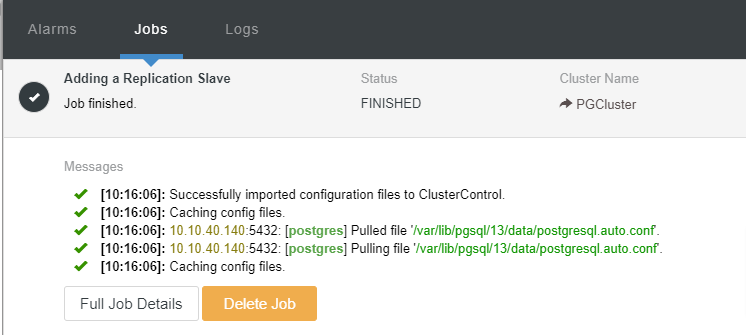
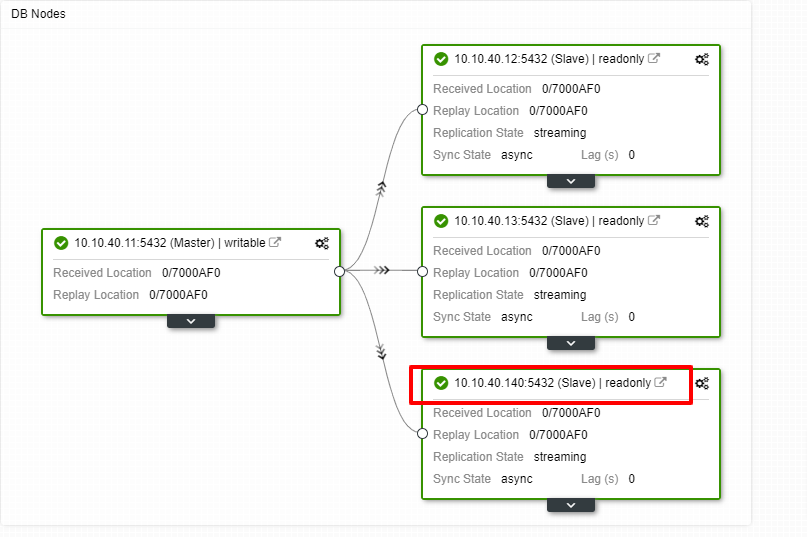
We can now monitor the job activity and let the setup complete. To confirm the setup, we can go to the “Topology” tab to see the new slave:
Scaling Out PostgreSQL with ClusterControl CLI
To add the new nodes into the existing cluster is very simple using the CLI. From the controller node, you execute the following command. The first command is to identify the cluster that we would like to add the new node to:
 $ s9s cluster --list --long
ID STATE   TYPE              OWNER GROUP  NAME      COMMENT
 1 STARTED postgresql_single admin admins PGCluster All nodes are operational.
In this example, we can see that node ID is “1” for the cluster name “PGCluster”. Let see the first command option on how to add a new node to the existing PostgreSQL cluster:
$ s9s cluster --add-node --cluster-id=1 --nodes="postgresql://10.10.40.141?slave" --logThe shorthand “–log” at the end of the line will let us see what is the current task running after the command executed as per below:
Using SSH credentials from cluster.
Cluster ID is 1.
The username is 'root'.
Verifying job parameters.
Found a master candidate: 10.10.40.11:5432, adding 10.10.40.141:5432 as a slave.
Verifying job parameters.
10.10.40.11: Checking ssh/sudo with credentials ssh_cred_cluster_1_6245.
10.10.40.11:5432: Loading configuration file '/var/lib/pgsql/13/data/postgresql.conf'.
10.10.40.11:5432: wal_keep_segments is set to 0, increase this for safer replication.
…
…
The next available command that you can use is like the following:
$ s9s cluster --add-node --cluster-id=1 --nodes="postgresql://10.10.40.142?slave" --waitAdd Node to Cluster
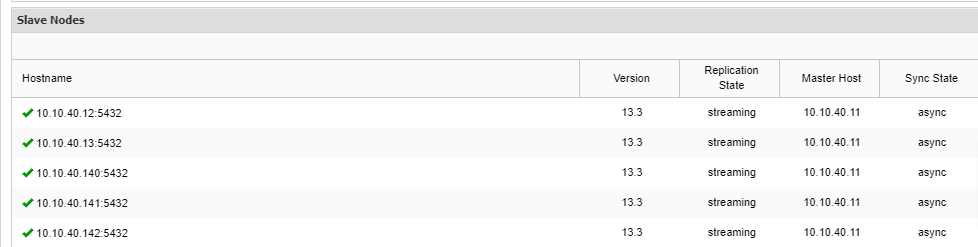
Job 9 RUNNING [▋ ] 5% Installing packagesNotice that there is “–wait” shorthand in the line and the output you will see will be displayed as above. Once the process completes, we can confirm the new nodes in the “Overview” tab of the cluster from the UI:
Conclusion
In this blog post, we have reviewed two options of scaling out PostgreSQL in ClusterControl. As you may notice, scaling out PostgreSQL is easy with ClusterControl. ClusterControl not only can do the scalability but you also can achieve high availability setup for your database cluster. Features like HAProxy, PgBouncer as well as Keepalived are available and ready to be implemented for your cluster whenever you feel the need for those options. With ClusterControl, your database cluster is easy to manage and monitored at the same time.
We hope that this blog post will help guide you in scaling out your PostgreSQL setup.


