blog
Running Galera Cluster With ClusterControl on Kubernetes

In our “MySQL on Docker” blog series, we continue our quest to make Galera Cluster run smoothly in different container environments. One of the most important things when running a database service, whether in containers or bare-metal, is to eliminate the risk of data loss. We will see how we can leverage a promising feature in Kubernetes called StatefulSet, which orchestrates container deployment in a more predictable and controllable fashion.
In our previous blog post, we showed how one can deploy a Galera Cluster within Docker with the help of Kubernetes as orchestration tool. However, it is only about deployment. Running a database requires more than just deployment – we need to think about monitoring, backups, upgrades, recovery from failures, topology changes and so on. This is where ClusterControl comes into the picture, as it completes the stack and makes it ready. In simple words, Kubernetes takes care of database deployment and scaling while ClusterControl fills in the missing components including configuration, monitoring and ongoing management.
ClusterControl on Docker
This blog post describes how ClusterControl runs in a Docker environment. The Docker image has been updated, and now comes with the standard ClusterControl packages in the latest stable branch with additional support for container orchestration platforms like Docker Swarm and Kubernetes, we’ll describe this further below. You can also use the image to deploy a database cluster on a standalone Docker host.
Details at the Github repository or Docker Hub page.
ClusterControl on Kubernetes
The updated Docker image now supports automatic deployment of database containers scheduled by Kubernetes. The steps are similar to the Docker Swarm implementation, where the user decides the specs of the database cluster and ClusterControl automates the actual deployment.
ClusterControl can be deployed as ReplicaSet or StatefulSet. Since it’s a single instance, either way works. The only significant difference is the container identification would be easier with StatefulSet, since it provides consistent identifiers like the container hostname, IP address, DNS and storage. ClusterControl also provides service discovery for the new cluster deployment.
To deploy ClusterControl on Kubernetes, the following setup is recommended:
- Use centralized persistent volumes supported by Kubernetes plugins (e.g. NFS, iSCSI) for the following paths:
- /etc/cmon.d – ClusterControl configuration directory
- /var/lib/mysql – ClusterControl cmon and dcps databases
- Create 2 services for this pod:
- One for internal communication between pods (expose port 80 and 3306)
- One for external communication to outside world (expose port 80, 443 using NodePort or LoadBalancer)
In this example, we are going to use simple NFS. Make sure you have an NFS server ready. For the sake of simplicity, we are going to demonstrate this deployment on a 3-host Kubernetes cluster (1 master + 2 Kubernetes nodes). Though we recommend running at least 3 Kubernetes nodes to minimize the risk of losing quorum.
With that in place, we can deploy the ClusterControl as something like this:
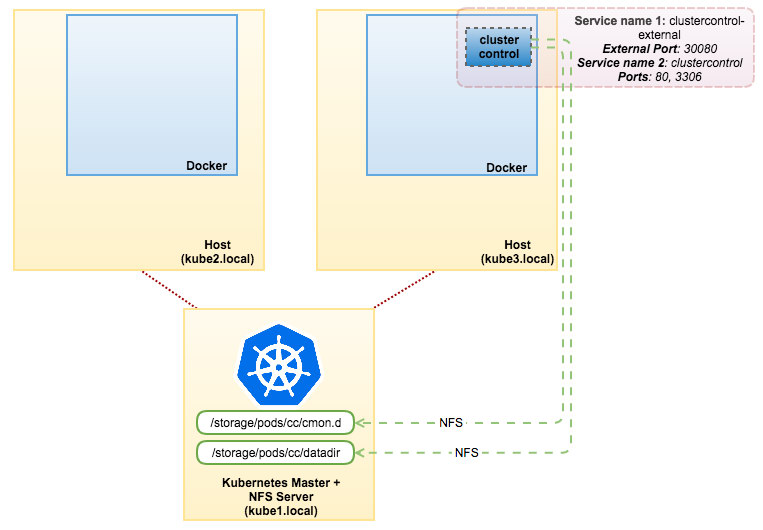
On the NFS server (kube1.local), install NFS server and client packages and export the following paths:
- /storage/pods/cc/cmon.d – to be mapped with /etc/cmon.d
- /storage/pods/cc/datadir – to be mapped with /var/lib/mysql
Ensure to restart NFS service to apply the changes. Then create PVs and PVCs, as shown in cc-pv-pvc.yml:
$ kubectl create -f cc-pv-pvc.ymlWe are now ready to start a replica of the ClusterControl pod. Send cc-rs.yml to Kubernetes master:
$ kubectl create -f cc-rs.ymlClusterControl is now accessible on port 30080 on any of the Kubernetes nodes, for example, http://kube1.local:30080/clustercontrol. With this approach (ReplicaSet + PV + PVC), the ClusterControl pod would survive if the physical host goes down. Kubernetes will automatically schedule the pod to the other available hosts and ClusterControl will be bootstrapped from the last existing dataset which is available through NFS.
Galera Cluster on Kubernetes
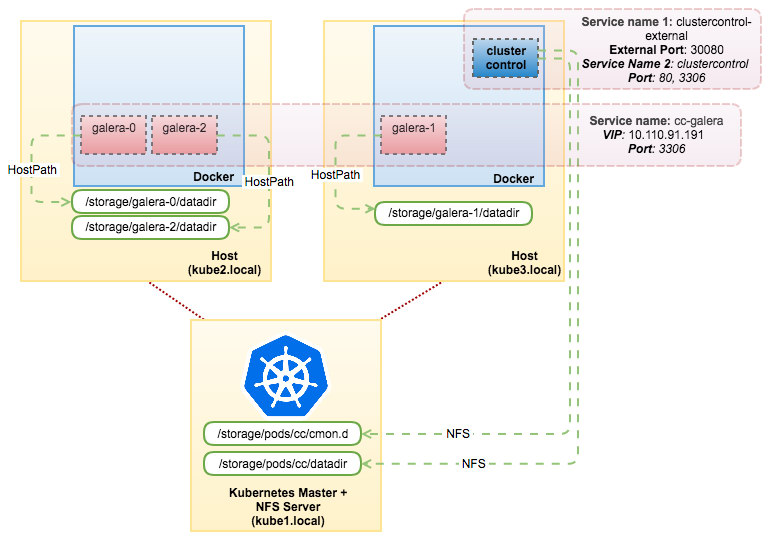
If you would like to use the ClusterControl automatic deployment feature, simply send the following YAML files to the Kubernetes master:
$ kubectl create -f cc-galera-pv-pvc.yml
$ kubectl create -f cc-galera-ss.yml
Details on the definition files can be found here – cc-galera-pv-pvc.yml and cc-galera-ss.yml.
The above commands tell Kubernetes to create 3 PVs, 3 PVCs and 3 pods running as StatefulSet using a generic base image called “centos-ssh”. In this example, the database cluster that we are going to deploy is MariaDB 10.1. Once the containers are started, they will register themselves to ClusterControl CMON database. ClusterControl will then pick up the containers’ hostname and start the deployment based on the variables that have been passed.
You can check the progress directly from the ClusterControl UI. Once the deployment has finished, our architecture will look something like this:
HAProxy as Load Balancer
Kubernetes comes with an internal load balancing capability via the Service component when distributing traffic to the backend pods. This is good enough if the balancing (least connections) fits your workload. In some cases, where your application needs to send queries to a single master due to deadlock or strict read-after-write semantics, you have to create another Kubernetes service with a proper selector to redirect the incoming connection to one and only one pod. If this single pod goes down, there is a chance of service interruption when Kubernetes schedules it again to another available node. What we are trying to highlight here is that if you’d want better control on what’s being sent to the backend Galera Cluster, something like HAProxy (or even ProxySQL) is pretty good at that.
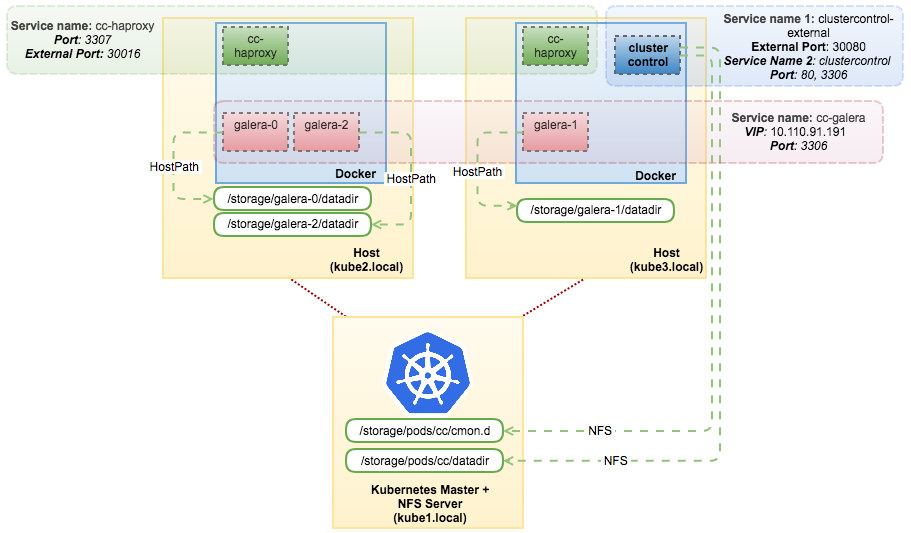
You can deploy HAProxy as a two-pod ReplicaSet and use ClusterControl to deploy, configure and manage it. Simply post this YAML definition to Kubernetes:
$ kubectl create -f cc-haproxy-rs.ymlThe above definition instructs Kubernetes to create a service called cc-haproxy and run two replicas of “severalnines/centos-ssh” image without automatic deployment (AUTO_DEPLOYMENT=0). These pods will then connect to the ClusterControl pod and perform automatic passwordless SSH setup. What you need to do now is to log into ClusterControl UI and start the deployment of HAProxy.
Firstly, retrieve the IP address of HAProxy pods:
$ kubectl describe pods -l app=cc-haproxy | grep IP
IP: 10.44.0.6
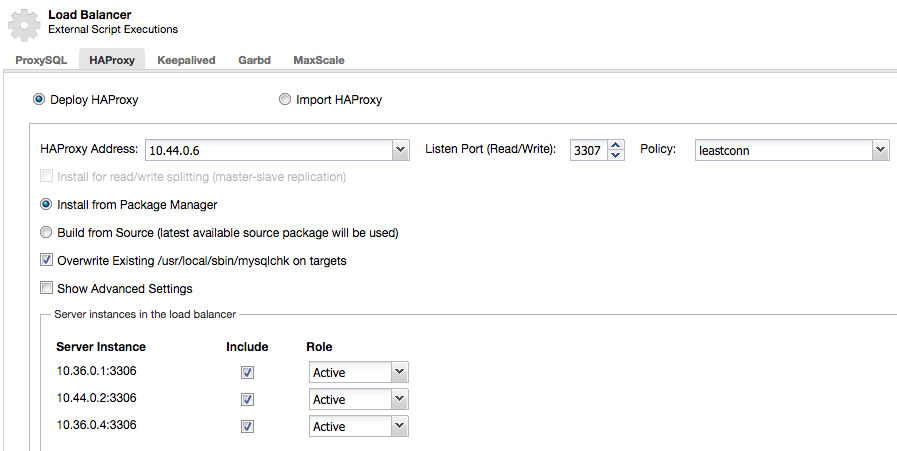
IP: 10.36.0.5Then use the address as the HAProxy Address under ClusterControl -> choose the DB cluster -> Manage -> Load Balancer -> HAProxy -> Deploy HAProxy, as shown below:
**Repeat the above step for the second HAProxy instance.
Once done, our Galera Cluster can be accessible through the “cc-haproxy” service on port 3307 internally (within Kubernetes network space) or port 30016 externally (outside world). The connection will be load balanced between these HAProxy instances. At this point, our architecture can be illustrated as the following:
With this setup, you have maximum control of your load-balanced Galera Cluster running on Docker. Kubernetes brings something good to the table by supporting stateful service orchestration.
Do give it a try. We would love to hear how you get along.
Disclaimer
ClusterControl Docker image support for Galera Cluster on Kubernetes is not part of the official ClusterControl product at the moment. It’s an open-source project, which you can track and contribute at our Github page.


