blog
PostgreSQL Load Balancing & ProxySQL Enhancements – ClusterControl 1.5

Load balancers are an essential component in database high availability; especially when making topology changes transparent to applications and implementing read-write split functionality. ClusterControl provides an array of features to securely deploy, monitor and configure the industry’s leading open source load balancing technologies.
In the past year we have added support for ProxySQL and added multiple enhancements for HAProxy and MariaDB’s Maxscale. We continue this tradition with the latest release of ClusterControl 1.5.
Based on feedback we received from our users, we have improved how ProxySQL is managed. We also added support for HAProxy and Keepalived to run on top of PostgreSQL clusters.
In this blog post, we’ll have a look at these improvements…
ProxySQL – User Management Enhancements
Previously, the UI would only allow you to create a new user or add an existing one, one at a time. One feedback we got from our users was that it is quite hard to manage a large number of users. We listened and in ClusterControl 1.5, it is now possible to import large batches of users. Let’s take a look at how you can do that. First of all, you need to have your ProxySQL deployed. Then, go to the ProxySQL node, and in the Users tab, you should see an “Import Users” button.
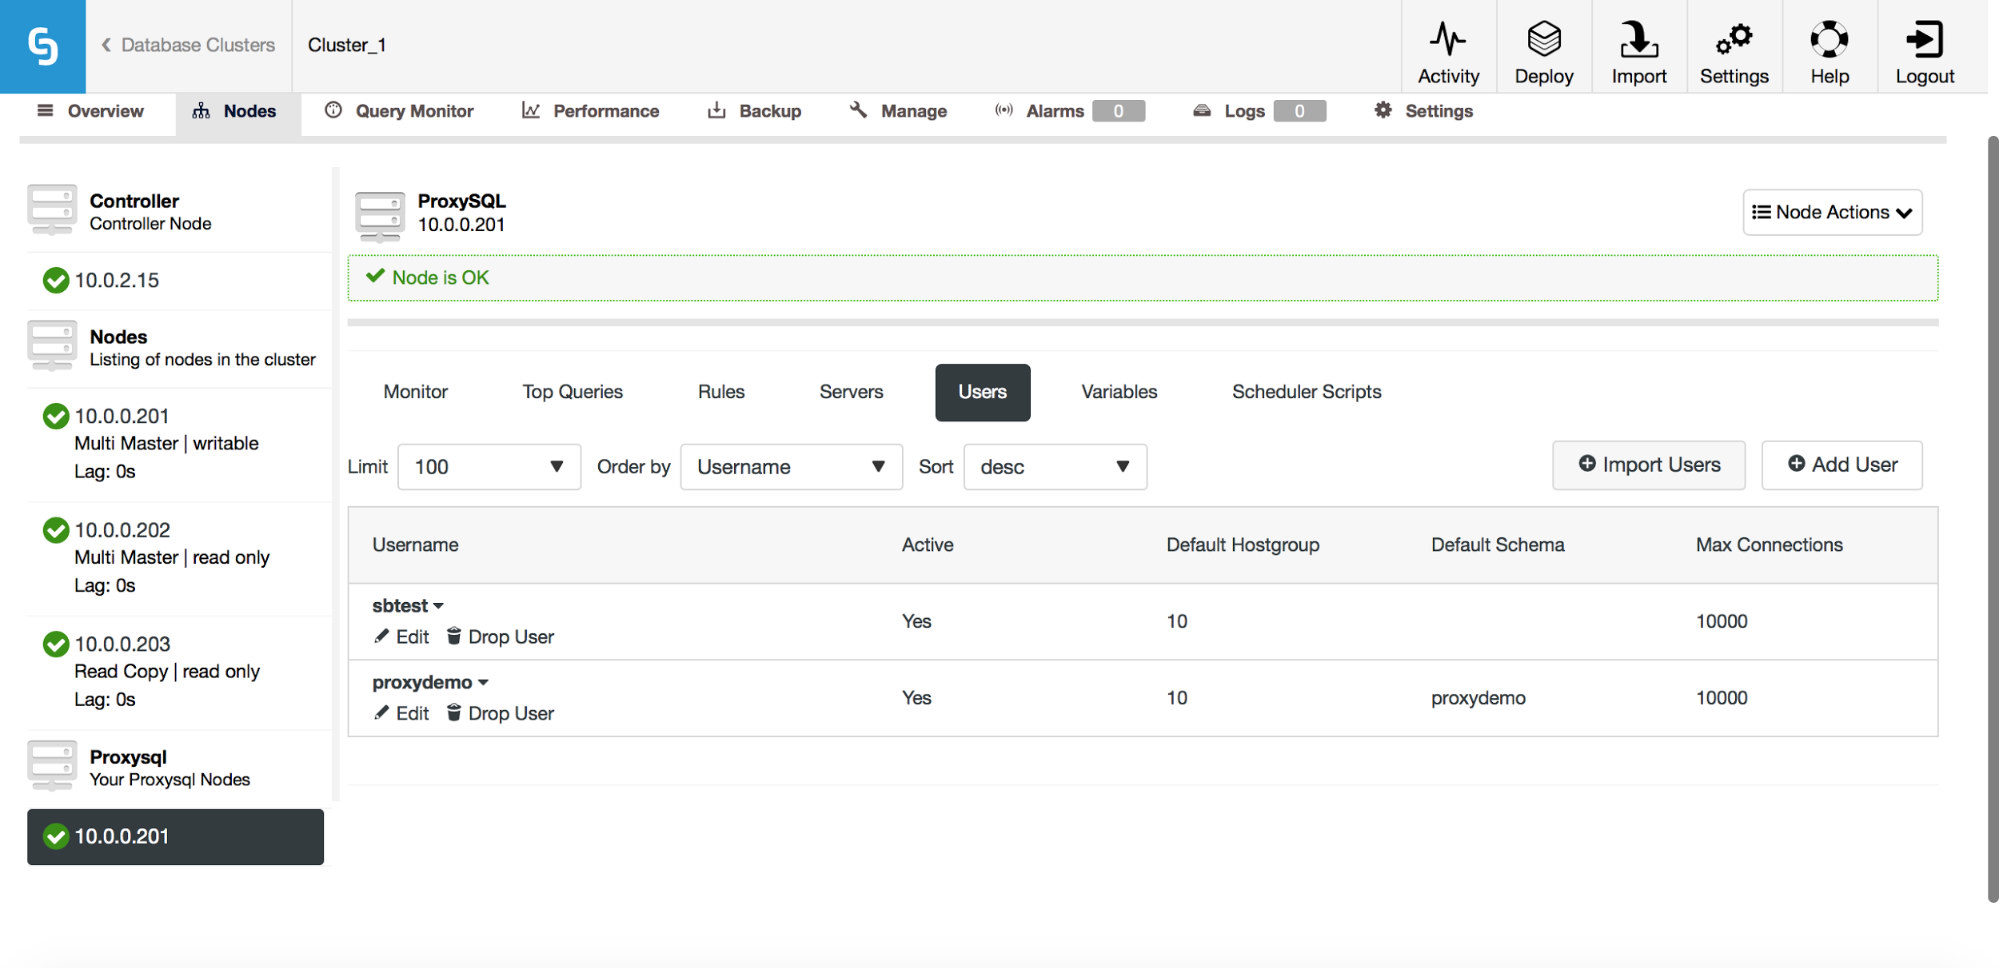
Once you click on it, a new dialog box will open:

Here you can see all of the users that ClusterControl detected on your cluster. You can scroll through them and pick the ones you want to import. You can also select or deselect all of the users from a current view.
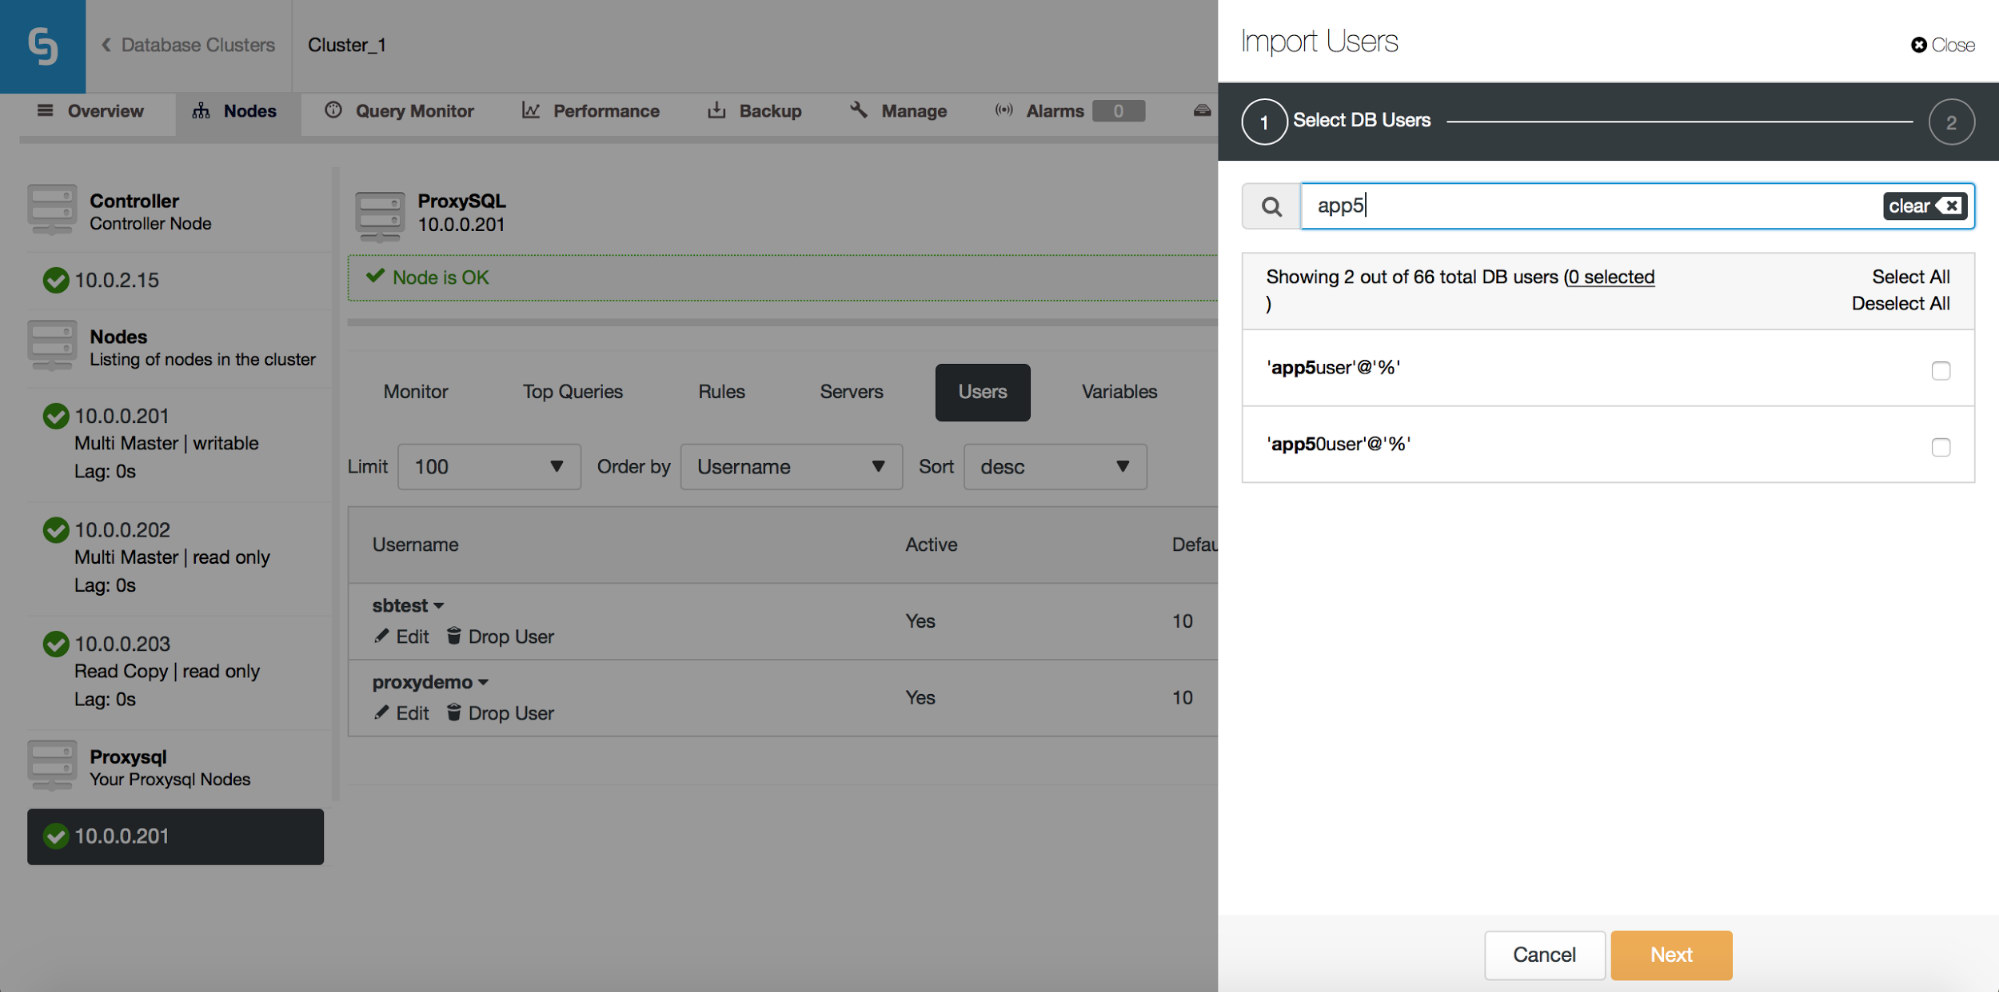
Once you start to type in the Search box, ClusterControl will filter out non-matching results, narrowing the list only to users relevant to your search.

You can use the “Select All” button to select all users which match your search. Of course, after you selected users you want to import, you can clear the search box and start another search:
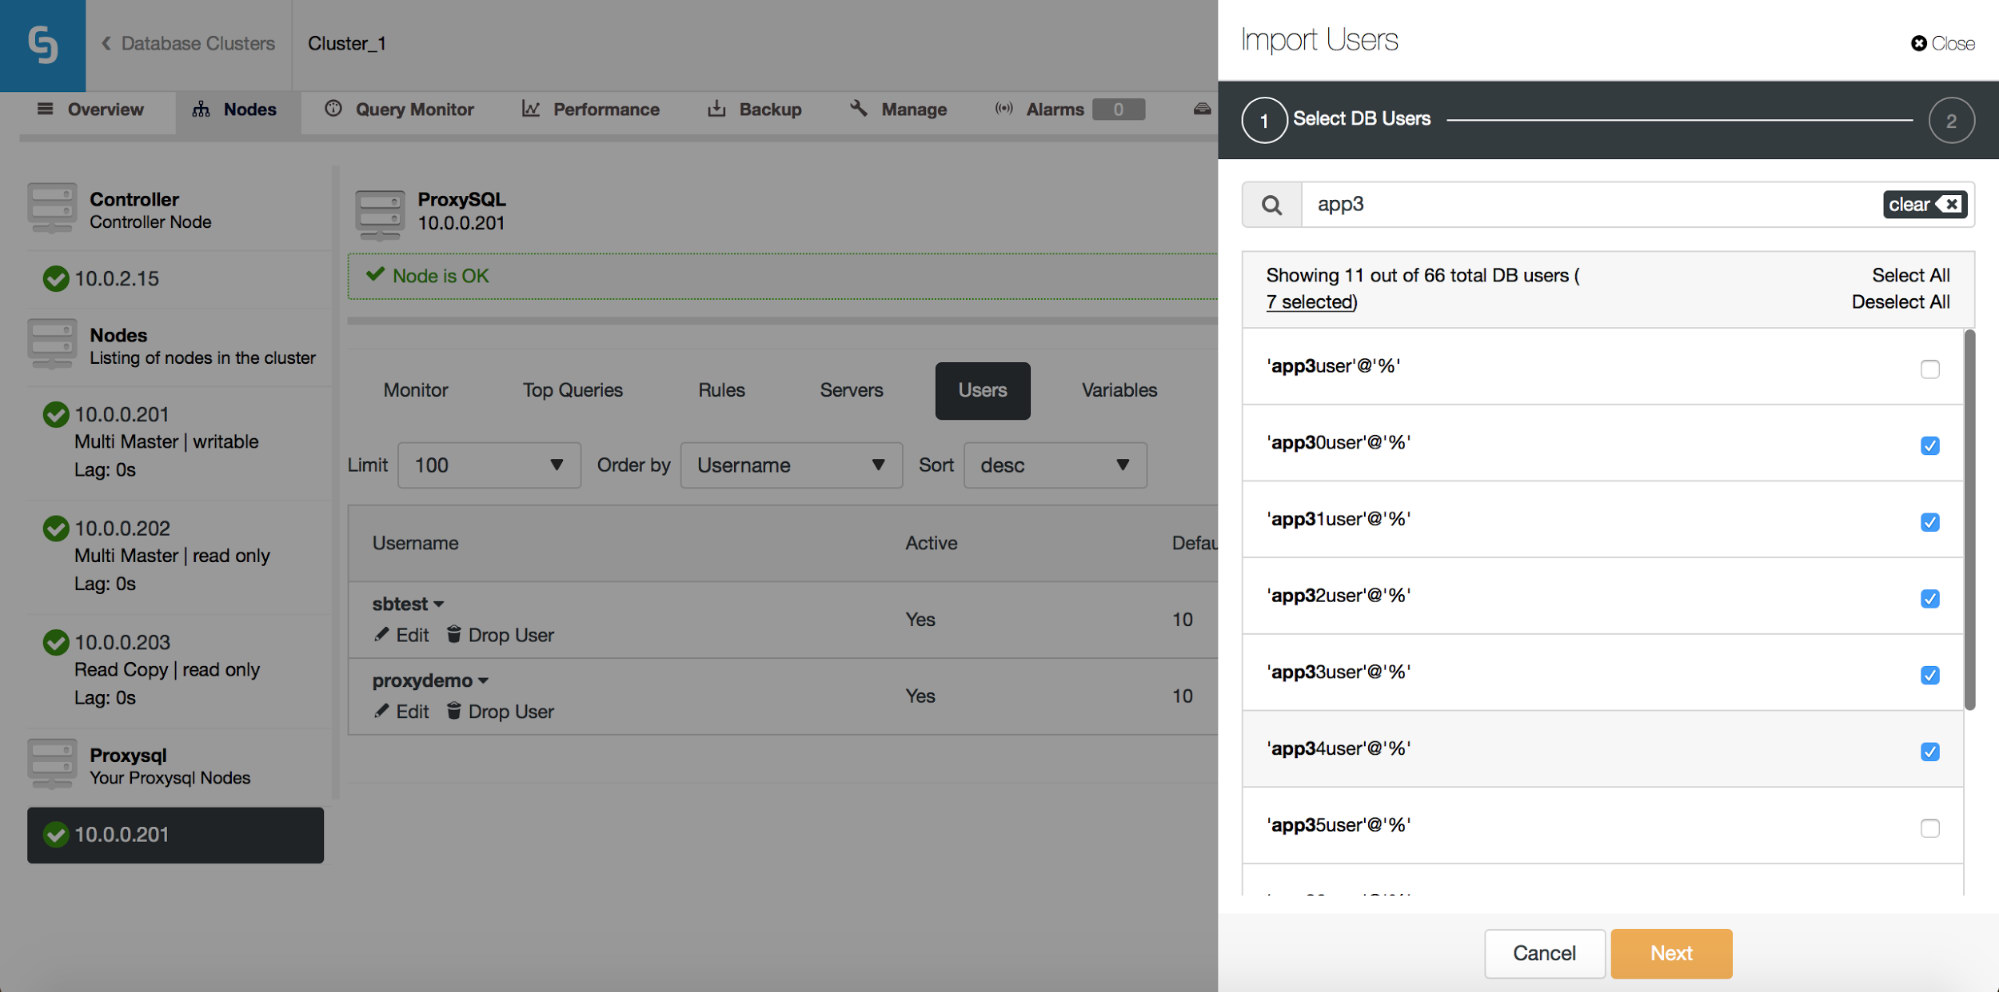
Please note “(7 selected)” – it tells you how many users, in total (not just from this search), you have selected to import. You can also click on it to see only the users you selected to import.
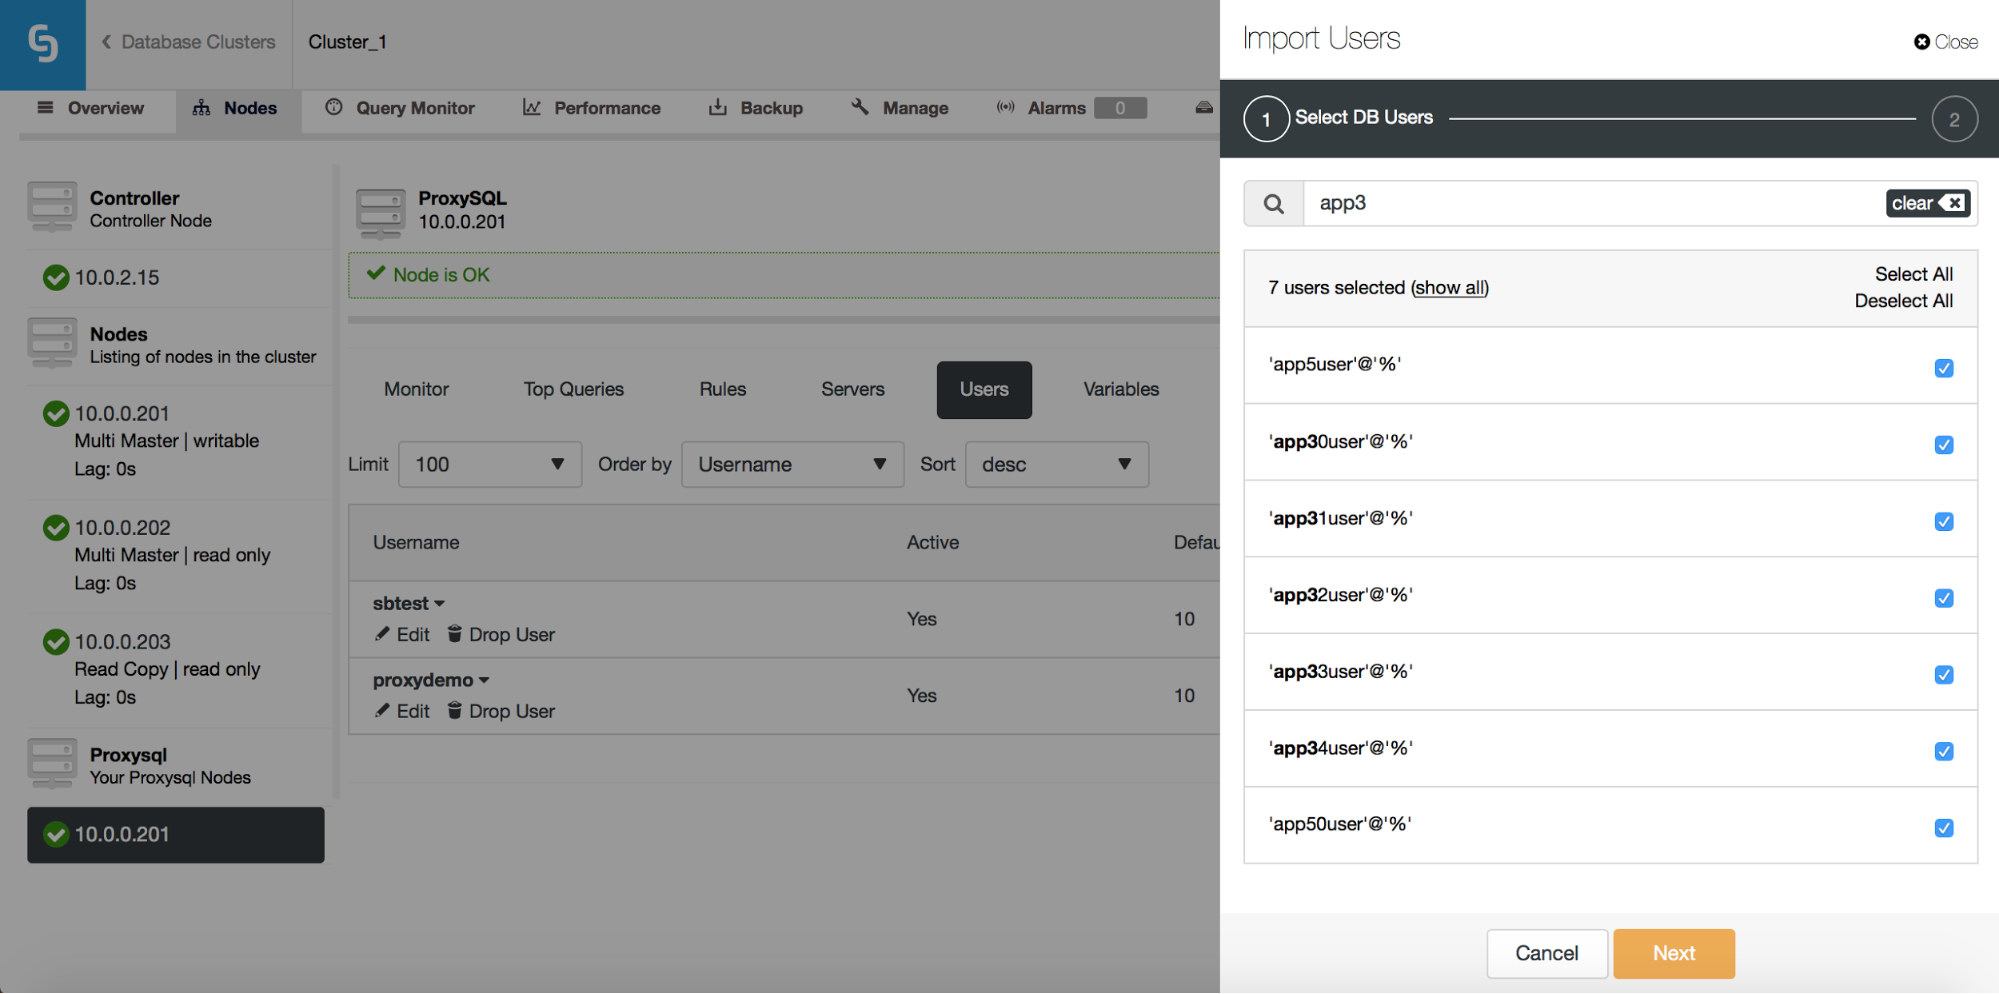
Once you are happy with your choice, you can click “Next” to go to the next screen.
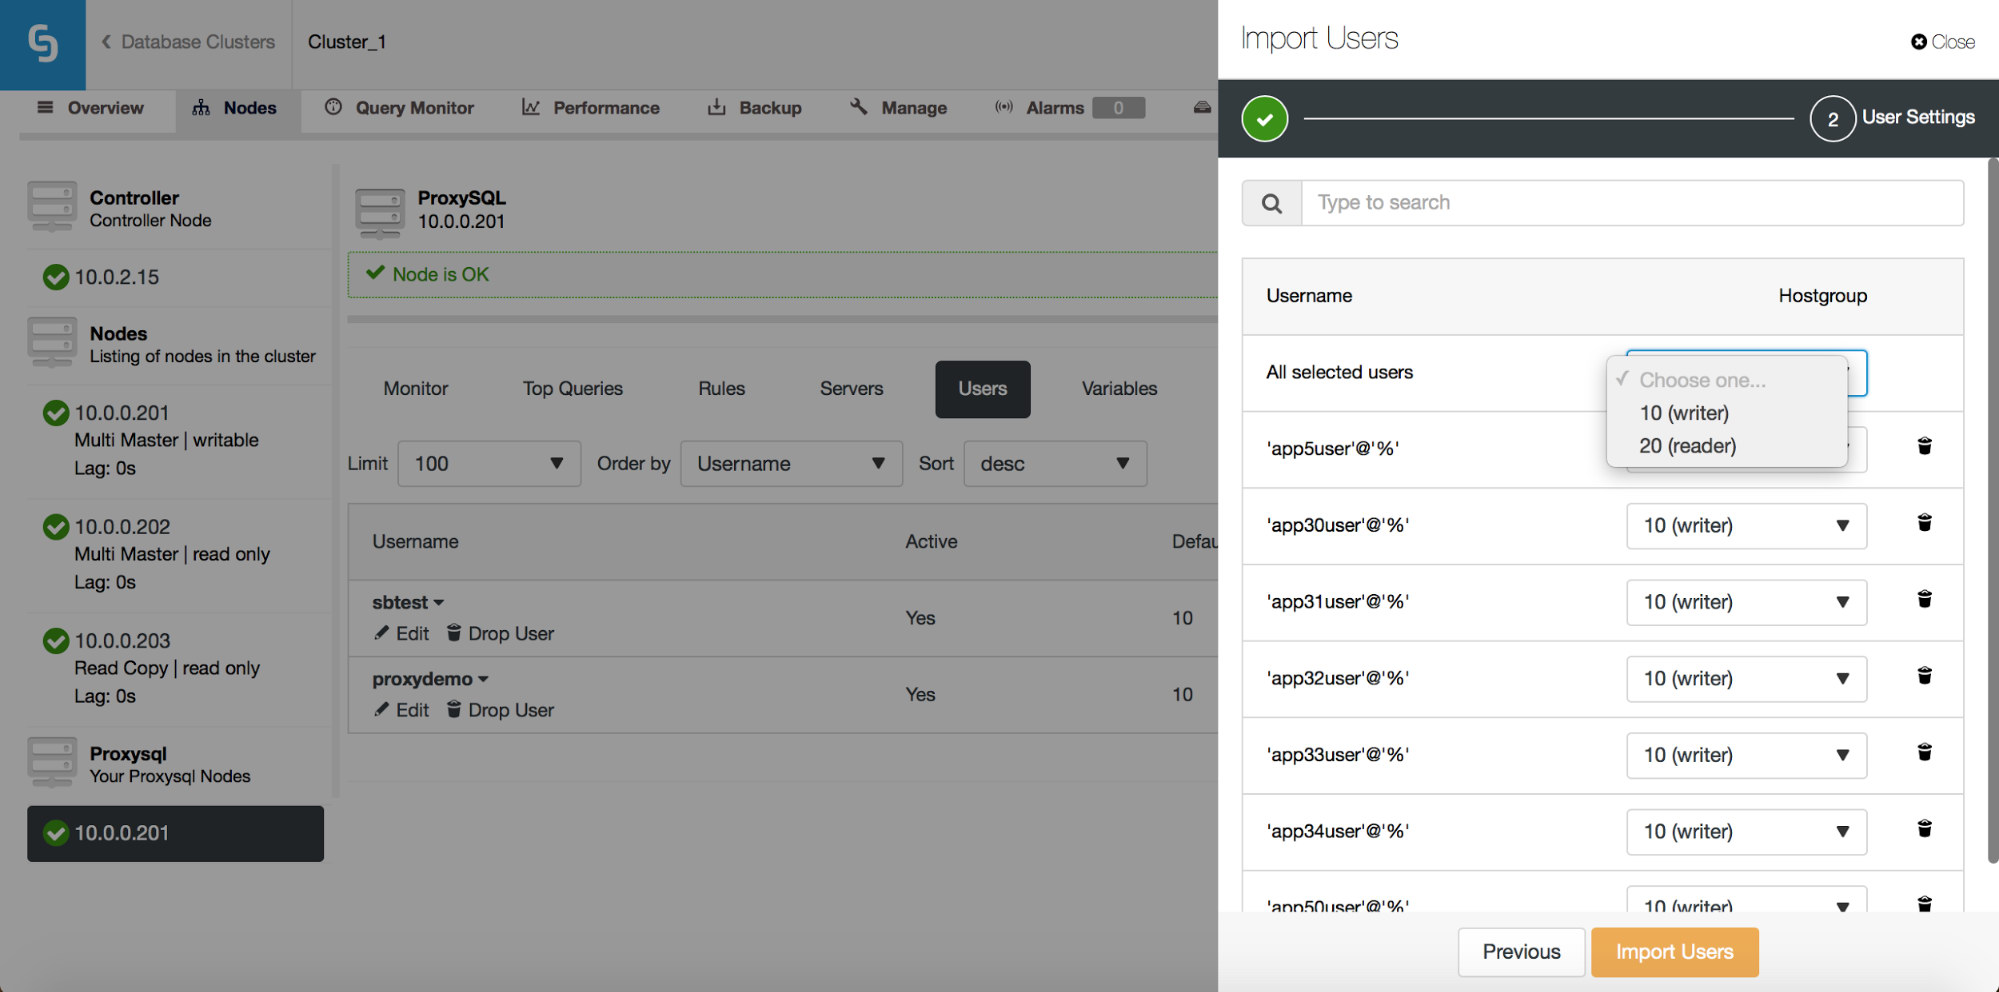
Here you need to decide what should be the default hostgroup for each user. You can do that on per-user basis or globally, for the whole set or a subset of users resulting from a search.
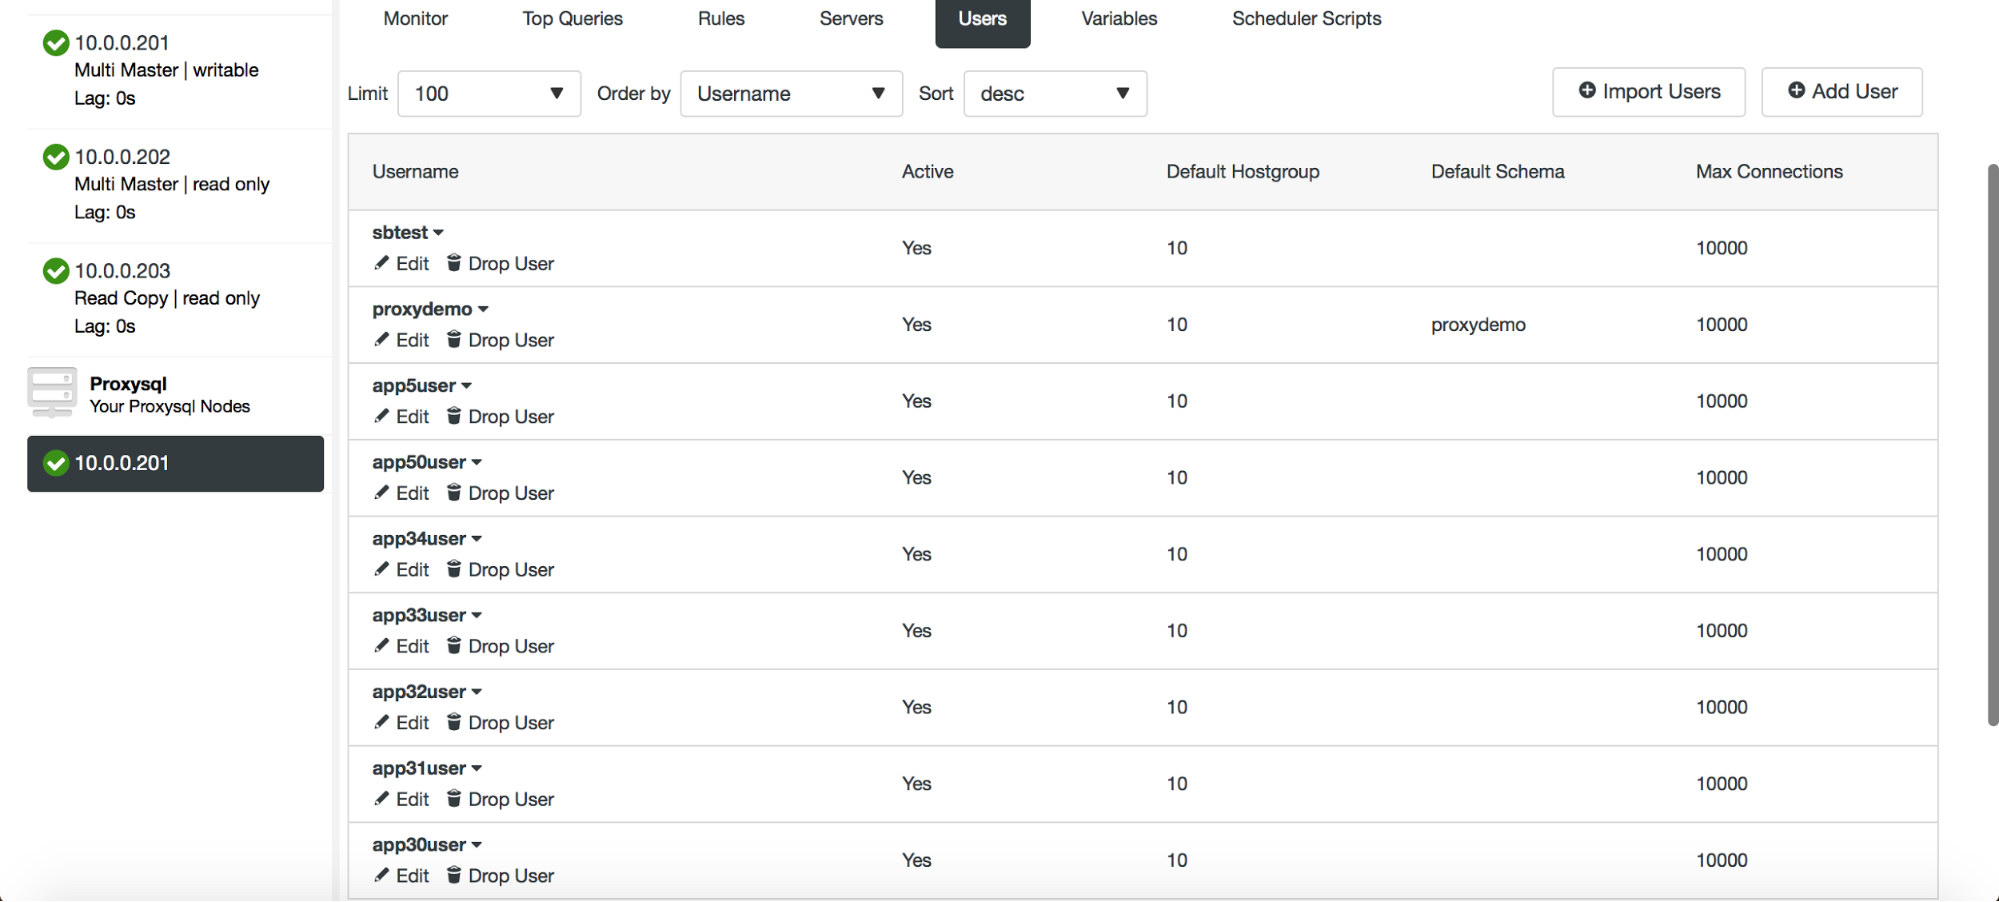
Once you click on the “Import Users” button, users will be imported and they will show up in the Users tab.
ProxySQL – Scheduler Management
ProxySQL’s scheduler is a cron-like module which allows ProxySQL to start external scripts on a regular interval. The schedule can be quite granular – up to one execution every millisecond. Typically, the scheduler is used to execute Galera checker scripts (like proxysql_galera_checker.sh), but it can also be used to execute any other script that you like. In the past, ClusterControl used the scheduler to deploy the Galera checker script but this was not exposed in the UI. Starting ClusterControl 1.5, you now have full control.
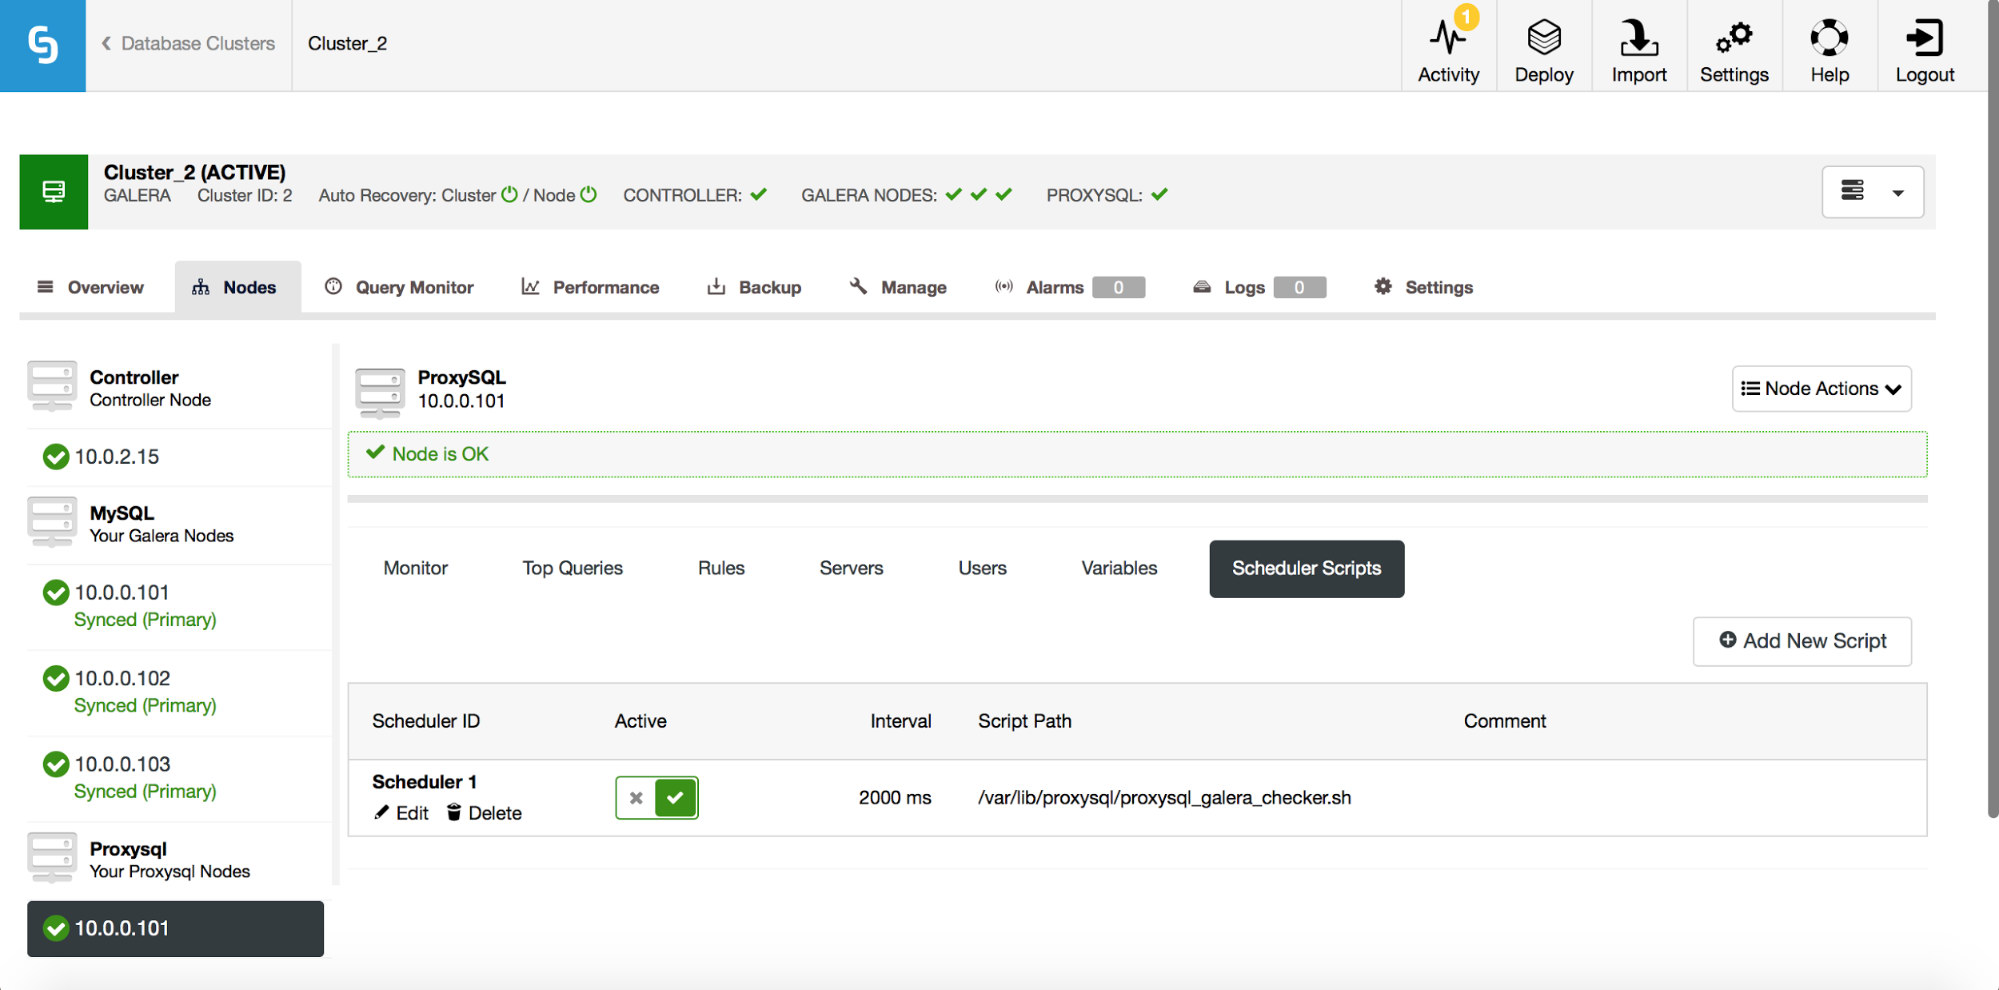
As you can see, one script has been scheduled to run every 2 seconds (2000 milliseconds) – this is the default configuration for Galera cluster.
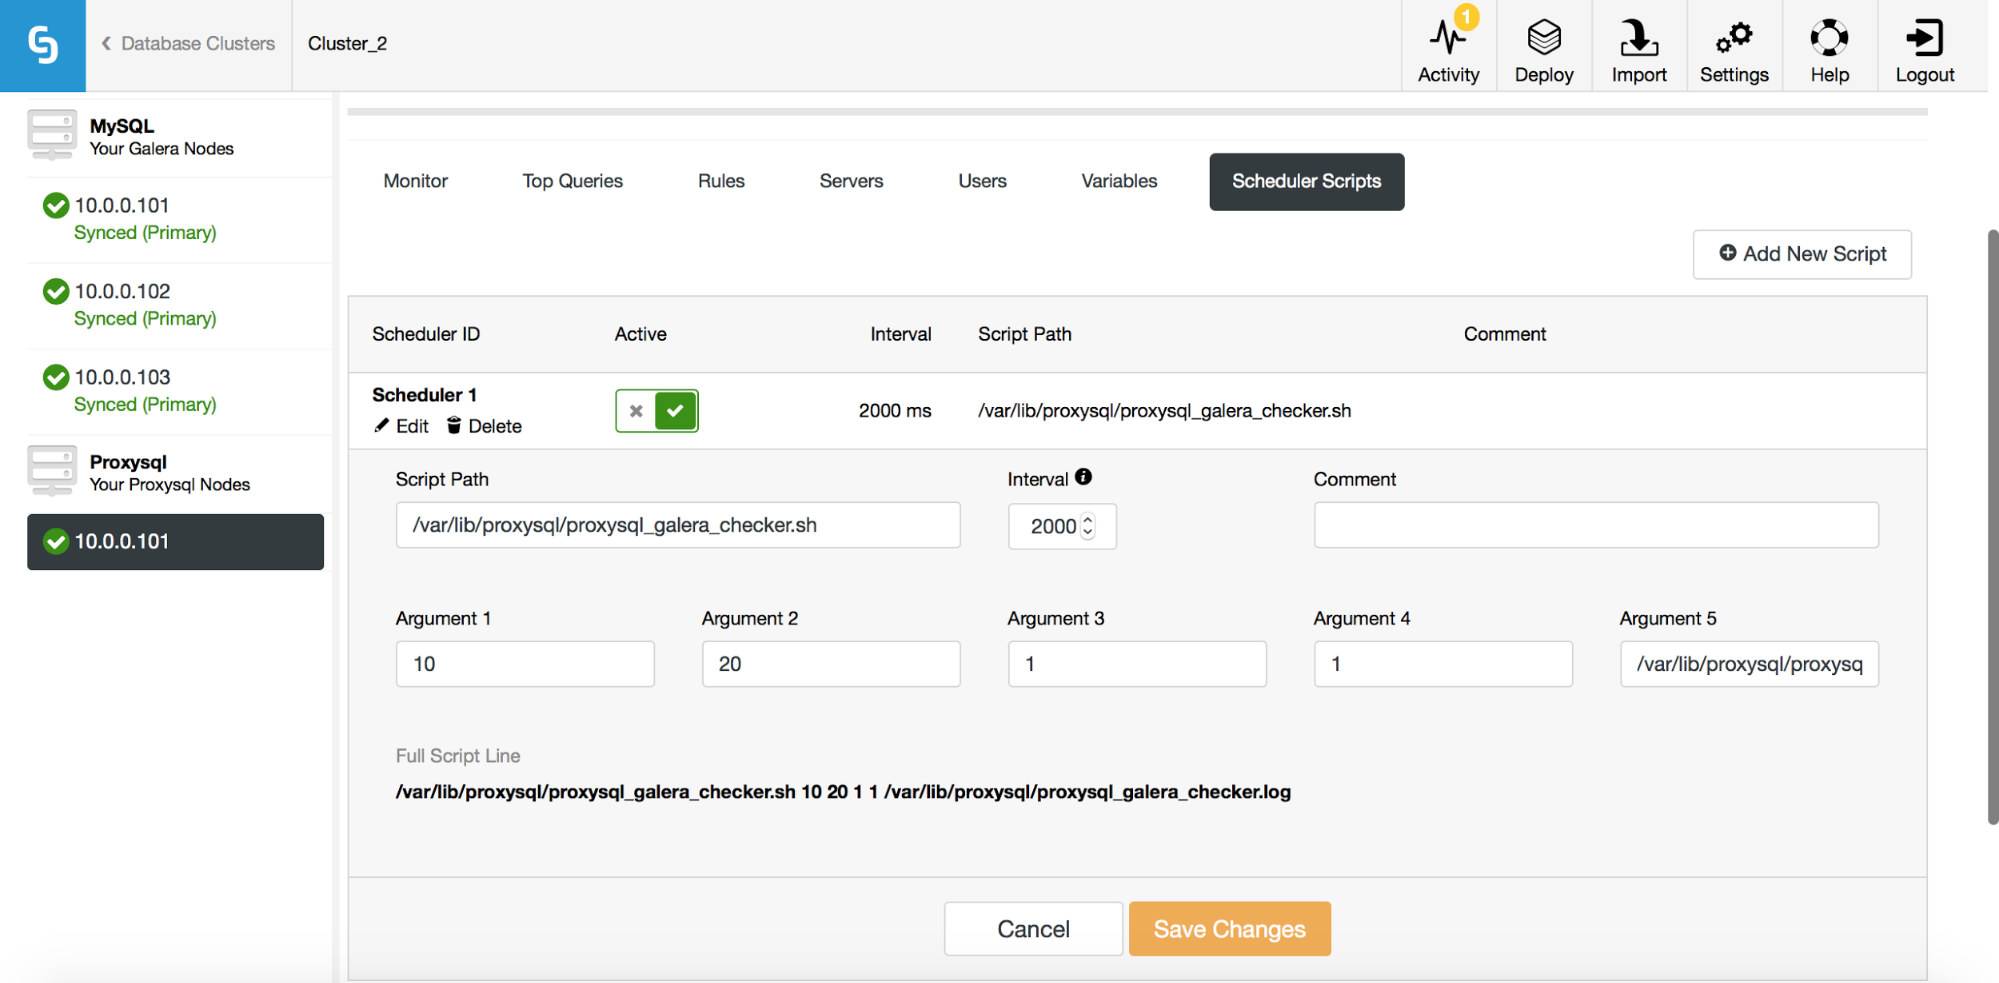
The above screenshot shows us options for editing existing entries. Please note that ProxySQL supports up to 5 arguments to the scripts it’ll execute through the scheduler.
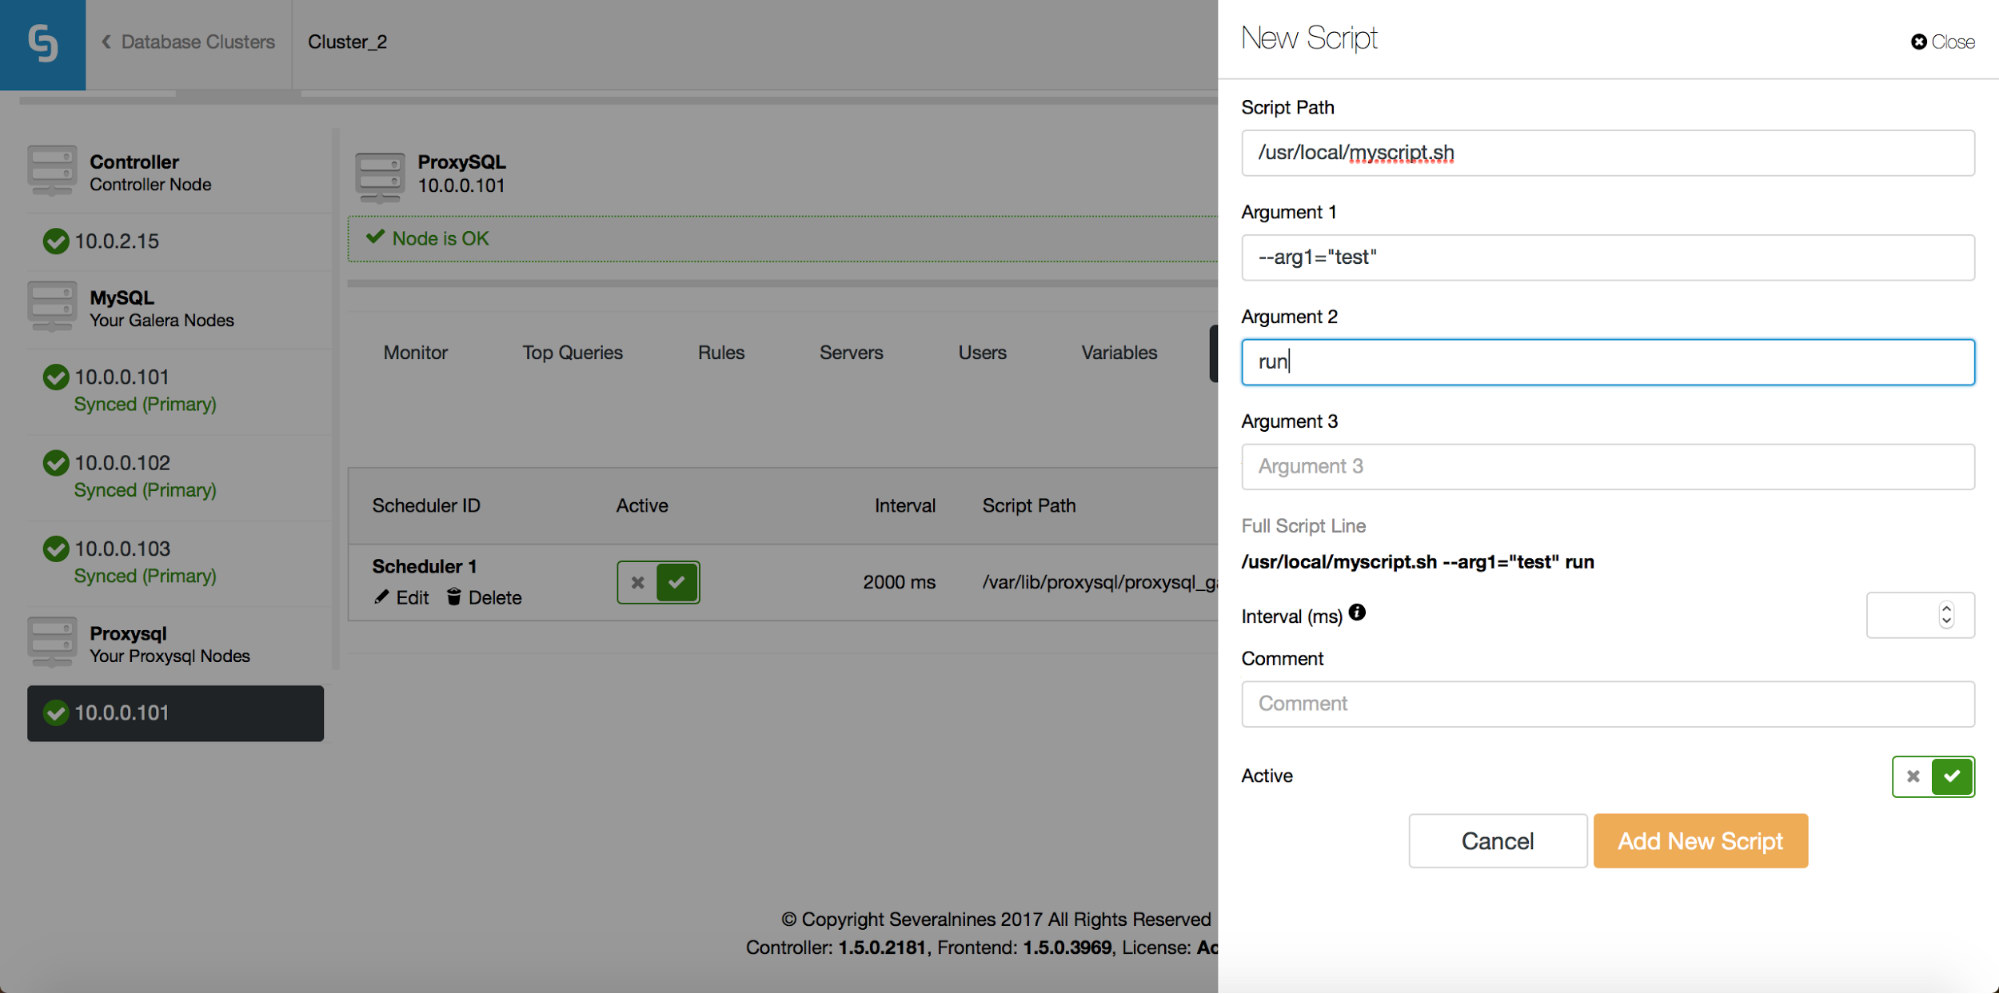
If you want a new script to be added to the scheduler, you can click on the “Add New Script” button and you will be presented with a screen like the above. You can also preview how the full script will look like when executed. After you have filled all “Argument” fields and defined the interval, you can click on “Add New Script” button.

As a result, a script will be added to the scheduler and it’ll be visible on the list of scheduled scripts.
PostgreSQL – Building the High Availability Stack
Setting up replication with auto failover is good, but applications need a simple way to track the writeable master. So we added support for HAProxy and Keepalived on top of the PostgreSQL clusters. This allows our PostgreSQL users to deploy a full high availability stack using ClusterControl.
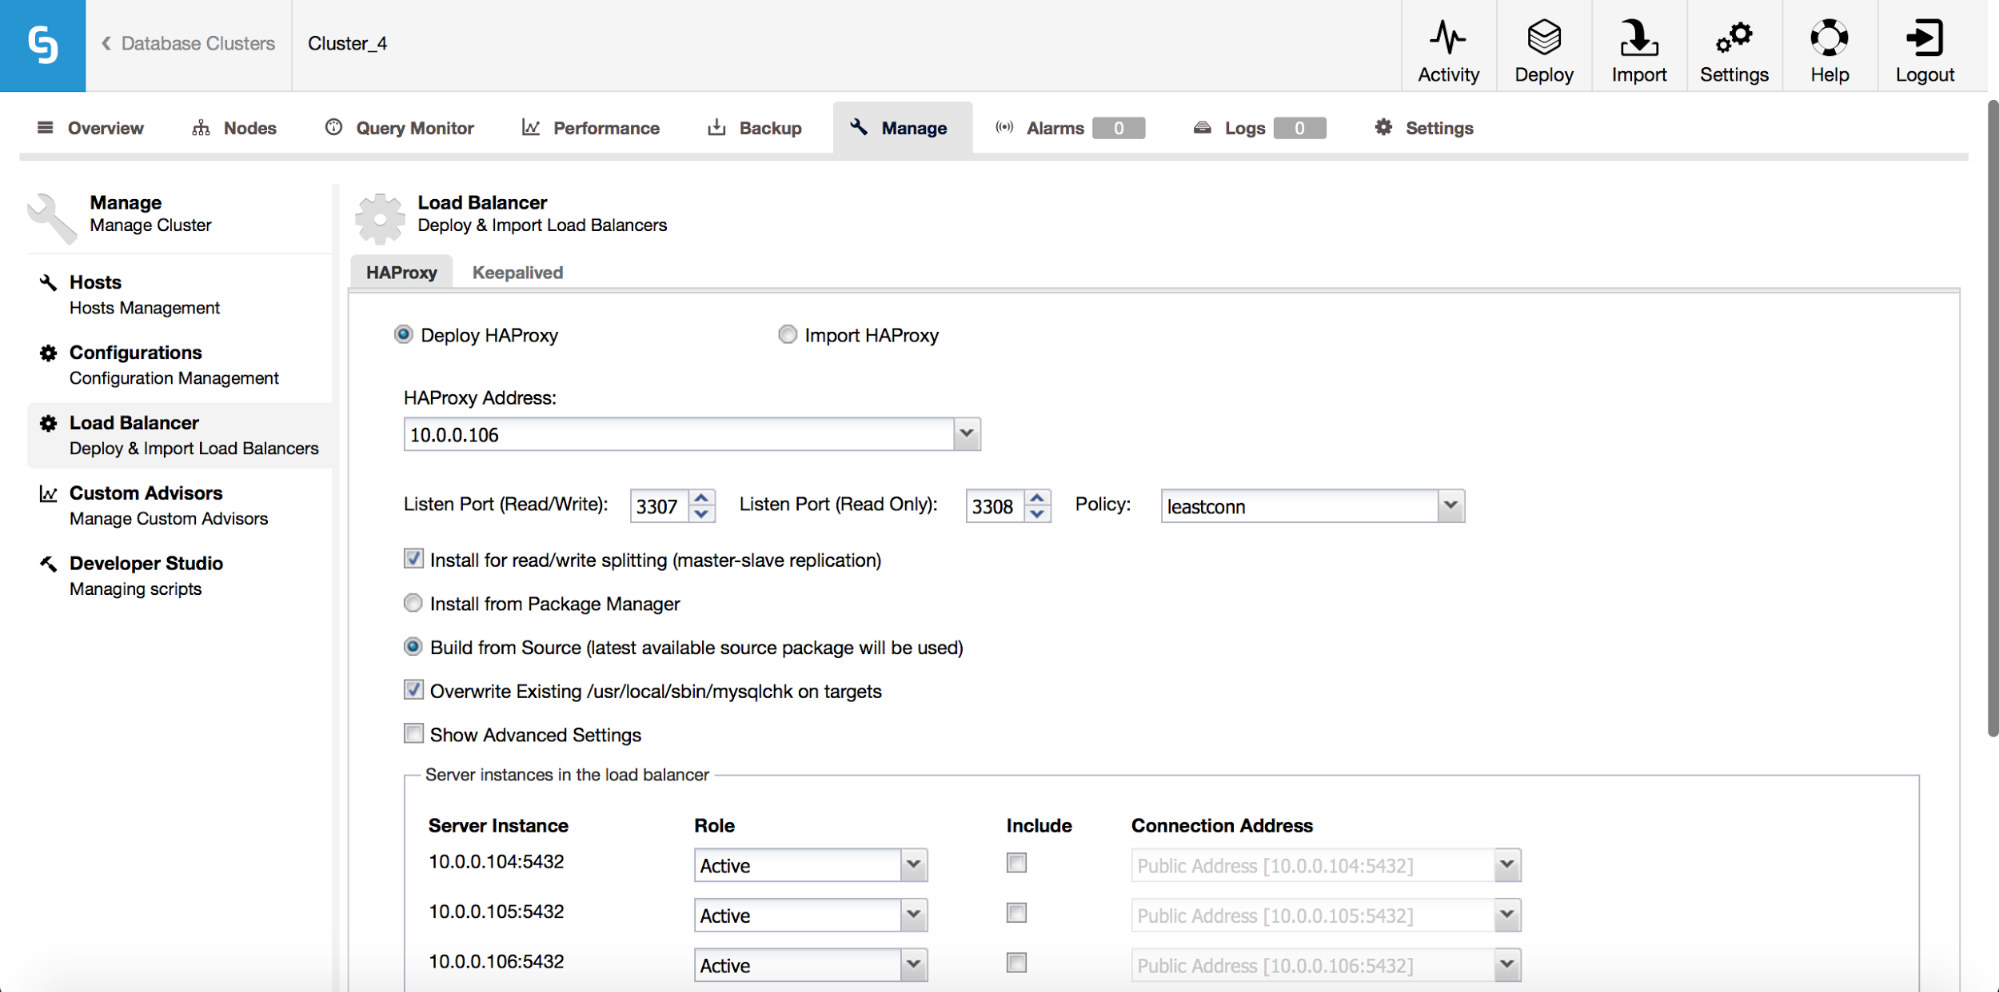
From the Load Balancer sub tab, you can now deploy HAProxy – if you are familiar with how ClusterControl deploys MySQL replication, it is a very similiar setup. We install HAProxy on a given host, two backends, reads on port 3308 and writes on port 3307. It uses tcp-check, expecting a particular string to return. To produce that string, the following steps are executed on all of the database nodes. First of all, xinet.d is configured to run a service on port 9201 (to avoid confusion with MySQL setup, which uses port 9200).
# default: on
# description: postgreschk
service postgreschk
{
        flags           = REUSE
        socket_type     = stream
        port            = 9201
        wait            = no
        user            = root
        server          = /usr/local/sbin/postgreschk
        log_on_failure  += USERID
        disable         = no
        #only_from       = 0.0.0.0/0
        only_from       = 0.0.0.0/0
        per_source      = UNLIMITED
The service executes /usr/local/sbin/postgreschk script, which validates the state of PostgreSQL and tells if a given host is available and what type of host it is (master or slave). If everything is ok, it returns the string expected by HAProxy.
Just like with MySQL, HAProxy nodes in PostgreSQL clusters are seen in the UI and the status page can be accessed:
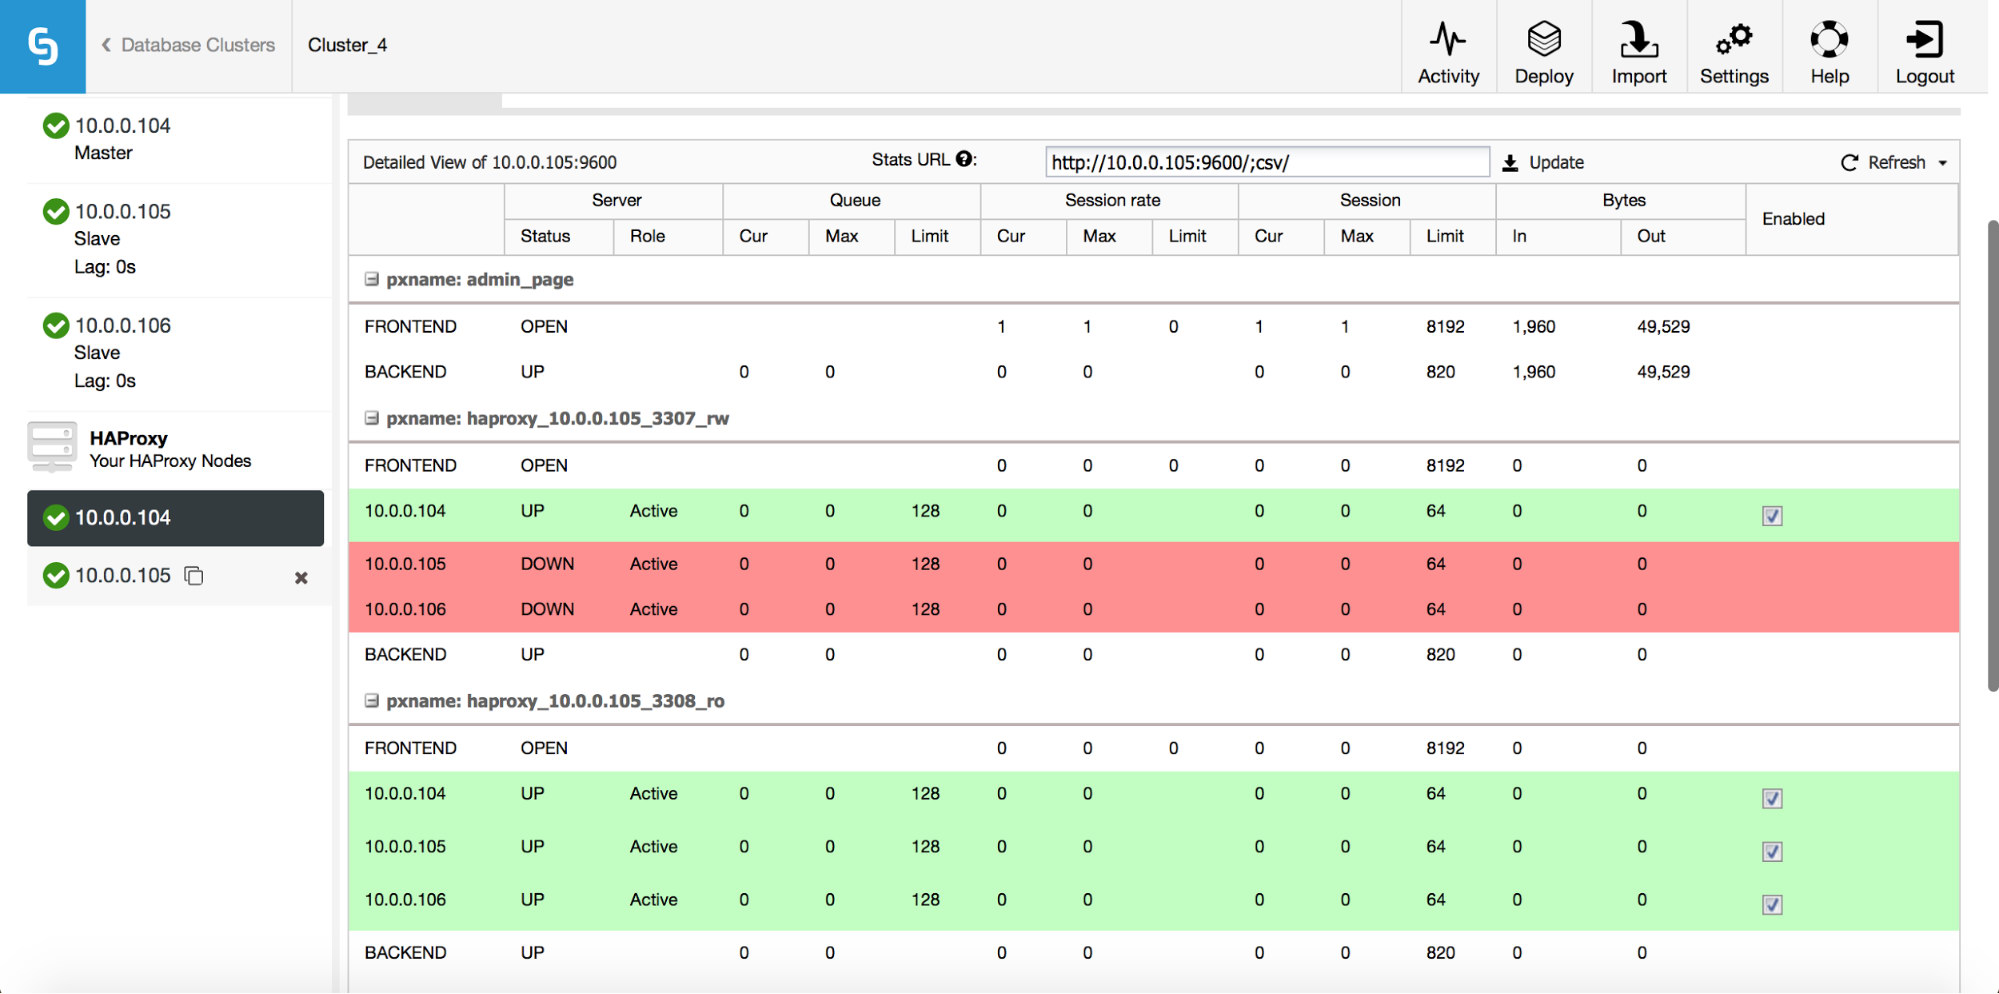
Here you can see both backends and verify that only the master is up for the r/w backend and all nodes can be accessed through the read-only backend. You can also get some statistics about traffic and connections.
HAProxy helps to improve high availability, but it can become a single point of failure. We need to go the extra mile and configure redundancy with the help of Keepalived.
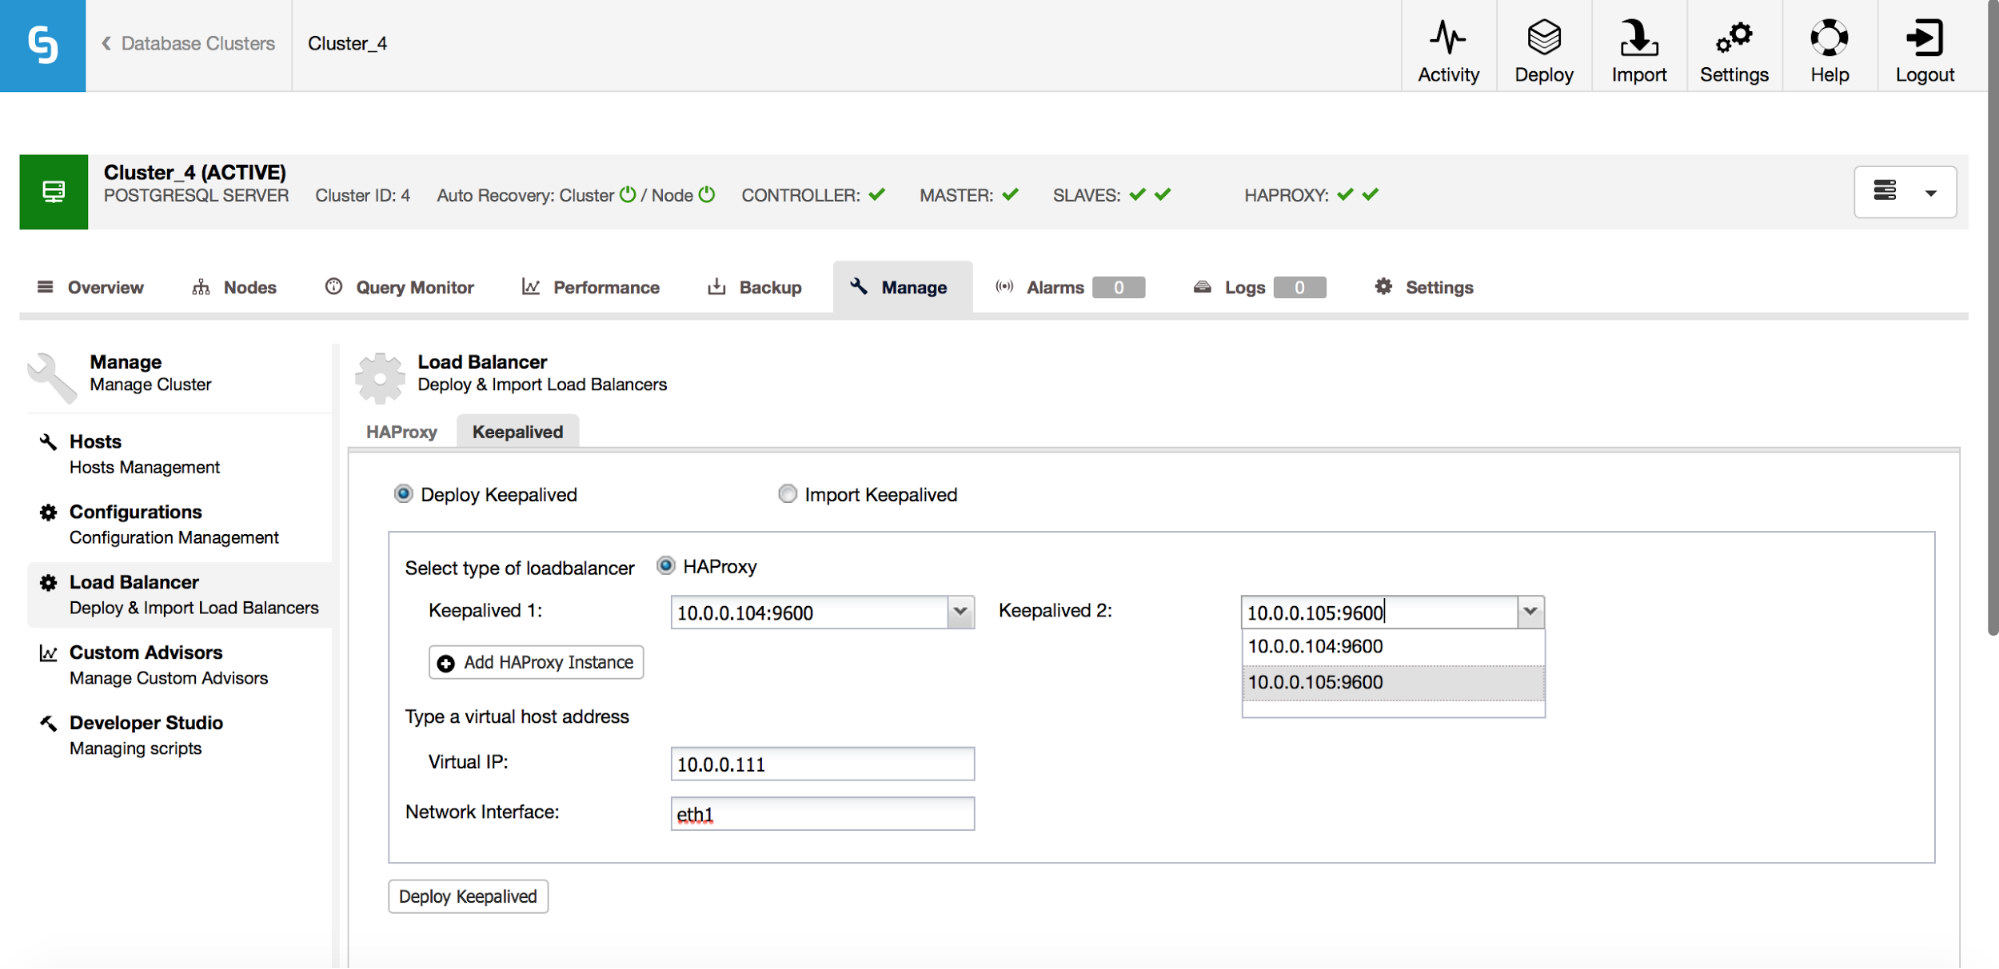
Under Manage -> Load balancer -> Keepalived, you pick the HAProxy hosts you’d like to use and Keepalived will be deployed on top of them with a Virtual IP attached to the interface of your choice.
From now on, all connectivity should go to the VIP, which will be attached to one of the HAProxy nodes. If that node goes down, Keepalived will take the VIP down on that node and bring it up on another HAProxy node.
That’s it for the load balancing features introduced in ClusterControl 1.5. Do try them and let us know how yo


